Axiell Move 3.6.28 for the iPhone
←
→
Page content transcription
If your browser does not render page correctly, please read the page content below
Axiell Move 3.6.28
     for the iPhone
         Server version 3.0.20309.1
Axiell ALM Netherlands B.V.
Copyright © 2013-2021 Axiell ALM Netherlands B.V.® All rights re-
served. Adlib® is a product of Axiell ALM Netherlands B.V.®
The information in this document is subject to change without notice
and should not be construed as a commitment by Axiell ALM Nether-
lands B.V. Axiell assumes no responsibility for any errors that may
appear in this document. The software described in this document is
furnished under a licence and may be used or copied only in accord-
ance with the terms of such a licence. While making every effort to
ensure the accuracy of this document, products are continually being
improved.
As a result of continuous improvements, later versions of the products
may vary from those described here. Under no circumstances may this
document be regarded as a part of any contractual obligation to sup-
ply software, or as a definitive product description.
Contents

1. Introduction ............................................................................................... 1
   1.1. Capabilities of Axiell Move ....................................................................... 3
   1.2. Using the iPhone/scanner combination ................................................... 3
   1.3. New in 3.6.28 ............................................................................................ 5

2. Working with Axiell Move .......................................................................... 7
   2.1. Starting Axiell Move .................................................................................. 9
   2.2. The Main menu ....................................................................................... 11
   2.3. Retrieving object or container information ............................................ 13
   2.4. Packing .................................................................................................... 16
   2.5. Moving .................................................................................................... 23
   2.6. Unpacking ............................................................................................... 28
   2.7. Missions .................................................................................................. 34
   2.8. Synchronizing offline transactions .......................................................... 45

3. Installation ............................................................................................... 49
   3.1. Installing the Axiell Service (on the server) ............................................ 49
     3.1.1. AdmoveServerSetup.xml .................................................................. 53
   3.2. Registering login details .......................................................................... 78
   3.3. Setting up the missions functionality ..................................................... 81
   3.4. Setting up the iPhone ............................................................................. 85
   3.5. Initializing Axiell Move ............................................................................ 87
   3.6. Installing an update of the software ....................................................... 92
   3.7. Security considerations........................................................................... 92
   3.8. Troubleshooting...................................................................................... 93
1. Introduction

The Axiell Move suite consists of an app for iOS 9 or later, called Axiell
Move (aka the AdMove Client or previously known as the Movement
module), to be installed on an Apple iPhone (from versions 5 and 5s)
or iPod touch 5 or iPad, possibly fitted with a Linea Pro 5 or later (or
Infinea Tab M for iPad mini and iPad Air) scanner sleeve (offered by
Infinite Peripherals*) to scan barcodes or RFID tags (although the
iPhone camera can handle scanning barcodes very well too if no sepa-
rate scanning device is connected), plus the Axiell Move server soft-
ware. The Axiell Move app can be downloaded from the Apple App
Store.

                                   1                             24-2-2021
Introduction                                                Axiell Move

In combination with Axiell (Adlib) Museum, Emu or Mimsy software,
Axiell Move supports the logistic process of movements of (packed or
bare) objects in museums or archives.
Axiell Move Premium has added functionality for so-called missions:
missions are bundles of move or pack tasks assignable to specific co-
workers, enabling you to plan and distribute the work to be done with
Axiell Move.
The iPhone/scanner combination provides a fast barcode and RFID
scanner with which identification numbers of objects, containers
(packages) and locations can be scanned easily and quickly. The
scanned codes will then be processed by Axiell Move. (An RFID tag -
Radio Frequency Identification - is a small programmable chip with
antenna, integrated in a label.)
If no scanner sleeve has been fitted around the Apple device, the
camera of the device will automatically be used to scan barcodes.
The iPhone, iPod or iPad has a built-in Wi-Fi transmitter and receiver
to enable a wireless connection to a local Wi-Fi hotspot which in turn
is connected to a computer and your network: optionally, 3G/4G con-
nectivity will be tried when the Wi-Fi connection fails (if the Apple
device supports 3G/4G). Via the network, Axiell Move will then call an
Axiell Move server on the database server to obtain direct access to a
live database in which the on-site scanned and registered changes will
then be saved automatically.
It is also possible to work offline with Axiell Move: this means that no
continuous connection to a live database is required, and that changes
will only be saved in the database when the Apple device is connected
to the network and you’ve given your permission to synchronize the
changes.
* Since the Linea Pro scanner sleeve is not made by Axiell, its availa-
bility for specific Apple devices and versions depends on supplier Infi-
nite Peripherals. Should a new scanner sleeve for an old Apple device
no longer be available in the future, then you can always fall back on
using the camera of the device as the barcode scanner.

24-2-2021                               2
Axiell Move                                                Introduction

1.1. Capabilities of Axiell Move
In brief, you have the following possibilities using the iPhone* and
Axiell Move:
•   registration of the packaging of one or more objects. Overpacks
    containing multiple packaged objects, can be registered as well.
    You actually establish a relation between an object and its packag-
    ing.
•   registration of movements of containers or bare objects. By scan-
    ning a new location or entering it manually, and subsequently
    scanning the containers or objects moving to this location, the
    registered location of all those items will be changed.
•   registration of the unpacking of one or more objects or smaller
    containers. You can do this per item or for all items in a package
    at once. You actually break the relation between the items and
    their packaging.
•   addition of supplemental information. During the registering of
    transactions you may enter several types of notes. It’s also possi-
    ble to take one or more pictures of the moved object, container or
    location, after which reproduction records for those photos will au-
    tomatically be created, which in turn will be linked to the relevant
    object, container or location record.
•   Axiell Move premium also offers the possibility to process packag-
    ing and movement work bundled in so-called missions used to or-
    ganise and distribute such tasks among coworkers.
All scanned or entered information, like container codes, location
changes and notes, will immediately be sent by Axiell Move (when you
are working online) and processed in the relevant database by the
Axiell Move server.
* Unless there’s a difference between the operation of the software on
iPhone, iPod or iPad, we’ll use “iPhone” whenever we mean “iPhone,
iPod or iPad” in the rest of this manual, for the sake of succinctness.

1.2. Using the iPhone/scanner combination
•   For data entry of barcode fields, you can use just the iPhone cam-
    era or the iPhone/scanner combination. In the latter case, keep
    the large button at the top of the right side of the scanner sleeve
    pressed down and aim the scanner on what you want to scan. Do
    not hold the scanner too close. When you hear a beep, you can let

                              3                                 24-2-2021
Introduction                                                  Axiell Move

     go of the button. The scanned value will appear in the active Bar-
     code field.
     The scanner can only work if currently no charging cable is con-
     nected to the iPhone/scanner combination and if the Axiell Move
     app is active.
     If you are not using a scanner sleeve, you only need to click
     (press) the grey SCAN button next to a Barcode field in the Axiell
     Move screen briefly to activate the camera. The image of the cam-
     era will appear on screen. Now reposition the camera in front of
     the barcode and allow the camera to focus on it. As soon as Axiell
     Move recognizes the barcode, the camera image disappears, you’ll
     hear a beep and the record data identified by the barcode will be
     retrieved from the database, if possible.
•    When scanning isn’t possible, for instance because the barcode on
     a packaging has been damaged or when you want to fill in a text
     field, you can enter text via the virtual keyboard of the iPhone.
     Make the desired field active by clicking (pressing) it and then
     start typing. Finish your input by clicking Return or Search on the
     virtual keyboard.
•    The Axiell Move app checks every 5 seconds if there is still a con-
     nection with the Axiell Move server. First a connection through Wi-
     Fi will be tried, and if that fails, a connection through 3G/4G* will
     be attempted. If successful, the client will try to send all subse-
     quent transactions to the server directly. If unsuccessful, your
     transactions will not be processed in the database immediately,
     instead they will be registered in a log file which can be synchro-
     nized with the database later on when you’re back online.

     * By default, the iPhone uses a 3G or 4G dial connection to send
     data over the internet when no Wi-Fi network is available. This
     may cause unintended expenses though. Therefore it’s good to
     know that this functionality can be switched off at any time: start
     the Settings app on the iPhone and select the Mobile data or Cellu-
     lar option.
     Now switch Mobile data or Cellular data off by dragging the slider
     to the left. (Green means: switched on.)
•    If the Axiell Move server has been set up securely, so that it is not
     accessible outside the company network, then any external Wi-Fi
     network connection or 3G/4G dial connection will fail, unless
     you’ve set up and activated a VPN connection on your iPhone. On-
     ly an active VPN connection will then allow Axiell Move to access
     its server on the company network. Once a VPN configuration has
     been made (see chapter 3.3) you can switch it on or off via the

24-2-2021                                4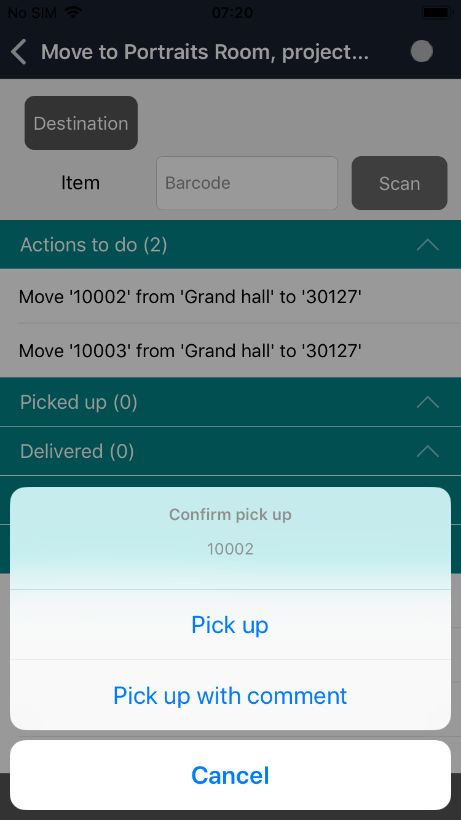
Axiell Move                                                Introduction

    VPN slider in the Settings app.
    Note that with VPN activated, normal internet access on your
    iPhone may be inhibited. Switching VPN off should solve the
    problem.
•   The scanner sleeve contains a battery which must remain charged
    and the same goes for the iPhone of course. The best way to keep
    both devices charged is to place the combined device in the
    supplied charging cradle at the end of your working day.

1.3. New in 3.6.28
•   You can now also set the home/normal location of an object or a
    container (if configured on the server side).
•   Axiell Move Premium: if you’re online, you can now release an
    already loaded mission from your device, so that it can be picked
    up by someone else.
•   Axiell Move Premium: mission items (individual actions) can be
    refused (because they can’t be executed normally for example)
    and you may add a comment to your refusal.
•   Axiell Move Premium: a move is now split up into a pickup action
    and a delivery action, pickup representing the loading of contain-
    ers or objects onto a trolley while delivery represents the offload-
    ing of those items onto the final destination. This provides a better
    registration of the move process.
•   Axiell Move Premium: pop-up confirmation is now optional (via the
    Confirm pickup & delivery option in the Axiell Move settings).
    Without confirmation you can work faster.
•   Axiell Move Premium: besides scanning each object or package to
    pick up or deliver, you can work even faster and just open a sub-
    menu for a move action and click Pick up or Deliver. The destina-
    tion location must have been scanned first though, for safety rea-
    sons.
•   Management of iOS 13 dark mode.
•   Some display issues on last iOS version have been fixed.
•   Miscellaneous bug fixes.

                               5                                 24-2-2021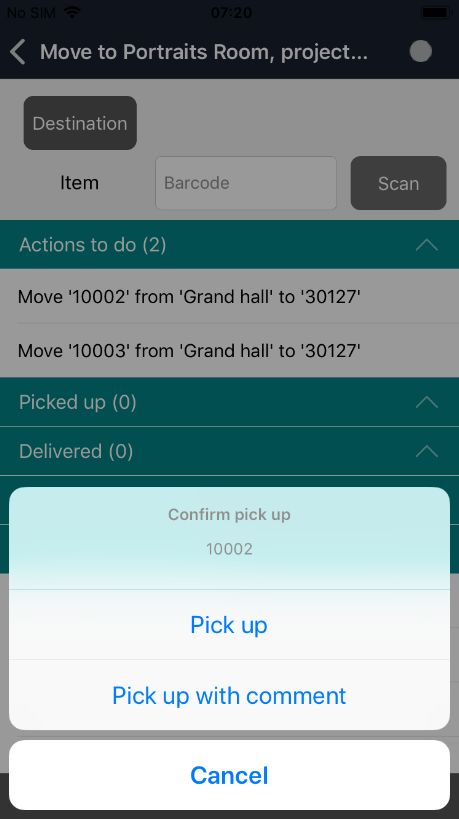
2. Working with Axiell Move
The first registration of objects, containers/packages and locations
must take place in one of the appropriate Adlib, Emu or Mimsy Axiell
products. This manual only illustrates the combination of Axiell Move
and Axiell (Adlib) Museum 4.5.
In Museum application 4.5, objects can be described in the Internal
and External object catalogue data sources; containers and locations
can be described in the Locations and containers data source – the
content of the Location or container field determines if the record per-
tains to a container or a location – and package types in the Container
types data source. (In older or newer applications, these data source
and fields may have different names.) All objects, containers and loca-
tions that you may want to work with in Axiell Move, must have been
registered in the Museum application first: you cannot do that regis-
tration from within Axiell Move. With Axiell Move you apply changes to
existing records.
So data scanned or entered via Axiell Move on the iPhone, will be add-
ed to existing object and container records, or it will replace existing
data in there. In principle, some data can be edited or entered in Axi-
ell Move as well as in the Museum application, but each application
has its own advantages: in Axiell Move you can register the packing
and moving of objects quickly and efficiently on-site, while the Muse-
um application is meant for the registration and management of entire
records.
The essence of Axiell Move is that it allows you to change the regis-
tered Current location of an item to a new current location, because in
reality you are moving that item as well. In this definition, an item can
be a bare or packaged object or an empty container. The basic con-
cept is that all movable items have a current location and that the
current location of an item inside a container its packaging is: a vase
packed in a small crate, has the crate as its location, while that crate
itself has a location of its own as well, maybe a shelf or a larger over-
pack. That’s why the three basic actions available in Axiell Move –
packing, moving and unpacking – are all in fact a type of moving: in
the record of the moved (meaning packed, moved or unpacked)
items, the Current location will be changed and the Location history
will be updated.
In more technical wording we can say that every record of a movable
item has to be linked to a location or container record and that, at the
same time, a reverse link between the location or container record
and the item record exists. During the move of an item, those links

                                  7                             24-2-2021
Working with Axiell Move Axiell Move
will be broken, after which a new link between the item record and the
new location or container record will be created.
• In an object record in the Museum application, the current location
or package as well as the normal location and planned future
movements, can be found on the Location | Future movements
screen tab, but only the current location can be changed by Axiell
Move; the normal location and any planned future movements are
in no way involved in transactions in Axiell Move. When you move
an object with Axiell Move, or put it in a package, the new location
or container will become the new current location of the object.
The details of the previous location or container of the object will
then be transferred automatically to the Location history tab. This
way you can always track where an object has been, when and for
how long.
• In a container record in the Locations and containers data source
in the Museum application, the current location or overpack can be
found on the Container details screen tab. When you move an
empty or filled package with Axiell Move, or put it in an overpack,
the new location or overpack will become the new current location
of the package. The details of the previous location or overpack of
the package will then be transferred automatically to the location
history on the same tab.
• In a location record in the Locations and containers data source in
the Museum application, details about the location type and the
location hierarchy can be found on the Location details screen tab.
With Axiell Move you can’t change anything in that hierarchy.
In an object or container record in the Museum application it is possi-
ble in principle to link to another current location or (over)package
manually, but then the location history won’t be updated automatically
(!) and you would have to do that manually as well.
With the Change locations procedure in Museum applications 4.2 and
higher you can apply location changes in batch to object records (not
to container records), and also have the location history updated au-
tomatically. For more information about this, see the Change locations
topic in the Axiell Collections Help.
24-2-2021 8Axiell Move Working with Axiell Move
2.1. Starting Axiell Move
1. Swipe through the apps on your iPhone to locate the Axiell Move
app. Click the icon to start the app.
2. Axiell Move opens with the login screen. Note that the language of
the user interface is the same as the language set for the iPhone
itself, but limited to either English, Dutch, French or German.
Tap the User name entry field to activate it and to open the virtual
keyboard: now enter your user name (without any domain). In-
stead of typing your user name you can also scan a barcode (us-
ing the scanner sleeve) representing your user name, if you have
such a barcode. Then click Return to activate the next entry field
9 24-2-2021Working with Axiell Move Axiell Move
and enter your password as well. For the password only asterisks
will appear, so that no-one can read your password from the
screen. Then click the Login button on screen to access Axiell
Move.
The user name and the encrypted password of the last 10 users
on this iPhone, will be remembered by Axiell Move. This allows us-
ers to log on to the client even if the iPhone is offline. The name of
the last or current user will have been filled in already in the User
name field when you start or activate Axiell Move, but the pass-
word must always be entered manually again, even when you’re
logged in and return to the login screen.
When you or someone else has logged on to Axiell Move once be-
fore by entering a user name and password, and one or more fin-
gerprints for Touch ID have been registered on your iPhone (see
chapter 3.3) then every time you start Axiell Move you’ll be of-
fered the possibility to log in via Touch ID by simply resting your
(registered) fingertip on the Home button.
The message will disappear of itself once your fingerprint is recog-
nized. If you cannot or don’t want to log in via your fingerprint,
then simply click Cancel to log in the normal way. Further note
that using Touch ID means that you automatically log in under the
name and password of the previously logged in user (even if
you’re somebody else) and that everyone with access to your i-
Phone who knows your access code, will be able to register their
own fingerprint allowing them to log on to Axiell Move. This also
means that you should never share your access code to an iPhone
with fingerprint recognition or that an iPhone with fingerprint
recognition shouldn’t be shared with colleagues at all or that your
shared iPhone with fingerprint recognition is allowed to log in via a
single general user name and password so that all users may log
in via their fingerprint and transactions may be logged under that
single name. An Apple device without fingerprint recognition does
not have these limitations.
24-2-2021 10Axiell Move Working with Axiell Move
2.2. The Main menu
Axiell Move opens with the Main menu. From here, you choose the
task at hand: packing (to link objects to containers), transport (to
move objects, packaged or not) or unpacking (to break the link be-
tween objects and a container). You can also retrieve object infor-
mation, container information or location information (for your infor-
mation or for checking); these three options are only active though if
there is a connection with the database and you have chosen to work
online. See chapter 1.2 for information about how to go online if the
iPhone is currently offline. The Premium version of Axiell Move further
offers the Last mission icon to open the last mission you were working
on and the Missions icon to download new missions from the server or
select one of the earlier downloaded missions to start or continue
working with. Use Logout to quit working in the app and to prevent
others from registering Move transations under your account on this
phone.
11 24-2-2021Working with Axiell Move Axiell Move
• If you are working offline, your changes will temporarily be stored
in a transaction log file on the iPhone until you can actually pro-
cess the changes in the database (see chapter 2.7). The dot in the
top right of the screen indicates whether you have access to the
Axiell Move service or not: if it is green, you have access; if it is
red, you have no access and the program automatically defaults
to offline mode. The connection with the Axiell Move server will be
checked every 5 seconds, during which time the dot may turn or-
ange briefly. Press the green dot to go offline temporarily: the dot
turns blue. Press the blue dot again to go back online. Having no
access (red dot) can be a consequence of a missing wireless net-
work connection or a consequence of an incorrectly set up Axiell
Move service.
Note that during offline work, no information can be retrieved
from the database either: if you scan the barcode of an object
now, then its accompanying data (and possibly an image) from
the record cannot be displayed. Only the scanned barcode of the
object will be shown, until you scan another barcode.
Aside from not being able to retrieve information, offline mode in
principle allows you to register the same transactions as you
would online. However, some limitations to those transactions
cannot be managed immediately when you are working offline, for
instance when you would try to unpack an object that isn’t regis-
tered as being packed in the first place. Such checks will then only
be performed when you synchronize the transaction log file with
the database.
• With the Sync option (bottom right) you’ll open the Synchroniza-
tion screen. When due to offline work a transaction log file has
been created, you can view that log here and still process it in the
database now or later (if you’re online) or remove it if the transac-
tions have become redundant.
• Using the < Main menu option on the top of other screens, you
can always return to this screen to start a different task. If you
are deep in the processing of a particular task, you’ll sometimes
have to return to a previous step first, viaAxiell Move Working with Axiell Move
emptied. You can log in again by re-entering the password and
clicking Login or Return. A different user may log in by using his
or her own user name and the accompanying password.
• If you want, you can close the app completely as well. You’ll have
to do that the iOS way: quickly press the Home button of the
iPhone twice, swipe left or right to the active Axiell Move app and
swipe it upwards to really close it.
2.3. Retrieving object or container information
Via Object, Container and Location in the Main menu of Axiell Move,
you can retrieve information about objects, containers and locations
from the database, if you are working online. This allows you to check
whether the object or box in front of you, is the right one. You can
also add a photo, correct the current location of an object or contain-
er, or correct both the current and normal location of an object or
container simultaneously.
Select the desired option and simply scan the barcode or RFID tag of
an object, container or location and selected data will be retrieved and
displayed. Swipe upwards in the displayed data to show the rest of it,
if not everything is visible at once.
Scan either by clicking the Scan button on screen and positioning the
iPhone camera over the barcode or keep the scanner sleeve button
pressed down while you aim the front of the scanner at the barcode.
You can use this screen to retrieve details from other records of the
same type as well, by just scanning another object, container or
location.
Instead of scanning, you may also click the Barcode entry field and
enter the barcode number manually, followed by Return or Search.
13 24-2-2021Working with Axiell Move Axiell Move With the Photo option, in the bottom right of the screen, you can take a picture or make a video on the spot, of the relevant object, container or location. After taking the photo, select the Use photo option to upload the picture to the \images folder of your Adlib system and have a reproduction record created for it in the Multimedia documentation database, which in turn will be linked to the relevant object-, container or location record: Axiell Move will notify you briefly of the upload. The Location option (only available for objects and containers) allows you to scan a new location for the object or container. This might be useful when you’ve located the item on a different location than the one registered in the relevant record and you’d like to correct that error immediately. Click OK to accept the scanned location or click Cancel to cancel the entry of a new location. 24-2-2021 14
Axiell Move                                   Working with Axiell Move

Set Normal (only available for objects and containers) does the same
thing as the Location option, but it also changes the normal (home)
location of the current item to the newly scanned location. So after
clicking Set Normal, you’ll get to scan a single location and this
location will then be registered in the object or container record as
both the Normal location as well as the Current location. The change
is reflected immediately in the retrieved item details in the app too.
On the Location and Container screens, amongst others, you will also
find the number of items which have this location or container as their
current location. Click the   icon behind Content to display the actual
list of containers and/or objects: swipe up to see the entire list (max.
50 items by default, but this can be increased in the Axiell Move
server configuration). In this list you may click  again behind an
object or container for more information about it.

Click the < icon or swipe right to return to the previous screen.

                              15                                24-2-2021
Working with Axiell Move Axiell Move 2.4. Packing With the Pack option you can link containers to objects or link a larger container/overpack to already packaged objects (you then link to the package, not the object). Containers must have a unique reference, like a barcode for instance. So every individual container must have its own database record in which details about the relevant packaging have been registered. In Museum application 4.5 this database is called Locations and containers: both container records as well as location records are stored in here. It is handy (but not mandatory) if a container has a location, so that of an empty package and especially of an object you pack in it, a location is always known. In any case it creates the necessity to register the relocation of both empty as well as filled containers, so that the location of any content can always be deduced. With a packaging transaction, the location of a package will not be transferred to the record of the object being packed, nor vice versa. Only the following changes will be transferred: 24-2-2021 16
Axiell Move                                   Working with Axiell Move

•   When an object is being packed, the location of the package
    remains what it was, while the new current location of the object
    becomes the current package. So the location registered in an
    object record can be a location or a container. This is indicated in
    the Location/package field of the Current location and the Location
    history of the object.
•   When a smaller, already packed object is being packed in an outer
    overpack, again the location of the overpack remains what it was
    and the location of the object doesn’t change either, while now the
    new current location of the smaller package becomes the outer
    overpack. So a container record has its own current location and
    location history, and that location can be a location or a container.
If you want to find out in the Museum application what the location of
a packed object is, you must search for it in the relevant container
record in the Locations and containers database. If the location itself
is an overpack, then open that record to find the location of the
overpack, etc. For a displayed record in Locations and containers you
can also open the Hierarchy browser (F9) for a succinct presentation
of the complete container/location hierarchy of the current container
or location.
1. Choose the Pack option in the Main menu to get going.

2. The Pack screen opens. To link a package to one or more objects,
   you will first have to scan the barcode of the relevant container or
   manually enter the unique identification code (barcode) of the
   packaging via the virtual keyboard (the cursor must be blinking in
   the Barcode field). Some properties of the container will be re-
   trieved (if possible) from the database and displayed.
   If the barcode cannot be found in the database, you’ll be notified
   so: it is possible that there is no container record with this bar-
   code yet. In that case you’ll have to register it through the Muse-
   um application first.

                              17                                 24-2-2021
Working with Axiell Move Axiell Move
3. Now you can do five things:
a. Object: click Object if you want to link this container to one or
more (unpacked) objects. Then proceed to step 4.
b. Container: click Container if you want to link this overpack to
one or more already packaged objects. Continue with step 4.
c. You could scan another container if you don’t want to do any-
thing with the currently selected container after all.
d. Click the icon behind Content to display the actual list of
containers and/or objects in this container: swipe up to see
the entire list. In this list you may click again behind an
object or container for more information about it.
e. < Main menu: click < Main menu or swipe to the right if you
don’t want to do anything with this container after all and you
want to stop packing.
4. Scan an unpacked object (if you chose Object in step 3) or smaller
package of one or more objects (if you chose Package in step 3)
24-2-2021 18Axiell Move Working with Axiell Move
to enter its identification number in the Barcode field. After scan-
ning an object or smaller package, some of its details are shown
(if you are working online): if your confirmation for the transaction
is required* you can use those to check whether you have the
right item in front of you.
Aside from going back to the previous screen because you don’t
want to pack the scanned object after all, the following three
options are now available to you (if your confirmation for packing
is required*):
a. Pack: to confirm that you want to link the selected package to
this object or smaller packaging of objects, click Pack. It takes
a moment before the registration has finished and you’ll see a
message stating that the relevant item has been packed.
19 24-2-2021Working with Axiell Move Axiell Move
If you want, you can scan the next item immediately to pack it
in the current container too by clicking Pack again after
scanning, etc.
In the relevant object record in the object catalogue of your
Museum application, you can observe that the container has
been linked to this object as its current location. The details of
the previous location have been transferred to the location
history of the object.
In case you have been packing an already packaged object in
an overpack, you can observe that the overpack has been
linked to the smaller package as its current location, in the
record of the smaller package in the Locations and containers
data source. The details of the previous location have been
transferred to the location history of the smaller package.
b. Clear: click Clear if you don’t want to link the currently
displayed item to the package, in order to pick another item.
You’ll then be able to scan a different unpacked object if you
also scanned an unpacked object just before, or scan a
different already packaged object if you also scanned an
already packaged object just before.
c. Notes: click the Notes icon if you want to register remarks
about the packing.
You can enter those notes in a new screen. The screen is
different for objects and smaller packages (see screenshots
below):
24-2-2021 20Axiell Move Working with Axiell Move
Objects – By default there are seven notes fields available.
The first three fields are about the container (a type of “loca-
tion”) in which you are momentarily packing objects, and this
data will be stored in the object record with the current
location. The last four fields, on the other hand, are about the
actual act of packing (a type of “movement”), and this data
will be stored in the object record with the previous location in
the location history.
Smaller containers – By default there’s only a single notes
field available here. This field is about the overpack (a type of
“location”) in which you are momentarily packing a smaller
packaged object, and these notes will be stored in the record
of the smaller package with the current location.
Click OK to keep the entered data or click Clear to throw the
entered data away. Click < or swipe right to return to the
previous step, if required. The data you keep will only be
saved in the item record when you actually pack the scanned
item by clicking the Pack button.
21 24-2-2021Working with Axiell Move Axiell Move 5. Click the < Pack option at the top of the screen or swipe right, if you are done with the current container. You’ll be able to scan a new container or return to the main menu. By the way, a means of transport like a truck can also be registered as a “package” with a location. When you load all overpacks in the truck, you are sort of packing them in the truck, and during unloading you are sort of unpacking them from the truck. With the Move option you can change the location of the truck after transportation. * In the configuration file for the Axiell Move server there’s a setting which determines if confirmation is required for the last step in packing, moving and unpacking. If not set, a scanned object is packed automatically and you cannot check its details beforehand or add notes. 24-2-2021 22
Axiell Move                                   Working with Axiell Move

2.5. Moving
With the Move option you register the new location of objects (packed
or not) which have just been moved in the real world. You register the
items (crates, boxes and any unpacked objects) as they arrive after
the relocation, still before you unpack anything. The point is to regis-
ter the new location of all these (usually packed) items on reception,
even if that is just a temporary storage space. Later, when you un-
pack objects, you can assign a new location per object again.
1. Select the Move option in the Main menu.

2. The Move screen opens. Scan the barcode or RFID tag of the new
   location: this is the location (not a container) where the shipped
   or received items will be stored now.

                              23                                24-2-2021
Working with Axiell Move Axiell Move
If the barcode cannot be found in the database, you’ll be notified
so: it’s possible that there is no location record with this barcode
yet. If that is the case, you’ll have to register it through the Muse-
um application first.
3. Now you can do five things:
a. Object: you want to link this location to one or more bare
objects. Click Object and proceed to step 4.
b. Container: you want to link this location to one or more
packaged objects. Click Container and continue with step 4.
c. You could scan another location if you don’t want to do any-
thing with the currently selected location after all.
d. Click the icon behind Content to display the actual list of
containers and/or objects on this location: swipe up to see the
entire list. In this list you may click again behind an object
or container for more information about it.
e. < Main menu: on second thought you don’t want to do
anything with this location and you want to stop moving. Then
click < Main menu or swipe right at the top of the screen.
4. Scan, depending on your choice in step 3, the barcode of an ob-
ject or container: if you are working online and if your confirma-
tion for the transaction is required* you can check the details.
24-2-2021 24Axiell Move Working with Axiell Move
Besides the option to go back to the previous screen, if you do not
want to move the scanned item after all and possibly to scan a
new location, the following three options are now available to you
(if your confirmation for moving is required*):
a. Move: to confirm that you want to link the new location to
this object or container of objects, click Move. It takes a
moment before the registration has finished and you’ll see a
message stating that the relevant item has been moved. If
you want, you can immediately scan the next item that has
been moved to the currently selected location, after which you
must click Move again to register it, etc.
In the relevant object record (of an unpacked object) in the
object catalogue of your Museum application, you can observe
that the currently selected location has been linked to this
object as its current location. The details of the previous
location have been transferred to the location history of the
object.
In case you have been moving a packaged object, you can
observe that the currently selected location has been linked to
this container as its current location, in the record of the
container in the Locations and containers data source. The
details of the previous location have been transferred to the
location history of the container.
b. Clear: click Clear if you don’t want to move the currently
displayed item, in order to pick another item. You’ll then be
able to scan a different unpacked object if you also scanned an
unpacked object just before, or scan a different packaged
object if you also scanned a packaged object just before.
c. Notes: click the Notes icon if you want to register remarks
about the movement.
You can enter those notes in a new screen. The screen is
different for bare objects and smaller packages (see
screenshots below):
Bare objects – By default there are seven notes fields
available. The first three fields are about the currently selected
location, and this data will be stored in the object record with
the current location. The last four fields, on the other hand,
25 24-2-2021Working with Axiell Move Axiell Move
are about the actual act of moving, and this data will be stored
in the object record with the previous location in the location
history.
Packaged objects – By default there’s only a single notes
field available here. This field is about the currently selected
location, and these notes will be stored in the record of the
container with the current location.
Click OK to keep the entered data or click Clear to throw the
entered data away. Click < or swipe right to return to the
previous step, if required. The data you keep will only be
saved in the item record when you actually move the scanned
item by clicking the Move button.
5. Click < at the top of the screen or swipe right if you are done with
movements to the current location. You’ll be able to scan a new
location or return to the main menu.
24-2-2021 26Axiell Move Working with Axiell Move
* In the configuration file for the Axiell Move server there’s a setting
which determines if confirmation is required for the last step in
packing, moving and unpacking. If not set, a scanned item is moved
automatically and you cannot check its details beforehand or add
notes.
27 24-2-2021Working with Axiell Move Axiell Move 2.6. Unpacking With the Unpack option you break the link between one or more items (smaller packaged objects or bare objects) and the current (over)- pack. You always provide the new location of every unpacked item. The location of the (over)pack remains what it was. By the way: any smaller packages which you take from the overpack do not necessarily have to be unpacked themselves too. 1. Choose the Unpack option in the Main menu to begin. 2. The Unpack screen opens. First scan the barcode of the new location for the items you are about to unpack. Axiell Move will check whether the location has been registered in the database and then displays it on screen. 24-2-2021 28
Axiell Move                                    Working with Axiell Move

   If the barcode of the location cannot be found in the database,
   you’ll be notified so: it’s possible that there is no location record
   with this barcode yet. If that is the case, you’ll have to register it
   through the Museum application first.
3. Now you can do six things:
   a.   Object: you want to unpack one, or just a few, bare objects
        from the container at hand, to the currently selected location.
        Click Object and proceed to step 4.
   b.   Container: you want to unpack one, or just a few, smaller
        packages from the overpack before you, to the currently
        selected location. Click Container and proceed to step 4.
   c.   All: you want to unpack all items at once, to the currently se-
        lected location. Click All and continue with step 5.
   d.   Click the     icon behind Content to display the actual list of
        containers and/or objects on this location: swipe up to see the
        entire list. In this list you may click again behind an object
        or container for more information about it.
   e.   You could scan another location if you don’t want to do any-
        thing with the currently selected location after all.
   f.   < Main menu: on second thought you don’t want to do
        anything with this location and you want to stop unpacking.
        Then click < Main menu at the top of the screen or swipe
        right.
4. If you chose Object or Container in the previous step, then now
   scan the barcode of the object or the smaller container. If you are
   working online, some details of the item are displayed and if your
   confirmation for the transaction is required*, you can use those
   details to check if you’ve scanned the right item.

                              29                                  24-2-2021
Working with Axiell Move Axiell Move
Apart from going back to the previous step because you don’t
want to unpack the current item after all, the following options are
now available to you (if your confirmation for unpacking is
required*):
a. Unpack: to confirm that you want to break the link between
the selected item and the current (over)pack, and assign the
new location to the item, click Unpack. It takes a moment
before the registration has finished and you’ll see a message
stating that the relevant item has been unpacked. If you want,
you can immediately scan a next item of the same type
(container/object) and unpack it to the new location by
clicking Unpack, etc.
Note that only the relation between the current (over)pack
and the relevant item in it has been broken: if the item is a
package itself, then for now the link between that smaller
package and its content remains as it is.
The details of the previous packaging have been transferred to
the location history of the unpacked item.
24-2-2021 30Axiell Move Working with Axiell Move
b. Clear: click Clear if you don’t want to unpack the currently
displayed item from the package, in order to pick another
item. You’ll then be able to scan a different bare object if you
also scanned a bare object just before, or scan a different
packaged object if you also scanned a packaged object just
before.
c. Notes: click the Notes icon if you want to register remarks
about the unpacking.
You can enter those notes in a new screen. The screen is
different for bare objects and smaller packages (see
screenshots below):
Objects – By default there are seven notes fields available.
The first three fields are about the new location, and this data
will be stored in the object record with the current location.
The last four fields, on the other hand, are about the actual
act of unpacking (a sort of “moving”), and this data will be
stored in the object record with the previous location in the
location history.
Containers – By default there’s only a single notes field
available here. This field is about the new location, and these
notes will be stored in the record of the container with the
current location.
Click OK to keep the entered data or click Clear to throw the
entered data away; click < or swipe right in case you didn’t
return to the previous screen automatically. The data you
keep will only be saved in the item record when you actually
unpack the scanned item by clicking the Unpack button.
Proceed to step 6.
31 24-2-2021Working with Axiell Move Axiell Move 5. If you chose All in step 3, then now scan the barcode of the (over)pack from which you want to unpack all items. If you are working online, some details of the package will be retrieved. You can click the icon to display the actual list of smaller packages and/or objects in the current (over)pack. 24-2-2021 32
Axiell Move                                    Working with Axiell Move

    Apart from going back to the previous step because you don’t
    want to unpack all items from the scanned overpack after all, the
    following options are now available to you (if your confirmation for
    unpacking is required*):
    a.   Unpack: to confirm that you want to break the link between
         the current (over)pack and all items in it, and assign the new
         location to all those items, click Unpack. It takes a moment
         before the registration has finished and you’ll see a message
         stating that the items have been unpacked. If you want, you
         can scan a next overpack immediately and unpack all items in
         it to the new location by clicking Unpack, etc.
         Note that only the relations between the current (over)pack
         and all items in it has been broken: if items are packages
         themselves, then for now the links between those smaller
         packages and their contents remain as they are.
         The details of the previous (over)packaging have been
         transferred to the location history of the unpacked items.
    b.   Clear: click Clear if you don’t want to unpack the displayed
         overpack, in order to pick another overpack.
6. Click < at the top of the screen or swipe right once or twice if you
   are done with the selected location. You’ll return to the Main
   menu.
* In the configuration file for the Axiell Move server there’s a setting
which determines if confirmation is required for the last step in
packing, moving and unpacking. If not set, a scanned item is moved
automatically and you cannot check its details beforehand or add
notes.

                               33                                 24-2-2021
Working with Axiell Move Axiell Move
2.7. Missions
Choose the Missions option (Axiell Move Premium only) to download
new misions or to start or continue working on downloaded missions.
Or choose Last mission to continue working where you left off last
time.
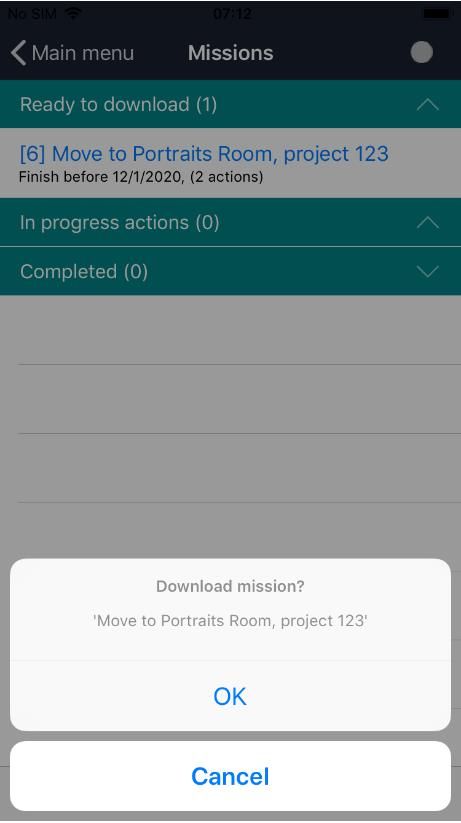
1. Choose the Missions option to open the Missions screen.
You’ll get a list of downloadable missions (the Status in the record
in Collections must be ready for download) and already download-
ed missions. Missions may have been assigned to you in advance
or may not have been assigned to one person in particular. A mis-
sion must have been downloaded to your device before you can
start working on it. Click an already downloaded mission to start
or continue working with it or click a downloadable mission to as-
sume the work: you’ll still have to confirm the downloading.
24-2-2021 34Axiell Move Working with Axiell Move
2. The downloaded mission is now listed under In progress actions
and is ready for operation. Once downloaded, the mission can only
be processed by you and other co-workers won’t be able to down-
load the same mission.
35 24-2-2021Working with Axiell Move Axiell Move
However, you can also release an already downloaded mission, if
on second thought, someone else should do it. To do so, slide the
relevant mission all the way to the left to reveal the Return option.
(This option is only available when the device in online to ensure
that all stored transactions are sent back to the server before the
mission is released from the device.) The mission is then automat-
ically returned and the status of the record is put back to ready for
download. You can even use this option later in the mission pro-
cess, if you can’t complete it yourself, but take note that in real
life the move process might be completed only half, with items on
a trolley, so make sure you have that covered when you use the
Return option halfway.
3. Click the downloaded mission to see the actual mission items it
contains: the actions/tasks to perform. In this example there are
two tasks which involve moving some object from one location to
another.
24-2-2021 36Axiell Move Working with Axiell Move
4. The actual tasks can now be performed in different ways. One way
(which requires scanning the item), is to start performing the
actual tasks by scanning one of the objects or containers to be
moved, by clicking the Scan button. A move is divided up in a
pickup action and a delivery action, allowing you to register your
actions just after you performed them in real life. So typically you
pick up all items to be moved first, put them on a trolley or
something like that and register the pickup in the app.
Another way (which doesn’t require scanning the item) is to swipe
left just a centimetre or so, to open a submenu with the options
Pick up, Refuse and Comment. Click Pick up to start the pickup
action without scanning the item.
(If you swipe too far, the Comment option will be activated, but
you can leave that screen by clicking Cancel if that was not what
you wanted).
37 24-2-2021Working with Axiell Move Axiell Move
In both cases, you’ll still have to confirm the pickup if the Confirm
pickup & delivery option in the Axiell Move settings has been
switched on: it allows you to confirm your action and possibly add
a comment about the pickup itself which will be stored in the
Notes field in the relevant mission item record in Collections.
Otherwise no confirmation will be asked and the action is
performed immediately.
24-2-2021 38Axiell Move Working with Axiell Move
The Comment option in the swipe-left submenu allows you an
alternative way to add a comment. The comment added this way
will only be saved in the mission item record after the pickup is
completed. After entering and saving a comment, you can revisit
it by clicking Comment again and you’ll also see it again when
clicking Pick up with comment in the confirmation. When adding a
comment, click the Comments field to activate the virtual
keyboard.
39 24-2-2021Working with Axiell Move Axiell Move
The Refuse option in the submenu discussed above is a way to
refuse the selected action, for example because the item is
missing, broken, too fragile or to heavy to be picked up by you.
After clicking Refuse you still get to confirm the action and you
may add a comment to explain the refusal. The status of the
mission item record will change to Cancelled. In the app, refused
actions will be listed underneath Refused actions.
24-2-2021 40Axiell Move Working with Axiell Move
The pickup means that the status of the mission item record in
Collections will be changed to Picked and the action itself will be
moved to the Picked up section in the Move app.
Repeat this step for all actions to do.
Note that a new status in a record which is already being
displayed in Collections may only become apparent once you
reload the record.
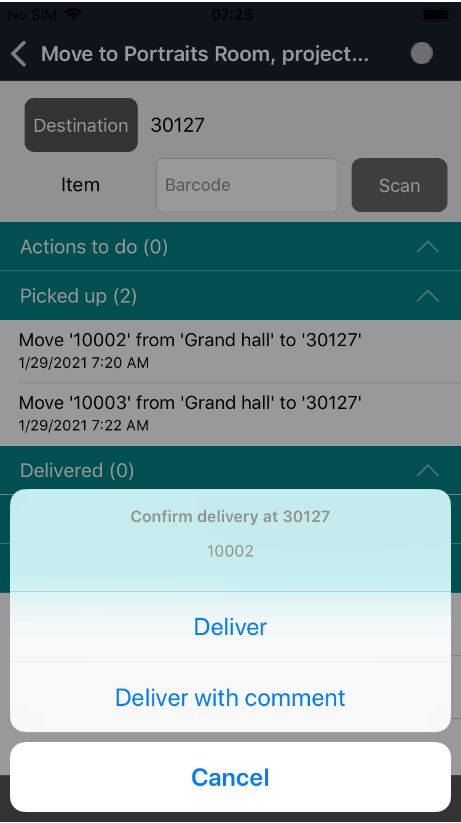
41 24-2-2021Working with Axiell Move Axiell Move 5. Picked up items can be delivered. But before you register the de- livery in the app, scan the destination location by clicking the Des- tination button in the app. This is just a safety measure to make sure you’re delivering the item to the correct location. If you ha- ven’t scanned the destination location yet and you try to deliver an item anyway, an error message will pop up to warn you to do that still. 24-2-2021 42
Axiell Move                                  Working with Axiell Move

6. Now register the delivered items one by one, but only do this once
   you’ve delivered the items in real life. Again there are two ways of
   doing this. The first one is to click an action in the Picked up
   section and scan the item barcode.
   The second way is faster because you don’t need to scan the item.
   Swipe left just a centimetre or so, to open a submenu with the
   options Deliver, Refuse and Comment. Click Deliver to start the
   deliver action without scanning the item.
   (If you swipe too far, the Comment option will be activated, but
   you can leave that screen by clicking Cancel if that was not what
   you wanted).
   In both cases, as with the pickup of an item, you get to confirm
   the delivery only if the Confirm pickup & delivery option has been
   switched on in the Axiell Move settings, also allowing you to add a
   comment about the delivery itself which will be registered in the
   mission item record.

   The Refuse option in the submenu discussed above is a way to
   refuse the selected action, for example because the item is broken
   or to heavy to be delivered by you. After clicking Refuse you still

                             43                                24-2-2021
Working with Axiell Move Axiell Move
get to confirm the action and you may add a comment to explain
the refusal. The status of the mission item record will change to
Cancelled. In the app, refused actions will be listed underneath
Refused actions.
7. The delivery will be processed in the database, which means that
the status of the mission item record in Collections will be changed
to Finished and the action itself will be moved to the Delivered
section in the Move app. Repeat this step for all actions to do.
You may continue with the other Actions to do now or some time
later until the entire mission is complete. Once the mission is
complete and you return to the Missions overview (swipe right),
the completed mission will be listed in the Completed section.
Once completed you cannot view the parts of that mission
anymore. And you’re done with the mission work.
(Note that the Not possible actions section is currently not being
used.)
24-2-2021 44Axiell Move Working with Axiell Move
8. Completed missions can be removed from the app by swiping the
relevant complete mission left: this won’t delete the mission from
the database though, so you can still look it up in Collections.
2.8. Synchronizing offline transactions
If you have been working offline, your transactions will have been
stored temporarily in a transaction log file on the iPhone. If you’re not
going back online during your current session and synchronize your
offline transactions, then next time you start Axiell Move you may
notice a small round badge with a number attached to the Axiell Move
icon: this (optional) badge indicates that offline transactions awaiting
your attention have been stored on the iPhone whilst the number indi-
cates the number of stored offline transactions.
When you are back online, you can have all of the transactions from
this file processed in the database at once. When you are logging in,
the dot in the top right of the screen indicates whether you have ac-
cess to the Axiell service or not: if it is green, you have access; if it is
red, you have no access and the program automatically defaults to
offline mode. Having no access can be a consequence of a missing
wireless network connection or a consequence of an incorrectly set up
Axiell service.
The Synch option in the bottom right corner of the Main menu opens
the Synchronization screen in which you can still process stored trans-
45 24-2-2021Working with Axiell Move Axiell Move
actions in the database. The option is always active so that you can
check any logged transactions.
You then have the following options:
• Direct synchronization – Click the icon in the bottom left corner
of the screen to synchronize immediately.
Depending on the number of transactions, the processing can take
a while. Once synchronization has been completed, the stored
transactions will be removed. The number of processed transac-
tions and the number of errors is displayed as well. The nature of
any occurring errors will be shown too. Click Main menu to contin-
ue with your regular work.
24-2-2021 46You can also read