HPE Smart Array SR Gen10 User Guide - Senetic
←
→
Page content transcription
If your browser does not render page correctly, please read the page content below
HPE Smart Array SR Gen10 User Guide

Abstract
This document includes feature, installation, and configuration information about Hewlett
Packard Enterprise Smart Array SR Gen10 and is for the person who installs, administers,
and troubleshoots servers and storage systems. Hewlett Packard Enterprise assumes you are
qualified in the servicing of computer equipment and trained in recognizing hazards in
products with hazardous energy levels.

Part Number: 879006-004a
Published: May 2019
Edition: 4a
©   Copyright 2017, 2019 Hewlett Packard Enterprise Development LP

Notices
         The information contained herein is subject to change without notice. The only warranties for Hewlett
         Packard Enterprise products and services are set forth in the express warranty statements accompanying
         such products and services. Nothing herein should be construed as constituting an additional warranty.
         Hewlett Packard Enterprise shall not be liable for technical or editorial errors or omissions contained
         herein.
         Confidential computer software. Valid license from Hewlett Packard Enterprise required for possession,
         use, or copying. Consistent with FAR 12.211 and 12.212, Commercial Computer Software, Computer
         Software Documentation, and Technical Data for Commercial Items are licensed to the U.S. Government
         under vendor's standard commercial license.
         Links to third-party websites take you outside the Hewlett Packard Enterprise website. Hewlett Packard
         Enterprise has no control over and is not responsible for information outside the Hewlett Packard
         Enterprise website.

Acknowledgments
         Microsoft® and Windows® are either registered trademarks or trademarks of Microsoft Corporation in the
         United States and/or other countries.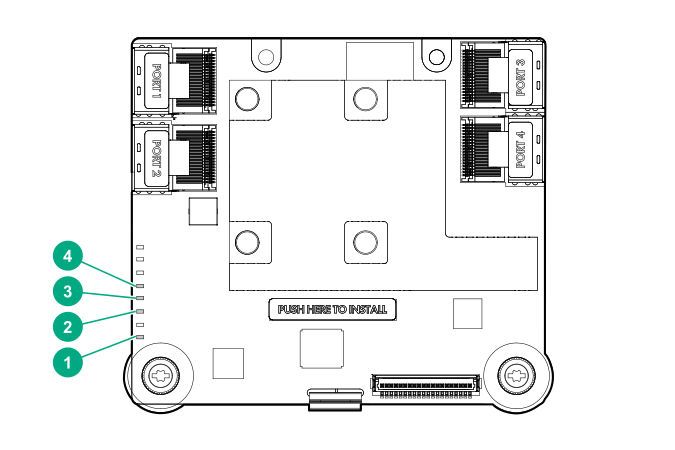
Contents

    HPE Smart Array SR Gen10................................................................... 6
           S-class.......................................................................................................................................... 6
           E-class.......................................................................................................................................... 7
           P-class.......................................................................................................................................... 7

    Features................................................................................................... 9
           Features support...........................................................................................................................9
                  Operating environments.....................................................................................................9
                  RAID technologies..............................................................................................................9
                  Transformation................................................................................................................. 10
                  Drive technology...............................................................................................................10
                  Security.............................................................................................................................11
                  Reliability.......................................................................................................................... 11
                  Performance..................................................................................................................... 11
                  Controller supported features...........................................................................................12
           RAID technologies...................................................................................................................... 12
                  Selecting the right RAID type for your IT infrastructure....................................................12
                  Mixed mode (RAID and HBA simultaneously)................................................................. 15
                  Striping............................................................................................................................. 16
                  Mirroring........................................................................................................................... 16
                  Parity................................................................................................................................ 19
                  Spare drives..................................................................................................................... 23
                  Drive Rebuild....................................................................................................................24
           Transformation............................................................................................................................ 26
                  Array transformations.......................................................................................................26
                  Logical drive transformations........................................................................................... 27
                  Transformation priority..................................................................................................... 28
           Drive technology......................................................................................................................... 28
                  Predictive drive failure......................................................................................................28
                  Online drive firmware update........................................................................................... 28
                  Dynamic sector repair...................................................................................................... 28
                  Controller surface scan.................................................................................................... 28
                  Shingled magnetic recording............................................................................................29
                  HPE SmartDrive LED.......................................................................................................29
                  SSD over-provisioning optimization................................................................................. 31
                  SSD Wear Gauge reports................................................................................................ 31
           Security....................................................................................................................................... 31
                  HPE Smart Array SR Secure Encryption......................................................................... 31
                  Sanitize erase...................................................................................................................32
                  Sanitize freeze lock and anti-freeze lock..........................................................................33
           Reliability.....................................................................................................................................33
                  Dual Domain Topologies.................................................................................................. 33
                  Link error monitoring........................................................................................................ 34
                  Recovery ROM.................................................................................................................34
                  Cache Error Checking and Correction (ECC).................................................................. 34
                  Thermal monitoring.......................................................................................................... 34
           Performance................................................................................................................................34
                  HPE Smart Array SR SmartCache...................................................................................34
                  SSD Smart Path...............................................................................................................35

                                                                                                                                                            3
Dual domain path selection..............................................................................................35
                     Cache...............................................................................................................................35
                     Drive write cache control..................................................................................................37
                     Video on demand............................................................................................................. 37
                     Stripe size selection......................................................................................................... 38
                     Power modes................................................................................................................... 38

    Installation, configuration, and maintenance.....................................40
           Installation...................................................................................................................................40
                   Supported servers............................................................................................................40
                   Installing a Smart Array in an unconfigured server.......................................................... 40
                   Installing a Smart Array in a previously configured server............................................... 41
                   Installing a Smart Array....................................................................................................42
                   Connecting storage devices.............................................................................................45
                   Cable part numbers..........................................................................................................47
           Enabling Smart Array SW RAID..................................................................................................47
                   Device drivers...................................................................................................................47
                   Windows operating systems.............................................................................................47
           Configuration...............................................................................................................................48
                   Array and controller configuration.................................................................................... 48
                   HPE Smart Storage Administrator....................................................................................49
                   UEFI System Utilities........................................................................................................50
                   Intelligent Provisioning..................................................................................................... 50
                   Configuring boot controller options.................................................................................. 51
           System maintenance tools..........................................................................................................52
                   Updating software and firmware...................................................................................... 52
                   Diagnostic tools................................................................................................................53

    Models....................................................................................................55
           Modular Smart Array (-a/-b/-c).................................................................................................... 55
                 HPE Smart Array E208i-a SR Gen10.............................................................................. 55
                 HPE Smart Array P408i-a SR Gen10.............................................................................. 56
                 HPE Smart Array P816i-a SR Gen10.............................................................................. 59
                 HPE Smart Array P204i-b SR Gen10.............................................................................. 62
                 HPE Smart Array E208i-c SR Gen10...............................................................................65
                 HPE Smart Array P204i-c SR Gen10...............................................................................65
                 HPE Smart Array P408i-c SR Gen10...............................................................................66
           Standup PCIe Plug-In Smart Array (-p)...................................................................................... 66
                 HPE Smart Array E208i-p SR Gen10.............................................................................. 66
                 HPE Smart Array E208e-p SR Gen10............................................................................. 67
                 HPE Smart Array P408i-p SR Gen10.............................................................................. 69
                 HPE Smart Array P408e-p SR Gen10............................................................................. 72
           Mezzanine controllers (-m)..........................................................................................................75
                 HPE Smart Array P408e-m SR Gen10............................................................................ 75
                 HPE Smart Array P416ie-m SR Gen10........................................................................... 77

    Additional hardware and options........................................................ 81
           Energy pack options................................................................................................................... 81
                 HPE Smart Storage Battery............................................................................................. 81
                 HPE Smart Storage Hybrid Capacitor..............................................................................81
                 Energy pack specifications...............................................................................................82
           HPE 12G SAS Expander Card................................................................................................... 82

4
Specifications........................................................................................83
       Memory and storage capacity conventions.................................................................................83
       RAID conventions....................................................................................................................... 83
       Controller specifications..............................................................................................................83
       Energy pack specifications......................................................................................................... 83

Support and other resources...............................................................85
       Accessing Hewlett Packard Enterprise Support......................................................................... 85
       Accessing updates......................................................................................................................85
       Customer self repair....................................................................................................................86
       Remote support.......................................................................................................................... 86
       Warranty information...................................................................................................................86
       Regulatory information................................................................................................................87
       Documentation feedback............................................................................................................ 87

Websites................................................................................................ 88

                                                                                                                                                5
HPE Smart Array SR Gen10
       HPE Smart Array SR Gen10 offers a reliable family of RAID controllers that attach to:
       •   Internal hot-plug drives
       •   Internal non hot-plug drives
       •   External JBODs to HPE Gen10 ProLiant, Synergy, and Apollo servers

       The HPE Smart Array SR Gen10 family includes S-class, E-class, and P-class integrated within a
       common set of Smart Array SmartRAID (SR) management tools. Each class is characterized according to
       software features of RAID support, RAID levels, features, and performance, and hardware features of
       SAS/SATA lanes, port type, and form factor.
       The type-a, type-b, and type-c designations indicate the server and compute module platforms that are
       supported. Specifically:

       •   Type-a modular controllers are compatible with ProLiant DL, ProLiant ML, and Apollo platforms.
       •   Type-b modular controllers are compatible with ProLiant BL platforms.
       •   Type-c modular controllers are compatible with HPE Synergy platforms.

S-class
       S-class provides software RAID capabilities for use with Microsoft Windows operating systems. HPE
       Smart Array S100i SR Gen10 SW RAID is an ideal entry-level solution that use SATA drives in basic
       RAID configurations.
       S-class provides

       •   Up to 14 SATA lanes attached to internal drives
       •   RAID levels 0, 1, 5, and 10
       •   Hot-plug and non hot-plug SATA drive support
       •   6G SATA support

6   HPE Smart Array SR Gen10
•   UEFI Boot Mode Only
   •   Windows Server 2012 R2, Windows Server 2016, and Windows Server 2019
   •   System memory used as read cache
   •   Smart Array management tools

   NOTE: Currently only offline HPE Smart Storage Administrator is supported in a pre-boot environment.
   HPE Smart Storage Administrator available through Service Pack for ProLiant is not supported.

    Name                                                  Supported HPE Gen10 servers

    HPE Smart Array S100i SR Gen10 SW RAID                ProLiant, Apollo, Synergy, BladeSystem

E-class
   E-class Smart Array controllers provide an enterprise level, cost-effective solution for RAID 0, 1, 5, and 10
   and software-defined storage solutions. These controllers operate in Mixed Mode which combines RAID
   and HBA operations simultaneously. They offer encryption for data-at-rest on any drive with HPE Smart
   Array SR Secure Encryption and provide enterprise-class reliability, security and efficiency.
   E-class HPE Smart Array SR Gen10 provides:

   •   Up to 8 SAS/SATA lanes for internal or external drives
   •   RAID levels 0, 1, 5, and 10
   •   Mixed mode (RAID and HBA pass-through functionality simultaneously)
   •   Data-at-rest encryption
   •   12G SAS support
   •   HPE 12G SAS Expander Card support
   •   UEFI and Legacy Boot modes
   •   No cache memory support
   •   Smart Array management tools

    Name                                     Supported HPE Gen10
                                             servers

    HPE Smart Array E208i-a SR Gen10         ProLiant and Apollo
    HPE Smart Array E208i-p SR Gen10         ProLiant and Apollo
    HPE Smart Array E208e-p SR Gen10         ProLiant and Apollo
    HPE Smart Array E208i-c SR Gen10         Synergy

P-class
   P-class Smart Array controllers are ideal for maximizing performance while supporting advanced RAID
   levels. These controllers operate in Mixed Mode which combines RAID and HBA operations
   simultaneously. They offer encryption for data-at-rest on any drive with HPE Smart Array SR Secure

                                                                              HPE Smart Array SR Gen10        7
Encryption. They offer flash-backed write cache, read-ahead cache, and provide enterprise-class storage
       performance, reliability, security, and efficiency.
       P-class HPE Smart Array SR Gen10 provides:

       •   Best RAID performance capabilities with large flash-backed write cache
       •   Up to 16 SAS/SATA lanes for internal or external drives
       •   RAID levels 0, 1, 5, 6, 10, 50, 60, 1 ADM, and 10 ADM
       •   Mixed mode (RAID and HBA pass-through functionality simultaneously)
       •   Data-at-rest encryption
       •   12G SAS support
       •   HPE 12G SAS Expander Card support
       •   UEFI and Legacy Boot modes
       •   Smart Array management tools

        Name                                            Supported HPE Gen10
                                                        servers

        HPE Smart Array P408i-a SR Gen10                ProLiant and Apollo
        HPE Smart Array P408i-p SR Gen10                ProLiant and Apollo
        HPE Smart Array P408e-p SR Gen10                ProLiant and Apollo
        HPE Smart Array P816i-a SR Gen10                ProLiant and Apollo
        HPE Smart Array P204i-c SR Gen10                Synergy
        HPE Smart Array P408i-c SR Gen10                Synergy
        HPE Smart Array P416ie-m SR Gen10               Synergy
        HPE Smart Array P408e-m SR Gen10                BladeSystem
        HPE Smart Array P204i-b SR Gen10                BladeSystem

8   HPE Smart Array SR Gen10
Features
Features support
    This section lists the features supported for each controller class. For the latest information about the
    features supported by each individual controller, see the Quick Specs. See "Controller supported
    features" for the web links to the Quick Specs.

Operating environments
                                                              E-class                 P-class
     Operating system              S-class

     Windows

     Linux
                                   --

     VMware
                                   --

     Legacy Boot mode
                                   --

     UEFI Boot mode

    NOTE: For Linux users with an S-class controller, Hewlett Packard Enterprise offers a solution that uses
    in-distro open-source software to create a two-disk RAID 1 boot volume. For more information, see
    https://downloads.linux.hpe.com/SDR/project/lsrrb/.

RAID technologies

     Feature                            S-class                 E-class                 P-class

     RAID levels                        0, 1, 5, 10             0, 1, 5, 10             0, 1, 5, 6, 10, 50, 60, 1
                                                                                        ADM, 10 ADM
     Max Logical Drives                 14                      64                      64
     Max Physical Drives                14                      238 1                   238 1
     Max Physical per Logical Drive     14                      64                      64
     Mixed mode (RAID and HBA)          --

     Read load balancing

     Mirror splitting and
     recombining
     Rapid Parity Initialization        --

     Regenerative Writes

     Backed out Writes

                                                                                                  Table Continued

                                                                                                     Features       9
Feature                        S-class   E-class   P-class

        Full Stripe Writes

        Dedicated spare

        Predictive Spare Activation

        Failure Spare Activation

        Auto-replace Spare

        Rapid Rebuild

        Rebuild Priority

       1 With expander

Transformation

        Feature                        S-class   E-class   P-class

        Expand Array                   --

        Move Array

        Replace Array                  --

        Shrink Array                   --

        Mirror Array                   --

        Heal Array

        Extend Logical Drive           --

        Migrate RAID Level             --

        Migrate Stripe Size            --

        Transformation Priority        --

Drive technology

        Feature                        S-class   E-class   P-class

        Predictive Drive Failure

        Online drive firmware update        1      1         1

        Dynamic sector repair

        Controller surface scan

                                                                     Table Continued

10   Features
Feature S-class E-class P-class
Shingled Magnetic Recording --
(SMR)
HPE SmartDrive LED
SSD Over-Provisioning --
Optimization
SSD Wear Gauge reports
1 Reboot is required
Security
Feature S-class E-class P-class
HPE Smart Array SR Secure --
Encryption
Sanitize Erase
--
Sanitize Freeze Lock
--
Signed Firmware not applicable
Drive Authentication
Reliability
Feature S-class E-class P-class
Dual Domain Topologies --
Link Error Monitoring --
Recovery ROM not applicable
Cache Error Checking and not applicable
Correction
Thermal Monitoring
Performance
Feature S-class E-class P-class
HPE Smart Array SR -- --
SmartCache
SSD Smart Path
Table Continued
Features 11Feature S-class E-class P-class
Dual Domain Path Selection --
Read Cache --
Flash-Backed Write Cache -- --
Cache Ratio Selection -- --
Write Cache Bypass -- --
Threshold
Drive Write Cache Control
Video on Demand --
Stripe Size Selection
Power Modes --
Controller supported features
The features supported by each Smart Array controller are described in the Controller Family Datasheet
and in the following QuickSpecs:
• S-class controller S100i
• All E-class and P-class controllers
RAID technologies
Selecting the right RAID type for your IT infrastructure
The RAID setting that you select is based upon the following:
• The number of parity groups that you have
• The fault tolerance required
• The write performance required
• The amount of usable capacity that you have
Configuring the RAID fault tolerance
If your IT environment requires a high level of fault tolerance, select a RAID level that is optimized for fault
tolerance.
This chart shows the relationship between the RAID level fault tolerance and the size of the storage array.
The chart includes RAID 0, 5, 50, 10, 6, 60, and RAID 10 ADM. It also shows the percent reliability in
increments between 1 and one billion and the storage array drive increments between 0 and 96.
This chart assumes that two parity groups are used for RAID 50 and RAID 60.
This chart shows that:
12 Features• RAID 10 is 30,000 times more reliable than RAID 0.
• RAID 10 ADM is 450,000,000 times more reliable than RAID 0.
• The fault tolerance of RAID 5, 50, 6, and 60 decreases as the array size increases.
Configuring the RAID write performance
If your environment requires high write performance, select a RAID type that is optimized for write
performance
The chart below shows how RAID 10, 10 ADM, 5, 50, 6, and 60 compare to the percent write
performance of RAID 0.
The data in the chart assumes that drives are limited and that drive write performance is the same as
drive read performance.
Consider the following points:
• Write performance decreases as fault tolerance improves due to extra I/O.
• Read performance is generally the same for all RAID levels except for smaller RAID 5\6 arrays.
Features 13The table below shows the Disk I/O for every host write:
RAID type Disk I/O for every host write
RAID 0 1
RAID 10 2
RAID 10 ADM 3
RAID 5 4
RAID 6 6
Configuring the RAID usable capacity
If your environment requires a high usable capacity, select a RAID type that is optimized for usable
capacity. The chart in this section demonstrates the relationship between the number of drives in the
array and the percent usable capacity over the capacity for RAID 0.
Consider the following points when selecting the RAID type:
• Usable capacity decreases as fault tolerance improves due to an increase in parity data.
• The usable capacity for RAID 10 and RAID 10 ADM remains flat with larger arrays.
• The usable capacity for RAID 5, 50, 6, and 60 increases with larger arrays.
• RAID 50 and RAID 60 assumes two parity groups.
Note the minimum drive requirements for the RAID types, as shown in the table below.
RAID type Minimum number of drives
RAID 0 1
RAID 10 2
RAID 10 ADM 3
RAID 5 3
RAID 6 4
RAID 50 6
RAID 60 8
14 FeaturesConfiguring the storage solution
The chart in this section shows the relevance of the RAID type to the requirements of your environment.
Depending on your requirements, you should optimize the RAID types as follows:
• RAID 10 ADM: Optimize for fault tolerance and write performance.
• RAID 6/60: Optimize for fault tolerance and usable capacity.
• RAID 1/10: Optimize for write performance.
• RAID 5/50: Optimize for usable capacity.
Mixed mode (RAID and HBA simultaneously)
Any drive that is not a member of a logical drive or assigned as a spare is presented to the operating
system. This mode occurs by default without any user intervention and cannot be disabled. Logical drives
are also presented to the operating system.
Features 15Controllers that support mixed mode (P-class and E-class) can reduce the number of controllers in the
system and efficiently use drive bays within a backplane. For example, a solution that needs all the drives
presented as HBA (except a two-drive mirror for boot support) can be accomplished with a single
controller attached to a single backplane.
Striping
RAID 0
A RAID 0 configuration provides data striping, but there is no protection against data loss when a drive
fails. However, it is useful for rapid storage of large amounts of noncritical data (for printing or image
editing, for example) or when cost is the most important consideration. The minimum number of drives
required is one.
This method has the following benefits:
• Useful when performance and low cost are more important than data protection.
• Has the highest write performance of all RAID methods.
• Has the lowest cost per unit of stored data of all RAID methods.
• All drive capacity is used to store data (none allocated for fault tolerance).
Mirroring
RAID 1 and RAID 1+0 (RAID 10)
In RAID 1 and RAID 1+0 (RAID 10) configurations, data is duplicated to a second drive. The usable
capacity is C x (n / 2) where C is the drive capacity with n drives in the array. A minimum of two drives is
required.
When the array contains only two physical drives, the fault-tolerance method is known as RAID 1.
16 FeaturesWhen the array has more than two physical drives, drives are mirrored in pairs, and the fault-tolerance
method is known as RAID 1+0 or RAID 10. If a physical drive fails, the remaining drive in the mirrored pair
can still provide all the necessary data. Several drives in the array can fail without incurring data loss, as
long as no two failed drives belong to the same mirrored pair. The total drive count must increment by 2
drives. A minimum of four drives is required.
This method has the following benefits:
• It is useful when high performance and data protection are more important than usable capacity.
• This method has the highest write performance of any fault-tolerant configuration.
• No data is lost when a drive fails, as long as no failed drive is mirrored to another failed drive.
• Up to half of the physical drives in the array can fail.
Features 17RAID 1 (ADM) and RAID 10 (ADM)
In RAID 1 (Advanced Data Mirroring (ADM)) and RAID 10 (ADM) configurations, data is duplicated to two
additional drives. The usable capacity is C x (n / 3) where C is the drive capacity with n drives in the array.
A minimum of 3 drives is required.
When the array contains only three physical drives, the fault-tolerance method is known as RAID 1
(ADM).
When the array has more than six physical drives, drives are mirrored in trios, and the fault-tolerance
method is known as RAID 10 (ADM). If a physical drive fails, the remaining two drives in the mirrored trio
can still provide all the necessary data. Several drives in the array can fail without incurring data loss, as
long as no three failed drives belong to the same mirrored trio. The total drive count must increment by 3
drives.
This method has the following benefits:
• It is useful when high performance and data protection are more important than usable capacity.
• This method has the highest read performance of any configuration due to load balancing.
18 Features• This method has the highest data protection of any configuration.
• No data is lost when two drives fail, as long as no two failed drives are mirrored to another failed drive.
• Up to two-thirds of the physical drives in the array can fail.
Read load balancing
In each mirrored pair or trio, Smart Array balances read requests between drives based upon individual
drive load.
This method has the benefit of enabling higher read performance and lower read latency.
Mirror splitting and recombining
The split mirrored array feature splits any mirrored array (RAID 1, 10, 1 ADM, or 10 ADM) into multiple
RAID 0 logical drives containing identical drive data.
The following options are available after creating a split mirror backup:
• Re-mirror the array and preserve the existing data. Discard the contents of the backup array.
• Re-mirror the array and roll back to the contents of the backup array. Discard existing data.
• Activate the backup array.
The re-mirrored array combines two arrays that consist of one or more RAID 0 logical drives into one
array consisting of RAID 1 or RAID 1+0 logical drives.
For controllers that support RAID 1 (ADM) and RAID 10 (ADM), this task can be used to combine:
• one array with RAID 1 logical drives and one array with RAID 0 logical drives into one array with RAID
1 (ADM) logical drives
• one array with RAID 1+0 logical drives and one array with RAID 0 logical drives into one array with
RAID 10 (ADM) logical drives
This method allows you to clone drives and create temporary backups.
Parity
RAID 5
RAID 5 protects data using parity (denoted by Px,y in the figure). Parity data is calculated by summing
(XOR) the data from each drive within the stripe. The strips of parity data are distributed evenly over
every physical drive within the logical drive. When a physical drive fails, data that was on the failed drive
can be recovered from the remaining parity data and user data on the other drives in the array. The
usable capacity is C x (n - 1) where C is the drive capacity with n drives in the array. A minimum of three
drives is required.
Features 19This method has the following benefits:
• It is useful when usable capacity, write performance, and data protection are equally important.
• It has the highest usable capacity of any fault-tolerant configuration.
• Data is not lost if one physical drive fails.
RAID 50
RAID 50 is a nested RAID method in which the constituent drives are organized into several identical
RAID 5 logical drive sets (parity groups). The smallest possible RAID 50 configuration has six drives
organized into two parity groups of three drives each.
For any given number of drives, data loss is least likely to occur when the drives are arranged into the
configuration that has the largest possible number of parity groups. For example, four parity groups of
three drives are more secure than three parity groups of four drives. However, less data can be stored on
the array with the larger number of parity groups.
20 FeaturesAll data is lost if a second drive fails in the same parity group before data from the first failed drive has
finished rebuilding. A greater percentage of array capacity is used to store redundant or parity data than
with non-nested RAID methods (RAID 5, for example). A minimum of six drives is required.
This method has the following benefits:
• Higher performance than for RAID 5, especially during writes.
• Better fault tolerance than either RAID 0 or RAID 5.
• Up to n physical drives can fail (where n is the number of parity groups) without loss of data, as long
as the failed drives are in different parity groups.
RAID 6
RAID 6 protects data using double parity. With RAID 6, two different sets of parity data are used (denoted
by Px,y and Qx,y in the figure), allowing data to still be preserved if two drives fail. Each set of parity data
uses a capacity equivalent to that of one of the constituent drives. The usable capacity is C x (n - 2)
where C is the drive capacity with n drives in the array.
A minimum of 4 drives is required.
This method is most useful when data loss is unacceptable but cost is also an important factor. The
probability that data loss will occur when an array is configured with RAID 6 (Advanced Data Guarding
(ADG)) is less than it would be if it were configured with RAID 5.
This method has the following benefits:
• It is useful when data protection and usable capacity are more important than write performance.
• It allows any two drives to fail without loss of data.
RAID 60
RAID 60 is a nested RAID method in which the constituent drives are organized into several identical
RAID 6 logical drive sets (parity groups). The smallest possible RAID 60 configuration has eight drives
organized into two parity groups of four drives each.
For any given number of hard drives, data loss is least likely to occur when the drives are arranged into
the configuration that has the largest possible number of parity groups. For example, five parity groups of
Features 21four drives are more secure than four parity groups of five drives. However, less data can be stored on
the array with the larger number of parity groups.
The number of physical drives must be exactly divisible by the number of parity groups. Therefore, the
number of parity groups that you can specify is restricted by the number of physical drives. The maximum
number of parity groups possible for a particular number of physical drives is the total number of drives
divided by the minimum number of drives necessary for that RAID level (three for RAID 50, 4 for RAID
60).
A minimum of 8 drives is required.
All data is lost if a third drive in a parity group fails before one of the other failed drives in the parity group
has finished rebuilding. A greater percentage of array capacity is used to store redundant or parity data
than with non-nested RAID methods.
This method has the following benefits:
• Higher performance than for RAID 6, especially during writes.
• Better fault tolerance than RAID 0, 5, 50, or 6.
• Up to 2n physical drives can fail (where n is the number of parity groups) without loss of data, as long
as no more than two failed drives are in the same parity group.
Parity groups
When you create a RAID 50 or RAID 60 configuration, you must also set the number of parity groups.
You can use any integer value greater than 1 for this setting, with the restriction that the total number of
physical drives in the array must be exactly divisible by the number of parity groups.
The maximum number of parity groups possible for a particular number of physical drives is the total
number of drives divided by the minimum number of drives necessary for that RAID level (three for RAID
50, four for RAID 60).
This feature has the following benefits:
• It supports RAID 50 and RAID 60.
• A higher number of parity groups increases fault tolerance.
Background parity initialization
RAID levels that use parity (RAID 5, RAID 6, RAID 50, and RAID 60) require that the parity blocks be
initialized to valid values. Valid parity data is required to enable enhanced data protection through
background controller surface scan analysis and higher write performance (backed out write). After parity
initialization is complete, writes to a RAID 5, RAID 6, RAID 50, and RAID 60 logical drive are typically
faster because the controller does not read the entire stripe (regenerative write) to update the parity data.
This feature initializes parity blocks in the background while the logical drive is available for access by the
operating system. Parity initialization takes several hours or days to complete. The time it takes depends
on the size of the logical drive and the load on the controller. While the controller initializes the parity data
in the background, the logical drive has full fault tolerance.
This feature has the benefit of allowing the logical drive to become usable sooner.
Rapid parity initialization
RAID levels that use parity (RAID 5, RAID 6, RAID 50, and RAID 60) require that the parity blocks be
initialized to valid values. Valid parity data is required to enable enhanced data protection through
background controller surface scan analysis and higher write performance (backed out write). After parity
22 Featuresinitialization is complete, writes to a RAID 5 or RAID 6 logical drive are typically faster because the
controller does not read the entire stripe (regenerative write) to update the parity data.
The rapid parity initialization method works by overwriting both the data and parity blocks in the
foreground. The logical drive remains invisible and unavailable to the operating system until the parity
initialization process completes. Keeping the logical volume offline eliminates the possibility of I/O activity,
thus speeding the initialization process, and enabling other high-performance initialization techniques that
wouldn't be possible if the volume was available for I/O. Once the parity is complete, the volume is
brought online and becomes available to the operating system
This method has the following benefits:
• It speeds up the parity initialization process.
• It ensures that parity volumes use backed-out writes for optimized random write performance.
Regenerative writes
Logical drives can be created with background parity initialization so that they are available almost
instantly. During this temporary parity initialization process, writes to the logical drive are performed using
regenerative writes or full stripe writes. Any time a member drive within an array is failed, all writes that
map to the failed drive are regenerative. A regenerative write is much slower because it must read from
nearly all of the drives in the array to calculate new parity data. The write penalty for a regenerative write
is n + 1 drive operations where n is the total number of drives in the array. As you can see, the write
penalty is greater (slower write performance) with larger arrays.
This method has the following benefits:
• It allows the logical drive to be accessible before parity initialization completes
• It allows the logical drive to be accessible when degraded
Backed-out writes
After parity initialization is complete, random writes to a RAID 5, 50, 6, or 60 can use a faster backed-out
write operation. A backed-out write uses the existing parity to calculate the new parity data. As a result,
the write penalty for RAID 5 and RAID 50 is always four drive operations, and the write penalty for a RAID
6 and RAID 60 is always six drive operations. As you can see, the write penalty is not influenced by the
number of drives in the array.
Backed-out writes is also known as "read-modify-write."
This method has the benefit of faster RAID, 5, 50, 6, or 60 random writes.
Full-stripe writes
When writes to the logical drive are sequential or when multiple random writes that accumulate in the
flash-backed write cache are found to be sequential, a full-stripe write operation can be performed. A full-
stripe write allows the controller to calculate new parity using new data being written to the drives. There
is almost no write penalty because the controller does not need to read old data from the drives to
calculate the new parity. As the size of the array grows larger, the write penalty is reduced by the ratio of
p / n where p is the number of parity drives and n is the total number of drives in the array.
This method has the benefit of faster RAID 5, 6, or 60 sequential writes.
Spare drives
Dedicated spare
A dedicated spare is a spare drive that is shared across multiple arrays within a single RAID controller.
Features 23It supports any fault tolerant logical drive such as RAID 1, 10, 5, 6, 50, and 60.
The dedicated spare drive activates any time a drive within the array fails.
Predictive Spare Activation
Predictive Spare Activation mode will activate a spare drive anytime a member drive within an array
reports a predictive failure. The data is copied to the spare drive while the RAID volume is still healthy.
Assigning one or more online spare drives to an array enables you to postpone replacement of faulty
drives.
The predictive failure drive is marked as failed and ready for removal and replacement after the copy is
complete. After you install a replacement drive, the controller will restore data automatically from the
activated spare drive to the new drive.
This method has the following benefits:
• It is up to four times faster than a typical rebuild.
• It can recover bad blocks during spare activation.
• It supports all RAID levels including RAID 0.
Failure spare activation
Failure spare activation mode activates a spare drive when a member drive within an array fails using
fault tolerance methods to regenerate the data.
Assigning one or more online spare drives to an array enables you to postpone replacement of faulty
drives.
Auto-replace spare
Auto-replace spare allows an activated spare drive to become a permanent member of the drive array.
The original drive location becomes the location of the spare drive.
This method has the benefit of avoiding the copy-back operation after replacing the failed drive.
Drive Rebuild
Rapid rebuild
Smart Array controllers include rapid rebuild technology for accelerating the rebuild process. Faster
rebuild time helps restore logical drives to full fault tolerance before a subsequent drive failure can occur,
reducing the risk of data loss.
Generally, a rebuild operation requires approximately 15 to 30 seconds per gigabyte for RAID 5 or RAID
6. Actual rebuild time depends on several factors, including the amount of I/O activity occurring during the
rebuild operation, the number of disk drives in the logical drive, the rebuild priority setting, and the disk
drive performance.
This feature is available for all RAID levels except RAID 0.
24 FeaturesRebuild priority
The Rebuild Priority setting determines the urgency with which the controller treats an internal command
to rebuild a failed logical drive.
• At the low setting, normal system operations take priority over a rebuild.
• At the medium setting, rebuilding occurs for half of the time, and normal system operations occur for
the rest of the time.
• At the medium high setting, rebuilding is given a higher priority over normal system operations.
• At the high setting, the rebuild takes precedence over all other system operations.
If the logical drive is part of an array that has an online spare, rebuilding begins automatically when drive
failure occurs. If the array does not have an online spare, rebuilding begins when the failed physical drive
is replaced.
Before replacing drives
• Open Systems Insight Manager, and inspect the Error Counter window for each physical drive in the
same array to confirm that no other drives have any errors. For more information about Systems
Insight Manager, see the documentation on the Insight Management DVD or on the Hewlett Packard
Enterprise website.
• Be sure that the array has a current, valid backup.
• Confirm that the replacement drive is of the same type as the degraded drive (either SAS or SATA and
either hard drive or solid-state drive).
• Use replacement drives that have a capacity equal to or larger than the capacity of the smallest drive
in the array. The controller immediately fails drives that have insufficient capacity.
In systems that use external data storage, be sure that the server is the first unit to be powered down and
the last unit to be powered up. Taking this precaution ensures that the system does not, erroneously,
mark the drives as failed when the server is powered up.
In some situations, you can replace more than one drive at a time without data loss. For example:
• In RAID 1 configurations, drives are mirrored in pairs. You can replace a drive if it is not mirrored to
other removed or failed drives.
• In RAID 10 configurations, drives are mirrored in pairs. You can replace several drives simultaneously
if they are not mirrored to other removed or failed drives.
• In RAID 50 configurations, drives are arranged in parity groups. You can replace several drives
simultaneously, if the drives belong to different parity groups. If two drives belong to the same parity
group, replace those drives one at a time.
• In RAID 6 configurations, you can replace any two drives simultaneously.
• In RAID 60 configurations, drives are arranged in parity groups. You can replace several drives
simultaneously, if no more than two of the drives being replaced belong to the same parity group.
• In RAID 1 (ADM) and RAID 10 (ADM) configurations, drives are mirrored in sets of three. You can
replace up to two drives per set simultaneously.
To remove more drives from an array than the fault tolerance method can support, follow the previous
guidelines for removing several drives simultaneously, and then wait until rebuild is complete (as indicated
by the drive LEDs) before removing additional drives.
Features 25However, if fault tolerance has been compromised, and you must replace more drives than the fault
tolerance method can support, delay drive replacement until after you attempt to recover the data.
Transformation
Array transformations
Expand array
Increase the capacity of an existing array by adding currently existing unassigned drives to it. Any drive
that you want to add must meet the following criteria:
• It must be an unassigned drive.
• It must be of the same type as existing drives in the array (for example, SAS HDD, SAS SSD, SATA
HDD, or SATA SSD).
• It must have a capacity no less than the capacity of the smallest drive in the array.
Move array
The Move Array operation allows you to transfer the contents of a disk array from one set of physical
drives to a second set of physical drives. Note the following conditions and restrictions for the Move Array
operation:
• The destination physical drive set must have the same number of drives as the source physical drives
set.
• The array type (SAS or SATA) must remain the same.
• The destination drive(s) must have enough capacity to hold all the logical drives present in the source
array.
Replace array
The Replace Array operation allows you to transfer the contents of an array to an existing empty array or
a new array. All logical drives from the source array are transferred. The original array is deleted and its
data drives are freed as unassigned drives. The drive types at source and destination arrays can be
different. Note the following conditions and restrictions for the Replace Array operation:
• The destination array must have the same number of physical drives as the source array to be
replaced.
• Both the source and the destination arrays must be in OK state. All the existing logical drives in the
source arrays must be in OK state.
• The destination array must have enough capacity to hold all the logical drives present in the source
array.
Shrink array
The Shrink Array operation allows you to remove drives from an existing array. The following conditions
apply:
• The array must have enough free space to accommodate all existing logical drives.
• You may not remove drives from the array if the resulting number of drives will not support the fault
tolerance (RAID level) of any existing logical drive. For example, if you have an array with four
26 Featuresphysical drives and a RAID 5 logical drive, you may remove at most one drive since RAID 5 requires
at least three physical drives.
• If the array contains a RAID 1+0 logical drive, you may only remove an even number of drives.
• If the array contains a compound RAID (RAID 50 or RAID 60) logical drive, drives may only be
removed in multiples of the number of parity groups. For example, an array with 10 physical drives and
a RAID 50 logical drive may be shrunk by removing two or four disks only.
Mirror array
The Mirror Array operation allows you to double the number of data drives in the array and convert all
logical drives in the array to RAID 1 or RAID 1+0.
Keep the following points in mind:
• This option is only available if the array contains only RAID 0 drives.
• When the total number of data drives in the resulting array is two, the resulting RAID level is RAID 1.
When the total number of data drives is four or more, the resulting RAID level is RAID 1+0.
Heal array
The Heal Array operation allows you to replace failed physical drives in the array with healthy physical
drives. The original array and logical drive numbering is unaffected after the replacement. Note the
following conditions and restrictions for the Heal Array operation:
• The replacement physical drives and the original drives must be the same interface type (such as SAS
or SATA) as the original drives.
• The operation is available only if enough unassigned physical drives of the correct size are available.
• The array has at least one failed drive.
• The array is not transforming (for example, rebuilding to a spare).
• The array has a working cache, making it capable of transformation.
Logical drive transformations
Extend logical drive
Increase the capacity of an existing logical drive by specifying a new size. Once the task is performed,
use operating system partitioning software to take advantage of the extended space available.
Migrate RAID level
The migrate RAID level feature allows you to change the current level of fault tolerance (RAID type) for
your logical drive. When the fault tolerance changes, you may have more or less unused space,
depending on the fault tolerance with which you started.
Migrate stripe size
The migrate stripe size feature allows you to change the current strip size for your logical drive. When the
strip size changes, you may have more or less unused space, depending on the strip size with which you
started. For migration to a larger stripe size to be possible, the array might need to contain unused drive
space. This extra space is necessary because some of the larger data stripes in the migrated array are
likely to be filled inefficiently.
Features 27Transformation priority
As the transformation priority level increases, the rate at which requests from the operating system are
processed decreases. Transformation refers to array expansions, logical drive extensions, logical drive
migrations, and array shrink and move operations.
• High: Transformation will complete as fast as possible at the expense of normal I/O.
• Medium: Transformation will perform with some impact on normal I/O.
• Low: Transformation will perform only when normal I/O is not occurring. This level will cause the
transformation to take the most time to complete.
Drive technology
Predictive drive failure
HPE Smart Array controllers use Self-Monitoring and Reporting Technology (S.M.A.R.T to inform the host
when a disk drive is experiencing abnormal operation likely to lead to drive failure.
S.M.A.R.T. places the monitoring capabilities within the disk drive itself. These monitoring routines have
direct access to internal performance, calibration, and error measurements for a specific drive type.
Online drive firmware update
The latest generation HPE Smart Array controllers support online drive flashing, which saves time when
updating disk drive firmware. Instead of taking the hard disk drive (HDD) offline before loading a new
firmware image, you can download an updated HDD firmware image to the HPE Smart Array controller
and update all of the HDDs the next time you reboot the server.
Dynamic sector repair
Disk drive media can develop defects caused by variances in the drive mechanisms under normal
operating conditions. To protect data from media defects, HPE built a dynamic sector repair feature into
HPE Smart Array controllers.
HPE Smart Array controllers:
• Perform a background surface analysis during inactive periods, continually scanning all drives for
media defects
• Detect media defects when accessing a bad sector during busy periods
• Automatically remap the bad sector to a reserve area on the disk drive
• (in a fault-tolerant configuration) Automatically regenerate the data and write it to the remapped
reserved area on the disk drive
Controller surface scan
Controller surface scan analysis is an automatic background process that ensures that you can recover
data if a drive failure occurs. The controller scanning process
• checks physical drives in fault-tolerant logical drives for bad sectors
• in RAID 5 or RAID 6 (ADG) configurations, verifies the consistency of parity data
28 FeaturesYou can disable the surface scan analysis, set it to high, or specify a time interval that the controller is
inactive before a surface scan analysis is started on the physical drives that are connected to it.
• Disabled: Disabling the controller surface scan can decrease the potential latency impacts that may
occur due to waiting for a scanning I/O to complete, but at the cost of not detecting the growth of bad
blocks on the media before a data loss situation.
• High: Setting the controller surface scan to high increases the probability of detecting a bad block
before it becomes a data loss situation.
• Idle: Setting the controller surface scan to idle and setting the corresponding surface scan delay can
decrease the potential latency impacts, but still allow the scanning of bad blocks during the idle time.
Parallel surface scan count allows the control of how many controller surface scans can operate in
parallel. This is used when there is more than one logical drive on a controller. This setting allows the
controller to detect bad blocks on multiple logical drives in parallel and can significantly decrease the time
it takes to detect back, especially for logical drives using very large capacity drives.
Shingled magnetic recording
Shingled Magnetic Recording (SMR) is a magnetic storage data recording technology for HDD that allows
up to 30% higher capacity by overlapping the previous drive tracks. Thus, the tracks partially overlap,
similar to roof shingles. The overlapping tracks slow down random write performance since the operating
system must perform a read modify write of the entire zone. SAS SMR drives use the Zoned Block
Command (ZBC) set. SATA SMR drives use the Zoned ATA Command (ZAC) set.
Host Aware (HA) Device Managed (DM)
Drives Host Managed (HM)
SAS SMR HBA Only (ZBC) HBA Only (ZBC) Not supported
SATA SMR HBA Only (ZAC) HBA Only (ZAC) SATA SMR + DM is not
supported
This method has the following benefits:
• Support for HDD with higher storage density
• Supports for HDD with lower cost per GB
• Support for HDD with lower power per GB
HPE SmartDrive LED
HPE SmartDrives are the latest Hewlett Packard Enterprise drive technology. Identify a SmartDrive by its
carrier, shown in the following illustration.
When a drive is configured as a part of an array and connected to a powered-up controller, the drive
LEDs indicate the condition of the drive.
Features 29You can also read