BEAUTY AND WELLNESS - CBSE Academic
←
→
Page content transcription
If your browser does not render page correctly, please read the page content below
BEAUTY AND WELLNESS
          JOB ROLE:     Beauty Therapist
           (QUALIFICATION PACK: Ref. Id. BWS/Q0102)

                STUDY MATERIAL
                       CLASS 12

PSS CENTRAL INSTITUTE OF VOCATIONAL EDUCATION
(a constituent unit of NCERT, under MHRD, Government of India)
          Shyamla Hills, Bhopal- 462 002, M.P., India

               http://www.psscive.ac.in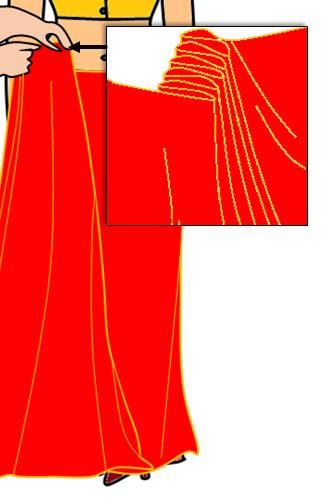
BWS – Beauty Therapist Page |2
COURSE OVERVIEW
A beauty therapist is a professionally trained individual who specialises in beauty services
of both the face and body. A beauty therapist performs various duties such as providing
skin care, applying makeup, removal of unwanted hair, manicure and pedicure services.
The Beauty Therapist needs to be knowledgeable on health, safety and hygiene, beauty
products, and a range of beauty services.
COURSE OUTCOMES: On completion of the course, students should be able to:
Identify skin type correctly;
Define skintone or undertone;
State features of various makeup products;
Identify various makeup products;
Apply makeup products correctly;
Explain the importance of colour wheel in the makeup;
Define terms like hue, tint, shade, tone, complementary colours, warm colours,
analogous colours and cool colours;
Perform tests to identify skin tone;
Describe various makeup removal methods;
Explain the importance of facial steaming;
List benefits of steaming;
Use correct electrical brush for deep cleansing;
Perform galvanic electro- facial skin treatment;
Use lymphatic drainage machine;
Carryout ultrasonic exfoliation;
State the importance of personal grooming;
State the responsibilities of a receptionist;
Schedule an appointment with a client;
Maintain reception area as per salon standards;
State various methods of payment;
Handle financial transactions effectively; and
Create a positive impression at the workplace.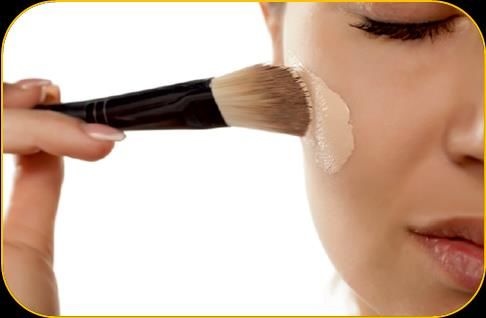
BWS – Beauty Therapist                          Page |3

 CONTENTS
UNIT 1: MAKEUP SERVICES
SESSION 1: BASIC SKIN TYPES AND SKIN TONES
SESSION 2: MAKEUP PRODUCTS
SESSION 3: SELECTION AND APPLICATION OF RIGHT MAKEUP
PRODUCTS TO ENHANCE FACIAL FEATURES
SESSION 4: THE COLOUR WHEEL
SESSION 5: BASIC BINDI DESIGNS
SESSION 6: DRAPING
SESSION 7: MAKEUP REMOVAL METHODS
UNIT 2: FACIAL BEAUTY SERVICES
SESSION 1: FACIAL STEAMER
SESSION 2: ELECTRO FACIAL SKIN TREATMENT
UNIT 3: SALON RECEPTION DUTIES
SESSION 1: CLIENT CARE
SESSION 2: MAINTAIN RECEPTION AREA
SESSION 3: PROCESS PAYMENTS
UNIT 4: CREATING POSITIVE IMPRESSION AT WORK PLACE
SESSION 1: CREATING POSITIVE IMPRESSION AT WORK PLACE
GLOSSARY
FURTHER READING
BWS – Beauty Therapist                       Page |4

                 Sector: Beauty &Wellness
                Job Role: Beauty Therapist

                         UNIT 1: MAKEUP SERVICES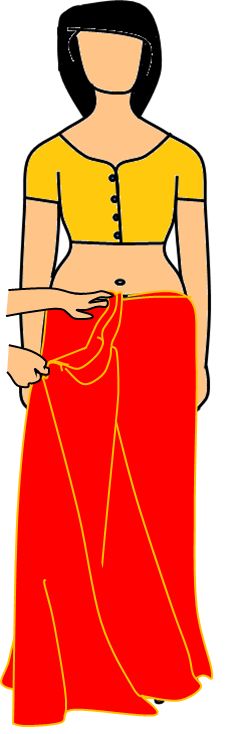
BWS – Beauty Therapist Page |5
UNIT 1: MAKEUP SERVICES
LEARNING OUTCOMES
On completion of this unit the student will be able to:
Identify skin types accurately;
Explian ‘skin tone’ and ‘undertone’;
List various products required for the makeup;
Select right products based on the skin type and client’s requirement;
Apply foundation, concealer, face powder, blusher, highlighter,
shader, eyeshadow, eyeliner and lipstick;
Explian the importance of colour wheel and state its significance in
the makeup;
Distinguish between primary colours, secondary colours and tertiary
colours;
Perform tests to identify skin undertone;
Identify some commonly used bindi designs; and
Use various makeup removal methods.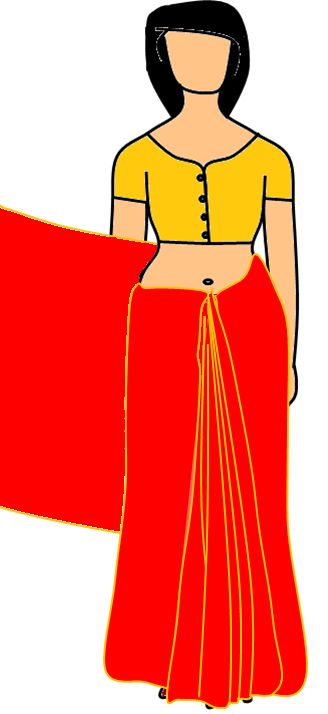
BWS – Beauty Therapist Page |6 INTRODUCTION The Beauty and Wellness Industry in India is growing at a CAGR of 18.6 % and is likely to reach the 100,000 crore mark soon. Increased emphasis on a holistic wellbeing with people's desire to look good and young are other motivators for the Beauty and Wellness Industry. Employment in Beauty and Wellness sector is expected to grow at a CAGR of 20%, with 23% in organised and 15% in unorganised segments with a shortage of over 600,000 skilled personnel by the end of 2016. With a shift in focus towards the quality of service, the industry has been looking to hire a skilled workforce to sustain growth. A Beauty Therapist provides various skin care and makeup services to enhance facial features using a range of products. The makeup services should suit the client's requirement and skin type.The skin may be broadly categorised as normal skin; dry skin; sensetive skin; mature skin; oily skin and combination skin. The beauty therapist should also be aware of various types of products and most popular brands. To achieve the desired results, the products have to be applied in a particular sequence. A makeup artist is required to suggest suitable colour based on the skintone and complexion. Therefore it is important to understand how the colour wheel works. This unit describes the following topics: Basic skin types and skin tones Various makeup products How to select and apply right makeup product to enhance facial features Various bindi designs Draping techniques Makeup removal methods
BWS – Beauty Therapist Page |7
SESSION 1: BASIC SKIN TYPES AND SKIN TONES
LEARNING OUTCOMES
On completion of this unit the student will be able to:
List various types of skin;
Explain features of various skin types;
Identify skin type correctly; and
Describe ‘Skin tone’ and ‘Undertone’.
Basic skin types
A Beauty Therapist should be aware of basic skin types to provide effective skin care
services. The following are the general types of skin:
Normal skin
Dry skin
Allergic and Sensitive skin
Matured skin
Oily skin
Combination skin
Normal skin Dry skin
- Generally, the pH of skin ranges from 5.5 - Dry skin is due to lack of lubrication
to 5.8. from the sebaceous glands.
- Very rare to find such type of skin. - Dry skin can be identified by the fine
- It is a balance between the dry and oily lines around the eyes and the mouth.
skin. - Skin loses elasticity slowly with the
- Normal skin has healthy colour and is age.
soft.
- The skin has a translucent glow.
Allergic and Sensitive skin Oily skin
- Very sensitive to cold, heat and wind. - This type of skin is thicker and coarser
- The skin becomes allergic and sensitive than other types of skins.
because of broken capillaries and results - It has a tendency to develop open
in rashes or irritation through strong pores, pimples, blackheads, papules
preparation. and pustules.
- Oily skin can be found around the nose
and chin.
- Oily skin is the result of clogging of
sebaceous glands causing sluggish
circulation.
Matured Skin Combination skin
- It is very similar to dry skin in - This type of skin is very common.
appearance. - This can be identified by the oily centre
- Appears parched, saggy and dehydrated. panel or T- zone with pores and slight
- Skin is deeply lined and loose. oil.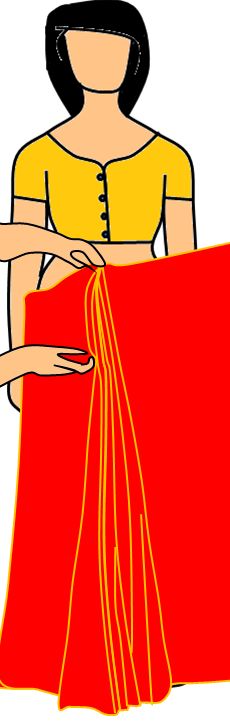
BWS – Beauty Therapist                                              Page |8

Basic skin tone
‘Skin tone’ also called as ‘Undertone’ describes the shade of the skin. It is different to the
skin complexion. The shade of the skin may be light, medium or dark.
The undertone will remain the same irrespective of the weather conditions or exposure to
various climatic conditions.
The skin tone will help in selecting the right lipstick colour and which colours are most
suited for the makeup.
BWS – Beauty Therapist Page |9 SESSION 2: MAKEUP PRODUCTS LEARNING OUTCOMES On completion of this unit, the student will be able to: List various products required for makeup; Identify various types of foundation and explain their features; Explain the necessity for blusher, shader and highlighter; State the purpose of using mascara; List various types of eyeshadows; and Identify various types of eyeliners and state their features. Introduction A beauty therapist uses various products to provide makeup service as per the client’s needs. Some of the commonly used makeup products are: 1. Foundation 2. Blusher 3. Mascara 4. Eyeshadow 5. Eyeliner In this unit, we will study various products, their types and application. Foundation Foundation is applied to achieve smooth and even complexion. Foundation can be applied to eye makeup, cheeks or lips. The right shaded foundation will disappear into the face. A beauty therapist is required to select right type and brand of the foundation so that it can go well with makeup.
BWS – Beauty Therapist                                               P a g e | 10

Types of Foundation

   1. Liquid (Cream) foundation
   2. Tinted moisturiser
   3. Oil based foundation
   4. Sheer foundation
   5. Matte or oil free foundation
   6. Mousse or whipped foundation
   7. Stick foundation
   8. Powder or compact foundation
   9. Shimmer foundation
   10. Waterproof foundation
   11. Foundation primer

Liquid (Cream) foundation
Cream foundation is suitable for Normal or Dry skin. It
provides heavy coverage. Liquid foundation is available
in many specialised versions such as oil-free, oil-based,
waterproof, etc.

Tinted moisturiser
Tinted moisturisers are used to cover up some
unevenness and provide light coverage. These are best
suited for women with pretty good skin.

 These are best suited for warmer months where little
coverage and moisturising effect is required.

Oil-based foundation makeup
This type of foundation is best suited for dry skin and
provides temporary ‘plump up’ skin effect. This also acts
as the moisturiser.
Oil- based foundation makeup can be used for older
women to minimise the appearance of fine lines and
wrinkles.
Sheer foundation
The sheer foundation is used for normal or dry skin. This provides the appearance that no
foundation is applied at all. This type of foundation provides light coverage.
Many sheer foundations contain SPF 40, which is helpful in providing sun protection.
“Matte” or "Oil-free" foundation
The base for such foundations is water and not oil. This is best suited for oily skin. Oil-free
foundations dry very quickly.
To add additional layers, a moisturiser or foundation primer is required.
BWS – Beauty Therapist P a g e | 11 Mousse or Whipped foundation This is a liquid foundation with air whipped in. Such foundations provide perfect matte finish and weightless feel. This is best suited for all types of skin. Stick foundation The coverage is heavy and is perfect for covering up blemishes, scars, reddened areas and dark under-eye circles. They are best suited for normal to oily skin. It is recommended to apply stick foundation only to the problem area. Rest area can be covered by regular liquid or cream foundation. Powder ( Compact) foundation It makes a great foundation for women who want on- the-go portability. It is a combination of powder and foundation and available in various formulations. This is best suited for oily skin. Mineral foundation This foundation is best suited for the people interested in natural or organic makeup. Mineral foundations consist of natural minerals. This type of foundation can be used on sensitive/allergic skin. Waterproof foundation This foundation is suitable for humid areas and hot days. It is made to stay for a long time. A makeup remover is required to remove the foundation. Foundation primer This foundation is used to fill little cracks and pores. This facilitates application of foundation smoothly and seamlessly. Blusher Blushers are used to enhance the features of the face such as cheeks and eyes. There are different forms of blushers such as powders, creams, gels, mousses, sticks and liquids. Powder blush is very popular and commonly used. Cream blush is denser and consists of natural oils and moisturisers. Gel blush is best for oily skin Tint blush stays for a long time till the wish to remove the make up Shimmers are really important to provide a light glow over your face
BWS – Beauty Therapist P a g e | 12
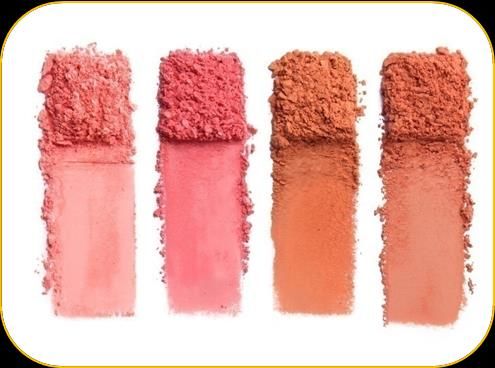
Types of Blush
1. Powder blush
2. Cream blush
3. Gel or fluid blush
Powder Blush Cream Blush
This is good for all types of skin. Powder Cream blush provides more strong shadow
blusher is applied after the face powder. than the powder blush. The best method to
Powder blush can be applied effortlessly apply cream blush is by using fingers. Cream
as compared to the liquid and cream blush consists of wealth moisturising or oil
blush. components. It is best suited for the dry skin
types.
This should be applied over the base but before
the powder. Cream blush is attractive for
evening makeup.
.
Gel or Fluid Blush
Gel blush adds the glow to the skin. This blush is
best suited for oily to the usual skin. The gel
blush is of fast-drying nature and thus it is hard
to disperse onto dry skin. The gel blush should
be applied over foundation or on the bare skin.
Mascara
Mascara cosmetic is used to enhance the eyelashes. It is used to darken, thicken, lengthen
or define the eyelashes.
Types of Mascara
1. Powder mascara
2. Cream mascara
3. Liquid mascaraBWS – Beauty Therapist P a g e | 13
Powder mascara
Water is added to the powder mascara. A
wand is required to apply this mascara. It
gives a false kind of eyelash finish.
Cream mascara
Mascara provides volume to thin and sparse
eyelashes and adds depth to the eyes.
Liquid mascara
Liquid mascaras are most commonly used by
women. It enhances and sharpens the lashes.
Eyeshadow
There are many forms of eyeshadows available in the market. These are available in various
forms such as powders, pencils, crayons, etc. Eyeshadows are made up of waxes, oils and
pigments to provide the colour.
Types of Eyeshadow
1. Powder eyeshadow
2. Cream eyeshadow
3. Liquid eyeshadow
4. Loose powder eyeshadow
5. Crayon eyeshadow
6. Baked eyeshadow
Powder Eyeshadow Cream Eyeshadow
- Available in various forms; pans, tubes
and sticks.
- Provides shimmery and long- wearing
formula.
- Cream eyeshadows should be avoided in
hot weathers as they will melt down.
Two or more colours can be combined to
give a rich look.
- This is the most commonly used eye
shadow.
- It is easy to blend.
- Available in various kind of finishes;
o Matte eyeshadow
o Shimmer eyeshadow
o Satin eyeshadow
- Never rub powder eyeshadow.
- Apply by gently patting and pressing the
colour onto the eyelid .BWS – Beauty Therapist P a g e | 14
Liquid Eyeshadow Loose powder Eyeshadow
- Perfect shadow for beginners.
- Apply directly onto the lids with the wand
or with a fine thin liner brush.
- Liquid eyeshadows dry quickly.
- Easy to apply.
- Used for advanced makeup.
- Not suitable for dry skin.
Crayon Eyeshadow Baked Eyeshadow
- Very easy to use since it is slid on the
lids.
- It can usually last up to 24 hrs.
- The eyeshadow is baked in an oven.
- It is ultra smooth and easily bendable.
Eyeliner
Eyeliner is used to define the eye area and to help accentuate the eye and lashes.
There are various forms of eyeliners available in the market.
Types of Eyeliner
1. Liquid eyeliner
2. Felt-tip eyeliner
3. Gel or Cream eyeliner
4. Kohl Pencil eyeliner
5. Kajal eyeliner
6. Regular pencil eyeliner
7. Mechanical twist–up eyelinerBWS – Beauty Therapist P a g e | 15
Liquid eyeliner Gel or Cream eyeliner
- There are two types of eyeliners namely, - It has waxy consistency and can be
brush tip and felt-tip marker. applied with the help of a brush or a q-
- The liquid eyeliner stays long. tip.
- This can be used when there is a
requirement of waterproof eyeliner.
Kajal eyeliner Kohl Pencil eyeliner
- These have an immediate benefit over the - It is known for creaminess.
pencil eyeliners. - Much easier to smudge around.
- This eyeliner is a like a dried out - It is used to create smokey eyes.
marker.
- This eyeliner
lasts much
more than any
other
eyeliners.BWS – Beauty Therapist P a g e | 16
SESSION 3: SELECTION & APPLICATION OF MAKEUP
LEARNING OUTCOMES
On completion of this unit, the student will be able to:
Suggest suitable makeup based on the skin type and occasion;
Select and apply right kind of foundation based on the skin type;
Apply face powder/loose powder over the foundation;
Use appropriate blusher/shader and highlighter;
State the importance of eyeshadow and use right eyeshadow based on
the client’s requirement; and
Select and apply the right type of lipstick.
Introduction
We have studied various products used in the makeup and their features, application and
suitability. In this section, we will study the method to apply various makeup products
such as:
Face
Blusher/Shader/
Foundation Concealer Powder/Loose
Highlighter
Powder
Eye shadow Eyeliner Lip Pencil Lipstick
Application of Foundation
Step 1: Decant Foundation from the container
onto a pallet.
Step 2: Match the foundation with the client’s
skin tone using damp sponge or fingers.
Step 3: Cover the eyelids and lips.
Step 4: Apply green cover stick/concealer before
the foundation if you have any pimples or red
areas.
Step 5: Squeeze out some foundation onto your
spatula and apply onto your hand
Step 6: If you are using your hand for applying
foundation then apply a dot on the forehead, cheeks, nose and chin and jawline and spread
it evenly.
Step 7: Take your foundation brush and blend the foundation in downwards stroking
movements. Ensure that no makeup is visible and all is blended in well.
Step 8: Remove extra Foundation around the hairline and eyebrow by using a damp cotton
wool pad.
Step 9: If needed apply a colour wash after the Foundation. This will give glaze over the
skin.BWS – Beauty Therapist P a g e | 17
Application of Concealer
Concealers are used to improve or correct
imperfections of the skin.
Step 1: Apply concealer to the relevant area
with a cotton brush or cotton bud.
Step 2: Press into the skin with a dry
sponge.
Step 3: Apply coloured concealer only to the
area where it is required.
Application of Facepowder/Loose powder
Powders help to conceal and set the
foundation and prevent shine and smearing
of the underlying makeup. There are special
ingredients in some powders that help to
cover blemishes, such as zinc oxide, they
also tend to be heavier and a stronger
compact.
Step 1: Tip a small amount of loose face
powder into a bowl.
Step 2: If using block powder, scrape a
small amount off with a palette knife into a bowl.
Step 3: Apply with dry cotton wool; work downwards covering the eyes and all of the face.
Ensure that no makeup is visible and all is blended in well.
Benefits of loose translucent powder:
Loose powder creates a more natural look.
It sets the basis of your make-up – foundation, cover stick.
It creates a more matte appearance.
It blots any oiliness.
Application of Blusher/Shader/Highlighter
Rouge also called blush or blusher, is a cosmetic typically used to redden the cheeks so as
to provide a more youthful appearance and to emphasise the cheekbones.
There are 2 types of blush:
1. Compact blush
2. Cream blushBWS – Beauty Therapist P a g e | 18 Step 1: Use a spatula to remove the blusher from the container. Step 2: Apply shader or darker blusher, always start with a minimum amount and then add to it. Step 3: Apply the blusher using a clean brush along the cheekbones; never take the blusher in towards the nose. Step 4: Place the brush in the middle of the area that you are going to cover and blend back and forth. Application of Eyeshadow Eyeliners are categorised into three groups namely: Highlighters: Cream, white, beige colours (very light and neutral) Medium colours: Like blue, green, brown, grey, pink, etc. Eyeliner colours: Black, dark brown, grey. Matte colours: Creates a good illusion. Glittery/shiny colours: Let the illusion disappear. Step 1: Analyse the eye shape so that you know how to correctly apply the eyeshadow Step 2: Scrape the powder onto the palette. Step 3: Using eyebrow brush, brush eyebrows in an upwards direction. Step 4: Then take the brush and “drag” down any hair that may be out of their place. Step 5: Apply the lightest powder first. Step 6: Apply over the entire eyelid and the brow area. Step 7: Dust loose powder under the eye using a tissue to prevent the shadow falling into the foundation. Step 8: Apply the contrasting shade, this may be applied to the socket and blended outwards and upwards. As a practice darkest colour is applied in the last phase.
BWS – Beauty Therapist                                                 P a g e | 19

Application of Eyeliner

Eyeliner is used to define the eye area and to
help accentuate the eye and lashes.

Step 1: Cake eyeliner should be applied with a
fine wet brush.
Step 2: Liquid eyeliner should be used with a
disposable brush.
Step 3: Never apply to the whole of the eyes as
this will make the eyes appear heavy and small.

Application of Lip pencil

Step 1: Start at the cupids bow in light strokes
and follow the upper lip to the outer corners,
then work from the centre on the lower lip.
Step 2: Darken if necessary.

Application of Lipstick

Step1: Firstly start off by applying foundation, a bit of cover
stick and lots of powder onto your lips. This will set the base for
your makeup.
Step 2: Take a lip liner pencil, similar to the lipstick colour that
you are going to use and apply it either just inside your natural
lip line if you have full lips, or just on the outside of your
natural lip line for smaller lips.
Step 3: Take your lipstick colour and apply it with your lipstick
brush.
Step 4: Apply some powder over this.
Step 5: Repeat steps 2 and 3.
BWS – Beauty Therapist P a g e | 20
SESSION 4: THE COLOUR WHEEL
LEARNING OUTCOMES
On completion of this unit, the student will be able to:
State the importance of colour wheel in the makeup;
Distinguish between primary, secondary and tertiary colours;
Define important terms like hue, tint, shade, tone, complimentary
colours, analogous colours, warm colours and cold colours;
Perform vein test and old jewellery trick to understand the undertone;
and
List various bindi designs and suggest suitable bindi design to the
client.
Introduction
A makeup artist is required to suggest clients suitable colours based on the skintone and
complexion. Some colours may look good for a particular skin complexion.
Therefore, it is important to understand how colours work. The theory of colour
combination is best understood by studying the colour wheel.
In the session, we will take you through the colour wheel.
Primary colours
Primary colours are red, yellow and blue. These colours make up
all of the other colours on the spectrum. Yellow + Blue= Green
Red + Blue = Voilet
Secondary colours Yellow + Red= Orange
Secondary colours can be obtained by mixing the primary
colours together.BWS – Beauty Therapist P a g e | 21 Tertiary colours Colours on either side of the secondary colours are called as tertiary colours. For example, red-violet or blue-violet, which can be obtained by adding a little more of the closest primary colour. Terms 1. Hue Hue can be defined as,"The degree to which a stimulus can be described as similar to or different from stimuli that are described as red, green, blue and yellow". Hue is represented quantitatively by a single number. Hue corresponds to an angular position around a central or neutral point or axis on a colourspace coordinate diagram (such as a chromaticity diagram) or colour wheel, or by its dominant wavelength or that of its complementary colour. Brightness and density of the colours can be adjusted by adding white or black or grey colour to the primary colours. By this way, we can get pastel and muted colours. 2. Tint The tint is defined as the mixture of a colour with white. Tint increases the lightness of a colour. Lavender can be obtained by adding white to intense purple. 3. Shade Shade is the mixture of a colour which reduces lightness. To obtain a deeper, richer red black is added to the bright red. 4. Tone The‘True tone’ is the combination of any hue with the addition of pure grey. 5. Complimentary colours The colours that are opposite to each other on the colour wheel are called as complimentary wheels.
BWS – Beauty Therapist                                                       P a g e | 22

6. Analogous or similar colours
The colours that are found right next to each other on the colour wheel are called as
Analogous colours.

7. Warm colours
Colours with red, orange or yellow
undertones. Warm colours are bright
and energetic and tend to pop
forward.
8. Cool colours
Colours with blue or red undertones.
Cool colours are more soothing and
tend to recede a bit more.

Significance of colour wheel to makeup
We have seen that the colours are broadly classified as ‘Warm’ or ‘Cool colours’. It is to be noted here
that the undertone has a major impact on the colour scheme for the makeup.

Thre are two simple ways to determine the undertone.

1. Vein test

Observe for the vein colours under the wrist. If the vein appears blue in colour, then the
undertone is categorized under warm undertone. Warm clours should be used for makeup.
If the vein appears green, then it is to be interpreted as a cool undertone. A makeup artist
should use cool colours for the makeup.

2. The Old Jewellry Trick
The undertone can also be determined whether the client looks good in gold or silver. If the
client looks good in gold ornaments, then the undertone is warm. If silver ornaments are
suitable for the client, the undertone is cool.
The colour wheel helps in identifying the suitable colour for the foundation, conceal, blush,
eyeliner and lipstick.
The basic rule is to stick to cool colours for cool undertone and warm colours for warm
undertone.
BWS – Beauty Therapist P a g e | 23
SESSION 5: BASIC BINDI DESIGN
LEARNING OUTCOMES
On completion of this unit the student will be able to:
List various bindi designs and suggest suitable bindi design to the
client.
Introduction
Bindi is a symbol tradition and style and adds
charm to overall personality. Bindis are available
in various designs, shapes, sizes and colour.
1. Snake style bindi
This style will help to look wild and fashionable. It is a very popular design.
2. Letter style bindi
This type of bindi adds little fun to the bindi style.BWS – Beauty Therapist P a g e | 24 3. Questionmark style bindi This bindi design provides fetish, freaky look. 4. Designer bindi This bindi style goes well with designer sarees. 5. Tribal style bindi This is best suited for long skirts and tribal print tops. 6. Flower style bindi This a simple bindi design. Looks beautiful when worn with embroidered kurtis and Salwars.
BWS – Beauty Therapist                                               P a g e | 25

7. Party wear bindi design
This bindi style looks best when worn with black sarees, lehengas and sequins work
salwars.

8. Half moon style bindi design
Looks best on square, long and heart-shaped faces.

9. Sun style bindi design
   A form of bindi style that represents the divine form of energy, the Sun.
BWS – Beauty Therapist P a g e | 26
SESSION 6: DRAPING
LEARNING OUTCOMES
On completion of this unit, the student will be able to:
Drape saree using Nivi style; and
Drape lehenga and dupatta.
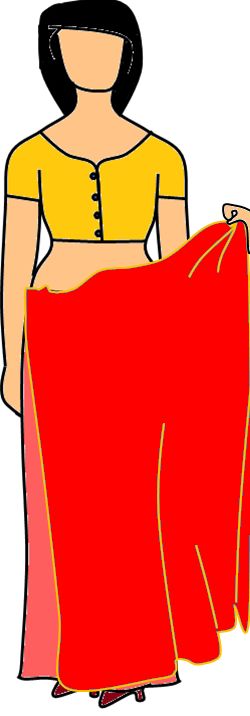
Draping a Saree in Nivi Style or Air hostess Style
First figure out the innermost and outermost part of the Saree as well as the lower
and upper end of the Saree.
Ensure that the Saree is creasefree.
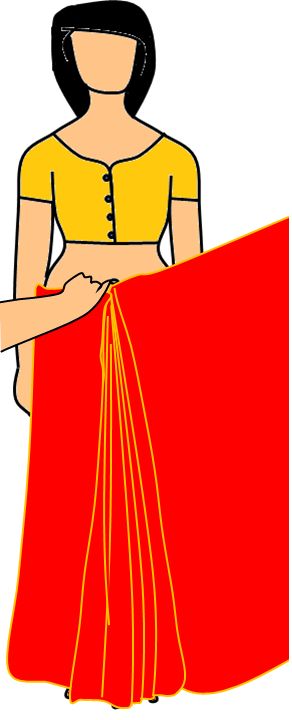
Step 1: Have the client put on the Step 2: Tuck the innermost Step 3: Wrap the saree
underskirt (petticoat), Blouse and and upper end of the Saree from right to left around
footwear. Check that underskirt is into underskirt at the waist the lower body once. Keep
tightly tied and that there are no in the front. tucking the saree at the
wrinkles in the front. waist in a manner that
there are no wrinkles in the
length of the saree.BWS – Beauty Therapist P a g e | 27
Step 4: Now gather the saree into Step 5: Check that the Step 6: Tuck the topmost
6-7 pleats of the same size which pleats are in order along the 3-5 inches into the skirt,
would be between of about 4 to 6 length of the saree. just below the navel.
inches in width depending on the Ensure that the saree
fall of the saree. reaches floor but does not
touch it.
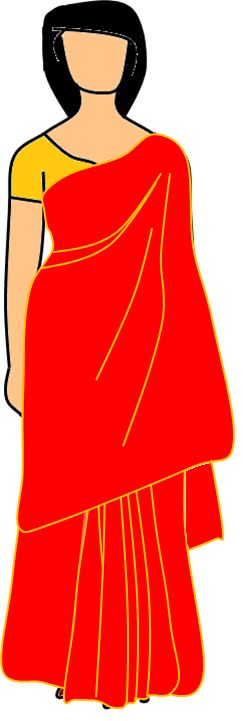
Step 7: Drape the saree once Step 8: Take it diagonally Step 9: The pallu is 3 to 5
more, left to right around the across the upper body and feet in length as per theBWS – Beauty Therapist P a g e | 28
hip without tucking and bring drape over the shoulder. The height and preference of the
it round to the front. rest falls freely down the back client.
from the shoulder and is
called the pallu.
Adjust the edge of the Saree at the back and front to ensure that the Edge is smooth
and the folds of the pleats are straight and symmetrical and the midriff is
adequately covered as per the client’s preference
Most people prefer to pin up the saree as various points to maintain the symmetry of
the folds and pleats as well as keep the saree securely in place. The saree can be
pinned at the pleats tucked in front at the waist or at the shoulder where the pallu
begins its fall at the back. The pleats of the pallu can also be pinned at the shoulder
and sometimes a pin is used to gather the pleats in front from inside the saree.
The Pallu can be left to hang down the shoulder in pleats or without pleats. It can
also be wrapped around and tucked into the waist or draped it over the right
shoulder or the edge can cover the head in a graceful manner.BWS – Beauty Therapist P a g e | 29 How to drape a Lehenga Dupatta 1. Tie on wrist: Make pleats on the dupatta and place the pleats on the right shoulder such that the outmost end of the Dupatta falls off the shoulder and reaches a little below the knees. While placing the dupatta on the shoulder ensure that the open end of the uppermost pleat is facing out and the folded part in facing the neck. Secure the pleats at the shoulder with a safety pin that is fixed from inside the shirt, so that it is not visible. Take the upper corner of the opposite end of the dupatta and fold it around the left wrist in a loop such that only the border is visible. Secure the loop around the wrist with a safety pin. Allow the lower corner to fall grace fully from the wrist. 2. The Half Sari: This style is used in South India. Dupatta is wrapped around the waist. Tuck one corner of the dupatta in the waist at right side. Wrap the dupatta around the waist. Pleat the other end and secure it on the left shoulder in a such a way that the end falls gracefully down the back and reached till below the knee. Ensure that the dupatta makes a V at back and is wrapped tightly. 3. The V pallu: This is a Gujarati /Rajasthani style. Tuck one corner of the dupatta in left side of the lehenga Make pleats at the other end and secure it with a pin on the right shoulder. Let it fall till in front till the knee. Take the inner corner of dupatta falling in front and put it on your left shoulder. Make sure there is a V in front. Secure the V on top side with a pin.
BWS – Beauty Therapist P a g e | 30
SESSION 7: MAKEUP REMOVAL METHODS
LEARNING OUTCOMES
On completion of this unit, the student will be able to:
Describe various makeup removal methods; and
Remove makeup using wipes, toner, micellar water, cold cream and
cleansing oil.
Introduction
In this session, we will study various makeup removal techniques.
Makeup Removal Techniques
1. Using Wipes or Towelettes
2. Using Toner
3. Using Micellar Water
4. Using Cold Cream
5. Using Cleansing Oil
Makeup removal methods
Wipes or towelettes
This technique is best suited for daily use and
acts as pre-step for cleansing. These wipes can
remove foundation, concealer and eyeshadow.
These wipes are easy to carry and can be used to
maintain fresh face while travelling. It is suggested
to use alcohol- free wipes as they are less likely to
dry the skin.
Using a Toner
Toner act as pre-step to cleansing to remove
makeup. Toners provide clean skin and refresh
skin complexion. To use a toner, a cotton pad is
required. Add few drops of toner to the cotton pad
and gently wipe the skin.
It is better to use non-drying, alcohol-free toners.
Such toners help against the moisture loss.BWS – Beauty Therapist P a g e | 31 Using Micellar Water This method was invented by Persians and currently most popular in the United States. Micellar water removes makeup, cleanse and hydrate the skin at the same time. It is a perfect product to achieve the fresh face on the go. This product is recommended for the clients with dry skin. Micellar water attracts makeup and dirt like a magnet. Add few drops of micellar water to the cotton swab and swipe across the skin to remove the makeup and dirt. Using Cold Cream A cold cream can also be used to remove makeup. Cold cream is an emulsion of mineral oil, water and wax. To remove the makeup, dip a wipe in the cream and swipe across areas of heavy makeup like face, eyes, cheeks, nose and forehead. Cold creams also act as a moisturiser. Using Cleansing Oil The cleansing oil is required to remove heavy eye make and for dry skin. However, it is to be noted that cleansing oil is best suited for all skin types. Apply a few drops to a cotton pad and dab across the skin. The cleansing oil is less harsh on the dry skin especially the delicate dry skin around the eye. Wash the cleansed area with warm water to remove the oil and follow with regular cleanser.
BWS – Beauty Therapist P a g e | 32 PRACTICAL EXERCISE Activity 1: Select and apply right foundation Materials Required: The following resources are required: Pallet Suitable foundation Concealer Spatula Step by Step Procedure: The step by step procedure is explained below. Step 1: Decant Foundation from the container onto a pallet. Step 2: Match the foundation with the client’s skin tone using damp sponge or fingers. Step 3: Cover the eyelids and lips. Step 4: Apply green cover stick/concealer before your foundation if you have any pimples or red areas. Step 5: Squeeze out some foundation onto your spatula and apply onto your hand. Step 6: If you are using your hand for applying foundation then apply a dot on the forehead, cheeks, nose and chin and jawline and spread it evenly. Step 7: Take your foundation brush and blend the foundation in downwards stroking movements. Ensure that no makeup is visible and all is blended in well. Step 8: Remove extra Foundation around the hairline and eyebrow by using a damp cotton wool pad. Step 9: If needed, apply a colour wash after the Foundation. This will give glaze over the skin. Activity 2: Apply concealer Materials Required: The following resources are required: Pallet Suitable foundation Concealer Spatula Step by Step Procedure: The step by step procedure is explained below. Step 1: Apply concealer to the relevant area with a cotton brush or cotton bud. Step 2: Press into the skin with a dry sponge. Step 3: Apply coloured concealer only to the area where it is required. Activity 3: Apply face powder/loose powder Materials Required: The following resources are required: Bowl Loose face powder Palette knife
BWS – Beauty Therapist P a g e | 33 Dry cotton wool Step by Step Procedure: The step by step procedure is explained below. Step 1: Tip a small amount of loose face powder into a bowl. Step 2: If using block powder, scrape a small amount off with a palette knife into a bowl. Step 3: Apply with dry cotton wool; work downwards covering the eyes and all of the face. Activity 4: Apply eyeshadow Materials Required: The following resources are required: Eyeshadow Palette Brush Step by Step Procedure: The step by step procedure is explained below. Step 1: Analyse the eye shape so that you know how to correctly apply the eyeshadow. Step 2: Scrape the powder onto the palette. Step 3: Using eyebrow brush, brush eyebrows in an upwards direction. Step 4: Then take the brush and “drag” down any hair that may be out of their place. Step 5: Apply the lightest powder first. Step 6: Apply over the entire eyelid and the brow area. Step 7: Dust loose powder under the eye using a tissue to prevent the shadow falling into the foundation. Step 8: Apply the contrasting shade, this may be applied to the socket and blended outwards and upwards. Activity 5: Apply eyeliner Materials Required: The following resources are required: Eyeliner Disposable brush Step by Step Procedure: The step by step procedure is explained below. Step 1: Cake eyeliner should be applied with a fine wet brush. Step 2: Liquid eyeliner should be used with a disposable brush. Step 3: Never apply to the whole of the eyes as this will make the eyes appear heavy and small.
BWS – Beauty Therapist P a g e | 34 Activity 6: Apply Lipstick Materials Required: The following resources are required: Lipstick Step by Step Procedure: The step by step procedure is explained below. Step 1: Firstly start off by applying foundation, a bit of cover stick and lots of powder onto your lips. This will set the base for your makeup. Step 2: Take a lip liner pencil, similar to the lipstick colour that you are going to use and apply it either just inside your natural lip line if you have full lips or just on the outside of your natural lip line for smaller lips. Step 3: Take your lipstick colour and apply it with your lipstick brush. Step 4: Apply some powder over this. Step 5: Repeat steps 2 and 3.
BWS – Beauty Therapist                            P a g e | 35

 CHECK YOUR PROGRESS

   1. State features of oily skin.

   2. Define ‘skin tone' and ‘undertone’.

   3. List products required for the makeup.

   4. Why a ‘foundation’ is used in the makeup?
BWS – Beauty Therapist                                          P a g e | 36

   5. List various types of foundation used in the makeup.

   6. What is the purpose of using a ‘blusher’ in the makeup?

   7. Which product is used to define eyelashes?

   8. List commonly used eyeliners?

   9. Explain the step by step process to apply foundation.
BWS – Beauty Therapist                                P a g e | 37

   10. Name primary colours.

   11. Define ‘Hue’ and ‘Shade’

   12. List commonly used methods to remove makeup.

   13. Choose the most appropriate answer.
          a. The pH of the normal skin ranges from
                  i. 5.5 to 5.8
                  ii. 6.5 to 7.5
                 iii. 4.5 to 3.5
                 iv. 2.5 to 3.4
          b. Dry skin is due to the lack of
                  i. Heat
                  ii. Cold
                 iii. Lubrication
                 iv. None of the above
          c. Undertone defines the skin complexion
                  i. True
                  ii. False
BWS – Beauty Therapist P a g e | 38
d. Foundation is used to
i. Removes dead cells
ii. Moisturise the skin
iii. Provide shading effect
iv. Achieve smooth and even complexion
e. Cream foundation is suitable for
i. Oily skin
ii. Matured skin
iii. Combination skin
iv. Normal or Dry skin
f. Powder blush is suitable for
i. Oily skin
ii. Normal skin
iii. Allergic skin
iv. All of the above
g. The colour that are found next to each other are called as
i. Complex colour
ii. Analogous colours
iii. Both (a) and (b)
iv. Neither (a) nor (b)
14. Fill in the blanks
a. ………………….. type of skin is thicker and coarser that other types of skin.
b. Skin tone is also called as…………………………….
c. ………………………is applied to achieve smooth and even complexion.
d. ……………………..type of foundation is suitable for humid and hot days.
e. ------------------------primer is used to fill little cracks and pores.
f. Blushers are used to enhance the features of the face such
as…………………and……………………………..
g. …………………….is used to draken, thicken,lenthen or define eyelashes.
h. …………………….is used to apply concealer.
i. Two common types of blush are……………..and……………….
j. Primary colours are……………………..,…………………..and…………….
k. The colours that are opposite to each other are called as……………………BWS – Beauty Therapist P a g e | 39
15. Say True(T) or False(F)
a. Primary colours are orange, green and yellow. (T/F)
b. The combination of yellow and blue leads to green colour. (T/F)
c. Shade is the mixture of a colour which reduces lightness. (T/F)
d. Colours that are next to each other are called as ‘complimentary colours’.
(T/F)
e. Colours with red, oragnge or yellow undertone are called as ‘warm colours’.
(T/F)
f. Wipes provide clean skin and refresh skin complexion.(T/F)
g. Micellar water removes makeup, cleanse and hydrate the skin at the same
time. (T/F)BWS – Beauty Therapist P a g e | 40
GLOSSARY
Term Description
Allergic and Sensitive skin Very sensitive to cold, heat and wind.
Analogous colours The colours that are found right next to each other on the
colour wheel are called as Analogous colours.
Blusher Blushers are used to enhance the features of the face
such as cheeks and eyes.
Combination skin This can be identified by the oily centre panel or T- zone
with pores and slight oil.
Complimentary colours The colours are opposite to each other on the colour
wheel are called as complimentary colours.
Cool colours Colours with blue or red undertones.
Dry skin Dry skin is due to lack of lubrication from the sebaceous
glands.
Eyeliner Eyeliner is used to define the eye area and to help
accentuate the eye and lashes.
Foundation Foundation is applied to achieve smooth and even
complexion.
Foundation Primer This foundation is used to fill little cracks and pores.
Hue Hue can be defined as, "The degree to which a stimulus
can be described as similar to or different from stimuli
that are described as red, green, blue and yellow".
Liquid (Cream) Foundation Cream foundation is suitable for Normal or Dry skin.
Mascara Mascara cosmetic is used to enhance the eyelashes.
Matured Skin Appears parched, saggy and dehydrated.
Normal skin It is a balance between dry and oily skin.
Oil-based Foundation Makeup This type of foundation is best suited for dry skin and
provides temporary ‘plump up’ skin effect.
Oily skin This type of skin is thicker and coarser than other types
of skins.
Primary colours Primary colours are red, yellow and blue.
Secondary colours Secondary colours can be obtained by mixing the primary
colours together.
Shade Shade is the mixture of a colour which reduces lightness.
Tertiary colours Colours on either side of the secondary colours are called
as tertiary colours.
Tint The tint is defined as the mixture of a colour with white.BWS – Beauty Therapist P a g e | 41
Tinted Moisturiser Tinted moisturisers are used to cover up some
unevenness and provide light coverage.
Tone The ‘True tone’ is the combination of any hue with the
addition of pure grey.
Undertone Describes the shade of the skin.
Warm colours Colours with red, orange or yellow undertones.BWS – Beauty Therapist P a g e | 42
Sector: Beauty & Wellness
Job Role: Beauty Therapist
UNIT 2: FACIAL BEAUTY SERVICESBWS – Beauty Therapist P a g e | 43
UNIT 2: BASIC DEPILATION SERVICES
LEARNING OUTCOMES
On completion of this unit, the student will be able to:
Explain the significance of facial steaming;
Perform facial steaming using a steamer;
Describe various methods of electro facial skin treatment;
Use an electric brush effectively for deep cleansing;
Carryout galvanic electro facial skin treatment;
Use a lymphatic drainage facial machine; and
Carryout ultrasonic exfoliation.BWS – Beauty Therapist P a g e | 44
INTRODUCTION
We are introducing a new treatment method ‘Cosmetic electrotherapy’ also called ‘Electrical
– Facial- Skin – Treatment’ in this unit.
Low electric current is passed through the skin to achieve many therapeutic effects like
muscle toning and micro-lifting of the face. The history of cosmetic electrotherapy dates
back to 19th century.
Electrical current enhances the skin quality and also improves the effectiveness of various
skin care products.
Based on the type of current and use, cosmetic electrotherapy can be classified into 4 types:
Galvanic treatment
Neuromuscular Electrical Stimulation (NMES)
Micro-current electrical neuromuscular stimulation (MENS)
High–frequency treatment
There are some minor differences in the working process of each of the Electrical-Facial-
Skin Treatment. The basic process involves the use of positive or negative poles or both to
get required end results.
In this unit, we will study the following:
Facial Steaming
Use of electrical brush for deep cleansing
Galvanic electro-facial skin treatment
Lymphatic drainage facial machine
Ultrasonic exfoliationBWS – Beauty Therapist P a g e | 45
SESSION 1: FACIAL STEAMER
LEARNING OUTCOMES
On completion of this unit, the student will be able to:
State the importance of facial steaming;
List the benefits of steaming; and
Perform face steaming using a face treatment.
Introduction
Warm steam softens the surface of the skin by removing impurities, bacteria and dirt from
pores. Steaming the face is also a method of relaxing as it improves the circulation and
opens pores for further cleansing.
Benefits of steaming
The following are the benefits of steaming:
Keeps pores open
Loosens blackheads
Pushes out dirt
Sheds dead skin
Prevents pimples
Removes trapped makeup
Kills bacteriaBWS – Beauty Therapist P a g e | 46 How to Steam Face? Step 1: Boil the water in a pot or alternatively use a facial steamer. Step 2: Use a gentle cleanser to remove all makeup, dirt, oil or sweat. Never use harsh soap or scrub. Step 3: Add some essential oils or herbs to the boiling water.Ensure that the scents will evaporate. Step 4: Cover head with the towel such that it drops on either side of the face trapping the steam entirely. Place face close enough to let the skin feel that steam. It is to be ensured that steaming should not be done for more than 10 minutes.
BWS – Beauty Therapist P a g e | 47
SESSION 2: ELECTRICAL FACIAL SKIN TREATMENT
LEARNING OUTCOMES
On completion of this unit, the student will be able to:
Define cosmetic eletrotherapy;
List various cosmetic electro therapy methods;
Explian the use of electric brush;
Use electric brush for the skin treatment;
Describe galvanic electro facial skin treatment;
Perform galvanic electro facial skin treatment;
Explain the significance of lymphatic system;
Perform lymphatic drainage facial therapy; and
Carryout ultrasonic exfoliation.
Introduction
Electrical facial treatment is also called as ‘Cosmetic electrotherapy’. This includes a range
of beauty treatments wherein an electrical current is used through the skin to give different
therapeutic and cosmetic effects.
Electrical current enhances the skin quality and also improves the effectiveness of various
skin care products.
Some commonly used types of electrical skin care treatment are:
Galvanic treatment
Faradic treatment or Neuromuscular electrical stimulation
High-frequency treatment
Micro-current electrical neuromuscular stimulation
The outcome of each treatment is different. A particular type of treatment should be
selected based on the client’s requirement.
The process involves positive or negative poles or both to achieve the required benefits.BWS – Beauty Therapist P a g e | 48 Electric brush Facial cleansing brushes are used for more professional and deep cleansing. These brushes have become popular because they leave the skin completely free from imperfections and residue. Electric brushes have rotating heads driven by electricity. This works similarly to an electric toothbrush. These brushes are perfect for a deep cleansing treatment. Benefits Gently massage the skin to stimulate blood circulation Removes dead skin cells Skin can better absorb nutrients in any cream Better and deeper cleansing How to select a right brush? It is recommended to choose a brush with soft bristles. The brush should be rounded at the ends to avoid damage to the skin. The brush selected should be water resistant. Using an Electric Brush Step 1: Rinse the face with plenty of water and leave the skin wet. Step 2: Apply a little facial cleanser or gel. Step 3: Turn on the brush and move over the face in a circular manner. Step 4: Hold the brush on each area for at least a few seconds to cleanse that area properly. Step 5: After the treatment rinse the face with plenty of water and pat dry with a soft clean towel. Step 6: Apply usual moisturiser to hydrate the skin. Contra-indications This treatment is not suitable for the people with sensitive skin. This includes conditions which affect skin such as eczema, psoriasis and rosacea. Not at all advisable for people with varicose veins on their face.
BWS – Beauty Therapist P a g e | 49
Galvanic Electro-facial skin treatment
This treatment is most commonly used as cosmetic facial electrotherapy. Galvanic electro-
facial skin treatment carried out to ensure better extraction of skin impurities. This
treatment also enhances penetration of various skin care products.
A sophisticated galvanic device is required which emits Direct Current (DC) to bring some
chemical changes in the skin.
Galvanic Electro-Facial Skin Treatment
Step 1: Apply acidic solution on the skin. This is done to open up the skin pores, soften
tissues and increase the blood circulation.
The acidic solution breaks down the skin oil
stuck in the pores, clears the follicles and
extracts any skin impurities.
Step 2: Apply an alkaline solution to the
skin. This step closes the pores and
reduces blood circulation in that area. This
also soothes the nerves.
Step 3: Use a galvanic positive probe to
improve the penetration of skin care
products. This step is also called as
‘iontophoresis’.
Effects of this treatment are:
Complete cleansing and detoxification
Increases blood circulation
Reduced appearance wrinkles and fine lines
Effective application of skin care products
Makes the skin brighter
Contra-indications
Skin infection or irritation
Vascular or hypersensitive skin
Sinusitis
Epilepsy
Excessive fillingsBWS – Beauty Therapist P a g e | 50 Lymphatic drainage facial machine It is a soothing and relaxing massage using gentle brush motions to reduce swelling in the eye, neck area and rest of the face. The body’s lymphatic system consists of a large network of lymphatic vessels and nodes. The lymphatic system is linked to the immune system. This machine virtually retains the body’s lymphatic system by rhythmic suction. This machine helps to improve circulation, swelling, congestion and dull skin. This treatment helps in the removal and filtering of wastes, toxins and excess fluid from cells. This treatment is highly recommended for acne, couperose and general congestion of the lymphatic system. This is not an ordinary massage. Such treatment should be provided by only a trained personnel. Lymphatic drainage facial machine Step 1: Perform a deep skin cleansing. Step 2: Slough off dead skin cells of the upper layer using the diamond microdermabrasion technique. Step 3: Steam the skin using a vapour steamer. This process opens up the pores. Step 4: Ready the machine for the treatment. Stimulate the flushing out using a soft gripping technique. Apply pressure and strokes at the same time. Step 5: Massage using a Hyaluronic acid into the skin. The serum nourishes and moisturises the skin. Step 6: Lie back and relax with a special face mask.
BWS – Beauty Therapist P a g e | 51
Contra-indications
Acute inflammation may be caused by bacteria, viruses and poisons
There is a fear of spreading the cancer
This treatment may result in free-floating blood clots in the circulatory system
Microdermabrasion Or Ultrasonic Exfoliation
This treatment removes dead skin cells to even out the skin tone. This procedure stimulates
circulation and makes the skin smooth.
It is recommended for thicker skin. It is advised not to perform this treatment for the
sensitive skin.
Ultrasonic Exfoliation
Step 1: Apply water solution to the skin to loosen surface dead skin cells.
Step 2: Using an ultrasonically activated spatula, lift dry skin cells off the skin. During this
process, water solution gets infused deep
into the skin and hydrates new cells.
Contra-indications
Skin diseases
Neuralgia eye and trigeminal nerves
Acute infectious diseases
Dilated capillaries
Tumors and postoperative period
Recently made chemical peeling
Pregnancy
TuberculosisBWS – Beauty Therapist P a g e | 52 PRACTICAL EXERCISE Activity 1: Perform deep cleansing with an electric brush Materials Required: The following resources are required: Facial cleanser or gel Moisturiser Electric Brush Step by Step Procedure: Step 1: Rinse the face with plenty of water and leave the skin wet. Step 2: Apply a little facial cleanser or gel. Step 3: Turn on the brush and move over the face in a circular manner. Step 4: Hold the brush on each area for at least a few seconds to cleanse that area properly. Step 5: After the treatment rinse the face with plenty of water and pat dry with a soft clean towel. Step 6: Apply usual moisturiser to hydrate the skin. Activity 2: Provide Galvanic Electro-facial skin treatment Materials Required: The following resources are required: Acidic solution Alkaline solution Galvanic probes Electric Brush Step by Step Procedure: Step 1: Apply acidic solution on the skin. This is done to open up the skin pores, soften tissues and increase the blood circulation. The acidic solution breaks down the skin oil stuck in the pores, clears the follicles and extracts any skin impurities. Step 2: Apply an alkaline solution to the skin. This step closes the pores and reduces blood circulation in that area. This also soothes the nerves. Step 3: Use a galvanic positive probe to improve the penetration of skin care products. This step is also called as ‘iontophoresis’.
BWS – Beauty Therapist P a g e | 53 Activity 3: Use of Lymphatic facial machine Materials Required: The following resources are required: Skin cleanser Vapour steamer Hyaluronic acid Face mask Lymphatic facial machine Step by Step Procedure: Step 1: Perform a deep skin cleansing. Step 2: Slough off dead skin cells of the upper layer using the diamond microdermabrasion technique. Step 3: Steam the skin using a vapour steamer. This process opens up the pores. Step 4: Ready the machine for the treatment. Stimulate the flushing out using a soft gripping technique. Apply pressure and strokes at the same time. Step 5: Massage using a Hyaluronic acid into the skin. The serum nourishes and moisturises the skin. Step 6: Lie back and relax with a special face mask. Activity 4: Perform facial steaming Materials Required: The following resources are required: Skin cleanser Essential oils and herbs Towel Face steamer Step by Step Procedure: Step 1: Boil the water in a pot or alternatively use a facial steamer. Step 2: Use a gentle cleanser to remove all makeup, dirt, oil or sweat. Never use harsh soap or scrub. Step 3: Add some essential oils or herbs to the boiling water. Ensure that the scents will evaporate. Step 4: Cover the head with the towel such that it drops on either side of the face trapping the steam entirely. Place face close enough to let the skin feel that steam. It is to be ensured that steaming should not be done for more than 10 minutes.
BWS – Beauty Therapist                                         P a g e | 54

CHECK YOUR PROGRESS

   1. Why steaming treatment is performed?

   2. State advantages of steaming.

   3. List some methods of electrical facial skin treatment.

   4. Name the equipment used for deep cleansing.

   5. How to choose a right electrical brush?
BWS – Beauty Therapist                                             P a g e | 55

   6. Explain the process of galvanic electro facial skin treatment.

   7. List some contra-indications of galvanic electro facial treatment.

   8. Which treatment removes wastes, toxins and excess fluid from cells?

   9. Explain the process of lymphatic drainage.
BWS – Beauty Therapist                                               P a g e | 56

   10. List some contra-indications of ultrasonic exfoliation

   11. Say True (T) or False (F)
          a. Steaming clogs the pores of the skin. (T/F)
          b. Essential oils are added cold water. (T/F)
          c. Cosmetic electropathy is also called as Electrical facial skin treatment.(T/F)
          d. Electric brush can be used for deep cleansing. (T/F)
          e. Moisturiser is applied at the beginning of the treatment. (T/F)
          f.   Acidic solution is used to close the pores during the galvanic electro facial
               treatment. (T/F)
          g. Lymphatic system is linked to the immune system. (T/F)
          h. Ultrasonic exfoliation is recommended for thin skin.(T/F)

   12. Choose the most appropriate answer
          a. The electrical facial treatment is also called as:

                   i. Galvanic treatment
                  ii. Cosmetic electrotherapy
                  iii. High-frequencytreatment
                  iv. Faradic treatment
          b. Which tool is best suited for deep cleansing?

                   i. Electric brush
                  ii. Foundation brush
                  iii. Cotton pad
                  iv. None of the above
          c. Which type of electric current is used in Galvanic electro-facial skin
               treatment?

                   i. Alternate Current (AC)
                  ii. Direct Current (DC)
                  iii. Combination of AC and DC
                  iv. None of the above
You can also read