Catnip Mouse What you'll need: Joint Animal Services
←
→
Page content transcription
If your browser does not render page correctly, please read the page content below
Thank you so much for helping make toys for our cats! We use some of these
toys with the cats when they are at the shelter and others go home with an
adopted cat so they have a toy in their new home. If you have any questions,
please contact the Volunteer Coordinator at volunteer@jointanimalservices.org.

Catnip Mouse
What you'll need:
  • One 8x10 felt square (any color)plush or regular felt
  • Embroidery thread that matches the felt
  • A jingle bell
  • Cat nip
  • Glue and thread
  • Stuffing

How to do it:

Cut out the body of the mouse on a fold (so that the straight part of the mouse is on the fold.)
Then cut out two of the circles for ears. Once you have the pieces cut out, you will want to sew
the mouse body together all the way except about an inch from the point on the nose. Now stuff
your mouse and put some cat nip in there too! Now go ahead and sew the rest of the mouse up.
Once that is done, you will want to glue the ears on. Fold the ears on the lines and glue them
where ever you think the ears should go. Then cut a long piece of embroidery thread and tie the
jingle bell to the end of it. Then glue or hand sew the tail to the mouse’s rear end. Let all the glue
dry and you have wonderful catnip mouse to play with.

Note: You can also leave the mouse inside the box or bag of catnip overnight. Then the smell
will stay there longer and be stronger.
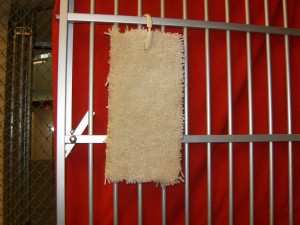
Carpet Scratching Pads
Carpet scraps turn into scratching posts for the
kitties. Simply cut into 3- by- 8-inch pieces, use
a hole punch to make a hole at the top and
attach to the cage with a plastic shower hook.
When a cat or kitten is adopted, we can send it
home with them.

              From the Charleston Animal Society
How to M
                                                    Make
                                                      ake a
                                             Catnip Mouse
MATERIALS

Catnip
Scissors
1 child's sock
Felt scraps
Plastic from milk or detergent jug
Cotton yarn
Darning needle

MAKING THE MOUSE

1. Using scissors, cut off the toe section of the child's sock at the heel. Also cut two mouse ear shapes
from the felt scraps and cut a teardrop shape from the plastic stock.

2. Insert the plastic teardrop into the sock (it serves to hold the mouse's shape) and fill the sock with the,
catnip. Turn back the sock's edge and, with the cotton yarn and darning needle, lay a running stitch around
the opening. Draw the yarn tight to close the opening.

3. Tie off the cotton yarn, leaving the extra for the tail. Sew on the felt ears and create embroidery floss
whiskers.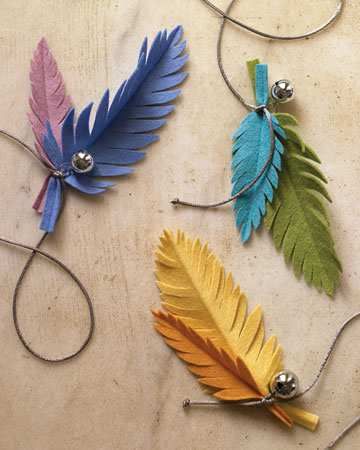
Baby Sock Cat Toy
A flowering member of the mint family, catnip releases an aromatic oil that sends most cats into
a blissful frenzy. This simple and inexpensive mouse-size toy, filled with catnip and sewn by
hand, will provide your cat with hours of entertainment.

                                  Tools and Materials
                                  Newborn-baby sock
                                  Dried catnip
                                  Needle and thread
                                  Yarn

Baby Sock Cat Toy How-To
Insert a paper cylinder into a newborn-baby sock, and use a spoon to fill the sock with dried
catnip, breaking up any large pieces with your hands. Be sure to use dried catnip, as the fresh
herb tends to mold, and bear in mind that catnip settles, so pack the toy tightly. With a needle
and thread, blind-stitch along the top of the sock; to refill the sock, simply take apart the
stitching, refill, and restitch. To dangle the toy from a doorknob or your hand, thread a piece of
yarn through the back top of the sock so the yarn doubles itself, cut it to the desired length, and
knot it in a few places to prevent tangling.

                                          Copyright 2010 Martha Stewart Living Omnimedia, Inc. All rights reserved.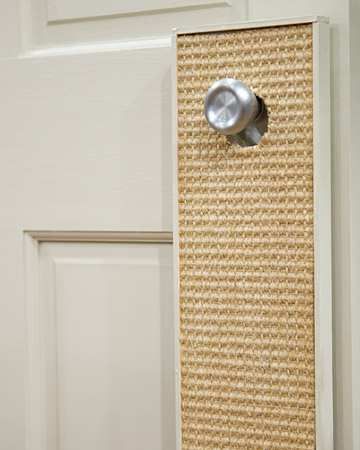
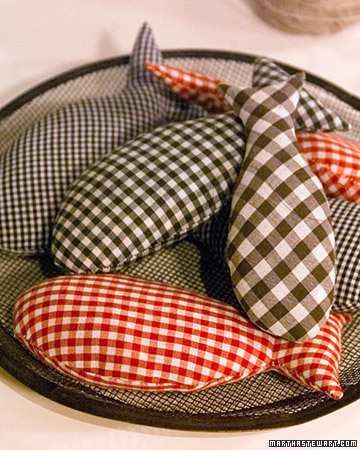
Catnip Fish Toy
This whimsical fish-shaped toy is sure to become one of your cat's favorite playthings.

                                         Tools and Materials
                                         Fish template (next page)
                                         Fabric
                                         Pins
                                         Pinking shears
                                         Cotton batting or wool scraps
                                         Piece of paper
                                         Catnip
                                         Needle and thread
                                         Upholstery needle and thin sturdy twine, for hanging

Catnip Toy How-To
1. Trace template onto two layers of fabric. Cut out shapes.

2. Pin right sides together, leaving 1/4-inch seam allowance. Sew seam, and leave 1 1/2-inch
opening for filling.

3. Trim seams with pinking shears.

4. Turn right side out. Press seams flat.

5. Stuff with cotton batting or wool scraps until firm. Shape a piece of paper into a funnel, and
use it to add 1 to 2 tablespoons of dried catnip or to fill the whole toy with catnip.

6. Hand-stitch opening closed.

7. If desired, make fishing line: Thread an upholstery needle with 30 inches of thin sturdy twine,
and sew through the seam of the fish's mouth. Tie knot to secure.

                                                 Copyright 2010 Martha Stewart Living Omnimedia, Inc. All rights reserved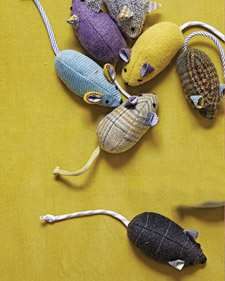
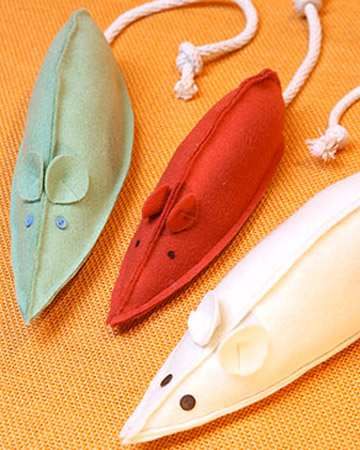
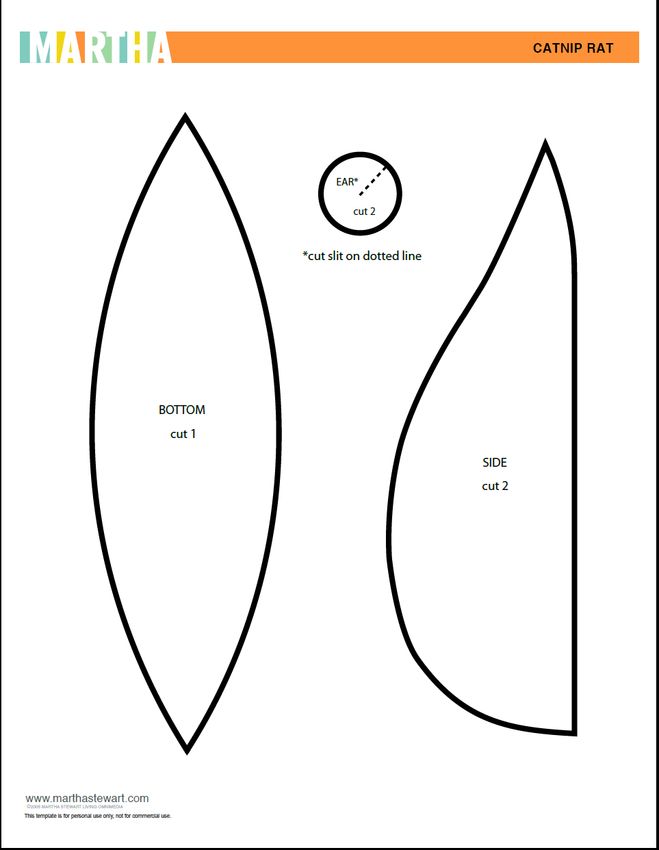
Catnip Rat Toy
Your cat will love this adorable, easy to make toy rat.

                                     Tools and Materials
                                     Catnip Rat Template (next page)
                                     Felt
                                     Stuffing
                                     Rope
                                     Catnip
                                     Scissors
                                     Hot glue gun and hot glue sticks
                                     Extra felt (optional for eyes)

Catnip Rat How-To

1. Using the 7 1/2-inch template, cut out the bottom and side pieces of felt, using the circles for ears.

2. Glue the top edges of the side pieces to each other. Glue the bottom piece of felt to the bottom of the
side pieces. Be sure to leave an opening in the back to insert stuffing.

3. For your stuffing, use cotton batting and catnip. Cut a piece of rope for the rat's tail and stuff in the
back of the rat. Seal with glue, and glue on the ears. To add eyes, use a marker or felt.

                                                          Copyright 2010 Martha Stewart Living Omnimedia, Inc. All rights reserved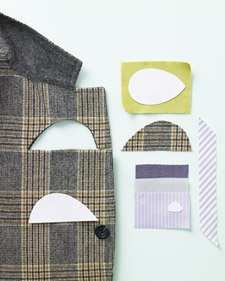
Door Cat Scratcher
Save your furniture from your cat's claws by making this simple cat
scratcher from carpet remnants.

                                            Tools and Materials
                                                •    Wooden plank (we used poplar) that is 1/2-inch thick, 6
                                                     inches wide, and 39 inches long
                                                •    Carpet remnant (ideally from the room in which you will
                                                     use the cat scratcher), cut to the length and width of the
                                                     wood plank
                                                •    Wood glue
                                                •    Weights (canned food works well)
                                                •    Measuring tape
                                                •    Pencil
                                                •    Drill with 2-inch hole saw attachment
                                                •    3/4-inch-wide lattice
                                                •    Finish nails
                                                •    Paint (to match the door, if possible)
                                                •    Paintbrush
                                                •    Optional: heavy-duty Velcro, catnip

Door Cat Scratcher How-To

1. Glue remnant to board with wood glue. Place assembled board and remnant face down, and
place a weight on it. Let dry.

2. Measure from the floor to the center of the doorknob. Subtract 1 inch. Measure this length up
from the bottom of the board and mark with a pencil. Using a 2-inch hole saw drill attachment,
drill through board and carpet, with the top of the hole meeting the line you have marked. Note:
Make sure the hole is big enough for your doorknob; 2 inches works for most.

3. Add 3/4-inch-wide lattice strip trim to all four edges, using wood glue and finish nails. The
lattice can be painted to match the door, if desired.

4. Optional: Attach the bottom of the cat scratcher to the bottom of the door with heavy-duty
Velcro, to keep the scratcher from swinging. Cats can be enticed to use the board with a little
catnip until they get into the habit.

                                           Copyright 2010 Martha Stewart Living Omnimedia, Inc. All rights reserved
Feather Cat Toy
What cat wouldn't love this fun feather toy to play with? Made of wool felt,
they're simple to create.

Cat Toys How-To

1. Using templates as guides, cut out one large and one small feather from two pieces of
different colored medium-weight wool felt.

2. With a hot iron, press a crease down the center of each feather.

3. Add a jump ring to a jingle bell.

4. Slip end of a 1-yard length of satin cord through jump ring. At bell, tie stems of feathers to
cord with a square knot. Knot both ends of cord to prevent fraying.
                                       Copyright 2010 Martha Stewart Living Omnimedia, Inc. All rights reserved
Menswear Mouse Toy
Treat a kitty to a game of cat and mouse with a few dapper toys. There's no mistaking these critters for the
real thing -- they're constructed from brightly colored suiting and shirting fabric
Tools and Materials
• Assorted menswear fabrics (such as wool suiting, cotton shirting, corduroy, and cotton
velvet)
• Iron
• Fusible webbing
• Sewing machine and sewing supplies
• Loop turner
• Fill
• Embroidery floss
• Embroidery needle
• Mouse Template (next page)
Step 1 Cut Out Body Pieces
Print the pattern pieces, and cut out. Using the pattern as a guide, cut out 1 bottom
piece and 1 side piece from the same or different fabric. Flip pattern, and cut out
another side piece. For a tail, cut a 1-by-4-inch strip on the bias. For ears, adhere 2
different fabrics together using iron and fusible webbing, following manufacturer's
instructions. Using pattern, cut out ears from fused fabric.
Step 2 Make Tail and Body
Fold tail in half lengthwise, right sides facing; stitch with a 1/4-inch seam allowance,
leaving ends open. Turn tail right side out using loop turner. Pin body pieces together,
right sides facing; stitch with a 1/4-inch seam allowance, leaving a 1-inch opening at
the back.
Step 3 Stuff and Assemble Mouse
Turn body right side out, and stuff with fill. Insert tail into opening; slip-stitch closed.
Knot end of tail.
Step 4 Add Ears and Features
Fold ears in half, and attach to body with small hand stitches. Mark placement of
eyes with pins, and then embroider eyes and nose using backstitches.
Copyright 2010 Martha Stewart Living Omnimedia, Inc. All rights reserved.Make your own yarn ball
Start with two rounds of lightweight, flexible Holding the rings together, wind the yarn tightly around them; continue until all seven balls of
cardboard (or plastic), about 4 1/4" across, yarn have been wound around the rings.
with a hole in the center about 1 1/2"
across. (You can use any size round, but
the proportions of round to hole should be
approximately 1/3 the diameter of the
round.) Wind a ball of synthetic wool yarn
that just fits into the inner hole, then wind
six more balls, each a little smaller than the
previous ball. You can use different colored
yarns for a multi-colored ball.
The color pattern of the ball is determined Push the blades of a pair of scissors Or, use a craft knife to complete the cut,
by the order in which you use the colors of between the two rings, and cut the yarn which can be easier than scissors. Make
yarn. You can experiment with different around the outer edges, keeping the blades sure the cardboard rings stay in place.
color combinations—and the cats don't of the scissors between the rings so that
care! A majority of light colored yarn in each you cut the yarn evenly.
ball is best for visual impact to the cat.
Slip a length of yarn between the rings Pull off the card rings and fluff out the It is that easy! Just add cats for endless,
and tie it tightly around the cut yarn. Pull ball. Trim off any straggly ends on the and cruelty-free, fun.
the yarn to the opposite side of the ball yarn and cut the tie strings to match the
and tie tightly again, then repeat on the length of the ball yarn.
first side, tying 2-3 times to make the ball
as secure as possible.
From PAWSCat Rod Toy
You can attach any toy to the end
Use acrylic rods or wooden dowels. (¼ inch rods work best)
Do not use elastic bands, fishing line or wire as the string
*Attach
toy
here.
*These fishing tackle
pieces are great ways
to attach the toy to
the line
(no hooks please)
From SFSPCAYou can also read