CIC Regionalization and Dial Plan
←
→
Page content transcription
If your browser does not render page correctly, please read the page content below
PureConnect®
        2021 R3

         Generated:
       12-August-2021

    Content last updated:
                                      CIC Regionalization and
        19-May-2020                          Dial Plan
See Change Log for summary of
          changes.
                                                       Technical Reference

                                                                         Abstract
                                    This technical reference outlines the concept of regionalization, which
                                    consists of de ning multiple locations where CIC users have SIP
                                    devices. Each location de nes some endpoints (lines, stations, and/or
                                    servers), and the codecs that enable the endpoints at the locations to
                                    communicate. These locations, then, normally tie in to the regionalized
                                    dial plan con guration, which enables CIC administrators to lter and
                                    de ne local dial plan entries for each location while retaining the most
                                    economical dialing paths between all sites.
                                    For the latest version of this document, see the PureConnect
                                    Documentation Library at: http://help.genesys.com/pureconnect.

                                For copyright and trademark information, see
                                https://help.genesys.com/pureconnect/desktop/copyright_and_trademark_information.htm.

                                                       1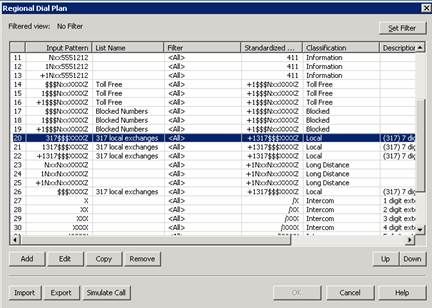
Table of Contents
Table of Contents                                                   2
Who should read this document?                                      4
What are the basic concepts?                                        5
  Locations                                                         5
  Default location                                                  5
  Endpoints                                                         5
  Regional dialing                                                  5
  Server endpoints                                                  6
  Regional dial plan                                                6
  Old dial plan                                                     6
  Filters                                                           6
  Codec selection maps                                              6
  Required checklist                                                6
  No remote PSTN connections?                                       7
Differences between the old dial plan and the regional dial plan    9
  User interface changes                                            9
  Single-table dial plan                                            9
  Number lists                                                     10
  Regionalization and location filters                             10
  Simulate calls                                                   11
  Classification categories                                        11
    Additional classifications                                     12
  Advanced features                                                13
    User data                                                      13
    Quoted and escaped string literals                             13
  Performance improvements                                         13
Understanding Locations                                            15
  The most common use for locations                                15
    Locations for incoming calls                                   15
    Representing locations                                         15
  Prerequisites for creating locations                             16
  Creating locations                                               17
  Configuring locations                                            20
  Using the Location Map                                           23
Understand and update the Regional Dial Plan                       26
  Understand the dial plan settings                                26
    Default dial plan entries                                      26
    Rules for standardized numbers                                 27
    Wildcard characters                                            28
    Special characters                                             28
    Ordinal numbers                                                28
    Dial groups                                                    28
    Location filters                                               29
  Understand the dial plan process                                 29
  Update the dial plan entries                                     30
    New area codes                                                 30
    New exchanges                                                  30
    Emergency dialing                                              31
    Filtering the dial plan                                        31
    Ordering the dial plan entries                                 31
    Importing and exporting the dial plan                          31
  Update the local 911 entry                                       32
    Create a new dial plan entry                                   32
    Create a new dial group entry                                  34
  Convert to the regional dial plan                                35
  Remote station connection calls                                  35
  Forward and follow-me region selection                           35
  Server parameter for internal, regional calls                    36
What is a dial plan?                                               37
What is regionalization?                                           38
Change Log                                                         39
                                                               2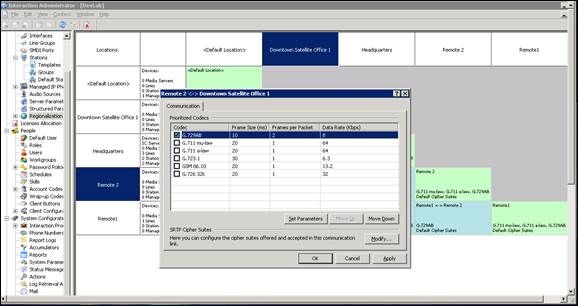
3

Who should read this document?
This document is intended for CIC administrators and those who want to:
    Understand the concepts of regionalization, locations, and the CIC dial plan configuration.
    See a summary of the differences between the newer, second generation, single-table, regional dial plan and the older, original
    dual-table dial plan.
    Learn how to configure SIP lines and stations to use local resources and take advantage of a centralized dial plan.

                                                                 4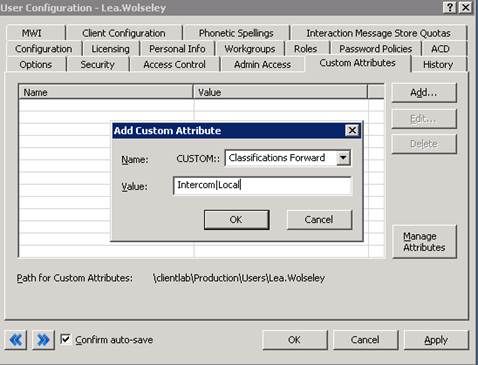
What are the basic concepts?
The CIC regionalization features are based on the following concepts and Interaction Administrator configuration options.

Locations
A location, usually associated with a physical place, is really a virtual grouping of endpoints (devices) that share a common dial
plan and codecs. Locations are defined in Interaction Administrator. A location defines a set of physical endpoints (SIP endpoints
and lines) that share common dial plan characteristics. A location also specifies the codec map between the endpoints (i.e., SIP
stations, SIP lines, and the CIC server). It may further define a home-site CIC server, a peer-site CIC server, or an Interaction Media
Server for processing voice (RTP) traffic instead of the CIC server.
Common examples of a location include:
   A small satellite office (in the same town or another city or state) with all SIP phones serviced by the CIC server at
   headquarters
   A group of remote employees that use SIP phones over the corporate VPN
   A remote peer-site office with its own CIC server in a multi-site configuration
   A gateway in an obsolete (closed) office with no phones, but used to redirect incoming phone calls to an old number.

Default location
The Default Location is used in all cases where no location is specified (e.g., for all SIP devices that are not assigned to any
location). This is where you specify the codec mappings for all devices in sites that have SIP lines and stations but no Locations
defined. That means even sites that use the old dial plan may need to modify the Default Location, if they are also using SIP devices
with the CIC server. The  entry is created via a new or upgrade installation, and it includes one codec mapping to
itself to enable some SIP functionality automatically.

Endpoints
An endpoint is a device that can receive audio. This can be a SIP Line, SIP Station, an CIC server, or an Interaction Media Server. For
example, a dozen SIP stations that are in a different area code than the CIC server might comprise a list of endpoints.

Regional dialing
                                                                    5
In larger infrastructures, Customer Interaction Center must use seven-digit, ten-digit, or sometimes longer user and station
extensions for PSTN dialing and globally unique stations. Regional Dialing allows users to dial other users within a location using
shorter, more convenient extensions. The number of digits to use for the shorter extensions is specified as the Significant
Extension Digits. For example, if Significant Extension Digits is set to 3 , users can dial each other using the last three digits of their
extensions.
For more information, see Location Configuration in Interaction Administrator Help.

Server endpoints
This option appears only if you have a SIP Media Server license. It allows you to specify information about your SIP Media Server,
and to map the server to specific locations.

Regional dial plan
Also referred to as a Generation 2 dial plan, a regional dial plan is one that uses the single-table dial plan and that incorporates one
or more locations. By default, new CIC installations use this dial plan and assume a single CIC server with all lines and stations in
one dial plan location, indicated by the filter group  . For a summary of the differences between the old dial plan and the newer
regional dial plan, see Differences between the old dial plan and the regional dial plan.

Old dial plan
Existing CIC installations that upgrade will continue to use the generation 1 dial plan (or old dial plan) until an administrator
manually migrates the original dial plan into a regional dial plan. Using the Advanced Dial Plan Operations dialog box, you can
specify which dial plan is visible in Interaction Administrator, and which one is active. Only one dial plan can be active at a time, but
you can modify and save the inactive dial plan without interfering with the active dial plan.

Filters
A filter is a specific view into the overall dial plan and enables you to see only the dial plan entries for a particular location. All
entries not relevant to that location are filtered out of that view. On the Regional Dial Plan page, you can filter the display to show
only the dial plan entries for the selected location(s).

Codec selection maps
Codec selection maps are used to define the allowed communications between any two locations, or communication within a
location. The map must exist and be accurately configured for two locations to communicate with each other.

Required checklist
                                                                     6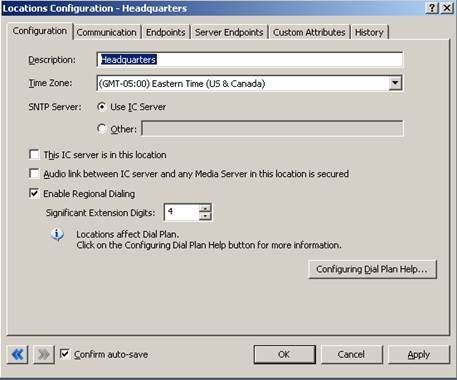
Configuring locations by themselves in Interaction Administrator is not difficult, but location entries alone may be ineffective,
depending on your implementation. You must have a clear understanding of the use and application of CIC locations, the gateways,
networks and system software that connect locations, and you must know how to customize the regional dial plan in order to see
the cost savings and other benefits of these regionalization features. Unless you configure all of these areas, you may not see the
expected results.
The following high level checklist provides guiding questions and a general order of planning and implementation as you consider
adopting the regional dial plan.
    Determine the purpose and type of application you want for these locations. For example:
        Toll call avoidance
        Remote office with a gateway and local 911 calling
        Remote stations only
        Media server locations and utilization
    Plan for and design the needed infrastructure, if it is not already in place. This includes tasks such as:
       Determining local PSTN line and service options and requirements (e.g., is local PSTN dialing required? What about E911
       service? Local toll-free calls? etc.)
       Acquiring the appropriate SIP-enabled gateways for each site
       Setting up or understanding the WAN configuration and codecs
       Acquiring SIP phones for all locations
       SIP device configuration
       Identify how many CIC locations you plan to use and the relationships between each.
    Update the default SIP line configurations on the CIC server for the SIP connections between the CIC server and the SIP
    stations. CIC automatically creates line configurations for each protocol:  ,  , and
     . You can use one of these default configurations or create your own SIP line configuration.
        In the SIP Line Configuration tab, on the Access page, give the appropriate access control to each line. This could be
        unrestricted (ALL) access for all stations, or it could be a specific list of IP addresses, or a range of IP addresses.
    Create SIP line configurations on the CIC server, at least one for each SIP gateway.
       On the SIP Line Configuration tab, do the following:
       On the Access page, give the appropriate access control to each line.
       Also on the Access page, restrict access control for gateway lines, to associate gateways and lines.
       On the Proxy page, set the gateway’s IP address as the proxy for this line.
           Make sure the appropriate lines are defined in the right line group, for later use in dial groups in the regional dial plan.
           While you are setting up the configuration and customizing a live system, set the lines to be inactive until the regional
           dial plan configuration is complete.
    Create SIP stations for each SIP device, or use managed phone objects.
       If creating SIP stations, possibly use a station template to create a base configuration for all SIP stations.
       Add the IP address of each SIP device. The process of synchronizing SIP phone IP addresses with new stations in
       Interaction Administrator can be automated.
    Create a location entry in the Regionalization container (Interaction Administrator) for each logical group of SIP endpoints that
    share common codecs and dial plan entries.
       Select the appropriate codecs (mappings) for connections between each location.
       Select the appropriate lines and stations (line/station endpoints) to be associated with this location.
       Determine whether or not the location will use regional dialing, and if so, determine the number of digits in the extensions
       for that location. Regional dialing allows dialing of short extensions within the location.
    Use the regional dial plan to specify call routing and create location-specific dial plan entries.
       Use the default dial plan as a starting point, then duplicate and customize entries for specific locations (for example, E911
       for each office, toll avoidance, and so on).
       Add dial groups for each location, as needed.
       Add location-based entries to the appropriate dial group.
       Activate lines when configuration is complete.
       Test all customized dial plan entries.

No remote PSTN connections?

                                                                    7
Some CIC implementations may use remote SIP phones in a location that does not have a remote gateway. These stations may
connect to an CIC server via a VPN or other IP connection without the need to support local PSTN calls. In this scenario, the
remote employees would have:
   A SIP station defined in Interaction Administrator for each remote employee.
   A SIP line defined to support the remote SIP stations.
   A location (called something like "Remote Workers") defined to include the remote SIP stations. It should also specify a low-
   bandwidth codec between the "Remote Workers" and themselves, and between the CIC server and the "Remote Workers" in the
   Mappings tab.
   No dial plan changes, because these stations do not have local (different) PSTN service. Local calls on these stations would be
   via the CIC server.

                                                                8
Differences between the old dial plan and the regional
dial plan
The following information summarize the changes added for the regional dial plan, compared to the original or "old" dial plan, as it
is now referred to in Interaction Administrator.

User interface changes
The Regional Dial Plan tab groups all of the common dial plan functions on a home page with buttons that launch the key
components of the dial plan.

Each button launches a particular part of the dial plan building/editing process.
   Dial Plan - Launches the Dial Plan edit dialog box.
   Manage Lists - Launches the number list edit dialog box.
   Classifications - Launches the classification list edit dialog box.
   Simulate Call – Launches the call simulation dialog box.
   Advanced – Launches the advanced page view and generation selection dialog box.

Single-table dial plan
The old dial plan uses a two-table approach where you specify input patterns that are processed through the Input Conversion table,
resulting in output patterns that are used in the Dial Plan table. This two-table approach, along with the ordinal number syntax to
represent positions in the output patterns, is efficient and compact, but somewhat complex for users to grasp.
The regional dial plan uses a simpler single dial plan table that eliminates the input conversion step, and practically eliminates the
need for using ordinal numbers in table. This approach may generate larger dial plan tables than before, but the reusable number
lists help keep it very manageable.

                                                                   9
Number lists
In the old dial plan, the Add Many button enables you to create a single combined input conversion/dial plan object that actually
handles many similar kinds of phone number input. The single-table regional dial plan uses the idea of number lists to simulate this
behavior. A number list would contain, for example, all of the local exchanges in an area code, and the dial plan would reuse this list
for every local call within that area. In addition, consider the following items:
 1. Number lists can be used by multiple dial plan entries.
 2. Number lists can contain quoted or escaped literal values.
 3. Like the old dial plan, lists can contain items with wildcard characters (for example, 317Nxx); but unlike the old dial plan, all
     wildcard characters are supported, not just the fixed-length characters (that is, ? and Z are now supported). This also means
     that a list may contain items of different lengths, like 123 and 1234.

Regionalization and location filters
Heavy use of SIP devices in distributed offices, along with the use of gateways in locations with different dialing requirements has
driven the need to provide location-based dial plan entries. Within the regional dial plan, you can create entries that are specific to a
location. These entries can further be part of a dial group (that is, a line group) that is used to place calls for that location. Within
the regional dial plan you can set a filter that displays only the dial plan entries for the selected location, enabling administrators to
more easily manage dial plan configuration for each location. The locations are defined under the Regionalization container and
referenced within the Regional Dial Plan edit dialog boxes. You can filter the dial plan entries by location so that only the
applicable entries appear. For more information on filtering by location, see "Location filters" in Understand the dial plan settings.

                                                                    10
Simulate calls
This feature is similar to the Simulate Call page in the old dial plan, but in the regional dial plan, you can test a call simulation
without actually saving and publishing the dial plan. This enables you to test dial plan entries before saving them and putting them
online. The new Simulate Call – Regional Dial Plan page also indicates which version of dial plan you are testing (for example,
Generation 2 Regional dial plan), so there is no confusion.
Classification categories
In the old dial plan, classification strings (for example, Emergency and Intercom) were visible in the dial plan table and they were
literally used in some handlers to identify types of calls. This process did not support localization (in other languages) very well, so
to abstract these classification strings for grouping similar classifications, and to support localizing these strings, classifications
categories have been added to the regional dial plan. A distinction has been made between the actual category name and the
display string, which can be translated. So instead of handlers depending on the classification string name, it bases its logic on the
classification category.
11Genesys recommends that you not change or remove the default classifications and categories in the base dial. You can change
the display text, but the default handlers and functionality rely on the default classification categories.
PureConnect uses classification categories to determine if a user is allowed to make a call by matching the resulting classification
category for the input pattern with the list of classification categories configured for the user, role, workgroup, and so on, under the
Phone Number – Classifications category on the Access Control tab in the People container.
Additional classifications
In addition to the phone number classifications on the Access Control tab in Interaction Administrator, there is now support for
additional classification lists which allow you to set different call rights for a user:
Classifications Forward – This classification list specifies the types of calls (for example, intercom and local) that can be
forwarded successfully.
Classifications Follow-Me – This classification list specifies the types of calls that can be transferred to different numbers
using follow-me routing.
Classifications TUI – This classification list specifies the types of calls that can be forwarded from the voicemail TUI.
Users are not prevented from setting numbers that don’t match the specified call types, but those numbers will result in insufficient
dialing privileges when attempted and calls will roll over to voicemail.
To invoke these additional classifications, you must define custom attributes in Interaction Administrator, with the classification as
the attribute name and a pipe-delimited list of the allowed classifications as the value.
12The custom attributes override the default classification list. For more information about defining custom attributes, see Custom
Attributes topic in Interaction Administrator Help.
Handlers will automatically populate the custom attributes the first time a user has one of these dialing instances with the
classifications in their regular dialing list. To limit the classifications, simply remove any unwanted classifications from the pipe
delimited list in the custom attribute.
Advanced features
Two advanced features are part of the regional dial plan: user data embedded in dial plan entries and literal values embedded in
input patterns.
User data
The regional dial plan enables CIC administrators to attach arbitrary user data to a phone number and have it:
Be preserved when passing a number from one subsystem to another
Be preserved in the dial plan processing
Be ignored by the dial plan pattern matcher
This can be useful to handler developers who may want to embed account codes or dialing card information in a dial plan entry
rather than codify it in the dial plan.
Quoted and escaped string literals
The regional dial plan enables CIC administrators to embed literal characters or strings in a dial plan input pattern, even if it
contains wildcard characters. These literal characters in an input pattern can be used by handler customizations to do special
processing, or provide visible indicators to CIC administrators. For example, Oldphone:+1NxxNxxxxxxZ , or
sip:"?"@inin.com. Previously this would not be possible because certain characters (for example, ? and n), were only treated as
wildcard characters.
Performance improvements
The performance of the regional dial plan increased while the memory and network traffic footprints decreased in the following
13ways:
Moving to a single dial plan table means only one pattern matching step.
The list-based matching has been optimized to perform a fast, set-based match on eligible lists (most are eligible) instead of
looping though and expanding.
Includes a better compression library to compress the dial plan data that is sent to CIC clients when they initialize the phone
number library, and on change notifications.
On the CIC clients, list-based dial plan entries are not automatically expanded on initialization; the matching is done in place
(set-based or not). This greatly reduces the client-side memory footprint.
The exact performance improvements will vary depending on the dial plan complexity. In general, the more entries you have,
especially list-based entries, the more pronounced the performance increase will be.
14Understanding Locations
The most common use for locations
Only sites that use SIP devices, such as SIP lines, gateways, and SIP-enabled IP phones, can take full advantage of the
regionalization feature benefits. However, because of the cost savings involved in VoIP, the increase in the popularity of SIP phones
and gateways, and the support CIC has for hosting distributed offices, increasing numbers of CIC implementations will define
locations and create regionalized dial plans. Of course, you can also have non-SIP devices in the same location as the CIC server,
but they do not need to be defined in a location.
There are many possible CIC implementation scenarios that can benefit from defining locations. One common scenario that can
serve as a pattern for many implementations is that of a central (for example, headquarters) office with an CIC server and one or
more remote satellite offices with a gateway and a small number of SIP stations, and all offices connected by a Wide Area Network
(WAN). That scenario might look similar to the following diagram:
You can imagine additional satellite offices, each with a gateway connected to the PSTN, and one or more of these offices could be
in different area codes, or some could support multiple area codes as local calls. On the Headquarters side, a separate SIP line on
the CIC server would be dedicated to each gateway that services a satellite office. Such a configuration would require expertise to
configure the gateway interface itself, which is not covered in this document.
Locations for incoming calls
The line that a call comes in on is used to determine the location of the call. You can either use the called port or the calling IP
address to determine the location of the call.
To use the called port to determine the location, you will need to have different lines configured, with each in a different location
and each with a different port. The called port determines the line, and then the line determines the location.
To use the calling IP address to determine the location, you will need to have different lines configured, with each in a different
location and each with a different subnet mask on the Access page of the Line Configuration dialog box in Interaction
Administrator. The calling IP address determines the line, and then the line determines the location.
Representing locations
In the diagram, you can easily identify two locations with the following characteristics:
Each location has at least one gateway.
Each location has SIP devices (stations).
Each location uses G.711 codec for communication within the location (e.g., station to station).
15Each location uses G.729 codec for the lower bit rate communication between endpoints in different locations over the WAN.
Each gateway is associated with a SIP Line defined in Interaction Administrator (not shown on the diagram).
Each SIP station is defined in Interaction Administrator with the appropriate privileges.
At least one location has an CIC server.
The combination of these characteristics, or a variation of these characteristics, comprises a location defined in Interaction
Administrator. The essential devices that must be configured in the Location container are: CIC server, lines and codecs, stations,
and (optionally) media servers. In addition, there are other configuration prerequisites that must be met. As you can see, it is not a
trivial exercise to define a location, so the following sections present a logical order to step through that process.
Prerequisites for creating locations
The following steps should be completed before creating a location entry and regionalized dial plan entries in Interaction
Administrator.
1. Configure the gateway(s) and their connections to the PSTN (analog, ISDN, T1, E1) lines that provide your external service.
You need the IP address of each gateway for SIP Line configuration.
2. Create SIP lines, if necessary, to support SIP station connections.
Note that Customer Interaction Center automatically creates three SIP lines, one for each protocol. You can use these lines or
create new ones:
Note:
SIP line configurations for codecs and compression rates are now defined as part of a mapping between two endpoints in
a location. (This used to be part of the SIP line and SIP station configuration.)
3. Update the SIP line to remove any access control restrictions so that all SIP station connections are supported.
This is a simplified, minimal way to support SIP stations and gateway lines correctly. You can optionally create a range of IP
addresses that represent the SIP stations.
4. Create SIP Lines to support the gateways.
You will need one SIP line dedicated to each gateway.
5. Use the Access page to restrict access to this line except from the gateway(s) that can use it.
In general, there should be at least one IP address (that is, the gateway's IP address) for each line (and one line dedicated to
each gateway).
In other scenarios, you may want to grant access to all IP addresses except a named list, or you may want to deny access to all
IP addresses except the named addresses. In any case, this configuration page sets up the associations between the devices
and lines.
166. On the SIP Line Configuration tab, on the Proxy page, set the gateway's IP address as the proxy for this line.
7. Create SIP Stations for each SIP phone.
You can use a station template to define the basic characteristics of all SIP phones and then create all of the SIP stations using
this template.
Creating locations
Once you have the gateways, SIP lines and SIP stations configured, you are able to create locations to represent these resources.
Note:
There is always a Default Location defined in Interaction Administrator. You cannot delete it, but you can use it for the CIC
server (for example, Headquarters) location if you want. Otherwise, you can ignore the default location, create your own named
location for the CIC server, and then move everything from the Default Location into your primary location.
1. Under the Regionalization container, select Locations .
2. Right-click the right side of the Interaction Administrator window, and then click New from the resulting shortcut menu to
create a new location.
The Create Location dialog box appears.
173. Enter appropriate information in the following controls:
Location Name
Description
Time Zone
SNTP Server (if applicable)
Use IC Server
Other
Enable Regional Dialing – You can enable this check box and specify a number of significant digits in the extension.
For more information on these controls, see Location Configuration in Interaction Administrator Help.
4. Click Next .
5. In the Select Location Communication Mappings dialog box, choose the locations to map to the new location so that
devices in those locations are able to communicate.
6. Click Next .
The Select Codecs for each Location Mapping dialog box appears.
187. To select the codecs supported by this server, click the Modify Codecs button.
The Prioritized Codecs dialog box appears.
Since this server supports both LAN (high bit rate) connections and connects to the gateway and WAN, select both G.711
codecs. If you need to adjust any of the codec parameters, you can select Set Parameters to adjust the frame size and
frames per packet, but this should rarely be necessary. If you need to modify the SRTP cipher suites, click Modify . Do not
attempt to change the default settings, however, unless you are familiar with cipher suites concepts.
8. Click OK , and then click Next to continue.
9. In the Ready to Save the New Location dialog box, open the Location Assistant by enabling the Launch the Location
Assistant after the new location is saved check box.
19Note:
The Location Assistant steps you through the location configuration tasks in a linear fashion, so there is no need to
manually open each related container or sub-container to complete the new location configuration. Location Assistant
provides an overview and guides you through the following tasks: Add Station Support, Assign Stations, Add Gateway, Call
Routing, and Select Media Server.
10. Click Finish to save the location.
If you chose to launch the Location Assistant , the dialog box appears and you are ready to configure the location's behavior
11. Click the Help button for details on the Location Assistant.
After you configure the locations, you can display a map diagram showing your location configurations. For more information, see
Using the Location Map.
Configuring locations
You can either use Location Assistant, which is described in the previous section, to configure your locations, or you can configure
them manually. Do the following steps to manually configure locations.
1. In the Regionalization container, select Locations and double-click the location you want to configure.
The Locations Configuration dialog box appears.
202. If you are configuring the location for the CIC server, select the This CIC server is in this location check box on the
Configuration tab.
A CIC server belongs to only one location, but you must specify codec mappings between the server and all other defined
endpoints.
3. On the Endpoints tab, under Lines , click Add to view the list of pre-defined lines available for this location.
For a CIC server that needs to connect to SIP stations on the LAN and to remote SIP stations over the WAN, select both the
SIP line that supports station-to-station connections ( , , , or the line you
created) and the SIP line created to connect to the gateway/WAN.
4. If required by the gateway, select any additional codecs as well and use the Up and Down buttons to set the priority order of
codecs usage, usually from fastest to slowest.
5. Click OK to complete the codec selection.
216. Under Unmanaged Stations , click the Add button to select the stations supported in this location.
The selected stations connect to the CIC server through the line(s) listed in this tab.
7. For Interaction Media Servers, click the Server Endpoints tab, and then click the Add Media Server button to specify the
Interaction Media Servers to include in the location.
8. On the Configuration tab, click the Configuring Dial Plan Help if you want to launch Interaction Administrator Help.
9. Click OK to save the CIC server location configuration.
10. Create another location for the satellite office and assign an appropriate name.
The name you assign should make identification of the physical location simple, such as Satellite Office 1.
11. On the Configuration tab, enter a description for this location.
Important!
Do not enabled the This IC server is in this location check box.
12. If required, enable the Enable Regional Dialing check box and specify the Significant Extension Digits .
For more information, see Location Configuration in Interaction Administrator Help.
13. In the Communications tab, select the Modify button to specify the codecs supported between this location and itself, and
between this location and the other locations.
22Within the satellite office where communication is over a LAN, the preferred codec is the higher bit rate G.711. From Satellite
Office 1 to Headquarters (over the WAN), it uses the slower G.729 codec.
14. On the Endpoints tab, click Add under the Lines area to select the predefined lines available for this location.
You cannot select the line used in the Headquarters location. In this case, select a line designated for SIP stations, with
unrestricted access.
15. Click Add under Unmanaged Stations to select the stations supported in this location.
The selected stations are part of a station group that uses this designated SIP line.
16. Click OK to save the location configuration.
Note:
Once the location configurations are complete, you must update the regional dial plan to make use of these locations, if the
locations require different local dialing patterns.
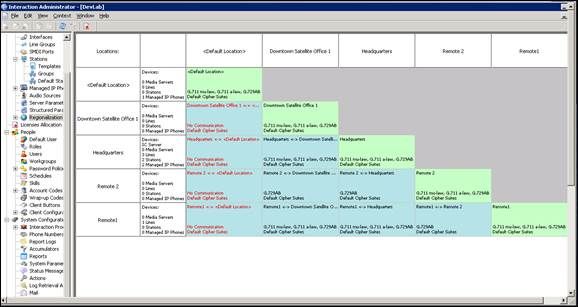
Using the Location Map
23After you add and configure your locations, click on the Regionalization container in Interaction Administrator to view a diagram
that displays the following items:
List of locations, along the left side and also across the top of the map
The number of devices (media servers, lines, stations, and managed IP phones) configured for each location
At the intersection of two locations, information about the way communication between the sites is configured:
The status of communications
The codecs used for communication in order of priority
The cipher suites used for encrypting SIP messages when using TLS on the SIP lines
This map is useful for viewing and troubleshooting the overall configuration information and comparing the configurations at the
individual locations. If there is no communication between two locations, the intersection of those locations displays a red No
Communication message.
In the location map, the intersection of each location with itself appears in one color, while the intersection of each pair of distinct
locations appears in another color.
You can update the codecs, codec parameters, and cipher suites used between two locations by right-clicking the intersection of
those locations and clicking Properties from the resulting shortcut menu.
24You can also edit all the information in a location's configuration by double-clicking the intersection of that location with itself.
25Understand and update the Regional Dial Plan
If SIP stations in your locations need to place local calls to an exchange or area code not included in the default dial plan, such as
using gateways to make local calls, you must update the regional dial plan to reference these locations to complete the
regionalization.
For more information, see the following:
Understand the dial plan settings
Understand the dial plan process
Update the dial plan entries
Update the local 911 entry
Convert to the regional dial plan
Remote station connection calls
Forward and follow-me region selection
Server parameter for internal, regional calls
Understand the dial plan settings
CIC creates the initial dial plan settings when a system administrator runs Setup Assistant on the server and chooses to create a
dial plan. Setup Assistant includes a wizard that allows the administrator to specify a list of local area codes and exchanges. Setup
Assistant then uses that information to create the appropriate entries in the dial plan, along with some default, generic entries. You
can see the local and default entries when you open the phone numbers configuration in Interaction Administrator.
If the system administrator chose not to create or import a dial plan when running Setup Assistant, the dial plan will be blank.
For more information on Setup Assistant, see IC Setup Assistant Help.
Note:
For international number plans, it is recommended that you import your own dial plan or create your dial plan in Interaction
Administrator.
Default dial plan entries
The following default entries in the Phone Number Configuration container allow Customer Interaction Center to format and
classify certain types of calls without Administrator modification or input:
26Description Entry Description Entry
SIP (explicit) sip:Z SIP (secure) sips:Z
SIP address (@-based) ?@Z SIP (with IP address or phone number) tel:Z
Company Operator 0 Local Telephone Company Operator 00
911 911 411 or Information 411
1411
5551212
Nxx5551212
1Nxx5551212
+1Nxx5551212
Toll Free Numbers Blocked Numbers
$$$NxxXXXXZ $$$NxxXXXXZ
1$$$NxxXXXXZ 1$$$NxxXXXXZ
+1$$$NxxXXXXZ +1$$$NxxXXXXZ
Long Distance Single digit extensions X
NxxNxxXXXXZ
1NxxNxxXXXXZ
+1NxxNxxXXXXZ
Double digit extensions XX Three digit extensions XXX
Four digit extensions XXXX Five digit extensions XXXXX
Six digit extensions XXXXXX N-digit extensions /Z
International Numbers Other numbers Z
011+Z
011Z
+Z
Rules for standardized numbers
The dial plan configuration packaged with Customer Interaction Center illustrates the preferred way to implement standardized
number formats. If you want the phone numbers to be completely international and portable to any location in the world, keep these
characteristics in your standardized number format:
27Numbers are completely specified. Entries should contain a country code preceded by a plus sign (+), an area/city code (if
applicable), a local number, and an optional extension.
Exceptions are:
The number is purely an extension, like /131.
The number is a specially-recognized number in a country, such as 911.
Numbers are location-independent and must contain address information rather than dialing information. For example, an
international number should not be standardized to include the 011 International Direct Dialing (IDD) prefix, because other
countries and numbering plans have different IDD prefixes.
Wildcard characters
Wildcard characters are variables used to represent a range of numbers in phone number patterns. Patterns can consist of all digits,
all wildcard characters, some non-dialing characters (such as + and /), or any combination.
These digits and Are represented by the wildcard character…
characters…
0 through 9 X (or x) represents a single digit character in that range.
2 through 9 N (or n) represents a single digit character in that range.
Any characters after Z represents zero or more trailing characters of any value.
the 7, 10, or 11
required telephone Using Z allows the dialer to enter extra characters after the required digits without interfering with the
company digits dial string. This wildcard character must be the last character of the pattern; it is an error for it to appear
anywhere else (which means there can be only one occurrence of this character in each number).
0 through 9, #, *, ? represents zero or more of these characters. Note that /, @, and + are not included.
'
$ $ represents a substitution character used in defining multiple exchanges from a list.
Special characters
These characters are not actually dialed, but are preserved as part of the stored phone number:
+ is a prefix to introduce a country code.
/ is a prefix to introduce an extension for direction extension dialing.
Ordinal numbers
Ordinals identify the position or order of a number in a sequence, such as 1st, 2nd, 3rd, etc. Their positions are displayed in braces
such as {1}, {2}, {3}, etc., and can be combined with dialable digits.
The following table indicates input and output patterns for a local phone number, 872-3000:
Local Number Input Pattern Output Pattern (Ordinal)
8723000 +1317{1}{2}{3}{4}{5}{6}{7}{8}
317NxxxxxxZ +1317{4}{5}{6}{7}{8}{9}{10}{11}
317NxxxxxxZ +1317{5}{6}{7}{8}{9}{10}{11}
Dial groups
A dial group is a group of lines or channels that are defined in the Line Groups container and that CIC uses for outbound calls. The
lines included in this group should have a direction of Outbound or Both , rather than Inbound , to avoid line contention when
dialing.
You can assign dial groups to patterns in the dial plan to direct certain kinds of outbound calls to specific lines. For example,
outbound international calls might be directed to one dial group, while local outbound calls are directed to another dial group.
28You could also create a SIP line group and assign it to the default sip:Z entry in the dial plan so that all SIP calls will use the SIP
line group.
Location filters
The location filter assigned to a dial plan object determines the locations to which that object applies.
This filter… Means that…
The entry is applicable to all locations.
for testing or other purposes.
and SIP Line codec used when no locations are defined.
29Understand the dial plan process
When a user dials a number, Customer Interaction Center first matches the number with one of the defined input patterns in the dial
plan. Once a match is made, Customer Interaction Center converts the dialed number to a standardized format and processes the
call based on the details identified for that pattern (dial string, display string, classification, dial group).
If you double-click the 317$$$XXXXZ entry in the dial plan, for example, or select the entry and click Edit , you can see the details for
that input pattern.
Update the dial plan entries
You can add new input patterns or make edits to existing ones from the Regional dial plan table or by using Setup Assistant.
New area codes
30If you choose to add a new area code directly through the dial plan page, you will need to know all of the specifics of your entry. For
example, you will need to provide the correct input pattern, the standardized number, the default dial string, display string,
classification, and any lists used.
If you plan to add a new area code by rerunning Setup Assistant, Setup Assistant configures all of this information for you. All you
need to supply is the area codes and the local exchanges.
New exchanges
If you only need to add new exchanges for existing area codes, click Manage Lists on the Regional dial plan tab of the Phone
Number Configuration dialog box.
You can add each exchange individually, or if all numbers within an exchange will be local, then you can also use wildcard
characters to indicate the exchange. For example, if all numbers within the 317 area code will be local, you can add Nxx to the list
of entry numbers.
Emergency dialing
You will need to make dial plan changes to ensure that emergency calls work in each location. There are two methods to ensure
that emergency calls are routed appropriately:
Create a new dial plan entry for 911 (the North American emergency number) and assign it to the specific location.
Use a single emergency number entry (911 in North America) and assign the dial group filters for each location.
For more information, see Update the local 911 entry.
Filtering the dial plan
Click Set Filter at the top of the screen to select the dial plan objects to display based on a specific location.
Ordering the dial plan entries
The order in which your objects appear is important as it determines which object will be used for the call because Customer
Interaction Center stops after it finds the first matching pattern. To arrange your dial plan objects in the appropriate order, use the
Up and Down buttons.
31Importing and exporting the dial plan
The Import and Export buttons allow you to import or export the dial plan files (*.i3dplan).
You should export your dial plan to a file, for example, to make a backup copy of it before you make changes.
If you need to add a new area code to an existing dial plan, you could export the current dial plan, use Setup Assistant to add the
new area code, test the new objects using the Simulate Call feature, and then import the previous dial plan and merge it with the
new entries.
Note:
You might need to manually move the new dial plan objects higher up in the dial plan as they are added at the bottom of the dial
plan by default. For more information, see "Ordering the dial plan entries".
Update the local 911 entry
One of the first dial plan changes is to ensure emergency (E911) calls work in each Location. You can make these changes in one
of two ways:
Create location-specific dial plan entries in the top-level dial plan table.
Keep one dial plan entry and modify it to use location specific dial groups to direct calls over certain lines.
Note:
CIC offers the following methods for making emergency calls:
Station location fields in Interaction Administrator and configuring dial plans to ensure that emergency calls from managed
stations use a local gateway for connection to a Public Safety Answering Point (PSAP)
E911, introduced in CIC 2017 R1, which requires you to acquire the services of a third-party E911 service provider that
routes the emergency call to the appropriate PSAP based on the identifying IP and Media Access Control (MAC) address of
the station and previously-provided Automatic Location Information (ALI) data.
For more information about the first emergency call method, see the following:
Create a new dial plan entry
Create a new dial group entry
For more information about the E911 method, see E911 Technical Reference in the PureConnect Documentation Library.
Create a new dial plan entry
1. In the Phone Number Configuration container, select the Regional Dial Plan tab.
2. Click the Dial Plan button to display the Regional Dial Plan table.
By default, you will see all dial plan entries for all locations.
323. Create a customized 911 Emergency number for the Satellite Office, select the Input Pattern row for 911 (index item 7) and
click Copy .
4. In the Edit Pattern dialog box, select Downtown Satellite Office 1 from the Location Filter list.
5. Add a description of the Downtown Satellite Office 1 entry for ease of identification when later viewing the master
Regional Dial Plan table.
6. Click OK when finished.
A new dial plan entry for 911 specific to Satellite Office 1 appears below the default 911 entry in the Regional Dial Plan
table.
7. Select the new 911 entry (currently index item 8) and click the Up button to move it up one row, to row 7.
33Now, CIC evaluates and processes 911 calls from Satellite Office 1 using row 7 instead of the general 911 dial plan entry that
applies to all other locations on row 8.
Create a new dial group entry
Another way to enable a location to use an existing dial plan entry is to add a dial group filter for each location within each dial plan
entry that needs it. In this case, there will be only one dial plan entry for 911, for example, but within that entry, a list of dial groups
will be defined to match calls from each location. When there is a match, CIC will dial on the appropriate lines. Dial groups are
simply line groups that are enabled to be selected in the dial plan.
1. Open the default regional dial plan and double-click the 911 entry (index item 7).
The Edit Pattern dialog box for that entry appears.
2. Click the Add Group button to display the Dial Group – Add Entry dialog box.
3. In the Dial Group column, select the dial group (SIP line) that you want to designate to server the remote office.
4. In the Location Filter list box, select Satellite Office 1 .
5. Click OK .
6. Repeat these steps to add another dial group for the Headquarters location.
If Satellite Office 1 and Headquarters are the only defined locations, you can select the location for the
Headquarters dial group, as,the Satellite Office 1 location already has its own dial group for calling 911.
7. Click OK .
34The 911 pattern now shows the selected dial group, and any 911 calls placed from Satellite Office 1 will match this entry and
use the specified dial group.
8. Update the Description field to reflect changes with the dial group and click OK .
Convert to the regional dial plan
All existing sites that upgrade to releases with regional dial plan features can continue to use their original generation 1 dial plan
without modification. However, new sites, or existing sites that want to deploy SIP devices in various locations should use the
regional dial plan.
An automated migration tool does not exist to migrate an old dial plan table to the new single-table regional dial plan format. You
must manually move the desired dial plan entries from one to the other, taking into consideration the impact of using locations as
you go. Because only one dial plan is active at one time, you can easily work on the migration without disrupting service while using
the original dial plan.
CIC Regionalization and Dial Plan Technical Reference
Remote station connection calls
Remote station connection calls use a region context if placed from the server. Connection calls, which are calls used to connect
to remote numbers for remote users, can occur for inbound calls.
For inbound calls, the region of the line the call originated on is used for placing the connection call. CIC uses the dial plan
associated with the region of the line receiving the inbound call.
For outbound calls, there is usually no line associated. The outbound call process uses the location of the user. If the server
parameter Use Outbound Base Call For Connection is set to 0 (default value), the CIC server uses its location dial plan to
make the connection call to the remote station. If the server parameter has a value of Y , Yes , T , True , or 1 , the CIC server uses the
location plan for the user to make the call.
Copyright and trademark
Forward and follow-me region selection
When a user's status is set to a Forward or Follow-Me status, outbound calls use the region of the line from which the call is
placed. Forward and Follow-Me numbers are standardized when the values are entered into the CIC client. Therefore, the
standardized number is passed to the dial plan of the region of the inbound call’s line when the call is placed.
35Server parameter for internal, regional calls
The Keep Internal Regional Calls On Server CIC server parameter allows control of calls that can be completed as intercom
calls rather than over tromboning; having calls go out of the internal network and come back in through the PSTN.
The server parameter supports the following values:
Value Description
Enable (or This value enables the keeping of internal regional calls on the server. Internal regional calls do not go out to the
"E") PSTN and come back in. This is the default value. Any value other than Disable or Same Region Only is
interpreted as Enable .
Disable (or This value disables the keeping of internal regional calls on the server. Intercom calls go out to the PSTN and come
"D") back in.
Same This value keeps calls on the server only if they are made within the same region.
Region
Only (or
"S")
36What is a dial plan?
Outgoing calls placed through Customer Interaction Center can originate from a number of places. Because phone numbers can
look very different—some with area codes, some with letters, some with country codes, and so on—Customer Interaction Center
uses a pattern matching process to format and dial phone numbers in a consistent manner, regardless of how they were dialed by
the user.
The dial plan defines the input patterns that Customer Interaction Center uses to change phone numbers into a standardized format.
It also defines the dialing actions to take for each pattern, as well as the locations and classification for each pattern.
Customer Interaction Center uses the information in the dial plan to perform the following tasks:
Format the phone number into a standard package.
Determine the call classification (local, long distance, toll, etc.).
Determine if the user is allowed to make that type of call.
Send the appropriate numbers (7, 10, or 11 digits).
Determine which line or lines to use for the call.
Determine what to display on the CIC client.
Parse and store segments of the telephone number for statistical reports.
37What is regionalization?
In most previous releases, the dial plan on an CIC server was specific to a single site and Central Office (CO) or PBX. In a
configuration where a central CIC server hosts one or more remote offices, significant handler modifications were required, and
every line and station in remote offices had to use the same dial plan. Sites with remote SIP devices had to configure the codecs
for each device individually. CIC system configuration was independent of the phone configuration, and there was no way for
various phones to use a specific (unique) gateway when dialing the same phone number.
Now, however, CIC administrators can use regionalization features to create "Locations" comprised of (SIP) lines and stations and
the codecs that enable them to communicate. These locations are normally used in the new single-table (i.e., simpler) dial plan
configuration to support unique and localized dial patterns for remote sites. This concept of region, or location, enables
administrators to specify and control the resources (for example, lines, stations, gateways, and servers), and codecs for all of the
connections on a remote or local CIC system. It makes it easier and more flexible to configure multi-location installations, and it
centralizes control of codecs and call routing. The new single-table dial plan can apply to all lines and line groups hosted by an CIC
server and it can route remote SIP station calls to local gateways.
Initially, this location configuration applies only to SIP lines, stations, and Media Servers, but eventually it may apply to other
resources as well. Existing sites that upgrade can choose to continue to use their original dial plan, since migration is not required
unless you want to take advantage of the regionalization features for SIP lines and stations.
38Change Log
The following tables lists the changes to the CIC Regionalization and Dial Plan Technical Reference since its initial release.
Date Changes
30-August-2011 Updated for Interaction Center 4.0.
13-September-2014 Updated documentation to reflect changes required in the transition from version 4.0 SU# to CIC 2015
R1, such as updates to product version numbers, system requirements, installation procedures,
references to Interactive Intelligence Product Information site URLs, and copyright and trademark
information.
Updated for CIC 2015 R1.
25-August-2015 Updated for rebranding and client changes and cleaned up inconsistent capitalization.
04-October-2016 Updated Copyright and trademark information page
OT-173: Added content to Update the local 911 entry for the new E911 feature for CIC that enables usage
of a third-party E911 service provider.
Implemented various edits and modifications to make the document and its content align with current
departmental standards.
Updated content for remote stations in Remote station connection calls.
08-December-2017 Rebranded from Interactive Intelligence to Genesys.
12-June-2019 Reorganized the content only, which included combining some topics and deleting others that just had an
introductory sentence such as, "In this section...".
19-May-2020 Updated value options for Use Outbound Base Call for Connection parameter.
39You can also read