COLLECTION 2021 - DELUXE RV GROUP
←
→
Page content transcription
If your browser does not render page correctly, please read the page content below
COLLECTION 2021
Manuel d‘utilisation
User Manual
Benutzerhandbuch
Manual de Instrucciones
Guida per l’utente
Bruksanvisning
CONTENTS                                                                                                                           3.       PREPARING TO TRAVEL
                                                                                                                                             3.1     Servicing after immobilisation..........................................70
                                                                                                                                             3.1.1   Fresh water.............................................................................................. 70
          1.         WELCOME                                                                                                                 3.1.2   Refrigerator.............................................................................................. 70
          1.1        Welcome aboard!...............................................................56                                        3.2     Refuelling and levels...........................................................70
          1.2        How to use this manual......................................................56                                          3.2.1   Fuel............................................................................................................ 70
          1.3        Legal Information................................................................57                                     3.2.2   Tyre pressure........................................................................................... 70
          1.3.1      Regulations...............................................................................................57            3.2.3   Fresh water............................................................................................... 71
          1.3.2      Warranty....................................................................................................57          3.2.4   Gas.............................................................................................................. 71
53
          1.4         Campervan manners..........................................................58                                          3.2.5   Battery........................................................................................................72
          1.4.1      General principles.................................................................................. 58                 3.3     Practical and emergency equipment...............................72
ENGLISH

          1.4.2      Parking...................................................................................................... 58        3.3.1   Light bulbs.................................................................................................72
          1.4.3      Waste......................................................................................................... 58
                                                                                                                                             3.4     Loading..................................................................................73
                                                                                                                                             3.4.1   Technical specifications........................................................................73
          2.         EXPLORING YOUR CAMPERVAN                                                                                                3.4.2   Calculating mass.....................................................................................74
          2.1        Base vehicle..........................................................................59                                3.4.3   Storing baggage......................................................................................74
          2.1.1      Chassis...................................................................................................... 59        3.4.4   Trailer..........................................................................................................75
          2.1.2      Tyres........................................................................................................... 59
          2.1.3      Accessories.............................................................................................. 59            4.      TRAVELLING
          2.2        Living area............................................................................ 60                              4.1     Safety checks before departure.......................................76
          2.2.1 Hatches, openings and valves............................................................ 60                                  4.2     Settings..................................................................................76
          2.2.2 Interior layout.......................................................................................... 60
                                                                                                                                             4.3     Driving.................................................................................... 77
          2.3         Basic fluid diagrams...........................................................61                                      4.4     Authorised seats................................................................... 77
          2.3.1      Water..........................................................................................................61
          2.3.2      Electricity.................................................................................................. 62
          2.3.3      Gas............................................................................................................. 66
          2.3.4      Ventilation and heating......................................................................... 67
          2.4        Safety.....................................................................................67
          2.4.1      Fire.............................................................................................................. 67
          2.4.2      Gas............................................................................................................. 68
          2.4.3      Electricity.................................................................................................. 68
          2.4.4      Emergency exits..................................................................................... 69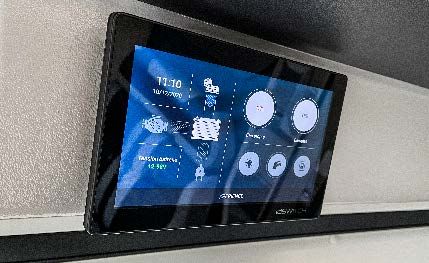
5.          STOPPING AND PARKING                                                                                                 7.       MAINTENANCE AND WINTERISATION
5.1        Choosing a spot...................................................................78                                  7.1      Gas systems..........................................................................91
5.2        Safety when stationary......................................................78                                        7.2      Interior maintenance..........................................................91
5.3        Supply....................................................................................78                          7.2.1    Cab..............................................................................................................91
5.3.1      Turning on the water............................................................................. 78                  7.2.2    Furniture....................................................................................................91
5.3.2      Turning on the gas................................................................................. 78                7.2.3    Cushions and mattresses..................................................................... 92
5.3.3      230V electricity....................................................................................... 79            7.2.4    Cleaning windows................................................................................. 92
                                                                                                                                 7.2.5    Bathroom equipment............................................................................ 92
5.4        Draining.................................................................................79                           7.2.6    Cooking appliances............................................................................... 92
5.4.1      Wastewater.............................................................................................. 79
                                                                                                                                 7.2.7    Refrigerator.............................................................................................. 92
                                                                                                                                                                                                                                                                    54
5.4.2      Toilet.......................................................................................................... 79
                                                                                                                                 7.2.8    Water heater............................................................................................ 92
5.5        Insulation.............................................................................. 80

                                                                                                                                                                                                                                                                  ENGLISH
                                                                                                                                 7.2.9    Control panel.......................................................................................... 92
5.6        Locking................................................................................. 80                           7.2.10    Cleaning the pop-up roof................................................................... 93
                                                                                                                                 7.3      Cleaning the exterior..........................................................93
6.          USING THE EQUIPMENT                                                                                                  7.3.1    Washing the bodywork......................................................................... 93
6.1        Windows and doors............................................................81                                       7.3.2    Tar............................................................................................................... 93
6.1.1      Windows....................................................................................................81         7.3.3    Small scratches....................................................................................... 94
6.1.2      Skylight...................................................................................................... 83     7.4      Winterisation or long stops.............................................. 94
6.2        Kitchen.................................................................................. 84                          7.4.1    Batteries.................................................................................................... 94
6.2.1 Sink............................................................................................................. 84       7.4.2    Water......................................................................................................... 95
6.2.2 Gas-powered appliances..................................................................... 84                             7.4.3    Turning off the refrigerator.................................................................. 96
                                                                                                                                 7.4.4    Ventilation system.................................................................................. 96
6.3        Table.......................................................................................87                        7.4.5    Cushions, mattresses, curtains........................................................... 97
6.3.1 Table mounted to vehicle sidewall.................................................... 87                                   7.4.6    Repairs....................................................................................................... 97
6.3.2 Fixed-leg central table .......................................................................... 88
6.4        Beds....................................................................................... 88                        8.       CONTROL PANEL
6.5        Television.............................................................................. 89                           8.1      Home page.......................................................................... 98
6.6        Car radio and GPS (option)............................................... 89                                          8.2      Settings page....................................................................... 99
6.7        Bathroom............................................................................. 90
6.7.1      Shower and washbasin......................................................................... 90
6.7.2      Toilet.......................................................................................................... 90
6.8 Bike rack (option)................................................................ 90
6.9 Installing the awning (option).......................................... 90
6.10 Outside shower (option)................................................... 90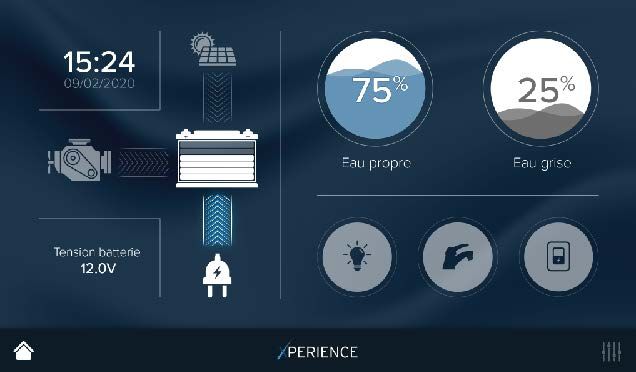
TYPICAL CAMPERVAN LAYOUT
            The pictograms and different areas shown on this basic diagram do not necessarily reflect the layout of your campervan.

55             Baggage
                                 230V connection     Water heater drain    Fresh water inlet      Fuel filler cap         Garage space
             compartment
ENGLISH

                                                                                                Fire extinguisher          Gas bottle
            Wastewater drain      Cassette toilet      Control panels       Leisure battery
                                                                                                 (depending on country)    cupboard

          Despite being the exclusive property of Groupe Pilote the photographs and illustrations published here are not contractual.
          Pilote Group reserves the right to modify, add or remove components or technical characteristics at any time, without notice,
          for the sole purpose of improving the quality of its products. Despite the care taken in preparing it, this catalogue is not a
          contractual document.
1. WELCOME                                                          Warning, risk of injury
                                                                    If you ignore this, you may place other people in
1.1 Welcome aboard!                                                 danger.
Thank you for choosing to buy a Pilote.
It is very important to read this user manual carefully, as well
as the instructions provided with all the fittings: refrigerator,   Warning, risk of property damage
water heater, heater, oven, etc.                                    If you ignore this, you may damage the appliance(s)
To ensure greater comfort and to prevent excessive                  concerned.                                              56
depreciation of your campervan, use it correctly.
Our Pilote network and Pilote customer relations department

                                                                                                                          ENGLISH
are always available to help.                                       Additional information
Any infringement, translation or copy of all or part of this        These provide further information or draw your
document is strictly forbidden. Any full or partial copy            attention to useful details.
requires our prior written permission.
Enjoy travelling in your campervan Pilote
                                                                    Protecting the environment
1.2 How to use this manual                                          Certain actions and behaviours may cause damage
                                                                    to the environment.
Always keep the user manual to hand in the campervan
and inform the other users of the safety instructions. This
document contains some important remarks concerning
personal safety. Please read it carefully. You will find            Cold weather use
below the meaning of the various pictograms used in this            Beware of hazards caused by cold weather.
document.

                                                                    Warranty limitation
                                                                    Warning, you may limit or void the warranty if you
                                                                    do not heed these recommendations.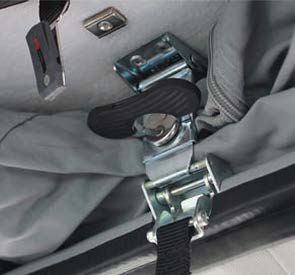
1.3 Legal Information
          1.3.1 Regulations
          The vehicle must be registered according to regulations. There are no specific regulations that apply to the use of a campervan.
          Campervans are both vehicles and a form of accommodation that are subject to the following codes, depending on the country:
          • the highway code when driving the vehicle
          • local legislation and the highway code when parking on public roads
          • urban land use code when parking on private property
57
          1.3.2 Warranty
ENGLISH

          • The dealership warranty is for 24 months from the campervan’s in-service date. The date is specifically mentioned by the
            dealer in the box reserved for that purpose on the warranty certificate.
          • The warranty only applies to the living area and any modifications made by GP SAS to the base vehicle chassis; the chassis
            is covered by the automotive manufacturer’s warranty.
          • The warranty should, as far as possible, be redeemed by the dealership where the vehicle was purchased, both for the living
            area itself and for any defective parts that may be replaced separately.
          • The campervan shall be made available to the dealer for any exchange or repair. No refund shall be made for the cost of
            transport to and from the dealer (both for the campervan and the people) or other related expenses incurred directly or
            indirectly.
          • If household appliances are covered by their own manufacturer’s warranty (fridge, heating system, etc.), contact your
            nearest brand representative (see list of representatives provided with the appliance) or, failing this, your Pilote dealer.
          • You must fill out the warranty documents for appliances when provided and return them to the various manufacturers.
          The warranty will not apply in the following cases:
          •   The buyer has not complied with the instructions for use
          •   The campervan has been modified by a non-approved person or by installing non-original parts
          •   The damage or the defect is due to failure to observe the Highway Code
          •   The damage results from improper or negligent use
          •   Normal wear and tear
          •   The campervan was repaired in a workshop not approved by GP SAS or without its prior written agreement
          •   The campervan has been transformed or equipped with accessories not fitted by the manufacturer and which are liable to
              affect key vehicle characteristics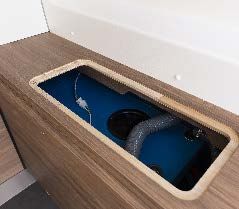
1.4 Campervan manners
1.4.1 General principles
Good campervan owners are discreet and should be careful not to leave any trace of their stay. Good manners, respect for
others and protecting the environment are values that everyone, including campervan owners, should abide by. The use of a
campervan as accommodation involves respecting the rules with regard to the inhabitants of those places visited.

1.4.2 Parking
In town centres or urban areas, it is advisable to park in areas that are not densely populated, that do not impair visibility or     58
prevent businesses from operating, and where the size of the campervan will not obstruct traffic. Likewise, campervans should
be used as accommodation in these areas:

                                                                                                                                    ENGLISH
•   without spreading to the area around the vehicle
•   without causing inconvenience to residents
•   without monopolising the public area
•   pets to run riot, foul or otherwise disturb the neighbours

1.4.3 Waste
Wastewater emptying must take place:
• In appropriate places and never near to housing, rivers, streams or crops
• The emptying of “black” waste (lavatory) into the rain water drainage network is strictly prohibited.
All water drainage valves must be closed whilst travelling. Even fresh water should be emptied discretely, to avoid arousing
suspicion. It is always worth checking the facilities in each location for properly disposing of wastewater. Household rubbish
must be placed in plastic bags and disposed of in designated places.

        Wastewater must be drained off in appropriate places, never near housing, rivers, streams or crops.

By observing all of these common-sense rules, everyone may fully enjoy the multitude of pleasures provided by their passion
for campervans.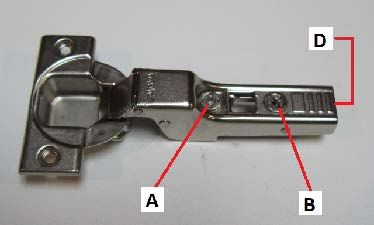
2. EXPLORING YOUR CAMPERVAN
          2.1 Base vehicle
          2.1.1 Chassis
          Your dealer should give you the user manual and the chassis maintenance book published by the automotive manufacturer
          when your campervan is delivered. We recommend that you take note of the contents and follow the instructions relating to
          chassis.
59                Wheel alignment must be checked at 1,500 km (900 miles). An additional inspection is also strongly recommended
                  at 20,000 km (12,000 miles). Such inspections are at your expense.
ENGLISH

          The chassis number stamp is located on the front right wheel-housing.

          The chassis number stamp is located
          on the front right wheel-housing.

                                         2.1.2 Tyres
                                         (See “Tyre pressure”, page 70.)

                                         2.1.3 Accessories
                                         Motorbike racks and coupling systems must be approved and fitted with the appropriate electrical
                                         circuit.

                  Accessories reduce the load capacity of the campervan and affect how the vehicle handles. The driver should adapt
                  their driving or even reduce speed in some countries.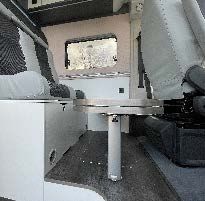
2.2 Living area
2.2.1 Hatches, openings and valves
Your campervan has several types of openings on the outside:
Doors and windows                                                 Drainage valves
• Cab entrance door(s)                                            • Draining the fresh water tank
• Living area entrance door                                       • Draining the water heater
• Side window(s)                                                  • Wastewater disposal                                             60
• Skylights (translucent)
• Storage compartment access doors                                Ventilation systems
                                                                  • Foul air grilles and/or ventilation shafts (for cooking

                                                                                                                                  ENGLISH
• Cassette toilet compartment door for draining
                                                                    appliances, refrigerator, heating system, etc. depending on
Hatches                                                             the model)
• Fuel                                                            • Devices built into the skylights and floor of the vehicle
• Fresh water inlet

2.2.2 Interior layout
Your campervan is made up of four equipment zones for your comfort and safety. The layouts differ according to the models
and the options delivered.
•   Driving: seats fitted with safety belts
•   Meals: table, seats, sink, cooking appliances, refrigerator
•   Bathroom: washbasin, shower, toilet
•   Living room: TV fixture, cupboards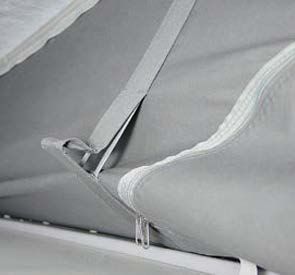
2.3 Basic fluid diagrams

                 DO NOT PIERCE THE CAMPERVAN FLOOR.
                 Gas and water supply pipes are built into the floor.
                 Never carry out any modifications unless performed by approved fitters.

          2.3.1 Water
61
          Supply diagram                                                  Fresh water
                                                                          Tank
ENGLISH

                 Fresh water
                 Filling is done via a filler flap fitted
                 with a locking cap and identified
          by a pictogram. The tank is located in the
          chest in the storage area. A door or hatch,
          depending on the model, provides easy
          access for draining and cleaning the tank.

                 Wastewater
                 Wastewater is collected in a tank
                 under the vehicle. The tank is
          emptied using a drainage valve located
          under the sliding door.
                                                              Tank     Water heater                  Wastewater
                                                            draining    Draining                       Tank
                                                                                                              Cassette toilet
                                                                                        Wastewater
                                                                                         Draining
2.3.2 Electricity
Supply diagram
The power supply is made up of a 230V AC part and a 12V DC
part.
230V supply
Connecting to the mains supply allows you to: 230V 12V
62
• recharge the leisure battery
ENGLISH
• use power outlets ~230V
12V leisure battery
• run the refrigerator on 230V Circuit breaker
• run the heating system if your vehicle is fitted with a 230V
Power pack 12V cab battery
heating system Sensors + booster
Fresh water Wastewater
12V supply Tank tank
Control panel
The campervan’s 12V supply comes from two batteries:
The engine battery and the leisure battery. The engine battery powers all electrical equipment in the vehicle section. The
leisure battery powers the electrical appliances in the living quarters. It is located under the passenger seat. This battery is of
the “semi-stationary” type. Under no circumstances may it be replaced by a vehicle start-up battery. For any replacement,
please contact your dealer. The two batteries are separated by a coupling device which charges using the alternator or
recharges using the automatic battery charger (230V supply). The charger for the power pack provides an additional charge to
the engine battery to offset low consumption when running a car radio, for example.
Under no circumstances will this operation completely recharge a depleted battery.
Never carry out or allow modifications to electrical appliances or systems, unless performed by approved fitters. A
cable reel must be completely unwound to prevent the electric power supply cable from overheating.
Incorrect assembly of the electrical and electronic accessories may seriously damage the campervan and void the
warranty.Solar panel
A solar panel may be plugged into the power pack’s connector (option). The installation of a solar panel as part of a second
assembly must be performed by a certified professional.
Solar panels often do not provide adequate additional charge when several electric appliances are used simulta-
neously at night.
63
A feeder cable is available behind the service hatch in the living room’s overhead unit.
ENGLISH
Generator set
When using a generator set, please carry out the following
steps in the right order: Any generator set connected to the campervan’s
230V system must be perfectly calibrated (risk of
• First start the generator set damage to the internal charger).
• Connect the 230V cable to the campervan
The circuit elements
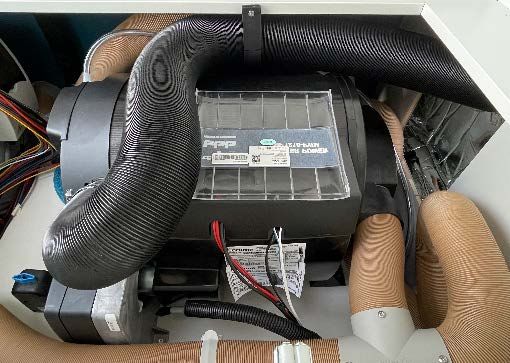
Power pack
The power pack includes a charger, a transformer (complete 12V distribution), and a fuse (circuit protection). On all models, it
is located in the lounge area.
Circuit breaker
The circuit breaker is next to the power pack.
Sensors
The sensors measure the fresh water and wastewater tank levels.
The current consumed should not exceed 90% of the nominal value of the fuse on the electrical unit.Xperience control screen
Xperience is the vehicle’s control screen. It enables you to control
electrical functions in the campervan’s living area and to display the
following:
• leisure battery levels
• water tank levels
• outdoor temperature 64
• current electricity consumption
• energy source indicator
ENGLISH
It is located in the entrance to the living area. See chapter 8 on how to
operate Xperience.
Technical provisions
The campervan’s electrical system must comply with required standards. Any interference with or modifications made to
electrical systems may affect personal and vehicle safety and is therefore prohibited. It is formally prohibited to carry out
modifications to the control panel. Only qualified technicians are allowed to work on the electrical connections, as specified in
the manufacturer’s assembly manual.
Operating voltage
The rated voltage is 12V.Electrical unit - Fuses Electrical unit - Connectors
Fuse No. Rating Purpose
1 230V input
F2 5A Awning light
2 Solar panel
F3 7.5A Pump
3 Refrigerator
F4 10A Auxiliaries
4 Electric bed
F5 10A Oven
5 Engine battery
F6 10A Lighting 1
65 6 Leisure battery
F7 10A Lighting 2
7 Living area charges
F9 10A Bedroom USB port
ENGLISH
8 Living area charges
F10 10A Kitchen USB port
9 Living area charges
F11 15A 12V kitchen power outlet
10 Chassis signal input
F12 10A Satellite dish
11 Wastewater tank
F13 5A Car radio
12 Fresh water tank
F14 10A Heating system
13 RS-485 port
F15 10A TV with demodulator
14 CI-Bus port
F16 25A Electric bed
15 CAN port (control screen)
F18 20A Permanent refrigerator
16 Battery / booster settings
F19 20A Step
F20 50A Auxiliary battery
F21 50A Engine battery
F1 25A Water pump bypass
F8 25A Lighting bypass
F17 25A Electric bed bypass2.3.3 Gas
Supply diagram
Pressure
The gas pressure regulator may be equipped with an automatic inverter, Connector hose regulator
depending on the model.
Flow regulator
with manual reset
Only approved fitters are authorised to work on gas-powered
appliances.
66
System
ENGLISH
Your campervan is fitted with a gas compartment that can hold two
bottles, only one of which is connected at a time. The gas bottles
should be placed in the compartment provided for this purpose. The
system operates only on propane, in all countries. The operating
pressure is 30 mbar.
For all connections of additional elements to your system, please
consult your dealer.
• Do not change the type of regulator
• Do not use the appliances with a different service pressure
• Before the indicated expiry date, replace the flexible supply hoses
(tubes) with an approved model that is identical to the original.
Do not store equipment in the gas compartment.
Gas system allowing heating while driving
The pressure regulator has a built-in impact detector. In case of an accident, with a strong deceleration, a mechanical
protection system shuts off the gas inlet. This system complies with European regulations and allows you to use the gas
heater while driving.
Apart from the heating, no other appliances are designed to be used when driving.2.3.4 Ventilation and heating
Having permanent upper and lower ventilation is essential in order to ensure constant air renewal.
• Lower ventilation is generally provided through a vent at the bottom of the furniture or in the floor.
• Upper ventilation is provided through the roof windows, which have a permanent vent system.
These systems enable natural air circulation, including inside the bench seats.
67 The vents should never be blocked, even during the winter. They must be kept clean and dust free. Do not store
equipment in the heating compartment.
ENGLISH
2.4 Safety
Never leave children unattended in your campervan. This safety precaution is crucial in campervans due to the presence of
medium and low voltage electrical appliances and gas-powered equipment.
Using the electric-window command can be dangerous. Ensure that there is no risk of passengers’ limbs getting caught in the
electric-windows.
2.4.1 Fire
Provide an approved dry powder fire extinguisher with a capacity of at least 1 kg and familiarise yourself with the instructions.
Keep a fire-blanket near the kitchen area. Consult the local fire safety measures.
Do not store aerosol cans in the campervan; there is a risk that they could explode at temperatures above 50°C, which can
often occur in the summer. Never use cooking or heating devices other than those installed in the campervan. If you must
plug in a cooking appliance or electric heater, it must work on the principle of direct radiation to avoid fire and asphyxia
hazards. (See “Emergency exits”, page 69.)2.4.2 Gas
Gas leak
If you notice the smell of gas, do not turn on lights, hand torches, lighters, matches, or any electrical item (e.g. switch), until
the smell disappears.
You should immediately:
1. Shut off the gas bottles
2. Ventilate by opening all windows and doors 68
2.4.3 Electricity
ENGLISH
Any modifications or repairs to the electrical circuit carried out in a non-compliant manner or without taking account of the
technical specifications of the circuit may cause malfunctioning or a fire hazard.
The battery is a dangerous piece of equipment and incorrect handling may trigger strong electric shocks. Do not go near the
battery with naked flames, lit cigarettes, any source of sparks or aerosol cans: risk of fire or explosion.
Always wear suitable eye protection when working on the battery or nearby. Do not store equipment in the
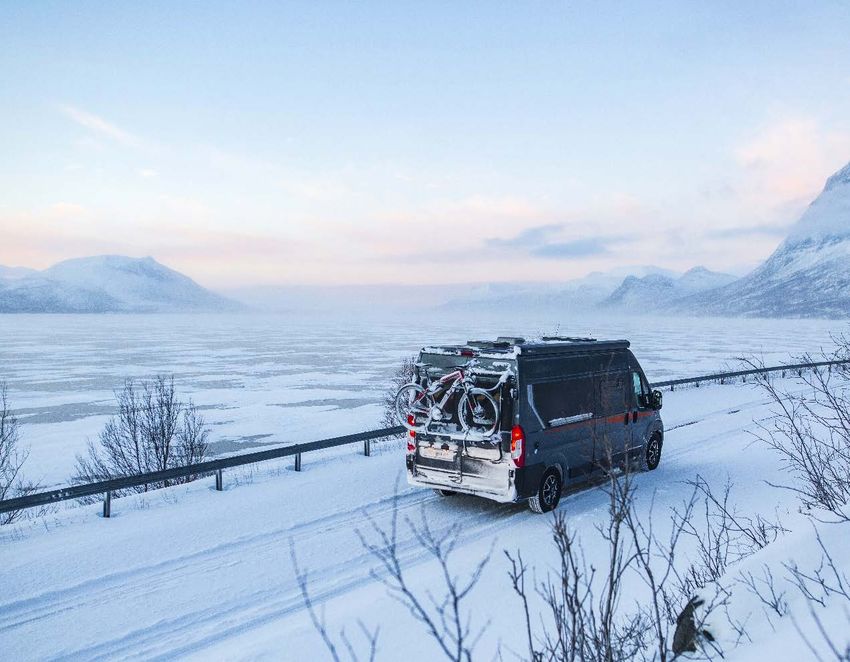
electrical compartment.2.4.4 Emergency exits
The diagrams below show the emergency exits in your campervan, in accordance with the applicable regulations.
69
ENGLISH
540G 540GD 600G
600S 600J 630G
630J 630LG
Model only available in Great Britain.3. PREPARING TO TRAVEL
3.1 Servicing after immobilisation
3.1.1 Fresh water
Re-pressurisation after a long wintering period can lead to the water arriving in a sporadic manner. It is therefore better to
purge the system while leaving the tap on. The pressure becomes constant as soon as there is no more air in the pipes.
70
3.1.2 Refrigerator
ENGLISH
For a gas-powered refrigerator, you must remove the external covers on the upper and lower air vents. The air vent covers
should only be used in the event of very cold weather to protect the interior; in this case, all gas appliances should be
switched off.
3.2 Refuelling and levels
3.2.1 Fuel
The fuel tank is accessed by a hatch located beside the driver’s door. The AdBlue tank cap is located in the same place.
Consult the user manual of the chassis manufacturer for the specifications. Before refuelling, turn off the gas appliances
and close the gas bottle taps.
When refuelling, it is strictly prohibited to use gas appliances, including heating, which may however be used
when driving.
3.2.2 Tyre pressure
To drive in complete safety, check the tyre pressure every 15 days and before any long trip.
Check the pressure when cold. Never reduce tyre pressure when tyres are hot, otherwise the pressure will be too low once
the tyres cool down. Tyre pressure should be adjusted according to the vehicle’s load.Cold tyre pressure recommended by manufacturer
See the base vehicle’s manual for tyre pressure information.
Under-inflating tyres reduces their service life and compromises your safety: risk of blowout, increase in braking
distances and loss of grip.
71 Consult the vehicle manufacturer’s manual for correct pressures. This information is usually displayed on a plate in the door or
fuel hatch.
ENGLISH
3.2.3 Fresh water
You can find water supplies in service stations when refuelling. An increasing number of service points are being set up
by local authorities; use them for both filling up with fresh water and emptying your wastewater. Filling up is done using
an external nozzle fitted with a lockable cap, identified by a pictogram.
3.2.4 Gas
Starting and stopping the system
Refer to the manufacturer’s manual to start and stop the gas system.
Changing the empty bottle
Refer to the manufacturer’s manual for how to change an empty bottle. Bottles must be securely strapped in place before
closing the compartment. Gas bottle connectors differ from one country to another. Make sure that the bottle is compatible
with your rubber gas pipe before replacing the bottle when abroad.
Residual gas: no smoking or naked flames.3.2.5 Battery
Before setting out on a trip, particularly after a long period of inactivity, check the charge on
the two batteries. To recharge the battery, connect the vehicle to the 230V mains supply for
24 hours, having previously checked that the F10 leisure battery protection fuse is installed.
Completely flat batteries are less efficient (they discharge more quickly).
The battery must not be in contact with any metal object. The battery housing
under the passenger seat must be kept closed at all times and must only contain the 72
battery.
ENGLISH
How to recharge
To recharge the battery, connect the vehicle to the 230V mains supply for 24 hours. Winterisation or storage for over 15 days
• Turn off the main 12V switch located in the entrance.
• Switch off all appliances and lights.
• Disconnect the battery terminals for stops over 30 days.
Follow the user manual instructions for the electrical unit corresponding to other immobilisation measures. If the vehicle
remains immobilised for a long period in severe cold, remove the batteries and keep them at a moderate temperature.
3.3 Practical and emergency equipment
You must have reflective vests as well as an emergency warning triangle (important: the legislation differs from country to
country, so check before travelling). Pack minimum items, such as a map, first-aid kit, toolbox, spare bulbs and fuses, water-
tank filling pipe, 230V extension lead.
Make sure there are snow tools in the campervan (spade, broom, etc.) to clear the entrance step, roof, windows
and around the vehicle.
3.3.1 Light bulbs
For all vehicle running lights, consult the FIAT user manual.3.4 Loading
3.4.1 Technical specifications
Your campervan was designed and approved in accordance with strict technical specifications that should be observed, such as:
• the maximum authorised mass (vehicle only)
• the maximum towable mass (for the trailer)
• the gross train weight (vehicle + trailer)
• the maximum loads allowed on each of the axles
73
• the mass in running order (See “Note”, page 75.)
These are stated on your certificate of compliance. Some specifications are also on the vehicle registration certificate:
ENGLISH
• Box F1: maximum authorised mass
• Box F3: maximum gross vehicle mass
• Box G: mass in running order
Registration plate (situated in the engine compartment) indicates:
• the maximum technically permissible laden mass (MTPLM) of the vehicle
• the gross train weight
• the maximum load on each axle (1, 2 or 3)3.4.2 Calculating mass
Calculate your load by taking into account all elements including passengers, luggage, equipment, optional extras, and full tanks
of fuel, fresh water and gas. This should be evenly distributed throughout the different storage areas of your vehicle.
≤ Maximum authorised
mass (MAM) 74
ENGLISH
Mass in running order (MRO)* Factory-assembled luggage + passengers + Gross train weight of
options (skirt drawer, equipment vehicle
gas cooker, hangers, etc.) (awning and air conditioning)
Actual mass
* MRO (mass in running order) is the vehicle’s mass (weight) with the fuel tank filled to 90%, 20 litres of fresh water, one gas bottle filled to 90%,
the driver (75 kg) and the standard vehicle fittings.
Caution: installing heavy optional equipment (additional water tank, 230V air conditioning + generator, motorcycle carrier,
etc.) will affect your load. Failure to follow these instructions may impact campervan safety conditions, particularly road
holding.
3.4.3 Storing baggage
To avoid having excess baggage, draw up lists for crockery, clothing and personal objects. We advise you to keep them in
a specific place, well wedged into the many storage compartments intended for the purpose, so as to be able to find them
easily. Make good use of the purpose-built storage compartments such as the furniture and lockers.
Failure to respect these instructions may lead to dangerous situations in case of sudden braking or collision.Load distribution
To preserve the roadholding of your campervan, the centre of gravity of the load must be as low as possible. This will reduce
any undesirable suspension effects, such as rolling, pitching, etc. Heavy loads must be tied down or wedged in to avoid any
ill-timed movement. If possible they should be placed close to the campervan floor and distributed evenly so as not to exceed
the maximum permissible loads.
75
ENGLISH
3.4.4 Trailer
The trailer weight must be less than or equal to:
• your campervan’s maximum tow weight
• the maximum authorised mass for your coupling.
Unladen weight Payload Trailer weight
The latter is calculated based on the value D (in kN) indicated on the coupling, using the following formula:
MR = (D x T) ÷ [(9.8 x T) - D]
Where T = maximum authorised mass of your vehicle (in tonnes). For example, if T = 3.5t and D = 12.5kN, then MR = 2t.
Maximum authorised mass Maximum Gross Vehicle Weight
Previous designation Previous designation
English: GVW English: GTW (gross train weight)
Maximum towable weight
Note: Pilote Group is committed to delivering vans whose MRO sits within the 5% tolerance threshold of that set during the certification process. This
5% value was set by European regulations in order to take into account potential variations in campervan weights due to manufacturing variables, both
for the base vehicle and living area; for example, the external canvas’ average thickness or the humidity rate of porous components may vary.4. TRAVELLING
4.1 Safety checks before departure
Before taking to the road, systematically check that all signalling devices (indicators, main-beam, dipped, warning headlights,
horn, etc.) are functioning correctly. Your campervan is always ready to take the road. There are no other specific road
preparations to be made. However, some precautions are necessary to avoid incidents.
• Check that all taps and valves are closed 76
• Lock the refrigerator door
• Close the doors to the wardrobe and bathroom
ENGLISH
• Close the side windows
• Close the skylights
• Lock the cupboards
• Close all drawers
• Lock all cupboard doors
• Lock the toilet sliding door
• Do not leave items on the tables or kitchen workbench
• Check that all the functions on the control panel are off
• Pull up the entrance step (electric or manual locking depending on the model)
• Close the living area door
• Disconnect the exterior 230V power cable
• Switch the refrigerator to 12V (only functions when the engine is running)
• Close and lock the pop-up roof if you have one.
Close gas bottles and gas-powered appliances before leaving, except for vehicles equipped with the gas system
allowing the heater to be used while driving.
4.2 Settings
• Check the adjustment of seats, safety belts and head rests
• Adjust the wing mirrors to your field of vision4.3 Driving
A campervan is much bulkier than a car.
Before first use, familiarise yourself with driving the vehicle, particularly in
reverse. Be very careful when going downhill, overtaking or if there are side
winds. On the road, always bear in mind the dimensions of your vehicle.
Height
77
Be careful with bridges, tunnels, car parks, overhead branches, service station
canopies, etc.
ENGLISH
Width
Avoid entering narrow passageways or areas involving complicated extraction
manoeuvres. If need be, perform an initial reconnaissance of the site.
Difficult situations
When manoeuvring, do not hesitate to ask for assistance from someone outside the vehicle.
4.4 Authorised seats
Authorised seats while driving
Only the seats in the living area marked with the sticker shown opposite are authorised when
driving, with the seat belt fastened. Only seats facing the road or back to the road are authorised
during driving, depending on the models. In some lounge configurations, you must remove the
cushions and adjust furniture elements (see the dinette sleeping area).5. STOPPING AND PARKING
5.1 Choosing a spot
Choosing flat ground will enhance your comfort inside the vehicle. If necessary, use chocks to level out your vehicle.
5.2 Safety when stationary
• Put the handbrake on
• Deploy the step if you are using the living area 78
• If you have to leave the vehicle for a while, close the sunroof and the skylights
• Turn off the power supply to the water pump on the control panel
ENGLISH
• Turn off the 12V switch on the control panel to avoid discharging the battery unnecessarily
It may be useful to use chocks to level out the vehicle.
5.3 Supply
5.3.1 Turning on the water
A switch on the control panel activates the water supply pressure. The pump works automatically whenever the sink or
washbasin tap is open (drawdown). While in use, the pump automatically sends water from the tank to fill the hot water tank
and the water heater.
5.3.2 Turning on the gas
Open the feed valves on the appliances located in the kitchen. If using the heating system when in motion, the heating
system/water heater valve must remain open.
1 2 3 Using gas-powered appliances in garages, enclosed car
parks or on ferries is prohibited.
1 • Heating/water heater 2 • Refrigerator 3 • Stove5.3.3 230V electricity
Connection to the mains is by means of a cable that can be plugged into the campervan exterior in the blue
socket. This socket includes a mandatory “earth” connection. Plug in the mains cable then activate the circuit
breaker located next to the power pack, to provide power to the living area. To avoid damaging your charger,
ensure that the supply provides 230V +/-10%.
Connect the motorhome to a 230V outlet as often as possible to prolong the life of the leisure
79 battery.
Stops from one week to one month
ENGLISH
Turn the control panel switch to the stop position.
Any generator set connected to the campervan’s 230V system
must be perfectly calibrated (risk of damage to the internal charger).
5.4 Draining
Motorway car parks, service stations and municipal rest areas often provide terminals for draining wastewater. Do not
leave draining to the last moment.
5.4.1 Wastewater
To drain it, activate the drain valve handle located under the sliding door. The valve area is marked by a pictogram.
Wastewater must be drained off in appropriate places, never near housing, rivers, streams or crops. The tanks should
be regularly cleaned to prevent bad smells.
5.4.2 Toilet
To drain the cassette toilet, fully open the hatch under the vehicle’s side in order to trigger the magnet and facilitate the
operation. No operation is required for 540G and 600S. For 600G, 630G and 630J, take the toilet out of its compartment
to access the cassette. For the 600J, the toilet must be stored in its compartment. To empty the cassette, consult the
manufacturer’s instructions.5.5 Insulation
In summer, use the insulating panels or screens to prevent the temperature rising in the campervan. Use appropriate
equipment to firmly attach your screen to the ground.
5.6 Locking
When you leave the campervan, systematically lock all doors and hatches and close all windows, including the skylight. Bring
in your screens and satellite dish to prevent any damage in case of wind. 80
ENGLISH6. USING THE EQUIPMENT
It is essential to be familiar with chapters 2, 3 and 5 before you read this chapter.
6.1 Windows and doors
6.1.1 Windows
Outward-opening window
81
Opening the window
ENGLISH
1. Pull the handles up into a vertical position.
2. Push the window outwards.
3. Adjust the windows using the friction stays.
The handle can also be used to set the window in a ventilation position: bring the handle back to a horizontal position so that
it lies halfway between the lock mechanism.Closing the window
82
ENGLISH
1. Push the window out as far as possible.
2. Pull the window slowly inwards.
3. Lower the handles into a horizontal position.
Outward-opening windows must be closed when the vehicle is in motion. Some windows have open sensors,
which turn the heating off when the heating vents are near a window.
Combined mosquito/sun screen
Pleated blinds.
3. The lower tab enables you to 4. To disconnect them, pull on the
1. Use the groove to lower the 2. Using the other groove, raise the
attach the mosquito screen to the tab to release the mosquito screen
mosquito screen. black-out blind.
black-out blind. part from the blackout blind part.6.1.2 Skylight
Special recommendations
Make sure that there is no snow, ice or dirt on the sunroof before opening. Check that the acrylic sunroof has not been
damaged by overhead branches or by toxic substances. The sunroof must be completely closed and locked before starting up
the vehicle. Do not operate it when driving. Consult a specialised workshop in case of defect or malfunction.
Opening
1 • Press the button.
83 2 • Pull the bar down.
3 • Select the open angle using the side notches.
ENGLISH
4 • The maximum open angle is 70°.
Closing
5 • Push the bar up until you hear a click.
6 • The skylight is locked.
The sunroof must only be cleaned with
alcohol-free substances. Close the roof
openings in the event of rain or strong winds,
and when the vehicle is moving.
Do not walk on the acrylic pane. Failure to comply with this recommendation will void the warranty.
Combined fly/sun screen
A ratcheting system allows you to combine the two screens to adjust the shade while protecting against mosquitoes and flies.
In hot weather, never block the roof window
by more than two thirds to ensure proper
ventilation and protect the material from
excessive heat.6.2 Kitchen
6.2.1 Sink
The water levels can be read on the control panel.
The pump may work in spurts if the water pressure is too low.
Never pour boiling water down the sink.
84
6.2.2 Gas-powered appliances
• Carefully read the instructions for gas-powered appliances.
ENGLISH
• Never use appliances with an operating pressure that differs from that for which they were intended.
• Never obstruct the waste gas discharges from the various appliances.
Hob
The hob should never be used for heating purposes. Furthermore, the campervan should be sufficiently ventilated when cooking
to avoid the formation of steam and condensation.
Switching on
1 2 3
1. Press the button while turning it
slightly to the left.
2. Light with the electric ignition
button if available.
3. Hold the button down for 5 to 10
seconds, then release.
The gas-powered appliances are equipped with safety mecha- nisms: the gas is automatically cut off if the
flame goes out. Do not fold down the glass cover while the stove is on.
Oven (option)
See the manufacturer’s instructions for operating the oven.Heating/water heater
General details
Our campervans are rated in the no. 3 heating category (according to the European standard EN 1646-1). Constant air renewal
and the appropriate amount of heating provide a pleasant atmosphere inside the campervan in all seasons.
Heat the inside of the vehicle sufficiently, even in your absence, to prevent the water pipes from freezing (especially those for
the toilet or used for wastewater). The inside of the campervan is airtight so condensation from the kitchen, shower or damp
85
clothing will not evaporate naturally. It is therefore necessary to air thoroughly while heating.
Adjust the heating according to the number of people, the parking location, and the internal and external temper-
ENGLISH
ature and humidity levels. A Truma window contact sensor automatically turns off the heating when the living
room window is open. Do not obstruct the air vents to the water pump in the storage area.
Heating/water heater system:
TRUMA Combi 4000W or 6000W water heater (depending on model) Air vent
Controls Drainage valveTruma Combi heating system (with optional 230V system)
Heating systems operating on gas or electricity (Combi EH option) diffuse heat throughout the vehicle via hot air vents.
Truma Combi diesel heating system (option)
The Truma Combi diesel heating system is connected directly to the vehicle’s fuel tank. In this case, the vehicle is not equipped
with an LPG regulator with impact detector. You must therefore close your gas bottles when driving.
Safety/drain valve
Your vehicle is equipped with an automatic safety valve, which opens as soon as there is a risk of freezing in the vehicle. Once 86
activated, it must be manually reset.
Start-up
ENGLISH
The system must be full to get hot water. The pump must therefore be activated first on the control panel. Activate the safety
valve to remove the air.
Please read the manufacturer’s manual before using for the first time.
Refrigerator
The air vent covers (optional) must be removed if the refrigerator is gas powered (see chapter 3.2).
Warning
When storing food, it is important to be aware of the specific operating conditions of a refrigerator installed inside a vehicle.
There are conditions under which the appliance is unable to guarantee the necessary temperature to preserve some highly
perishable items, because:
• when travelling, the refrigerator uses the 12V supply
• when parked, you can choose to run the refrigerator on gas or the 230V supply
• a refrigerator may be located behind a window exposed to the sun
• the vehicle’s temperature may vary a lot depending on external weather conditions
• the temperature inside a closed stationary vehicle, exposed to sunlight, may exceed 50°C/122°F
• you may need to use the refrigerator shortly after it reaches the optimum temperature.
The following are considered as highly perishable foodstuffs: all products with a use-by date combined with a storage temperature
equal to or below 4°C, specifically meat, fish, poultry, cooked meats and pre-cooked dishes.Health recommendations
• Pack raw and cooked foods separately using aluminium foil or plastic wrap.
• Only remove the cardboard or plastic outer packaging if the useful instructions (use-by date, storage temperature, cooking
instructions, etc.) are marked on the packaging directly in contact with the product.
• Do not leave refrigerated products too long out of the refrigerator.
• Place products whose use-by dates are the closest to expiring in the front.
• Place any leftovers in sealed containers and use them quickly.
• Wash your hands before touching food, between each handling of different products and before sitting down to eat.
87 • Clean the refrigerator regularly with soapy water. Rinse with a bleach solution.
6.3 Table
ENGLISH
6.3.1 Table mounted to vehicle sidewall
Eating position
To use the extension:
• pull the black knob downwards
• rotate the extension into the desired position
Sleeping position (option)
To convert the table into an additional sleeping
area:
• Fold the lower section of the leg
• Release the locks holding the table edge on the runner
• Reposition the table onto the lower runner
• Put the extra board in position by unfolding the
three legs and positioning the detachable leg to properly
support the board.
• Add the cushions.
• Put sheets on your bed. It is now ready!
To return the table to the eating position, repeat the
operation in reverse order.6.3.2 Fixed-leg central table
Eating position
The table can be adjusted in two directions
• lower the lever located under the table
• move the table to the desired position
• pull the lever back up to lock the table in place
Sleeping position (option)
88
To put the table in the sleeping position
• pull the lever located under the table
ENGLISH
• push downwards on the table until it lowers to the level of the bench
• pull the lever in the opposite direction to lock the table in position
To return the table to the raised position, repeat the operation in reverse order.
6.4 Beds
Pay attention to the risk of falling, especially for children. The upper bunk beds are not suitable for unattended children under
6 years old. Only use the bunk beds for sleeping purposes. Use the protective net in the vehicle to prevent falling from the
upper beds.
Pop-up roof (option)
Only use this bed when the vehicle is stationary.
Opening the pop-up roof:
• Insert the ladder.
• Unclip the straps.
• Unhook the fasteners and attach them to the
magnet.
• Push the roof up evenly to deploy it.
• Put sheets on your bed. It is now ready!
Important: Do not pinch the canvas in the
fastener, as this could put a hole in it.It is best to close the roof in a storm. As for rain, this will depend on how hard it is raining. The canvas is coated with a
waterproofing agent, but it cannot withstand heavy rain with strong gusts of wind. Use your best judgement when assessing
meteorological conditions.
Closing the pop-up roof:
• Remove the sheets and your belongings from the bed.
• Open a door to allow some airflow.
89 • Hold the handles on the top of the roof and pull down.
• Pull the canvas inside so it does not get stuck in the mechanism.
• Repeat this operation until the roof is completely folded down.
ENGLISH
• Hook the butterfly fasteners on and clip on the straps.
• Make sure the butterfly fastener is keeping the roof fully compressed.
The roof must be closed (with the fastener and strap) before you get back on the road.
6.5 Television
A TV mounting point has been fitted. The adjustable bracket ensures it can be safely mounted. The switch in this compartment
is used to shut off the 12V supply in order to avoid power consumption in standby mode. A connection (feeder yellow wire) is
available to automatically fold away the satellite dish when the engine starts. Consult your dealer about installing a TV.
6.6 Car radio and GPS (option)
Factory fitted in-car audio systems are powered by the leisure battery. This means they can be used
when at a standstill without discharging the engine battery. To use the car radio, turn on the vehicle
ignition using the key or switch on the auxiliary function on the control screen (see chapter 8).
Steering wheel controls are available as an option.
Butterfly clip that locks the roof6.7 Bathroom
6.7.1 Shower and washbasin
Never pour boiling water down the washbasin or the shower. When the wastewater tank is too full,
the overflow may back up into the shower basin. To avoid this problem, empty the tanks regularly
The bathroom’s retractable basins hold a maximum load of 5 kg.
Make sure you pull the shower curtain shut before leaving.
6.7.2 Toilet 90
Never pour boiling water down the toilet.
Handle to fold in the gusset
ENGLISH
Using the toilet
When using the toilet, turn on the valve located at the side of the bowl. Following use, activate the
flush on the tank then close the valve again. Before driving, slide the toilet into its position and lock it in place using the strap.
Emptying the cassette toilet
Empty the cassette toilet as often as necessary (see chapter 7).
6.8 Bike rack (option)
Incorrect use of your bike rack may damage your vehicle’s bodywork. Before opening the rear doors, pull your bike rack’s rails
as far to the left as possible so that they do not knock against your vehicle.Check this before each departure and adhere to the
bike rack’s maximum allowable weight, as indicated in its manual.
6.9 Installing the awning (option)
Before installing the awning, ensure that the sliding door is closed in order to avoid pinching or ripping the canvas. Do not use
the awning in strong winds.
6.10 Outside shower (option)
Use a cloth to prevent any water from flowing onto the unit when disconnected. Wipe away any remaining droplets.7. MAINTENANCE AND WINTERISATION
7.1 Gas systems
Regularly check that the gas intake hoses in the gas cupboard are in good condition. Replace them with an approved model
identical to the original, as soon as they wear out, and before the expiry date marked on the hose. Never use extensions on
these hoses.
91 Check the condition of the gas hoses regularly.
Follow the instructions in the manufacturer’s manual when replacing them.
ENGLISH
7.2 Interior maintenance
7.2.1 Cab
Refer to the manufacturer’s user manual.
7.2.2 Furniture
Use a damp cloth or mild cleaning product on furniture.
Metal hinges on furniture doors:
Over time, the cupboard and wardrobe doors may drop. You can adjust the hinges on these items.
A: Adjusting the contact surface to realign the doors:
turn the screw clockwise to reduce the contact, or
anti-clockwise to increase the contact.
B: Depth adjustment: Adjust the depth by turning the
off-set screw.
C: Safety screw (remove before dismantling).
D: To take off the doors, press the unlock button.You can also read