COLLECTION OF BLOOD SPECIMEN MANUAL 2020-2022 - Hamad ...
←
→
Page content transcription
If your browser does not render page correctly, please read the page content below
COLLECTION OF BLOOD SPECIMEN MANUAL
              2020-2022

    PREPARED BY: AMAL HUSSAIN ATEF- SENIOR LAB TECHNOLOGIST
    UPDATED BY: SAEHAM ALYAFEI, PHLEBOTOMY SUPERVISOR AND
                               LEADS
          REVIEWED BY : MONA FARAJ –AED/ LAB SERVICES
   APPROVED BY : DR. ABUL JALALUDDIN BHUIYAN – HEAD OF SECTION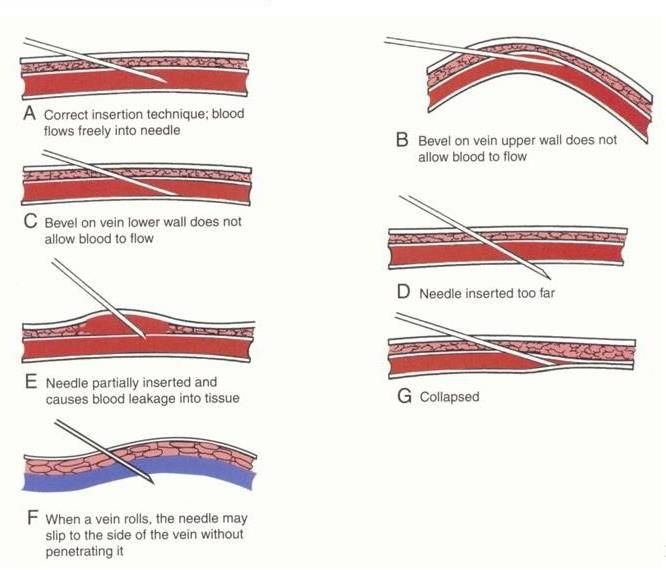
COLLECTION OF BLOOD SPECIMENS MANUAL

1. INTRODUCTIO:

1.1. Scope:
                        To standardize the venous and arterial blood specimen collection procedures for
                        medical laboratory testing. These guidelines are appropriate for adoption by all
                        health care providers responsible for blood specimen’s collection in outpatient and
                        inpatient setting.

                        1.2. Standard Precaution:
                        All patients and laboratory specimens are treated as infectious and handled
                        according to “standard precautions “. This includes and not limited to:
                        1.2.1. Personal protective equipment (PPE); i.e. gloves, close shoes, mask, gown, etc.
                        1.2.2. Hand hygiene practices.
                        1.2.3. Follow the corporate waste management practices. All contaminated items
                        such as gloves, tourniquets discard on clinical waste.
                        1.2.4. Maintaining clean work environment by daily disinfectant of work surfaces,
                        and clear phlebotomy arms’ chairs after each patient.
                        1.2.5. Adheres to use safety needles. Recapping a used needle is not recommended.
                        1.2.6. Personnel reasonably expected to have direct contact with body fluids shall be
                        identified and offered hepatitis B vaccinations.
                        1.2.7. If respiratory protection is needed because of potential exposure to an
                        infectious agent by aerosol or droplet, personnel should use either a properly fit-
                        tested filter respirator (N-95 or higher).

                        1.3. Definitions:
                         1.3.1. Phlebotomy – the act of drawing or removing blood from the circulatory
                         system through a puncture to obtain a specimen for analysis and diagnosis.
                         1.3.2. Venipuncture- the puncture of a vein for surgical or therapeutic purposes, or
                         for collecting blood specimens for analysis.
                         1.3.3. Vascular Access Devices (VAD)-a device inserted temporarily or permanently
                        into a vein and /or artery to allow access to the circulatory system for the
                        administration of fluids or medications, or for various procedures.
Figure 1. Blood Collection flow chart

2. BLOOD SPECIMEN COLLECTION PROCESS

2.1. Patient registration:
2.1.1. Proper patient identification begins at the registration process. Registration occurs when a patient is
admitted to a hospital or along-or short-term care facility.
2.1.2. Collection test request: Upon patient receiving for blood collection, test request – manual or
electronic- must be checked and ensure that information entered is accurate.
2.1.3. Approach the patient:
        2.1.3.1. The collector must observe at inpatient area for conditions and details related to the
        procedure; including but not limited to: signage, bracelets, specific precautions, present of ID
        wristband, obstacles preventing access to patients, patient position, present of IV lines, VAD, or
        fistulae.

                                                                                                  Page 2 of 27
COLLECTION OF BLOOD SPECIMENS MANUAL

         2.1.3.2. The specimen collector (Phlebotomist / Nurse) identifies herself or himself and stated her
         or his purpose.
         2.1.3.3. Sleeping patients must be awakened before proceeding.
         2.1.3.4. The healthcare provider (Phlebotomist / Nurse) must demonstrate empathy and respect
         upon approaching the patient.

2.2. Patient Identification
2.2.1. Patients shall be actively involved in the identification process and shall be educated on the
importance of correct patient identification if he/she is conscious and oriented
2.2.2. The specimen collector must ensure that the blood specimen is drawn from the right patients.
2.2.3. The two main identifiers shall be the patient’s full name and Health Care (HC)
Number/(QID)Number. HC number known as Medical Record Number (MRN) , and contains eight digits.
2.2.4. In Outpatient settings, verify patient identification using patient full name and HC number, and the
information given shall be cross-referenced with details in patient’s medical record.
2.2.5. Any discrepancies are identified; specimens are not to be collected until all inconsistencies are
resolved.
2.2.5.1. Patients who are unable to participant in the identification verification process, the health care
provider must ask a relative , a friend or other healthcare professional (assigned nurse/ physician) to
identify the patients . Document the process and representative information.

2.3. Pre-collection requirements:
The phlebotomist must comply with all pre-collection requirements.
2.3.1. Providing information and obtaining consent:
2.3.1.1. Explain to the patient about the laboratory testing and specimen collection.
2.3.1.2. Blood collection must not perform against the patients or guardian’s consent. The phlebotomist
must report the patient’s objections to the physician or other healthcare professional (assigned nurse/
physician).
2.3.1.3. Physiological Factors.
        2.3.1.3.1. Some specimens require collection at a specific time, or fasting requirements. Time and
         diet restrictions according to the test restrictions are necessary to ensure accurate test results
         2.3.1.3.2. It is vital that timed tests are collected at the precisely specified internals, examples are:
         Glucose Tolerance Test (GTT), cortisol, digoxin, Growth Hormone,..ect and more information can
         be found on the internal lab guide.
         2.2.1.3.3. No food or liquid, chewing gum, or other objects should be in the patient’s mouth at the
         time the specimen is drawn.
         2.2.1.3.4. Politely ask patient to not use the mobile or take photo during the procedure.

2.4. Hand Hygiene
The phlebotomists or health care provider who will perform the collection must perform hand hygiene
before contact patients according to (refer to CL 7241: HAND HYGIENE)

2.5. Assess the patient
2.5.1. To ask the patients if any complications or condition with blood collection, examples: latex allergy, shock
cases.
2.5.2. If a patient with a history of syncope (faint) must be recumbent (horizontal) by proper Reclining chair or bed.
2.5.3. No food, liquid, chewing gum, or another object should be in the patient’s mouth at the time of specimen
collection.

                                                                                                              Page 3 of 27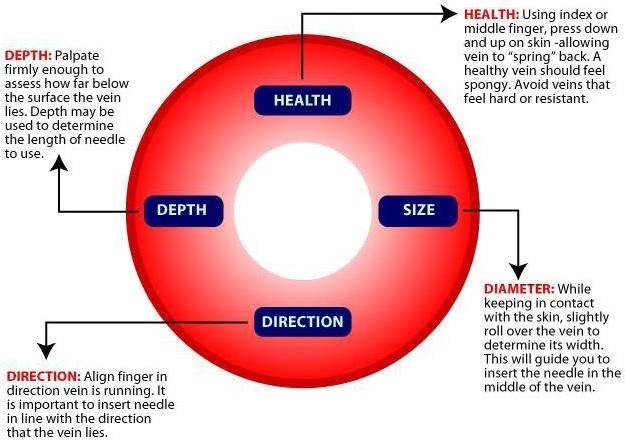
COLLECTION OF BLOOD SPECIMENS MANUAL

2.6. The position of the patient:
2.6.1. Specimens must collect with the patient positioned comfortably in a seat or recumbent position. The arm
should be placed horizontally or slanting slightly downward on a suitable support (armrests, table,).
2.6.2. Assist the patient to extend her/his arm into proper position. Must not forcibly extend the arm of a patient if
the full extension is not possible due to stroke, injury, or other circumstances.
2.6.3. Patients must sit in a chair with safety features to provide support and prevent falls. If it is not available;
collection must be collected with the patient in a recumbent position.
2.6.4. Patient in a wheelchair, ensure secure the chair to prevent movement during the procedure.
2.6.5. Not to collect specimen when the patient is sitting on an examination table or a side of the bed.
2.6.6. Adjust the patient’s bed if necessary to facilitate arm extension.

2.7. Home collection:
2.7.1. Patients must be placed in a recumbent position or a chair with arm support.
2.7.2. Do not put your equipment on or near food.
2.7.3. Ensure patient safety since there may not be any help available if the patient faints.
2.7.4. Ensure patient confidentially and the privacy of the patient’s home.

2.8 Specimen Collection:
2.8.1. Phlebotomy Supplies:
2.8.1.1. Supplies must be inspected for defect and used within expiry date.
2.8.1.2. Devices MUST NOT be preassembled by the collector before the patient is identified.

2.9. Select the site:
2.9.1. The preferred venipuncture site is the antecubital fossa, if not unavailable, the vein on the back of the hands
can be used.
2.9.2. Arterial puncture SHALL NOT consider an alternative to venipuncture because results will not be equivalent for
many analyses.
2.9.3. Veins on the palmar surface of the wrist and the lateral wrist above the thumb to the mid-forearm must not
be used.
2.9.4. Draw must not be performed on the scalps of newborn, or ankles because of the potential of significant
medical complications.

                                                  Sites That Must Not Be Used
                           Sites                                                        Rationale
Fistula, arm with a fistula, or vascular graft.              Threatens the integrity of fistula and vascular grafts, which
                                                             can lead to serious patient complications.
Arteries                                                     Risk of misinterpretation of results and patient
                                                             mismanagement if arterial blood is used rather than venous
                                                             blood.
                                                             (Note: Arterial and venous blood specimen are not
                                                             equivalent for many analytes).
Veins on the lateral and palmar surface (underside) of       Increase risk of nerve, tendon, and arterial involvement.
the wrist.
                                            Sites That Should be avoided
                          Sites                                                     Rationale
Extensive scaring, healed burns                          Palpation and needle insertion complications.
                                                         Inability to detect the adverse reaction.
Hematoma                                                 May cause discomfort and potential altered test results.
Above and below infusing fluid or from VAD               Possible contamination of specimen with IV fluid.
Inflamed sites ( including tattoos)                      Patient discomfort and possible complications

                                                                                                            Page 4 of 27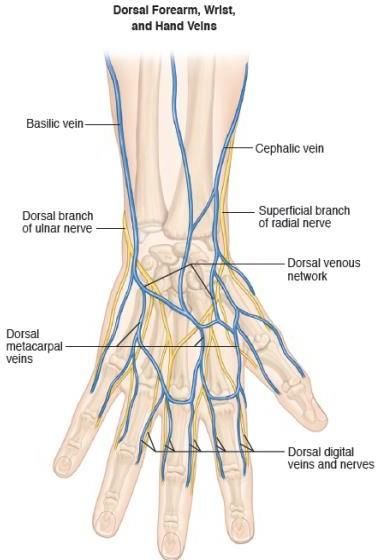
COLLECTION OF BLOOD SPECIMENS MANUAL

Edematous sites                                           Potential for altered test results
Feet or Ankles                                            Risk of clot forming especially in bedridden patients
Extremity affected by stork and injury                   Inability to detect adverse reaction, eg. Nerve injury, pain,
                                                         infection.
Mastectomy                                               Risk of infection and lymphedema if arm on side of
                                                         mastectomy in used
                     Table 1. Site Selection limitation when collecting Venous blood specimen

2.9.5. Select the vein.
         2.9.5.1. Apply Tourniquet to facilitate vein palpation and specimen collection by prioritize the antecubital
         veins for safety. Place the tourniquet around the arm 3-4 inches (7.5 to 10 cm) above the intended
         venipuncture site
         2.9.5.2. Tourniquet application MUST NOT exceed ONE MINUTE before accessing the vein to prevent
         patient complications and ensure accurate test results. Comply with this will prevent Hem-concentration.
         2.9.5.3. If tourniquet placed for longer than one minute before accessing the vein, it must be released and
         reapplied after two minutes before the venipuncture is performed.
         2.9.5.4. A non-latex tourniquet must be used to prevent latex sensitivity and allergic reactions.
         2.9.5.5. A single-use tourniquet is recommended to avoid the spread of healthcare-acquired infections.
         2.9.5.6. Construction must not be excessive or uncomfortable to the patient.
         2.9.5.7. For patient comfort, the tourniquet may be applied over clothing to prevent pinching of the skin, or
         gauze can be used as a barrier between tourniquet and the patient skin.
         2.9.5.8. Always check the second arm for alternative and better vein before performing the venipuncture in
         the first arm.
         2.9.5.9. The vein assessment to determine : vein’s depth , size, direction , and health condition.

                                  Figure 2.Vein assessment. CAP competency 2017.

2.10. Antecubital anatomy:

2.10.1. Antecubital vein location varies from person to person. There is two basic vein distribution arrangement, the
“H-shaped” and “M-shaped.”
2.10.2. The “H-shaped” pattern is in the most population including the cephalic, median cubital, and basilic veins.

                                                                                                          Page 5 of 27
COLLECTION OF BLOOD SPECIMENS MANUAL

                                   Figure 3. Superficial veins of the arm . GP41, 7th ed , P. 19

                                       Figure 4. Hands veins . GP41, 7th ed, p.15

2.10.3. Prioritizing veins according to risk can minimize the potential for injury and complications .
Vein selection as follows:

                                                                                                         Page 6 of 27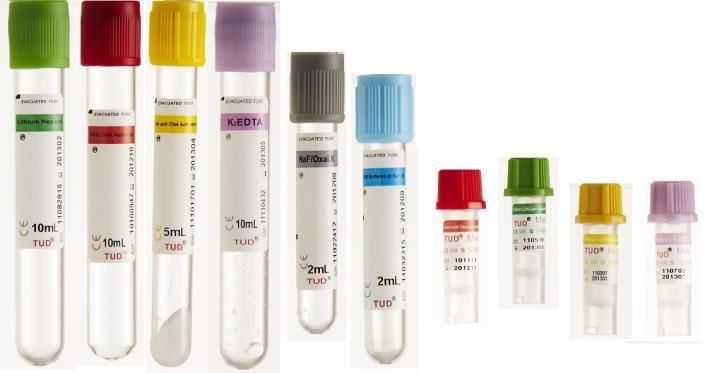
COLLECTION OF BLOOD SPECIMENS MANUAL

                                                               First; Veins in the medical aspect (Centre) ,
                                        Figure 5. Antecubital veins  locationsand lateral aspect of the
                                                               i.e., Median
                                                               medical cubital veins

                                                                Second; Veins in the lateral aspect (Outer) ,
                                                                i.e., Cephalic vein and accessory cephalic
                                                                vein.

                                                                Third; Veins in the medial aspect ( Inner),
                                                                i.e. , Basilic vein and medial aspect of the
                                                                medial cubital vein

                          Figure 6. Prioritization of antecubital veins . GP41, 7th ed , p.21

2.11. Clenching the fist:
2.11.1. It is not a mandatory requirement. Vein become more prominent and more accessible to enter when a
patient forms a fist.
2.11.2. Patient must not be instructed to vigorously open and close the hand (pumping) that can cause significant
elevations in the potassium concentration in the specimen collected.

2.12. Phlebotomy supplies:
The phlebotomist/collector must inspect all supplies for possible defect and check the expiration date. Devices must
not be preassembled by the collector before the patient identified.
2.12.1. Needles: Select the appropriate device and needle gauge based on the vein characteristics and volume of
blood to be collected.
2.12.2. Tubes: must be selected according to the test requested and a laboratory requirement.

                                          Figure 7. Tubes and needles sizes

                                                                                                           Page 7 of 27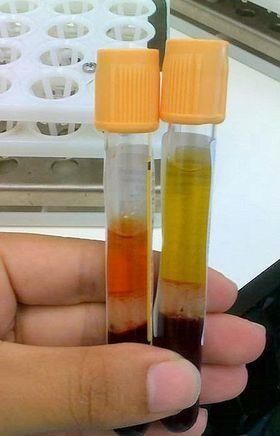
COLLECTION OF BLOOD SPECIMENS MANUAL

2.13. Gloves are donned:
The phlebotomist or collector must put new gloves on before the venipuncture is performed for each patient; with
consideration of latex hypersensitivity. It is not allowed to remove fingertips of the gloves.

2.14. Clean the site and apply tourniquet:
The venipuncture site must be cleaned to minimize microbiological contamination of the specimen and patient
infection.
2.14.1. Clean the site with 70% isopropyl alcohol pad or solution. If specimen is being collected for a blood alcohol
level; use a non-alcohol-based cleaner.
2.14.2. Allow area to air dry. This prevents any burning sensation experience when venipuncture performs and also
prevent hemolysis of specimen collected.
2.14.3. Clean the site outward using back& forth.
2.14.4. If the site re-palpation after cleaning, the site must be clean again.

                                                                              Tourniquet time NOT
                                                                               accessed ONE min.

                                           Figure 8. Apply the tourniquet

2.15. Perform the Venipuncture:

2.15.1. When using evacuated tubes, following steps must be performed:

2.15.1. 1. Ensure the patient’s arm or other venipuncture site remains is a downward position to prevent reflux or
backflow from collection tube into the vein.
2.15.1.2. Hold the patient’s arm firmly distal the intended puncture site. Draw skin taut to anchor the vein 1 to 2
inches (2.5 to 5 cm) below the venipuncture sire in such manner that anchoring dose not impeded needle insertion.
2.15.1.3. Anchoring the vein from above is not recommended due to the risk of an accidental needle.
2.15.1.4. To prepare the patient to inform the patient that venipuncture is about to occur. Be prepared for any
sudden unexpected movement or adverse.
2.15.1.5. Puncture the vein with steady forward motion in the direction of venous with the bevel up, keep the needle
in line with the vein and at an angle of 30 or less .

                                                                                                         Page 8 of 27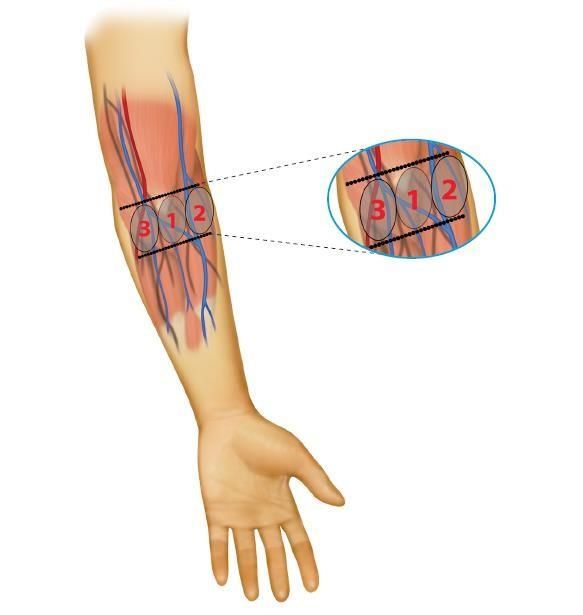
COLLECTION OF BLOOD SPECIMENS MANUAL

                                    Figure 9. Needle Angle of Insertion. GP$, 7th ed. p.24

2.15.1.6. Maintain needle placement while advancing the tube using the fingers of the holder to stabilize the device
until tube fills.
2.15.1.7. When using a winged blood collection set, maintain needle placement by holding or otherwise securing the
device throughout the collection.
2.15.1.8. Do not allow the patient the pump hand. Instruct patient to open his or her hand if the fist is performed.
2.15.1.9. Release the tourniquet as soon as blood flow is established to minimize hemoconcentration; unless is felt
that vein collapse.
2.15.1.10 Remove the last collection tube from the holder before removing the needle from the vein.
2.15.1.11. Remove the needle in one smooth motion without lifting up or pressing down on it.

2.16 When using syringe method:
The traditional venipuncture syringe should be avoided for safety reason. If condition required a syringe collection,
the following procedure is recommended:
2.16.2.1. Assemble the needle and syringe. Break the seal of the plunger according to the manufacturer’s
instructions, ensuring all air is expelled before use.
2.16.2.2. Repeat points (2.15.1.4 to 2.15.1.11).
2.16.2.3. When transfer blood from a syringe to a blood collection tube is required:
2.16.2.3.1. When transferring blood from a syringe to a blood collection tubes; activate safety feature of the needle
or winged blood collection set as soon as the needle is withdrawn. Remove and discard the assembly and apply a
safety transfer device to the syringe.
2.16.2.3.2. Immediately insert the first tube into the safety transfer device and pierce the closure with the needle.
Allow the tube to fill without applying any pressure to the plunger. Follow the same order of draw.

2.17. Collection tubes:
2.17.1. All additive tubes MUST BE filled to their stated volumes. Closure MUST NOT remove to fill tubes or transfer
blood from one tube to another even same type.
2.17.2. Allow blood to fill the tube until the maximum stated volume is reached (vacuum is exhausted).
2.17.3. When tube is filled removes the tube from the needle /holder and mix by gentle inversion.
2.17.4. Follow the recommended order of draw (figure).
2.17.5. Release the tourniquet before remove the last collected tube.
2.17.6 Order of Draw.
The order of draw is the same for specimens collected by syringe or tube holder; the purpose is to minimize crosses
contamination when multisample specimens are collected that avoid possible test result error due to additive
carryover:

    1.                            Blood culture bottle
    2.                            Sodium Citrate tube ( Light blue closer)
    3.                            Serum tubes, including clot activator and gels (red, gold closures).
    4.                            Heparin tubes with or without gel (dark green, light green closures).
                                                                                                          Page 9 of 27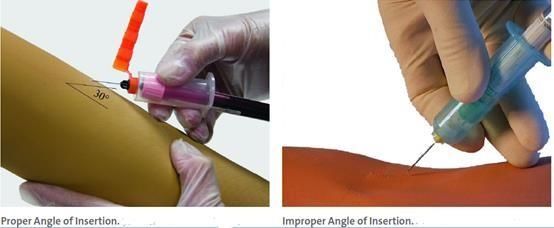
COLLECTION OF BLOOD SPECIMENS MANUAL

    5.                           EDTA tubes (lavender, pink closures)
    6.                           Sodium Fluoride/potassium oxalate glycolytic inhibitor (gray closure).
    7.                           Trace elements tubes (Lithium Heparin and EDTA), Royal or dark blue closure.
                                      Table 2. Recommended Order of Draw

2.17.7. After filling any tube immediately, phlebotomist /collector must mix blood gently by inverting the tube slowly
for the required number of inversions per the manufacturer’s instructions. For multiple tube collection, tube can be
inverted while the next tube is filling. Avoid mixed vigorously that cause hemolysis.

                                     Figure 10. How to perform tube inversion

                            Figure 11. Vacutainer order of draw and mixing guidelines .

2.17.8. When a winged collection set is used for venipuncture, and a coagulation tube is the first tube needed, the
phlebotomist must first collect a discard tube to prime the tubing of the collection set, and ensure proper blood and
anticoagulant ratio. The discard tube must be non-additive or a coagulation tube, and dose not to be completely
filled.

2.18. Needle removal, disposed of, and pressure applied:
2.18.1. The phlebotomist/collector must remove the needle, place a clean gauze pad lightly over the venipuncture
site, and immediately activate the safety feature, some devices activated before the needle is removed from the
vein, follow the manufacturer’s instructions.

                                                                                                        Page 10 of 27
COLLECTION OF BLOOD SPECIMENS MANUAL
2.18.2. Then apply pressure to the site. The patient may assist in applying direct pressure as long as a phlebotomist is
monitoring the site to ensure pressure is adequate.
2.18.3. Patient must not be allowed to bend his/her arm at the elbow; this technique is not adequate to prevent
hematoma formation.
2.18.4. Cotton and rayon ball are not recommended; because of the possibility of dislodging the platelets plug at the
venipuncture site.
2.18.5. Needles must discard safely on sharps container.
2.18.6. Needles must not be re-sheathed, bent, or broken.
2.19. Labeling of Specimens:
2.19.1. Specimens tubes must be labelled immediately after the collection and in the present of the patients.
2.19.2. Information required information are:
1- Patient’s first and last name.
2- Patient medical record number (MRN).
3- Collection data and time.
4- Collector identity (electronic sign).
2.19.3. The label must be applied to the tubes in a manner that ensures all the information is visible. Position the
barcode labels carefully in tubes.
2.19.4. For manual or handwriting labelling, each tube must be labelled at the time of the collection by the
information required and collector sign, date and time. Information must be verified to match the information
into the LIS or written on the paper records.
2.19.5. If more than one specimen is expected to be collected, i.e. glucose tolerance tests (GTT), collection time must
be added to the label.
2.20. Post-Venipuncture Care:
2.20.1. Check the bleeding in stopped from the venipuncture sites for any hematoma. Prolong bleeding site must be
observed at least five to ten seconds before bandage. If bleeding has not stopped, pressure must be applied as long
as necessary to stop the bleeding.
2.20.2. When the bleeding stopped apply gauze bandage or self-adhering bandage tightly around the arm to keep
the pad in place. Latex-free adhesives must be available.
2.20.3. Instruct the patient to leave bandage on for at least 15 minutes. Moreover, to give attention to any pressure
on the arm to protect the wound site.
2.21. Specimen Handling and Transportation:
Some specimens required special handling. Proper transport conditions must be maintained to preserve specimen
integrity. For additional information, refer to lab guide and CL7067 policy.
Figure 12. Placed tubes upright postions on a specimen rack
Page 11 of 27COLLECTION OF BLOOD SPECIMENS MANUAL
3. Blood Specimen That Cannot be obtained:
3.1. Repositioning the needle without establishing vein location is considered blind probing and must not be
performed. This can be painful and result in nerve damage, arterial puncture, or hematoma.
3.2. When collection failed; the tourniquet and needle must be removed, activate safety needle and apply pressure
to the puncture site.
3.3. Any additional attempts must start from the beginning of the procedure, another site or arm is preferred. Never
use the same needle for re-puncture. It is advised that same phlebotomist can attempt a venipuncture no more than
twice. If possible another phlebotomist can perform it; unless there are no alternatives, the phlebotomist must
consent the patient to perform an additional attempt.
3.4. If the specimens cannot be obtained, this must be recorded along with phlebotomist ID, if at INPT wards, Nurse
In-charge or a physician should be notified.
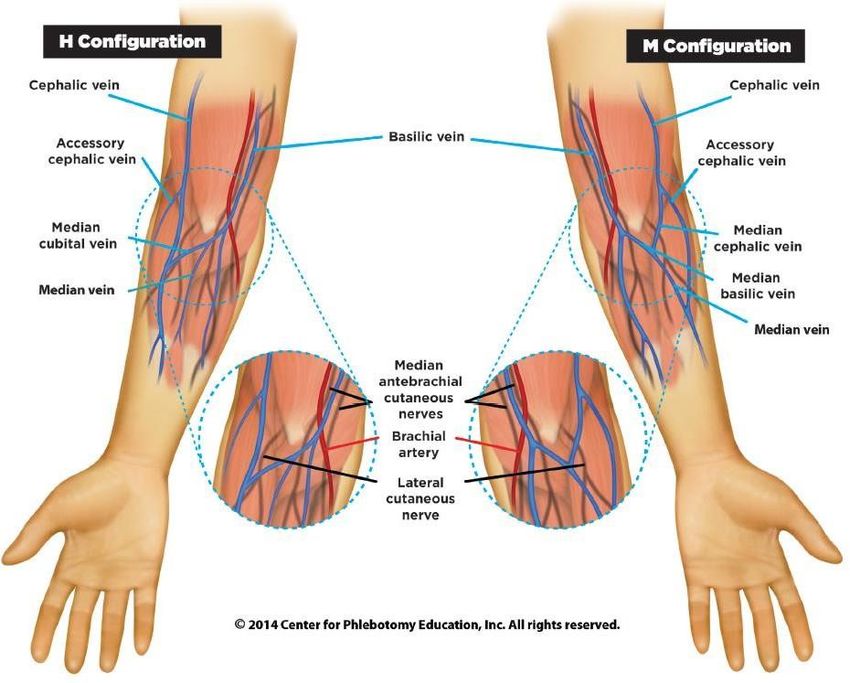
3.5. When blood does not flow upon needle insertion, the phlebotomist must assess the situation before considering
the following actions:
3.5.1. The needle placement is too shallow; advance it slightly farther.
3.5.2. The needle has penetrated too far into the vein; withdraw is slightly.
3.5.3. If the vein collapsed upon the needle of the bevel needle; release the vacuum pressure (remove the
tube or release the syringe plunger), wait for the vein it fills, and reapply the vacuum pressure. If blood flow
cannot be established, a repeat puncture may be necessary using a smaller needle and or smaller volume
tube.
3.5.4. Apply another tube of the same type in case the current one is defective.
4. Other Difficult Situations:
Patients may present with a verity of conditions that can challenge the phlebotomists or collectors:
Situation Difficulties Recommendations
Difficult to locate veins,
decreased vein elasticity, Pre-warming venipuncture sites help to locate veins. Anchor
Elderly patients rolling, collapsing or fragile veins securely to prevent rolling. Using small needles, low-
( Geriatric) veins, dehydration and low volume tubes or syringe with gentle pulling pressure prevent
blood pressure make locating vein to collapse.
vein difficult.
Longer needles help access deeper vein. Bariatric chairs are
Deep veins, challenging
recommended at out-patient to prevent discomfort and
Obese patients palpation and locate a vein.
embarrassment. Pre-warming sites can help. Using a vein
Rolling veins may present.
finder may enhance vein location.
Chemotherapy can alter
Oncology vasculature and affect vein Same techniques of Elderly patients
patients patency and palpability.
Rolling veins.
Present yourself with confidence, complete producer as quickly
Fear of needles, a negative
Needle-phobic as possible. Reclining the patients, use distraction techniques,
encounter with sharps,
patients exercise an abundance of patience and compassion to help
painful.
patients.
An additional person or employee to assist is recommended to
Cognitively immobilize the patient. If phlebotomist feels that producer
Impaired and Unpredicted and sudden cannot be performed safely, assistance should be requested or
combative motions and behaviours. notify physician or caregiver. Do not place equipment within
patients reach of the patient. A clean gauze pas should be ready in case
of needle violently removed.
Page 12 of 27COLLECTION OF BLOOD SPECIMENS MANUAL
Venipuncture in Apply reducing stress strategies include; giving patient a role to
pediatric patients Can result pain and anxiety.
play, distraction and interactive games ( see. ….)
Table 3. Difficult situations in phlebotomy
Figure 13. Needle positioning and failure to draw blood
5. Collection Proximal to an Intravenous Infusion site:
Collecting blood proximal to active intravenous (IV) sites is not recommended. However; if no options are available,
the procedure followed is:
5.1 Ask the responsible caregiver to turn off the IV infusion for at least two minutes before venipuncture. Make sure
the flow has been completely discontinued.
5.2. Apply the tourniquet just proximal to the vascular access devices (VAD), but no so close that may obstruct the
procedure or constrict the catheter within the vein.
5.3. Perform the venipuncture. Then notify the caregiver that collection completed and infusion may be restarted.
5.4. Document in the patient record that specimen was obtained proximal to an active IV site with the type of fluid
being infused.
Page 13 of 27COLLECTION OF BLOOD SPECIMENS MANUAL
6. Capillary Collection:
In this section we are applying information that will ensure quality of pediatric blood specimens that are not affected
by pre-analytical errors
6.1. Type of patients:
6.1. 1. A health care setting can present many challenges when it comes to collecting blood specimens that are
necessary for diagnosis and treatment.
6.1.2. If venipuncture is not possible, capillary puncture may be useful for:
6.1.3. Pediatric patients are:
I. Neonates and infants
II. Critically ill children whose condition warrants such technique
III. Children where venous access is not readily available
IV. Children who require frequent medical procedures (chemotherapy).
6.1.4. Other difficult critical:
I. Severely burned patients
II. Critically ill or oncology patients whose veins are used frequently to administer therapeutic
medications or treatments
III. Geriatric or other patients with very fragile veins
IV. Point-of-care testing procedures
V. Extremely obese patients
6.2. Collection sites:
6.2.1. Collection by capillary puncture is NOT appropriate when conditions are present that include:
I. Dehydration
II. Edema
III. Poor peripheral circulation.
6.2.2. Advantages of skin puncture technique:
I. No need to use a vein
II. Sites can be easily rotated
III. Technique is easily taught
IV. Small but adequate testing volumes can be obtained
V. A specimen is always obtainable
Page 14 of 27COLLECTION OF BLOOD SPECIMENS MANUAL
Figure 14. Capillary collection sites
6.3. Puncture Devices:
6.3.1. For children less than 1 year of age: the penetration depth of the device should not exceed 1.8 mm, e.g.,
Neonate lancet or similar device
6.3.2. For children over 1 year of age: the penetration depth of the device should not exceed 2.0mm
6.4. Capillary Collection Devices:
6.4.1. Skin-puncture specimens may be collected by capillary action into Micropipette:
Capillary tubes (heparinized or non-heparinized).
Blood gas capillary tubes.
Micro collection containers
6.4.2. For a variety of semi-quantitative tests directly onto:
Special kinds of filter paper
Special “reagent strips”
6.6.3. Skin-puncture blood can be obtained from the:
Lateral or medial plantar surface of the heel
Plamar surface of the distal phalanx of a finger
6.6.4. Prepare list of items in your area :
Disposable gloves
Packaged alcohol swabs or pads
Gauze sponges (2X2)
Microcollection tubes
Capillary tubes
Disposable retractable blood lancet device
Puncture-resistant sharps container
6.5. Patient identification for Pediatric:
6.5.1. Ask the child to state his/her name if this is an older child or ask the parent or guardian to state the child's
name if this is a young child or if the child is unable to provide the information.
6.5.2. Newborns that are not yet named may be identified by their last names and unique identification number. In
some hospitals, the baby may wear a bracelet that cross-references to the mother.
6.5.3. An outpatient's name and birth date may be used for identification if ID bracelets are not used for outpatients,
but the patient must verbalize the information (or the patient's parent or guardian can verbalize if the patient is not
capable of providing this information). ( Refer to CL 7026: patient identification).
6.6. Restraint and positioning
When performing a pediatric capillary sample, it is important to immobilize and position the child in order to safely
perform the procedure and obtain the desired specimen. The following steps can be used to help achieve a positive
outcome:
6.6.1. If possible, have the child sit on the parent's lap and instruct the parent to hug the child in a way that will keep
the child still.
6.6.2. After the blood collection is completed, give positive reinforcement such as letting the child know that he/she
did a great job holding his/her arm still.
Page 15 of 27COLLECTION OF BLOOD SPECIMENS MANUAL
6.6.3. If the parent or guardian objects to the procedure, do NOT proceed. Notify the clinical person who is in charge
of the child's care.
6.7. Preparation of Patient’s Finger:
6.7.1. Wash your hands with either an alcohol-based hand rub (if hands are not visibly soiled) or soap and water (if
hands are visibly soiled) and wear new, properly fitting gloves for each patient.
6.7.2. Avoid puncturing a patient’s finger if it is cold, cyanotic (blue), swollen, or inflamed.
6.7.3. The patient should be positioned so that their finger is steady and supported in a comfortable position.
6.7.4. With your thumb and index finger , grasp either the patient’s long or ring finger about 1 inch from the tip of
their finger
6.7.5. With your other hand , hold the sides of the patient’s finger
6.7.6. Moving your supporting hand toward the tip of the patient’s finger , apply a massaging motion to the fleshy
portion of the finger
6.7.7. Repeat this massaging process 5 or 6 times
6.7.8. With the alcohol swab, cleanse the entire fingertip
6.7.9. To reassure the patient prior to performing the skin puncture, you might say, “ Ok this will pinch for just a
second”
6.8. Puncturing the finger of a child (greater than 1 year of age)
6.8.1. Pick up a sterile retractable lancet. Select the proper lancet size for the age and size (or weight) of the patient
and volume of blood required
6.8.2. With one hand, firmly grasp the lancet. With your other hand, firmly grasp the patient’s finger to maintain
control and provide the best access to the puncture site
6.8.3. Hold the device firmly against the side of the pad of the finger. Activate the unit, the puncture should be
across the lines of the fingerprint, not along the lines of the fingerprint.
6.8.4. Dispose of the blood lancet in an approved puncture-resistant sharps container
6.8.5. The puncture should be performed on the palmer surface of the middle or ring finger, between the side and
the center of the finger.
6.8.6. The puncture should be across the lines of the fingerprint, not along the lines of the fingerprint.
6.9. Skin punctures procedures:
6.9.1. Warm the puncture site for 1-2 minutes (if necessary) using a warm cloth not exceeding (42°C) or warming
pack. This will help blood flow and is essential when specimens for pH and blood gas analysis are collected.
6.9.2. Do not wipe, fan or blow on site to dry alcohol.
6.9.3. Wipe away the first drop of blood with a sterile gauze pad.
6.9.4. Position the puncture site downward on a plane below the heart after puncture. this increases blood flow and
allows gravity to keep the blood at the point of exit to avoid “run-off” and smearing
6.9.5. Avoid squeezing the puncture site excessively as this action can hemolysis the specimen and contaminate it
with tissue fluid and free hemoglobin
6.9.6. If age appropriate,
6.9.6.1. Provide information to the child such as “You’re going to feel a little poke now” and “I’m almost
finished.”
6.9.6.2. Give praise and a reward, e.g., a sticker or special bandage.
6.9.7. Do not bandage skin puncture sites on infants or children less than two years of age. The adhesive can affect
delicate skin and there is a risk of ingestion and choking should the bandage come off. Apply pressure to the site
until stasis is complete instead.
6.10. Heel Prick procedures:
6.10.1. Utilize appropriate techniques to warm the heel if desired. Heel pokes should not be performed on children
over 1 year of age or if walking.
6.10.2. Wash hands and put on gloves.
6.10.3. Cleanse with 70% isopropanol and allow it to air dry.
Page 16 of 27COLLECTION OF BLOOD SPECIMENS MANUAL
6.10.4. Hold the patient's heel firmly enough to prevent sudden movements.
6.10.5. Use a puncture device with automatic retraction to prevent possible needle stick injury, and built-in depth
control to prevent puncturing the heel bone.
6.10.6. The depth of the skin puncture must not exceed 2 mm. The heel bone (calcaneus) may be located no more
than 2 mm beneath the lateral and medial heel surfaces on a small infant and could be pierced if the puncture
exceeds this depth, possibly resulting in bone damage.
6.10.7. Wipe away the first drop of blood with gauze to avoid diluting and contaminating the specimen with tissue
fluid. It may be necessary to gently massage the heel to keep the blood flowing freely, but avoid squeezing the heel
excessively so that the blood specimen does not hemolysis and/or become contaminated with tissue fluid.
6.10.8. If blood does not flow freely, it may be necessary to repeat the process using a different site.
6.10.9. Allow the micro-collection tube to fill by capillary action; avoid continuously scraping the collection device
opening against the skin to collect the blood.
6.10.10. Once the collection is completed, a clean gauze pad should be pressed against the puncture site until the
bleeding stops. Adhesive bandages should not be used because they can cause irritation to the skin.
6.11. The order of draw for capillary tubes by skin punctures:
6.11.1. The order of draw is a critical process that is necessary to eliminate or minimize the possibility of microclot
formation in anticoagulated specimens.
6.11.2. The order of draw is NOT the same as it is for specimens collected by venipuncture.
6.11.3. If more than one type of specimen is required from a skin puncture collection the following order of draw
should be followed:
1. Lavender top tubes containing the anticoagulant EDTA
2. Tubes with other additives (such as heparin)
3. Tubes without additives.
Table 4. Order of Draw of Capilary/Microtainer tubes.
6.12. Avoided techniques:
The following techniques have the potential to adversely affect test results:
6.12.1. Excessive squeezing of the blood into the microcollection device:
6.12.2. Drops of blood should be allowed to flow freely into the top of the microcollection device and down the walls
into the tube.
6.12.3. Do NOT scrape the device against the skin as this can introduce excess tissue fluid into the specimen and/or
cause hemolysis of the red blood cells (RBCs).
6.12.4. Avoid strong, constant, or repeated pressure to reduce the potential for hemolysis and the amount of tissue
fluid introduced into the specimen, Blood flow is enhanced by applying gentle, intermittent pressure while holding
the heel stick site or finger site downward.
Page 17 of 27COLLECTION OF BLOOD SPECIMENS MANUAL
7.0. Complications
Be prepared to deal with a reaction every time you do a venipuncture, There is no way to predict how a patient will
react to a needle puncture. The collector must immediately report to the supervisor all complications and incident
occurring during the draw and document it according to HMC policy, including exposure to blood and other
infectious materials.
7.1. Hematoma Formation
7.1.1. Hematoma is caused by blood leaking into the tissue during tissues during or following venipuncture and
is identified by rapid swelling at or near the venipuncture site.
7.1.2. If a hematoma begin to form during the venipuncture , the collector must remove the needle immediately
and apply pressure.
7.1.3. The collector must apply a pressure over the puncture site for at least 2 minutes. A cold or compress or
an ice pack must also be applied to relieve pain and reduce swelling.
7.1.4. Situations that can trigger hematoma formation are as follows:
I. The vein is fragile or too small for the needle size.
II. The needle penetrates all the way through the vein.
III. The needle is only partly inserted into the vain.
IV. The needle is removed while the tourniquet is still on.
V. Excessive or blind probing is used to locate.
VI. Reassure is not adequately applied following venipuncture.
Figure 15. Hematoma
7.1.5. To prevent a hematoma, the collector must:
I. Remove the tourniquet before removing the needle.
II. Maintain needle placement throughout the collection.
III. Remove the tube from the holder before needle removal.
IV. Before bandaging, take steps to determine whether the puncture site is sealed.
7.2. Accidental Arterial Puncture:
7.2.1. If the blood pulses into the collection system or fills collection tubes rapidly and is bright red, an artery has
been punctured.
7.2.2. The collector must remove the needle immediately and apply direct forceful pressure to the puncture site
for a minimum five minutes and until active bleeding has ceased.
7.2.3. Inform the supervisor, or nurse –in-charge /physician; and document the incident.
7.3. Dizzines , Syncope :
7.3.1. Fainting or Syncope refers to the state of loss of consciousness and postural tone resulting from insufficient
blood flow to the brain.
7.3.2. The collector must watch the patient for signs of fainting like pallor (paleness), hyperventilation,
vertigo, dizziness and light-headedness.
7.3.3. When an incidence of fainting occurs, the collector must discontinue immediately the procedure by
releasing the tourniquet and discarding the needle to protect the patient and discarding the needle to protect
the patient and himself from injury.
7.3.4. The collector must have the patient to lay the patient flat or lower his/her head and arms .Recline chair is
recommended for blood collection procedure.
7.3.5. Loosen tight clothing; ask assistance form relative if available.
7.3.6. A glass of water or orange juice may be provided.
7.3.7. Maintain the patient in recumbent position until fully recovered, and continue monitoring.
Page 18 of 27COLLECTION OF BLOOD SPECIMENS MANUAL
7.3.8. The collector must call any nearby attending nurse or physician if the patient did not respond.
7.3.9. Ammonia inhalants may be associated with adverse reaction and must not be used.
7.3.10. Never draw blood from a patient who is standing. A standing
patient is more likely to faint than one who is sitting or lying down.
1- Discontinue immediately the procedure by releasing the
tourniquet and discarding the needle to protect the patient and your
self from injury.
2- Lie down on his / her back, raise their foot above the level of their
head, loosen tight, apply a cold compress to their forehead and
check their pulse.
3- call any nearby attending nurse or physician if the patient did not
respond.
4- Report the incident. .
Figure 16. Patient Faint during blood collection
7.4. Nausea and Vomiting
7.4.1. If patient feels nausea and vomits during venipuncture, the process must be terminated straight away.
7.4.2. The patient should be reassured and made as comfortable as possible.
7.4.3. The blood collector must ask the patient to breathe deeply and slowly.
7.4.4. The blood collector must apply a cold compress to the patient’s forehead and provides him with an
emesis basin (kidney dish) or bag.
7.4.5. Give patient water to rinse out his/her mouth.
7.5. Anxiety / Fear
7.5.1. Patients, especially children under the age of 12 or mentally disabled persons, may show anxiety or fear
when they present for blood collection.
7.5.2. The collector must start by relieving the patients by explaining exactly what will happen and tries to calm
him down as much as possible.
7.5.3. The collector must communicate with the patient on each step he is doing to keep on reassuring him.
7.6. Excessive Bleeding
7.6.1. Normally, a patient will stop bleeding from the venipuncture site within few minutes. However, some
patients are on anticoagulant therapy like aspirin, may take longer to stop bleeding.
7.6.2. If bleeding endures, the collector must apply a firm pressure on the puncture site until the bleeding visibly
ceases.
7.6.3. The collector can also advise the patient to hold his hand elevated above the level of his/ her heart.
7.6.4. If by any means, the bleeding didn’t stop for more than 5 minutes, the collection must notify his or her
treating physician.
7.7. Needle Injury:
1. Wash wounds and skin sites that have been in contact with blood or body fluids with soap and water
2. Apply a sterile dressing as necessary and apply pressure through the dressing if bleeding is still occurring.
3. Encourage bleeding before washing well with soap and water.
4. If blood gets on the skin, irrespective of whether there are cuts or abrasions, wash well with soap and water,
5. If blood or body fluids get in the mouth, spit them out and then rinse the mouth with water several times.
Page 19 of 27COLLECTION OF BLOOD SPECIMENS MANUAL
6. If clothing is contaminated, remove clothing and shower if necessary
7. Inform your Immediate Supervisor and/or Head of the Department immediately after the exposure
8. An Occurrence, Variance and Accident (OVA) report through electronic incident reporting system and Blood
and Body Fluids Exposure Report Form must be filled within the same working day
9. Visit the Staff Medical Center (SMC) immediately during working hours (7: am – 3 pm) /or Emergency
Department (ED) after 3:00 pm.
10. It is recommended to collect the medical number of the patients in the incident to confirm medical history
with your physician. It may need to collect extra sample from the patient to confirm selected tests.
Not all needle-stick injuries are
preventable, but the majority of
these injuries can be prevented by
using safer needle devices.
Figure 17. Needle Stick Injuries
Page 20 of 27COLLECTION OF BLOOD SPECIMENS MANUAL
8. ORAL GLUCOSE TOLERANCE TEST (OGTT) (Trutol 75).
The glucose tolerance test is a laboratory method to check how the body breaks down (metabolizes) blood sugar.
OGTT consider as Timing test.
8.1. Patient Group:
8.1.1. Pregnant women older than 14 years of age.
8.1.2. Male, Non Pregnant women, and pregnant women known to have diabetes mellitus (Type 1 or Type 2).
8.1.3. Male / Female less than 14 years of age.
8.2. PATIENT PREPARATION:
8.2.1. Patients have got proper explanation from Physician or Nurse at clinic about the test procedure.
8.2.2. Phlebotomist will explain the procedure, and make sure that patient understand that he/she will remain to
8.2.3. obtain three samples for two hours without eating, drinking or smoking.
8.2.4. Patient must be fasting for (8- 10) hours.
8.3. SPECIMEN REQUIREMENTS:
8.3.1. All blood samples collected on Fluoride Oxalate / Na F + EDTAK2 (Gray top) and must invert gently for (8-10)
times (according to manufacturer’s instructions).
8.3.2. All specimens sent to central processing (CP) in the regular transportation time Clinical Chemistry lab not
exceed 12:00pm.
8.3.3. All three tubes must label by: (patient’s full name – HC number- Collection time- Collection Date- collector
initial). Cerner label contain these information.
8.3.4. For electronic orders: access power chart for test’s request; print the label for each specimen collection time,
and log in it in ordinary timing.
8.3.5. If manual request form is used; collection time must by written on with phlebotomist’s initial on the request
form and specimen labels.
8.4. REAGENTS, CALIBRATORS, QC, SUPPLIES:
8.4.1. Glucose beverage bottles have many flavors (ex.: orange- lemon- cola fruit).
8.4.2. According to suppliers. Bottle size 296 ml.
8.4.3. Storage on 15 -30 C.
8.4.4. To enhance the palatability, chill before serving. Protect from light, do not freeze, and discard any remaining
solution.
8.4.5. The beverage must be:
FDA approved, caffeine free,
Clear Instructions and precautions in English on the bottle.
Graduated bottles assure proper dose every time
Kosher-certified
Caffeine-free
FDA approved.
Clinical References provided
8.5. STEP BY STEP PROCEDURE;
8.5.1. Confirm that patient is fasting for at least 8hrs, and understanding the procedure.
8.5.2. Identify patient correctly by requesting patient health card use two identifiers: full name, HC number, and
date of birth.
8.5.3. Follow venipuncture procedure.
Page 21 of 27COLLECTION OF BLOOD SPECIMENS MANUAL
8.5.4. Collect Fasting sample in Gray tube and label it with ( fasting label) If patient have extra tests follow order of
draw, and log in with the same collection time if Cerner request.
8.5.5. Instruct the patient to drink all the glucose solution quantity (within 5 minutes).
8.5.6. Start timing when the pt begins to drink.
8.5.7. Discard the plastic Beverage bottle in black waste.
8.5.8. Record the time and provide the patient a note paper with all collection times.
8.5.9. Ask the patient that they must not eat, smoke, or drink anything except water.
8.5.10. After one hour obtain the second sample.
8.5.11. After the second hour obtain the third sample.
8.5.12. All tubes must label immediately beside patient as mentioned above with collection time.
8.5.13. Log-in (Electronic sign) each specimen after collection on Cerner. Manual laboratory order registers the
patient in the log book
8.5.14. Sending samples frequently – no need to accumulate them until patient finish the procedure- not exceed
12:00 to chemistry lab with related request forms if applicable, or transfer list.
8.6. Consideration issues:
8.6.1. Identify patient correctly every time.
8.6.2. Not to collect sample if patient delay more than 20 min and reschedule the test
8.6.3. For pregnant; three samples will be obtained (Fasting – 1st hr - & 2nd hr).
8.6.4. For non-pregnant and Male patients; two sample will be obtained (Fasting – & after 2hrs).
8.6.5. An attendance letter is given to patients explaining the taken time of the procedure upon request, and
approved by out-patient department office.
8.6.6. It is VERY important to observe the patient during drinking for ANY discomfort at reactions. This includes
feeling faint or dizzy, sweating, clamminess, and nausea or sick at your stomach. If throw up during the test, patient
need to consulate the physician to reorder the test.
Page 22 of 27COLLECTION OF BLOOD SPECIMENS MANUAL
9. Blood Culture collection:
This section outlines the best practices of Blood Culture collection by venipuncture for all healthcare providers who
are responsible for the collection and handling of blood specimens in both out-patient and in-patient
9.1. Blood culture collection supplies:
9.1.1. BACTEC PLUS Aerobic/F Culture Vial Optimum blood volume for each vial is 8-1 mL; 3-10 mL of blood is
acceptable (blue cap).
9.1.2. BACTEC PLUS Anaerobic/F Culture Vial Optimum blood volume for each vial is 8-10 mL; 3-10 mL of blood is
acceptable (fuschia cap).
9.1.3. BACTEC PEDS PLUS Aerobic /F Culture Vial Optimum blood volume for each vial is 1-3 mL; 0.5-5 mL of blood is
acceptable.
9.1.4. VACUTAINER BRAND Blood Collection Set ("butterfly") or 20 mL LUER-LOK sterile syringe with a 21 gauge
needle; or 3 mL LUER-LOK syringe with a 23 gauge needle for Pediatric.
9.1.5. (3) ml Chlora –prep applicator (2% v/w Chlorhexidine gluconate, and 70% v/v Isopropyl alcohol).
9.1.6. Sterile gauze
9.1.7. Sterile gloves.
9.1.8. Tourniquet / Adhesive bandage.
9.2. Skin disinfection:
9.2.1. In order to minimize the risk of contamination with skin flora, blood culture collection sites require a 30
second friction scrub and disinfection with an appropriate disinfectant.
9.2.2. Tincture of iodine, multiple isopropyl alcohol preps, chlorhexidine gluconate, and povidone / 70% ethyl
alcohol-combination are equivalent.
9.2.3. Chlorhexidine gluconate is recommended for adult, children, and older infant. Take more care with infant
under 2 months of age, and it can cause irritation or chemical burns.
9.2.4. Always allow the disinfectant to dry completely.
9.2.5. The collector must not palpate vein after skin disinfection unless a sterile glove is worn or if disinfection repeat
it.
9.3. General considerations:
9.3.1. Blood cultures test usually ordered STAT.
9.3.2. A set of blood culture means two bottles – one aerobic and one anaerobic or in case of children only one
pediatric bottle.
9.3.3. When a syringe is used, the anaerobic bottle should be inoculated first to prevent possible exposure to air
If two sets are requested; time of gap is 45-90 min.
9.3.4. If the volume drawn cannot exceed 10 ml, inoculate only the anaerobic.
9.3.5. DO NOT refrigerate.
9.3.6. Check expiry date of the bottles.
9.3.7. Use a new needle if vein is missed initially.
9.3.8. It is preferable to take blood for culture separately.
9.4 Step by step procedure:
9.4.1. After assembling equipment and using universal precaution locate the vein. If pick a prominent vein easily
visualized because palpation must be avoided after site preparation.
9.4.2. Open the Chlora-prep package. Do not touch the sponge .Hold by center of handle in a horizontal position with
foam surface down. Pinch handles to break ampule at the dot. DO NOT CONTINUE TO SQUEEZE HANDLE.
9.4.3. Use a side-to-side motion to scrub the site with the friction pad for a full 30 sec; allow site to dry completely
(at least 30 sec) before venipuncture. Do not touch site after prep.
9.4.4. Pre-attached Push Button butterfly with holder can be used by the phlebotomist to monitor the volume of
collected the blood sample. A mark on the vial label. If the volume is not monitored, the stated maximum amount
Page 23 of 27COLLECTION OF BLOOD SPECIMENS MANUAL
collected may be exceeded. This condition may adversely create a "false" positive result, due to high blood
background.
9.4.5. If using a needle and syringe, typically a 20 mL syringe is used for adults. Transfer device MUST use when
transfer blood sample from syringe to bottle or tubes. Draw 16-20 mL of blood for one blood culture set (aerobic and
anaerobic). Aseptically inject 8-10 mL of specimen into each vial.
9.4.6. Remove plastic cap on each culture vial, being very careful not to touch the rubber stopper with your fingers.
Wipe tops of vials with alcohol.
9.4.7. Re-tie the tourniquet if venipuncture is impossible without again palpating the put on a pair of sterile gloves. It
should be noted that at no time after the skin area has been cleansed should the venipuncture site be touched, even
with a sterile glove. Palpation should occur at least 1 inch above the actual
9.4.8. Disinfect the rubber septum on the blood culture bottles with 70% isopropyl alcohol and allow it to dry.
9.4.9. Venipuncture site by sterile needle.
9.4.10. Transfer the blood sample according to volume needed by Syringe or by Transfer Devices.
9.4.11. Place the specimen bar code label identification vertically. Do not obscure the bottle bar code or the bottom
of the culture vial. Make sure that the collection site is written on the blood culture bottle.
9.4.12. Label each bottle by: Collector name, Date of collection, Time of collection, number of the set, Initial of the
collector / phlebotomist, patient location (Bed). Do not place the label on the bottle barcode area.
9.4.13. After venipuncture, use a sterile alcohol pad to remove the antiseptic solution.
9.4.14. The inoculated BACTEC vials should be transported as quickly as possible to the laboratory.
9.5. Blood Volume
9.5.1. The volume of blood cultured is critical because the concentration of organisms in most cases of bacteremia is
low, especially if the patient is on antimicrobial therapy.
9.5.2. In infants and children, the concentration of organisms during bacteremia is higher than adults, so less blood is
required for culture.
Children: 1-5 mL of blood per venipuncture.
Adult: 16-20 mL of blood per venipuncture.
10. Vascular Access Devices and Infusions:
VADs include a wide range of infusion catheters and posts. The most common is the short peripheral
catheter inserted on the arm or hand and used for infusion of fluid, medications, and blood products.
10.1. Intravenous Fluid:
10.1.1. Collecting blood form an arm that being infused with IV fluid carries a potential risk for
erroneous and misleading test results.
10.1.2. Blood must be collected from the opposite arm without IV fluid.
10.1.3. It is recommended that specimens collected distal or proximal to an IV site.
10.1.4. If blood needs to be collected on an arm with IV fluid you must follow these procedures:
10.1.4.1. Ask the responsible health care professional to turn off the IV infusion for at least two
minutes before venipuncture. Ensure that flow completely discontinued.
10.1.4.2. Apply the tourniquet between the IV site and the venipuncture site.
10.1.4.3. After perform the venipuncture; alert the responsible health care professional to restart the
infusion again.
10.1.4.4. Document in patient record when collection being from an arm with IV fluid.
Page 24 of 27COLLECTION OF BLOOD SPECIMENS MANUAL
11. Specimen Quality Concerns:
11.1 The quality of a blood specimen can be compromised by improper collection techniques. For that it is
significate that all personnel performing blood collection be trained on the proper collection techniques
and consequences.
Pitfalls of collections Ways to prevent
Hemoconcentration: Release the tourniquet within one minute.
Do not excessively massage the area in locating vein.
A decree in the fluid content of the Do not allow the patients to pump the fist.
blood, with an increase on protein-based Ask patient to release fist once blood flow.
blood components such as red blood Do not probe or redirect the needle multiple times in
cells. search of vein.
Hemolysis: Drawing a blood from a site with Hematoma.
Failure to remove away the first drop of capillary blood,
Damage or destruction of RBCs and which can contain alcohol residue.
release of hemoglobin into the fluid Avoid collection though a VAD or during and IV valves.
protein of a When using a syringe:
specimen, - Ensure needle fitted securely on a syringe to avoid
causing the frothing
serum color from - Avoid pulling the plunger back too forcibly.
pink (slight - Avoid forcefully transferring the blood to tube.
hemolysis) to red Tourniquet must not keep longer than one minute on
(gross hemolysis). the arm or hand.
Avoid mixing specimens vigorously.
Use the proper needle size according to vein size and
diameter. Avoid using large gauge for small needles and
vice-versa.
Figure 18. Hemolysed specimen Transport specimens gently, vertical position and avoid
shaking.
Clotted specimens :
Fill all blood collection tubes to the fill line.
Clotting occurs in a tube containing an Adequate tubes inversions.
anticoagulant. Do not overfill tubes.
Leaving blood in a syringe too long before placing in
tubes.
Delay of placing blood in tubes.
Figure 19. Clotted specimen
Page 25 of 27COLLECTION OF BLOOD SPECIMENS MANUAL
Improper filled tubes :
Tubes must fill until the normal amount Direct draw into vacutainer tube until it finishes filling to
of vacuum is exhausted. Under-filling or the correct volume
over-filling tubes result to incorrect Check to ensure tube has not passed its expiry date
additive –to- blood ration. Avoid manually filling of the tube (aliquoting).
Never pour two partially filled additive tubes together
to fill one tube; this effect blood-additive ratio.
Never collect tubes partically because to save time or
obtaining large quantities of blood!.
Figure 20. Filling tubes
Allow alcohol to dry.
Following the correct order of draw to minimize cross
contamination of additives between tubes.
Use the proper antiseptic to clean the site (alcohol for
Specimen Contamination: routine venipuncture, or chlorhexidine gluconate for
blood culture collection.
Usually as a result on improper If the blood collected for Alcohol test; use another skin
collection techniques or carelessness. disinfectant.
Using sterile collection sets for blood culture.
All phlebotomy equipment are sterile by manufacture.
Do not open tube cap; or open the needle in the present
of the patient.
11.2. When the collector receive a feedback about the quality of the specimen from the laboratory or
receiving area ; you should document in a feedback form .
11.3. Patient should be informed in proper way. Some patient contacted by phlebotomists to repeat their
tests before next appointment.
Page 26 of 27You can also read