D1E series: Stratus Workstation - Specification and Installation Guide - Product ID: D1E - Ergonomic Products
←
→
Page content transcription
If your browser does not render page correctly, please read the page content below
Specification and Installation Guide

                      D1E series: Stratus Workstation™

Pneumatic unit shown, configurations may vary.

                                                                 Product ID: D1E
                                                                       Manual version:   D
Stratus Workstation
                                                                                                                                 Model D1E

                 Thank you for purchasing the Ergonomic Products D1E Series Stratus Workstation.

                 Years of research by dentists, engineers and designers have made this a uniquely effective
                 product in the industry. We stand behind our equipment, and genuinely believe it to be the
                 best available on the market.

                 Should you have any questions regarding the product’s installation or use, please don’t
                 hesitate to call our customer service specialists at 1-866-ERGO-4-US. We may also be
                 reached via email at equip@ergonomic-products.com.

                 We hope you enjoy the benefits and quality of your new equipment and look forward to
                 handling your future needs as you and your practice continue to grow!

                                                                                                 - The Ergonomic Products Team

        CONTENTS:
           1. Introduction........................................................................ 3
           2. Basic Anatomy of the Workstation..................................... 5
           3. Specifications..................................................................... 6
           4. Power Channel Face Plate................................................. 7
           5. Rear and Underside of Channel..............................................9
           6. Foot Pedal.................................................................................. 11
           7. Options for Workstation ......................................................... 12
           8. Using Your Workstation............................................................ 13
           9. Required Tools / Unpacking and Installation........................ 27
           10. Standard Parts List ................................................................ 28
           11. Workstation Assembly............................................................ 29
           12. Umbilical Installation............................................................... 31
           13. Umbilical Connections........................................................... 33
           14. Worksurface Height Adjustment........................................... 35
           15. Maintenance............................................................................. 36
           16. Trobleshooting ........................................................................ 37
           17. Warrenty Information ............................................................. 38

        QUESTIONS?
        Call our Customer Service Specialists at:
        1-866-ERGO-4-US.                                                                                                               PAGE 2
ergonomic products • 198 Airport Rd • Fall River, MA 02720 • 866-374-6487                                               950-053 D1E manual ver D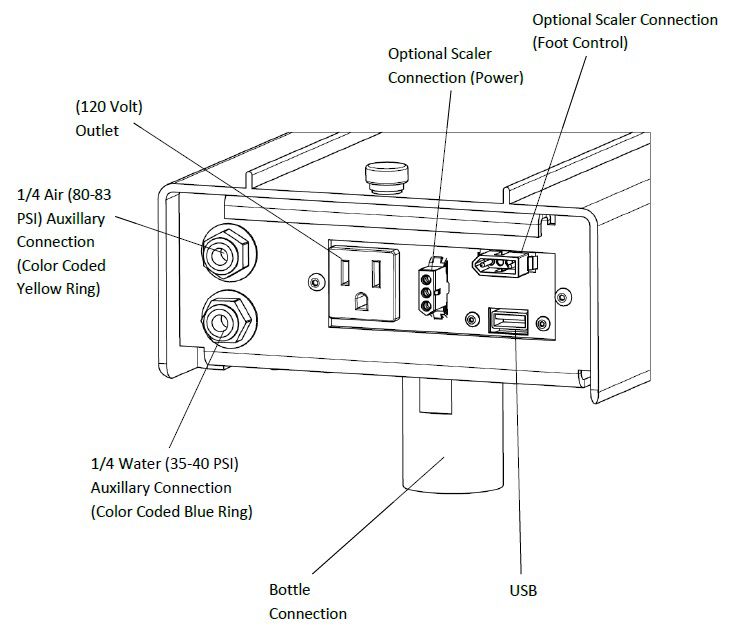
Stratus Workstation
                                                                                                                        Model D1E

   1 - INTRODUCTION
                   SYMBOLS USED IN THIS MANUAL AND ON PRODUCT LABELS
                       The following symbols are used in this manual and on product labels.

                           Symbol                   Meaning

                                                   This symbol means that you must refer to the
                                                   documentation that came with your device.
                                                   This symbol indicates a Warning. Warnings alert the user
                                                   to the possibility of serious injury or death if the equip-
                                                   ment is not operated properly.

                                                   This symbol indicates that the device is a Type B piece of
                                                   equipment and has a certain degree of protection against
                                                   electric shock. The B Type refers to applied parts that
                                                   are generally not conductive and can be immediately
                                                   released from the patient.

                                                   This symbol indicates that you must not dispose of any
                                                   electronic components along with general waste.

                                                   This symbol appears next to the next to the
                                                   manufacturer’s contact information.

                                                   This symbol appears next to the date of manufacture.

                                                   This Symbol Indicates Pushing Prohibited

                                                                                                                                PAGE 3
ergonomic products • 198 Airport Rd • Fall River, MA 02720 • 866-374-6487                                        950-053 D1E manual ver D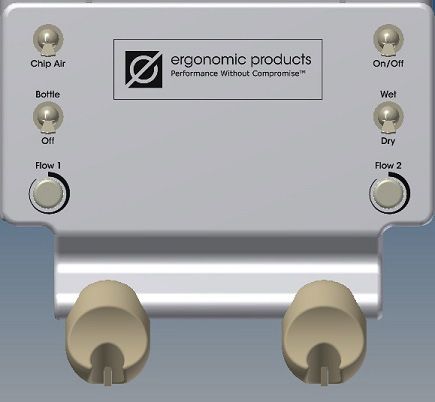
Stratus Workstation
                                                                                                    Model D1E

   1 - INTRODUCTION CONT’D
INTENDED USE
The Ergonomic Products Workstation is a dental operative unit, which is an AC-powered device that is
intended to supply power to and serve as a base for other dental devices and accessories. The device is to
be operated and used by dentists and other legally qualified professionals.

CONTRAINDICATIONS
There are no known contraindications for the use of this device.

WARNINGS AND PRECAUTIONS
Warnings alert the user to the possibility of serious injury or death if the equipment is not operated properly.

Only properly trained and authorized personnel must use this equipment.

Do not modify this equipment without authorization from Ergonomic Products, Inc.

Read and understand all warnings, precautions, and operating instructions before use.

To avoid risk of electric shock, connect this equipment only to an electrical supply with a protective earth
ground. Do not bypass the grounding circuitry.

The device might cause interference with other electronic devices while in use. Ensure that other medical
devices used in the treatment office do not receive interference from this device.

A dental unit might include magnets which might affect the function or programming of some implantable
pacemakers or defibrillators. People who have devices programmed to respond to a magnet must avoid
dental units with magnets.

Improper installation of the syringe can result in injury or damage. Refer to the syringe manufacturer’s
documentation for instructions on proper installation and use.

Do not position equipment so it is difficult to operate the disconnect device.

Do not use a socket multiplier or an extension cord to connect the Workstation to the electrical supply.

To avoid the risk of electric shock, do not connect equipment that must be connected a multi-socket outlet
with a separating transformer directly to an electrical wall outlet.

Connect only those items that are part of the Workstation or have been approved by Ergonomic Products,
Inc. to be compatible with the Workstation.

It is mandatory that metal reusable syringe tips are sterilized between each patient to prevent cross
contamination. Please follow the manufacturer’s recommended practices for sterilization.

                                                                                                            PAGE 4
ergonomic products • 198 Airport Rd • Fall River, MA 02720 • 866-374-6487                    950-053 D1E manual ver D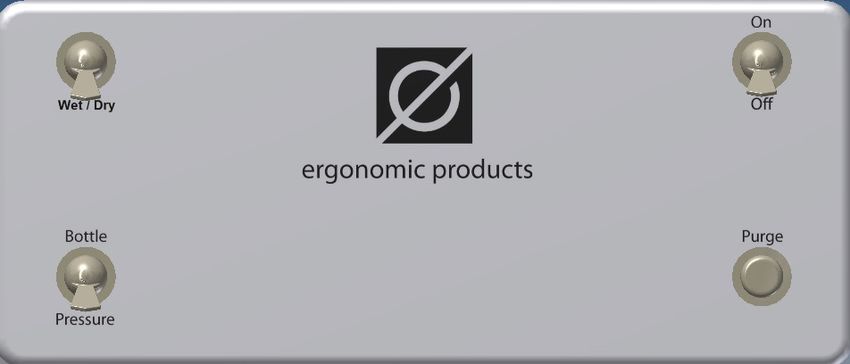
Stratus Workstation
                                                                                               Model D1E

 2 - BASIC ANATOMY OF THE WORKSTATION

                                                                            Ultra Tub
                   Powder Coated
                   Top Tier Surface                                                     Corian Staging
                                                                                        Tray

                                                                                        Keyboard
                                                                                        Pullout Tray

 Consumable Bin

                                                                                        Corian
                                                                                        Worksurface
       Sharps Bin (2)

          Channel                                                                         Trash

                                                                                                       PAGE 5
ergonomic products • 198 Airport Rd • Fall River, MA 02720 • 866-374-6487               950-053 D1E manual ver D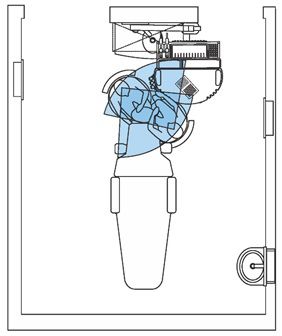
Stratus Workstation
                                                                                                                         Model D1E

   3 - SPECIFICATIONS
  STANDARD FEATURES                                                         OPTIONAL FEATURES
  • 1 High Speed Air       • 1 EP Mega Tub                                  • Bien Air Electric Hand Piece (1st and/or 2nd Position)
  • 1 A/W Syringe          • 1 HVE                                          • 3rd Air Driven Handpiece
  • 1 Saliva Ejector       • 3rd Air Driven Air piece                       • 2nd High Volume Suction
  • 1 Low Speed Air        • 2nd HVE                                        • 1 Dedicated Air Syringe
  • 2 Liter Water Bottle • Cure Light                                       • 2nd Air/Water Syringe
  • Standard Foot Pedal                                                     • Auto/Manual Tune Scaler W/ Foot
  • Power Channel swings 180⁰ for complete                                  Pedal and Scaler push button
    Left / Right convertibility                                             • Fiber Optic Hose
  • Keyboard Slide                                                          • City Water Connection
  • Quick Connect™ Umbilical Connection                                     • 3rd HVE
  • Waste Receptacle                                                        • 2nd High Volume Suction
  • Recessed Bur Detents Milled Into Surface
  • Rear Panel 120V Power Outlet & USB Connection
  • Rear Panel Auxiliary Air & Water
  • Corian Staging Tray
  • Powder Coated Top Tier / Magnetic Surface
  • 1 EP Consumable Bin
 DIMENSION SPECIFICATIONS
 Electrical Specifications*
 Electric 120VAC, 60HZ, 8A
 Fuse Value Label at Point of Use
                                                                                                29.00
 Conforms to
 US/ANSI/AAMI ES60601-1 2005+C1+A2
 CA/CNCSA-C22.2 No. 60601-1                                                                           30.00
 Air, Water, Electric Auxiliary
 Air, 3/8 Dental Style Female QD, 80 psi
 Water, ¼ Dental Style Female QD, 30-35 psi
 Electric Outlet, 120VAC. 60HZ, 4A*                                          34.00
 Storage and Transportation Conditions                                                                               29.00
 -30° C to +50 C                                                                                                    25.25
 10% to 90% Relative Humidity
 Standard Atmospheric Pressure
 Use Conditions
 Typical Dental Office Environment
 Standard Atmospheric Pressure
 Materials
 Corian Solid Surface, Aluminum, Stainless Steel,
 and Powder-Coated Steel
                                                                                              52.25
 *Refer to specific manufacturer’s documentation
 or the actual transformer for input and output
                                                                                                        31.00
 voltages, amp ratings, and Hz ratings.

                                                                                                                                 PAGE 6
ergonomic products • 198 Airport Rd • Fall River, MA 02720 • 866-374-6487                                         950-053 D1E manual ver D
Stratus Workstation
Model D1E
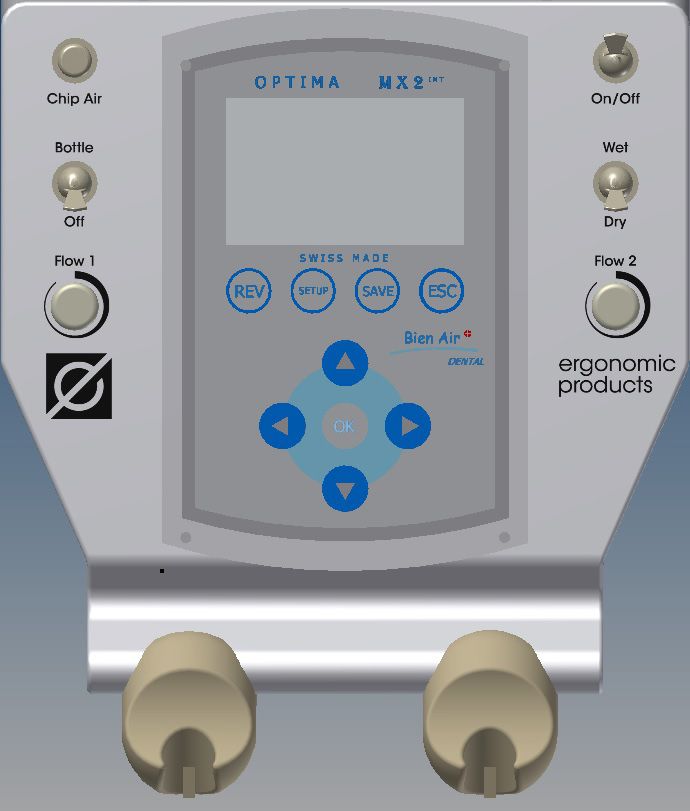
4 - POWER CHANNEL FACE PLATE
Pneumatic Faceplate Depending on your configuration, your face plate on the
power channel may vary. Below are the diffrent face plate
configurations and there functions.
Assistant Face Plate
Bien Air iOptima Face Plate Bien Air Optima MX Face Plate
PAGE 7
ergonomic products • 198 Airport Rd • Fall River, MA 02720 • 866-374-6487 950-053 D1E manual ver DStratus Workstation
Model D1E
4 - POWER CHANNEL FACE PLATE CONT’D
Function Description
Turning this switch on allows chip air coolant (or water
coolant atomizing air) to spray when the foot pedal is
Chip Air
depressed. When switch is turned off no air is emitted at
head of handpiece.
Pressurizes bottle and routes bottle water to devices.
Bottle/Off
When turned to off position, relieves bottle pressure and
turns on optional city water, if connected to source.
This adjusts the amount of coolant water that flows through the
Flow 1 left handpiece. Turn the knob counterclockwise to increase the
flow and clockwise to decrease the flow.
This switch turns on and off the air pressure and water
Master pressure to the workstation.
On/Off CAUTION: Turn the master switch Off when unit is not in
use to prevent accidental water flow.
This turns on or off the flow of coolant water to the
Wet/Dry handpieces. This control must be On to allow water to
flow to either of the Handpiece Coolant Flow controls.
The Chip Air switch should always be on when this
switch is set to the Wet position.
This adjusts the amount of coolant water that flows
through the right handpiece. Turn the knob counter-
Flow 2
clockwise to increase the flow and clockwise to de-
crease the flow.
Purge Clears lines and hose tubing.
PAGE 8
ergonomic products • 198 Airport Rd • Fall River, MA 02720 • 866-374-6487 950-053 D1E manual ver DStratus Workstation
Model D1E
5 - REAR AND UNDERSIDE OF CHANNEL
The below image shows the rear of the channel and its avaibale functions. (Please note options on your channel
may differ from that shown in the image below.)
(30 - 35 PSI)
PAGE 9
ergonomic products • 198 Airport Rd • Fall River, MA 02720 • 866-374-6487 950-053 D1E manual ver DStratus Workstation
Model D1E
5 - REAR AND UNDERSIDE OF CHANNEL CONT’D
The below image shows the undercarrige of the
channel and its avaibale functions. (Please note Handpiece
options on your channel may differ from that Hanger Valves
shown in the image below.) (3rd Optional)
Handpiece
Connectors
(3rd Optional)
Muffler/Oil
Collector
Vacuum Canister Outlets
(2nd HVE Optional)
Handpiece Drive
Air Adjusment
Screws
Umbilical Outlets
Water Bottle
Base/Connector
Cure Light Connection.
(Optional)
PAGE 10
ergonomic products • 198 Airport Rd • Fall River, MA 02720 • 866-374-6487 950-053 D1E manual ver DStratus Workstation
Model D1E
6 - FOOT PEDAL
Refer to Fig 6.1 to review your foot pedal type.
Refer to Fig 6.2 for a detailed view of the rheostat running
through the floor to the toe of the chair.
Fig 6.1
Standard Foot Pedal Single Button Foot Pedal Dual Button Foot Pedal
Drive Air Auto/Manual Scaler Turbo Sensor
Internal Scaler (D840) Turbo Piezo
Fig 6.2
1 4
2
3
Foot pedal tubing (1) is connected to the (2) floor box. Tubing is fed under the floor through
conduit (3) abd then is connected to the Air Regulator (4).
PAGE 11
ergonomic products • 198 Airport Rd • Fall River, MA 02720 • 866-374-6487 950-053 D1E manual ver DStratus Workstation
Model D1E
7 - OPTIONS FOR YOUR WORKSTATION
Curing Light
If Curing Light provided, refer to manufacturer’s documentation for proper operation of the curing
light for the workstation.
Umbilical quick disconnect
The umbilical quick disconnect is typically installed in the cabinet behind the workstation. It allows
for easy removal of mechanicals for repairs or upgrades, or for wheeling the entire workstation out
of the room for building maintenance such as floor work.
Handpiece Compatibility
The delivery system of the Ergonomics Products Workstation has been designed to be compatible
with air driven handpieces that conform to ISO 13294.
Tubing for air driven handpieces is available in 4-5 hole ISO B tubing or 6-hole ISO C tubing. The
end user has responsibility to acquire appropriate handpieces for use with the Workstation. Your
country might have certain regulations in regards to what handpieces are acceptable to use. Refer
to your local dealer for more information.
For instructions and details about accessories provided from other manufacturers, refer to their
product documentation.
PAGE 12
ergonomic products • 198 Airport Rd • Fall River, MA 02720 • 866-374-6487 950-053 D1E manual ver DStratus Workstation
Model D1E
8 - USING YOUR WORKSTATION
Waterline Disinfection Recommendations
The bottle mounted under the rear of the power channel is a .75L (750ml) or 2L (2000ml) bottle water
bottle.
Its use is selected via the “Bottle” position on the Bottle/Off switch mounted on the power channel face. The
“Off” position on the Bottle/Off switch relieves bottle pressure for bottle service and selects water from your
piped water supply (if this option is purchased).
The correct water to use in the Ergonomic Products Workstation equipped with self-contained water
depends on the quality of your municipal water.
Tap Water – If you have confidence in the quality of your municipal water supply, consider using tap water
in your self contained water bottle.
Softened Water – Water hardness that is greater than 200mg/L, Ergonomic Products recommends use of
a water softener to prevent build up of mineral deposits that may impact Workstation performance. Water
pH should be compliant with local drinking water regulations.
Ergonomic Products does not recommend the use of distilled or reverse osmosis water in self-contained
dental units.
It is important to regularly monitor the water in your dental equipment. The frequency depends on your test
results and water quality goals. Although the ADA has established a target of less than 200 colony forming
units per milliliter (cfu/ml) of heterotrophic, mesophilic organisms, acceptable water quality, according to
The Center’s For Disease Control (CDC), suggest less than 500CFU/mL. https://www.cdc.gov/oralhealth/
infectioncontrol/faqs/dental-unit-water-quality.html
Shocking you dental unit waterlines is required for every water treatment protocol followed up with a daily
or continuous maintenance.
PAGE 13
ergonomic products • 198 Airport Rd • Fall River, MA 02720 • 866-374-6487 950-053 D1E manual ver DStratus Workstation
Model D1E
8 - USING YOUR WORKSTATIO CONT’D
When you should shock:
• Before using your EP Workstation for the first time, shock your dental unit waterlines.
• At least every quarter (There are yearly continuous products, please refer to manufacturer)
• When your waterline test results reveal contamination of 500CFU/mL
• Any time you change up your daily waterline maintenance protocol
Daily Maintenance:
• Fill water bottles with use of daily and a water treatment (For example; BluTab; EPA registration
#84020-1).
• Flush waterlines at the beginning of the day for 30 seconds
• Flush waterlines for 30 seconds between patients
• Empty water bottles nightly
It is important to test the water in your self-contained dental unit once per month. If monthly results meet
water quality requirements for all treatment rooms for three consecutive months, reduce testing to once
every three months. Check with your dental supplier or local municipality for testing kits.
Treatment During periods of inactivity
Shut Down:
1. Remove and empty water bottle
2. Purge water from all waterlines including handpieces, ultrasonic scalers, and A/W Syringe.
3. Place empty water bottle back on unit.
Start up:
1. Shock dental unit
2. Test waterlines
3. Resume daily maintenance and fill water bottle.
Caution: Ergonomic Products self-contained water systems are not designed to deliver sterile
solution. A separate means for administering sterile coolant and irrigant is required if you use the
Ergonomic Products Workstations for surgical procedures.
Caution: Do not use saline solutions, mouth rinses or any chemical solutions not specified in this
guide in your Ergonomic Products Self- Contained water system. These may damage the system
components and cause equipment failure.
Check water lines periodically for deterioration and replace if necessary prior to patient use. If wa-
ter line tubing needs to be replaced, please contact Ergonomic Products.
Ergonomic Products does not assume responsibility for you waterline treatment decisions. Always
choose a waterlines maintenance protocol that fits your practice needs and in your practice budget.
All microbials used for dental waterline maintenance must be registered with the EPA. NOTE: De-
pending on the cleaning/shock product used, you may need up to 3 days to complete the cleaning/
shocking protocol. Always follow manufacturer instructions for cleaning/shocking procedures
PAGE 14
ergonomic products • 198 Airport Rd • Fall River, MA 02720 • 866-374-6487 950-053 D1E manual ver DStratus Workstation
Model D1E
8 - USING YOUR WORKSTATION CONT’D
VACUUM USE AND MAINTENANCE
CAUTION: Always wear gloves when servicing dental workstations.
System description
Your workstation is equipped with a 5/8” main vacuum tube connecting to a 3-port vacuum canister (2
HVE and 1 Saliva Ejector) mounted in the forward part of the power channel, with the lid protruding
through the cover for easy access. Units come standard with one saliva ejector valve and one HVE
valve. Both valves are a quick-disconnect and autoclaveble type. Tips for both valves are industry
standard and you can order these from your dental equipment supplier.
System maintenance Vacuum Canister
Check the vacuum canister and screen (part #409-155) weekly. Replace them as soon as lower than
normal vacuum is detected. To facilitate cap removal, turn off the vacuum pump before servicing. Call
Ergonomic Products, Inc. at 1-800-ERGO-4-US to order new components.
Valves
Valves can be autoclaved after each use or wiped down using any of the commercially available disin-
fecting wipes. Daily, draw clean water through the valves while working the valve handle to help pre-
vent the buildup of debris. Brush the internal bore once a week with a stiff brush of proper size. Disas-
semble valves periodically (2-3 months) to clean internal parts and lubricate the O-rings.
Muffler and Oil Collector Maintenance
A combination muffler and oil collector quiets the spent drive and traps excess handpiece lubrication.
Unscrew the lower portion of the canister to access the piece of gauze that acts as an absorbing pad.
Check the gauze every couple of weeks and replace it as necessary.
PAGE 15
ergonomic products • 198 Airport Rd • Fall River, MA 02720 • 866-374-6487 950-053 D1E manual ver DStratus Workstation
Model D1E
8 - USING YOUR WORKSTATION CONT’D
CLEANING AND DISINFECTING DENTAL UNITS AND ENVIRONMENTAL SURFACES
GENERAL GUIDELINES
After treatment of each patient and at the completion of daily work activities, countertops and dental unit
surfaces that might have been contaminated with patient material or when the surface is contaminated
with biological material must be cleaned with disposable toweling (for example PDI Super Sani Cloth)
and water as necessary. Then disinfect surfaces with a suitable chemical germicide (for example DisCide
Ultra Disinfectant Spray).
The CDC recommends using a chemical germicide registered with the EPA as a “hospital disinfectant”
and labeled for “tuberculocidal” (i.e., mycobactericidal) activity to disinfect surfaces that have been soiled
with patient material. These intermediate-level disinfectants include phenolics, iodophors, and chlo-
rine-containing compounds. Because mycobacteria are among the most resistant groups of microorgan-
isms, germicides effective against mycobacteria should be effective against many other bacterial and viral
pathogens.
Low-level disinfectants—EPA-registered “hospital disinfectants” that are not labeled for “tuberculocidal”
activity (e.g., quaternary ammonium compounds)—are appropriate for general housekeeping purposes
such as cleaning floors, walls, and other housekeeping surfaces. The CDC does not recommend using
intermediate- and low-level disinfectants to reprocess critical or semi critical dental instruments.
CDC Guideline for Disinfection and Sterilization in Healthcare Facilities, 2008; Centers for Disease Con-
trol and Prevention. Guidelines for Infection Control in Dental Health-Care Settings— 2003. MMWR
2003;52(No. RR-17):[inclusive page numbers]. FDA Processing/Reprocessing Medical Devices in Health
Care Settings: Validation Methods and Labeling DRAFT GUIDANCE May 2, 2011.
PAGE 16
ergonomic products • 198 Airport Rd • Fall River, MA 02720 • 866-374-6487 950-053 D1E manual ver DStratus Workstation
Model D1E
8 - USING YOUR WORKSTATION CONT’D
CLEANING
Metal Components
Use mild detergent and water or any of the commercially available sprays, such as 409, Fantastic, or oth-
ers, with a soft cloth or sponge. DO NOT USE ABRASIVES as these will permanently scratch the finish.
Plastic, Rubber and Painted Surfaces
Use mild detergent and water or any of the commercially available sprays, such as 409, Fantastic, or oth-
ers, with a soft cloth or sponge. DO NOT USE ABRASIVES as these will permanently scratch the finish.
Corian
Your Corian surfaces are delivered with a matte/satin finish and any of the above cleaners are accept-
able. Minor surface blemishes can be brought back to a like-new finish with the use of a mild abrasive
cleaner such as Comet on their own or in conjunction with a green or white Scotch-Brite Pad.
Dried composites can be scraped off using a single-edged razor blade or equivalent, being cautious not
to dig into the surface.
If the surface becomes too scarred to be renewed with the above procedures, a resurfacing can be done.
Please contact us or any Corian-certified installer for the correct procedure.
The FDA recommends that Items contaminated with blood or body fluids, which might contain blood
borne pathogens, must receive intermediate level disinfection with a product having an EPA-registered
claim for activity against hepatitis B after cleaning.
PAGE 17
ergonomic products • 198 Airport Rd • Fall River, MA 02720 • 866-374-6487 950-053 D1E manual ver DStratus Workstation
Model D1E
8 - USING YOUR WORKSTATION CONT’D
DISINFECTING
Instruments and Workstation
Infection Control in the dental environment is always a high priority for both the user and the patient. It is
the responsibility of the practitioner to be familiar with best practices and protocols for disinfecting of instru-
ments and surfaces as recommended by CDC, ADA and OSHA.
In addition to the General Guidelines, the CDC recommends general cleaning and disinfecting of clinical
contact surfaces, dental unit surfaces, and countertops at the end of daily work activities. Cleaning and
disinfection are required if surfaces have become contaminated since their last cleaning. To facilitate daily
cleaning, keep treatment areas free of unnecessary equipment and supplies.
To disinfect Corian surfaces, use a suitable chemical germicide (for example DisCide Ultra Disinfectant
Spray). Dental devices that are connected to the dental water system and that enter the patient’s mouth
(for example; handpieces, ultrasonic scalers, or air/water syringes) must be operated to discharge water
and air for a minimum of 20–30 seconds after each patient.
Most of the surfaces are compatible with commonly used disinfectants, however if discoloration is no-
ticed (especially hoses) it would be advisable to change cleaning products. If using a spray, use sparingly
around electrical devices and components.
PAGE 18
ergonomic products • 198 Airport Rd • Fall River, MA 02720 • 866-374-6487 950-053 D1E manual ver DStratus Workstation
Model D1E
8 - USING YOUR WORKSTATION CONT’D
BASIC PLACEMENT FOR CLINICAL DENTISTRY
Your Workstation is designed to be more flexible then other delivery systems. The Workstation’s
placement is also critical.
Correct Positioning
Ideal placement of the Ergonomic Products Delivery
System creates both an assistant’s “Control Panel”
and allows full access to supplies by the doctor.
In this position, hoses are able to comfortably reach
the patient without dangling to the floor while not in
use.
This is the most productive position for the Ergonomic
Products Workstation.
In-Correct Positioning
If individuals unfamiliar with the possibility of
fingertip supplies push the delivery system
back to a more familiar position, it may be less
productive.
This placement prevents fingertip access,
inhibits proper hose function, and markedly
slows treatment progress.
If handpiece hoses appear to be shorter than
needed for treatment, you will probably find
that the Workstation is not ideally placed.
PAGE 19
ergonomic products • 198 Airport Rd • Fall River, MA 02720 • 866-374-6487 950-053 D1E manual ver DStratus Workstation
Model D1E
8 - USING YOUR WORKSTATION CONT’D
WORKING WITH AN ASSISTANT
The Ergonomic Products doctor Workstations can be successfully used in both two- and
four-handed mode. In addition, delivery is possible with both seated and standing dental
assistants. Its flexibility permits side-saddle, leg overlap, and European 3 and 9 o’clock
seating as desired.
Offices in the U.S. that have been practicing with a side-saddle operating position do so
simply because supplies have always been out of reach for the seated assistant. This is
now changed with your new system that reduces wasted motions.
PAGE 20
ergonomic products • 198 Airport Rd • Fall River, MA 02720 • 866-374-6487 950-053 D1E manual ver DStratus Workstation
Model D1E
8 - USING YOUR WORKSTATION CONT’D
WORKING 2 AND 4-HANDED
The Workstation may be moved and positioned for a doctor or assistant working alone. Offices may
choose to equip all rooms equally and, therefore, rooms used for hygiene maintain two-handed posi-
tioning as their basic configuration.
Traditional delivery systems may force solo operators to stand up and stretch for supplies. Two-hand
can be accomplished by simply turning the Workstation to face the operator, while rotating the power
channel back toward the patient’s head.
4-Handed Layout
Workstation perpendicular to the long axis of the pa-
tient chair.
Assistant positioned with the ability to obtain all sup-
plies without torso rotation.
2-Handed Layout
Reposition light curing unit closer to operator.
Rotate the work surface.
Swivel power channel into position.
PAGE 21
ergonomic products • 198 Airport Rd • Fall River, MA 02720 • 866-374-6487 950-053 D1E manual ver DStratus Workstation
Model D1E
8 - USING YOUR WORKSTATION CONT’D
OFFICE WORKFLOW - ROOM CONSOLIDATION
Dental treatment Workstations can make it unnecessary to use dental support cabinetry. Rooms that are
purpose-built for Ergonomic Products, Inc. Workstations can be much narrower than is typical. No external
side cabinetry is necessary because all of your required (active) storage is at your fingertips as shown in
the following figure.
Consumable Supply Bin
Supply Bin
32” Media InWall 24” InWall
PAGE 22
ergonomic products • 198 Airport Rd • Fall River, MA 02720 • 866-374-6487 950-053 D1E manual ver DStratus Workstation
Model D1E
8 - USING YOUR WORKSTATION CONT’D
THE WORKSTATION AS HUB
There are many benefits to delivery Workstations. All materials, handpieces, and instruments are
consolidated into one highly-concentrated location. This markedly simplifies access and resupply for
the doctor and assistant.
A B
The Workstation (A) may be moved and positioned for a doctor or assistant working alone.
To do this, simply turn the Workstation to face the operator. The primary work surface allows
the doctor a directly accessible area to have bur blocks, implant components, crown castings,
and handpieces. The assistant also has all of the dental instruments by his or her side during
procedures (B). The Workstation power channel’s narrow width permits close positioning to
the patient. Both the doctor and assistant have everything needed at their fingertips.
PAGE 23
ergonomic products • 198 Airport Rd • Fall River, MA 02720 • 866-374-6487 950-053 D1E manual ver DStratus Workstation
Model D1E
8 - USING YOUR WORKSTATION CONT’D
SETUP AND RESTOCKING YOUR SUPPLY TUBS
Tubs can be stocked with any materials for any clinical procedure. The tubs serve to keep materials orga-
nized and are easy to visually inventory. This minimizes problems with missing supplies during the middle of
procedure appointments. Your tub will hold 90% of your expensive materials (non-consumables). Tubs make
drawers unnecessary, preventing searching for missing material. The tubs allow you to have your inventory
in a central place in the room, so your assistant can easily see when material inventory is getting low. You
will be able to stock what you need for a week or two.
The basic materials to place directly into the tubs are, for example, composite capsule tips, crown cement
powder and liquid, temporary cements, matrix bands, retraction cord and astringent. Bonding systems
should also be stored in the tub. Other materials can be placed in small clear containers with lids, such as
those that your lab uses for crowns and bridges. We find that this works well with polishing discs and with
articulating paper that is pre-cut. Primers, adhesives and catalysts all fit nicely into the dividers of the tub
when removed from their original packaging. Disposable mixing wells should also be housed in the tubs.
Size Two duplicate films also fit neatly into the tub and can be used for most of all unscheduled intraoral
procedure x-rays. Bulk film sets for full x-ray series are transported with procedure setups.
The Workstation tub can be custom fit for any doctor’s or assistant’s needs. The tub should be used so
that the assistant and doctor have everything they need for composite procedures, amalgam if utilized, any
cementing procedures, and also all of the small materials needed for a crown or bridge preparation. This
prevents the assistant from having to leave the room during a procedure. All materials can be set aside on
the secondary deployment tray wiped down with a disinfecting cloth prior to being reset into the tub at the
end of a procedure.
Using the tub also makes restocking of supplies much easier. The assistant can take the tub into the cen-
tral resupply area where all excess materials are kept. The tub can then be surveyed, easily restocked, and
returned to the treatment room quickly.
PAGE 24
ergonomic products • 198 Airport Rd • Fall River, MA 02720 • 866-374-6487 950-053 D1E manual ver DStratus Workstation
Model D1E
8 - USING YOUR WORKSTATION CONT’D
SETUP AND RESTOCKING YOUR WORKSTATION
Prior to introducing a patient to the treatment room for their appointment, instrument setups and all materials
are placed into the treatment room. A standard recommendation for all multi-tier Workstations is to place a
comprehensive supply tub on the second tier. Commonly, doctors choose from commercially available Zirc
storage containers. Also available are the Ergonomic Products Zirc Plus and Ergonomic Products Mega-Tub
sets, which increase storage capacity. Restocking items in this unit can now be accomplished by bringing
the tub back to central resupply on a weekly basis for replenishment.
All impression guns can be placed on the gun rack of the Workstation in the order in which they will be used
so that the doctor or assistant may easily obtain them. We suggest that you set up only those guns required
for the planned procedure. Handpieces should be placed on their hoses, tested, and ready for use. Any bur
blocks needed, can be placed in the recessed area of the Workstation closest to the doctor. All disposables
suction tips, gauze squares, and bonding brushes should be set up at this time. Any case pans, lab slips,
and alginate bowls can be placed behind the doctor on a secondary work surface.
Whether using an instrument cassette, tray setups, or loose instruments, these instruments are set out in
the center of the lower work surface. When possible, use a cassette system.
Typical Right-Handed Doctor Setup
Upper Level:
Supply Tub and
Impression Guns
and Composities
Lower Level:
Consumable Bin,
Biohazard Bin
and Instrument
Cassette.
PAGE 25
ergonomic products • 198 Airport Rd • Fall River, MA 02720 • 866-374-6487 950-053 D1E manual ver DStratus Workstation
Model D1E
8 - USING YOUR WORKSTATION CONT’D
USING YOUR KEYBOARD SLIDE
To use your Keyboard Slide simply pull the keyboard towards you untill it stops (Fig 8.1). To return the
Keyboard Slide into place, push the keyboard back until it locks in place (fig 8.2).
Keyboard Slide
Keyboard Slide Fig 8.2
Fig 8.1
PAGE 26
ergonomic products • 198 Airport Rd • Fall River, MA 02720 • 866-374-6487 950-053 D1E manual ver DStratus Workstation
Model D1E
9 - REQUIRED TOOLS / UNPACKING AND INSPECTING
Utility Knife
REQUIRED 5/32” Allen Wrench
TOOLS 3/16” Allen Wrench
1. Inspect shipping container (Fig 8.1) for visible damage upon
arrival. If transit damage is found, contact Ergonomic Products
immediately. (This will expedite the corrective process).
2. Use safe lifting procedures to free the product from
the container, and remove all packing material and accessory
boxes from shipping container (Fig 8.2).
3. Laying individual components on clean surface to avoid
scratching, and inspect contents. If damage is found, contact
Ergonomic Products immediately.
Fig 8.1
Accessory Boxes
Fig 8.2
PAGE 27
ergonomic products • 198 Airport Rd • Fall River, MA 02720 • 866-374-6487 950-053 D1E manual ver DStratus Workstation
Model D1E
10 - STANDARD PARTS LIST
Check that the configuration / options for your product(s) are correct. If anything is damaged or missing,
please contact Ergonomic Products customer service at 1-866-ERGO-4-US.
1.
2. 1. – (1) Medical Waste Bin and (1) Resupply Bin.
2. – (1) Ultra Tub Bin.
3. – Hose Connection Hardware Kit: (4) Sml Barb Connectors, (4) Lrg
Barb Connectors, (10) Sml Sleeve Clamps, (10) Lrg Sleeve Clamps, (1)
Sml Tubing Plug, (1) Lrg Tubing Plug, (3) Vacuum Canister Screens,
(1) Air Master Shut-off Valve. **City water Kit will include (1) Water
Master Shut-off Valve and (1) Orange tube with (1) Sml Tee Barb.**
4. – Standard Foot Pedal.
3.
4.
PAGE 28
ergonomic products • 198 Airport Rd • Fall River, MA 02720 • 866-374-6487 950-053 D1E manual ver DStratus Workstation
Model D1E
11 - WORKSTATION ASSEMBLY
STEP 1 - SECURE BIN FRAME TO WORKSTATION BASE
1. The Ultra Bin is placed on the top level
angled work surface. (Fig 11.1).
Fig 11.1
STEP 2 - INSERT BINS INTO PLACE
1. Slide your Resupply Bin inbetween the med
waste holders. Slide the Med Waste Bins in the
med waste holder slot. (Fig 11.2).
Resupply Bin
Medical
Waste Bin
Fig 11.2
PAGE 29
ergonomic products • 198 Airport Rd • Fall River, MA 02720 • 866-374-6487 950-053 D1E manual ver DStratus Workstation
Model D1E
11 - WORKSTATION ASSEMBLY CONT’D
STEP 3 - HOSES AND HANDPIECES
1. Attach hoses to channel and handpieces to
Worktop (Fig 11.3)
Handpieces
Fig 11.3
Hoses
STEP 4 - IDENTIFY YOUR FOOT PEDAL CONNECTIONS
1. Refer to Fig 11.4 to review your foot pedal type.
Fig 11.4
PAGE 30
ergonomic products • 198 Airport Rd • Fall River, MA 02720 • 866-374-6487 950-053 D1E manual ver DStratus Workstation
Model D1E
12 - UMBILICAL INSTALLATION
STEP 1 - IDENTIFY YOUR UMBILICAL CONNECTION
Note: The following figures will help determine which connection steps
Loose Wiring / Tubing
to take on installing your Umbilical Tubing.
1. In Fig 11.1 the Tubing and Wiring from the Umbilical is shown as
Quick Connect
loose ends and connections need to be done manually by your installer Plug
or a licensed contractor. Please follow the directions below to begin the
process.
2. In Fig 11.2 the Tubing from the Umbilical is shown with a quick con-
nect plug. Please follow the directions on page 31 to begin the process.
Fig 11.1
Fig 11.2
STEP 2 - REMOVE THE UTILITY COVER
1. Remove the Utility Cover (Fig 11.3) to get ac-
cess to the Hose Clamp that is attached to the back
of the Workcenter front panel.
Front Panel
Utility Cover
Fig 11.3
PAGE 31
ergonomic products • 198 Airport Rd • Fall River, MA 02720 • 866-374-6487 950-053 D1E manual ver DStratus Workstation
Model D1E
12 - UMBILICAL INSTALLATION CONT’D
STEP 3 - SECURE THE UMBILICAL TUBE
1. Inset Umbilical through 2. Once the Umbilical is held in place 3. Once the Umbilical is secured, replace
Hose Clamp opening (Fig (Fig 11.5) tighten the locking screw the Utility Panel when connections are
11.4). on the Hose Clamp to secure the complete.
Umbilical (Fig 11.6).
Fig 11.4 Fig 11.5 Fig 11.6
STEP 4 - WIRING AND TUBING CONNECTIONS
1. To make your wiring and tubing
connections you will need to remove C B
Y OPTIONAL 1/8" RED TUBE
IF FOOT CONTROL HAS
the Utility panel. Please see page 27,
BK YW
SCALER OPTION
OR PL GN R Y
C O
step 2 to review removal of the panel. OPTIONAL 1/8" CLEAR TUBE
IF FOOT CONTROL HAS
W
LO
TURBO SCALER OPTION
CK
YEL
BLA
1/
1/
2. Please be sure to have your li-
OPTIONAL
8"
8"
RE
CURE LIGHT
1/ " YEL
CL
BLACK
D
K
4"
1/8
EA
TRANSFORMER
X
AC
censed contractor or installer follow
PLE
YELLOW
CL
R
BL
E
DU
AR
Fig 11.7 for proper tubing and wiring
LO
H OS
W
E
H
connections. Wiring and tubing may
1 8" O
OS
E
1/8" BL
OPTIONAL FOOT CONTROL HOSE
RAN
differ depending on options pur- FIBER OPTICS
WHITE
GE
TRANSFORMER 1
8" YELLOW HOSE
UE HO
1
HO
chased. Configuration shown is with
4"
WATER REGULATOR
SE
YELLOW HO
SE
BLACK OPTIONAL
standard options.
BLACK
DUPLEX
GREEN
SE
AC CORD
BLACK 1/8" BLUE HOSE
WHITE
GREEN
OPTIONAL SCALER TRANSFORMER
AIR REGULATOR
Fig 11.7
1
4" YELLOW HOSE
PAGE 32
ergonomic products • 198 Airport Rd • Fall River, MA 02720 • 866-374-6487 950-053 D1E manual ver DStratus Workstation
Model D1E
13 - UMBILICAL CONNECTIONS
STEP 1 - MAKING THE UMBILICAL CONNECTIONS
Suction 9 Pin
1. All of the utilities required by your Workstation
Hose Connector
are supplied via the Umbilical Tube. Installation Tubing
simply involves plugging in tubing and electrical Optional
Connector
connectors.
2. Refer to Fig 12.1 to get familiar with the
tubing and electrical connections (some options
shown, and may not be to the configuration of
your Workstation.).
3. Be Careful not to cut or damage any of the
tubes and wires inside the umbilical tube.
USB Connection
Optional
Fig 12.1 Power cord
Optional
Umbilical Tube
STEP 2 - CONNECTING THE 9 PIN AND TUBING CONNECTORS
1. Plug in 9 Pin Power Connector and
Tubing Connector as shown in Fig 12.2. 9 Pin Power
Connector
2. For proper orientation the 9 Pin Power
Connector wires black, yellow, and red
should be on top.
3. To plug and secure the Tubing Con-
nector move lever clockwise to install or
remove. Move counter clockwise to lock
in place.
Fig 12.2
Tubing
Connector
PAGE 33
ergonomic products • 198 Airport Rd • Fall River, MA 02720 • 866-374-6487 950-053 D1E manual ver DStratus Workstation
Model D1E
13 - UMBILICAL CONNECTIONS
STEP 3 - CONNECTING THE USB, POWER AND SUCTION HOSE
Copper Power
1. Refer to Fig 12.3 for connections Tube Cord
Suction
2. Plug suction hose onto copper tube.
Hose
3. Run USB cord through hole and make
appropriate connections.
4. Run Power cord through hole and make
appropriate connections.
USB
Cord
Fig 12.3
STEP 2 - CONNECTING THE 9 PIN AND TUBING CONNECTORS
1. Securely attach umbilical hose to chassis with
hose clamp. See Fig 12.4. When in place rotate Umbilical
clamp nut towards back of tab. Cover
2. Hook cover on tab at top and fasten with the 2
thumb screws on bottom corners.
3. To make your final wiring and tubing connec-
tions you will need to remove the Utility panel.
Please see page 27, step 2 to review removal of the
panel.
4. See page 28, Fig 11.7, for wiring and tubing
diagram to make your final connections.
Thumb
Screw (2)
Umbilical Hose Clamp
Hose Fig 12.4
PAGE 34
ergonomic products • 198 Airport Rd • Fall River, MA 02720 • 866-374-6487 950-053 D1E manual ver DStratus Workstation
Model D1E
14 - WORKSURFACE HEIGHT ADJUSTMENT
STEP 1 - LOOSEN SET SCREW AND ADJUST TO DESIRED HEIGHT
1. Loosen the Height Adjust Set Screw (use provided 3/16”
Ù
Allen wrench) on the Workstation Support Post Coupler.
Fig 13.1
2. Raise or lower the worksurface (in one inch increments).
One inch height
3. Tighten the set screw to the desired height. adjustment slots
Ù
Support Post
Coupler
Set Screw
Fig 13.1
PAGE 35
ergonomic products • 198 Airport Rd • Fall River, MA 02720 • 866-374-6487 950-053 D1E manual ver DStratus Workstation
Model D1E
15 - MAINTENANCE
Cleaning instructions
Painted and Anodized Aluminum Surfaces
Clean with mild detergent, damp cloth and dry thoroughly after cleaning.
Do NOT use alcohol or solvent based cleaners, ScotchBrite or other abrasive pads.
CORIAN® Surfaces
Clean with warm, soapy water or any non-abrasive ammonia based cleaner or disinfectant. Dry
thoroughly after cleaning. For tougher stains, use Clean EnCounters® from DuPont.
Do NOT use window-cleaning solutions (they will leave a waxy build-up), ScotchBrite or other
abrasive pads.
For more information on cleaning CORIAN surfaces, go to:
http://www.dupont.com/products-and-services/construction-materials/surface-design-materials/
brands/corian-sol¬id-surfaces/articles/how-to-clean-corian.html
PAGE 36
ergonomic products • 198 Airport Rd • Fall River, MA 02720 • 866-374-6487 950-053 D1E manual ver DStratus Workstation
Model D1E
16 - TROUBLESHOOTING
Problem Possible Issue and Solution
No air to workstation Air compressor is off
Air supply valve is off
Air regulator not adjusted properly. Adjust to 80-85 PSI
Master switch is off or not suppl;ying air to master regulator
No bottle water supply Master switch is off.
Bottle is empty
Bottle/ Line switch is on line (if applicable)
Bottle Pressure switch is off (if applicable
No or low drive air for the handpieces check air pressure supplied to workstation at 80+ PSI.
Adjusting screws on bottom of power channel not adjusted properly
No water for handpieces Check water supply with syringe, if no go to 2
Wet/Dry switch on face plate or foot pedal not switched on
Flow control for handpieces not adjusted
No air / water at syringe Check air supply, bottle water supply
Workstation does not turn on Verify that the workstation is properly connected to a working air source
No line water supply (optional) Dental water supply switch (on Workstation) or water valve shut off
at regluator
Water regulator not adjusted
Master switch is off or not supplying air to master regulators.
For Support, call Ergonomic Products directly at 1-866-374-6487
PAGE 37
ergonomic products • 198 Airport Rd • Fall River, MA 02720 • 866-374-6487 950-053 D1E manual ver DStratus Workstation
Model D1E
17 - WARRANTY INFORMATION EXTRACT FROM 950-029 REV: D
Ergonomic Products offers the following warranty on our products.
• 5-year limited warranty on all Corian® surfaces*
• 3-year warranty on all RapidCarts®**
• 5-year warranty on all EP 3 Series® Patient Chairs***
• 3-year warranty on all Workstations®
• 3-year warranty on all EP Lighting****
• 1-year warranty on all cabinetry, laminates and components
• 1-year warranty on all storage tubs and bins
• 3rd party components carry the original manufacturer’s warranty:
- 1-year warranty on scalers
- 1-year warranty on cure lights
- 1-year warranty on Ultraleather upholstery
- 1-year warranty on BienAir Electric Motors
* Limited to manufacturer’s defects only
** Excludes powder coated RapidCarts® tops (1 year warranty)
*** Excludes upholstery (1 year warranty)
**** Excludes bulbs
Discontinued parts or components cannot be serviced once the warranty has expired. Additional 3rd party sources may
be available.
We promise to offer you prompt, inexpensive repairs. Products under warranty will be fixed as quickly as possible and
service will be done on site if feasible. If it must be returned to our technical center, it will be returned to you without
additional shipping charges. If the time needed to repair it will affect your practice schedule, we will try to provide a
loaner so as to not interrupt your service to your patients. In an emergency, our Doctor Delivery Power Channels® will
ship overnight.
Should your office damage equipment, due to improper use or inadequate installation or maintenance, we’ll still make
sure to fix your problem, promptly and without complaint. The warranty will not apply, nor is there a warranty for fabric
damaged by infection control products.
We promise to continuously satisfy you with our products and services. We want to hear from you and help you im-
prove your practice.
Sincerely,
The Staff at Ergonomic Products, Inc.
1-866-ERGO-4-US
PAGE 38
ergonomic products • 198 Airport Rd • Fall River, MA 02720 • 866-374-6487 950-053 D1E manual ver DYou can also read