Derma-MED3 Control - Operating manual - UV skin measuring device - Holtkamp Electronics GmbH
←
→
Page content transcription
If your browser does not render page correctly, please read the page content below

Derma-MED3 Control
    UV skin measuring device

 German utility model
 no.: 20 2014 003 013.8

            Operating manual
Important: For safe and proper use, read the instructions for use and further product-related documents carefully and keep
it for later use!

For errors, technical errors, printing errors and incompleteness, we assume no liability.
Holtkamp Electronics Derma-MED3 Control                                    techn. Stand 07.2018                                                              4122_02.2020

                                                                                                                    S ü d s t r a ß e 4 0 / D- 4 9 0 8 4 O s n a b r ü c k
                                                                                                                    info@holtkamp.de / www.holtkamp.de
European Union conformity explanation

                       EU-Konformitätserklärung / European Union conformity explanation
    Für das nachfolgend bezeichnete Erzeugnis / For the following designated product

                                                                    Derma-MED3 Control®
    wird hiermit bestätigt, dass die Bauart, in der von uns in Verkehr gebrachten Ausführung, den unten genannten Normen
    entspricht.
    It is hereby confirmed, that the construction in that execution brought by us in traffic corresponds to the standards specified
    down.

    Diese Erklärung gilt für alle Geräte, die nach den beiliegenden technischen Unterlagen, welche Bestandteile dieser Erklärung
    sind, hergestellt werden.
    This explanation applies to all devices, after the enclosed technical documents, which are components of this explanation,
    are manufactured.

    Einschlägige EG-Richtlinien / Relevant EC guidelines
    RoHS-Richtlinie 2011/65/EU / RoHS Directive 2011/65 / EU

    1. 2014/35/EG (Niederspannungsrichtlinie)
       2014/35/EC (low-voltage guideline)
       geändert durch
       changed through
       2006/95/EG

    2. 2014/30/EG (EMV-Richtlinie)
       2014/30/EC (EMV guideline)
       geändert durch
       changed through
       2004/108/EG

    Angewendete harmonisierte Normen:
    Applied one harmonized standards:

         EN 60335-1:2012/A13:2017 (Sicherheit)
         EN 60335-1:2012/A13:2017 (security)
         EN 55022 von 12/2011 (Emissionen)
         EN 55022 from 12/2011 (emissions)
         EN 61000-3, Teil 2 + 3 von 03/2010 und 03/2014 (Emissionen)
         EN 61000-3, part 2 + 3 from 03/2010 and 03/2014 (emissions)
         EN 61000-6, Teil 1 + 2 von 10/2007 und 03/2006 (Immunität)
         EN 61000-6, part 1 + 2 from 10/2007 and 03/2006 (immunity)

    Diese Erklärung ist bindend für den Hersteller
    This declaration is binding on the manufacturer

    Manfred Holtkamp Elektronik GmbH
    Südstraße 40 in 49084 Osnabrück
    abgegeben durch:
    Signature:
    M. Hashemizadeh (EMV-Beauftragter)

    ..........................................
    Osnabrück, den 05.09.2018

    Telefon: +49 541 97120-0, Fax: +49 541 97120-40
    Geschäftsführung: Magnus Michael, Uwe Staudinger; Sitz der Gesellschaft: Osnabrück, AG Osnabrück HRB 213567
    Banken: Deutsche Bank Osnabrück, IBAN: DE28 2657 0090 0039 5251 00; SWIFT/BIC: DEUTDE3B265
    Die Lieferung erfolgt zu unseren Allgemeinen Geschäftsbedingungen mit Stand Juni 2011 nach ZVEI unter Einbeziehung der Softwareklausel
    zur Überlassung von Standard-Software als Teil von Lieferungen mit Stand April 2012 nach ZVEI.
    Zusätzlich gelten unsere Vertragsbedingungen „Hardware/Schaltplan/Layout“ und „Auftragsfertigung“.
    Es gelten unsere Einkaufsbedingungen mit Stand Januar 2018.

                                                                                      -3-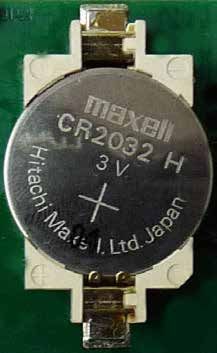
Holtkamp Electronics Derma-MED3 Control                                             techn. Stand 07.2018                                                                               4122_02.2020

                                                                                             Content
1    Legal information...................................................................................................................................................................... 5
2    Warranty		           ............................................................................................................................................................................. 5
3    Safety notices........................................................................................................................................................................... 5
4    Notes on cleaning and maintenance...................................................................................................................................... 5
5    Introduction ............................................................................................................................................................................. 6
6    Device description.................................................................................................................................................................... 6
7    Start up		 ............................................................................................................................................................................. 7
8    Check device versions, date and time.................................................................................................................................... 7
9    Activation of the Derma-MED3 Control.................................................................................................................................. 7
     9.1		     Execution of the temporary activation............................................................................................................................. 7
     9.2       Execution of the final activation....................................................................................................................................... 8
10 Perform skin measurements................................................................................................................................................. 10
     10.1      Basics for skin measurement........................................................................................................................................ 10
     10.2      Handling of the skin measuring head............................................................................................................................ 10
     10.3      Cleaning the skin measuring head.................................................................................................................................11
     10.4      Placement of the skin measuring head..........................................................................................................................11
     10.5      Carrying out the skin measurement 1 (Back of Hand).................................................................................................. 12
     10.6      Carrying out the skin measurement 2 (Wrist)................................................................................................................ 12
     10.7      Carrying out the skin measurement (Elbow)................................................................................................................. 13
11 Select UV index....................................................................................................................................................................... 14
12 Insert chip card....................................................................................................................................................................... 14
13 Enter age		            ........................................................................................................................................................................... 15
14 Select solarium....................................................................................................................................................................... 15
15 Skin test results screen......................................................................................................................................................... 16
16 Print results ........................................................................................................................................................................... 17
17 Transfer the recommended tanning time to chip card timer.............................................................................................. 18
18 Show chip card data on the display...................................................................................................................................... 18
19 Save date of birth etc. on chip card...................................................................................................................................... 19
20 Menu functions....................................................................................................................................................................... 20
     20.1      Call up the menus......................................................................................................................................................... 20
           20.1.1 Calling up the menu by entering a password .(jumper 1a is missing)...................................................................... 20
           20.1.2 Calling up the menus via service cards .(jumper 1a is inserted).............................................................................. 21
21 Menu selection screens......................................................................................................................................................... 22
22 General information about menu operation......................................................................................................................... 23
     22.1      Statistics menu.............................................................................................................................................................. 24
     22.2      Info menu...................................................................................................................................................................... 24
     22.3      Date / Time menu.......................................................................................................................................................... 26
     22.4      Configuration menu....................................................................................................................................................... 26
     22.5      "Solarium data" menu.................................................................................................................................................... 31
     22.6      More menu items in the menu "Solariums data"........................................................................................................... 32
23 Jumper		 ........................................................................................................................................................................... 32
     23.1      Functions of the jumpers............................................................................................................................................... 32
24 Reset to factory data.............................................................................................................................................................. 33
25 Change battery........................................................................................................................................................................ 33
26 Connection to a PC................................................................................................................................................................. 34
27 Receipt printer........................................................................................................................................................................ 34
28 Error messages....................................................................................................................................................................... 34
Index				........................................................................................................................................................................... 37

                                                                                                     -4-
Holtkamp Electronics Derma-MED3 Control                      techn. Stand 07.2018                                                4122_02.2020

1       Legal information                                                   2      Warranty
All  rights  reserved.  No  part  of  this  manual  may  not  be  repro-    On the function of the device is granted for a period of 12 months.
duced  or  copied  in  any  form  without  permission  of  Holtkamp         The warranty  is limited solely to technical defects of the unit, it
Electronics GmbH. The rights for contained software in control              can´t  be  accepted  further  claims.  Further  apply  our  general
and memory blocks are  exclusively from the manufacturer.                   terms  and  conditions,  stand  of  June  2011,  for  products  and
The reading and copying of the program content is strictly prohi-           services of the electrical industry (ZVEI) - also see website: www.
bited. The  Holtkamp  Electronics  GmbH  is  not  liable  to  the           holtkamp.de.
purchaser  of  this  product  or  third  parties  for  damages,  los-       Any liability extinguished by the manipulation of the device.
ses,  costs  or expenses caused by the buyer or any third party
due to accident, misuse or unauthorized alterations, repairs or
improvements.
The Holtkamp Electronics GmbH shall remain liable for any loss,
costs, disruptions or consequential damages that result from the
use of the control.
The  technical  data are  up to  date.  Misprints,  errors and modi-
fications  excepted.  Older manuals  are  no longer  valid  with the
publication of this manual.

3       Safety notices                                                      4      Notes on cleaning and maintenance
The UV measurment device are built according to the prior art               The device is largely maintenance-free. Only clean the UV skin
and the recognized safety rules.                                            measuring device with a damp cloth or brush to remove dust and
Nevertheless, its use threats to life and limb of the user or third         deposits. Under no circumstances may be used cleaning agents
parties, or cause damage to the device or other equipment du-               for cleaning! Never use thinner, petrol, acetone or abrasive cle-
ring  use.  Use  the  device  only  in  perfect  condition,  and  in-       aning agents.
tended,  safety  and  the  risk  of  danger,  in  compliance  with  the
instruction  manual!  Do  immediately  eliminate  particular  dis-
orders,  which  may  affect  safety!  Always  keep  the  operating
instructions  directly to  the  device!  Note,  in  addition  to the
user  guide,  the  generally  applicable legal  and  other mandato-
ry regulations relevant to accident prevention and environmental
protection!
Perform no changes and/or modifications to the UV measurment
device without approval of the manufacturer! Spare parts must
meet the requirements specified by the manufacturer.  This is gu-
aranteed only for original spare parts.  Do observe the in the user
manual  specified  or  prescribed  deadlines  for  recurring  main-
tenance  intervals!  Do  provide  for  the  safe  and  environmental-
ly friendly  disposal  of  plastic  parts  and  electronic  replacement
parts!  The  manufacturer  is  not  liable  for  damage  caused  by
improper use.  The  user bears the risk.  Intended use also inclu-
des compliance with the operating instructions and compliance
with the inspection and maintenance conditions.

                                                                      -5-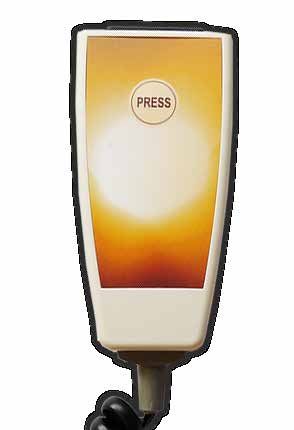
Holtkamp Electronics Derma-MED3 Control techn. Stand 07.2018 4122_02.2020
5 Introduction
The Derma-MED3 Control enables a skin measurement, from The recommended maximum tanning time for tanning beds can
which are calculated the maximum allowed tanning time and be stored on the customer's Holtkamp chip card, which he uses
further data. to pay for the tanning session on the Holtkamp chip card timer
In addition, the Derma-MED3 Control can save the customer's (Duo-XXL etc.). The permitted tanning time is automatically ta-
personal data on their chip card (date of birth, skin type, tanning ken over by the time counter, the recommended tanning time on
counter), which are required by the Holtkamp chip card timer for the chip card is marked as canceled. If desired, the customer can
age control and UV dosing. also sunbathe for a shorter time (with a special configuration of
the time counters, he can also sunbathe for a longer time).
The Derma-MED3 Control is operated via a touchscreen display. Alternatively, the recommended tanning time can be read on the
display of the Derma-MED3 Control. This is particularly neces-
The skin measurement in detail: sary if no chip cards are used or if a customer does not have a
Derma-MED3 Control contains a skin measuring head for the chip card and pays by inserting a coin. In this case, the customer
skin analysis of tanning customers. should not buy more minutes than recommended on their own
To determine the current UV sensitivity, the skin is measured at 3 responsibility.
points (must be carried out before each tanning session). Note: When configuring the chip card timer, the option "SkinCon-
Then the maximum length of stay in the sun (with different trol / Derma-MED3 Control" must be activated. The device ad-
erythema-effective radiation intensities, see entering the UV in- dress can be set as desired (number of the associated tanning
dex) or on the tanning bed whitch is allowed, is calculated with an bed).
erythema-effective radiation intensity that can be set in the menu For more details, see the “UV Control” menu in the operating
"Solarium data". instructions for the chip card timer.
Several values are output optionally on the results screen (can
be set in the configuration menu): Important instructions:
Do not look into the opening of the skin measuring
head during a skin measurement, your eyes would be
blinded by invisible UV light!
Be sure to follow the instructions in the chapter
"Cleaning the skin measuring head"!
The housing of the Derma-MED3 Control must not
be opened, otherwise the guarantee expires!
These operating instruction are intended to help you get the most
out of your Derma-MED3 Control.
We recommend therefore that you read this manual carefully be-
fore start up to avoid malfunctions.
Dose = erythema-effective radiation
6 Device description
The Derma-MED3 Control is available in 2 versions: Connection sockets on the back of the Derma-MED3 Control:
a) Counter version
b) Wall mounted type
RS232 socket USB port On / off switch
The skin measuring head is connected to the device via a spiral (printer connec- (PC connection)
cable. The skin measurement is triggered by pressing the button tion)
on the skin measuring head.
The receipt printer is a special accessory. The PC is not included Power supply socket (use the enclosed
in the scope of delivery. power supply unit! 12VDC / 500 mA)
-6-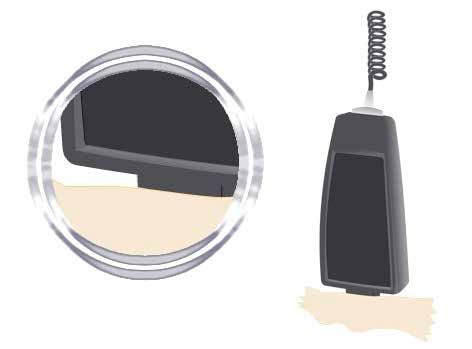
Holtkamp Electronics Derma-MED3 Control techn. Stand 07.2018 4122_02.2020
7 Start up 8 Check device versions, date and time
Turn on
In idle an invisible button is located in the top left corner of the-
The Derma-MED3 Control is started up by switching on the tog- screen. If this is pressed for 2 seconds, the expanded version
gle switch on the rear of the housing. screen is displayed. Among other things, the setting of the de-
The device is ready for operation immediately. The procedure for vice's internal clock can be checked here:
a skin measurement is described in the chapter "Skin measure-
ment menu".
Notice: At a new Derma-MED3 Control you must activa-
ted the device at first, whitch is described in the next
chapter.
Tip: Note: Outside of business hours, the Derma-MED3
Control should be turned off to improve the picture quality
of the display for as long as possible (aging-related mini-
mize the reduction of contrast and brightness)!
9 Activation of the Derma-MED3 Control
9.1 Execution of the temporary activation
When switching on a new Derma-MED3 Control you will be as- Now insert the activation card, whitch is enclosed with the Der-
ked to carry out the temporary activation by inserting the activa- ma-MED3 Control, into the slot on the right side, until it clicks into
tion card: place. This prompt appears:
-7-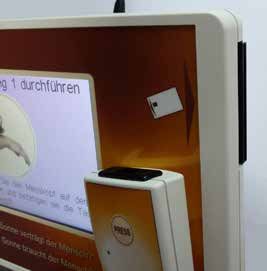
Holtkamp Electronics Derma-MED3 Control techn. Stand 07.2018 4122_02.2020
Now press the "Yes" button and the temporary activation is car-
ried out. As a confirmation you will see this text for a short time:
Now the activation card can be removed, done. All functions of
the Derma-MED3 Control are now available.
The temporary activation is valid for a period of 90 days. Keep
the activation card in a safe place!
See also the next chapter "Execution of the final activation"!
9.2 Execution of the final activation
You will receive an activation code from the manufacturer in a
letter or by telephone. This must then be entered in the Der-
ma-MED3 Control. The activation code consists of 8 capital let-
ters.
Note: The temporary activation must have been carried
out in advance, see previous chapter!
Touch the hidden menu button at the bottom left of the idle screen
for 2 seconds: The password screen appears:
Enter the password "Ope" (note upper / lower case! Switch to
Touch here lower case is done with the "abc" key!). Confirm with the green
"OK" button.
-8-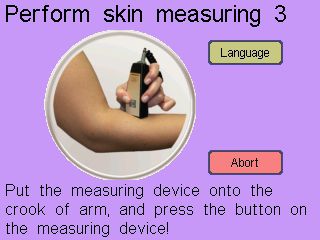
Holtkamp Electronics Derma-MED3 Control techn. Stand 07.2018 4122_02.2020
Now comes up the menu selection screen: Press the "Configuration" button. Then use the orange arrow
keys to navigate to the activation code screen:
Now enter the activation code (8 capital letters). Then press and
hold the "OK" button for one second. If the activation code has
Touch the "UNLOCKING CODE" field. This will activate it: been entered correctly, you will briefly see this message:
Now all functions of the Derma-MED3 Control are available in-
definitely. Exit the menu by pressing the red arrow key several
times.
Derma-MED3
The activation code can then no longer be changed. The
Control is now unlocked permanently and
for an unlimited period. Keep the activation card and the
activation code in a safe place!
-9-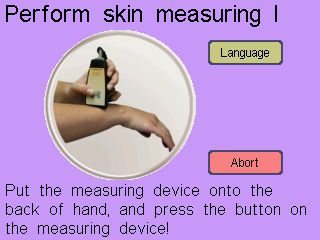
Holtkamp Electronics Derma-MED3 Control                  techn. Stand 07.2018                                              4122_02.2020

10     Perform skin measurements
10.1 Basics for skin measurement

Basically, every time before a tanning client wants to use a tan-        The skin measurement sensor is located on the front of the exter-
ning bed, their skin is measured. In this skin analysis, his indivi-     nal skin measurement head:
dual light defense against UV radiation is determined, which then
significantly influences the calculation of the tanning times.                              Skin measurement sensor
A visual determination of the skin type is not necessary becau-
se the condition of the skin is recorded fully automatically. The
customer does not have to be asked about skin type determina-
tion (concerns skin color, eye color, previously taken medication,
etc.).
However, the customer must still be asked about the exclusion
criteria (skin diseases, sunburn, etc.), eLikewise, he must to be
informed continue about possible risks and give his declaration
of consent and a dosing plan should be drawn up (see UV guide,
chapter 9.4, catalogs A, C, E and F).
The skin measurement directly determines the UV sensitivity of
the skin and is therefore much more accurate than the error-pro-
ne, visual assessment of the skin type.

         Do not look into the opening of the skin measurem-
         ent sensor during a measurement, your eyes would
         be blinded by invisible UV light!

10.2 Handling of the skin measuring head

The measuring sensor is located on the front of the skin mea-
suring head. This sensor contains two essential components,
the transmitter diode (irradiates the skin with UV radiation that
is harmless to the skin) and the receiver diode (measures how
much radiation is absorbed, reflected and remitted by the skin).A
measurement is triggered by pressing the "PRESS" button on
the skin measuring head.
The measuring process starts with the first acoustic signal. The
completion of a successful measurement is confirmed by a se-
cond signal. The skin measuring head must not be moved during
this period (measuring process)!

                                                                       - 10 -
Holtkamp Electronics Derma-MED3 Control techn. Stand 07.2018 4122_02.2020
10.3 Cleaning the skin measuring head
The skin measuring head must be cleaned every few
days.
The front side is wiped with a damp, disinfectant cloth.
The inside of the measuring opening may not be cleaned
this way!
Cleaning the transmitter and receiver diode inside the
measurement opening is carried out with a dry one cotton
swabs to remove dust or dander and thus ensure the
measuring accuracy (do not clean with spray, do not use
either any cleaning agents !!).
10.4 Placement of the skin measuring head
As already described in the previous chapter "Handling the skin
measuring head", the measuring sensor is located in the measu-
ring head. In order to avoid incorrect measurements, the entry of
extraneous light must be avoided.
The skin measuring head should therefore be placed flat on the
skin surface and the measurement should be carried out with
moderate pressure.
Incorrect placement can have extraneous light on the side of the
measurement process. An incorrect measurement can lead to a
reduced tanning time.
Human skin is also a light guide, so never measure under very
bright and strong lighting (e.g. spot light).
To carry out the measurements described below, press the skin
measuring head flush with moderate pressure onto the respecti- Do not measure on veins, large pimples, mosquito bi-
ve skin surface. The opening must be completely closed by the tes, freckles, pigments, warts, liver spots, scars, etc.!
skin.
The position of the skin measuring head on the skin must be
kept constant during the measurement, which takes only a few
moments.
- 11 -Holtkamp Electronics Derma-MED3 Control techn. Stand 07.2018 4122_02.2020
10.5 Carrying out the skin measurement 1
(Back of Hand)
A total of 3 skin measurements are carried out. Now carry out the
measurements in the order whitch is shown in the display.
First, the skin measuring head is placed flush above the back of The measurement is triggered by pressing the "PRESS" button
the hand, about 5 cm towards the outside of the forearm, pres- on the skin measuring head. A short acoustic signal sounds. A
sed lightly and held in this position as still as possible: progress bar is displayed during the measurement:
At the end of the measurement, which takes only a few moments, If the measurement was successful, the display now shows the
a signal sounds again, the skin measuring head can now be re- screen for the 2nd skin measurement (otherwise an error messa-
moved from the measuring point. ge and a repeat request would be displayed).
10.6 Carrying out the skin measurement 2
(Wrist)
Second, the skin measuring head is placed flush on the wrist, The measurement is triggered by pressing the "PRESS" button
about 5 cm towards the inside of the forearm, pressed lightly and on the skin measuring head. A short acoustic signal sounds. A
held in this position as still as possible. progress bar is displayed during the measurement:
Attention: do not place directly on a vein!
At the end of the measurement, a signal sounds again, the skin If the measurement was successful, the display now shows the
measuring head can now be removed from the measuring point. screen for the 2rd skin measurement (otherwise an error messa-
ge and a repeat request would be displayed).
- 12 -Holtkamp Electronics Derma-MED3 Control techn. Stand 07.2018 4122_02.2020
10.7 Carrying out the skin measurement 3
(Elbow)
Third, the skin measuring head is placed flush in the crook of the The measurement is triggered by pressing the "PRESS" button
arm, pressed lightly and held in this position as still as possible. on the skin measuring head. A short acoustic signal sounds. A
progress bar is displayed during the measurement:
Attention: do not place directly on a vein!
At the end of the measurement, a signal sounds again, the skin If the measurement was successful, the display now shows diffe-
measuring head can now be removed from the measuring point. rent screens depending on the configuration (otherwise an error
message and repeat request would be displayed).
Note:
Now all 3 skin measurements are automatically compa-
red. Should 2 measurements be a very large one Diffe-
rence, this is interpreted as a faulty measurement Pre-
tiert, and a repeat of all 3 measurements is started requi-
red!
- 13 -Holtkamp Electronics Derma-MED3 Control techn. Stand 07.2018 4122_02.2020
11 Select UV index
This screen only appears if the "Enter UV index" option is set to This prompts the customer to enter the current UV index of his
"Yes" in the configuration menu: location (keys 1 to 12) or to select a solarium.
A UV index of 12 corresponds to the equatorial sun at noon. In
most European countries, this is the maximum permitted erythe-
ma radiation intensity of a solarium (0.3W / m²). In Central Eu-
rope, the index is up to 8 or 9 at noon in summer, and is often
significantly lower.
If the customer selects "Solarium", the associated erythema radi-
ation intensity can be set in the "Solarium data" menu.
The current UV index (UVI) can be viewed on these websites:
http://www.bfs.de/uv/
http://www.wetter.info/umweltwetter/uv/deutschland/17745468
http://www.wetteronline.de/dldluvi.htm
If the customer presses a button, the next screen appears im-
mediately.
12 Insert chip card
This screen only appears if the "SAVE DATA TO CHIP CARD" This prompts the customer to insert his Holtkamp chip card into
option is set to "Yes" in the configuration menu: the slot on the right side of the Derma-MED3 Control until it clicks
into place.
Card slot
The calculated tanning time and other data are then saved on the
card and the customer is asked to remove the chip card again.
If there is no chip card, the "No chip card" button is pressed. In
both cases you get to the next screen.
- 14 -Holtkamp Electronics Derma-MED3 Control techn. Stand 07.2018 4122_02.2020
13 Enter age
Age is needed to calculate vitamin D units. This screen only ap-
pears
● if the option "Show Vitamin D" is set to "Yes" in the confi-
guration menu,
● if no chip card has been inserted,
● if there is no date of birth on the chip card.
Here the customer is asked to enter their age.
Finally he presses the green "OK" button, then the next screen
appears.
14 Select solarium
This screen only appears
● if the "Number of solariums" appears in the solarium
data menu is set to a value greater than 1, and
● if the "Solarium" button was pressed on the "Select UV
index" screen.
By touching the screen, the customer selects a solarium, then
the next screen appears.
(The calculated tanning time depends on the selected solarium.
The radiation intensity of this solarium must have been set in the
"Solarium data" menu.)
- 15 -Holtkamp Electronics Derma-MED3 Control techn. Stand 07.2018 4122_02.2020
15 Skin test results screen
If all skin measurements have been carried out successfully, the
results are displayed:
Note: The data displayed may vary, depending on the
settings in the configuration and solarium data menu!
Here the option "Save skin measurement results on chip card" is
activated and the calculated data apply to tanning on a solarium.
The tanning progress provides information about the effective-
ness of the last tanning (the more tanning the greater the pro-
gress). It is only displayed when the chip card is inserted if the
card contains a recommended tanning time including skin mea-
surements or feedback data from the chip card timer (data from
the last tanning session!).
The 3 skin measurements at the bottom left and, if applicab-
le, the age of the customer are only displayed if an invisible
button is pressed for 1 second at this point (bottom center).
For control purposes only!
Another way the result screen can look like:
Note: The displayed data can vary depending on the set-
tings in the configuration menu!
The additional text below the vitamin D units appears because
the "Save skin measurement results on chip card" option is
switched off and the calculated data apply to tanning in the sun.
Note: If the triple skin measurement is repeated several
times, the measured values determined and thus the tan-
ning times calculated from this can be somewhat differ
from each other.
This is normal because the skin is a living medium and
can therefore never provide absolutely constant measu-
red values!
- 16 -Holtkamp Electronics Derma-MED3 Control techn. Stand 07.2018 4122_02.2020
16 Print results
If the Derma-MED3 Control is equipped with a printer (special
accessory) and this is set correctly in the configuration menu
under menu item "PRINTER TYPE", the results are printed out.
The printed data can vary depending on the settings in the con-
figuration menu:
Individual logo (see notes under menu item "Print logo" in the
configuration menu)
Sun paradise
Firestreet 7 Up to 8 lines can be entered individually in the configuration
12345 South menu, see "PRINT TEXT (receipt start)"
Phone: 01234/56789
The customer name can be entered here by hand if neces-
Date: 17.07.2018 sary.
Time: 11:31:42
Name: The chip card serial number is only printed if "SAVE DATA TO
CHIP CARD" is set to "Yes" in the configuration menu. If no
Chip card no.: 1234556 card has been inserted, the number will be replaced
"---" printed .
Skin value:
Back of hand 46% The skin measurements only appear if "PRINT SKIN MEA-
Wrist 33% SUREMENTS" is activated in the configuration menu.
Crook of the arm 48%
2 Sunmaker XY
UV index (UVI): 16
The tanning progress is only printed if available. So only if a
Browning progress: 5% chip card was inserted on which there was feedback data!
Recommended
tanning time
min sec): 6:30 The recommended tanning time for the selected solarium.
Dose (Joule/qm): 157 Erythema-effective radiation
Vitamin-D3-Units
ca. (IU): 6160 „IU“ = „International Units“
(when total body expo-
sition in midday sun)
Daily requirement ca. 2000
to 3000 IU!
Derma-MED3 Control (R)
Visit also Up to 8 individual lines can be printed here (see "PRINTER
our sauna in the basement! TEXT -> End of receipt)" in the configuration menu.
- 17 -Holtkamp Electronics Derma-MED3 Control techn. Stand 07.2018 4122_02.2020
17 Transfer the recommended tanning
time to chip card timer
a) Time purchase with Holtkamp chip card
Customers who have a Holtkamp chip card have it easy. You go
to the Holtkamp chip card timer with your card and, as usual,
Hints:
To operate a Derma-MED3 Control in combination with
buy your tanning time. Payment is made with the chip card. The Holtkamp chip card timer (e.g. of the type DUO-XL or
recommended tanning time which is saved on the chip card pre- VENUS-XL) the timer must have software version 9.1 or
vents, that the customer can buy more time than is recommen- higher (was released delivers from February 2004). For a
ded (unless a warning is explicitly permitted in the configuration possibly necessary update please contact your specialist
of the time counter, then a warning is given). However, it is pos- dealer.
sible to buy less time without limitation.
A limitation of the max. tanning time can also be set on the chip The "SkinControl / Derma-MED3 Control" option must be acti-
card timer. If this is less than the time recommended by the Der- vated in the chip card timer. The device address can be set as
ma-MED3 Control has priority! desired (number of the associated solarium). For more details,
After purchasing time, the recommended tanning time is marked see the operating instructions for the chip card timer.
on the chip card as "canceled", which means that no further time Emergency operation: if the Derma-MED3 Control fails, the
purchase can be carried out. This is only possible after a new "SkinControl / Derma-MED3 Control" option is simply switched
skin measurement. The time purchase is only possible on the off and the tanning salon can continue to be operated. The time
day on which the skin measurement was carried out (see validity purchase then works normally again, without evaluating the re-
date). commended tanning time.
If the chip card timer refuses to buy time, the text "Please mea-
sure your skin!" is displayed.
It can also be happen that the use of the tanning beds is blocked,
because their radiation is too strong for the customer (recom-
mended tanning time = 0). Then the message "Solarium not
recommended" appears, when the chip card is inserted.
b) Time purchase without a Holtkamp chip card
Customers who pay by cash must remember the recommended
tanning time which is shown on the display of the Derma-MED3
Control and then go to the coin timer. When purchasing time af-
terwards, you should not exceed the recommended tanning time
on your own responsibility.
18 Show chip card data on the display
This option is only available if the "Save date to chip card" opti-
on is set to "Yes" in the configuration menu. The data stored on
the chip cards can be called up at any time.
To do this, the card is inserted into the Derma-MED3 Control and
the "Card data" button that appears is pressed. Now there are
2 options:
a) The card contains a recommended tanning time (Skin
measurement was done, but it still happened no time
purchase):
tings
Note: The data displayed may vary, depending on set-
in the configuration menu!
The vitamin D3 units are calculated only if there is a date
of birth on the card!
- 18 -Holtkamp Electronics Derma-MED3 Control techn. Stand 07.2018 4122_02.2020
b) After the skin measurement, a time purchase was carried
out, and the recommended tanning time is on the chip
card marked as "canceled". Then you can call up the
"feedback data" of the chip card timer in the display in the
same way.
tings
Note: The data displayed may vary, depending on set-
in the configuration menu!
The vitamin D3 units are calculated only if there is a date
of birth on the card!
The "Selected tanning time" can be less than the time which
recommended by the Derma-MED3 Control, but depending on
the configuration of the time counter it can also be higher!
cally
Note: The display of the chip card data goes out automati-
if no key is pressed for a while.
19 Save date of birth etc. on chip card
With this function you can enter or change the customer's perso-
nal data with the Derma-MED3 Control and save it on their chip
card. This data is required by the Holtkamp chip card timer for operating
Note: For more information on these functions, see the
instructions for the chip card timer in the "UV
age control and UV dosing (Duo-XL, Venus-XL, etc.): Control" menu.
● Date of birth: some Holtkamp chip card timer only allow
This data is usually not entered by the custo-
time to be bought if the customer is older than 18 years
mer, but by the tanning salon staff. For this pur-
(age control, see menu item "Check 18 years" in the UV
pose, the staff legitimizes themselves with a type
Control menu of the XL). The XL checks the date of birth
73 revalue card, which is briefly inserted into and
on the card.
removed from the Derma-MED3 Control. This activates
● Skin type: some Holtkamp chip card timer calculate the the "Chip card editing mode" and this display appears:
maximum permissible tanning time under consideration
of the skin type (see menu item "UV dosing" in the UV
control menu of the XL). The XL checks the skin type on
the chip card.
● Tanning counters: some Holtkamp chip card timer mana-
ge a kind of tanning schedule (see menu item "UV do-
sing" in the UV control menu of the XL).
For this purpose, the XL counts the number of tanning
sessions and saves them on the card.
The tanning counter is normally managed independently
by the chip card timer, it should normally not be changed
with the Derma-MED3 Control.
For certain reasons, it may be necessary to set it to an
initial value, for example to reset the counter after a tan-
ning session or to transfer the counter to a new card.
- 19 -Holtkamp Electronics Derma-MED3 Control techn. Stand 07.2018 4122_02.2020
Then the customer chip card is inserted. The data are displayed
which read from the chip card, these can be changed as follows:
Note: The data displayed can vary depending on the set-
tings in the configuration menu!
With the corresponding buttons, the values can now be changed
and then saved on the chip card.
After removing the customer chip card, the next chip card can be
inserted and processed, etc.
If a customer chip card is no longer inserted, the chip card editing
mode is automatically ended after some time (duration can be
set in the configuration menu). Alternatively, the mode can also
be ended with the "Exit" button. Then the normal skin measure-
ment screen appears again.
20 Menu functions
Individual configurations can be set here in the Derma-MED3
Control. Various statistics counters can also be read.
20.1 Call up the menus
The menu can be called up in two ways:
a) by entering a password,
b) or by Holtkamp service cards (special equipment).
Jumper 1a switches off the password entry and the service card
acceptance on (jumper position see chapter "Jumper").
20.1.1 Calling up the menu by entering a password
(jumper 1a is missing)
In idle and on the blue screens there is an invisible button in the
bottom left corner of the screen. This has to be pressed for 2
seconds to access the password: The password entry screen appears:
Touch here!
- 20 -Holtkamp Electronics Derma-MED3 Control techn. Stand 07.2018 4122_02.2020
There are 3 different passwords, which are arranged hierarchi-
cally. Depending on the password entered, more or fewer menus
can be called up on the following menu selection screen (corres-
pondingly more or fewer buttons appear on the screen):
Password
Menu name Menus accessible with this password
(initial values)
Statistics
Cou Counter (statistics)
(is called up suddenly, the numerical values cannot be deleted)
Statistics / Info
Bas Basic menu selection
(Statistics-Numerical values can be deleted)
Statistics / Info / Date / Time / Configuration / Tanning bed data
Ope Operator menu selection
(Statistics-Numerical values can be deleted)
Process of password entry
Use the keyboard which is shown on the screen:
● Note upper / lower case!
● Switching to lowercase letters etc. happens with key
"abc" etc.
● After entering the password completely, confirm with the
green "OK" button.
● The passwords can be changed in the configuration
menu. We strongly recomend entering individual pass-
words there!
● If 2 passwords are identical, there is assigned the higher
access right
● Forgotten passwords can be reset to their initial values,
see chapter "Resetting to factory data"!
For more see chapter "Menu selection screens"!
20.1.2 Calling up the menus via service cards
(jumper 1a is inserted)
There are 3 Holtkamp service card types (special equipment):
● type 33 (Query card to call up the statistics menu)
● type 43 (Query / delete card to call the basic menu selec-
tion screen)
● type 53 (Key card for calling up the operator menu selec-
tion screen)
Card slot The service card is inserted into the slot on the right side of the
Derma-MED3 Control until it clicks into place.
- 21 -Holtkamp Electronics Derma-MED3 Control techn. Stand 07.2018 4122_02.2020
Depending on the inserted type of chip card, different menus or
menu selection screens are called up (correspondingly more or
fewer buttons appear on the screen):
Card type Menu name Menus that can be accessed with this card type
Statistics
33 Counter (Statistics)
(is called up suddenly, the numerical values cannot be deleted)
Statistics / Info
43 Basic menu selection
(Statistics-Numerical values can be deleted)
Statistics / Info / Date / Time / Configuration / Tanning bed data
53 Operator menu selection
(Statistics-Numerical values can be deleted)
For more see chapter "Menu selection screens"!
21 Menu selection screens
The password "Ope" or the service card type 53 have the highest
hierarchy, after entering them all, menu buttons appear on the
menu selection screen:
Various counters
Software version, H numbers (chip card), activation data ect.
Setting the clock in the Derma-MED3 Control.
Numerous settings of the Derma-MED3 Control.
Names of the tanning beds and their radiant power
With the password "Cou" or service card type 33, the menu
selection screen does not appear, you immediately get to the
With the password "Bas" or service card type 43, the menu statistics menu. The counters located there, can only be viewed,
selection screen is smaller: the password "Cou" does not allow deleting the counters:
- 22 -Holtkamp Electronics Derma-MED3 Control techn. Stand 07.2018 4122_02.2020
22 General information about menu
operation
The setting of the menu items is described below using the ex-
ample of the "Maximum skin measurement time" as an ex-
ample.
Call up the menu and press the button "Configuration". The first Use the orange arrow key to scroll to the screen with the menu
menu page appears: item Maximum skin measurement time:
Touch the field "Maximum skin measurement time". This will
activate it:
The value shown in the yellow field can now be changed with the
plus and minus key, the flashing cursor is under the number to
be changed.
Tapping the green "OK" button moves the cursor to the next di-
git, which can then be changed with the plus and minus buttons.
With the red button "C" you can discard the changes (cancel).
If you confirm instead the green "OK" button for one second, the
changes are saved:
The menu is exited by pressing the red arrow key. If the menu
was called up with a password, it is automatically exited after a
certain time if no key is pressed (this time can be set in the con-
figuration menu, see "Menu duration").
- 23 -Holtkamp Electronics Derma-MED3 Control techn. Stand 07.2018 4122_02.2020
22.1 Statistics menu
Calling up this menu: See chapter "Call up the menus" and
"General information on menu operation"!
Collected data can be viewed in this menu.
Overview of menu items with explanations:
Customer counter. Here you can see the number of customers
whose skin has been measured.
This menu item only appears if the menu item "Save data on
chip card" is set to "Yes" in the configuration menu!
This counter counts the number of Holtkamp chip cards on which
a recommended tanning time and other data have been saved.
Exception: Holtkamp test cards of type 14 and 15 are not coun-
ted.
This menu item only appears if the H numbers of the Der-
ma-MED3 Control have been initialized (if the device supports
chip cards).
This counter counts the number of Holtkamp chip cards whose
tanning counter has been changed (see chapter "Saving birth
date etc. on chip card"). Exception: Holtkamp test cards of type
14 and 15 are not counted.
Note:
After reaching their maximum value "9999", all counters
start again at "0" and count from the beginning.
22.2 Info menu
Calling up this menu: See chapter "Call up the menus" and
"General information on menu operation"!
In this menu various information about the Derma-MED3 Control
can be viewed, they cannot be changed. If you call the manufac-
turer service, you may have to provide some of this information.
Overview of menu items with explanations:
Current software and hardware versions of the Derma-MED3
Control (basic device).
Current software and hardware versions of the skin measuring
head, connected by a spiral cable.
- 24 -Holtkamp Electronics Derma-MED3 Control techn. Stand 07.2018 4122_02.2020
H numbers of the Derma-MED3 Control. The H numbers only
have a function if the menu item "Save data on chip card" is set
to "Yes" in the configuration menu.
The H numbers determine the assignment of the chip cards to
the chip card devices. This prevents the acceptance of third-par-
ty chip cards.
This is another special coding used for security, similar to the
H numbers, which must match for chip card devices and chip
cards.
This code can be used, stolen chip card devices to make it use-
less for the thief, so that he can no longer upgrade chip cards.
In this case please consult the manufacturer (Software update
required!).
Alternatively, stolen devices could also be blocked by changing
the H numbers!
These 4 menu items provide information on the activation of If the final activation has been carried out, the bottom line shows
the Derma-MED3 Control (see also the chapter of the same the date of the final activation.
name!).
The device operating time indicates the number of days since
the temporary activation was performed, regardless of whether
the Derma-MED3 Control was switched on or not. For example,
here it is 0 days.
The serial number of the activation card "1234567" and the date
of the temporary activation "13.06.2017" can be seen as an ex-
ample.
If a final activation has not yet been carried out, the bottom line
shows the remaining days within the final activation should be
carried out.
State of the jumpers in the hardware of the Derma-MED3 Cont-
rol. The function of the jumpers is described in the chapter "Jum-
pers".
Is "Yes" if a USB cable is wired to the PC and the PC is switched
on.
Operating voltage monitoring of the Derma-MED3 Control.
- 25 -Holtkamp Electronics Derma-MED3 Control techn. Stand 07.2018 4122_02.2020
22.3 Date / Time menu
Calling up this menu: See chapter "Call up the menus" and
"General information on menu operation"! Note: If the device more often "forgets" the time and date,
it is necessary to change the battery. See chapter
In this menu you set the system time of the Derma-MED3 Con- "Changing the battery"! It is recommended to change
trol. Optionally, you can activate an automatic summer time ch- the battery every 3 years to prevent the watch from failing!
angeover. The correct setting of time and date is very important
for the validity date when calculating the recommended tanning
time!
Overview of menu items with explanations:
Set here the current time. You can set different versions of the 24
or 12 hour clock with the "Format" button, with the "Separator"
button different separators.
Here you set the current date. You can set different versions (or-
der of day, month and year etc.) with the button "Format" with
the button "Separator" different separators.
If you change the date format, letters are briefly displayed ins-
tead of the numbers to make orientation easier. Importance:
DD = day, MM = month, YY or YYYY = year (2- or 4-digits). (Note:
the date of birth of the customer is always displayed in 4 digits!).
With "Yes" the automatic summer time changeover is activated.
On the last Sunday in March, the time is automatically changed
to summer time, on the last Sunday in October it is automatically
reset to winter time.
At the beginning of summer time, the clock is set forward by 1
hour (at night from 2:00 a.m. to 3:00 a.m.), at the end of summer
time it is set back by 1 hour (at night from 3:00 a.m. to 2:00 a.m.).
If is set here "No", you must change the time for the changeover
dates manually!
22.4 Configuration menu
Calling up this menu: See chapter "Call up the menus" and
"General information on menu operation"!
In this menu the Derma-MED3 Control can be adjusted to your
personal needs.
Overview of menu items with explanations:
Language of the texts that are shown on the display and output
on the printer (= default language).
If is set here "Yes", an additional button "Language" appears
on the skin measurement screen. This enables the customer to
select the language independently.
After expiration of “Max. Skin measurement duration” (see
menu item below) the preset language is automatically reactiva-
ted (according to menu item “Language” above).
Which languages can set the customer, can be specified with
the menu item "Language" (see above) and the following menu
items "Selectable language 2 ... 7".
- 26 -Holtkamp Electronics Derma-MED3 Control techn. Stand 07.2018 4122_02.2020
These menu items (up to 6 items) only appear if the menu item
"Key for temporary language switching" is set to "Yes"!
If is set here "---", the menu item is out of operation. Example:
The customer should be able to choose the languages German,
English and French, and German should be the default langua-
ge. Then these settings must be made:
Language = German
Selectrable language 2 = English
Selectrable language 3 = French
Selectrable language 4 = ---
Selectrable language 5 = ---
Selectrable language 6 = ---
Selectrable language 7 = ---
Set here the current time. With the button "Format" you can
set different versions of the 24 or 12 hour clock, with the button
"Separator" different separators.
The background color of the skin measurement screen can be
set here. The purple field shows a color preview.
The font color of the skin measurement screen can be set here.
The black field shows a color preview.
If is set here "Yes", the current date is displayed on the skin
measurement screen.
If is set here "Yes", the current time is displayed on the skin
measurement screen.
If there is a break between 2 skin measurements for the time
which set here, the skin measurements are automatically inter-
rupted. The Derma-MED3 Control shows the idle screen again.
This menu item only appears if jumper 1a is not inserted!
If you call up a menu by entering a password and no key is pres-
sed for the time which set here, the menu is automatically ended.
Volume of the operating tones of the device.
Volume of the tones for text messages, error messages, when a
chip card is inserted, etc.
The calculated tanning time is rounded to the integer multiple of
this value. 15, 30 or 60 seconds can be set.
- 27 -Holtkamp Electronics Derma-MED3 Control techn. Stand 07.2018 4122_02.2020
The operating sequence can be reversed with this setting.
Sequence 1 (setting = "Yes"): Sequence 2 (setting = "no"):
1. Skin measurement procedure (is always available) 1. Enter UV index (optional, choose sun or solarium)
2. Enter UV index (optional, choose sun or solarium) 2. Select solarium (optional, only if at least 2 solariums
3. Insert the chip card (optional, may contain the age, age are posed)
tanning times) 3. Skin measurement procedure (is always available)
4. Enter age (optional, only with vitamin D calculation) 4. Insert the chip card (optional, may contain the age, age
5. Select solarium (optional, only if at least 2 solariums are tanning times)
are posed) 5. Enter age (optional, only for vitamin D calculation)
If "Yes" is set here, the recommended tanning time and further
data are saved on a Holtkamp value card after a skin measu-
rement. The calculated tanning time, dose and vitamin D units
apply to whole body radiation on a solarium. The customer can
go with his card to the Holtkamp chip card timer and buy the re-
commended tanning time.
After the skin measurements, the customer is asked to insert the
card. This text does not appear if "No" is set here.
Note: this setting has no influence on the chip card
editing mode (changing the date of birth, skin type,
etc. of the customer on the chip card)!
This menu item can only be set if the menu item "Save data on
chip card" is set to "Yes"!
If here set "Yes", after the 3rd skin measurement the screen will
still appear "Please insert chip card" (only if no card is currently
inserted), but without the "No chip card" button. The chip card
must be inserted! Without this you won't get to the results screen
of the skin measurement!
If set here "No", customers can complete the skin measurements
without a chip card by pressing the button "No chip card".
This menu item can only be set to "Yes" if the menu item "Save If the menu item "Save data on chip card" is set to "Yes", the
data on chip card" is set to "No"! UV index is always determined by the selected solarium. (This
If here set "Yes", after the skin measurements the customer will UV index is set in the menu "Solarium data").
be asked to enter the current UV index of their location or to The calculated tanning time, dose and vitamin D units then apply
select a solarium. to whole body radiation at the solarium.
For more information, see chapter "Selecting the UV index". The UV index 12 corresponds to an erythema-effective radiation
The calculated tanning time, dose and vitamin D units then apply intensity of 0.3W / m².
to full body radiation in the midday sun or on the solarium to be
selected by the customer!
If here set “Yes”, the UV index selected by the customer is dis-
played on the skin measurement result screen and printed out
on the printer.
If here set “Yes”, the calculated dose (erythema radiation in jou-
les / m²) is displayed on the skin measurement result screen and
printed out on the printer.
If here set “Yes”, the amount of vitamin D³ is calculated in IU
(international units). This requires the age of the customer, which
is either read from the customer chip card after the skin measu-
rement or queried on the screen. The amount of vitamin D³ is dis-
played on the skin measurement result screen and printed out.
- 28 -You can also read