Expanded Athlete Performance Analysis - Zybek Sports
←
→
Page content transcription
If your browser does not render page correctly, please read the page content below
Expanded Athlete Performance Analysis

                            Test Performance Results

                                         Event Details:

                                   Location: San Antonio, TX

                                     Date: January 5, 2018

                                        Testing Standards:
                                 Zybek Sports Football 2018.1 –
                                 Full automated electronic times

  Athlete: John Doe                                                         1
  Event: 2018 National Combine                                     © 2018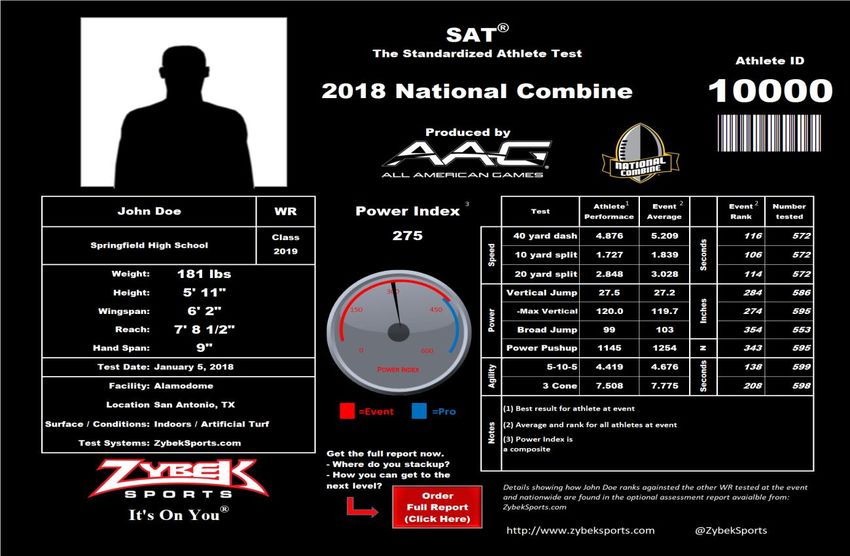
Contents
BASIC STANDARDIZED ATHLETIC TESTING RESULTS: ................................................................................................3
ATHLETE - ANALYSIS AND RECOMMENDATIONS: .........................................................................................................4
        Background: ......................................................................................................................................................................................................................5
        Athlete’s Power Index – Detail.................................................................................................................................................................................6
    THE 40 YARD DASH ..................................................................................................................................................................................................................... 7
        Background: ......................................................................................................................................................................................................................7
        40 Yard Dash – the rules: ...........................................................................................................................................................................................8
        Athlete’s Performance on the 40 Yard Dash ...................................................................................................................................................9
        The Science Behind Your Performance ........................................................................................................................................................... 12
        40 Yard Dash – Performance Improvement................................................................................................................................................. 13
    THE SHORT SHUTTLE (A.K.A 20-YARD SHUTTLE) ................................................................................................................................................................ 17
        Background: ................................................................................................................................................................................................................... 17
        Athlete’s Performance on the Short Shuttle ................................................................................................................................................. 19
        The Science Behind Your Performance- Short Shuttle ........................................................................................................................... 22
        Short Shuttle – Performance Improvement.................................................................................................................................................. 22
    THE 3-CONE DRILL .................................................................................................................................................................................................................... 24
        Background: ................................................................................................................................................................................................................... 24
        3-Cone – the rules: ....................................................................................................................................................................................................... 25
        Athlete’s Performance on the 3-Cone ............................................................................................................................................................... 26
        The Science Behind Your Performance- 3-Cone ......................................................................................................................................... 28
        3-Cone – Performance Improvement ............................................................................................................................................................... 29
    THE VERTICAL JUMP ................................................................................................................................................................................................................... 30
        Background: ................................................................................................................................................................................................................... 30
        Athlete’s Performance on the Vertical Jump ................................................................................................................................................ 31
        Athlete’s Performance on the Max Vertical Jump ..................................................................................................................................... 33
        The Science Behind Your Performance- Vertical Jump .......................................................................................................................... 35
        Normal vertical jump compared to whom? .................................................................................................................................................. 36
        Vertical Jump – Performance Improvement ................................................................................................................................................ 37
    THE BROAD JUMP ....................................................................................................................................................................................................................... 40
        Background: ................................................................................................................................................................................................................... 40
        Athlete’s Performance on the Broad Jump .................................................................................................................................................... 41
        Broad Jump – Performance Improvement .................................................................................................................................................... 43
    THE POWER PUSHUP .................................................................................................................................................................................................................. 44
        Athlete’s Performance on the Force Plate Power Pushup .................................................................................................................... 45
        Force Plate Power Pushup – Performance Improvement .................................................................................................................... 48
    IS THIS A GOOD SCORE? .............................................................................................................................................................................................................. 49
        COMBINE AVERAGES – QUARTERBACKS AND RUNNING BACKS ........................................................................................................ 49
        COMBINE AVERAGES – LINEBACKERS............................................................................................................................................................... 49
        COMBINE AVERAGES – PASS CATCHERS .......................................................................................................................................................... 50
        COMBINE AVERAGES – DEFENSIVE BACKS ..................................................................................................................................................... 50
        COMBINE AVERAGES – OFFENSIVE LINEMAN ............................................................................................................................................... 51
        COMBINE AVERAGES – DEFENSIVE LINEMAN............................................................................................................................................... 51
    NFL BEST IN RECENT YEARS ................................................................................................................................................................................................... 52
        40-Yard Dash.................................................................................................................................................................................................................. 52
        20-Yard Shuttle (5-10-5) ......................................................................................................................................................................................... 52
        Three Cone Drill Test (L-Drill) .............................................................................................................................................................................. 52
        Vertical Jump.................................................................................................................................................................................................................. 53
        Broad Jump...................................................................................................................................................................................................................... 53
APPENDIX A .............................................................................................................................................................................. 54
    VERTICAL JUMP POWER CALCULATIONS ................................................................................................................................................................................ 54
       Lewis Formula ............................................................................................................................................................................................................... 54
       Harman Formula ......................................................................................................................................................................................................... 55
       Johnson & Bahamonde Formula ......................................................................................................................................................................... 56
       Sayers Formula ............................................................................................................................................................................................................. 57
       Bosco Formula ............................................................................................................................................................................................................... 58
    REFERENCES................................................................................................................................................................................................................................ 59

Athlete: John Doe                                                                                                                                                                                                                         2
Event: 2018 National Combine                                                                                                                                                                             © 2018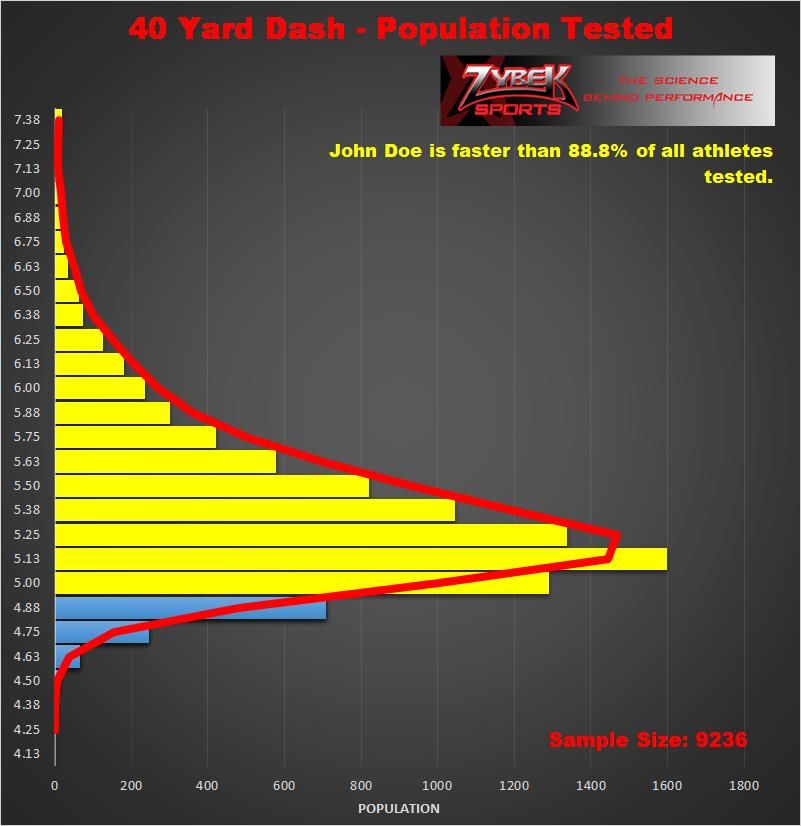
Basic Standardized Athletic Testing Results:

                                       Figure 1 - Basic Report

Report Notes:
   1. Procedures used and test conditions: It is important to note the conditions, procedures, and
      environmental aspects realized during the test. Although the performance impact of these
      can be endlessly debated, documenting these provide a sis for future comparison when test
      environments change.
   2. The Power Index is a composite measure of basic athleticism. The Power Index was
      derived from first principle physics and refined empirically by using real-world measured
      athletic results from top athletes.
   3. Event Rank: This number is the actual rank of the athlete when considering only the sample
      set at the event. Comparisons to a significantly larger sample set are included in this
      expanded athlete assessment report.
   4. Number tested: This is the number of athletes who completed the referenced test at this
      event.

Athlete: John Doe                                                                              3
Event: 2018 National Combine                                                      © 2018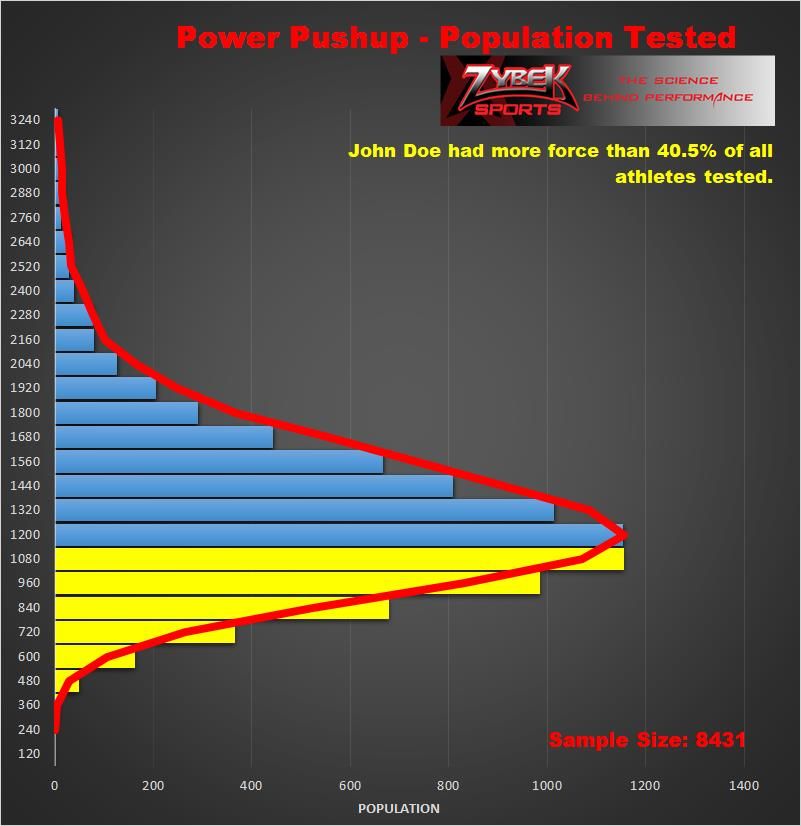
Athlete - Analysis and Recommendations:
This section of the report contains the following for each drill:
   - Background of the individual test
   - The athlete’s measured performance on each drill
   - The basic science behind your performance
   - How the Athlete’s performance compares to:
           o Other athletes at the event
           o Professional athletes
   - Performance improvement suggestions

SAT® (Standardized Athlete Test)
Speed matters. Almost every sport is a very quick game with every single action in the
sport being an explosive action. As athletes get bigger, stronger, and faster, and more
reactive, even quicker execution is required. Well-rounded athletes are required to have
the ability to react efficiently to every aspect of the sport they play.

Strength, power, acceleration, multi-directional quickness and lateral agility are all
essential athletic attributes needed to perform successfully. These coupled with stability,
intensity, and clean mechanics are key factors for skills such as batting and throwing
power, dominant tackling, and formidable speed around the court or field. Along with high
levels of performance, athletes must also possess excellent hand-eye coordination.

While training your body is important, it is important to note that poor split second timing
and lack of reactive agility cannot always be overcome by raw athleticism. Sports are as
much a mental game as physical one – so train both if you want to succeed.

Athlete: John Doe                                                                          4
Event: 2018 National Combine                                                  © 2018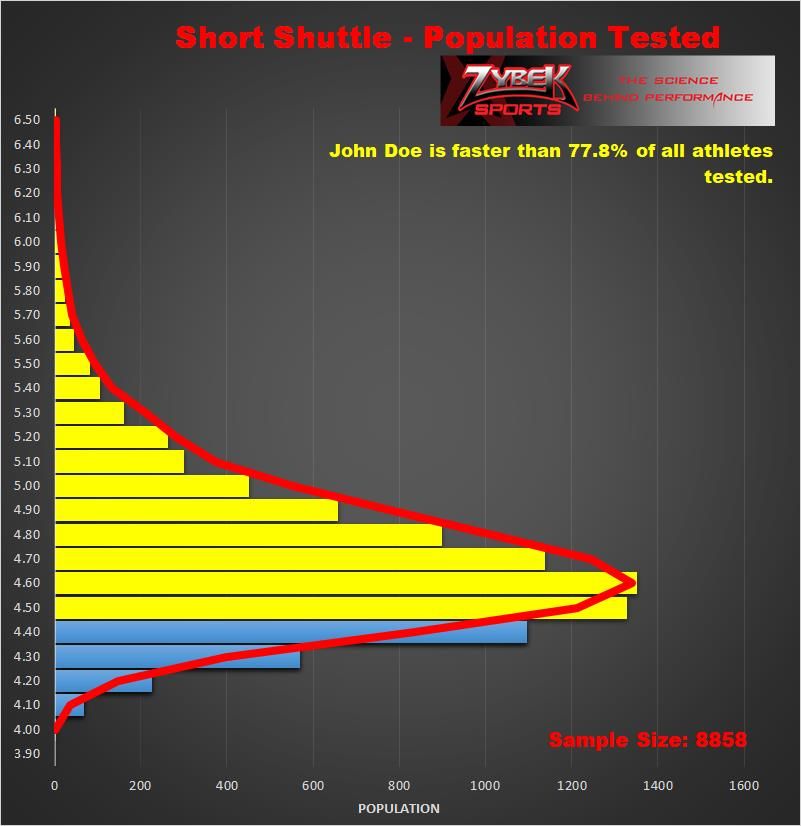
the Composite Power Index
Background:
The combine test results presented in this document are the standard tests that have been
used for decades. These tests report the athlete’s performance in units of time, distance,
and weight. This information provides the basis for position-specific athlete comparison,
water-cooler conversations, and sports talk radio topics. It is arguably inadequate for
comparing athletes of different positions, physical sizes, and weight.

The Power Index integrates standard measured results and known test configurations to
calculate the Athlete’s power output on each drill. The Power Output is then pro-rated into
the athlete’s body weight which yields the Power Index.

The Power Index was derived from first principle physics and refined empirically by using
real-world measured athletic results from top athletes. Along with publicly available data
from the NFL Scouting Combine, the Power Index has been adapted to yield a score that of
up to 100 on each test. Although there is no limit in the calculation that precludes
exceeding a score of 100 on each test, the data from the past several years suggest that it
would take an extraordinary athlete to surpass 100 on these tests.

The Power Index is essentially an athlete’s Power to Weight ratio that allows cross-athlete
comparisons.

Athlete: John Doe                                                                         5
Event: 2018 National Combine                                                 © 2018

Athlete’s Power Index – Detail

Athlete: John Doe                         6
Event: 2018 National Combine     © 2018
the 40 Yard Dash
Background:
The 40 yard dash has been a standard test used to evaluate the speed of football players by
scouts for the NFL Draft. A quick reference search reveals that there are two different
explanations regarding the origins of the 40 yard dash. Some references state that the
origin comes from the average distance of a punt being 40 yards. Punts average around 40
yards in distance from the line of scrimmage, and the hang time (time of flight) averages
approximately 4.5 seconds. Therefore, if a coach knows that a player runs 40 yards in 4.5
seconds, he will be able to leave the line of scrimmage when a punt is kicked, and reach the
point where the ball comes down just as it arrives.

Speed makes a huge difference in nearly every game and every sport. Half a second is the
difference between being safe at first base by 10 feet or being out by a mile. Touchdowns
and goals are often scored or stopped by less than one step. This is equal to just 1 or 2
tenths of a second.

Others claim that in the 1950’s, “Coach Paul Brown of the Cleveland Browns is believed to
have timed his players in the 40 in training camp as a means of evaluating potential
starters. Why Brown picked 40 yards is a secret he took to the grave”1

Speed and agility are important on both sides of the ball. On defense, speed is important
when an opponent must be defended. On offense, speed puts pressure on the other team
and forces coaches to change their game plan; this can aide an entire team when opposing
coaches need to compensate for one disruptive athlete.

Speed is a skill - having a quick first step, agile lateral motion, and aggressive acceleration
can turn a player or team into a high-octane scoring machine. Tenths of seconds make the
difference in being out or safe, scoring or not scoring, winning or losing.

While different sports focus on different sprint lengths (10-yds, 20-yds, 40-yds or 60-yds)
an athletes time in these sprints has become one of the most important tests that can add
or subtract from a player’s value.

The following sections discuss your measured results as well as ways to improve your
future performance in this event.

1

https://books.google.com/books?id=EYYa7ITAFecC&pg=PA43&lpg=PA43&dq=40+yard+dash+history+footb
all+cleveland&source=bl&ots=_dYsufmkhx&sig=N0h_RhdeeGDOdvV9EqUWb4B-
0kg&hl=en&sa=X&ei=zyMkVY7kMMHssAX6-
4KIDA&ved=0CFwQ6AEwCQ#v=onepage&q=40%20yard%20dash%20history%20football%20cleveland&f=f
alse

Athlete: John Doe                                                                             7
Event: 2018 National Combine                                                     © 2018
40 Yard Dash – the rules:
The rules used for the 40 yard dash are the following:
   1. The Athlete starts in a 3-Point Stance
   2. The Athlete must remain stationary for 3 seconds before running.
   3. The time starts when the down-hand separates from the surface.
   4. The time stops when the athlete passes through the laser at the 10, 20, and 40 yard
       positions.

Athlete: John Doe                                                                       8
Event: 2018 National Combine                                               © 2018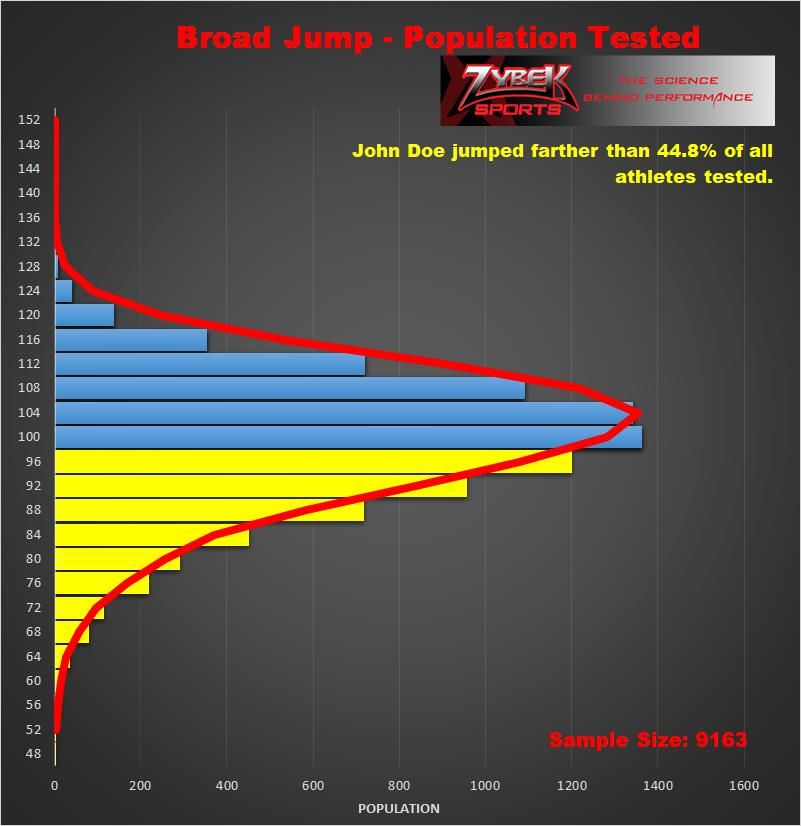
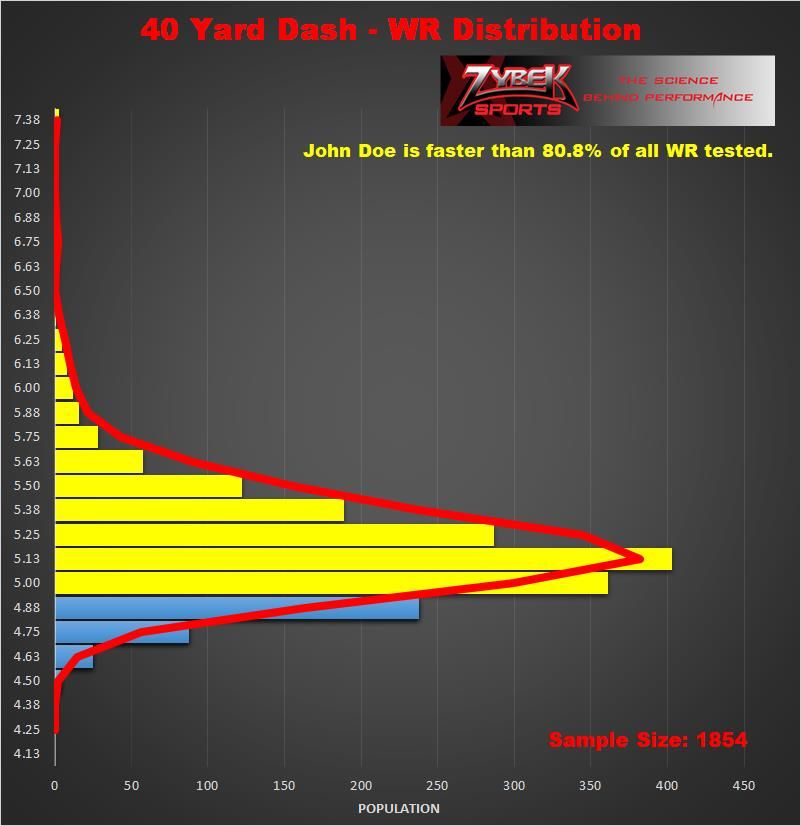
Athlete’s Performance on the 40 Yard Dash

Athlete: John Doe                                9
Event: 2018 National Combine            © 2018
Athlete: John Doe                       10
Event: 2018 National Combine   © 2018
Athlete: John Doe                       11
Event: 2018 National Combine   © 2018
The Science Behind Your Performance
The 40-yard dash (as run by the NFL) can be divided into three phases that match the
traditional time splits used by the industry. These phases are:
   • 0 Yard to 10 Yard.
   • 10 Yard to 20 Yard
   • 20 Yard to 40 Yard.

Considering that reaction time is not measured or included in an athlete’s sprint time, the
measurement isolates physical performance.

Each phase of the run can be used to quantify a different athletic characteristic. The
following describes the three phases:

                                   Phases of the 40 yard dash
Phase 1: 0 to 10 Yard:                                         Explosive Power
Although the 40 yard dash time is probably the most discussed performance number for
athletes, the 10 yard split is probably the most important for all positions. Only a fraction
of the plays in a football game require an athlete to run for over 10 yards.

An athlete’s explosive power is measured during this phase of the run.

From basic physics, an equation for power is:

                                Power = Force x Velocity

The Power required to accelerate the athlete from a stationary position to a sprint requires
more strength and power than any other phase of the run.

Phase: 10 to 20 Yard                                                                Transition
At the start of this phase of the run, the athlete is starting to reach top speed and, as a
result, acceleration is diminishing. When acceleration is reduced, the corresponding power
required is also reduced. In this transition phase, the athlete must move from explosive
power to endurance. By the conclusion of the second phase of the run, the athlete has
typically reached their top speed and is trying to maintain it.

Phase: 20 to 40 Yard:                                                            Speed
Endurance
During this phase, the acceleration is very minimal and an athlete’s running ability and
endurance become the most important characteristic.

Athlete: John Doe                                                                           12
Event: 2018 National Combine                                                   © 2018
40 Yard Dash – Performance Improvement From your performance on the SAT®, here are some segments to focus on with your to improve your time. Running a good 40-yard dash can be the difference from being a full ride scholar to a walk on. Since the 40-yard dash is measured from 10, 20, and 40 yards, it’s often best to look at the 40-yard dash in the segments, and there is a certain understanding of what each marker means. The first 10-yards measures acceleration from a standstill; at 20 yards the measure of acceleration to top end speed; and 40 yards measures how long top end speed is maintained. To get the best results for those three components of the 40-yard dash, you further break down the whole dash into four keys components: The stance, the first ten yards, the 10 to 20, and the finish. Understanding, training and perfecting these four parts will help produce your fastest 40-yard dash. Perfecting your 40-yard dash will not only improve your time, but your stock in a college or scout’s eyes as well. The Stance When it comes to the stance, this is the most overlooked part of the run. Perfecting a great stance sets you up for success. When setting up your stance you must learn how to ‘crowd the line’. The only part of your body that must be behind the line are your hands and feet. A speed coach will help you figure out which foot will be forward and backward in your stance. Usually a good rule of thumb is having the foot you jump off in front. At this point, you must learn how to get your feet set appropriately (and this can vary slightly from athlete to athlete, so it is important to have your coach or trainer determine which stance is best for you). Most athletes find success with their front foot roughly ½ to 1-foot length back from line. The key here is not just reps, but combining reps with video analysis and automated timers to you can be sure you are finding the best stance for you. Next you learn how to get your 2nd foot lined up with your opposite foot’s heel. Since you can also set your foot up 1-foot length back from opposite foot’s heel (or somewhere in between those 2) this is an area where working with a trainer can pay off. Again, this is dependent upon you, so you should experiment. Once your feet are set you must learn to set your arms/hands and your shin angle. To do this, you’ll work on placing your hands in front of line and “walking” yourself back behind the line; you’ll want to focus how to raise your hips and load yourself like a spring. Athlete: John Doe 13 Event: 2018 National Combine © 2018
While “walking” yourself back, focus on where to place the hand of your back leg in relation
to the start line and how to position your shoulder slightly in front of your hand to feel a
“forward lean”. You’ll feel like you are almost falling forward (this is important at takeoff as
it will ensure you shoot forward instead of popping up).

Once your “3 point” stance is established, you will raise your opposite arm up to your hip
while maintaining the proper angle at the elbow. At this point, you should learn how to
effectively brace your core and keep your chin tucked as you prepare for take-off.

Explosive Starts
Power is the key to an athlete and their success in all aspects of the game of football. The
10-yard dash is the key component in the 40-yard dash. A slow start often indicates that
you took a drop step in your start that lifted your body upward, rather than forward. This
slows down your explosion off the line. In 95% of athletes that we have tested in the 40-
yard dash, first movement is normally the hand coming off the turf.

The best way to improve on this part is to work on drills that help with exploding off the
line on your power leg, so you won’t drop step. This will also help with the angle of your
body as well, since it will help you to come out of your sprint at a lower angle before you
rise to get to max speed.

The First 10 Yards
As you begin to accelerate from a dead stop, training sessions should focus on pushing off
with both legs. Again, the first 10 yards is acceleration and to accelerate as quickly as
possible you need to use the power in your legs to drive your feet in the ground as strong
as humanly possible.

Driving your arms as hard with power while keeping your chin down is an important
lesson to learn, as you do not want to rise. As you fire your arms back (think driving
elbows back), be sure to keep your elbows at the ideal angle for the best acceleration.

Proper training helps you improve your ability to cover as much ground as possible with
your first step. Once coached, your first step will be about a yard beyond the line (if it is
shorter than this, you’ll want to learn methods to improve it.)

Working with a good trainer will help you understand ways to manage your breath and
brace your core until the end of the 10 yards. As you run, your coach will evaluate your
knee drive and flexion in the ankle. Proper training can help you cover as much ground as
possible with each step. A good time typically has 5 1/2 to 6 ½ steps through the first 10-
yards.

Plyometric training teaches the body to explosively contract muscles (generate force) in
the quickest time (velocity) possible. Lower body plyometric motions will aid starting
speed due to the explosiveness and elastic responses of the hips and knees.
10 – 20-yds

Athlete: John Doe                                                                               14
Event: 2018 National Combine                                                    © 2018
Training with the resistance will recruit more muscle fibers and translate into improved
speed performance. To improve times between 10-20 yards, the resistance is kept under
10% of bodyweight so to not alter sprinting mechanics.

Examples of exercises you might work to improve this phase of the sprint could include:
resisted sled dragging; Bulgarian squats; dot drills; lunges; speed ladders; and jumping
rope.

It is important to touch on the need to integrate into the training program some core
conditioning work. The core is the muscular connection between the muscles of the upper
and lower body. Having a stable mid-section, strong abdominals and obliques, and a strong
lower back are key to speed performance and balance.

Medicine ball work is valuable, as are stability ball exercises. Studies show that it is
important for an athlete training for speed, to mix up between core work with resistance
for low repetitions and high repetition core work, such as crunches and leg raises.

The Finish (20 – 40)
As you come to the finish of the run try and prevent a letdown at the end. Learning
techniques to help drive the elbows to keep your speed (the legs follow the arms) are a part
of a solid training program. It is highly critical to avoid slowing up or losing focus.
Practicing running through the finish helps you avoid the most common mistake untrained
athletes make, they let up right before the line which costs them a tenth of a second.

Training can improve the clearance rate of lactate and reduce early lactate formation.

Both submaximal aerobic exercise and interval training can improve the body's ability to
buffer and tolerate lactate. However, only intense interval training can increase various
important components of anaerobic power and capacity. Submaximal aerobic exercise does
not and may even decrease anaerobic enzyme activity (not good for speed development!)

Speed endurance training to help improve your finish is like speed or sprint training,
however there are two important distinctions:
   • Repetitions should last from 30 seconds up to 2-3 minutes as opposed to 5-10
      seconds for speed drills.
   • Rest intervals between repetitions is reduced to prevent complete recovery

Athlete: John Doe                                                                          15
Event: 2018 National Combine                                                 © 2018
Knee drive This is also very common technique to isolate when looking at an athlete’s 40-yard dash. When we calculated your steps between the 20 and 40 yard splits you are taking too many steps to cover 20 yards. To improve on your knee drive you need to work on your flexibility along with the strength in your lower body. There are many exercises that you can do daily that can really help improve this part of the 40-yard dash. Every day you need to stretch, whether you are watching TV or just standing in a line at school. To help with strength in your lower body talk with your strength coach to give you a workout routine to help you strengthen that part of your body. It is also a good idea to work on your mid-section, since you need strength in your core and in your hip flexors. Athlete: John Doe 16 Event: 2018 National Combine © 2018
the Short Shuttle (a.k.a 20-yard shuttle)
Background:
The short shuttle is the first of the cone drills. It commonly known as the 5-10-5. The
purpose of this exercise is to test the athlete's lateral quickness and explosiveness in short
areas. The athlete starts in a three-point stance, explodes out 5 yards to their right, touches
the line with the right hand, goes back 10 yards to their left, left hand touches the line,
pivots, and then turns 5 more yards and finishes.2

The short shuttle is a series of quick bursts from side to side. The lateral movement with
starts and stops can be a better indicator of true sports speed for some positions than the
40-yard dash. Athletes in most sports must possess great linear speed, but must
compliment that speed with agility. Agility is the ability to quickly change directions
without the loss of speed, balance, or body control.

2   http://www.nfl.com/combine/workouts

Athlete: John Doe                                                                             17
Event: 2018 National Combine                                                    © 2018
Agility and quickness play an important role for athletes. Since there is little time to react
when a ball is hit, or thrown, being able to quickly move laterally helps an athlete get in
front of balls, grab rebounds, make last second adjustments, and utilize good footwork to
set up for a strong shot, cut, or block.

Agile athletes can get their hips and body in position to make turns to grab that extra yard,
or base, while in soccer or lacrosse they utilize agility to put pressure on the opposing
defense which leads to more errors and more goals.

The 5‒10‒5 is considered the most valid test to measure the ability to change direction.
Relative to offense, slot receivers who may lack blazing speed can have a very productive
career if they can change of direction quickly. On special teams, the punt returner will have
one of the top shuttle times on the field.

Athlete: John Doe                                                                                18
Event: 2018 National Combine                                                    © 2018
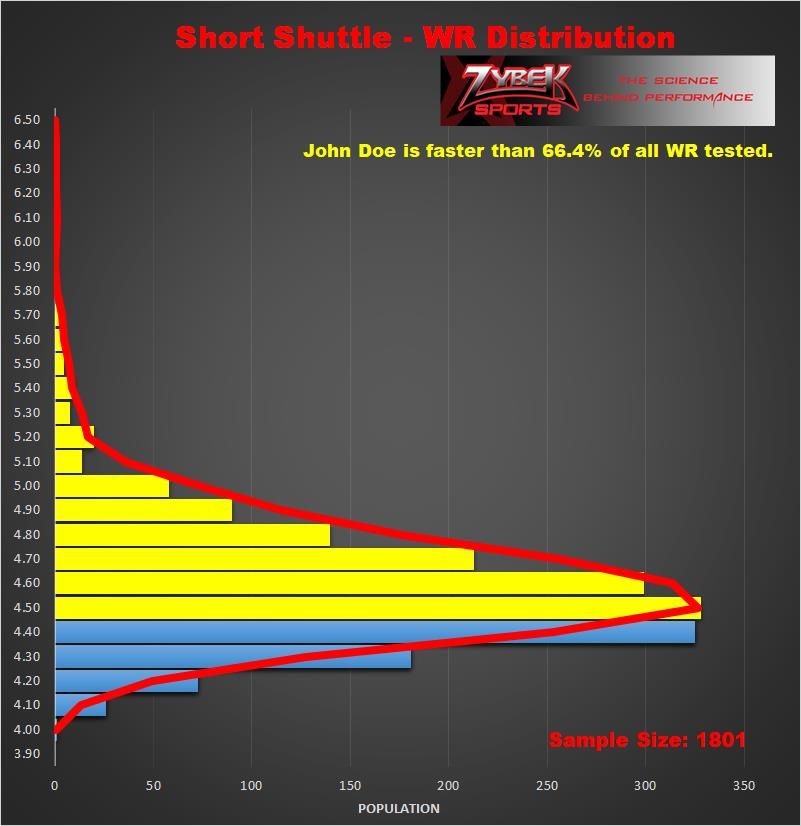
Athlete’s Performance on the Short Shuttle

Athlete: John Doe                                 19
Event: 2018 National Combine             © 2018
Athlete: John Doe                       20
Event: 2018 National Combine   © 2018
Athlete: John Doe                       21
Event: 2018 National Combine   © 2018
The Science Behind Your Performance- Short Shuttle
The primary result of the short shuttle test is to measure an athlete’s capability to change
direction and exhibit explosive power. From basic physics, the acceleration of an object as
produced by a net force is directly proportional to the magnitude of the net force, in the
same direction as the net force, and inversely proportional to the mass of the object.

From an athlete’s perspective this means:
   - it takes more force (effort) to change directions faster
   - The heavier an athlete is the more force it takes to change the direction.

The short shuttle integrates the power to start the run and the power to change direction
two times.

Short Shuttle – Performance Improvement
Scouts generally consider good lateral movement to be .4 seconds less than the 40-yard
dash time. In other words, an athlete who runs a 5.1 second 40-yard dash should be
capable of a 4.7 Short Shuttle. Technique here is a bit controversial. Athletes are having
excellent results with competing philosophies, so it really takes practice and trial and error
to figure out what technique is right for you. In fact, this drill is one that has shown the
largest improvement over the past few years as techniques get better.

Techniques you should work on:
   1. Narrow start stance with a crossover start. Whichever direction you start-out the
      drill going, you put the opposite arm down. So, for example, if you were going to the
      right first, you’d put your left arm down before you start. The philosophy you will be
      taught is to use the opposite arm to push you and give you momentum as you start.
   2. 5-yards right using the proper number of steps is ideal depending on your size
      (you’ll learn that one missed step necessitates two steps as the athlete must touch
      with the right hand and right foot). The big key you will learn here is to land on the
      proper part of your foot and execute an immediate crossover step.
   3. 10-yards left using the correct number of steps. With proper coaching, you will learn
      how to make your second to last step a hard foot plant leading to another crossover.
   4. Sprint back through the center.
   5. Key improvements you will learn - 12 steps is the ideal for an athlete preparing for
      Division 1. Missteps can turn 12 steps into 16 steps. The next big keys you will work
      on are great crossovers at both turns.
   6. One area of controversy is touching the ground with the inside hand to get a low
      turn. Although we do not suggest it, more and more athletes are beginning to do it
      and this is perfectly ‘legal’ to do. Some scouts ignore this, others don’t. As many of
      these tests have been done for years, there are only basic rules and the process
      continues to evolve. Improved teaching methods have seen times move to .5 to .6
      seconds lower than the 40-yard dash and recently we have recently begun to get
      elite athletes in the 3.9 range which seemed unachievable a few years ago.

Athlete: John Doe                                                                           22
Event: 2018 National Combine                                                   © 2018
Below are few additional tips you can work on that will help reduce your time when
training:
1. Running the entire drill on the correct part of your foot, this allows for explosive
power.
2. Running at the proper level throughout the whole drill. The reasoning is that for you
to change directions, you must drop your hips… so by running at the proper level,
you will require less distance to bend and touch the lines.
3. Tricking your mind into thinking you’re about to run a 40-yard dash on the last leg
of the drill. As you finish, this should help ensure that you accelerate through the
finish line. A lot of athletes “let up” before they cross the line, slowing down their
time. After testing thousands of athletes, we can tell you that it’s tough not to “let-
up” as you approach that finish line, so having this frame of mind can make a big
difference in your time in the drill.
Athlete: John Doe 23
Event: 2018 National Combine © 2018the 3-Cone Drill Background: The L-Cone or 3-Cone drill tests an athlete's ability to change directions at a high speed.3 The drill has recently become popular in combine testing because it blends aspects of several of the drills together and gives a scout a much better indicator of pure speed than either the 40 or the short shuttle. It takes strength, balance, quickness, and explosion to get a good 3-Cone time. The setup for the drill is that three cones are placed five yards apart from each other forming a right triangle. The athlete starts with one hand down on the ground and runs to the middle cone and touches it. The athlete then reverses direction back to the starting cone and touches it. The athlete reverses direction again but this time runs around the outside of the middle cone on the way to the far cone running around it in figure eight fashion on his way back around the outside of the middle cone and finally finishing back at the starting cone. 3 http://www.nfl.com/combine/workouts Athlete: John Doe 24 Event: 2018 National Combine © 2018
3-Cone – the rules:
The rules used for the 3-Cone are the following:
   1. The Athlete starts in a 3-Point Stance.
   2. The Athlete runs to the line near the middle cone and touches it, then reverses
       direction and touches the starting line.
   3. The Athlete then reverses direction, but this time runs around the outside of the
       middle cone.
   4. The Athlete loops around the outside cone and continues running around the middle
       cone back to the start cone.
   5. The time stops when the athlete passes through the start line.

                                  Figure 2 - 3 Cone Layout

Athlete: John Doe                                                                   25
Event: 2018 National Combine                                            © 2018
Athlete’s Performance on the 3-Cone Athlete: John Doe 26 Event: 2018 National Combine © 2018
Athlete: John Doe                       27
Event: 2018 National Combine   © 2018
The Science Behind Your Performance- 3-Cone
The 3 Cone drill integrates angular acceleration and rapid momentum changes. The rapid
transitions require power and control to achieve superior performance.

From a basic science perspective, several forces are acting on the athlete during the tests.

The first portion of the test is identical to the 20-yard short shuttle.

The second phase of the 3-Cone evaluates an athlete’s ability to counter balance the
centrifugal force realized when rounding the corner. In the case of the athlete running
around a sharp corner, all the forces are momentum exerted during the corner. From basic
physics, the acceleration of an object as produced by a net force is directly proportional to
the magnitude of the net force, in the same direction as the net force, and inversely
proportional to the mass of the object.

Athlete: John Doe                                                                              28
Event: 2018 National Combine                                                   © 2018
3-Cone – Performance Improvement
Since the drill forces an athlete to show great footwork and quickness in changing
directions, you will want to work on drills that improve these two skills, as they are keys to
playing at top levels in nearly every sport.

To help you improve the results of the 3-cone test, here are some areas you should train:

1. Learn to start in a good sprinters stance and explode out of it towards the first cone.
Acceleration is optimal when you learn to take long powerful steps to cover the most
ground possible. Practice this start over and over with the goal of getting to the 5-yard
mark in 3-4 steps.

2. Learn proper weight balance and how to utilize a cross-over step to change direction, as
you return to touch the starting line and head back to the second cone. Work with a
trainers and/or watch videos to learn the proper footwork and technique to round the 2nd
cone as you head toward the 180 degree turn around the 3rd cone.

3. Learning to use short, choppy steps to circle around the 3rd cone is essential. You will
need to practice techniques that build your balance, as balance is key here, since you
cannot put your hand down going around the cone.

4. Rounding the final turn is a skill you must learn to be successful - a good time and bad
times are separated by how much you slow down right here. Some athletes prefer a speed
cut; however, we often see the most success in using a wider sweeping turn. You will get a
slower time if you lose momentum on the turn and must reaccelerate the last 5 yards.

Athlete: John Doe                                                                             29
Event: 2018 National Combine                                                   © 2018
the Vertical Jump
Background:
The vertical jump is all about lower-body explosion and power. The athlete stands flat-
footed and they measure his reach. It is important to accurately measure the reach, because
the differential between the reach and the flag the athlete touches is his vertical jump
measurement.4

The vertical jump is a common action in various acceleration and game-related dynamic
movements, and is a valid assessment to evaluate explosive power. Vertical jumps are used
to both train and test power output in athletes.

Vertical Jump tests are usually just reported as the distance jumped in centimeters or
inches. This does not always tell the full story. A heavier person jumping the same height as
a lighter one has to do much more work to move a larger mass. Therefore, it is sometimes
useful to convert the score to units of power or work.

4   http://www.nfl.com/combine/workouts

Athlete: John Doe                                                                         30
Event: 2018 National Combine                                                  © 2018
Athlete’s Performance on the Vertical Jump

Athlete: John Doe                                 31
Event: 2018 National Combine             © 2018
Athlete: John Doe                       32
Event: 2018 National Combine   © 2018
Athlete’s Performance on the Max Vertical Jump

Athlete: John Doe                                33
Event: 2018 National Combine            © 2018
Athlete: John Doe                       34
Event: 2018 National Combine   © 2018
The Science Behind Your Performance- Vertical Jump
Leg strength is a crucial attribute for all athletes. Batters draw from the power in their hips
to hit harder. Quarterbacks draw from the strength in their legs and hips to throw faster.
Lacrosse and soccer players draw from the strength in their legs to beat out opponents and
score game-winning goals.

Without leg strength, the force necessary to start a powerful movement is not produced.
Furthermore, the movement might be flawed due to only upper body generation and weak
leg stabilization.

When throwing a ball, shoulder strength is not the only factor that comes into play. Strong
hips are necessary for developing more velocity in the throwing motion.

The mechanical work performed to accomplish a vertical jump can be determined by using
the jump height distance that was measured (using Work = Force x Distance where Force =
Mass x Acceleration). However, Power cannot be calculated (Power = Work / time) since
the time that force is acted on the body is unknown. Power can be directly measured using
a force plate, though these are not readily available. Over time a few different formula have
been developed that estimate power from vertical jump measurements. A few of these are
presented below, with examples.5

A few of the accepted methods of calculating the Power for the vertical jump are presented
in the Appendix.

5   http://oregonstate.edu/instruct/exss323/Force_Lab/indexa.htm

Athlete: John Doe                                                                            35
Event: 2018 National Combine                                                   © 2018
Normal vertical jump compared to whom?
The average leaping ability really differs significantly when you’re comparing males and
females. Because of their muscle mass and strength advantages, men have generally better
jumping capacity.

Another thing to consider is age. As we get older, our muscles get weaker. This means that
given the same training, your jump when you’re in your 40’s will be lower than when you
were in your 30’s. Our best jumping heights come during our 20’s. As a whole our best
jumping ability comes before we get to 30 years of age and slowly goes down by about 3
inches for each decade we age.

Lastly, it has been shown that depending on what sport you play, the average vertical
differs too. Sports where jumping ability is tested, measured and needed to get an edge, like
basketball, volleyball and football have athletes that score higher on jump tests compared
to athletes who don’t need that particular skill

Athlete: John Doe                                                                         36
Event: 2018 National Combine                                                 © 2018
Vertical Jump – Performance Improvement
A weight training program that improves your maximal strength can improve you power
and increase vertical jump ability. For beginners to strength training, traditional weight
training exercises provide a safe, accessible and highly effective way to increase vertical
jump power. As an athlete improves and is able to lift more weight, the speed of
movement decreases and so does power output. For experienced strength training athletes
wishing to improve their vertical jump, traditional weight training is the least beneficial of
the three methods

A custom weight training program should be implemented that improves your maximal
strength; this helps you improve your power and increase vertical jump ability. However,
strength is just one component required for a powerful vertical – the movement is dynamic
and explosive.

Keep it simple.
Before upping the ante, you must build a strong foundation; that is, plenty of leg strength.
While many vertical leap guides and tutorials provide countless, often intricate exercises to
improve jump speed, agility, and overall vertical leap, the power has simply got to be there
first. So, if you can’t squat 1.5x your body weight, you will start with basic squats and
related exercises, such as box jumps, deadlifts, and other exercises across the vertical
plane. Once you become more advanced, we can then proceed to lateral and other more
minor movements.

Stretch it out.
Athletes of all levels often underestimate the importance of stretching. But frequent static
stretching has been found to increase vertical leap and other fast-twitch power exercises.
Stretching instruction increases range of motion (flexibility), which allows for further
activation of muscle groups. Too much flexibility won’t help power, but a solid stretching
routine will help your vert. Those who think stretching is for yogis… might get dunked on
by a yogi.

Jump around.
Jumping rope is another technique used, as it is believed to improve many athletic
functions that lead to a higher vertical, such as explosiveness and timing. It also
strengthens muscles in the lower legs that might not be as engaged during other exercises,
such as squatting. Bonus: Jump ropes are cheap, portable, and light, and can be used when
you are at home or traveling. Beyond just skipping in place — you should learn how to mix
in some trickier plyometric moves.

Athlete: John Doe                                                                           37
Event: 2018 National Combine                                                   © 2018
Get up, get up, get down.
While weighted squats can improve leg strength and help increase your vertical, all you
really need is you. Weightless squat jumps are dynamic and athletic, improving strength
through actual performance of jumps with maximum effort. Or, to kick things up a notch,
during training you might do “The Hundo,” a popular squat jump variation where you
perform 100 squats, jumping with maximum efforts every ten. This exercise can also help
you work on your landing by adding turns and other tweaks.

Don’t force it.
Before and after you jump, you should learn how to “coil” — or bend down — allowing you
to transfer energy into and out of a jump. Proper instruction helps make sure you can
manage the force before and after a jump by incorporating pauses. Squat. Hold. Jump. is a
saying you will want to get familiar with when training your vertical.

Put your hands up.
Quick fixes are hard to come by, we know. And though research varies on how much arm
swinging can impact maximum vertical leap, results consistently indicate that upper body
training as well as proper arm-swinging technique can in fact increase maximum vertical
leap. To jump your highest, learn how to swing your arms downward during a pre-jump
knee bend, to maximize the upward force created when you swing your arms upward
during the jump itself. Exercises that enhance this motion should be implemented, such as
cleans and snatches and kettlebell swings.

Go hard.
A recent study has found that core training can help improve both maximum squat load
and vertical leap. Keep in mind that abs are abs, and the core is much more (we’re not just
talking six-packs, but also the obliques, lower back, and hips.) Therefore, a good training
program often uses exercises such as woodcutters and medicine ball slams, which are great
for activating the core in ways that are useful for vertical leap. Performing these after more
foundational exercises, such as squats and deadlifts (which also engage other core areas as
well) will be a part of your training as you advance through instruction.

Start swinging.
Jump training often utilizes kettlebell swings for getting up high because they involve
dynamic weight transfer on planes that are similar to those during actual jumping. Also,
kettlebell swings are low-impact and low-pressure in comparison to squats and other
exercises.

Get low.
All the above exercises mainly focus on the muscles above the knee. While it is beneficial to
focus on muscles such as the calves, shins, and those in the feet, trainers usually won’t
spend too much time focusing specifically on these, as they’re all engaged and strengthened
with virtually every vertical-increasing exercise. For a time-efficient approach to training
these lower areas, you may start with calf raises and toe taps, which can be added to any of
your workouts, or performed in a super-set.

Athlete: John Doe                                                                          38
Event: 2018 National Combine                                                  © 2018
Think big.
Vertical leap training should be part of every sports training regimen. While, you can train
for strength, power, speed, or stamina, for a solid combination of all of these, be sure you
are diversifying your workout. Depending on your fitness level and goals, the key is mixing
things up. (Life isn’t a track meet or a marathon. It’s both.)

Athlete: John Doe                                                                         39
Event: 2018 National Combine                                                 © 2018
the Broad Jump
Background:
The broad jump is like being in gym class back in junior high school. Basically, it is testing
an athlete's lower-body explosion and lower-body strength. The athlete starts out with a
stance balanced and then he explodes out as far as he can. It tests explosion and balance,6

For example, the stride an athlete makes while shifting the hips in the direction of a throw
is an explosive step. The more dynamic the stride, the more the hips and torso can help
accelerate the arm. Thus, the more forward momentum that is produced.

Without a firm base, athletes will not be able to generate any force from the ground into the
legs, to the trunk, and finally the upper body. This power generated through the lower
body muscles are vital for actions such tackling, hitting, and throwing.

In both throwing and hitting, a smooth and efficient transfer of force from the lower body
to the upper body is required. This kinetic chain and power production is indicative of the
broad jump, whereas arm swing accounts for 15% of the total broad jump distance.

Coaches use broad jumps not only to build leg strength in athletes, but also as a standard to
test leg strength and explosive power.

6   http://www.nfl.com/combine/workouts

Athlete: John Doe                                                                            40
Event: 2018 National Combine                                                    © 2018
Athlete’s Performance on the Broad Jump

Athlete: John Doe                                  41
Event: 2018 National Combine              © 2018
Athlete: John Doe                       42
Event: 2018 National Combine   © 2018
Broad Jump – Performance Improvement
Plyometrics and explosive weightlifting are sure-fire ways to maximize your muscle
potential, but as you will learn, technique is also very important and can affect your
jumping distance by several inches.

Utilize repetition.
The more you perform a certain motion with your trainer, the more efficient your body
becomes. Increased efficiency translates to a more explosive jump. Performing the broad
jump each time you train pays off, and the reps will add up.

Jump over something.
It may seem counter-intuitive, but we have found that taking off at a slightly higher angle
will often increase your jumping distance instantaneously by increasing your frictional
force on the ground and increasing your hang time. Additionally, the biomechanics of the
motion become more natural for your body, so you can generate more power. One way to
practice this technique is by placing an object—such as a short agility hurdle—in your
jumping path and having you leap over it while still jumping as far as you can.

Find your comfort zone.
We do not believe that there’s a single technique that will work best for everyone. Coaches
and trainers have found that forcing an athlete to use a certain technique just because
someone told them it was the ‘right way’ can hinder your performance. So a good trainer
will help you to experiment with different techniques to find which motion is comfortable
for you, and perfect it.

Always, always, always measure.
It is critical to measure your broad jumps as you train, for two reasons. First, measuring
each jump prepares you mentally for the added pressure of a meaningful test. Second,
while experimenting with techniques, you may unexpectedly find methods that add an inch
or two to your jump. Try and tweak your form from jump to jump while training and note
the changes that increase your distance.

Athlete: John Doe                                                                         43
Event: 2018 National Combine                                                  © 2018
the Power Pushup

Background:
There is no debate that players need a strong, durable upper body in order to transmit
force generated from the legs through the hands. The stronger the upper body, the more
force a player can transfer to the ball or player they’re tackling or blocking.

Good throwers are said to have strong arms. The propulsive force applied by the arm is
actually the final phase of a three-part total body movement sequence, and is performed in
conjunction with the upper body. The triceps muscles that extend the elbow, the pectoralis
major, deltoids, and latissimus dorsi are all involved in delivering the ball.

The pushup, as delivered on the force plate, is an indicator of upper body strength and
power through the teamwork of the torso muscles, rotator cuff which stabilize the
shoulder, and the arms. The entire performance of one segment is determined by the
performance of adjacent segments which ultimately determines the performance of the
entire system. Because of this, the force plate is the best device to measure ground reaction
forces generated by the human body.

Athlete: John Doe                                                                         44
Event: 2018 National Combine                                                 © 2018
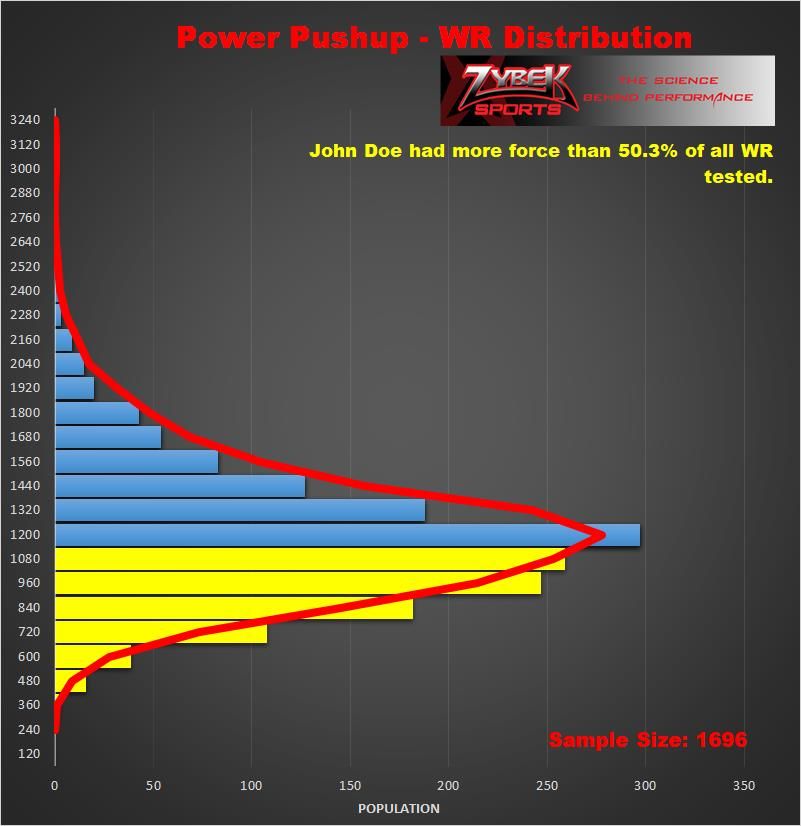
Athlete’s Performance on the Force Plate Power Pushup

Athlete: John Doe                                    45
Event: 2018 National Combine                © 2018
Athlete: John Doe                       46
Event: 2018 National Combine   © 2018
Athlete: John Doe                       47
Event: 2018 National Combine   © 2018
Force Plate Power Pushup – Performance Improvement
Plyometric push-ups—where you push yourself up so explosively that you “get air”—are
widely used by athletes interested in gaining ballistic strength. However, many people have
trouble doing them effectively because they can’t move fast enough to leave the floor. The
solution is to reduce the resistance, which you can do by placing your hands on a bench,
thereby lightening your load to less than 40% of your body weight.

To do it, place your hands on a secure bench with your arms shoulder-width apart and your
feet behind you on the floor. Bend your arms to lower your body. As soon as your chest
touches the bench press up explosively to catapult your body as high as possible. Catch the
bench as you come down, letting the momentum bring your chest to the bench again, at
which point you should feel the stretch reflex kick in. Take advantage of it by immediately
hitting the next rep.

PLYO PUSH-UP ON BENCH
Sets: 3 Reps: 6–8 Rest: 2–3 min

Complement these push-ups with other exercises, such as the inclined dumbbell press and
flat bench dumbbell flies. However, one should always do plyo push-ups as the first
exercise in a chest workout, when fast twitch muscle fibers are fresh and can generate the
most power.

Athlete: John Doe                                                                       48
Event: 2018 National Combine                                                © 2018
You can also read