Extend Interoperability Suite 10.4.0 - Release Notes - Micro Focus
←
→
Page content transcription
If your browser does not render page correctly, please read the page content below
extend Interoperability
          Suite 10.4.0

            Release Notes
Micro Focus
     The Lawn
     22-30 Old Bath Road
     Newbury, Berkshire RG14 1QN
     UK
     http://www.microfocus.com

     © Copyright 2009-2020 Micro Focus or one of its affiliates.

     MICRO FOCUS, the Micro Focus logo and extend are trademarks or registered trademarks of
     Micro Focus or one of its affiliates.

     All other marks are the property of their respective owners.

     2021-04-27

ii
Contents
extend Release Notes ........................................................................................ 6
extend System Requirements ........................................................................... 7
Windows Installation ........................................................................................11
License Files for Windows .................................................................................................11
The Activator Utility ................................................................................................ 11
Changing or Updating a Windows License File ......................................................12
Installation on Windows Platforms .................................................................................... 12
Supported Windows Platforms ............................................................................... 12
Installation Steps .................................................................................................... 12
Silent Installation .................................................................................................... 14
Windows 64-bit Installations ...................................................................................18
Installation Notes ....................................................................................................18
BIN-REDIST and REDIST Installation Directories ................................................. 19
Uninstalling or Modifying Your Installation .............................................................. 19
Launching extend Products on Windows 8 or Later ..........................................................20
Compiling Your Programs ..................................................................................................21
Running Your Programs ................................................................................................... 21
Printing and Spooler Issues .............................................................................................. 22
Spooler Formatting .................................................................................................22
Direct Control ......................................................................................................... 23
Printing Multiple Jobs Simultaneously ....................................................................24
UNIX Installation ...............................................................................................26
License Files for UNIX ...................................................................................................... 26
The Activator Utility ................................................................................................ 26
Changing or Updating Your UNIX License Files .....................................................26
Installation Under UNIX .....................................................................................................26
Installation Process ................................................................................................ 26
SHARED_LIBRARY_PREFIX Configuration Variable ............................................ 27
Configuring Your Terminals .................................................................................... 28
What's New ....................................................................................................... 30
AcuBench Enhancements .................................................................................................30
ECN-WB718 New atw-script special properties control ......................................... 30
ECN-WB722 New grid properties and style ........................................................... 30
ACUCOBOL-GT Enhancements ....................................................................................... 31
ECN-4658 Create .NET objects on the server in the distributed environment ....... 31
ECN-4659 New C$SOCKET server-name parameter and numeric option ............ 31
ECN-4662 New atw-script control for use with AcuToWeb .....................................32
ECN-4673 ECNs removed from 10.4.0 onwards ....................................................35
ECN-4678 Two new fields added to C$REDIRECT I/O linkage handlers .............. 35
ECN-4679 New CobolJavaJDBC sample program ................................................ 36
ECN-4686 New RESTful Web services support in RMNet .................................... 36
ECN-4687 New functions to support HTTP servers that require a login ................ 38
ECN-4697 Hidden and moveable grid columns ..................................................... 40
ECN-4698 Increase in size of CJAVA-DBQUERY query string ............................. 40
ECN-4700 New JSON PARSE and GENERATE feature ........................................41
AcuSQL Enhancements ....................................................................................................41
ECN-SQL162 Support for COBOL-CHARACTER-SET in AcuSQL ....................... 41
AcuToWeb Enhancements ................................................................................................ 41
ECN-AW157 CSS Theme Generator now supports customized controls .............. 41
ECN-AW159 AcuToWeb Connection Panel now detects websockets ....................42
Contents | 3AcuXDBC Enhancements ................................................................................................. 42
ECN-XD127 KEY columns excluded from "null_alpha_read null" ..........................42
Resolved Issues ............................................................................................... 43
Acu4GL ECN List .............................................................................................................. 43
ECN-GL579 Error reading NULL data from national columns ............................... 43
ECN-GL580 Unable to use 4GL-COLUMN-CASE ................................................. 43
ECN-GL581 Missing records on READ NEXT with split key ..................................43
ECN-GL582 No AIX support for Acu4GL for ODBC ..............................................44
AcuBench ECN List ...........................................................................................................44
ECN-WB720 Limitation when searching for regular expressions ...........................44
ECN-WB721 AcuBench crash in the ActiveX Component bar ............................... 44
ECN-WB843 MOVE X TO ACCEPT CONTROL omitted NONE option ................. 45
ECN-WB846 Deleted files were not going to the recycle bin ................................. 45
ECN-WB848 Parser did not allow BLANK WHEN ZEROS .................................... 45
ACUCOBOL-GT ECN List .................................................................................................46
ECN-4659 Incorrect binding for SERVER_IP and SERVER_HOST ...................... 46
ECN-4660 Thin Client automatic update TC_INSTALLER_TARGET_DIR has no effect
............................................................................................................................... 46
ECN-4665 Acuthin ignoring user input during heavy output .................................. 47
ECN-4666 Bitmap buttons with text issues ............................................................ 47
ECN-4671 Acuthin hangs on ACCEPT BEFORE TIME 0 ...................................... 47
ECN-4672 "Index out of bounds" error when initializing a var-size array ............... 48
ECN-4673 AcuThin displays a "Not Responding" message on lengthy processes
............................................................................................................................... 48
ECN-4674 AcuThin disappears without error .........................................................48
ECN-4675 C$REGEXP crash ................................................................................ 49
ECN-4676 Runtime memory corruption when calling .NET assemblies ................ 49
ECN-4677 ACCEPT FROM TERMINAL-ABILITIES always returns the same information
............................................................................................................................... 49
ECN-4680 Incorrect results from SORT table WITH DUPLICATES IN ORDER .... 50
ECN-4681 Memory Access Violation (MAV) when creating a sequential file .........50
ECN-4682 Invalid handle reported on a .NET object return ...................................50
ECN-4683 C$DELETE returns the wrong value .................................................... 51
ECN-4684 Unable to search a paged list for a string starting with a national character
............................................................................................................................... 51
ECN-4688 Sample 4 Control Panel is not big enough to span its children ............ 51
ECN-4689 Sample 4 boxes too small to display contents correctly ....................... 52
ECN-4690 WHEN directive causes XFD warning .................................................. 52
ECN-4691 Second OPEN on file "NUL" causes 93 file status code ...................... 52
ECN-4692 Exception handled incorrectly, causing a crash in AcuThin ..................53
ECN-4693 MAV on entry-field validation on 64-bit Windows ..................................53
ECN-4694 XML-TEXT of 0 length causes XML PARSE to crash ...........................53
ECN-4696 Double-byte character display misalignment ........................................ 54
ECN-4699 XML GENERATE crashed with zero-length OCCURS DEPENDING ON
............................................................................................................................... 54
ECN-4701 Line sequential file error ....................................................................... 54
ECN-4702 PDF corrections ....................................................................................55
ECN-4703 Thin Client automatic update support for older versions ...................... 55
ECN-4704 NETBOJECTS sample fails with "invalid handle" ................................. 56
AcuSQL ECN List ..............................................................................................................56
ECN-SQL163 Numeric data cannot be written when DECIMAL-POINT IS COMMA set
............................................................................................................................... 56
AcuToWeb ECN List ..........................................................................................................56
ECN-AW156 Display and Print updates ................................................................. 57
ECN-AW158 Error when executing AcuToWeb alias within an iFrame .................. 58
AcuXDBC ECN List ...........................................................................................................58
4 | ContentsECN-XD128 AcuXDBC installer does not deploy requisite Visual C++ libraries .... 58
ECN-XD129 AcuXDBC 64-bit msi silent install not updating the registry ...............59
Boomerang ECN List ........................................................................................................ 59
ECN-BMRG002 Boomerang compiler shows wrong line number or gives a memory fault
............................................................................................................................... 59
Xcentrisity-BIS ECN List ................................................................................................... 60
ECN-BIS001 Debugger sometimes attempts to start with a Debug tag .................60
ECN-BIS002 UNIX Debug tag's TYPE keyword accepted only lower-case values
............................................................................................................................... 60
ECN-BIS003 BISMKAPP crashed on startup when decimal point was comma in the current culture
............................................................................................................................... 61
Updates and SupportLine ................................................................................62
Further Information and Product Support ......................................................................... 62
Information Needed by Micro Focus SupportLine .............................................................62
Copyright and Disclaimer ................................................................................ 64
Contents | 5extend Release Notes
These release notes contain information that might not appear in the Help. Read them in their entirety
before you install the product.
Note: This document contains links to external web sites. Micro Focus cannot be responsible for the
contents of the website or for the contents of any site to which it might link. Web sites by their nature
can change very rapidly and although every attempt is made to keep links up-to-date, Micro Focus
cannot guarantee that external links will always work as expected.
6 | extend Release Notesextend System Requirements
Note: This product includes software developed by the University of California, Berkeley and its
contributors.
Hardware Requirements
extend software has the following requirements:
For Windows:
• The amount of disk space needed to install the ACUCOBOL-GT development system is typically less
than 35 MB.
• AcuBench® requires at least 20 MB for installation.
• You need an additional 40 MB to install all of the other extend products.
• Use of .NET controls with the runtime and thin client requires .NET Framework 4.0.
For all other platforms:
• The amount of disk space needed to install all extend products is typically less than 35 MB.
Supported Operating Systems
Note: AcuBench no longer supports Windows XP or Windows Server 2003 (or any Windows
platforms that pre-date these). This is because AcuBench utilizes a number of third-party libraries that
have ceased to be supported on those platforms.
For this release, if you are running on the AIX 7.1 platform, the minimum requirement is version 7.1
Technology Level 4 (7100-04) ), and if you are running on the AIX 7.2 platform, the minimum requirement is
version 7.2 SP1.
For a full list of the supported operating systems, check the Product Availability section on the Micro Focus
SupportLine Web site: https://supportline.microfocus.com/prodavail.aspx.
Additional Requirements
General requirements
Linux-based platforms require glibc version 2.5 or later.
AcuServer:
• Each server machine must be networked to UNIX, Linux, or Windows clients with TCP/IP. TCP/IP is not
sold or supplied by Micro Focus.
• All servers must have a copy of the AcuServer license management file.
• Windows clients can run any TCP/IP software that uses a WINSOCK2 compliant ws2_32.dll.
• Unless you have an unlimited license for AcuServer, all UNIX servers must run the current version of
acushare, which is included on the AcuServer distribution media.
• All servers must have a copy of the license file activated by the product installation script. This file is
named acuserve.alc.
• Client machines must have an ACUCOBOL-GT AcuServer-enabled runtime. All Windows runtimes
Version 5.0 and later are AcuServer-enabled. To verify that your UNIX runtime is AcuServer-enabled,
type runcbl -v in a Command prompt and look for this line.
AcuServer client
• Servers being accessed by the ACUCOBOL-GT Web runtime must have a multiple-user ACUCOBOL-
GT runtime license that accommodates each concurrent user that is anticipated. (If you anticipate 100
extend System Requirements |7concurrent users of the Web runtime, you need a 100-user runtime license on the server in addition to
the AcuServer license file. Alternatively, runtime users can install a local or network floating license for
the runtime themselves.
AcuBench:
• Intel Pentium III CPU, 300 MHz; Intel Pentium IV, 2 GHz recommended
• 128 MB of RAM recommended
• 120 MB of available hard disk space recommended
• mouse
• 800 x 600 VGA display or better; 1024 x 768 VGA display recommended
AcuToWeb:
gcc AcuToWeb requires the following gcc versions or later on the following platforms:
versions
Platform Minimum requirement
Aix6.1 GCC 7.1.0
Aix7.1 GCC 7.1.0
Aix7.2 GCC 7.1.0
HP 11.31 PA-RISC GCC 4.3.1
HP 11.31 IA GCC 4.2.3
Linux GCC 4.8.0
Linux PPC GCC 4.1.2-46
Sun Solaris 10 GCC 3.4.3
Sun Solaris 11 GCC 4.8.2
Linux- For Linux-based platforms, the following packages must be added:
based
platforms Debian-based libc6:i386
libstdc++6:i386
RHEL/Centos-based libstdc++.i686
SUSE-based libstdc++6-32bit
AIX and AIX and Solaris platforms require the Foreign Function Interface Library (libffi) is installed.
Solaris More information and the installation packages can be found at the following:
platforms
AIX You can download an RPM package from:
platforms
http://www.bullfreeware.com/affichage.php?id=3638
And then install it using:
rpm -Uvh http://www.bullfreeware.com/download/bin/3638/
libffi-20170516-1.aix6.1.ppc.rpm
Solaris You can download the package from:
platforms
https://www.opencsw.org/packages/libffi6/
General information on libffi can be found at:
https://cffi.readthedocs.io/en/latest/installation.html
8 | extend System RequirementsIf you are running on the Solaris 11 platform, the minimum version
required to run the AcuToWeb Gateway is version 11.3.
AcuSQL:
• Your COBOL application must run on a Windows system or a UNIX system supported by Micro Focus.
Unless otherwise indicated, the references to Windows in this manual denote supported Windows
operating systems. Where necessary, individual versions of those operating systems are referred to by
their specific version numbers.
• AcuSQL must be installed with the ACUCOBOL-GT development system on your Windows or UNIX
system.
• If using a database other than Microsoft SQL Server, you must have a working ODBC level 2 API
connection to your database, including any required networking software support.
• For SQL Server, if running the AcuSQL interface to Microsoft SQL Server, you must have the SQL
Server client software from Microsoft. Use the Query Analyzer to see if the SQL Server client software
from Microsoft is on your system. For information on opening the Query Analyzer, see the SQL Server
client documentation. If the Query Analyzer opens and you are able to connect to the database, the
client libraries are most likely all present. Your SQL Server data source may be hosted on one or more
of the supported server operating systems.
• If you are running the AcuSQL interface to MySQL, you must have the following software:
• MySQL 5.0 Database Server Version 5.0.18 or later (Generally Available release). Testing was done
with MySQL 5.0.18 Standard.
• MySQL Connector/ODBC Version 3.51.11 or later (Generally Available release). Testing was done
with the libmyodbc3-3.51.12.so library. This file is available from http://dev.mysql.com.
You can check the version of your server by connecting using mysql. The version prints upon
connection. For example:
[testing ]: mysql
Welcome to the MySQL monitor. Commands end with ; or \g.
Your MySQL connection id is 29 to server version:
5.0.18-standard
Type 'help;' or '\h' for help. Type '\c' to clear the buffer.
Once in MySQL, you can also use the following:
mysql> select version();
+-----------------+
| version() |
+-----------------+
| 5.0.18-standard |
+-----------------+
1 row in set (0.09 sec)
• If your application accesses DB2 data, IBM's DB2 Connect™ software is recommended. Access to DB2
databases has been tested with DB2 Connect. However, any vendor's properly configured ODBC level
2 API connectivity software should work. Your DB2 data source may be hosted on one (or more) of the
supported operating systems.
Acu4GL (for ODBC) driver requirements:
Your ODBC driver must include the following functions:
• all Core ODBC driver functions
• the Level 1 function SQLColumns
• the Level 1 function SQLTables
Depending on the method of record locking you choose, your driver may also need to support some of the
following function calls:
extend System Requirements |9• SQLSetStmtOption
• SQLSetScrollOptions
• SQLExtendedFetch
• SQLSetPos
See A_ODBC_LOCK_METHOD in the extend online help for more information.
To test the capabilities of your ODBC driver, we have included a driver test program on your Acu4GL for
ODBC installation disks. You can also consult your driver documentation to ensure that it meets these
requirements.
10 | extend System RequirementsWindows Installation
License Files for Windows
You may request a license file for one or more users. The number of users (user limit) is set in your license
agreement with Micro Focus.
When you receive your products, the package includes product codes and product keys for every product
you ordered. You must have the product codes and product keys to create the license file.
When you install or update your license file, place it in the appropriate directory for your version of
Windows. The location is:
C:\ProgramData\Micro Focus\extend\x.x.x\x86\product-license.alc
(Where x.x.x is the product version number.)
Note: This location is new to extend 9.0 and later, and differs from past versions of extend products.
See Appendix C - Changes Affecting Previous Versions in the ACUCOBOL-GT Appendices manual
for details.
When you have multiple users or products, you may copy the license file onto each machine containing the
corresponding product or place the products and license file on a shared drive. Each product must be able
to locate its license file in order to function.
Note: The ACUCOBOL-GT Transaction Server runtime license file is named wrun32.1lc. If you are
using other extend products, the license files must be concatenated into a special file.
The Activator Utility
The Activator Utility automates the process of creating a license file.
During installation, select Install License Activator on the Installation Settings page to install the Activator
Utility (activator.exe). It is installed in the \AcuGT\bin sub-directory of the installation directory.
Note: Always use the version of the Activator supplied with the version of the product you have
installed.
To create the required license files during installation, select Launch License Activator on the Installation
Settings page. This will launch the Activator Utility when the selected products have installed, enabling you
to enter the product code and key pairs required to create the license files.
You can also create license files after the installation by running the Activator Utility (activator.exe)
from the location detailed above or from the Start menu.
During product installation, if the Activator detects the presence of an existing license file, the extension of
the existing file is changed before a new license file is created. For example, runcbl.alc is renamed
runcbl.al!. If the Activator is unable to rename the existing license file, it quits with an error message,
and no new license file is created. If a license file with the back-up extension already exists, the Activator
attempts to overwrite it. If that fails, the Activator quits with an error message and no new license file is
created. On Windows platforms, file attributes such as Read Only are also preserved.
Windows Installation | 11Changing or Updating a Windows License File
If you need to alter your license file information, contact your Micro Focus extend representative for
updated product code(s) and product key(s). When you receive them, launch the Activator and enter the
new information as prompted.
Note: If you have copied a license file to a non-default directory, remember to replace that file with a
copy of the updated license file.
Installation on Windows Platforms
The Windows installation requires little interaction; the setup program copies the files into a directory you
designate, or C:\Program Files\Micro Focus\extend x.x.x (where x.x.x is the version number)
by default. On 64-bit machines, 32-bit executables are installed to C:\Program Files (x86).
Before you run an installation, you should ensure that you have your product codes and product keys, and
the product media to hand. Refer to the appropriate installation instructions below.
Also, you should ensure that you do not have another version of the extend Interoperability Suite
referenced in the PATH system environment variable, as having more than one version specified may
cause unexpected results.
After the installation is complete, if you have installed both the compiler and runtime, you can begin to
compile and execute your COBOL programs. Basic compilation and execution techniques are described in
Compiling Your Programs and Running Your Programs.
Note: If you move or delete any .dll files that have been installed, your products may not run as
expected.
AcuBench and AcuXDBC™ must be installed locally (on the client). Server-side products such as
AcuServer™, AcuXDBC™ Server and AcuConnect® are to be installed only on server machines.
Supported Windows Platforms
For a full list of the supported operating systems, check the Product Availability section on the Micro Focus
SupportLine Web site: https://supportline.microfocus.com/prodavail.aspx.
Installation Steps
Attention: The installation is supplied in two formats: .exe and .msi. On the installation CD,
the .exe is located in the top level folder, and the .msi is located in the msi folder. If you plan to
install Xcentrisity Business Information Server, or start AcuServer or AcuConnect from the installer,
you must run the installation with administrator privileges, from an account that is in the Administrator
group.
If you install from the CD, it will automatically run the .exe version with administrator privileges. To
run the .msi, you must run it from a command prompt that has administrator privileges. To run
the .msi with administrator privileges, click Start, and in the Search programs and files field, type
cmd.exe, then in the list displayed, right-click cmd.exe and select Run as administrator: this opens
a command prompt with administrator privileges, where you can run the install by typing the full path
name of the .msi file.
Follow these steps to install your products.
1. Insert the product CD, or use the provided link to download the installation package from the Micro
Focus website.
If you are using the CD, it runs the .exe version automatically.
12 | Windows Installation2. If the .exe version does not start automatically, or you are using the downloaded installation package,
do one of the following:
• Navigate to the CD drive, then double-click the .exe.
• Navigate to the location of the downloaded file, then double-click it. (See the above note if you are
running the .msi version.)
The installation starts.
3. On the Welcome page, click Next.
4. On the End-User License Agreement page, select I accept the terms in the License Agreement,
then click Next.
5. On the Select Installation Folder page, click Browse and select installation directories for 32-bit and
64-bit (if applicable) products. Alternatively, you can accept the default location(s), then click Next.
Restriction: If you specify a mapped drive, it must map to a local directory; remote mapped drives
are not supported.
6. On the Product Selection page, select the required products, then click Next.
You must have product codes and keys to activate each product; however, you can install all products
now, and activate those products for which you do not have a license at a later date. (Be aware that if
you attempt to use products for which you do not have a license, you may receive error messages
indicating that no license file is available.)
Note: Ensure you select Documentation on this page to install and access the product user
guides.
7. On the Installation Settings page, select one or more of the following, then click Next:
Select To
Install License Activator Install a copy of the License Activator
Launch License Activator Launch the License Activator at the end of the
installation process
Start AcuServer Start AcuServer as a service
Start AcuConnect Start AcuConnect as a service
Note: Starting either AcuServer or AcuConnect as a service will only occur if you have run
the .exe or .msi version of the installer with administrator privileges (see note above). If a
previous version of either product is already running on its default port, an additional prompt is
displayed, asking you if you want to shut down that service; you must answer Y if the new version
of AcuServer or AcuConnect is to start - see Notes on AcuConnect and AcuServer Installation for
more details.
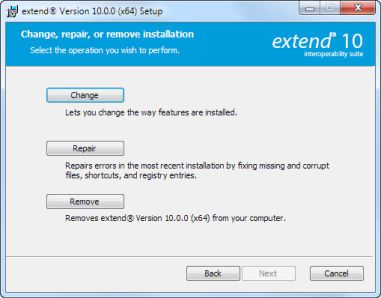
If you selected Launch License Activator on the Installation Settings page, the Activator Wizard
appears.
Windows Installation | 138. Type your first product code and key in the appropriate fields.
The License Activator is case-insensitive and displays only uppercase characters. It also ignores
embedded spaces and separating characters. Product codes and keys do not contain the letters "O" or
"I".
Caution: If you have a license for both the Windows runtime (wrun32.exe) and an Alternate
Terminal Manager (ATM) runtime (run32.exe) for the same machine, be aware that the Activator
Utility creates a license file named wrun32.alc for each of them. To avoid a situation in which the
Activator Utility overwrites the license file for the second runtime:
•
Make a backup copy of the Windows runtime license file prior to creating (and renaming) the
ATM runtime license.
• Create the ATM runtime license and rename it to match the executable (change wrun32.alc
to run32.alc) before creating the Windows runtime license.
9. If you have more than one code and key pair to enter, select More after typing the first code/key pair.
Repeat this process until you have entered all code and key pairs, then click Finish.
Each time you press More, the License Activator creates a separate license file for the product code
and key you entered and returns you to the code and key entry screen.
10.Click Finish on the Installation Complete page to complete the installation.
Note: If license activation was successful, but you get a message during product startup indicating
that the license file cannot be found, the license file may not be in the correct directory. The License
Activator determines where to place the license file based on entries in the Windows registry. If no
registry entry is found, the license file is placed in the same directory as the License Activator
executable file, which is the \AcuGT\bin sub-directory of the default installation directory. If this is
not the location of the product's executable file, move the license file to the directory containing the
corresponding executable file; for example, move wrun32.alc to the directory containing
wrun32.exe.
Silent Installation
On Windows platforms, you can perform a silent installation of the extend Interoperability Suite using the
msiexec command, which requires that you use the .msi install package that is shipped with your
product. This must be run from a command line prompt that has administrative privileges.
14 | Windows InstallationThe syntax required is:
msiexec /i INSTALLDIR= [INSTALLDIR64=] ADDLOCAL= [WINDOWSVERSION=] /qn [/L*v ]
where:
The .msi installation file. This could be a 32-bit or a 64-bit version.
The directory in which the product will be installed.
Restriction: If you specify a mapped drive, it must map to a local
directory; remote mapped drives are not supported.
The directory in which the 64-bit products will be installed. This is mandatory if you are
using the 64-bit installer, because it installs both 32-bit and 64-bit versions of some
products, using for the 32-bit versions and for
the 64-bit versions.
Restriction: If you specify a mapped drive, it must map to a local
directory; remote mapped drives are not supported.
A list of products and services to be installed; see Product Variables for Silent Installation
for the comprehensive list of options.
This is required for Windows versions 8 and later, in order to create the Extend Start menu.
The only permissible value for is PostWindows7.
The path and file name of a log file in which to log the installation details.
Examples
32-bit installation:
For example, the following command silently installs the ACUCOBOL-GT runtime,
Acu4GL for MSSQL, and the AcuSQL runtime to the C:\AcuInstallDir directory,
and (on Windows 8 and later) also creates the extend start menu in the Windows
program list:
msiexec /i "extend(R) Version 10.2.0 x86.msi" INSTALLDIR=C:
\AcuInstallDir ADDLOCAL=Runtime,Acu4GLMSSQL,AcuSQLRuntime
WINDOWSVERSION=PostWindows7 /qn
64-bit installation:
For example, the following command silently installs the ACUCOBOL-GT runtime,
Acu4GL for MSSQL, and the AcuSQL runtime to the C:\AcuInstallDir directory,
and the 64-bit runtime, Acu4GL for MSSQL, and AcuSQL runtime to the C:
\AcuInstallDir64 directory:
msiexec /i "extend(R) Version 10.2.0 x64.msi" INSTALLDIR=C:
\AcuInstallDir INSTALLDIR64=C:\AcuInstallDir64
ADDLOCAL=Runtime,Runtime64,Acu4GLMSSQL,Acu4GLMSSQL64,AcuSQLRunti
me,AcuSQLRuntime64 /qn
Windows Installation | 15Comments
You can also use the msiexec command to run the installation with a user interface: omit the ADDLOCAL
parameter and substitute /qn for /qf.
You can also use the msiexec command to install the thin client .msi file that is supplied with your
product: omit the ADDLOCAL parameter.
Product Variables for Silent Installation
The following table contains a list of possible arguments that you can use with ADDLOCAL when running a
silent installation. Most argument names are self-explanatory; the Notes column explains those that are
not.
Argument name Notes
Acu4GLDB2
Acu4GLDB264
Acu4GLMSSQL
Acu4GLMSSQL64
Acu4GLODBC
Acu4GLODBC64
Acu4GLOracle
Acu4GLOracle64
AcuBench
AcuConnect
AcuConnect64
AcuConnectDistributedProcessing
AcuConnectThinClient
AcuServer
AcuServer64
AcuSQLPrecompiler
AcuSQLPrecompiler64
AcuSQLRuntime
AcuSQLRuntime64
AcuToWeb
AcuXDBC
AcuXDBC64
AcuXDBCEnterpriseEdition The 32-bit and the 64-bit versions of
AcuXDBCEnterpriseEdition are mutually exclusive; you
may only specify one of these versions during the
installation.
16 | Windows InstallationArgument name Notes
AcuXDBCEnterpriseEdition64
AcuxdbcsBat
AcuxdbcsBat64
AcuXDBCServer The 32-bit and the 64-bit versions of AcuXDBCServer are
mutually exclusive; you may only specify one of these
versions during the installation.
AcuXDBCServer64
BIS
Compiler
DevSys The ACUCOBOL-GT Development System, which
includes the following: Compiler, Runtime, WebRuntime,
ThinClient, and WebThinClient.
ExtendStartMenu The entry shown on the Windows program menu for
Windows versions 8 and later. The 32-bit and the 64-bit
versions of ExtendStartMenu are mutually exclusive; you
may only specify one of these versions during the
installation.
ExtendStartMenu64
LicenseActivator
LicenseActivator64
OnlineDocumentationCHM
Runtime
Runtime64
ThinClient
VCRedist Installs the Microsoft redistributable files, required by the
extend products, if they are not already installed.
VortexJar Required for AcuXDBCEE. The enterprise edition of
AcuXDBC needs the vortex.jar file, which enables a
Java client application to connect to your Vision database.
VortexJar64
WebRuntime
WebThinClient
Examples
32-bit installation:
For example, the following command silently installs the ACUCOBOL-GT runtime,
Acu4GL for MSSQL, and the AcuSQL runtime to the C:\AcuInstallDir directory,
Windows Installation | 17and (on Windows 8 and later) also creates the extend start menu in the Windows
program list:
msiexec /i "extend(R) Version 10.2.0 x86.msi" INSTALLDIR=C:
\AcuInstallDir ADDLOCAL=Runtime,Acu4GLMSSQL,AcuSQLRuntime
WINDOWSVERSION=PostWindows7 /qn
64-bit installation:
For example, the following command silently installs the ACUCOBOL-GT runtime,
Acu4GL for MSSQL, and the AcuSQL runtime to the C:\AcuInstallDir directory,
and the 64-bit runtime, Acu4GL for MSSQL, and AcuSQL runtime to the C:
\AcuInstallDir64 directory:
msiexec /i "extend(R) Version 10.2.0 x64.msi" INSTALLDIR=C:
\AcuInstallDir INSTALLDIR64=C:\AcuInstallDir64
ADDLOCAL=Runtime,Runtime64,Acu4GLMSSQL,Acu4GLMSSQL64,AcuSQLRunti
me,AcuSQLRuntime64 /qn
Windows 64-bit Installations
There are 64-bit versions of most extend products. These 64-bit versions are installed using a separate 64-
bit version of the installer. The installation process follows the same steps as described in Installation on
Windows Platforms, with the following notable exceptions.
When running the 64-bit installer, if no 64-bit version exists for a selected product (for example, AcuBench),
the 32-bit version is installed.
Products such as AcuConnect and AcuServer have 32-bit and 64-bit versions, and both are installed if you
select these products during installation. You can also decide which version of the product to start on
completion of the installation.
The AcuXDBC product is broken down into three installations: for the Data Interface, you can install both
the 32-bit and 64-bit versions; and for the AcuXDBC Server and Enterprise Edition, you must chose which
version to install.
By default, all 64-bit product versions are installed in the Program Files directory, and 32-bit product
versions (and any supporting non-64-bit tools) are installed in the Program Files (x86) directory;
although, you can change these locations during the installation. All the 32-bit versions are fully supported
and functional in a 64-bit environment.
Remember: When running the license activator after the installation, the 64-bit version of the
Activator utility is run, which installs license files into both the 32-bit and 64-bit directories. When
running the Activator utility from the command prompt, make sure you are using the 64-bit command
prompt to ensure the correct licenses are generated and placed in the correct locations; otherwise, if
the 32-bit Activator utility is run, only license files for 32-bit products will be generated.
Installation Notes
Debugging files
The Windows distribution media now contains .pdb debugging files to assist customer support in solving
runtime issues on a customer's machine - .pdb files enable runtime stack information to be generated.
To setup this ability, copy the .pdb files from the 32-bit or 64-bit Debug directories on the distribution
media to the 32-bit or 64-bit directory of the installation. 32-bit files on the media are located in Debug
\Win32\bin\*.pdb, and 64-bit files on the media are located in Debug\x64\bin\*.pdb.
Once the .pdb files are copied, follow any instructions given to you by Customer Support.
18 | Windows InstallationAcuConnect and AcuServer
During the installation process, if you are installing AcuConnect or AcuServer, you can choose to
automatically start those services as part of the installation process.
Those services can only be started if certain conditions are met. For example, the services will attempt to
start on a default port (AcuConnect 5632, AcuServer 6523). If an existing installation is already using that
port, that service must be stopped if the installation is to create and run the new service. If you do not stop
the existing service, the installation can only create the new service; it cannot run it.
If there is no previous installation, a default AcuAccess file is only created (in its default location of C:
\etc) when the service starts. If you configure the installation to not start the service, no AcuAccess file
will exist until you start the products from their respective control panels (or command line equivalents). If a
previous installation exists, the AcuAccess file already located in C:\etc is used.
Note: This file and directory are not removed when you uninstall a previous product.
BIN-REDIST and REDIST Installation Directories
The extend Windows distribution contains two directories: BIN-REDIST and REDIST.
REDIST contains thin client files that should be distributed along with the thin client.
BIN-REDIST contains Microsoft Redistributable files. These files are required in cases where the
ACUCOBOL-GT bin directory and runtime are placed on a shared drive and users then map to that drive.
The BIN-REDIST directory should be placed inside the shared bin directory.
Uninstalling or Modifying Your Installation
You can uninstall or amend your current installation in one of two ways: you can run the installer again, or
use the Programs and Features section in Windows. Both enable you to run the Installation Wizard, where
you can perform the following program maintenance:
Change Enables you to add or remove products to and from your current installation. Any products that
were already checked that you uncheck are uninstalled. Any additions are installed using the
default installation path (C:\Program Files\Micro Focus\extend x.x.x - where x.x.x
is the version number). There is no option to change to a non-default location, but you can
overcome this with some products by copying the installed files from the default location to your
preferred location. Note that this method will not work for AcuXDBC, AcuBench, and any server
products that are registered as services.
Repair Enables you to reinstall the currently installed products.
Remove Enables you to remove all products of your installation.
Windows Installation | 19Launching extend Products on Windows 8 or Later
Since the introduction of Windows 8, the Windows program menu does not display programs in a
hierarchical way. For the extend Interoperability Suite, this would mean that all the programs relating to
AcuBench, ACUCOBOL-GT, AcuConnect, etc... would be displayed as a flat list, and it would be difficult to
distinguish which programs were related to which products.
In order to show the programs grouped within the products they belong to, the extend Start Menu has been
introduced. After installation of the extend Interoperability Suite, there will be one entry in the Windows
programs menu - extend x.x.x Start Menu (where x.x.x is the version number of the installed product):
Launch this application to display a hierarchy that looks similar to the Windows program menus prior to
Windows 8. Simply navigate the folders displayed in the left-hand pane to display shortcuts to the related
programs in the right-hand pane. Select the required shortcut: at which point, the extend Start Menu closes
and the program is launched.
20 | Windows InstallationCompiling Your Programs
The ACUCOBOL-GT compiler is most easily used via AcuBench. However, it is also possible to compile
from the command prompt or the Windows Start menu, to establish an association between your source
files and the compiler executable, or to set up one or more icons to compile individual files. For information
regarding creating file associations and setting up icons, see your Windows documentation.
When you compile, if the system returns "Bad command or file name," you did not add the location of the
compiler to the PATH environment variable, or you have not rebooted since installing the software.
You can check the current definition of PATH by typing path and pressing Enter at the command prompt.
The default path is C:\Program Files\Micro Focus\extend x.x.x\AcuGT\bin (or c:\Program
Files (x86)\... for 64-bit installations). If you do not update PATH with this entry, you must type the
full path and program name to the compiler each time you compile; alternatively, you can create a .bat
file.
Once you have verified that the compiler is in your PATH (or you have decided that you will specify the full
path every time you compile), you are ready to compile your programs. Refer to ACUCOBOL-GT User's
Guide > Compiler and Runtime > Using the Compiler for a complete list of compile options. You can also
display a complete list of options by running the compiler command:
ccbl32 -help
One commonly used option is -o. This option is used to specify the name of the output object file. Note
that ACUCOBOL-GT uses the naming convention .acu to indicate an ACUCOBOL-GT object file. If -o is
not used, the compiler will name the file source-name.acu. If your source includes COPY files, you can
copy the COPY files to your current working directory, specify their location with the -Sp option followed by
the complete path of one or more directories, or set the COPYPATH environment variable. A typical
compilation command might look like:
ccbl32 -Sp c:\work\lib -o sample.cbx sample.cbl
Running Your Programs
After a successful compilation, the resultant object file is ready for immediate execution (no link step is
required). To run your program, make a note of the full path to your object file and return to the Windows
desktop.
There are a variety of ways to run your program under Windows. The basic methods are:
• Running a command from the Start menu.
Windows Installation | 21• Placing an icon for each program in a Program Group or folder, and then starting the program by
double-clicking its icon.
• Naming your COBOL object files with a common file extension and then associating the extension with
the runtime. After the association is established, you can run a program by double-clicking on the name
of the file as it appears in Windows.
• Using the wrun32 (or crun32 if you are using the console runtime) command at the command prompt.
This document describes how to run a program from the Start menu only (although, the command line
option is almost identical). The advantage of this method is that it requires no special setup. However, it is
more time-consuming (than other methods) because you must type the command line options every time
you execute the program. For greater convenience, it is best to set up a program icon: to do this, or to
create a file association to the runtime, please refer to your Windows documentation.
1. Click the Start button.
2. On the Start menu, in the entry field, type the name of your ACUCOBOL-GT Windows runtime.
The default name is wrun32.exe. If you changed the name of the runtime executable, enter that name.
3. Following the name of the runtime, enter any runtime options required, followed by the path and name
of the COBOL executable program you want to run.
4. After you have entered the complete command line, press Enter to execute the program.
Note: If you did not add the \bin directory path to the PATH system environment variable (typically,
that is: c:\Program Files\Micro Focus\extend xxx\AcuGT\bin), you will need to specify
the full path to the runtime (c:\Program Files\Micro Focus\extend xxx\AcuGT\bin
\wrun32.exe) each time in the command (and not simply wrun32.exe).
You can use the COBOL configuration variable DEFAULT_PROGRAM to specify the name of the program
to execute when no program is specified on the command line. See Appendix H in the ACUCOBOL-GT
documentation set for more configuration information.
Printing and Spooler Issues
ACUCOBOL-GT includes extended support for printing under Windows. In addition to the basic print
spooler access procedures described below, the WIN$PRINTER runtime library routine provides easy
access to extended Windows print spooler capabilities. See the entry for "WIN$PRINTER" in ACUCOBOL-
GT Appendices Guide > Appendix I. Rules for printer handling are illustrated in the ACUCOBOL-GT User's
Guide > Compiler and Runtime > Filename Interpretation > Assigning Files to Printers.
Under Windows, you may print directly to the printer by defining PRINTER in the configuration file as "-D
PRN". Be aware that this does not prevent other programs from printing at the same time and as a result
you may get intermixed pages.
You may also print using the Windows spooler, even if your reports have embedded control codes. The
spooler allows many programs to create print files at the same time, and also allows the user to do other
tasks while the report is being printed.
Note: The configuration variable WIN_SPOOLER_PORT allows you to divert printer output to a file or
port through the Windows print spooler. For more information, see ACUCOBOL-GT Appendices
Guide > Appendix H of the ACUCOBOL-GT manual set.
Before you assign your print file to the Windows spooler, you must decide whether you want to control the
format of each page directly (with embedded control codes) or whether you want the print spooler to format
the pages.
Spooler Formatting
There are two ways to use the Windows spooler to format your print file: "-P SPOOLER" and "-
Q ". See Direct Control for information on controlling the formatting yourself.
22 | Windows Installation-P SPOOLER
If you want to use the default printer and font, simply assign your print file to "-P SPOOLER". For example,
to assign "PRINTER1" to the spooler, enter the following line in your COBOL configuration file
("CBLCONFI"):
PRINTER1 -P SPOOLER
By default, the runtime system assigns the "PRINTER" device to the spooler. You may change this in the
configuration file by assigning "PRINTER" to some other name.
When the runtime opens a file assigned to "-P SPOOLER", it automatically initiates a job with the Windows
spooler and constructs print pages in accordance with your program. The runtime uses the default printer
and font. If the user looks for the job in the spooler, it is named with the current title of the ACUCOBOL-GT
window.
Note:
The Windows spooler operates by drawing your report on each page. It constructs its own control
codes to handle formatting. If you assign your print file to "-P SPOOLER" and your file contains
device-dependent control sequences (such as those used to shift to a condensed font, or to print a
form and then fill it in), the codes will be passed to the spooler as data and thus will not be interpreted
correctly. If you have reports that depend on embedded control codes, you should print those directly
to the device, or assign the print file to "-P SPOOLER-DIRECT," as described below.
-Q
If you want the Windows spooler to format the pages of your report, but you want to use a particular printer,
assign your print file to:
PRINTER1 -Q \\printername
in the configuration file (CBLCONFI). Printername is the printer designation as given in the Devices and
Printers screen. The name may be up to 80 characters long and contain embedded spaces. The name
may not include the semicolon character (;) or be surrounded by single or double quotes. The pages are
printed in the manner described in "-P SPOOLER", above. The sample programs graphprn.cbl and
prndemox.cbl contain examples of these functions.
To determine a valid printer name, use the WIN$PRINTER library routine to obtain the name of the desired
printer. (This is described in Appendix I under the WINPRINT-SET-PRINTER operation code in "Specifying
a Printer".) Then add the following line to your code:
MOVE "-Q \\printername" TO WS-PRINTER-NAME.
When the runtime opens a file assigned to "-Q ", it sets the Windows print spooler to use
this printer. The printer driver must be installed on the computer from which you print. If printername is not
recognized by the runtime, a dialog box allows you to choose a printer manually.
Note:
If you want to access a printer using a UNC path, you have to print directly to the printer by defining
PRINTER as "-D PRN". If you use the UNC path, Windows formatting is not supported.
Direct Control
If you want to control the format of the printout yourself using embedded control codes, simply assign your
print file to -P SPOOLER-DIRECT or to -Q using the DIRECT=ON option. For example,
to assign the print job "PRINTER1" to the spooler and retain direct control over formatting, enter the
following line in your COBOL configuration file (CBLCONFI):
PRINTER1 -P SPOOLER-DIRECT
Windows Installation | 23Or, use the following command to assign PRINTER1 to the spooler for printing to a specific printer while
retaining direct formatting control:
PRINTER1 -Q printername;DIRECT=ON
Both of these methods cause the print job to be sent to the printer via the Windows spooler, but the
program does not use the spooler to format the pages. You must use embedded control codes to handle
formatting (much as you would under UNIX if you used the UNIX spooler).
When using the -P SPOOLER-DIRECT option, you may use the WIN$PRINTER library routine to choose a
printer, but because you completely control the printer, the various options provided by WIN$PRINTER are
ignored. For example, WIN$PRINTER does not set the page size, page orientation, or font. Information
returned from WIN$PRINTER, such as number of lines and columns on the page, may not be accurate and
should not be used. This subject is discussed in detail in Appendix I "Library Routines" of the ACUCOBOL-
GT manual set.
Because some print drivers do not flush the last page, be sure to end your last page with a form-feed (for
example, WRITE ... BEFORE ADVANCING PAGE). This ensures that all pages are printed. The
ACUCOBOL-GT runtime ensures that no extra blank pages are printed at the end.
If you code WRITE...AFTER ADVANCING PAGE instead of WRITE...BEFORE ADVANCING PAGE, you
might receive a blank last page. This is because a blank line written on the new page causes the Windows
subsystem to flush the page for some print drivers. ACUCOBOL-GT ensures that entirely empty lines are
not sent to the device (only the form-feed will be sent). But it is essential that:
• You have specified trailing space removal in your COBOL code (the default for print files).
• You have set the configuration option MIN-REC-SIZE to "0".
Your other option is to specify WRITE... BEFORE ADVANCING PAGE to avoid this potential problem.
If the user looks for the job in the spooler, it is named with the current title of the ACUCOBOL-GT window.
Printing Multiple Jobs Simultaneously
If you need to print multiple jobs at the same time, you must open multiple File Descriptors that point to "-P
SPOOLER" or "-P SPOOLER-DIRECT" simultaneously. For example, you may have two simultaneous print
jobs:
SELECT FIRST-FILE
ASSIGN TO PRINTER "-P SPOOLER".
SELECT SECOND-FILE
ASSIGN TO PRINTER "-P SPOOLER".
..PROCEDURE DIVISION.
..
OPEN OUTPUT FIRST-FILE.
OPEN OUTPUT SECOND-FILE.
and both will print to the default Windows printer without interfering with each other. You can call WIN
$PRINTER USING WINPRINT-SETUP before one or both of the OPEN statements. Each file may have
individual file status variables or may refer to a common file status variable.
This does not mean that you can open a single File Descriptor multiple times. For example, the following
will return file status indicating that the file is already opened:
SELECT FIRST-FILE
ASSIGN TO PRINTER "-P SPOOLER".
..
PROCEDURE DIVISION.
24 | Windows Installation..
OPEN OUTPUT FIRST-FILE.
OPEN OUTPUT FIRST-FILE.
This is normal behavior and is consistent with the way file handling is implemented in COBOL and in other
programming languages.
If you are using only the verbs OPEN, CLOSE, and WRITE, no further changes to your code are needed. If
you are using WIN$PRINTER functionality (other than WINPRINT-SETUP) you will need to specify which
print job is affected. This can be done in two ways:
1. The simplest way is to execute the WIN$PRINT operation immediately after an OPEN or WRITE
statement on the intended job. Every execution of OPEN and WRITE sets the current job as the default
so that subsequent activity using WIN$PRINTER is automatically directed to the job that was last
accessed with an OPEN or WRITE statement.
In this situation, if you have multiple jobs running, and you close one of them, the runtime switches to
the next job in the list. For example, if you are printing jobs 1, 2, and 3, and you close job 2, the close
command sets the current job to 3. If there is no job 3, the runtime attempts to set to the job that
preceded the closed job (which in this case is job 1). If there are no jobs, the current job is initialized.
2. The other method is to use the WINPRINT-SET-JOB operation of the WIN$PRINTER library routine.
This operation is described in Appendix I of the ACUCOBOL-GT manual set.
Windows Installation | 25You can also read