FILMICPRO USER MANUAL V6 - REV 1 - CURRENT AS OF FILMIC PRO IOS V6.0
←
→
Page content transcription
If your browser does not render page correctly, please read the page content below
FiLMiCPRO
                     User Manual v6
                rev 1 - current as of FiLMiC Pro iOS v6.0

                                  FiLMiCInc
                        copyright 2017, All Rights Reserved

                    All Apple products, models, features, logos etc
                  mentioned in this document are trademarks of Apple
                    Inc., registered in the U.S. and other countries.

                   Any reference to third-party software, hardware etc
                   are trademarks held by the third-party organization.
                                   All rights reserved.

FiLMiC Pro v6                                                             User Manual, Page 1
Welcome to FiLMiC Pro 6
FiLMiC Pro v6 is the largest release in the company’s history.

The app has been used for more high-profile projects and industry firsts than any other. First
launched in 2011 it is one of the longest, continually-available camera platforms available for
iOS.

With v6 we have used our experience as filmmakers and engineers to maximum effect in
eroding the differentiators between mobile video and that which is shot on dedicated cinema
cameras costing thousands more.

The new version has something for everyone.

For the first time ever, professional filmmakers will be able to shoot in Log for greater usable
range from the iPhone camera sensor and additional flexibility in post production work. †

For the everyday filmmaker there are a host of new features to take the guesswork out of
achieving a perfect shot. A sampling of these include:
- Live analytics provide fast focus and exposure acquisition with unprecedented accuracy. *
- Dual manual arc slider controls for simultaneous adjustment of focus and exposure. The
  venerable FiLMiC reticles may have met their match.
- White balance adjustment matrix with predefined and custom presets.

The FiLMiC team has worked for over a year on these new capabilities and is excited to offer
them to the creative masses. We look forward to seeing what you will create with v6.

† Available with optional purchase for iPhone 7 and 7 Plus only
* Available for A8 processor devices or newer

                                NOTE: This user manual includes information related to the FiLMiC
                                Watch app designed for the Apple Watch. See the contents page.

FiLMiC Pro v6                                                               User Manual, Page 2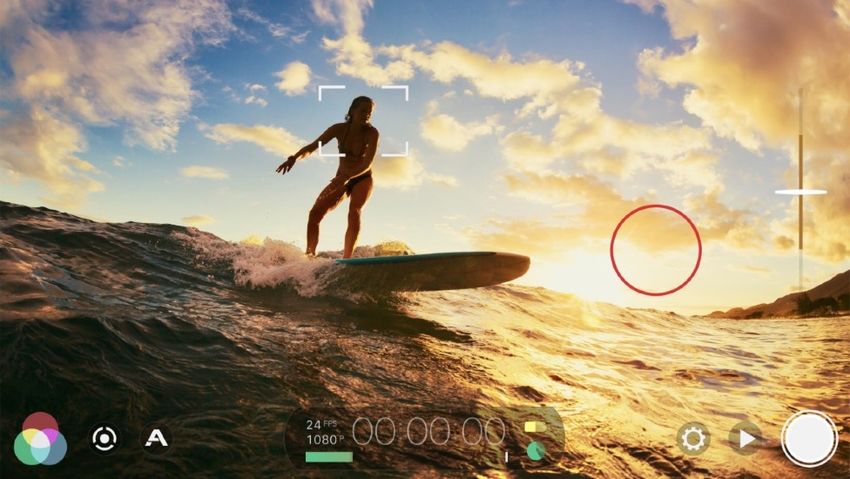
Welcome to FiLMiC Pro 6 -----------------------------------------------------------------------2
Camera View -------------------------------------------------------------------------------------4
Learning Camera View Controls ----------------------------------------------------------------5
Histograms ---------------------------------------------------------------------------------------6
Mixed Reticle States -----------------------------------------------------------------------------7
Vertical Video Capture ---------------------------------------------------------------------------8
Live Analytics -------------------------------------------------------------------------------------9
    Zebra Stripes                 10
    Clipping                      10
    False Color                   11
    Focus Peaking                 11

Manual Controls----------------------------------------------------------------------------------12
Imaging Panel ------------------------------------------------------------------------------------15
    Temperature                   15
    Tone                          16
    Color Behavior                17

Settings Menu ------------------------------------------------------------------------------------18
    Resolution, Framing & Quality 19
    Frame Rate                    21
    Timelapse                     22
    Audio                         23
    Device                        25
    Presets                       28
    CMS                           29
    Hardware                      30
    Sync                          33
    Community                     34
    Overview                      34

FiLMiC Library ------------------------------------------------------------------------------------36
FiLMiC Player ------------------------------------------------------------------------------------37
FiLMiC Watch App -------------------------------------------------------------------------------38
Tips and Tricks -----------------------------------------------------------------------------------40
    Best practices when filming with FiLMiC Pro             40
    Saving footage to your computer via iTunes (iOS only)   40

Appendix - FiLMiC Log -------------------------------------------------------------------------- 41

FiLMiC Pro v6                                                                            User Manual, Page 3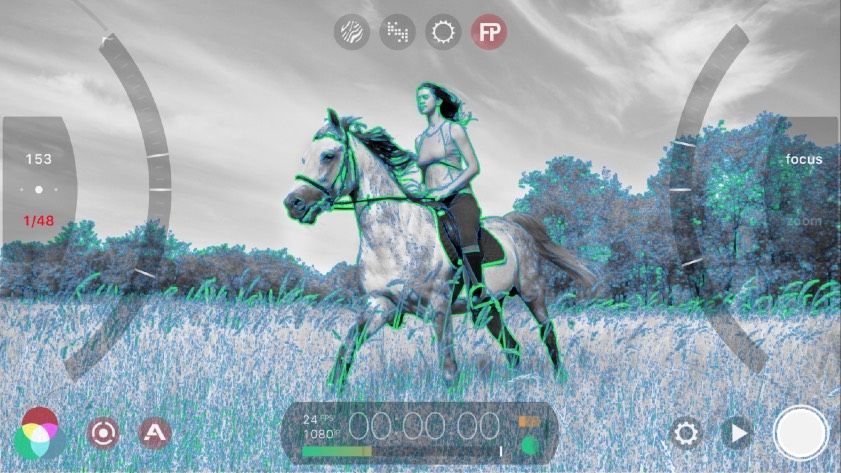
Camera View
The FiLMiC Pro Camera View user interface, is designed to shoot high quality video from
the moment you open the app.

FiLMiC Pro defaults to 1080p HD video in 16x9 aspect ratio and has a default cinematic frame
rate of 24fps as opposed to the 30fps of the native camera. (fps=frames per second)

FiLMiC Pro additionally has a default ‘FiLMiC Quality’ encoding option that records video data
with 33% more information than Apple’s Standard encoding. All of this means that once you
hit record you are well on your way to an improved, FiLMiC experience.

FiLMiC Pro v6                                                           User Manual, Page 4
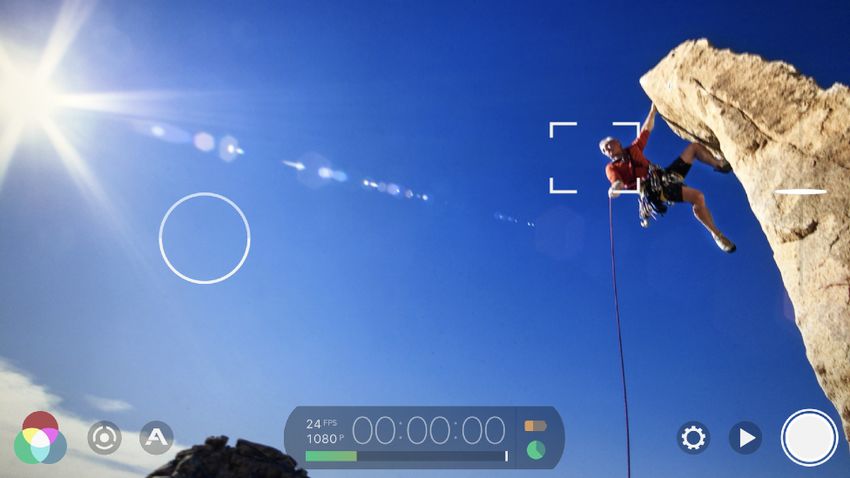
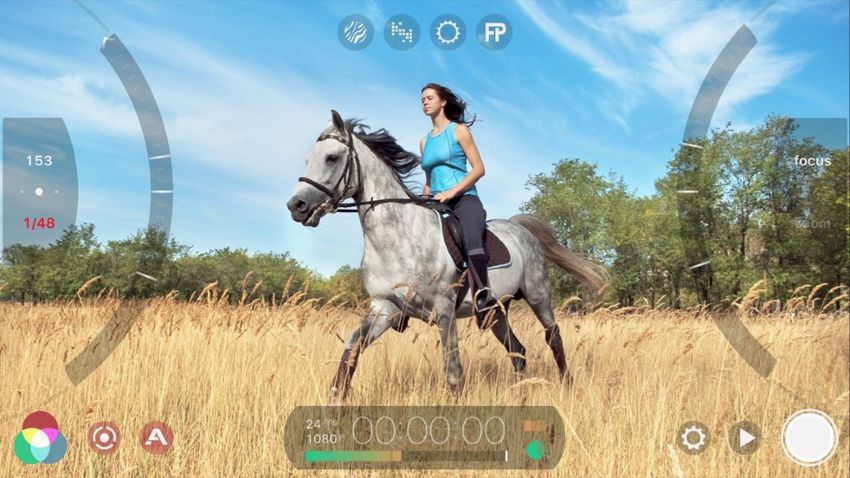
Learning Camera View Controls
Step 1: Learn to move and use the separate focus (square) and exposure (round) reticles

Step 2: Tap the Focus or Exposure reticles to lock their current value (or leave unlocked to
account for varying lighting or shifting focus target.

Step 3: Tap the record button to start and stop your video recording

Step 4: Monitor device status and record time with the Battery/Hard Drive Indicators and Time
Code Counter

Step 5: Change Settings by accessing the Settings Gear

Step 6: Find recorded clips inside the Clip Library (Play button icon).

FiLMiC Pro v6                                                             User Manual, Page 5
Adjust White Balance Tap the Imaging Panel icon to adjust
                               the white balance manually or use a gray card or white sheet of
                               paper under the scene lighting conditions and press
                               to lock the white balance

                               Set Focus before Exposure, Focus performs best in all available
                               light. Always stop down Exposure after Setting Focus if possible.

                               Riding Exposure, when panning, tracking or tilting in
                               variable light conditions, place the unlocked Exposure reticle
                               at the leading edge of frame in whatever direction you are
                               moving

                               Histograms
You can use a histogram to identify if your video exposure is evenly balanced and make any
corrections necessary. By tapping the time code counter medallion you can cycle between
three different imaging histograms:

                          — Tap once to access a dynamic full luminosity histogram.

                          — Tap again to access a histogram with composite and RGB
                          layers.

                          — Tap again to access a Waveform monitor. This plots luminance
                          values on the vertical axis and the width of the current frame
                          across the horizontal axis.
                                    *Only available for devices with A7 or newer processors.

FiLMiC Pro v6                                                                          User Manual, Page 6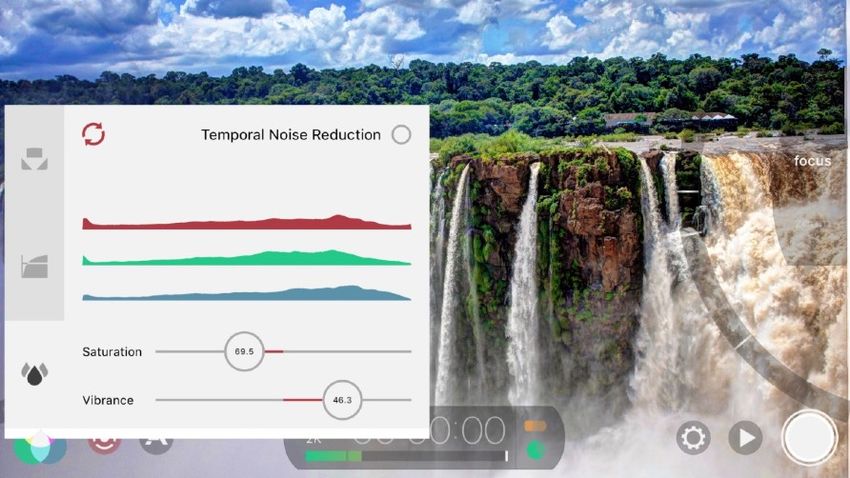
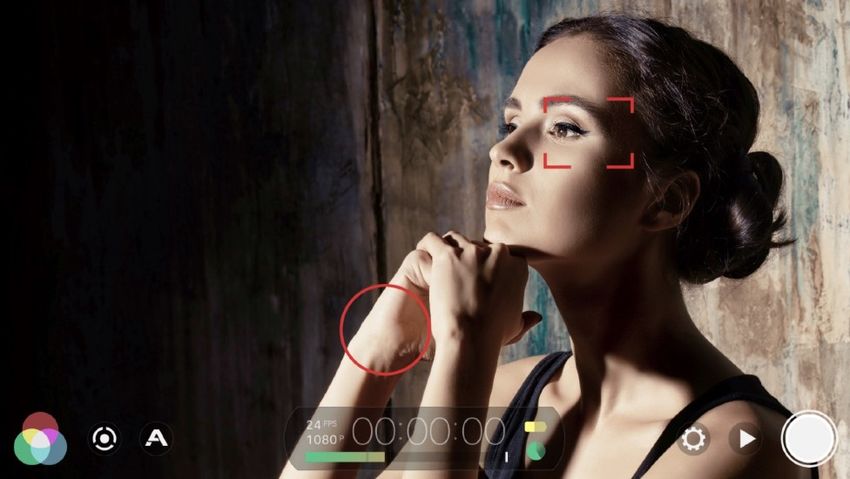
Mixed Reticle States
Create compelling images by controlling focus and exposure individually to capture the exact
image you want. For more advance techniques, look for opportunities to leave either the
Focus or Exposure reticle unlocked and continually sample (or ride) the changing Focus or
Exposure value.

The above example utilizes locked exposure on the sunset and an unlocked focus reticle on
the surfer in preparation to capture the focus as they move through the frame.

If your subject is moving and not at a fixed focal distance, place the unlocked focus reticle
over the moving subject to continually and automatically adjust focus.

FiLMiC Pro v6                                                             User Manual, Page 7
Vertical Video Capture
FiLMiC Pro offers vertical video. Capturing vertically opens up new opportunities for creative
expression in a format that is easily consumed by mobile devices.

To use vertical video simply
rotate the device and hold it
vertically. The application
interface will automatically adjust
to vertical layout. If you prefer to
use vertical or landscape in
certain circumstances or as a
default, consider saving this
using the orientation lock (see
the device section of the settings
menu for more details).

FiLMiC Pro v6                                                           User Manual, Page 8
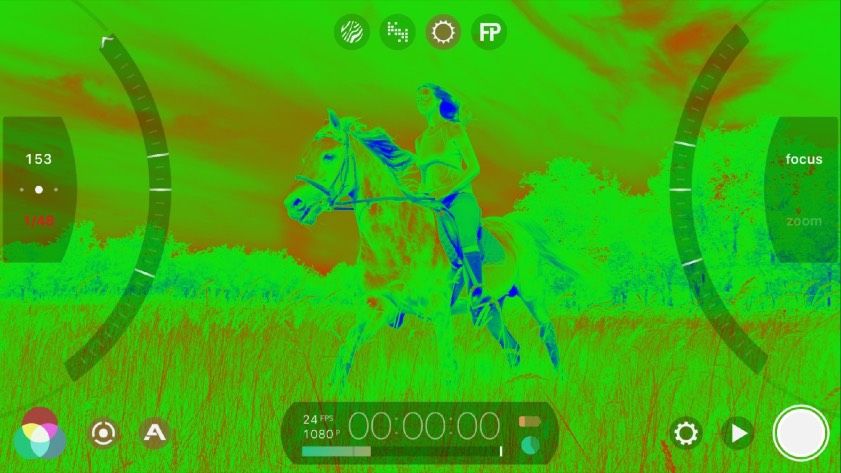
Live Analytics
v6 includes a set of live analytics to precisely set focus and exposure for your video. (Devices
with A8 or higher processor).

The live analytics tray consists of a set of four buttons to enable Zebra Stripes, Clipping, False
Color and Focus Peaking. This tray is at the upper center of the camera view. The live
analytics tray can be exposed or hidden using the          button found in the lower control bar
to the left of the time code counter.

You can tap one of the four options to enable. The overlay will desaturate the screen to make
it easer to use the analytics option and to ensure you disable overlay when you have finished
making adjustments. The live analytics use a large amount of system resources and it is
recommended that they are used only while needed.

Additionally, if the live analytics tray is enabled then the manual sliders will automatically apply
zebra stripes and focus peaking for the respective adjustment sliders to assist
instantaneously and fade away once the adjustment is complete.

FiLMiC Pro v6                                                                User Manual, Page 9
Zebra Stripes
This overlay assists with setting exposure by overlaying the image with red forward stripes for
areas of overexposure. Blue backward stripes indicate underexposure areas.

                                     Clipping
Just like when using a luminance histogram, the clipping overlay shows you areas of
exposure that are ‘clipped’ which indicates complete data loss. Red is overexposure clipping
and blue is underexposure clipping.

FiLMiC Pro v6                                                           User Manual, Page 10
False Color
Shows you a complete picture of your video’s exposure profile. Remember that ‘green is
good’. Areas of red indicate overexposure and blue indicates areas of underexposure. Focus
Peaking
Focus Peaking
Micro-Contrast Focus Peaking (pat pending). Focal accuracy on a per pixel level provides
better insight on focus acquisition than ever before. Light blue indicate areas of focus and
green indicates the target is in critical focus.
FiLMiC Pro v6 User Manual, Page 11Manual Controls FiLMiC Pro Manual Controls Access manual controls through any of the following actions: - Long press on corresponding reticle to open focus or exposure control - Swipe in from the left or ride side of the screen to open exposure or focus respectively. Swipe again in reverse to dismiss the manual control and expose the reticle. - Tap the manual controls button to open both controls, tap again to dismiss both. Exposure Adjust the exposure by moving the left arc up or down. This will change both the ISO and Shutter Speed in correlation with one another. ISO/Shutter Lock You can dial in a specific ISO or Shutter speed and then tap the top or bottom half of the exposure control block respectively to lock that value. In the example above the shutter has been locked at 1/48th. Locking one value allows the app to freely adjust the other through its range. ISO Priority You can use the control in between the ISO and Shutter displayed values to set the ISO priority range. In doing so you can establish a preferred range of ISO values you would like FiLMiC Pro v6 User Manual, Page 12
the app to stay within. This assists in maintaining a quality exposure and guard against ISO
noise which can be common in shots with high ISO settings.

Focus
Adjust the focus by moving the right arc up or down. Note that on smartphones and tablets,
the small lens is calibrated to focus to infinity in a short range. To capture beautiful
compositions with shallow depth of field (blurred background) make sure to get very close to
your primary subject (< 2’).

                                                                  Integrated Live
                                                                  Analytics
                                                                  If using the manual controls
                                                                  while also having the Live
                                                                  Analytics tray open the
                                                                  manual controls will
                                                                  automatically display the
                                                                  Zebra Stripes or Focus
                                                                  Peaking overlay (or both) as
                                                                  you move the arc sliders. In
                                                                  this case the image will not
                                                                  desaturate and the
                                                                  analytics will automatically
                                                                  fade out when the
                                                                  adjustments have been
                                                                  completed.

      Zoom
      You can use the right arc slider as an
      alternate control for zoom (in addition
      to the zoom rocker on the camera
      view). Tap the ‘zoom’ button in the
      focus/zoom control block on the right
      side of the screen to switch to zoom
      mode. Now any control inputs to the
      right arc slider will affect the zoom.
      This coupled with the pull-to-point
      control (see below) can provide
      control for an automated zoom.

FiLMiC Pro v6                                                          User Manual, Page 13
Upper Pull Point
Set Point
Lower Pull Point
Pull-To-Point Slider Control
FiLMiC Pro allows you to set automated pull controls for
Tip: You can create an interesting
smooth pulling of focus exposure or zoom. ramping effect by actuating the pull
- To create a pull operation you will need to establish speed control while operating a pull
the upper and lower pull point values. This is done by event. Go from fast to slow, or slow to
moving the arc slider to the value you would like to fast during the pull operation.
establish. Tap the set point line in the middle of the
arc. This will automatically move the closest pull point to the set point.
- Now move the arc slider again to establish the second value and tap the set point again this
will set the secondary point.
- To actuate a pull operation you can tap either the upper or lower pull point. The app will
automatically move between these in one smooth motion. (if the pull point you wish to
move to is off the screen you will see a > arrow. Tap this to move to that pull point)
- You can adjust the speed of the pull event by grabbing the control block (exposure or
focus/zoom) and pulling in towards the center of the screen. The higher the setting the
faster the pull speed.
FiLMiC Pro v6 User Manual, Page 14Imaging Panel
The Imaging Panel contains controls for Temperature, Tone* and Color Behavior* (optional
purchase for iPhone 7/7+ only). Tap the button to open the Imaging Panel.
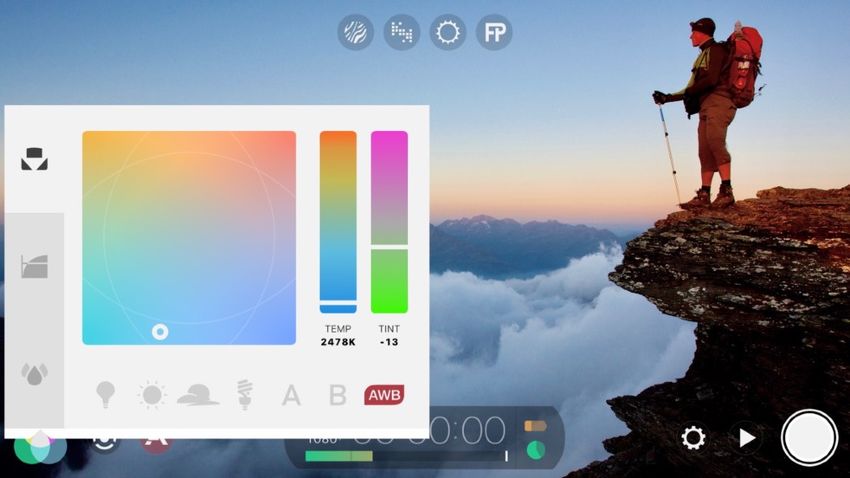
Temperature
Use the Temperature sub-panel to adjust the white balance or apply a preset.
Temperature/Tint Temperature/Tint
Matrix Individual Control
Adjust both temperature and Individually dial in a
tint by moving the selector Temperature or Tint setting
throughout the range.
Auto White Balance
When gray, the white balance
White Balance Presets
From left to right: is manually-adjusted or a
Incandescent, Sunlight, preset has been applied. Tap
Cloudy, and Fluorescent to enable auto white balance
(blue). Tap to lock the white
balance setting (red).
Custom Presets
Dial in a custom white balance. Long press A or B
to save this value. Tap A or B to call this setting.
FiLMiC Pro v6 User Manual, Page 15Tone
(available with purchase of the Cinematographer Kit, for iPhone 7/7+ only)
The Tone sub-panel provides maximum control over tone, shadow and highlights in your video.
Gamma Curves
The top section of the Tone sub-panel includes four gamma curve options that can be applied to the video. The
default is ‘natural’ and is an unmodified curve based on the iPhone’s default video tone mapping capability.
Dynamic, Flat and Log curves are proprietary, patent-pending gamma curves intended to allow for greater
flexibility in tone and dynamic range. Each curve offers different behavior for shadow and highlight detail
recovery. For professionals performing color grading in post production the Log will offer the most aggressive
capabilities, but at greater possibility of increased noise or other flaws. It is recommended to become
comfortable with the capabilities of the Flat curve which offers similar capabilities as Log but with a more
forgiving performance envelope. (for technical details regarding the FiLMiC Log capabilities and information on
grading please consult the Appendix in this user manual.)
Black/Mid/White Point Adjustment
You can dial in custom behavior for the tone of your video by sliding the the tone range selectors left or right.
Shadow/Highlight Adjustment
The sliders at the bottom of the Tone sub panel control the Shadow and Highlight behavior. Default is the
midpoint, but can be adjusted plus or minus to achieve a specific look.
Tip: Tap the reset button to reset any
changes back to the default.
FiLMiC Pro v6 User Manual, Page 16Color Behavior (available with purchase of the Cinematographer Kit, for iPhone 7/7+ only) The color behavior sub-panel provides fine control for color in your video. Temporal Noise Reduction Temporal Noise Reduction (TNR) can be used to reduce noise artifacts in your video. It works by compositing three exposures into one through the duration of the clip. It is a similar process to HDR photo capture in that the samples are composited using a differential engine. TNR is opportunistic (acting only on static parts of the frame) so it should not be considered a blanket approach to noise reduction. Also consider that TNR actually ignores extremely high noise levels because those are best repaired with spacial noise reduction in post. (TNR is available up to 1080p resolution only) RGB / Saturation / Vibrance Adjustments Below the TNR control are the sliders for RGB, Saturation and Vibrance. - The RGB controls allow for individual adjustment of the Red, Green and Blue color channels. - Saturation controls the absolute color saturation across all three color channels. So you can adjust the RGB’s individually and then dial in the saturation which is effectively a multiplier of the color channel settings. - Vibrance, as compared to Saturation is a weighted saturation adjustment. Almost considered as ‘smart saturation’ it will ramp colors accordingly to increase/decrease color saturation but sparing neutral colors such as skin tones. FiLMiC Pro v6 User Manual, Page 17
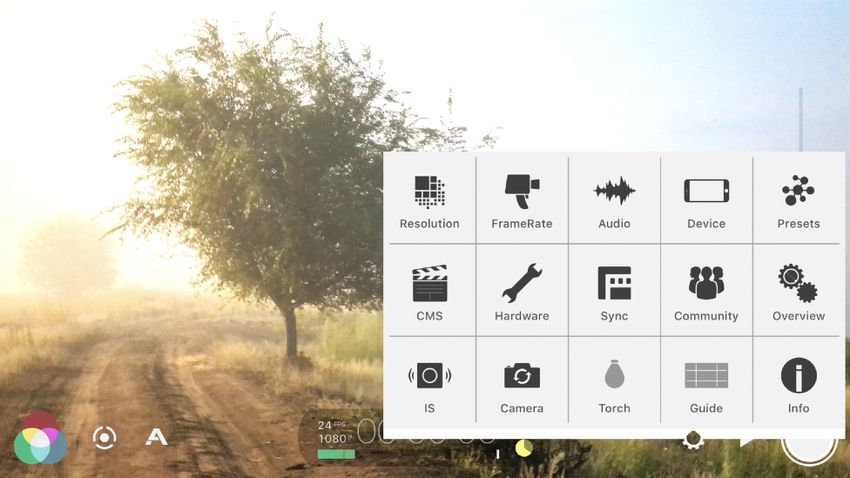
Settings Menu

                                           Settings Menu
                Tapping the     button will reveal the settings menu.

                - Tap anywhere in the camera view outside of the Settings menu to close or to go back up a
                  level while navigating settings menu categories.

                The following sections will allow you to discover all of the fine control that lies at your
                fingertips. Wide screen options, throwback aspect ratios, higher bit rates, altered frame rates,
                audio options, 35mm glass integration, resolutions, etc

                FiLMiC Pro v6                                                            User Manual, Page 18
Settings Menu
Resolution, Framing & Quality
Resolution Options
4K 2160p*
3K 1836p*
2K 1152p*
HD 1080p
HD720p
* iPhone 6s/6s+, iPhone SE, iPhone 7/7+ and iPad Pro 9.7 only
Framing Options:
16:9 - Standard Wide Screen format
17:9 - DCI
2.59:1 - Cinerama
1:1 - Square crop, especially great for social network content
2.2:1 - Letter Box
2.76:1 - Ultra Panavision
4:3 - Standard
2.39:1 - Super 35
Crop Source to Overlay
When enabled this will display black bars to indicate the recorded area of the screen. If you
just want to frame the footage as a guide and handle the crop in post production, you will
want to disable this. In this case a thin border on the frame will display the target aspect ratio
but the full 16:9 frame will be recorded.
FiLMiC Pro v6 User Manual, Page 19Settings Menu
Video Encoding:
Video encoding rate has a large impact on final video quality. The higher the encoding rate
the more data data is utilized for a particular clip. FiLMiC Pro offers four levels of encoding
rates from Extreme at the high-end to economy at the low-end. The higher the quality but
also the higher the video size in your device’s storage. Experiment with different encoding
rates for your particular shoot to identify the best combination of performance, size and
quality to suit your needs. Examples of FiLMiC Pro bit rates are below. (mbps=megabits per
second)
Note: Our proprietary clip writer code uses functionality to sample the quality from the
incoming video feed and automatically scale the data rate based on 'need'. When you set a
bitrate in FiLMiC Pro you are establishing a target for the camera framework. Depending on
the quality of the feed you may see final bit rates that are higher or lower than this target in
order to ensure quality. In doing this we can provide for a high quality while also keeping the
video file size as low as possible.
FiLMiC Extreme
• The app sets a target of 100mbps for 2k, 3k and 4k. At 1080p this target is is 50mbps.
FiLMiC Quality
• At 1080p, FiLMiC Quality is 32mb per second for improved image quality, detail and color
information.
Apple Standard
• The same data rate as you get with the native camera. Adjusts for resolution as do all
bitrates.
Economy
• Save space with this economy bitrate. Lower resolution to save more space.
FiLMiC Pro v6 User Manual, Page 20Settings Menu
Frame Rate
Frame Rate Options:
The frame rate mode selector is at the top right of the screen and allows you to switch
between Standard and Timelapse mode. (For Timelapse settings review the next section in
this manual.)
Frame Rate Presets - The top section of this menu displays the 'standard' frame rate presets
as supported by your device. Preset options include: 24 FPS, 25FPS, 30FPS, 48FPS, 50FPS,
60FPS, 120FPS & 240FPS
Tapping one of the frame rates will put a gray circle around it to select and will set your
capture and playback frame rate to one of the values. 24, 25 and 30 are the most commonly
used around the world.
**Support for 120FPS and 240FPS is device dependent, and only supported when the
resolution is set to 720p
Motion Slider - The frame rate motion slider is an intuitive solution to a confusing problem in
the past: How do you know by selecting a slow or fast motion option what it will do to your
actual frame rate? The motion slider mechanism works by tapping and dragging the circle
from the middle to either the left or right. In the middle this indicates that you are in standard
motion, so your capture and playback will be the same. From there you can move it left or
right to create slow or fast motion effects. When you make changes to the motion slider you'll
see that the frame rate preset you selected at the top will now show a red circle to indicate
you're no longer in a standard frame rate but rather an altered motion frame rate based on a
playback rate from your original selection. Or to put it another way, ‘if red, then you're out of
sync’.
FiLMiC Pro v6 User Manual, Page 21Settings Menu
Frame Rate Selectors - The bottom third of the menu is where you have even more control.
You can select individual capture and playback frame rate values and create your own
custom combinations. By doing this too you can even achieve any desired non-standard
sync rate. Want to have a clip that is recorded and played back in sync at 7fps? sure.. set
both selectors to 7fps and you are good to go.
Timelapse
The app can be placed in timelapse mode. This is an alternate form of framerate system by
which the app will take video images based on seconds per frame rather than frames per
second. Timelapse is used to create beautiful, smooth clips that capture over a long period of
time and play back at an accelerated pace. Shoot a sunset scene or capture the hustle and
bustle of an entire day’s downtown traffic in one small finished clip.
FiLMiC timelapse can record on one of eight pre-defined capture intervals and playback at
one of the standard broadcast video frame rates (24fps, 25fps and 30fps). When in timelapse
mode the app will display ‘ TL’ in the timecode medallion and use the third segment of the
counter to count off frames taken. The first two segments of the counter will display as
minutes and then seconds of final footage.
FiLMiC Pro v6 User Manual, Page 22Settings Menu
Audio
Microphone Selection Modes:
Video Only
iPhone Microphone - Bottom
iPhone Microphone - Front
iPhone Microphone - Back
** Tip, select the microphone option closest to the sound you’re capturing
A note on External Microphones:
When an external mic is plugged in the App will automatically use that as your primary audio
input, “disabling the iPhone microphone”. Please note some external mics may require a
TRRS adapter to work with the FiLMiC Pro app.
Supported audio encoding formats:
AAC
AIFF
WAV
Supported audio sampling rates:
44.1kHz
48.0kHz
96.0kHz (requires supported lightning external microphone)
FiLMiC Pro v6 User Manual, Page 23Settings Menu
Additional options include:
Automatic Gain Correction - Used primarily when the device’s internal microphone is
employed or with an external microphone without gain level adjustment. This allows the
FiLMiC Pro gain control slider and setting to be enabled. If this setting is unchecked then the
expectation is that an external microphone is being used that supports a native gain control
on the microphone itself.
Voice Processing - When enabled this setting highlights audio frequencies in the range of
human speech to bring out human voice better.
Bluetooth Audio Monitoring - (There is no on-screen switch in the app for this) You can can
connect bluetooth headphones to your device using the Apple settings app under the
bluetooth heading. Once connected when using FiLMiC Pro the audio output will
automatically route to the bluetooth device.
NOTE: It is recommended to only connect bluetooth headphones when using the app. The
use of a bluetooth speaker could lead to a disruptive audio feedback loop as the microphone
could pick up the audio output from the speaker.
FiLMiC Pro v6 User Manual, Page 24Settings Menu
Device
Save to Camera Roll
Enable this to have all footage recorded in FiLMiC Pro save to the camera roll by default.
Note: FiLMiC recommends using the FiLMiC library wherever possible based on the following:
- Native video quality is ensured when using the FiLMiC library.
- The FiLMiC library is the only way to maintain the filename encoding from the app. If you
copy to the camera roll, iOS will the filename to a random string of numbers and letters.
- Another concern is that the camera roll is a potential point of failure. When copying to or
saving to the camera roll there is data in transit that if for some reason the operation gets
interrupted (low disk space, low battery, incoming call, etc) there is a small chance of data
loss.
Additionally there are three known scenarios that should be avoided when using the camera
roll:
- iCloud Photo Library: If you use the iCloud Photo Library it is recommended to avoid
copying or saving to the camera roll as this can lead to data loss. Check this in your
device’s settings app under the iCloud->Photos menu.
- 4k video with 1.33 Anamorphic (Moondog) footage: When using the Moondog adapter with
4k the resulting clip would exceed the resolution limits of the camera roll. In order to
transfer file it will be resized which can result in quality loss.
- High speed frame rates (in excess of 60fps) should be avoided when saving or copying to
the camera roll. The camera roll itself will retain the frame rate correctly, however sharing
from the camera roll will often retime the footage to a different frame rate.
FiLMiC Pro v6 User Manual, Page 25Settings Menu
Orientation lock
This option controls the ability to preserve the current orientation of the app. eg: If you enable
this feature while in vertical orientation then the app will lock vertically. Coupled with presets
this feature can be very handy to set a preferred shooting combination for vertical or
landscape clips.
Preview Active
Controls whether the video preview is displayed on the screen. Use this feature in situations
where the light emitted by the preview screen could affect the ambient light in the room or of
a secondary camera placed nearby. When used in conjunction with ‘Tap to Hide Interface’
the entire device screen can be blacked out.
Tap to Hide Interface
This setting hides the on-screen controls with a tap to the screen. Use this function if
mirroring the device’s screen display to an external screen for monitoring purposes. In this
capacity, setup your shot, tap record, confirm video recording on the time counter then tap
the screen to hide the primary controls. Note that this option is great for use with the HDMI
video adapter for monitoring externally or via an AirPlay enabled device such as the AppleTV.
Hide Reticles with Interface
Use this setting along with the ‘Tap to Hide Interface’ if the desire is to hide the focus and
exposure reticles as well, leaving a completely clean preview of the recording.
FiLMiC Pro v6 User Manual, Page 26Settings Menu
Stitch Mode
Stitch Mode enables you to pause and resume a live recording. The resulting sequence of
clips are automatically edited together, potentially eliminating the need for post-production
editing.
The Stitch Mode record
button in paused state. Tap
the record button again to
resume recording for the
next segment of the stitch
clip.
To end a stitch recording -
At any point, long press on
the record button.
- When using Stitch Mode you can tap the recording button to start a recording.
- Tap the recording button again to pause the recording.
- Tap again to resume recording.
- Long press the record button to stop the recording.
Snap Focus
This setting will change the behavior of the focus reticle to be more responsive and respond
quicker to movement and a changing focal reading. This is best used for shooting content
that has quickly changing composition and live-action shooting such as, sports, dance, etc.
When this setting is disabled the standard focus behavior will apply which uses a smoother,
less-sensitive focus algorithm.
Enable Remote
Toggle this setting to ON if you would like FiLMiC Pro to be discoverable by devices running
FiLMiC Remote on the same WIFI network. FiLMiC Remote is a separate application that can
control all aspects of FiLMiC Pro from a separate device running the remote.
FiLMiC Pro v6 User Manual, Page 27Settings Menu
*Sample data shown
Presets
The preset controls allow you to configure, save and update presets for most of FiLMiC Pro’s
settings. This allows for quick recall of a particular shooting style. Want a special Preset for
your favorite Motion FX? Select the desired frame rate and then Save as a Preset. Want to
access the Super 35 Matte at the touch of a button? Select the desired Aspect Ration Matte
and Save as a Preset. Want to create your own economy Preset for when you are low on
storage space or wish to email smaller size files. Select 720, choose a lower bitrate then Save
as a Preset. (do not use #, \ or / characters in the preset name as these are not valid
filenames in the iOS data storage framework.
FiLMiC Pro v6 User Manual, Page 28Settings Menu
CMS
The CMS (Content Management System) settings option is used to control the file-naming
properties of the app. The default behavior of the app is to encode files with a date/time
stamp of when the clip was recorded. A typical filename such as ‘03022017_171425.mov’
would indicate a video file that was recorded on March 2nd 2017 at 5:14PM local time. If you
enable CMS the app will instead encode filenames based on a combination of data to
indicate the Production, Scene and Take of each clip:
- Production: Set this value once for an entire production. Once set the value will not
change until you modify it.
- Scene: Similar to Production this value will not change until it is modified.
- Take: Set the starting take number. The first clip for the Production and scene will include
this value. From there all subsequent file names will automatically increment the take value.
FiLMiC Pro v6 User Manual, Page 29Settings Menu
Hardware
DJI OSMO Mobile
(only for use with FiLMiC Pro for iOS) This setting allows FiLMiC Pro to be controlled by the
hardware buttons of the DJI OSMO Mobile handheld gimbal (identified as ‘OSMO’ below).
Connecting your OSMO to FiLMiC Pro:
- Ensure that bluetooth is enabled on your iPhone and that it is placed in your OSMO with the
OSMO powered on.
- In the hardware settings of the FiLMiC Pro settings menu ensure that the ‘DJI OSMO
Mobile’ option is enabled. (Note: It may be necessary to disable/reenable this option when
reestablishing connection to the OSMO)
- A drop-down box of available OSMO devices nearby will be displayed. Select the OSMO
you would like to connect to.
- The connection should be active now.
Working with the OSMO and FiLMiC Pro:
- There are four buttons on the OSMO that can be used to control various FiLMiC Pro
functions:
- The circular joystick control
- The large button beneath the circular joystick (referred to as the ‘Shutter’ button by DJI)
- This button serves as the mode selector when used with FiLMiC Pro
- The record button to the right of the circular joystick
FiLMiC Pro v6 User Manual, Page 30Settings Menu
- Regardless of which mode you are using the record button can be used to start or
stop a FiLMiC Pro recording.
- The trigger button on the reverse side of the OSMO grip
- Tap this trigger button to return to Mode 1
- Double tap this trigger to reset your OSMO’s orientation if necessary
There are three modes of operation when using FiLMiC Pro with the OSMO. Tap the large
(shutter) button to cycle through each mode. The details of each mode are outlined below:
Mode 1 - Pan/Tilt:
This is identified by a Blue LED on the OSMO and is the default launch mode when
connecting FiLMiC Pro to an OSMO.
- The circular joystick button on the OSMO can be used in this mode to control panning and
tilting the OSMO.
- Double tap the trigger button to quickly reset the pan and/or tilt to default orientation.
Mode 2 - Reticles:
This is identified by a white LED on the OSMO. This mode offers the ability to lock and unlock
the focus and exposure reticles and perform slider pull capabilities:
- Press the circular joystick button to the left to lock the exposure reticle. Press left again to
unlock the exposure reticle.
- Should the manual exposure slider be enabled on the FiLMiC Pro screen then a tap to
the left on the circular joystick will engage the pull exposure to the top pull point. Tap
again to pull to the lower pull point.
- Press the circular joystick button to the right to lock the focus reticle. Press right again to
unlock the focus reticle.
- Should the manual focus slider be enabled on the FiLMiC Pro screen then a tap to the
right on the circular joystick will engage the pull focus to the top pull point. Tap again to
pull to the lower pull point.
Mode 3 - Manual Focus/Exposure:
This is identified by a magenta LED on the OSMO. This mode offers manual exposure and
focus adjustment:
- Slide the circular joystick left and right to control focus in and out.
- Slide the circular joystick up and down to control exposure (ISO) light to dark.
- Note that the speed of each adjustment will be determined by the position of the speed
slider for focus and exposure from the app. If you open the manual control capability on
screen and expose the pull speed control you can slide this up or down to adjust how
quickly the OSMO performs changes of focus and exposure.
FiLMiC Pro v6 User Manual, Page 31Settings Menu
Moondog Anamorphic 2.40:1 Adapter
Configures the app to de-squeeze footage shot using the Moondog Labs Anamorphic
Adapter. This lens was used to shoot the movie TANGERINE that was released theatrically in
the Summer of 2015.
Desqueeze Moondog Preview Only
This setting can be enabled when using the Moondog Labs Anamorphic Adapter if the
preference is to desqueeze video in post-production. The setting provides a desqueezed,
‘finished’ appearance for the video preview, however the recorded clip will remain in the
native squeezed state.
35mm Adapter / Image Flip
Use this setting to ensure that your video will be the correct orientation if using the Beasgrip
Pro DOF or similar lens adapter.
COVR Photo Lens
This setting enables support for COVR lens cases.
Purchase Gear
For more information on gear that the FiLMiC team has had good experiences using in the
field see: www.filmicpro.com/gear
FiLMiC Pro v6 User Manual, Page 32Settings Menu
Sync
The FiLMiC Sync capability offers the ability to synchronize your preset data to a cloud
storage account. This saves time and effort when applying presets to multiple devices as one
device’s presets can be synchronized to an account and then downloaded by any device that
logs in with the same credentials. This is especially handy to guard against lost presets
should you delete/uninstall the app or have an equipment failure. To use FiLMiC Sync:
1. Tap the signup button to create a Sync account. You may sign up with your name and
email address and a password, or optionally sign up using your credentials from
Facebook.
2. Once logged in simply tap the Sync button to synchronize any new presets or changed
presets presets between the app and your account. Note: Sync will only be performed
when the Sync button is pressed.
FiLMiC Pro v6 User Manual, Page 33Settings Menu
Community
Connect with FiLMiC Pro on Social Media. Check out our Website. Give us a review in the
App store. Direct link to this manual as well ways to get additional help with FiLMiC Pro via
our Support team and Contact Page.
Overview
The Overview panel is a useful single source of the app’s current configuration. It displays
resolution, frame rate, bitrate, hardware, audio and preset information currently applied in the
app.
FiLMiC Pro v6 User Manual, Page 34Settings Menu
Image Stabilization Torch
Enable this when capturing footage Tap on this to Info
hand held for more steady footage. If enable the Helpful information for your use of
you are using a tripod or stabilizing LED on your FiLMiC Pro: Includes links to app
gimbal turn this off. Image rear camera documentation, tutorials, FiLMiC
Stabilization is an on/off setting and as a constant Support and version/build information.
will automatically apply the highest light source.
level of stabilization supported for
the device and shooting
configuration. This option is Grid
independent of presets and will Enable the Rule of Thirds grid to help you line up
remain on or off until changed. your horizons or get your framing just right!
Camera Selection
Access your front (selfie)
camera or the wide, tele and
zoom options. (iPhone 7 Plus
Only)
FiLMiC Pro v6 User Manual, Page 35FiLMiC Library
The FiLMiC Library offer the most efficient way to review, edit and transport your FiLMiC
footage. Tap the button to open the Library.
Filter Copy
Filter your list of clips by resolution, Selected
Frame Rate, or Favorites. Delete Selected
Clip to
Camera Roll
Clip Select
Select one or more clips to upload or delete. Upload to Share Target
Favorite Filename
Tap the star in the thumbnail to easily mark a clip as a favorite. This The filename can be set using either
will apply a ⭐ at the beginning of the filename when transferred to a date/time stamp (default) or based on
computer, making it easy to find and work with your favorite takes. CMS. (See CMS section of this manual).
Resolution and Playback Frame Rate Clip Length (HH:MM:SS)
Audio format
File size
FiLMiC Pro v6 User Manual, Page 36FiLMiC Player
The FiLMiC Player is the quickest way to review a clip to see if you ‘got the shot’. Tap a clip
in the Library to open this clip in the Player. Tap the button to start clip playback.
Close
Close the Player and return to the camera view.
Trim
Use this to adjust the start and end points of your clip. This will save both the
trimmed and original clips.
Image Adjustment Sliders
A slate of tools to adjust exposure, contrast, white balance, saturation, and tint.
This will save both the filtered and original clips.
Down-sampling
This tool allows you to reduce the size and quality of your footage to assist with
transfer and archiving. This will save both the down-sampled and original clips.
Share Targets
Easily share your clip with any apps that support the iOS sharing framework.
Example: share to Facebook, Google Drive or iMovie.
Quick Share to Camera Roll
Tap this button to share the clip to the FiLMiC Pro folder in the camera roll.
FiLMiC Pro v6 User Manual, Page 37FiLMiC Watch App
This companion application is designed to allow an Apple Watch wearer
to view a live preview of the video from FiLMiC Pro, control the start and
stop of video recording as well as to pause and restart recordings while
in ‘Stitch Mode’.
The Apple Watch must be running watchOS 2 or higher and the iPhone
must be running iOS 10 or higher to use the FiLMiC Watch App.
Getting Started with the FiLMiC Watch App
Installing the Watch App
The Watch App is an installable component of FiLMiC Pro. If you have
an Apple Watch paired to your iPhone, and install FiLMiC Pro, the
watch component is available for install:
• Automatic Install - If you have enabled Automatic Install in the
Watch Settings App on your iPhone then the FiLMiC Watch app
will automatically install. This is found by tapping ‘General’, then
tapping ‘App Install’ in the Watch Settings App settings on your
iPhone. Enable or disable Automatic App Install.
• Manual Install - If you prefer to install Watch Apps manually the
above setting will be disabled. To install the FiLMiC Watch App
you will launch the Watch Settings App, scroll through the list of
apps until you see FiLMiC Pro. Enable the ‘Show App on Apple
Watch’ setting. The app will now install on your watch.
Launching the Watch App with FiLMiC Pro
Once installed, launch the app by tapping the FiLMiC logo on your Apple Watch. The FiLMiC
Watch App is designed to automatically connect to the paired iPhone’s version of FiLMiC Pro.
The FiLMiC Pro app on the iPhone must be launched manually. Allow 2-3 seconds for the
pairing process to complete. At this point the watch app and the FiLMiC Pro app on your
iPhone are ready to communicate with one another. (The launch sequence can be reversed
without issue)
FiLMiC Pro v6 User Manual, Page 38Using the Watch App with FiLMiC Pro
When paired with the FiLMiC Pro app on your iPhone, the watch app allows the wearer to
remotely call FiLMIC Pro’s start and stop functionality as well as preview the video feed, see
below for details:
Pre-Record State
Pause for Stitch Recording - Disabled until recording
commences
(See ‘Stitch Mode’ in Device settings earlier in this manual for more information)
Current Time
Video Preview
Initial Start of Recording - Tap to start recording
Active Recording State
Pause for Stitch Recording - Tap to pause recording
using Stitch Mode
(See ‘Stitch Mode’ in Device settings earlier in this manual for more information)
Active Recording State - Stitch Clip Paused
Paused Stitch Recording - Tap to resume recording using Stitch Mode
(See ‘Stitch Mode’ in Device settings earlier in this manual for more information)
Active Recording, Paused in Stitch Mode - Tap to stop recording
Tip:
- The Apple Watch display quickly goes to sleep to save battery. To quickly
return to the FiLMiC Watch app, set the watch to wake to the ‘Previous
Activity’ under the watch settings menu, general, wake screen setting.
FiLMiC Pro v6 User Manual, Page 39Tips and Tricks
Best practices when filming with
FiLMiC Pro
Before you start filming we recommend the following tips:
Be sure your device is fully charged.
Be sure you have plenty of free storage on your device. Pay close attention to storage and
stop any recording if a storage warning is presented or if the storage indicator is blinking red.
Ensure adequate light is present for your shoot. Poor lighting can contribute to the presence
of video noise and other quality issues.
Put your device into Airplane mode, as notifications can interrupt the recording process.
Saving footage to your computer via
iTunes (iOS only)
1. Connect your device via cable to your computer and launch iTunes.
2. You should see your device. Click on the button with the silhouette of your device.
3. In the list at the left click on 'apps'.
4. Now grab the scroll bar all the way at the right and scroll down past the list of apps to
show the file sharing section for the apps on your device.
5. Scroll until you see FiLMiC Pro. Click on this and it will display all of your clips (.mov files)
and other files that the app uses.
6. Select the clips you want to save to your computer, then click Save To… and select a
directory on your computer.
7. You can also delete any unnecessary clips from your device by selecting them and
pressing the Delete key on your keyboard.
Have a question that was not answered in this User Manual?
Please email us at support@filmicpro.com
FiLMiC Pro v6 User Manual, Page 40Appendix - FiLMiC Log (FiLMiC Log - Patent Pending) Abstract Filmic Log is a gamma function that protectively remaps linear (or linearized) raw image data buffers, enabling greater flexibility when grading footage in post-production. What is the purpose of a logarithmic remapper for low-bit-depth video? If there is an intention to correct or modify mobile-originated footage in post production, the raw data must be reorganized protectively before encoding. When footage is exposed properly, Filmic Log can preserve almost the entire tonal range of the raw buffer in the encoded medium. Filmic log is a composite curve whose spline is heavily influenced by a base-10 logarithmic function. Unlike most “flat” gamma profiles, Filmic log does not exhibit an exaggerated log shoulder. FiLMiC Pro v6 User Manual, Page 41
Luma Characteristics
The filmic Log function has been designed to expose an additional stop in the encoded media without
blackpoint/whitepoint modification. While Filmic Log is somewhat tolerant of underexposure, it is not
designed to correct footage that was intentionally underexposed.

Note that Filmic Log maintains natural looking gradation through the tonal range without inherent
modification of the blackpoint or the whitepoint respectively. However, there are platform-specific
controls in place that will crush basal gray if the dynamics of the video capture device do not support
the remap.

The default configuration of Filmic Log does not remap luma as aggressively as other logarithmic
solutions. An 8-bit color cube does not have enough data in its root sector to support an unmodified
logarithmic remap without producing undesirable artifacts1. The Filmic Pro application compensates for
this limitation by strictly maintaining the native blackpoint and whitepoint of the raw image buffer.
However, whitepoint/midpoint/blackpoint adjustments are still possible by way of a separate remapping
tool in the Filmic Pro application interface. Any adjustments that the user makes to whitepoint/midpoint/
blackpoint is concatenated with the log remapper into a single fragment shader and executed at
runtime in a 10 bit container2. The user is then able to determine how much the basal dynamics of a
scene are to be modified. With minor blackpoint and midpoint adjustments, it is generally possible to
capture the entire available dynamic range of the image buffer in the encoded media.

1   Artifacts include striping, chroma noise, and sparse-data noise
2
  This approach alleviates the need for destructive intermediate renders; Math is done in an 10 bit container, but
the output is still 8 bit
FiLMiC Pro v6                                                                           User Manual, Page 42
Chroma Characteristics
The Filmic Log pipeline remaps the chrominance of the linear
image-buffer before the gamma remap takes place. A Chromatic
conditioning stage is employed to achieve three objectives:

       1. Better emulation of the spectral sensitivity of color-negative
          film
       2. Protection against hue shifts consequent of gamma
          adjustment
       3. Minimization of chroma noise in critically underexposed
          regions of the image buffer

The chrominance remap is accomplished with a logarithmic
colorimetric (relative luminance) weight3. While the saturation
remap itself is logarithmic, it has a markedly different spline than
the subsequent gamma remap.

The saturation remap will increasingly desaturate the color as it approaches basal gray. Of particular
note, the Red, Green, and Blue channels are remapped separately with distinct weights. The red
channel desaturates at 9.333% IRE; the green channel desaturates at 4.888%; the blue channel
desaturates at 20.222%.

                                                                                 While this technique
                                                                                 effectively controls
                                                                                 chroma noise in
                                                                                 critically underexposed
                                                                                 regions of the image
                                                                                 buffer, blue-channel
                                                                                 dominant colors may
                                                                                 be rendered with a gray
                                                                                 cast when dramatically
                                                                                 underexposed.

                                                                                 Even though gamma
                                                                                 and saturation are
                                                                                 remapped separately,
                                                                                 Filmic Log introduces
                                                                                 no discernible hue
                                                                                 shifts above 15 IRE -
                                                                                 below which, saturation
                                                                                 simply decays along a
                                                                                 logarithmic spline.

3
    All remapping is done in an intermediate RGB colorspace
FiLMiC Pro v6                                                                   User Manual, Page 43
Gamma Remap Function
Using a fragment shader or a kernel, the gamma of the conditioned linear bitmap is conformed to the
Filmic Log spline. This remap is done in a 10 bit container and performed on a per-pixel basis.
The formula representing the Filmic Log curve is as follows:
y = 0.371 × (sqrt(t) + 0.28257 × ln(t) + 1.69542)
Where both y and t are scalars operating within a range of 0.0-1.0 representing a percentage
correlative to values in the intermediate color space.
Shader Based Approach
Filmic Log is was designed to be implemented with a GPU shader. Lookup tables require data point
interpolation and can result in unsatisfactory tonal gradation. As a consequence, Filmic Log is
computationally intensive.
Pre-encode Capture Pipeline
Three platform-specific capture pipeline variations are employed to ensure optimal buffer conditioning
and remapping before encoding.
FiLMiC Pro v6 User Manual, Page 44Minimizing Noise
To make filming at a base ISO range more practical, Filmic Log has been designed to be somewhat
tolerant of underexposure. Filmic Log can safely remap footage that is underexposed by -0.75 EV on a
reasonable gamut of recently manufactured mobile devices4. Devices with ⅓” class CMOS sensors5
typically have lower basal ISO’s than camera’s with larger dies. On these devices, it is not only
acceptable to shoot at a basal ISO, but it is preferable for two reasons:
Destructive Noise Reduction
Devices with ⅓” class camera modules tend to produce chrominance noise at relatively low
ISOs. Depending on the device, ISO levels as low as 2006 may automatically activate a spatial
or composite noise reduction pipeline. Spatial noise reduction is undesirable because
filamentous details (hair, grass, string), delicate textures (skin, fabric, paper), and color accuracy
will irreparably degrade. Alternatively, multi-frame composite noise reduction can result in
motion artifacts that cannot easily be repaired in post production. Filmic log is typically applied
after noise reduction if NR it is an immutable fixture of the device’s capture pipeline; it is
therefore best practice to keep ISO levels as low as practical to minimize the impact of on-
device NR.
Channel Divergent Noise
In a Bayer configuration, Red, Green, and Blue filtered photodiodes will manifest signal quality
variance at the same level of amplification. The green channel usually exhibits the least noise,
followed by the red and blue channels respectively. While this is true of all CCD and CMOS
photosensors, the smaller sensors found in mobile phones and tablets tend to express this
phenomenon more acutely - with the blue channel in particular falling off quite rapidly. By way of
example, an image with a noisier blue channel (captured at a medium-high ISO) may produce
skin tones that look unnatural even if chroma noise is superficially moderate. To minimize
chroma noise in underexposed regions of the buffer, Filmic Log employs a perceptual-
luminance weighted saturation remap that progressively reduces the saturation of critically
underexposed pixels. However, this will not repair color shifts that are a byproduct of moderate/
high ISO capture. The best practice is to shoot near a basal ISO to ensure accurate color
rendering.
Maximizing dynamic range
Some newer full-frame CMOS sensors offer
dynamic range that varies with ISO in a bell shaped
curve, peaking well past the base ISO. This is not a
characteristic of most mobile camera modules. With
mobile sensors, dynamic range peaks at (or very near)
base ISO and falls off rapidly from there. Be advised
that the total dynamic range of the sensor will be much
4 Verified on iPhone 7 & 6S series, Google Pixel, and Galaxy S7
5Some exotic mobile camera modules are manufactured with much smaller (or larger) sensors, however Filmic
Log has been specifically designed to remap images produced by ⅓” class dies
6
Noise reduction ISO threshold is variable based on device capability, software environment, and manufacturer
specification
FiLMiC Pro v6 User Manual, Page 45less than a dedicated still or video camera 7. While Filmic log has been designed to maximize the available
dynamic range of the image buffer, it cannot add dynamic range that is not there. To facilitate higher latitude
capture, Filmic Log can be safely underexposed by -0.75 EV, it is tolerant of -1.5 EV underexposure and
+1.25 EV overexposure.
Low Dynamic Range Shooting
To maximize total dynamic range in a low dynamic range scene, metering indirect ambient light
against an %18 reflectance gray card is appropriate. Slight underexposure may be required to
protect highlights.
Medium Dynamic Range Shooting
In a medium dynamic range scene, at least a portion of the composition will need to be
moderately underexposed. In this case, meter for the highlights8. In compositions where the
requisite under-exposure has resulted in nearly crushed blacks, the black point should be raised
slightly. If this does not recover enough information in the shadows, a shadow boost may be
employed. However, use the shadow boost tool sparingly as it can result in unwanted hue shifts and
gradation changes.
High Dynamic Range Shooting
In a high dynamic range scene use a spot meter to determine if the total dynamic range of the
environment exceeds 9-10 stops. If the scene does not exceed that gamut, consider raising the
black point slightly and use Filmic Pro’s luminosity map overlay to optimize the midtone/highlight
ballance.
If there are greater than 10 stops of dynamic range in the scene, some environmental controls will
be required to effectively shoot on a mobile platform:
Indoor Setting
If windows or television screens, are present, neutral density film will be required. If a
character is using an electronic device with a screen, turn down the brightness. If there is a
lighting fixture in the scene, replace the bulb with a low-lumen equivalent. Only after the
brightest light sources are moderated, should the global ambient lighting of the scene be
evaluated.
Outdoor Setting
For static scenes, a graduated neutral density filter may be required to compensate for the
brightness of the sky. Evaluate artificial light sources and external windows, applying the
same methodologies to them that you would when shooting indoors.
7 At the time of this writing, the camera modules in high-end, mainstream mobile phones can capture no more
than 10 stops of usable dynamic range without the aid of multi-sample compositing.
8
Alternatively, you may meter skin tones if a fair-complected subject in in the composition
FiLMiC Pro v6 User Manual, Page 46You can also read