Forehead thermometer with distance control User Manual - Microlife USA
←
→
Page content transcription
If your browser does not render page correctly, please read the page content below
Forehead
                 thermometer
                      with distance
                             control

User Manual

              NC200
              Non-Contact
              Thermometer
Important Product and Safety Information
Follow Instructions for Use. This document
provides important product information regard-
ing this thermometer. Please read this operation
and safety information thoroughly before using
the device and keep for future reference.
This digital infrared noncontact forehead thermometer is a
clinical thermometer using an infrared sensor to intermittently
detect human body temperature from the forehead. It is intended
for use within the home setting by adults, children and infants.
This device detects distance and automatically measures the
temperature when the correct measuring distance is achieved;
approximately 2 in. The thermometer may be used in either
direct or adjusted modes.
This thermometer IS intended to be used:
• In Adjusted/Clinical mode for self-measurement/monitoring
of human body temperature via the forehead, whereas the
person being measured may be the user/operator of the
device.
• Within a home healthcare environment.
• Adults
• Children
• Infants
• In Direct mode for measuring the temperature of objects.
This thermometer IS NOT intended for use with:
• Any other part of the body for obtaining clinical measurements
• Probe Covers
• Contraception
WARNING – Potentially hazardous situation that
if not avoided may result in serious injury or
death.
• Contact your physician in case of prolonged fever as this
requires medical attention, especially for young children.
• Self-measuring means monitoring, not diagnosis or
treatment. Under no circumstances should you independ-
ently alter the dosages of any medication prescribed by
your physician.
• Ensure that children are supervised around this medical
device; some parts are small enough to be swallowed.
• Keep batteries away from children; harmful if swallowed.
1• Be aware that a basic physiological effect called vasocon-
striction can occur in the early stages of a fever, resulting in
a cool skin effect. The measured temperatures using this
thermometer during this effect can, therefore, be unusually
low.
• If a measurement seems incorrect, is not consistent with
the patient’s finding, or is low, then repeat the measure-
ment every 15 minutes or double check the result by
another core body temperature measurement.
• Performance of this thermometer may be degraded if:
• used outside of its specified operation temperature
and humidity rating, or if stored outside of its
specified storage temperature and humidity rating.
Avoid storage in direct sunlight.
• the device is exposed to mechanical shock.
• the patient’s temperature is lower than that of the
ambient.
• the patient’s temperature is outside the specified
patient range.
• the tip/lens is dirty or damaged; ensure the tip/lens
is clean before using.
DO NOT:
• Use this device if you think it is damaged or anything
appears unusual (e.g. sporadic operation, open packaging
upon purchase).
• Dispose of the battery or device in fire; the battery may
explode.
• Use a metal tool to replace the battery; doing so may short
circuit the terminals.
• Attempt to recharge the battery as they are not recharge-
able.
• Run or walk while using this device.
• Open/modify this device; inaccuracy and/or harmful injury
may result
• Service the device when being used or when power is
supplied (other than changing batteries). No other
parts/components are accessible.
CAUTION – Potentially hazardous situation that if
not avoided may result in minor/moderate injury,
property damage, and/or damage to the device
• This device contains sensitive electronics components.
Avoid strong electrical or electromagnetic fields in the
2direct vicinity of the device (e.g., mobile telephones,
microwave ovens). These can lead to temporary impairment
of the measuring accuracy. Keep a minimum distance of 3.3
m from such devices when using or move the device to
another location if interference is determined.
• When not using the thermometer for extended lengths of
time, remove the batteries to avoid potential battery
leakage and damage to the monitor.
• Only open the thermometer battery cover to replace the
battery (when applicable). When replacing the batteries,
ensure all the batteries are replaced simultaneously to
avoid battery damage and potential damage to the monitor.
Microlife USA does not recommend using rechargeable
batteries.
• Batteries and electronic instruments must be disposed of in
accordance with the locally applicable regulations as
domestic waste.
DO NOT:
• Drop this device or expose it to strong vibrations; sensitive
components may be affected resulting in inaccuracies
and/or operational issues.
• Use the thermometer outside of its specified operation
temperature and humidity rating, or if stored outside of its
specified storage temperature and humidity rating. Avoid
storage in direct sunlight.
• Immerse in water or use abrasive cleaning agents for
cleaning. Follow instructions under cleaning.
This device has been Cleared by the FDA for use with infants.
Even so, doctors recommend rectal measurement for newborn
infants within their first 6 months.
STANDARDS
In addition to the standards stated in the Instruction Manual:
• This medical device is compliant with medical device and
thermometer standards AAMI/ANSI ES60601-1, ES60601-1-
2, AAMI/ANSI/ISO 14971, ISO 80601-2-56, and AAMI/ANSI
HA60601-1-11, and
• Electromagnetic standards IEC 60601-1-2 along with FCC
Part 15
3Test Protocol (for laboratory use)
1. Press and hold the START button for 10 seconds until the
unit beeps, then release.
2. Wait for the screen to stop showing numbers, turn grey,
and show dashes.
3. At that time place the thermometer into the blackbody and
press the start button to take the measurement.
TYPE
IP22: Protected against solid foreign objects of 12.5mm
diameter and greater. Protected against vertically falling water
drops when the device is tilted up to 15°.
Type BF Applied Part
SERVICE
When the device is not in use, battery/access (if applicable)
may be replaced by the user. No other parts/components are
accessible.
Batteries and electronic instruments must be disposed of in
accordance with the locally applicable regulations, not with
domestic waste.
It is recommended that this digital thermometer be checked for
accuracy every 2 years
Expected life of thermometer: 5 Years
FCC
This device complies with part 15 of the FCC Rules. Operation
is subject to the following two conditions: (1) This device may
not cause harmful interference, and (2) this device must accept
any interference received, including interference that may
cause undesired operation. Changes or modifications to the
product are not approved by Microlife USA and could void the
user's authority to operate the equipment under FCC jurisdiction.
This equipment has been tested and found to comply with the
limits for a Class B digital device, pursuant to part 15 of the
FCC Rules. These limits are designed to provide reasonable
protection against harmful interference in a residential installa-
tion. This equipment generates, uses and can radiate radio
frequency energy and, if not installed and used in accordance
with the instructions, may cause harmful interference to radio
communications. However, there is no guarantee that interfer-
ence will not occur in a particular installation. If this equipment
4does cause harmful interference to radio or television
reception, which can be determined by turning the equipment
on and off, the user is encouraged to try to correct the interfer-
ence by one or more of the following measures: 1) Reorient or
relocate the receiving antenna, 2) Increase the separation
between the equipment and receiver, 3) Connect the equipment
into an outlet on a circuit different from that to which the
receiver is connected, 4) Consult the dealer or an experienced
radio/TV technician for help.
56
Non-Contact Forehead Thermometer
Instruction Manual
Table of Contents

1. The advantages of your thermometer
2. Product overview
2.1. Diagram
2.2. Displays and symbols
3. Getting started
3.1. Setting date & time
3.2. Sound settings
3.3. Changing between body mode and object mode
3.4. Changing from fahrenheit to celsius
4. How to use
4.1. Measuring body temperature
4.2. Measuring in body mode
4.3. Self-measurement mode
4.4. Measuring in object mode
4.5. Additional controls
5. Viewing stored readings (memory)
6. Error messages
7. Care and maintainance
8. Replacing the battery
9. Limited warranty
10. Technical specifications
11. How to contact us

                                                  7
1. The advantages of your thermometer This Microlife thermometer is a high quality product incorporat- ing the latest technology and tested in accordance with international standards. With its unique technology, this device can provide a stable, heat-interference-free reading with each measurement. The device performs a self-test every time it is switched on to always guarantee the specified accuracy of any measurement. This Microlife thermometer is intended for the periodic measurement and monitoring of human body tempera- ture. This thermometer has been clinically tested and proven to be safe and accurate when used in accordance to the operating instruction manual. Measurement in a matter of seconds The innovative infrared technology can take a measurement without touching the object. This guarantees safe and sanitary measurements within 3 seconds. Auto measurement with distance control The thermometer can take a measurement automatically when it detects the distance from the object is appropriate, approx. 2” (5 cm). Multiple uses (wide range measurement) This thermometer offers a wide measurement range feature. The thermometer can be used to measure body temperature or surface temperature, such as: • Milk surface temperature in a baby's bottle • Surface temperature of a baby's bath • Ambient temperature Accurate and reliable The unique probe assembly construction, incorporating an advanced infrared sensor, ensures that each measurement is accurate and reliable. Easy to use • The ergonomic design enables simple and easy use of the thermometer. • This thermometer can be used on a sleeping child without disrupting them. • This thermometer is quick, therefore child-friendly. 8
Multiple reading recall
Users will be able to recall the last 30 readings when entering
the recall mode, enabling efficient tracking of temperature
variations.
Safe and hygienic
• No direct skin contact.
• No risk of broken glass or mercury ingestion.
• Completely safe for use on children.
• Cleaning of the probe can be done with an alcohol
moistened cotton tissue, making this thermometer
completely hygienic for use by the whole family.
High temperature alarm
10 short beeps and a red LCD backlight alert the patient that
he/she may have a temperature above 99.5 °F (37.5 °C).
Guidance system for self-measurement
A green self indicator light illuminates when the thermometer
is at an accurate distance, and a measurement will automati-
cally be taken.
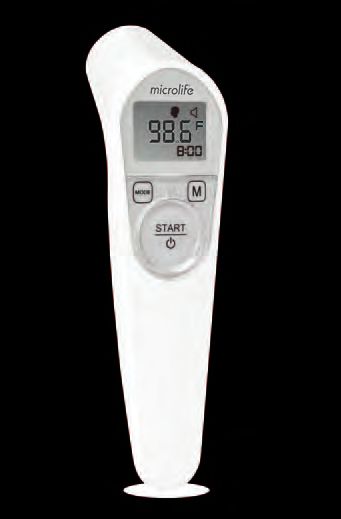
92. Product overview
2.1. Diagram
1. Measuring sensor
2. Tracking light
3. Self-indicator light
4. Battery compartment cover
5. Display
6. Memory (M-button)
7. Mode button
8. START I/O button
O
N
P
Q
R
S
T
U
102.2. Displays and symbols
LCD Display Area Description
All segments Press the START/IO
displayed button to turn on
the unit; all
segments will be
shown for 1 second.
Ready When the unit is
ready for measure-
ment, the «°C» or
«°F» icon will keep
flashing while the
mode icon (body or
object) will be
displayed.
Measuring A 3 second
countdown countdown will be
shown on the
display (3, 2, 1),
before each
measurement.
Measurement The reading will be
complete shown on the display
with the «°C» or «°F»
icon and the mode
icon steady. The unit
is ready for the next
measurement as
soon as the «°C» or
«°F» icon is flashing
again.
When the unit is
Low battery turned on, the
indication battery icon will
keep flashing to
remind the user to
replace the batteries.
113. Getting started
3.1. Setting date & time
1. After the new batteries are inserted, the year
will flash in the display. You can set the year by
pressing the M-button.
2. To confirm and then set the month, press the
MODE button.
3. Follow the previous instructions to set the
month, day, hours and minutes.
4. Once you have set the minutes and pressed the
START/IO button, the date and time are set and
the time is displayed.
• If no button is pressed for 20 seconds, the body
measuring
device automatically switches to ready for mode
measuring.
To cancel when setting up the time:
• Press the START/IO button during time setup.
The LCD will show Date/Time icons with «—
:—».
• Then press the START/IO button to start a new
measurement.
• If no further action is taken within 30 seconds,
the device will automatically turn off.
Change current date and time:
• Press and hold the MODE button for approx. 8
seconds until the year number starts to flash.
Now you can enter the new values as
described above.
3.2. Sound settings
1. Press and hold the MODE button for 3 seconds
to set the sound.
sound on
2. Press the M-button to turn the sound on or off.
The sound is activated when the sound icon is
shown without a cross.
• When the sound setting has been chosen, sound off
press the START/IO button to enter the «ready
for measuring» mode; otherwise the device will
automatically switch to ready for measuring
mode after 10 seconds. measuring
mode
123.3. Changing between body mode and object mode
Your thermometer’s default setting is body mode.
To change from body to object mode:
• Turn the thermometer on by pressing the
body
START/IO button. The display will show all measuring
segments for 1 second. mode
• Press the MODE button.
• To toggle between body and object mode, press
the MODE button again. object
measuring
3.4. Changing from fahrenheit to celsius mode
This thermometer can display temperature
readings in either Fahrenheit or Celsius.
• To switch the display between °C and °F, press
and hold the MODE button for 3 seconds; the
sound icon will appear.
• Press the MODE button again; the current
measurement scale («°C» or «°F» icon) will be
shown on the display.
• Toggle the measurement scale between °C and
°F by pressing the M-button.
• When the measurement scale has been
chosen, press the START/IO button. After 10
seconds, the thermometer will automatically
revert to the «ready for measuring» mode. measuring
mode
134. How to use 4.1. Measuring body temperature This thermometer measures infrared energy radiated from the forehead as well as objects. This energy is collected through the lens and converted into a temperature value. Before taking a measurement, try to remain in a steady-state for 30 minutes in the room. Activities like exercise and eating can affect your body’s temperature and should not be performed before/during a measurement, nor should a measurement be taken immediately after such activities. For the same reason, you should also not take a measurement during/immediately after nursing an infant. Always try to measure the same forehead location in order to obtain comparable measurements; while keeping in mind that body temperature changes through the day; highest in the evening and lowest about one hour before waking up. For reference, normal body temperature ranges are: •Axillar: 94.5 - 99.1 °F (34.7 - 37.3 °C) •Oral: 95.9 - 99.5 °F (35.5 - 37.5 °C) •Rectal: 97.9 - 100.4 °F (36.6 - 38.0 °C) •Non-Contact NC200 (FR1DG1): 95.7 - 99.4 °F (35.4 - 37.4 °C) Remember to remove the thermometer’s protective cover before starting. Once started, do not remove the thermometer from the measuring area until it has beeped; signaling that the measurement is complete. 14
4.2. Measuring in body mode
To measure a another person’s body temperature:
1. Press the START/IO button. When activated,
   the display will briefly show all symbols.
2. When the device is ready, «°C»/«°F» will flash,        body
   a blinking blue tracking light will appear, and      measuring
                                                         mode
   the thermometer will beep.
3. Hold the thermometer about 2 inches
   away, and aim it at the center of the
   forehead (5 cm). If the area is covered with
   hair, sweat or dirt, please remove the obstacle
   to improve the reading’s accuracy.
4. When the measuring sensor is an appropriate
   distance, the device will automatically start the
   measurement.
   The blue light will stop blinking and remain
   steady, the display will show a countdown (3,
   2, 1); after 3 seconds a long beep will verify the
   completion of measurement.
5. Read the recorded temperature from the LCD
   display.

                                          2”

                                                               15
4.3. Self-measurement mode
To measure your own body temperature:
1. Press the START/IO button. When activated,
the display will briefly display all symbols
2. When the device is ready, «°C»/«°F» will flash. body
measuring
3. Aim the thermometer at the center of your mode
forehead. A green light will appear when the
thermometer is within an accurate range,
approx. 2 in (5 cm).
4. The thermometer will beep when your measure-
ment is complete, and your temperature will be
displayed.
4.4. Measuring in object mode
To measure the temperature of an object (without
auto measurement):
1. Press the START/IO button. When activated,
the display will briefly display all symbols
object
2. Press the MODE button to switch to object mode. measuring
mode
3. When the device is ready, «°C»/«°F» will flash,
a blinking blue tracking light will appear, and
the thermometer will beep.
4. Aim the thermometer at the object you want to
measure with a distance of no more than 2” (5
cm). Press the START/IO button. The blue light
will stop blinking and remain steady. A long
beep will verify the completion of measurement.
5. Read the recorded temperature from the LCD display.
164.5. Additional controls
To take another measurement:
• Move the thermometer away from the forehead
and wait until the «°C»/«°F» icon flashes. Then
repeat steps 3-4 above.
To turn off the device:
• Press and hold the START/IO button for 3
seconds. The device will automatically switch
off after approx. 60 seconds
Notes:
A basic physiological effect called vasoconstriction can occur
in the early stages of a fever, resulting in a cool skin effect.
The recorded temperature using this thermometer can,
therefore, be unusually low.
If the measurement result is not consistent with the patient's
finding or is unusually low, repeat the measurement every 15
minutes or double check the result by another core body
temperature measurement.
In the following situations it is recommended that three
temperatures in the same location be taken and the highest
one taken as the reading:
1. Children under three years of age with a compromised
immune system and for whom the presence or absence of a
fever is critical.
2. When the user is learning how to use the thermometer for
the first time until he/she has familiarized himself/herself
with the instrument and obtains consistent readings.
3. If the measurement is surprisingly low.
175. Viewing stored readings (memory) This thermometer can recall the last 30 readings with time and date. To view stored readings (recall mode): • With the power off, press the M button. The memory icon «M» will appear. • Press and release the M button again to review the last reading. A «1» and «M» will appear, followed by the last reading. • Continue to press and release the M button consecutively to recall readings in succession, up to the last 30 readings. • Pressing and releasing the M button after the last 30 readings have been recalled will resume the above sequence from reading 1. 18
6. Error messages

LCD Display         Area         Description
                Measured         Displays «H» when
                temperature      measured temperature is
                too high         higher than 109.4 °F / 43
                                 °C in body mode or 211.8
                                 °F / 99.9 °C in object
                                 mode.

                Measured         Displays «L» when
                temperature      measured temperature is
                too low          lower than 93.2 °F (34.0 °C)
                                 in body mode or 32.2 °F
                                 (0.1 °C ) in object mode.

                Ambient          Displays «AH» when
                temperature      ambient temperature is
                too high         higher than 104.0 °F
                                 (40.0 °C).
                Ambient          Display «AL» when
                temperature      ambient temperature is
                too low          lower than 59.0 °F (15.0
                                 °C) in body mode or
                                 lower than 41.0 °F (5.0
                                 °C) in object mode.

                Error display    System malfunction.
                (0 & 6)

                Error function   The sensor is too close or
                display 2        touching object. Move
                                 the sensor 2” away from
                                 the object (5 cm). Do not
                                 touch sensor.
                Low battery      If the steady battery icon
                indicator        is the only symbol shown
                                 on the display, the batter-
                                 ies should be replaced
                                 immediately.
                                                                19
7. Care and maintainance To clean your thermometer’s casing and measuring probe, use an alcohol swab or cotton tissue moistened with alcohol (70% Isopropyl). Ensure that no liquid enters the interior of the thermometer. Take care not to scratch the surface of the probe lens and the display. Note: • Never use abrasive cleaning agents, thinners or benzene for cleaning • Never immerse the instrument in water or other cleaning liquids. • Do not store the unit under direct sunlight, at a high temperature, or in high humidity or dust. Performance may be degraded. 8. Replacing the battery This instrument is supplied with 2 new, long-life 1.5V, AAA batteries. Batteries need replacing when the battery icon is displayed alone. Remove the battery cover by sliding it in the direction shown. Replace all batteries at the same time with new batteries, ensure correct polarity as shown by the symbols in the compartment, and replace the battery cover. Never open the thermometer. This voids the manufacturer’s warranty. 20
9. Limited warranty
Your thermometer is warrantied 3 years by Microlife USA Inc,
against manufacturer defects for the original purchaser only,
from date of purchase.
This warranty applies to the thermometer only. Batteries are
not covered by this warranty.
The warranty does not apply to consequential and incidental
damages, or damage caused by batteries, improper handling,
and accidents. Professional use, not following the operating
instructions, and alterations made to the monitor or accessory
by third parties, are also not included in this warranty. Some
states do not allow the exclusion or limitation of incidental or
consequential damages, so the above limitation or exclusion
may not apply to you.
Microlife USA Inc will investigate your concern. A monitor or
accessory as defined by this warranty, determined to be out of
specification, will be replaced and shipped to you at no cost. A
monitor or accessory as defined by this warranty, determined
to be within specification, will be returned to you with a report
of findings, at no cost.
Please use the below customer service contact information to
reach Microlife USA Inc. regarding any warranty concerns. We
ask that you please contact us before sending any product back
in order to better identify, and more quickly process, your
concern.
This warranty gives you specific legal rights, and you may also
have other rights which vary from state to state.

                                                               21
10. Technical Specifications
Type: Non-Contact Forehead Thermometer NC200 (FR1DG1)
Measuring Range:
Body Mode: 93.2 – 109.4 °F (34.0 – 43 °C)
Object Mode: 32.2 – 211.8 °F (0.1 – 99.9 °C)
Accuracy
Resolution: 0.1°C/°F
Technical Characteristics: °C/ °F scale:
Measurement accuracy (laboratory):
±0.4, 95.0 ~ 107.6 °F (±0.2, 35.0 ~ 42.0 °C)
±0.5, 93.2 ~ 94.8 °F and 107.8 ~ 109.4 °F
(±0.3, 34.0 ~ 34.9 °C and 42.1 ~ 43.0 °C)
Display: Liquid Crystal Display, 4 digits plus special icons
Acoustic:
• The unit is turned ON and ready for the measurement: 1
short beep.
• Complete the measurement: 1 long beep (1 sec.) if the
reading is less than 37.5 °C (99.5 °F), 10 short «beep»
sounds, if the reading is equal to or greater than 37.5
°C (99.5 °F).
• System error or malfunction: 3 short «beep» sounds
Memory:
• 30 readings recall in the Recall Mode of both date and
time
Backlight:
• The display will glow GREEN for 1 second when the
unit is turned on.
• The display light will glow GREEN for 5 seconds when a
measurement is completed with a reading less than
99.5°F (37.5°C)
• The display light will glow RED for 5 seconds when a
measurement is completed with a reading equal to or
higher than 99.5°F (37.5°C )
Operating Temperature:
Body Mode: 59-104.0 °F (15-40.0 °C)
Object Mode: 41-104.0 °F (5-40.0 °C)
Relative humidity up to 95% (noncondensing)
Storage/transport Temperature:
-13 °F to 131 °F (-25 °C to +55 °C)
Automatic Switch-off:
Approx. 1 minute after last measurement
Battery: 2 x AAA, 1.5 V
22Expected service life: 5 years
Dimensions: 6.17 x 1.69 x 1.83 in (156.7 x 43 x 47 mm)
Weight:
3.2 oz (91.5 g) with batteries, 2.4 oz (68.5 g), w/o batteries
Technical modifications are reserved.
Made in China
2311. How to contact us Distributed by: Microlife USA 1617 Gulf to Bay Blvd Clearwater, FL 33755 Questions? Call Toll Free 1-800-568-4147 or email: custserv@microlifeusa.com 24
25
Termómetro sin contacto de la frente

Manual de Instrucción

Modelo #NC200 (FR1DG1)

26
Información importante y advertencias del producto
        Siga las instrucciones de uso. Este documento
        proporciona información importante sobre el
        producto y la seguridad referentes a este
        termometro. Lea este información de operación y
        seguridad cuidadosamente antes de usar el
        dispositivo y guárdelo para futuras referencias.
Este termómetro digital infrarrojo sin contacto para la frente es
un termómetro clínico que utiliza un sensor infrarrojo para
detectar de forma intermitente la temperatura del cuerpo
humano en la frente. Está destinado a ser utilizado en el hogar
por adultos, niños y bebés. Este dispositivo detecta la distancia
y mide automáticamente la temperatura cuando se alcanza la
distancia de medición correcta; aproximadamente 2 pulgadas.
El termómetro puede utilizarse en modo directo o ajustado.

Este termómetro ESTÁ diseñado para ser utilizado:
• En modo ajustado/clínico para la automedición/monitoreo
   de la temperatura del cuerpo humano a través de la frente,
   mientras que la persona a la que se mide puede ser el
   usuario/operador del dispositivo.
• En un entorno de atención de la salud en el hogar.
• Adultos
• Pediatría
• Infantes
• En modo directo para medir la temperatura de los objetos.
Este termómetro NO está diseñado para utilizarse con:
• Cualquier otra parte del cuerpo para obtener mediciones
   clínicas.
• Una cubierta de sonda
• Anticoncepción

                                                               27
ADVERTENCIA - Situación potencialmente
peligrosa que, si no se evita, puede provocar
lesiones graves o la muerte.
• Comuníquese con su médico en caso de fiebre prolongada,
ya que requiere atención médica, especialmente en los
niños pequeños.
• La automedición implica control, no diagnóstico ni
tratamiento. En ninguna circunstancia se debe alterar por
cuenta propia las dosis de cualquier medicamento recetado
por el médico.
• Asegúrese de que los niños estén supervisados cerca de
este dispositivo médico; algunas partes son lo suficiente-
mente pequeñas para ser tragadas.
• Mantenga las pilas lejos de los niños; son nocivas si se las
ingiere
• Tenga en cuenta que un efecto fisiológico básico llamado
vasoconstricción puede ocurrir en las primeras etapas de la
fiebre, lo que produce un efecto de enfriamiento de la piel.
Las temperaturas medidas con este termómetro durante
este efecto pueden, por lo tanto, ser inusualmente bajas.
• Si una medición parece incorrecta, no es consistente con el
hallazgo del paciente, o es baja, entonces repita la
medición cada 15 minutos o compruebe el resultado con
otra medición de la temperatura corporal central.
• El rendimiento de este termómetro puede verse afectado si
• se utiliza fuera del rango de temperatura y humedad de
funcionamiento especificado, o si se almacena fuera del
rango de temperatura y humedad de almacenamiento
especificado. Evite guardarlo en un lugar expuesto a la luz
solar directa.
• el dispositivo está expuesto a golpes mecánicos.
• la temperatura del paciente es menor que la del ambiente.
• la temperatura del paciente está fuera del rango especi-
ficado para el paciente.
• la punta/lente está sucia o dañada; asegúrese de que la
punta/lente esté limpia antes de usar.
NO:
• Utilice este dispositivo si cree que está dañado o algo le
parece inusual (por ejemplo, operación esporádica, el
envase estaba abierto al momento de comprarlo).
• Deseche la pila o el dispositivo en el fuego; la pila puede
explotar.
28• Utilice una herramienta metálica para reemplazar la pila; al
hacerlo puede provocar un cortocircuito en los terminales.
• Intente recargar la pila, ya que no es recargable.
• Correr ni caminar durante el uso de este dispositivo.
• Abra/modifique este dispositivo; pueden producirse
imprecisiones y/o lesiones dañinas
• Le dé mantenimiento al dispositivo cuando lo esté usando o
cuando se le suministre energía (excepto para cambiar las
pilas). No se puede acceder a otras piezas/componentes.
PRECAUCIÓN - Situación potencialmente
peligrosa que, si no se evita, puede provocar
lesiones menor o moderadas, daños a la propie-
dad y / o daños al dispositivo.
• Este dispositivo contiene componentes electrónicos
sensibles. Evite los campos eléctricos o electromagnéticos
en las inmediaciones del dispositivo (por ejemplo, teléfonos
móviles, hornos de microondas), ya que pueden ocasionar
la pérdida temporal de la exactitud de la medición. Manten-
ga una distancia mínima de 3.3 m de dichos dispositivos
cuando los utilice o traslade el dispositivo a otro lugar si se
determina que hay interferencia.
• Cuando no se utilice el termómetro durante un período de
tiempo prolongado, retire las pilas para evitar posibles
fugas y daños en el monitor.
• Solo abra la tapa de la pila del termómetro para reemplazar
la pila (cuando corresponda). Cuando cambie las pilas,
asegúrese de que todas las pilas se cambien simultánea-
mente para evitar daños en las pilas y posibles daños en el
monitor. Microlife USA no recomienda el uso de pilas
recargables.
• Las pilas y los instrumentos electrónicos deben eliminarse
como residuos domésticos de conformidad con los
reglamentos aplicables a nivel local.
NO:
• Deje caer este dispositivo ni lo exponga a fuertes vibracio-
nes; los componentes sensibles pueden verse afectados, lo
que puede dar lugar a inexactitudes y/o problemas de
funcionamiento.
• Utilice el termómetro fuera de su rango de temperatura y
humedad de funcionamiento especificado, o si se almacena
fuera de su rango de temperatura y humedad de almacena-
miento especificado. Evite el almacenamiento bajo la luz
directa del sol.
29• Lo sumerja en agua o utilice agentes de limpieza abrasivos
para la limpieza. Siga las instrucciones de la sección de limpieza.
Este dispositivo ha sido autorizado por la FDA para su uso en
bebés. Aun así, los médicos recomiendan la medición rectal
para los recién nacidos dentro de los primeros 6 meses.
NORMAS
Además de las normas establecidas en el Manual de instrucciones:
• Este dispositivo médico cumple con las normas de dispositi-
vos médicos y termómetros AAMI/ANSI ES60601-1,
ES60601-1-2, AAMI/ANSI/ISO 14971, ISO 80601-2-56, y
AAMI/ANSI HA60601-1-11, y
• Con las normas electromagnéticas IEC 60601-1-2 y con FCC
Parte 15
Protocolo de prueba (para uso en laboratorio)
1. Pulse y mantenga pulsado el botón START (inicio) durante
10 segundos hasta que la unidad emita un pitido, luego
suelte.
2. Espere a que la pantalla deje de mostrar números, se
vuelva gris y muestre guiones.
3. En ese momento coloque el termómetro en el cuerpo negro
y presione el botón de inicio para tomar la medición.
TIPO
IP22: Protegido contra objetos solidos extraños de 12.5 mm de
diámetro o más grandes. Protegido contra la caída vertical de
gotas de agua cuando el equipo está inclinado hasta 15 grados.
Pieza aplicada tipo BF
SERVICIO
Cuando el dispositivo no está en uso, el usuario puede
reemplazar la pila/el acceso (si corresponde). No hay otras
piezas ni componentes que sean de fácil acceso.
Las baterías y los instrumentos electrónicos deben desecharse
de acuerdo con la legislación local aplicable, no junto con los
residuos domésticos.
30Se recomienda verificar la precisión de este termómetro digital
cada 2 años.
Vida útil esperada del termómetro: 5 Años
FCC
Este dispositivo cumple con la Sección 15 de las normas de la
FCC. La operación está sujeta a las dos condiciones siguientes:
(1) este dispositivo no puede causar interferencias perjudiciales
y (2) este dispositivo debe aceptar cualquier interferencia
recibida, incluso las interferencias que puedan causar un
funcionamiento no deseado. Los cambios o modificaciones en
el productos no están aprobados por Microlife USA y pueden
anular la autoridad del usuario para operar el equipo bajo la
jurisdicción de la FCC.
Este equipo ha sido probado y cumple con los límites para un
dispositivo digital Clase B, de acuerdo con la Sección 15 de las
normas de la FCC. Estos límites están diseñados para propor-
cionar una protección razonable contra las interferencias
perjudiciales en una instalación residencial. Este equipo
genera, utiliza y puede irradiar energía de radiofrecuencia y, si
no se instala y utiliza de acuerdo con las instrucciones, puede
causar interferencias perjudiciales en las comunicaciones de
radio. Sin embargo, no hay garantía de que no se produzcan
interferencias en una instalación en particular. Si este equipo
causa interferencias perjudiciales para la recepción de radio o
televisión, lo cual puede determinarse apagando y encendiendo
el equipo, se recomienda al usuario que intente corregir la
interferencia mediante una o más de las siguientes medidas: 1)
reorientar o reubicar la antena receptora, 2) aumentar la
separación entre el equipo y el receptor, 3) conectar el equipo
en un tomacorriente en un circuito diferente al que está
conectado el receptor, 4) consulte al distribuidor o un técnico
experimentado de radio / TV para obtener ayuda.
31Termómetro sin contacto de la frente Manual de Instrucciones Índice 1. Ventajas de su termómetro 2. Descripción del producto 2.1. Diagrama 2.2. La pantalla y símbolos 3. Empezando 3.1. Ajuste la fecha y hora 3.2. Ajustes de sonido 3.3. Cambiando de modo entre cuerpo y objeto 3.4. Cambio de fahrenheit a celsius 4. Cómo utilizar 4.1. La medición de la temperatura corporal 4.2. Medición en modo de cuerpo 4.3. Modo de auto-medición 4.4. Medición en modo de objecto 4.5. Controles adicionales 5. Visualización de lecturas almacenadas (memoria) 6. Mensajes de error 7. Cuidado y mantenimiento 8. Sustitución de la batería 9. Garantía limitada 10. Características técnicas 11. Como contactarnos 32
1. Ventajas de su termómetro
Este termómetro Microlife es un producto de gran calidad que
integra la tecnología más avanzada y ha sido probado de
conformidad con los estándares internacionales. Gracias a la
tecnología única que incorpora, este termómetro permite
realizar las mediciones con total estabilidad y sin interferen-
cias del calor. Cada vez que lo ponga en marcha, el termómetro
realizará una prueba automática para garantizar la precisión
específica de las mediciones. Este termómetro Microlife está
diseñado para la medición y el seguimiento periódico de la
temperatura corporal.
Este termómetro ha sido clínicamente probado y ha demostra-
do ser seguro y preciso si se utiliza de acuerdo con las instruc-
ciones de este manual.

Medición en cuestión de segundos
La innovadora tecnología infrarroja puede tomar medidas sin
tocar el objeto. Esto garantiza una medición segura e higiénica
en 3 segundos.

Medición automática con control de distancia
El termómetro puede tomar una medida automáticamente
cuando detecta que la distancia del objecto es apropiado,
aprox. 5 cm (2”).

Usos múltiples (amplio nivel de medición)
Este termómetro ofrece un amplio nivel de medición. Este
termómetro se puede utilizar para medir la temperatura
corporal o para medir la temperatura de las superficies, como:
• Temperatura de la superficie de la leche en un biberón.
• Temperatura de la superficie del agua para el baño de un bebé.
• Temperatura ambiente.
Preciso y fiable
El montaje único de la sonda, que integra un sensor de
infrarrojos de alta tecnología, garantiza la precisión y fiabilidad
de cada una de las mediciones.
Fácil de utilizar
• El diseño ergonómico facilita el uso del termómetro.
• Este termómetro se puede usar en un niño dormido sin
  interrumpirlo.
• Gracias a la rapidez de la medición, el termómetro no
  resulta molesto para los niños.
                                                                 33
Recuperación de múltiples mediciones Se pueden volver a consultar las últimas 30 mediciones con fecha y hora al entrar en modo de recuperación, lo que permite realizar un seguimiento eficaz de las posibles variaciones de temperatura. Seguro e higiénico • Sin contacto directo con la piel. • Se elimina el riesgo de romper cristales o de ingerir mercurio. • Totalmente seguro para utilizarlo con niños. • La sonda de medición se puede limpiar con un algodón humedecido en alcohol, de modo que el termómetro se puede utilizar para toda la familia con total higiene. Alarma de temperatura alta Cuando el dispositivo emite 10 pitidos cortos y se enciende la luz LCD de fondo, el dispositivo indica al paciente que la temperatura es superior a 99.5 °F (37.5 °C). Sistema de orientación para la auto-medición Una luz verde de auto indicador se ilumina cuando el termóme- tro está una distancia precisa, y se realizará una medición automáticamente. 34
2. Descripción del producto

2.1. Diagrama
1. Sensor de medición
2. Luz de seguimiento
3. Luz de auto-indicador
4. Tapa del compartimento
    de la batería
5. Pantalla
6. Botón M (Memoria)
7. Interruptor de Modo
8. Botón START I/0 (Inicio)

                                  O
                                  N

                                  P

                                  Q

                              R

                              S
          T
                              U

                                      35
2.2. La pantalla y símbolos
Pantalla LCD Area Descripción
Aparición de Presione el botón O/I
todos los para poner la unidad
segmentos en marcha, aparecerán
todos los segmentos
durante 2 segundos.
Preparado Cuando el dispositivo
estará listo para
medir la temperatura
cuando el icono del
«°C» o del «°F»
parpadee; mientras
que el icono del modo
(cuerpo u objeto) se
muestra en la pantalla.
Medición en En la pantalla (3, 2,
cuenta regresiva 1) se mostrará una
cuenta regresiva de
3 segundos antes
de cada medición.
Medición La medición aparece-
terminada rá en la pantalla 4
con el icono «°C» o
«°F» y el icono del
modo seleccionado.
Cuando este icono
empiece a parpadear,
el dispositivo estará
listo para realizar otra
medición.
Indicación de Cuando se pone en
batería baja marcha el termóme-
tro, el símbolo de la
batería aparece
parpadeando para
recordar al usuario
que debe cambiar las
pilas.
363. Empezando
3.1. Ajuste la fecha y hora
1. Después de instalar las nuevas baterías, el
número del año parpadea en la pantalla. Ajuste
el año pulsando el botón M.
2. Para confirmarlo y ajustar a continuación el
mes, pulse el botón MODE.
3. Siga las instrucciones de arriba para ajustar el
mes, la fecha, las horas y los minutos.
4. Una vez que haya ajustado los minutos y
pulsando el botón START/IO, la fecha y la hora
quedan establecidas y se visualiza la hora.
• Si no se presiona ningún botón durante 20 Medición
segundos, el dispositivo cambia automática- en modo de
mente al modo de medición cuerpo
Cancelar el ajuste de la hora:
• Presione el botón START/IO durante el ajuste
de la hora. La pantalla mostrará los iconos
Fecha/Hora con «--:--».
• A continuación presione el botón START/IO
para comenzar la medición.
• Si no se hace nada durante 30 segundos el
termómetro se apagará automáticamente.
Cambiar la hora y fecha actuales:
• Mantenga pulsado el botón MODE durante 8
segundos aproximadamente hasta que el año
empiece a parpadear. Introduzca los nuevos
datos como se explica arriba.
373.2. Ajustes de sonido
1. Presione y mantenga presionado el botón
MODE durante 3 segundos para ajustar el
sonido. sonido
encendido
2. Presione el botón M para activar o desactivar
el pitido. El sonido se activa cuando se muestra
el icono sin una cruz.
sonido
• Cuando se ha seleccionado el ajuste del apagado
beeper, pulse el botón START/IO para entrar en
el modo «listo para la medición»; De lo contra-
rio el dispositivo conmuta automáticamente a
listo para medir después de 10 segundos. listo para
la medición
3.3. Cambiando de modo entre cuerpo y objeto
La configuración predeterminada de su termómetro
es modo de cuerpo. Para cambiar del modo cuerpo
al modo objeto:
• Encienda el termómetro presionando el botón Medición
START/ IO. La pantalla se activará y aparecerán en modo de
todos los segmentos durante 1 segundo. cuerpo
• Pulse el botón MODE
• Para alternar entre el modo cuerpo y objeto,
presione el botón MODE de nuevo. Medición
en modo de
objecto
383.4. Cambiar de Celsius a Fahrenheit
El termómetro puede mostrar los resultados de la
medición en grados Fahrenheit o Celsius.
• Para cambiar la pantalla entre °C y °F, simple-
mente apague el termómetro, presione y
mantenga presionado durante 3 segundos el
botón Mode, el icono del sonido se muestra en
la pantalla.
• Presione nuevamente el botón MODE; la escala
de medición actual (ícono «°C» o «°F») se
mostrará en la pantalla.
• Alternar entre la escala de medida entre °C y
°F presionando el botón M.
• Cuando se ha elegido la escala de medición,
pulsar el botón START/IO para entrar en el
modo «listo para la medición». El dispositivo
conmuta automáticamente a listo para medir listo para
después de 10 segundos. la medición
394. Cómo utilizar 4.1. La medición de la temperatura corporal El termómetro mide la energía infrarroja irradiada por la piel situada encima de la región de la frente al igual que de objetos. Esta energía es recogida por las lentes y convertida en un valor de temperatura. Antes de tomar una medición, intente permanecer en estado estable durante 30 minutos en la habitación. Actividades como el ejercicio y la alimentación pueden afectar a la temperatura del cuerpo y no deben realizarse antes/durante una medición, ni tampoco debe realizarse una medición inmediatamente después de dichas actividades. Por la misma razón, tampoco debe tomarse una medición durante o inmediatamente después de amamantar a un bebé. Intente siempre medir la misma ubicación de la frente para obtener mediciones comparables; teniendo en cuenta que la temperatura corporal cambia a lo largo del día; la más alta por la noche y la más baja alrededor de una hora antes de despertar. Escala de temperatura normal del cuerpo: • Axilar (bucal): 34.7 - 37.3 °C (94.5 - 99.1 °F) • Oral: 35.5 - 37.5 °C (95.9 - 99.5 °F) • Rectal (anal): 36.6 - 38.0 °C / 97.9 - 100.4 °F • Sin-contacto NC200 (FR1DG1): 35.4 °C - 37.4 °C / 95.7 - 99.4 °F Recuerde retirar la cubierta protectora del termómetro antes de comenzar. Una vez comenzado, no retire el termómetro de la zona de medición hasta que haya sonado un pitido, lo que indica que la medición ha terminado. 40
4.2. Medición en modo de cuerpo
Para medir la temperatura corporal de otra persona:
1. Pulse el botón START/IO. Cuando se activará,
   aparecerán todos los segmentos en la pantalla.
2. Cuando el dispositivo esta listo para la                 Medición
   medición, el icono «°C» o «°F» aparezca en la           en modo de
   pantalla, la luz de seguimiento azul parpadea y           cuerpo
   el termometro sueno con un pitido.
3. Sostenga el termómetro a unas 5 cm de
   distancia y apúntelo al centro de la frente
   (2”). Si el área está cubierta de pelo, sudor o
   suciedad, elimine el obstáculo para mejorar la
   precisión de la lectura.
4. Cuando el sensor de medición se encuentra a
   una distancia adecuada, el dispositivo iniciará
   automáticamente la medición.
   La luz azul dejará de parpadear y permanecerá
   estable, la pantalla mostrará una cuenta
   regresiva (3, 2, 1); Después de 3 segundos, un
   pitido largo verificará la finalización de la medición.
5. Lea la temperatura registrada en la pantalla LCD.

                                            2”

                                                                  41
4.3. Modo de auto-medición
Para medir su propia temperatura corporal:
1. Pulse el botón START/IO. Cuando se activará,
aparecerán todos los segmentos en la pantalla. Medición
en modo de
2. Cuando el dispositivo esta listo, el icono «°C» o cuerpo
«°F» aparezca en la pantalla.
3. Apunte el termómetro a su frente. Aparecerá
una luz verde cuando el termómetro esté
dentro de un rango preciso, aprox. 5 cm (2“).
4. El termómetro emitirá un pitido cuando se complete
la medición y se mostrará su temperatura.
4.4. Medición en modo de objeto
Para medir la temperatura de un objeto (sin
medición automática):
1. Pulse el botón START/IO. Cuando se activará, Medición
aparecerán todos los segmentos en la pantalla. enobjecto
modo de
2. Pulse el botón MODE para cambiar el modo de
objeto.
3. Cuando el dispositivo esté listo, parpadeará un
icono intermitente «°C»/«°F», aparecerá una luz
de seguimiento azul parpadeante y el
termómetro emitirá un pitido.
4. Apunte el termómetro al objeto que desea medir
con una distancia de no más de 2 " (5 cm). Presio-
ne el botón START / IO. La luz azul dejará de
parpadear y permanecerá estable. Un pitido largo
verificará la finalización de la medición.
5. Lea la temperatura registrada en la pantalla LCD.
424.5. Controles adicionales
Para tomar la próxima medición:
• Retire el termómetro de la frente y espere hasta que el
icono «°C»/«°F» parpadee. Siga los pasos 3-4 anteriores.
Para apagar el dispositivo:
• Mantenga presionado el botón START/IO durante 3
segundos. El dispositivo se apagará automáticamente
después de aprox. 60 segundos.
Notas:
Un efecto fisiológico básico llamado vasoconstricción puede
producirse en las primeras etapas de la fiebre, lo que da lugar
a un efecto de enfriamiento de la piel. Por lo tanto, la tempera-
tura registrada con este termómetro puede ser inusualmente
baja.
Si el resultado de la medición no es consistente con el hallazgo
del paciente o es inusualmente bajo, repita la medición cada
15 minutos o compruebe el resultado con otra medición de la
temperatura corporal central.
En las siguientes situaciones se recomienda tomar tres
temperaturas en el mismo lugar y tomar la más alta como
lectura:
1. Niños menores de tres años con un sistema inmunológico
comprometido y para los cuales la presencia o ausencia de
fiebre es crítica.
2. Cuando el usuario está aprendiendo a usar el termómetro
por primera vez hasta que se ha familiarizado con el instru-
mento y obtiene lecturas consistentes.
3. Si la medición es sorprendentemente baja.
435. Visualización de lecturas almacenadas (memoria) Este termómetro permite recuperar las 30 últimas mediciones de temperatura con un registro de fecha y hora. Para ver las lecturas almacenadas (modo de recuperación): • Cuando el dispositivo esté apagado, pulse el botón M. El icono de memoria «M» aparece en la pantalla. • Presione y suelte el botón M nuevamente para revisar la última lectura. En la pantalla, aparecerán «1» y «M», seguidos de la última lectura. • Continúe presionando y soltando el botón M consecutivamente para recuperar las lecturas en sucesión, hasta las últimas 30 lecturas. • Si pulsa una vez el botón M después de haber consultado las últimas 30 mediciones, la secuencia volverá a empezar a partir de la primera medición. 44
6. Mensajes de error

Pantalla          Area             Descripción
                  Temperatura     Muestra «H» en la
                  demasiado       pantalla cuando la
                  alta            temperatura sea superior
                                  a 109.4 °F / 43 °C en modo
                                  de cuerpo o 211.8 °F/
                                  99.9 °C en modo de objeto.
                  Temperatura     Muestra «L» en la
                  demasiado       pantalla cuando la
                  baja            temperatura sea inferior
                                  a (93.2 °F) en modo de
                                  cuerpo o 32.2 °F (0.1 °C )
                                  en modo de objeto.
                  Temperatura     Muestra «AH» en la pantalla
                  ambiente        cuando la temperatura
                  demasiado       ambiente sea superior a
                  alta            40.0 °C (104.0 °F).
                  Temperatura     Muestra «AL» en la
                  ambiente        pantalla cuando la
                  demasiado       temperatura ambiente
                  baja            sea inferior a 59.0 °F
                                  (15.0 °C) en modo de cuerpo
                                  o bajo de 41.0 °F (5.0 °C)
                                  en modo de objeto.

                  Pantalla de     Error del sistema.
                  Error
                  (0 & 6)

                  Pantalla de     El sensor está demasiado
                  Error 2         cerca o toca el objeto.
                                  Mueva el sensor a 2" de
                                  distancia del objeto (5
                                  cm). No toque el sensor.
                  Indicación de   Si este icono «batería»
                  batería         es el único símbolo que
                  agotada         se muestra en la
                                  pantalla, las baterías
                                  deben ser reemplazadas
                                  inmediatamente.
                                                          45
7. Limpieza y Conservación Para limpiar la superficie del termómetro y la sonda de medición, utilice un paño de algodón o algodón humedecido en alcohol (70% isopropílico). Asegúrese de que no entre líquido en el interior del termómetro. Tenga cuidado de no rayar la superficie de las lentes de la sonda ni la pantalla. • No utilice nunca productos de limpieza abrasivos, disolven- tes o benceno. • No sumerja el dispositivo en agua ni en ningún líquido de limpieza. • No almacene la unidad bajo la luz solar directa, a alta temperatura, con alta humedad o polvo. El rendimiento puede ser degradada. 8. Sustitución de la Batería Este instrumento incluye 2 baterías AAA 1.5V de larga duración. Las baterías necesitan ser rempla- zadas cuando el icono de la batería se muestra solo en la pantalla. Retire la tapa de la batería deslizándola en la dirección que se muestra. Reemplace todas las baterías al mismo tiempo con baterías nuevas, asegúrese de que la polaridad sea la correcta, tal como lo indican los signos en el compartimiento, y vuelva a colocar la tapa de la batería. Nunca abra el termómetro. Esto anula la garantía del fabricante. 46
9 Garantía limitada
Su termómetro está garantizado por Microlife USA Inc., por 3
años, por defectos de manufactura solamente para el compra-
dor original desde la fecha de compra.
La garantía de 2 años aplica solo al termómetro. Las pilas no
están cubiertas por esta garantía. Dentro de la unidad no hay
partes que le sirvan al usuario.
La garantía no aplica a daños consecuentes o incidentales, o
daños causados por las pilas o mal manejo y accidentes. Uso
profesional, no siguiendo el manual de instrucciones, y altera-
ciones hechas al monitor o accesorios por terceros, están
también excluidos en esta garantía. Algunos estados no
permiten la exclusión o limitación de los daños consecuentes o
incidentales. Por consiguiente dicha limitación o exclusión
puede que no apliquen en su caso.
Microlife USA Inc., investigará su reclamo. Un monitor o
accesorio definido por esta garantía, que se determine fuera de
especificaciones, será reemplazado y enviado sin costo para
usted. Un monitor o accesorio definido por esta garantía que
se determine estar dentro de las especificaciones, le será
devuelto con su respectivo reporte, sin costo.
Por favor usar la información de servicio al cliente de Microlife
USA Inc., para cualquier reclamo de garantía. Le solicitamos
por favor que nos contacte primero
Esta garantía le otorga derechos legales específicos, y usted
también puede tener otros derechos que varían de estado a
estado.

                                                                47
10. Características Técnicas
Modelo: Sin Contacto Termómetro de la Frente NC200 (FR1DG1)
Intervalo de Medición:
Modo de Cuerpo: 93.2 – 109.4 °F (34.0 – 43 °C)
Modo de Objeto: 32.2 – 211.8 °F (0.1 –99.9 °C)
Precisión:
Resolución: 0.1°C/°F
Características Técnicas: °C / °F escala:
Precisión de medición (Laboratorio):
±0.4, 95.0 ~ 107.6 °F (±0.2, 35.0 ~ 42.0 °C)
±0.5, 93.2 ~ 94.8 °F y 107.8 ~ 109.4 °F
(±0.3, 34.0 ~ 34.9 °C y 42.1 ~ 43.0 °C)
Pantalla: Pantalla de Cristal Líquido, 4 dígitos más símbolos
especiales
Acústico:
• El dispositivo está encendido y listo para ser utilizado:
emite un pitido corto.
• Lleve a cabo la medición: Sonará 1 pitido o bip largo
(1 seg.) si la lectura es inferior a 37,5 °C (99.5 °F), y
sonarán 10 pitidos o bips cortos si la lectura es igual
o superior a 37.5 °C (99.5 °F).
• Error del sistema o fallo de funcionamiento: Suenan 3
pitidos o bips cortos
Memoria:
• Memoria de 30 lecturas en el modo de memoria con
registro de fecha y hora.
Iluminación
• La pantalla se ilumina en VERDE durante 1 segundo
tras encender el aparato.
• La pantalla se ilumina en VERDE durante 5 segundos,
si se ha realizado una medición con un resultado
inferior a 37,5 °C (99.5 °F).
• La pantalla se ilumina en ROJO durante 5 segundos,
si se ha realizado una medición con un resultado
igual o superior a 37,5 °C (99.5 °F).
Temperatura operativa:
Modo de Cuerpo: 15-40.0 °C (59-104.0 °F)
Modo de Objeto: 5-40.0 °C (41-104.0 °F)
Humedad relativa de hasta 95% (sin condensación)
Temperatura de conservación y transporte:
-13 °F a 131 °F (-25 °C a +55 °C)
48You can also read