Front-end architecture for social media platform single page application - Huy Nguyen Thac Quang Bachelor's thesis Information Technology ...
←
→
Page content transcription
If your browser does not render page correctly, please read the page content below
Huy Nguyen Thac Quang

Front-end architecture for social media
   platform single page application
               Bachelor’s thesis

       Information Technology (T5616SN)

                    2021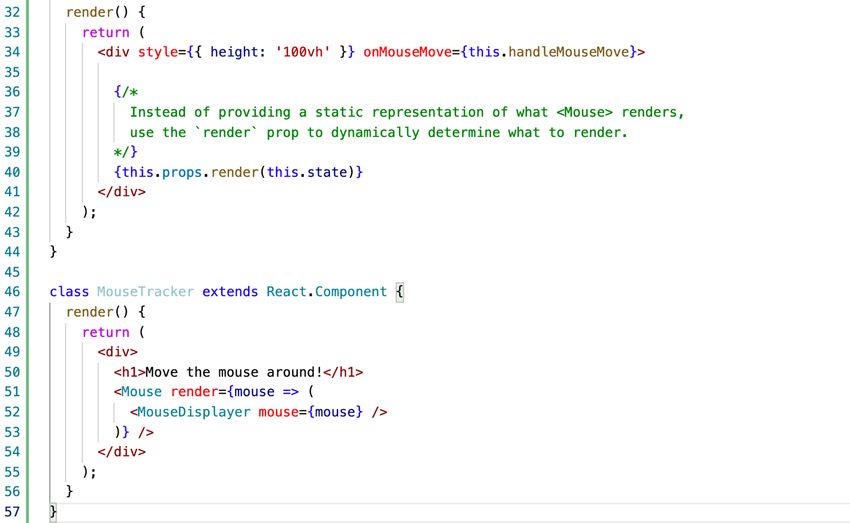
Author (authors)                             Degree title             Time

Huy Nguyen Thac Quang                        Degree Program in        May 2021
                                             Information
                                             Technology
Thesis title
                                                                    64 pages
Front-end architecture for social media platform single page
application
Commissioned by

Celenum Oy
Supervisor

Reijo Vuohelainen
Abstract

The thesis was started with two main purposes: research on trending web technologies to
determine which ones are the best fit to build a fast and scalable single page application.
to create a competent social media platform.

There has been a lot of demand for interconnectivity nowadays, therefore numerous
companies want to provide users with online platforms for users to share their ideas,
activities and shared interests, one of which was Pezzie Limited. The company came up
with an idea for a social media web application where pet owners and breeders can share
their pet’s (cats and dogs currently supported) profiles. Breeders need to have the ability to
advertise the pets and have access to potential buyers so they can grow their business.
Building such platform was not an easy task, especially with limited resources of a startup.
With lots of competitions around, the company needed their application up and running
fast, but also ready to be upscaled when users from all around the world are aware of the
product. Celenum Oy, a Finnish software outsourcing company was selected to handle the
technical implementation of the app and I, as the front-end specialist of the company, was
responsible for the front-end architecture of the application.

To decide on the technologies used in the project, several component-based libraries,
frameworks were studied such as AngularJS, VueJS, ReactJS. React stroke me as a light-
weight, easy to grasp and performant front-end library to build such application. Also, with
the help of a famous state management library Redux, the development tasks became
much easier to handle. Front-end code was compiled by webpack and eventually deployed
to AWS S3 bucket for internet access.

In conclusion, the technical choice for the project, which were React and Redux was
showing its effectiveness. The app was performant, smooth on UI, UX and easy to scale.
Keywords

front-end technologies, single page application, react-redux

                                                                                                 2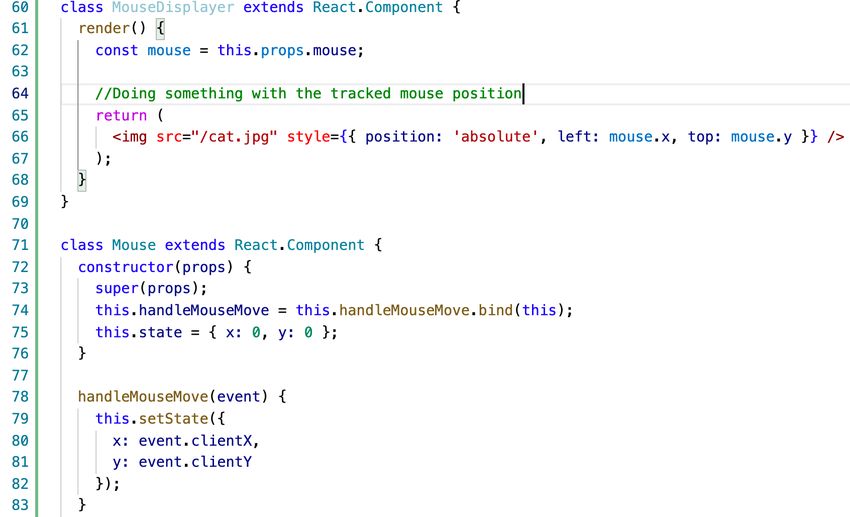
CONTENTS

1     INTRODUCTION ......................................................................................................................................................4

2     MAIN FEATURES OF THE APPLICATION....................................................................................................................4

    2.1       AUTHENTICATION AND AUTHORIZATION .......................................................................................................................... 4
    2.2       DATA STORAGE ON FRONT-END APPLICATION ................................................................................................................... 5
    2.3       TEXT TRANSLATION: .................................................................................................................................................... 5
    2.4       DEPLOYMENT ............................................................................................................................................................. 5

3     DEVELOPMENT TECHNOLOGIES ..............................................................................................................................6

    3.1       REACT ...................................................................................................................................................................... 6
    3.2       REDUX .................................................................................................................................................................... 17
    3.3       REDUX-OBSERVABLE .................................................................................................................................................. 25
    3.4       NODEJS, WEBPACK AND CREATE-REACT-APP ................................................................................................................... 29
    3.5       SASS ..................................................................................................................................................................... 30

4     IMPLEMENTATION IN THE APP.............................................................................................................................. 31

    4.1       AUTHENTICATION AND AUTHORIZATION FLOW ................................................................................................................ 31
    4.2       FOLDER STRUCTURE ................................................................................................................................................... 32
    4.3       DESIGN PATTERNS AND BEST PRACTICES IN REACT ............................................................................................................ 34
    4.4       MAIN FEATURES AND CHALLENGES IMPLEMENTATION ...................................................................................................... 40
    4.5       REACT PERFORMANCE OPTIMIZATION TIPS ..................................................................................................................... 56
    4.6       DEPLOYMENT: .......................................................................................................................................................... 58

5     CONCLUSION ........................................................................................................................................................ 61

                                                                                                                                                                                         3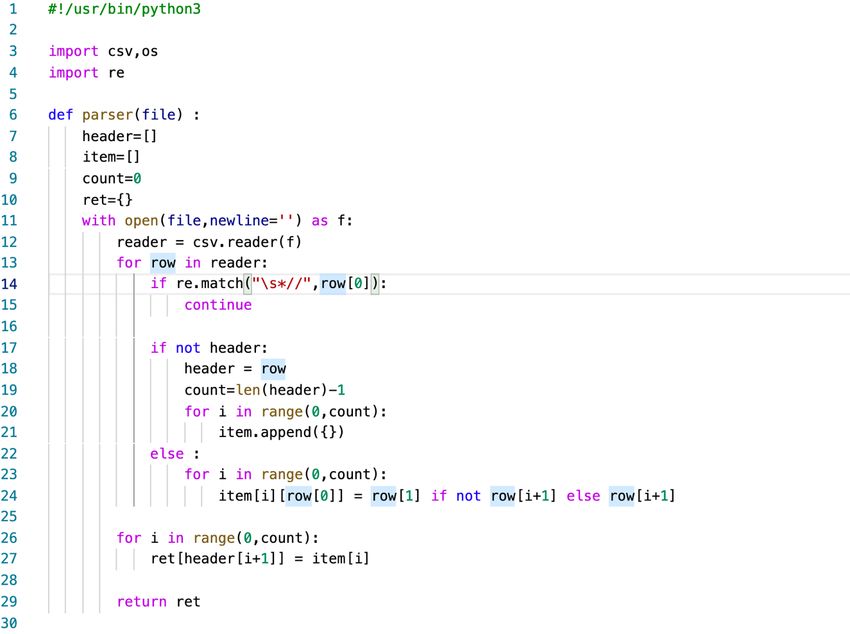
1     INTRODUCTION

With the growing in popularity and use cases of JavaScript nowadays, we, as
developers, have many tools at our hands to build performant web applications.
However, too many might not be good for someone who is new to the field, which
one should you use? Which one should be avoided? The answer is there is no
best technology for a project, only the best fit. In this thesis, I will try to explain the
concept and technical implementation of the app that I have been working on
over a year and hopefully, you will see how the smaller pieces connect and get a
better understanding of how to build the core features of a web application.
In the next chapter, I will go through the fundamental things that the app
provides. After that is a thorough discussion on the technologies used to build the
application. Lastly, I want to introduce to you some of the best practices and
development tricks to help you keep your codes organized, your app performant
and easy to scale.

With this paper, my goal is to show you the power of a relatively new front-end
library, ReactJS, with the help of another state management library, Redux, in
building a scalable single-page application. Also, with some additional design
patterns and optimization tricks, I hope you can find the usefulness in those and
apply to your own projects should you decide to go with the same technology
stack.

2     MAIN FEATURES OF THE APPLICATION

2.1   Authentication and authorization

Active users are what companies always try to acquire. To do that, the
application needs to provide a way for users to identify themselves and keep their
info protected. The most common ways to do this is with a combination of email
and password, which is exactly what I did in the project. Also, with the rising of
Google and Facebook (which already identifies users), we can sign users up with
the Facebook or Google credentials.

                                                                                         4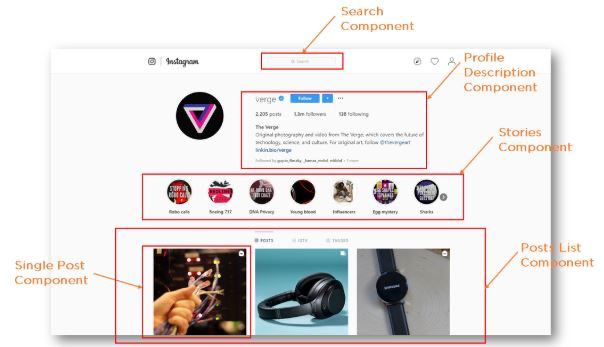
That’s the idea of authentication, authorization means that we provide specific
access to certain data and pages of the application to only allowed users. For
example, Pezzie application supports both paid and free users. We don’t want
non-paying users to freely type in the website url into the browser and have
access to the privileged page intended for paid ones. This is the concept that we
will discuss how to implement later on.

2.2   Data storage on front-end application

In order to keep the data that active users made, we store those in a database.
When our application wants to show them, it makes HTTP request to a backend
service to retrieve the data. However, that is not all we have to do. After
successfully getting the desired data, we also need a way to keep those data in
the browser for further manipulation. The task of storing data on the frontend side
can be cumbersome and some might even consider it similar to design a whole
new database. Luckily, we have some amazing state management tools that help
us deal with this problem.

2.3   Text translation

Although the app is mainly based in Finland, going internationally is the
company’s goal so we have to support multiple languages. In the initial stages,
Finnish and English are implemented. With the size of a social media platform,
we can imagine how many texts are on the screen at a time, too many, in my
opinion. The challenge to provide translation with almost all the texts with just one
button can however, be dealt with quite easily with some external libraries that we
can install.

2.4   Deployment

Last but not least, after hundreds of hours of coding, we want our application to
be available to users, which means, they can easily be accessed by typing in the
url in the browser and the page appears. In this project, I used an Amazon

                                                                                    5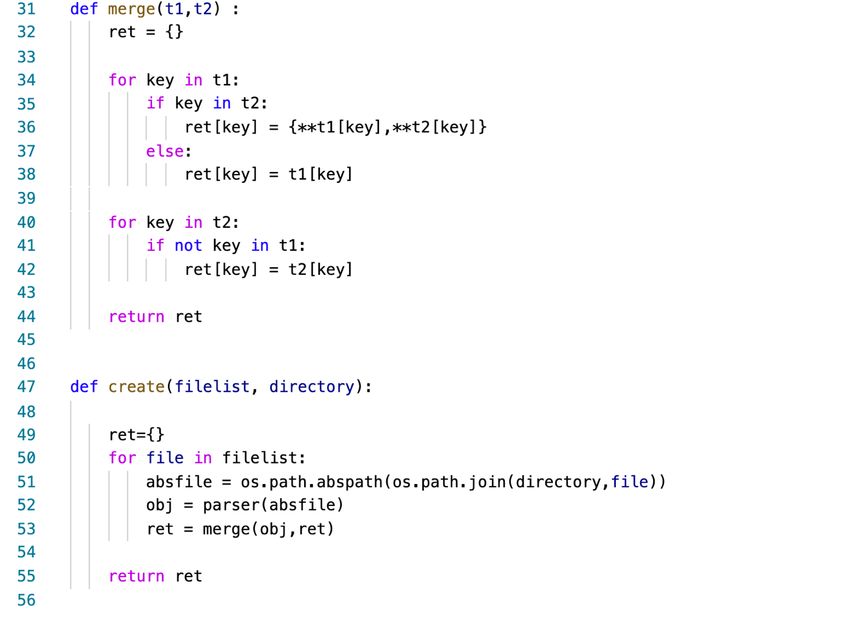
service called S3 where they host the code base, build the app and expose a
domain that can be easily reached by the browser.

3     DEVELOPMENT TECHNOLOGIES

Let’s start discussing the technical features of the application by talking about
how each tool I used connects together. First of all, since we are building a web
app based on JavaScript, we need an environment for JavaScript to run and
execute, NodeJS. Next, to write our UI components and render them on the
browser, we utilize the amazing JavaScript library, ReactJS. These components’
data are stored and managed in the browser by a state management library
called Redux that integrates very smoothly with ReactJS. Since we are building
the application for the web, styling those will require CSS. However, writing pure
CSS might be difficult to do so I chose to use a CSS processor called SASS, of
which details will be discussed later on. Lastly, all of our files are handled by
Webpack, a tool which takes our codes, turns them into small chunks of modules
which helps for code organization and optimization.

3.1   React

React is a JavaScript library used in web development to build interactive
components on websites (Sufiyan, 2021). It is used for handling the view layer of
a web or mobile application. It allows developers to build large application that
can change data, UI components without reloading the page. The most appealing
feature of React that I rely on is that we can divide the app into smaller chunks of
components. That way, it is easier to manage our codes as well as allows us to
reuse those components whenever possible. Let’s take a look at Instagram,
which was built entirely with React

                                                                                     6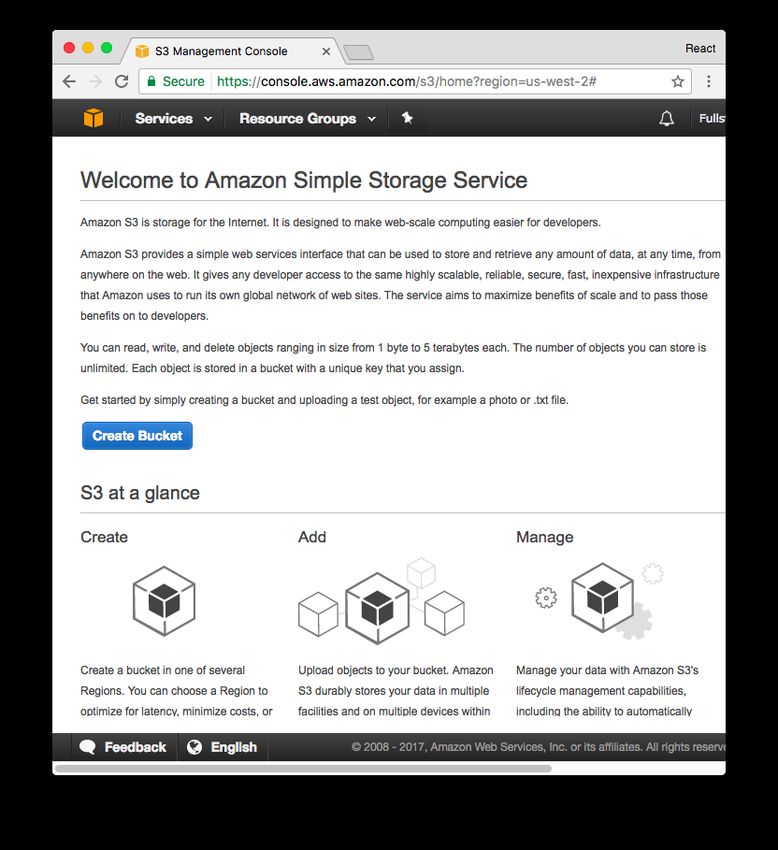
Figure 1 - Instagram with React

As you can see here, ReactJS allows us to not write the whole page in one go
with pure HTML and CSS (which is extremely long and hard to maintain in a large
application). We can break the UI into smaller components, build them in
separate files and combine those together to form the bigger screen or the reuse
the components whenever possible. Now let’s take a look at how to define a
component in ReactJS. In Figure 1 - Instagram with React, We can see that the
UI is divided into smaller pieces for components. The ‘Post List Component’ can
be, for example, reused in other pages of the application.

                      Figure 2 - How to create a React Component

Here we have a so-called Class-based component Hello (we will talk about
component types of React later in the paper). This is a class that extends the
                                                                                  7
Component Class from React. The content that we want on the browser is what
is returned from the render() method. The example simply renders a div with
content ‘hello world’. Finally, we add the component to the UI by calling
ReactDOM.render().
Now, imagine the component gets more complicated, we want a  and a
tag under the .

                             Figure 3 - React without JSX

One can see how quickly this can get out of hand. We can’t build big components
by this syntax without wasting time. That is why JSX was born.

3.1.1 JSX

JSX stands for JavaScriptExtended. It is basically a syntax that extends JS so
that XML/HTML syntax can co-exist with JavaScript (Facebook Inc, n.d). Let’s
modify our earlier example to use JSX syntax instead of JavaScript.

                              Figure 4 - React with JSX

                                                                                 8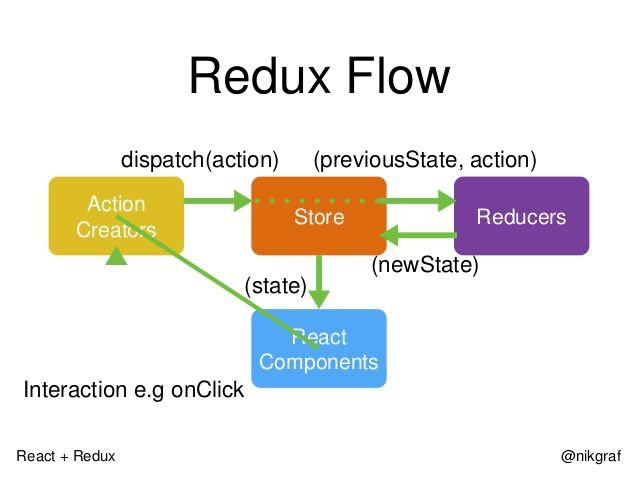
Compared to Figure 3 - React without JSX, this is way more convenient and time-
saving for developers. We save a lot of syntax redundancy and it is also easier to
read the code. Under the hood, JSX is used by a compiler (React uses Babel).
Babel turns JSX to pure JavaScript that we have seen before but since we have
Babel, we have a much more easy-to-handle syntax to work with. JSX also
allows us to assign HTML to variables, do condition checking and other JS
operators on HTML which helps bringing logic into our components.

                          Figure 5 - JSX with conditional logic

3.1.2 Component types

We briefly discussed how to define a component in React but now let’s take a
step further. There are two most common component types in React and they are
very different in how they work, Class Component and Functional Component.

3.1.2.1 Class Component

                                                                                 9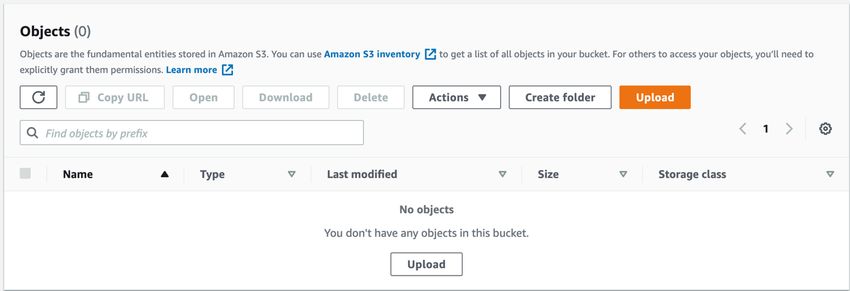
As the name suggests this type of component is class based, quite similar to the
concept of class from other object-oriented-programming language

                            Figure 6 - React Class Component

The most important feature about a class component is its lifecycle methods,
which are the methods that are run when React puts a component on the
browser. There are 3 phases in the life of a React component, initializing (before
it appears), updating (when a change happens, ReactJS calculate the change
and decide what to modify the UI) and unmounting (the component is erased). In
each phase, certain methods (constructor, componentWillMount,
componentDidMount, render, shouldComponentUpdate, componentDidUpdate
and componentWillUnmount) are called and in a specific order. Let’s discuss
more about these 7 methods that are available to us.
In the first phase, initializing (or mounting phase), constructor is run first to set up
the properties for the class. For example, in the code snippet, I set the class’s
‘state’ to be an empty object (we will study about state and props in the next

                                                                                      10
section). However, anything that we want to utilize later can be defined here too.
Next, it will run componentWillMount and then render, which is exactly when the
component gets rendered on the browser.
In the updating phase, which happens when state and props of a component
change, React first runs shouldComponentUpdate, if this method returns false,
React does nothing and the component stays the same, otherwise, it rerun
render and finally componentDidUpdate.
ComponentWillUnmount is called right before the component gets removed from
the screen.
All these methods are a great way for developers to monitor and get control of
the component. For example, a very common data flow of a component is:
Before Prepare data Show data in
component the component
appears
Figure 7 - React Component
data flow
With all the lifecycle methods at hand, inside componentWillMount, we can make
a HTTP request to get the desired data, store it inside this.state and use it inside
render.
Another use case for these methods could be for animation where we can
calculate component’s width, height, position and manipulate them accordingly.
3.1.2.2 Functional Components
This type of function is simpler to use but less powerful in my opinion because we
don’t have access to those lifecycle methods. It is just a normal JavaScript
function that returns a React component (Figure 8 - React Functional
Component). For example
11Figure 8 - React Functional Component
3.1.2.3 Parent and Child component
Much like with HTML where we can nest elements inside each other, we can do
that with React Component too.
Figure 9 - Example of component nesting
Parent and Child are just React Components that are taken from other files and
we can display them inside Hello Component.
3.1.3 State and Props
We have been thoroughly studying on how to create a component in ReactJS.
However, a big piece in the picture is still missing. Where do we store the data,
12how to pass data from this component to each other? This section should clear
that for you.
React introduces 2 ways to store and pass data around with state and props.
State is nothing but a variable, initialized and managed by one component. We
have seen in Figure 9 - Example of component nesting that ‘this.state’ is an
object that holds the most information of Hello Component. React detects
changes in this piece of data and decides whether to rerender the component.
One thing to note about changing the value of state. State in React should be
immutable, meaning that we should never change the value of state directly. For
example, modifying state by doing state.change = ‘change’ is a bad practice.
When doing comparison of state, React does a shallow comparison, which
means the library checks the reference point in the memory of the variable, since
we are modifying the state variable directly, to React, it is still the same one,
hence, no rerendering will be made.
Instead, a React component has access to a method called setState for state
manipulation.
Figure 10 - Example of setState
The new object that is passed to setState will be our new state, React sees this
as a change and have the component rerender.
13We have seen that component nesting is available to us in React (see Figure 9 -
Example of component nesting). When the Child component needs to be aware
of some data in Parent, we can pass down that data like so
Figure 11 - Passing data to child component
By doing this, inside Child, we can access data via a property called ‘props’.
Figure 12 - Accessing data with props
3.1.4 React is unidirectional data-flow
Now that we are aware of the possibility to nest component, let’s talk about the
way data flows.
14Figure 13 - React data flow
In React, unlike Angular, it has one-way data-binding. It means that data (state
for example) inside a component can only be manipulated by that component
only (line 7, Figure 13 - React data flow), if others have access to the data, it is
read-only. Parent can pass props to Children. In order to change the value of the
variable, we do that at the Parent level and pass down the handle function to
Child so Child can execute the function. (Denhub, 2017)
In my opinion, this design pattern is better than Angular since it is easier to debug
when something strange happens, we know exactly where in the code the bug
was caused.
153.1.5 Virtual DOM
Figure 14 - Browser DOM
The figure above represents the way the browser handles its elements. The tree
consists of objects that contain the relation information between the UI elements.
Browser can add new element to the tree, make changes to the existing ones
however, directly modifying the DOM is a costly task, it requires recalculating the
whole tree and create a new one to update what we see on the browser. React,
on the other hand, is famous for its performance in updating the UI. This is
achievable because it utilizes a virtual DOM. For example, a webpage that has a
list of 100 to-dos, when user decides to change the value of one to-do, with the
old technologies, the browser had to rebuild the whole 100 list of to-dos, which
lead to performance hit. To address this, React came up with the idea of virtual
DOM.
It stores the DOM state in memory and it is a representation of the real DOM.
When there’s a change in JSX, it updates the virtual DOM first, this does not cost
much since it does not draw anything on the screen, React then compares the 2
states and only draws the difference on screen. This greatly improves
performance.
163.2 Redux
Redux was introduced in 2015 as a centralized state management library. It
works with any UI layer, not just React (Abramov, n.d). However, it happens to
solve a problem that React fails to handle, data sharing in nested components.
Imagine you have a component tree like this.
Figure 15 - React component nesting nightmare
When the inner most Child wants to get data from Parent, we will have to pass
props down to every inner Child making the code extremely bulky.
Redux was born to address this. It provides a common place to store our data
and keep it in sync among the whole application. It also exposes a Higher Order
Component (which we will discuss later) that we can use to wrap around any
components that want access to the shared data.
17Figure 16 - Accessing Redux state
We will discuss thoroughly about the flow and how to set up Redux in the
application in the next chapter. For now, please notice that our App Component
can have access to ‘user’ through props (props.user). ‘user’ is a piece of data
from Redux, where we store the information that we want to make easily
accessible by any React components. Unlike Figure 15 - React component
nesting nightmare, Child component does not need Parent to pass down data,
any nesting level can have access to the Redux state, which helps us saving time
writing the code and also easier to debug when something unusual comes up.
3.2.1 Redux data flow
To understand the dataflow in Redux, we need to discuss about the terminology
of Actions, Reducers, store and dispatch
Imagine a scenario where user has logged into the application, we make an API
to retrieve user’s data such as name, age, country. This information is predicted
to show up in many places in the app so we need a place to store it and expose it
to the component easily. Redux is the perfect tool for that.
18Figure 17 - Redux state example
Let’s say this is the format that we want to store the information inside the
application state. Notice that our ‘user’ object is inside ‘AppReducer’ object.
AppReducer acts like an address so we can easily find user later on, the name
can be customed to anything that we want, it is just best practice to name this
‘address’ SomethingReducer.
3.2.1.1 Reducer
I will gradually explain how Redux is set up since it comprises of multiple
elements. Let’s first look at what is a reducer. A reducer is just a JavaScript
function, what it returns will be the new state in our Redux store.
Figure 18 - Reducer function example
19Looking at the snippet, we can see that reducer acts like a listener. It returns
values (which will reflect in Redux state) based on property ‘type’ that belongs to
an ‘action’. Also, in line 6 in Figure 18 - Reducer function example, I extract ‘user’
from action.payload. This indicates where get often get data to update the state,
action.
3.2.1.2 Action
An ‘action’ is a plain JavaScript object that must have a type and usually comes
with a payload. This can be considered as an event that happened in an
application. Let’s take for example the case when we finished getting user data
from the API, we want to update the state. We knew that we have reducer to
manipulate the state, we just need a way to tell reducer what ‘type’ of event
happened and what data should be put into the state (this data, as a best
practice, comes under action.payload)
Figure 19 - Action object example
In short, an action acts as an informer for reducer. It is used to tell reducer when
and what to update our state.
3.2.1.3 Dispatch
Although we have ‘action’ to carry all the information that reducer needs to
update state, it is just a JavaScript object after all, it does not do anything. We
20would need a function that when executed, lets reducer aware of the ‘action’.
Redux library provides us that function, which is called ‘dispatch’ to use in our
React component.
3.2.1.4 Store
With all the small parts explained, let’s finally set up our Redux store and apply it
into the architecture.
Figure 20 - Redux store creation example
In this file, we are actually creating the Redux ‘store’ object that contains all the
state that we want Redux to manage for us. ConfigureStore is a function that we
get from Redux library. It takes an object, whose keys are defined by developers
and values as reducers. Each reducer will result in a piece of the Redux state.
With all the steps, here is what our Redux state will look like (an object with the
first key = AppReducer whose value is an empty object). Notice in Figure 20 -
Redux store creation example, the ‘reducer’ returns {} (an empty object) in side
‘default’, that is why our Redux state is an empty object in its initial stage.
21Note that our reducer AppReducer returns empty object by default and since no
actions have been fired, empty object is the value of the key ‘AppReducer’ in
Redux state object. Later on, if an action of type ‘ADD_USER’ is made, the
reducer AppReducer will update the state accordingly.
To make this store available to React Components, we need the last step in our
setup. Redux exposes a React Component that takes the ‘store’ that we just
created as props, any components that want access to the store must be nested
inside this Redux Component. For my case, since I want the store to be available
everywhere in the application, I nested all my components inside it.
Figure 21 - Redux Provider
This snippet is located in the top-level entry file of the application. App is the
most-outer parent Component of the application so I put it inside so
all of my components will have access to the store.
Our Redux set up is complete, now let’s take a look at how a component can
access the store and update it at will.
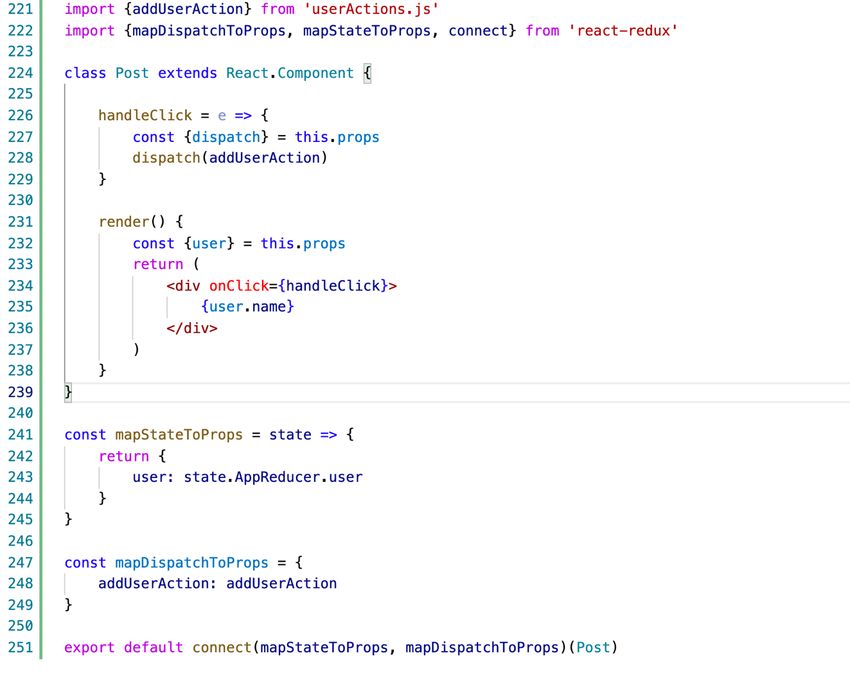
22Figure 22 - Access Redux state from Component
First, notice at line 227 and 232, we can see that ‘dispatch’ and ‘user’ are
available to the component by accessing this.props. This is achievable thanks to
the function ‘connect’ (which is imported from the library) and the function
mapStateToProps. ‘connect’ is function that returns another function. This new
function takes in a React Component (in our case, Post) and pass the data that
Redux generates down to Post. That is why Post can now have access to
‘dispatch’ through this.props. ‘connect’ also have 2 other parameters,
mapStateToProps and mapDispatchToProps. mapStateToProps is the piece of
code that gives our component the ability to extract data from Redux store. When
we pass mapStateToProps to ‘connect’ function, the library exposes the Redux
state to us by passing it to mapStateToProps function, what is returned from
mapStateToProps is then available to the component by extracting this.props.
The last piece of Redux is mapDispatchToProps. It is an object with keys and
values as ‘action’ that we define earlier (addUserAction). With this object passed
23to ‘connect’, we can now execute ‘dispatch’ (which is a function) on the ‘action’ by
calling dispatch(addUserAction). Doing so will trigger the action ‘ADD_USER’,
our reducer listens to this action and update the Redux state accordingly.
Looking at our addUserAction, it is an object which has a ‘payload’ of which
content was hardcoded {name: ‘John’, age: 18}. This works for our Redux
example, however, that is not exactly what usually happens in a real-life
application. We often want to fetch data from other resources and dynamically
update this in Redux state. In order to do that, we can change our addUserAction
(which is an object now) to a function that takes in the data and returns an object
(since Redux ‘action’ mush be object). In Redux term, we call this function an
‘Action creator’.
Figure 23 - Action creator
Compared to Figure 19 - Action object example, we can see that the action
creator gives us the ability to pass data around easily. With this approach, we can
now execute our action as dispatch(addUserAction(data)) to pass dynamic
content to reducer.
Let’s review the overall Redux flow by this diagram and discuss how it applies in
the Figure…
24Figure 24 - Redux data flow
Whenever we want changes to Redux state, we dispatch an action, which
contains a type and the data that Redux needs to update. Our reducer listens to
this action, takes the data and update the state. After the state changes, React
calculates if this change affects the component and updates the UI. In our code
snippet in Figure…, the function handleClick is executed when user clicks on the
element. Inside the function, we call dispatch(addUserAction) to update
Redux state.
3.3 Redux-observable
We have been taking about fetching data from other source and display in our
application. These tasks are not done instantly, it takes time to load and we call
this asynchronous data. We need a way to wait for it to be completed before
doing other things in our code. That’s where redux-observable comes in. It is
what we call a Redux middleware, which means it acts as a middleman between
25our ‘action’ and ‘reducer’. When an ‘action’ is active, the middleware is aware of
it, do things we tell it to do (deal with asynchronous data for example), and
optionally, fire other ‘action’ so ‘reducer’ can update.
However, before we dig deeper into redux-observable. Let’s first get ourselves
with the concept of reactive program, a new pattern that redux-observable relies
heavily on.
3.3.1 Reactive programming
At its core, the concept is programming with asynchronous data stream. This is
actually nothing new to the development world. Your everyday click on the
browser is an asynchronous event stream, which the browser listens (or in a
more topic-related term, we call it, observes) and does some side effects.
Reactive takes this concept and brings it to a broader scope: almost anything can
be turned into stream and observed to (variables, caches, or as we mentioned
above, API calls to other services) (Praveen, 2020).
Figure 25 - Reactive programming
A stream is basically a sequence of ongoing events ordered in time. It can emit 3
things: a value, an error, or a ‘completed’ status. We can observe these events
and define a function that executes when a value is emitted. The action listening
26to these events are called subscribe. The functions that we define are
observers and the stream that we subscribe to is called observable.
With this in mind, we are ready to move on to discuss Redux-obsevable.
3.3.2 Redux-observable
With reactive-programming, we have known that anything can be turned into
stream and subscribed to, so Redux-observable applies this into Redux. Turning
our Redux ‘actions’ into observable data gives us the ability to detect when an
action is fired and react to the event by making API requests, enable a loader
screen and finally (optionally) update Redux state.
We already have the observable data stream but now to subscribe to it, we need
an observer, in Redux-observable, we call it epic (Salter, 2016). It is a place
where we do all the side effects that we wish in case a Redux action is fired. In
here, we have access to various operators from reactive programming (a library
called Rxjs) to manipulate the observable stream. (Anthony, 2020)
Let’s see how this technology helps us deal with some API calls.
Figure 26 - Redux-observable epic
27In this snippet, we filter the ‘action’ has the type ‘fetchData’, which means only
when that action type is emitted, we do the following codes. Then we turn that
‘action’ stream into a new stream by calling ‘map’, this stream now contains an
API call which was returned from fetchAsyncData. MergeMap allows us to wait
for the request to complete, before returning a new stream which has the data
from the call. Finally, we emit a new action with type ‘fetch_data_done’ so Redux
can update its state.
However, if that is all we need to handle then Redux-observable might be an
overkill. These tasks can be easily done by other middleware libraries like redux-
thunk. Observable really shines when we have to deal with complex side effects
and complicated async calls. For example, what if we want to delete the data
whenever user clicks the delete button. This can be achieved with powerful
operators from Redux-Observable.
Figure 27 - Redux-observable epic
In here, we used ‘merge’ to create 2 observers to the action stream, one listening
to the action type ‘fetchData’, the other detects whether user presses ‘delete’ on
the keyboard. The 2 observers are active at the same time, if user decides to
delete the data, in line 127, the value emitted will be undefined.
283.4 NodeJs, webpack and create-react-app
3.4.1 NodeJs
In order for JavaScript to run, it has to be interpreted into machine code so that
the computer can understand. This has been implemented by the V8 engine,
which had been available only in the browser. Then, the original developers of
JavaScript extended it and built another run-time environment that includes
everything we need to execute a program in JavaScript, Nodejs. Now one can
build and run a JavaScript standalone application on any machine with NodeJs
installed. This has introduced JavaScript to a lot more tasks from front-end to
back-end development. With Node as our run-time environment, we also have
access to a package manager npm. It is a tool used to install and manage our
development dependencies. After installing Node, one can add other libraries to
the project by running ‘npm install …’
3.4.2 Webpack
Webpack is a Node-based tool which works as a static module bundler for
JavaScript applications. What it does is to look through all of our JS application,
and creates a so-called dependency graph which are different modules (chunks
of JS code). Then it generates a new package with minimum number of files
required. This can be done dynamically, meaning the initial code is minimum,
when it needs another chunk of codes to run, webpack will incrementally fetch
those, which helps us reduce the initial size of the application (Singh, 2019).
3.4.3 Create-react-app
The most well-known NodeJS tool that utilizes webpack to generate and bundle
the initial setup for a React application. This is highly customizable and can save
developers lots of time building the infrastructure.
This is the default files that create-react-app generates
29Figure 28 - Folder structure from create-react-app
3.5 SASS
Styling components is an inevitable part of a web application. However, the task
of writing CSS can be cumbersome and time-taking due to its syntax and lack of
variable usage. SASS is born as a CSS preprocessor which is a scripting
language that allows us to write CSS in a different format and then compile it to
the form that browsers can read (Coron, 2020). With SASS, we can now write
CSS with reusable variables, nested rules, block of styles (mixins). Example of
mixins that can be used in many places.
30Figure 29 - SASS Mixin example
In here we are able to use ‘color-white’ variable (which was written in another file)
since we used SASS. This styling snippet can now be reused in any buttons that
share the same style
Figure 30 - Reuse SASS Mixin
4 IMPLEMENTATION IN THE APP
4.1 Authentication and authorization flow
Before getting into the detailed implementation of the front-end architecture, let’s
talk a bit about how the app talks to backend APIs and how backend decides who
are authorized to make the requests.
The system utilizes AWS Cognito for authentication and authorization. Cognito is
a service that lets users create a profile (we can determine what fields are
31accepted) and maps users to specific roles. It currently supports emails and
passwords, Facebook and Google signup.
When user signs up and signs in, first, make the request with user’s credentials
to Cognito, Cognito then sends back a JWT Token that can be decrypted to
extract all user’s info like name, age, country, userLevel. Front-end will store this
token in localStorage, which is located in the browser that can be easily accessed
by front-end, to be used in later calls to backend APIs
t
r eques Cognito
Token
se
Front-end respon
Token
To
ken
Backend APIs
Figure 31 - Application authentication flow
4.2 Folder structure
In order for an app to scale easily, it is important to organize the files in a
reasonable way. That’s why I want to spend a bit of time discussing the folder
structure of the project. Let’s take a look
32Figure 32 - Project's folder structure
The files outside of /src are mostly generated from create-react-app. Inside of it,
we have some additional folders that are used for specific purposes. Store folder
includes codes that are used to build Redux store, which we will spend more time
discussing the details of. The content of /components folders contain big UI
33components, these are mostly seen as ‘pages’ of the app. /src/commons holds
the resources that can be reused like utilities (string, number, manipulations,
queries generators), icons, http request generators and reusable UI components.
4.3 Design patterns and best practices in React
Although it is quite easy for beginners to grasp the concept of React and start
coding in a short amount of time, once the code base gets bigger, it can get
cumbersome to maintain and scale the app if we don’t follow the best practices
and some helpful design patterns for component reusability and easy code
maintenance. Let’s discuss some of the most widely used patterns.
4.3.1 Container and representational component
Figure 33 - React Component composition bad practice
This simple code snippet showcases what we want to avoid in the application.
Here, TodoList does 2 things at a time. When it first mounts, make a request to
remote backend to get the Todo data and render them as . For our example,
34it is simple enough to read and understand what the component is doing, but if
the logic of processing data and rendering them gets more complicated, the
codes become bulky and hard to read. Moreover, since we do too many things
inside TodoList, the component is not reusable. Let’s try to split our component
into 2 separate ones.
Figure 34 - React Container - Representational design pattern
Looking at the refactored TodoList and Figure 33 - React Component
composition bad practice, we can observe that it does not make any requests or
data manipulation, it simply takes in an array of Todos and shows them on
screen. The component can now be reused easily with any passed array of data
as props. That is the concept of Representational Component, it answers only
one question: how things look.
On the other hand, a Container Component emphasizes how things work. All the
data processing should go inside a Container Component.
354.3.2 Higher-order component (HOC)
At its core, a HOC is just a function that takes a component and returns a new
component. It is mainly used as an abstraction that allows us to share a logic
between components (Facebook Inc, n.d). Consider this data flow:
Component Fetch data from Show data to
mounts remote user
Figure 35 - Common data flow in a React component
With HOC, we can write a function that takes a Component, a function to handle
API call and returns the desired Component.
Figure 36 - Higher Order Component example
36Another use case that I find HOC excels at is when we want to check some
dependencies before rendering the desired Component. This applies perfectly
with an application with authentication and authorization. We want to make sure
that user is logged in and have the right privileges to access certain pages.
Figure 37 - Authentication with HOC
Since we have Redux to store all the important information about users (are they
logged in, what account level are they in), we can do a quick check inside
componentDidMount and either render the Component or redirect them to the
sign in/sign up page.
374.3.3 Render props
This pattern refers to a technique that allows us to share code between React
Components using a prop whose value is a function (the prop, by convention, is
usually named ‘render’) (Facebook Inc, n.d.).
Consider this scenario where we want to track the mouse position of user and
display it on the screen.
Figure 38 - MouseTracker React Component
What if in another place of the application, we don’t want to print out the exact
same text but show a picture or a different cursor at the mouse position. We need
a way to encapsulate the piece of data that is mouse position and dynamically
generate other contents based on that information. Render props is what we
need.
38Figure 39 - Render props implementation
In here, Mouse Component simply tracks the mouse movement, the rendering
logic is outsourced to MouseDisplayer. Mousetracker is responsible for connect
the 2 components by assigning a ‘render prop’ to Mouse Component. ‘render’ (in
39line 51 Figure 39 - Render props implementation) is a function, which gets the
mouse data from Mouse and passes that to MouseDisplayer.
4.4 Main features and challenges implementation
This section was meant to explain the methods to address some of the most
challenging features but not every little detail of the application.
4.4.1 Feed page (list of all the related posts that user can view)
Building a feed page is not actually a complicated task. Front-end simply makes a
GET request to backend to retrieve a list of items and shows them to users. The
problem arises when eventually, user ends up with thousands of posts in the
feed. UI becomes slow and difficult to use especially with comment and like
features, updating the components faces a big performance issue. Luckily, there
are a lot external libraries born to deal with this problem, for example, react-
window. The library uses the concept of list virtualization also known as
‘windowing’. It only renders what is visible to users. Only a small number of posts
are rendered at a time, as user scrolls through the feed, the content of the visible
‘window’ are swapped with new content to keep the number of rendered posts
minimum.
Figure 40 - React windowing
40We can install the dependency easily with ‘npm install react-window’. ‘react-
window’ exposes 2 wrapper Components that we can use to generate the list:
‘FixedSizeList’ and ‘VariableSizeList’. The difference is that the former expects all
the post to have the same height and width while the latter is the opposite. For
our use case, since our posts might have different heights (happens when user
expands the comment section, each with different length), we have to use
VariableSizeList
Figure 41 - React windowing implementation
4.4.2 Dynamically inject components
Earlier in the document, we have discussed that webpack has the amazing
feature that allows us to bundle our application with minimum size and load
content as we need overtime. This is achievable since it provides us the ‘import’
and ‘export’ methods.
41Figure 42 - import and export from webpack
Import returns a Promise, which indicates asynchronous data, takes time to load,
and after a while, the desired code will be available. We can utilize this and
import our Component into the code bundle only when user navigates to that
specific page.
The approach to this is to make use of React component lifecycle methods. We
are going to wrap the desired Component inside a Parent component. Since we
have control over the lifecycle methods of this Parent, we only load the
destination Component when Parent is accessed (componentDidMount is the
method to do such thing)
Additionally, since importing is asynchronous, I decided to handle it with reactive
programming using RxJS, the core of Redux-observable to create AsyncRoute to
inject the components dynamically. Here’s what the file looks like:
42Figure 43 - Dynamically inject React Component
asyncRoute is a function that returns a react class-based Component. The
function takes a promise (which is ‘import’ from webpack) and use it for loading
the component. In here, we turn the ‘import’ Promise into an observable stream
and listen until the Promise resolves, the result of the Promise is the actual
Component that we need to inject, we set the Component to the state so that in
the render() method, only return the Component when it is fully loaded, else
return null.
If the component is all that we want then using ‘zip’ operator is abundant since it
is used to combine an array of streams and subscribe to each of them. However,
43I also need the ability to inject reducers and epics into the app, so zip is actually
needed. Let’s talk about that in the next section.
4.4.3 Reducer and epic injection
The idea for reducer injection is practically the same with component injection,
we do not want our app to be bloated with reducers and epics that are not used.
This method will drop the bundle size significantly when the app gets bigger and
might have dozens of reducers. Luckily, both Redux and Redux-observable
support this code splitting pattern and exposes some function that we can use for
the task.
Redux store introduces store.replaceReducer() that can be called anytime and
anywhere. It replaces the old reducers with the new ones that are provided. In
order to do that, I built a StoreBuilder to enhance our store. This StoreBuilder’s
purpose is to create Redux store, provides a function that handles file injection
(for reducers and epics) that other parts of the application can use.
4445
Figure 44 - Redux store builder

Let’s focus on the 2 methods registerReducers and createStoreProvider. In this
class StoreBuilder, we keep a list of all existing reducers as a dictionary inside
reducerMap (line 12), then when the store gets a new reducer (hint: the trick is
the same way we inject our component, with ‘import’ from webpack), we’ll
implement this in our AsyncRoute later on), add it to the dictionary and uses
store.replaceReducer() with the newly added one and we successfully injected
the new reducer.
Now, we want to expose this registerReducers to the outside world, that’s when
‘recompose’ comes into play. Basically, when we wrap a Component
(StoreContainer, Figure 45 - StoreContainer) inside ‘recompose’, the Component
will have access to the data that we provide inside ‘defaultProps’ (line 84, 85,
Figure 44 - Redux store builder).
The last piece of our store setup is the StoreContainer

                                                                                     46
Figure 45 - StoreContainer
To make Redux store available across the app, Redux provides a Wrapper
Component . All the components inside it will have access to the
Redux states, which is exactly what we are doing here. But remember, not only
the store, our registerReducers and registerEpics also need to be exposed, and
we have withContext() from ‘recompose’ to do that. With this setup, now all
nested children of StoreContainer will be able to inject reducers and epics.
AsyncRoute can be now completed.
4748
Figure 46 - AsycRoute completed

Line 22 to 27 is what allows AsyncRoute to use registerReducers and
registerEpics that we expose from our StoreBuilder and StoreContainer.
Line 53 to 71 uses Rxjs and webpack to import reducer and epic codes (same
idea with component injection).
Lastly, in the ‘return’ statement (line 86), we return the desired Component when
it is successfully imported, else we return nothing (null)
                                                                               49
We can now inject new component, reducer and epic any place in the application
using asyncRoute
Figure 47 - Using AsyncRoute
4.4.4 Translation implementation
I18next is a library that handles translation smoothly and integrates with React
very well. After briefing the documentation, I decided to use it for the project.
Let’s first see how easy it is to use i18next in our React Component
Figure 48 - use of i18next in React component
The library exposes a ‘t’ function that takes the input string and translates
automatically into the current language that the application is in. To change the
language, we can also easily use one of the functions that is provided to us by
the library (Raiano, 2021).
50Figure 49 - change current language with i18next
In here, whenever user clicks on the text, we change the language to ‘fi’.
In order to have all these amazing features, we need to do some setup so i18next
works properly.
51Figure 50 - i18next set up file
First, we define a i18next file and import this into the top-level entry file of the
app. Inside ‘resources’, we should define each language as an object which has
key and value as translation input and output.
52Figure 51 - Data format for i18next
However, after a while of updating the files with new content and modifications, I
find myself repeating too many steps and it’s difficult to handle translations when
there are lots of texts on screen. This was fixed with some automation, Python
script and Csv files.
Our goal is to generate a file which exports an object with the format similar to the
Figure so we can import it to the configuration file of i18next.
First, create an CSV of which each row has 3 columns. The first column is the
key that we use inside our React component, the next 2 columns are the
translation of the languages available.
Figure 52 - CSV file for translation resources
Next, we need a python script to process the CSV data.
53Figure 53 - Python code to turn the CSV files into the desired data form
54This file contains functions that are responsible for turning csv files into a Json
object that is compatible with i18next format.
This one imports the utility function from Figure 53 - Python code to turn the CSV
files into the desired data form and execute on the input csv files and writes an
JSON object into a new file.
55Lastly, the only script that we need to run on the terminal to get all the data
generated from above and write to a single file that can be used to set up
translation under /src/commons/resources/dynamic_configs/translation.js
4.5 React performance optimization tips
4.5.1 React.PureComponent
When initializing a React class-based Component, we have 2 options: class
extends React.Component or extends React.PureComponent. The main
difference is that PureComponent does something call shallowCompare() under
the hood. Internally, when deciding whether to rerender the component,
PureComponent iterates through nextState vs previousState, nextProps vs
previousProps and compare the key and values of them. Only when state and
props changes, the component rerenders. This pattern makes sure that we don’t
have any abundant rerendering of components because if state and props are
the same, the output should be too, hence, there is no need to rerender.
(Codementor Blog, 2021)
4.5.2 React.Fragments
Inside a React render method, it is essential to return all the elements inside a
top-level element, in this case (div tag), see Figure 38 - MouseTracker React
Component
For a lot of cases, that div tag is unnecessary and we end up with a div element
in the DOM. React.Fragment is a valid element to wrap all the inner elements and
it will not add an additional component to the DOM (Nnamdi, 2020).
56Figure 54 - React.Fragment usecase
4.5.3 Avoid passing inline function to other components
Figure 55 - Inline function example
In here we pass down the onClick handler (a function that is executed when
onClick event is fired) to Comment Component and the handler is an inline
function. When using inline function, every time CommentList updates, ReactJS
will generate a new function and pass down to Comment. Although the content of
57the function does not change, since it is newly created, inside Comment, ReactJS
will treat onClick as modified and rerender Comment. The best way to do this is
do define the handler function as a method of CommentList
Figure 56 - Inline function as handler fix
4.6 Deployment:
The last piece of technical implementation is to deploy the application to the
server so that it can be access by the internet.
There are a lot of services that we can use nowadays for such task, Heroku,
github, Microsoft Azure. After some research, I have decided to choose Amazon
S3 (Simple Storage Service) for this because of various reasons:
- It has free tier service which we can totally make use of in the initial stage
of the app. Even when we go to production, the pricing is cheaper
compared to the others
- S3 is fast since Amazon has its servers all around the world and we can
choose which ones closest to our target audiences
- Scaling, maintaining and monitoring is made easy with their service tools
58Before we push our code to the cloud, we need to run ‘npm start build’, this will
run a script that build the production ready version of our app.
Figure 57 - React build folder
This is everything we need to upload to S3. The html file in here will be our entry
to the application.
S3 treats each project as a Bucket so first we need to create a bucket in S3 to
host the application.
First go to the S3 management console web and create our bucket
59Figure 58 - S3 console page
60Figure 59 - S3 bucket creation
In here click upload and add all the files in side /build and our application is
successfully deployed. (Accomazzo, 2017)
5 CONCLUSION
We have gone through a lot of technologies and tools in this paper. We have
seen the core concept of building a single-page application with ReactJS which is
component-driven. The concept of component-driven development emphasizes
on dividing the UI into smaller pieces which helps with code reusability and
management. We also discussed how well Redux integrates with React and
gives us the ability to keep the data in sync inside the application. Our complete
61application is then bundled together by Webpack, with which we are able to
separate the application into small chunks and grows bigger dynamically when it
needs to. This is extremely helpful to a web application, especially under poor
internet connection because users only have to request for the minimum initial
files. Lastly, the app is hosted on Amazon S3, a static file hosting service that is
fast, easy to scale and monitor. With their servers all around the word, our
application is available to the world with the lowest latency possible.
After reading this paper, hopefully, you can see how a production-ready project is
set up and how each of the technologies used in it connects together. Building UI
for a single-page application is no easy task but thanks to React and Redux, we
can speed up the development process and get it up and running as fast as
possible.
62REFERENCES
Abramov, D. (n.d). Redux fundamentals. Retrieved from
https://redux.js.org/tutorials/fundamentals/part-3-state-actions-reducers
Accomazzo, A. (2017). Deploying React to S3. Retrieved from
https://www.newline.co/fullstack-react/articles/deploying-a-react-app-to-s3
Anthony, G. (2020). What is Redux-observable. Retrieved from
https://dev.to/anthonyjoeseph/should-i-use-redux-observable-also-what-is-
it-also-let-s-be-honest-what-s-redux-2hba
Codementor Blog. (2021). React optimization. Retrieved from
https://www.codementor.io/blog/react-optimization-5wiwjnf9hj
Coron, T. (2020). What is SASS. Retrieved from
https://www.creativebloq.com/web-design/what-is-sass-111517618
Denhub, L. (2017). Understanding unidirectional data flow in React. Retrieved
from https://medium.com/@lizdenhup/understanding-unidirectional-data-
flow-in-react-3e3524c09d8e
Doglio, F. (2020). Controlled vs uncontrolled components. Retrieved from
https://blog.bitsrc.io/react-controlled-vs-uncontrolled-components-
f569f4215ac9
Facebook Inc. (n.d). Higher order components. Retrieved from
https://reactjs.org/docs/higher-order-components.html
Facebook Inc. (n.d). Introducing JSX. Retrieved from
https://reactjs.org/docs/introducing-jsx.html
Facebook Inc. (n.d.). Render props. Retrieved from
https://reactjs.org/docs/render-props.html
Nnamdi, C. (2020). 10 ways to optimize your react application. Retrieved from
https://blog.bitsrc.io/10-ways-to-optimize-your-react-apps-performance-
e5e437c9abce
Praveen. (2020). Beginner’s guide to Redux-observable. Retrieved from
https://www.freecodecamp.org/news/beginners-guide-to-rxjs-redux-
observables/
63You can also read