Galileo 2 (G2) User Manual - Scubapro
←
→
Page content transcription
If your browser does not render page correctly, please read the page content below

®

 Galileo 2
   (G2)
User Manual

2 GALILEO 2 (G2) USER MANUAL
GALILEO 2 (G2) USER MANUAL
          The G2 Diving Computer – Designed for all kinds of diving.

                                                                                                                                      English
          Welcome to SCUBAPRO dive computers and thank you for purchasing the G2. You are now
          the owner of an extraordinary partner for your dives. This manual provides you easy access
          to SCUBAPRO state-of-the-art technology and the G2’s key features and functions. Should
          you wish to know more about SCUBAPRO diving equipment, please visit our website
          www.scubapro.com

                                                            IMPORTANT
           Before using your SCUBAPRO G2, please carefully read and understand the Read First booklet that
           is included in the package.

                                                              WARNING
           • The G2 has a depth rating of 120m/394ft.
           • At depths between 115m/377ft and 120m/394ft in dive computer mode the message SWITCHING
             TO GAUGE appears on the display, and at depths over 120m/394ft the G2 automatically switches to
             Gauge mode and cannot be used as a decompression computer for the remaining time of the dive.
           • Diving at oxygen partial pressures higher than 1.6bar (corresponding to a depth of 67m/220ft when
             breathing compressed air) is extremely dangerous and could lead to serious injury or death.

          The G2 dive instrument is a personal protective equipment in compliance with the essential safety requirements of the
          European Union directive 89/686/EEC. RINA SpA,Via Corsica 12, I-16128 Genoa, notified body no. 0474, have certified
          its conformity with the European Standard EN 250: 2014 (EN 250: 2014 : Respiratory equipment – Open circuit self-
          contained compressed air diving apparatus – requirements, testing and marking);
          The G2 dive instrument is also compliant with the European Union directive 2014/30/EU.
          Standard EN 13319: 2000
          The G2 dive instrument is compliant with the European standard EN 13319: 2000 (EN 13319: 2000 – Depth gauges and
          combined depth and time measuring devices – Functional and safety requirements, tests methods).

GALILEO 2 (G2) USER MANUAL                                                                                                        3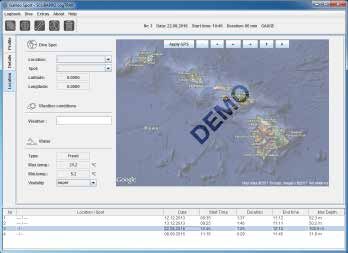
TABLE OF CONTENTS
    1.   Introduction to the G2 ........................................................................................... 8
             1 .1 Power concept and charging ................................................................... 8
             1 .2 Operating modes ................................................................................... 10
             1 .3 Switching on the G2 ............................................................................... 10
             1 .4 No-Dive warning .................................................................................... 12
             1 .5 No-Fly time ............................................................................................. 12
             1 .6 SOS ....................................................................................................... 12
                    1 .6 .1 Emergency information ........................................................... 13
             1 .7 Owner information .................................................................................. 13
             1 .8 Mounting and pairing the high pressure transmitter ................................ 13
             1 .9 SCUBAPRO Human Factor DivingTM ....................................................... 16
             1 .10 Turning off the G2 ................................................................................... 16
    2.   G2 settings and menus ......................................................................................        17
            2 .1 O2 settings .............................................................................................   19
                    2 .1 .1 Recreational (factory setting) ...................................................               19
                    2 .1 .2 Multigas (PMG) .......................................................................           19
                    2 .1 .3 Trimix ......................................................................................    20
                    2 .1 .4 CCR ........................................................................................     20
                    2 .1 .5 MOD setting ............................................................................         21
            2 .2 Dive settings ...........................................................................................   21
                    2 .2 .1 MB level ..................................................................................      21
                    2 .2 .2 Dive mode (Algorithm selection) ..............................................                   22
                    2 .2 .3 Safety stop timer .....................................................................          22
                    2 .2 .4 ppO2 max ...............................................................................         22
                    2 .2 .5 Water type ..............................................................................        22
                    2 .2 .6 Nitrox reset time ......................................................................         23
                    2 .2 .7 Max surface time ....................................................................            23
                    2 .2 .8 OTU settings ...........................................................................         23
                    2 .2 .9 All-silent mode ........................................................................         25
                    2 .2 .10 Sidemount ..............................................................................        26
                    2 .2 .11 CCR ........................................................................................    26
                    2 .2 .12 Trimix ......................................................................................   27
                    2 .2 .13 PDIS .......................................................................................    27
                    2 .2 .14 PMG ......................................................................................      27
            2 .3 Apnea dive .............................................................................................    27
                    2 .3 .1 Setting the maximum dual depth alarm ...................................                         28
                    2 .3 .2 Setting the depth incremental warning ....................................                       28
                    2 .3 .3 Setting the dive time interval warning ......................................                    29
                    2 .3 .4 Setting the surface interval warning .........................................                   29
                    2 .3 .5 Setting the ascent speed alarm ...............................................                   29
                    2 .3 .6 Low HR alarm .........................................................................           29
                    2 .3 .7 Water density ..........................................................................         30
            2 .4 Digital compass ......................................................................................      30
                    2 .4 .1 Use compass ..........................................................................           31
                    2 .4 .2 Auto-off time ...........................................................................        31
                    2 .4 .3 Declination ..............................................................................       31

4                                                                                                       GALILEO 2 (G2) USER MANUAL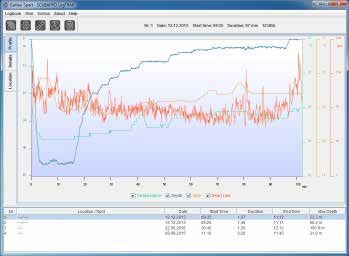
2 .5  Altimeter .................................................................................................   32
                  2 .6  Warning settings .....................................................................................        32

                                                                                                                                               English
                         2 .6 .1 Maximum dive depth warning ................................................                          32
                         2 .6 .2 CNS O2=75% .........................................................................                 33
                         2 .6 .3 No stop time = 2 min ..............................................................                  33
                         2 .6 .4 Entering deco .........................................................................              33
                         2 .6 .5 Maximum dive time warning ....................................................                       33
                         2 .6 .6 Tank pressure .........................................................................              34
                         2 .6 .7 RBT = 3 min ...........................................................................              34
                         2 .6 .8 Pressure signal ........................................................................             34
                         2 .6 .9 Entering level stops .................................................................               35
                         2 .6 .10 MB stop ignored .....................................................................               35
                         2 .6 .11 MB level reduced ....................................................................               35
                         2 .6 .12 L0 no stop time = 2 min ..........................................................                  35
                         2 .6 .13 Entering deco at L0 .................................................................               36
                  2 .7 Clock settings ........................................................................................        36
                         2 .7 .1 Wake-up alarm .......................................................................                36
                         2 .7 .2 Time ......................................................................................          37
                         2 .7 .3 Time zone ...............................................................................            37
                  2 .8 Other settings .........................................................................................       37
                         2 .8 .1 Device information ..................................................................                37
                         2 .8 .2 Gas integration ........................................................................             38
                         2 .8 .3 Tank reserve ............................................................................            38
                         2 .8 .4 RBT warning or alarm ............................................................                    38
                         2 .8 .5 Breathing sensitivity ...............................................................                38
                         2 .8 .6 Bar graph ...............................................................................            39
                         2 .8 .7 Gas summary ........................................................................                 39
                         2 .8 .8 Pairing ...................................................................................          39
                         2 .8 .9 Backlight duration ...................................................................               39
                         2 .8 .10 Backlight intensity ...................................................................             40
                         2 .8 .11 Water contacts ........................................................................             40
                         2 .8 .12 Factory settings ......................................................................             40
                         2 .8 .13 Feature upgrade .....................................................................               41
                         2 .8 .14 Software update .....................................................................               41
                         2 .8 .15 Format flash disk .....................................................................             41
                  2 .9 Personalization .......................................................................................        42
                         2 .9 .1 Screen configuration ...............................................................                 42
                         2 .9 .2 Language ................................................................................            42
                         2 .9 .3 Start-up picture .......................................................................             42
                         2 .9 .4 Setting the user preferred units ...............................................                     43
                         2 .9 .5 Workload ................................................................................            43
                         2 .9 .6 Show owner info .....................................................................                44
                         2 .9 .7 Emergency info .......................................................................               44
                         2 .9 .8 Display color ...........................................................................            44
                  2 .10 Pictures ..................................................................................................   45
                  2 .11 Dive planner ...........................................................................................      45
                         2 .11 .1 No-stop plan ...........................................................................            45
                         2 .11 .2 Decompression plan ...............................................................                  46

GALILEO 2 (G2) USER MANUAL                                                                                                                 5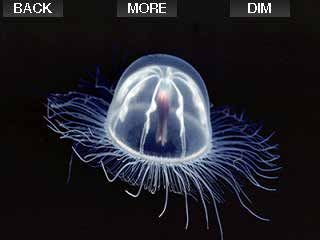
2 .12 Help .......................................................................................................   46
              2 .13 Bluetooth ..............................................................................................       46
              2 .14 Logbook ................................................................................................       46
                     2 .14 .1 Apnea logs ..............................................................................            48
    3.   Diving with the G2 ................................................................................................       49
             3 .1 Dive mode at surface .............................................................................               49
                    3 .1 .1 Recreational (factory setting) ...................................................                     49
                    3 .1 .2 PMG .......................................................................................            49
                    3 .1 .3 Trimix ......................................................................................          50
                    3 .1 .4 Sidemount ..............................................................................               50
                    3 .1 .5 CCR ........................................................................................           50
                    3 .1 .6 Surface interval, no dive and CNS% counters .........................                                  50
             3 .2 Button functions while diving ..................................................................                 51
             3 .3 Altitude diving .........................................................................................        53
                    3 .3 .1 Altitude classes and altitude warnings after a dive ...................                                53
                    3 .3 .2 Altitude and the decompression algorithm ..............................                                53
                    3 .3 .3 Prohibited altitude ...................................................................                54
                    3 .3 .4 Decompression dives in mountain lakes ..................................                               55
             3 .4 Diving with nitrox ...................................................................................           55
                    3 .4 .1 Technical diving .......................................................................               57
                    3 .4 .2 Diving with multiple gas mixtures .............................................                        57
                    3 .4 .3 Diving with Trimix mode ..........................................................                     61
                    3 .4 .4 Diving with CCR mode ...........................................................                       63
             3 .5 Warnings and alarms ..............................................................................               64
                    3 .5 .1 Warning settings .....................................................................                 64
                    3 .5 .2 Maximum depth ......................................................................                   64
                    3 .5 .3 CNS O2 = 75% .......................................................................                   64
                    3 .5 .4 No-Stop time = 2 min .............................................................                     65
                    3 .5 .5 Entering decompression .........................................................                       65
                    3 .5 .6 Dive time .................................................................................            65
                    3 .5 .7 Tank pressure .........................................................................                66
                    3 .5 .8 RBT = 3 min ...........................................................................                66
                    3 .5 .9 Pressure signal ........................................................................               66
                    3 .5 .10 Entering level stops .................................................................                67
                    3 .5 .11 MB stop ignored .....................................................................                 67
                    3 .5 .12 MB level reduced ....................................................................                 67
                    3 .5 .13 L0 no-stop = 2 min .................................................................                  67
                    3 .5 .14 Entering decompression at L0 .................................................                        68
             3 .6 Alarms ....................................................................................................      68
             3 .7 Ascent rate ............................................................................................         68
                    3 .7 .1 MOD/ppO2 ..............................................................................                70
                    3 .7 .2 CNS O2 = 100% .....................................................................                    70
                    3 .7 .3 Tank reserve pressure reached ................................................                         70
                    3 .7 .4 Missed decompression stop ...................................................                          71
                    3 .7 .5 RBT = 0 min ...........................................................................                71
                    3 .7 .6 Low battery .............................................................................              71

6                                                                                                          GALILEO 2 (G2) USER MANUAL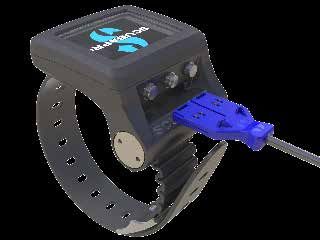
3 .8  Display information .................................................................................         72
                            3 .8 .1 Display configuration during the dive ......................................                         72

                                                                                                                                                    English
                            3 .8 .2 Setting bookmarks ..................................................................                 75
                            3 .8 .3 Stop watch timer ....................................................................                75
                            3 .8 .4 Safety stop timer .....................................................................              76
                            3 .8 .5 Backlight .................................................................................          76
                            3 .8 .6 Compass ................................................................................             76
                     3 .9 Diving with MB levels ..............................................................................           77
                            3 .9 .1 Comparison of dives with MB level L0 and MB level L5 ...........                                     77
                     3 .10 PDIS (Profile Dependent Intermediate Stop) ............................................                       77
                            3 .10 .1 Introduction to PDIS ...............................................................                77
                            3 .10 .2 How does PDIS work? ............................................................                    79
                            3 .10 .3 Special considerations when diving with
                                      more than one gas mixture (G2) ..............................................                      79
                            3 .10 .4 Diving with PDIS .....................................................................              80
                     3 .11 Gauge mode ..........................................................................................         81
                     3 .12 Apnea mode ..........................................................................................         82
          4.   G2 accessories ....................................................................................................       83
                  4 .1 Bungee arm strap ..................................................................................               83
                  4 .2 Wireless high pressure transmitter ..........................................................                     83
                  4 .3 Skin temperature heart rate belt .............................................................                    83
                  4 .4 Bluetooth USB stick ...............................................................................               84
          5.   Interfaces for the G2 and an introduction to LogTRAK ...................................                                  84
                   5 .1 Charging and using the G2 with a USB interface ....................................                              85
                   5 .2 Bluetooth ...............................................................................................        86
                           5 .2 .1 Connecting the G2 with LogTRAK ..........................................                             86
                           5 .2 .2 Download dive profiles ............................................................                   87
                           5 .2 .3 Changing warnings/settings on the G2,
                                   and reading computer info ......................................................                      87
                           5 .2 .4 USB flash disk operations .......................................................                     88
          6.   Taking care of your G2 ........................................................................................           89
                  6 .1 Format flash disk ....................................................................................            89
                  6 .2 Technical information ..............................................................................              90
                  6 .3 Maintenance ..........................................................................................            90
                  6 .4 Replacing the battery in transmitter ........................................................                     91
                  7 .1 Replacing the battery in Heart Rate Belt .................................................                        91
                  7 .1 Warranty ................................................................................................         91
          8.   Glossary ................................................................................................................ 93
          9.   Index ..................................................................................................................... 95

GALILEO 2 (G2) USER MANUAL                                                                                                                      7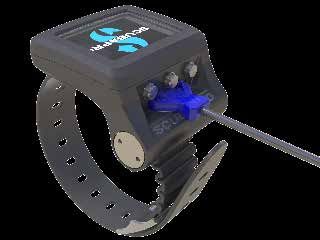
The G2 is a technologically-advanced            1.       INTRODUCTION TO
    instrument that can accompany you
    during your underwater adventures while                  THE G2
    providing you with accurate depth, time
    and decompression information.
                                                    1 .1     Power concept and
    Your G2 User Manual is divided into 6 main
                                                             charging
    sections.
    Introduction to the G2. This section            The G2 is powered by a rechargeable Li-
    provides an overview of the G2 computer         Ion battery. SCUBAPRO recommends
    and describes its operating modes and           fully charging the battery before using the
    main functions when on the surface.             computer for the first time.
    G2 settings and menus. This section             To charge the battery, plug the power/USB
    goes through the settings of your G2.           cable into your G2 as shown in the picture
                                                    below.
    Diving with the G2. This section takes you
    underwater with the G2, showing you how
    to use the G2 as a dive computer. It outlines
    everything the G2 can—and will—do to
    enhance your safety and fun underwater.
    G2 accessories. This section briefly
    describes the G2’s extras that you can
    purchase to get the most out of your dive
    computer in all conditions.
    Interfaces for the G2 and an
    introduction to LogTRAK. This section is
    all about personalization and customization.
    It describes how to change settings, how
    to download and how to manage your              Then, connect the other end of the cable
    logbook.                                        to a USB charger, or a USB device capable
                                                    of providing power for charging. At this
    Taking care of your G2. This section            point, the following battery charging status
    illustrates how to take care of your new dive   symbols will appear on the display of the
    computer.                                       G2.

                                                    F NOTE:  If the G2’s battery is deeply
                                                      discharged, nothing will appear on
                                                           the display screen until the battery
                                                           has reached a safe charge level
                                                           for a startup. If this occurs, do not
                                                           disconnect the USB, and do not try to
                                                           activate the G2 by pressing a button.
                                                           Simply leave the G2 charging for at
                                                           least half an hour.

8                                                                              GALILEO 2 (G2) USER MANUAL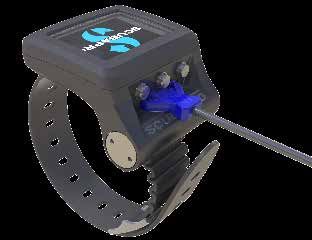
WARNING
                                                       Starting the dive with a weak battery may lead

                                                                                                             English
                                                       to a situation where the G2 shuts off during
                                                       the dive. In case of such an event you should
                                                       always carry a backup instrument that will
                                                       enable you to complete the dive safely. If the
                                                       G2 switches off during a dive it will remain
                                                       locked in Gauge mode for 48 hours. (For more
                                                       information on Gauge mode operation, see
                                                       chapter: Gauge mode.)

          Charging will continue, but the above        F NOTE:   Storing the G2 with a low
                                                         battery may lead to a deep discharge
          display will switch off after 3 minutes.         state, which shortens the life of the
          When the battery is completely charged,          battery.
          the following display will appear.

                                                                         WARNING
                                                       During the dive, when the battery charge level
                                                       indicator falls to only 1 segment, the display
                                                       will switch off automatically to save energy.
                                                       However, you can still check the display
                                                       manually by pressing the right button.

                                                                         WARNING
                                                       The G2 will not start a dive when the battery
          The G2 will alert you when the battery is    has reached the critical discharge level
          approaching a critical discharge level by    indicated by the warning: “Charge battery!”
          displaying the following message.            In this state you cannot use the G2 for diving.

          In addition, the battery icon with current
          charging status is shown above the main
          time-of-day display.

GALILEO 2 (G2) USER MANUAL                                                                               9
WARNING                         1 .3     Switching on the G2
     When your G2’s battery reaches the end           To switch on the G2, press and hold the
     of its lifetime, it can only be replaced by an   right button.
     authorized SCUBAPRO service center. Do not
     open your G2 or try to replace the battery
     yourself!
                                                      F NOTE:   You cannot turn the
                                                        when it is connected to USB.
                                                                                            G2 on

                                                      The initial activation of your G2 will require
     1 .2   Operating modes                           some basic set up (selecting language,
                                                      setting the time, etc.). The G2 will guide
     The G2 has 4 operating modes:                    you through them. Simply follow the screen
     • Charging and USB communication                 prompts while using the buttons.
       mode. When connected to a USB
       device the G2’s battery automatically          F NOTE:  The following basic setup will
                                                        also be required if you reset the G2
       starts charging. At the same time, you
                                                             with the menu 8.7. Factory settings.
       can access either the flash memory
       or the logbook using the LogTRAK
       program.
     • Sleep mode. In this mode the display is
       off, but the G2 still updates desaturation
       and monitors ambient pressure for
       altitude changes, etc. This mode is
       activated automatically at the surface
       after 3 minutes without operation.
     • Surface mode. After a dive or when
       manually activated, the display is on
       and you can change settings or operate
       the G2 with its buttons. The Bluetooth
       interface can be activated in this mode.       Press the right button.
     • Dive mode. This mode is activated
       when the computer reaches a depth
       of 0.8m/3ft or more. In this mode the
       G2 monitors depth, time, temperature
       and wireless sensors. Decompression
       calculations are performed in this mode.

                                                      Select your language with the left or middle
                                                      button. Then confirm your selection with a
                                                      press of the right button.

10                                                                               GALILEO 2 (G2) USER MANUAL
English
Select each unit with the left or middle You G2’s button functions can be found
button, and confirm it with the right button. on-screen. To illustrate, the screen above
shows that pressing the left button will
take you to the main menu, pressing the
middle button will take you to the logbook
and pressing the right button will dim the
display light.
However, be aware that these function
labels may change depending on the
operational mode you’re currently in.
F NOTE: There are two methods
pressing the G2’s buttons:
for
Set the time zone with the left or middle 1. “Short” press. This is the normal
button and confirm it with the right button. method used in most cases with the
labelled functions.
After this initial setup, your G2 will boot to
2. “Press-and-hold.” This method is
a display that we call the main time-of-
used only in special cases. They are
day display. This is the display in which the
described in this manual but are not
current time is shown in the main field.
labelled on the screen.
Button functions at the surface are
summarized in the following table.
LEFT BUTTON MIDDLE BUTTON RIGHT BUTTON
Press and Press and
Press Press and hold Press Press
hold hold
SCUBA, GAUGE
Gas summary
Main menu Oxygen setting Logbook Backlight Compass
table
Pictures
APNEA
Manual start of
Main menu Logbook Pictures Backlight Compass
a dive
GALILEO 2 (G2) USER MANUAL 111 .4 No-Dive warning WARNING
If the G2 detects a situation of increased risk Flying while the G2 displays the NO FLY
(due to potential microbubble accumulation symbol and countdown timer can result in
from previous dives or a CNS O2 level above serious injury or death.
40%), the NO DIVE symbol will appear to
advise you against performing another dive 1 .6 SOS
right away. The suggested time interval
that you should wait prior to diving again is If you stay above a depth of 0.8m/3ft for
shown on the dive mode display. more than 3 minutes without observing a
prescribed decompression stop, the G2 will
switch into SOS mode. Once in SOS mode
the G2 will lock up and will be inoperable
as a decompression dive computer for
24 hours. If it is used for diving within the
24hours of an SOS lock, it will automatically
switch to Gauge mode and provide no
decompression information.
WARNING
• Violating a mandatory decompression
You should not undertake a dive as long obligation may result in serious injury or
as the no-dive warning is displayed on death.
the computer screen. If the warning is • Serious injury or death may result if a diver
prompted by microbubble accumulation does not seek immediate treatment should
(as opposed to CNS O2 over 40%) and any signs or symptoms of decompression
you dive anyway, you will have shorter no- sickness occur after a dive.
stop times or longer decompression times. • Do not dive to treat symptoms of
Moreover, the duration of the microbubble decompression sickness.
warning at the end of the dive can increase • Do not dive when the computer is in SOS
considerably. mode.
1 .5 No-Fly time
The no-fly time (NO FLY) is the time during
which an exposure to the reduced pressure
(equal to ascending at higher altitudes)
inside the cabin of an airplane could cause
decompression sickness, as calculated by
the decompression model in the computer.
The no-fly text with countdown timer is
shown until the restriction is completed.
To learn more about altitude warnings
and altitude diving, see chapter: Altitude
diving.
12 GALILEO 2 (G2) USER MANUALThe display shows the same information 1 .7 Owner information
as when displaying desaturation but,
To customize your time-of-day display
English
in addition, the SOS mode message is
displayed. with your name or other text you need to
Instead of the no-fly time, the 24-hour use LogTRAK for Windows or Mac. See
countdown is shown. The middle button section: Interfaces for the G2 and an
description changes from LOG to SOS, introduction to LogTRAK.
and by pressing it an emergency message
is displayed. The emergency information
for this display can be entered using
LogTRAK. Once the emergency message
is displayed, pressing the LOG button
shows the details of the last dive.
F NOTE: If the battery becomes fully
discharged while at depth in spite
of using the power save mode, the
G2 will remain in SOS mode and
locked into Gauge mode for 48
hours, independent of the remaining
desaturation time.
F NOTE: In the event you misplace your
G2, it is advisable to include some
1 .6 .1 Emergency information contact information along with your
To add your emergency information you will owner information.
need to use LogTRAK for Windows or Mac.
See section: Interfaces for the G2 and
an introduction to LogTRAK.
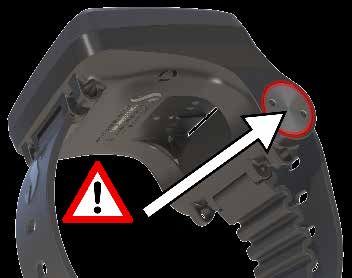
1 .8 Mounting and pairing the
high pressure transmitter
The G2 can receive tank pressure
information from multiple Smart series high
pressure transmitters. Each transmitter
needs to be mounted on a high pressure
port of a first stage regulator.
To mount the transmitter, first remove the
high pressure port plug from the first stage
regulator, then screw the transmitter in
place.
GALILEO 2 (G2) USER MANUAL 13F NOTE: Use an appropriate wrench to
tighten the transmitter. Take care to Transmitter position for the left hand.
not overtighten.
The Smart transmitter communicates via
radio frequency with the G2. For optimal
transmission performance, we recommend
positioning the transmitter as described in Transmitter position for the right hand.
the pictures below. In order for the G2 to display the pressure
signal from a Smart transmitter, a coded,
interference-free line of communication
must first be established. This step needs
to be performed only once for each
transmitter.
There are two methods for pairing the G2
to a transmitter.
1. For automatic pairing, proceed as
follows:
• Mount the first stage regulator with
the Smart transmitter on a full tank.
• Turn on the G2, ensure it is in the
time-of-day display, and place it near
(x) the transmitter as indicated in the
picture below.
• Open the tank valve.
14 GALILEO 2 (G2) USER MANUALUse the ARROW buttons to select the tank
that you want to assign to the transmitter,
English
then press SAVE to lock in your selection.
The G2 will confirm the pairing with the
message PAIRING TO T1 SUCCESSFUL.
If you do not wish to complete the
operation, with a press-and-hold of the
right button the G2 will show the message
PAIRING CANCELLED. The pairing will
also be cancelled if you do not press SAVE
within 3 minutes of tank selection.
2. For manual pairing, proceed as follows:
• Mount the first stage regulator with
the Smart transmitter on a full tank.
• Turn on the G2, select menu 8.2.6.
Pair with transmitter.
• Open the tank valve.
Upon pressurization, the Smart transmitter
will send a pairing sequence to the G2.
When the G2 receives this information, the
display changes to show a listing of tank F NOTE: The transmitter must have
been unpressurized for at least 40
designations. (T1, T2, etc.).
seconds prior to performing the
Tank T1 is always the main tank you start pairing operation; otherwise it will not
your dive with. Other tanks are used when transmit the pairing sequence.
diving with more than one gas mixture
Also, a transmitter can only be paired
(described in chapter: Diving with
to one tank designation. If you pair
multiple gas mixtures).
the same transmitter to a second
tank designation, the first one will be
erased. However, you can pair more
than one G2 to the same transmitter.
After a successful pairing of T1 to the G2,
the display will show the tank pressure in
either BAR or PSI. If tank T1 has not been
paired, the G2 will show NO P instead of a
pressure value.
If T1 has been paired but the G2 is not
receiving any signal, it will show - - - instead
of a pressure value.
On the surface, the status of tanks T2, T3,
etc. are shown in the gas summary table,
described in chapter: Gas summary.
GALILEO 2 (G2) USER MANUAL 151 .9 SCUBAPRO Human
Factor DivingTM
The G2 has patented underwater Heart
Rate, Skin Temperature and Breathing
monitors. These features will customize
every dive based on your body reactions
and provide you more data that enhances
your diving experience and helps you to
become a more advanced diver.
To learn more about the physiology
of the SCUBAPRO Human Factor
DivingTM, see the booklet: “HEARTRATE
F NOTES: MEASUREMENT
WORKLOAD
FOR
ASSESSMENT,”
BETTER
Dr.
• The Smart transmitter has a range of
approximately 1.5m/5ft. T. Dräger, Dr. U. Hoffmann, 2012,
• To maximize the life of the battery, www.scubapro.com.
the transmitter operates at a low
update rate when there is no pressure 1 .10 Turning off the G2
change for more than 40 seconds.
The transmitter also turns itself off The G2 turns off automatically after 3
when the pressure is 14bar/200psi minutes without active use, or without an
or less. active Bluetooth link. When in the time-
• If a transmitter battery is weak, the G2 of-day display, you can turn the G2 off
will alert you with a screen message manually with a press-and-hold of both
displaying the tank assigned to that right and left buttons simultaneously.
transmitter as shown on the screen
below.
See chapter: Replacing the battery in
transmitter for information on how to
replace the transmitter battery.
16 GALILEO 2 (G2) USER MANUAL2. G2 SETTINGS AND Regardless of the language setting, all
menus are numbered for easy identification.
MENUS
English
All of the sub menus function in a similar
By pressing MENU from the time-of-day way, meaning that if there is a value that
display you will enter the Settings folder. can be changed, the range will be shown
Note that when you first reach a menu, at the bottom of the screen (see screen
you are “outside” of it. Therefore, you must below). Sub menus are also numbered
press the ENTER button to get inside the using the decimal format x.y (x=main menu.
actual menu. Some menus have multiple y=sub menu).
levels. You can return to previous levels with
a press-and-hold of the ENTER button.
Also, you can return to time-of-day display
by press-and-hold both right and left
buttons simultaneously.
In this case, left and middle button functions
are labeled – and + (enabling you to edit the
current selection). The right ARROW button
moves your selection to the next field and
SAVE stores the entered values. On the
Simply, by pressing ARROW buttons you right side of the screen a navigation bar
can surf the menu, and by pressing ENTER indicates the value as an analog meter.
you get into the menu selection. For menus
with multiple items there is an indicator bar
on the right side of the screen which shows
your current location.
GALILEO 2 (G2) USER MANUAL 17The Main menu offers the following settings:
Nr. Menu Nr. Menu
1 O2 setting 6.10. MB stop ignored
2 Dive settings 6.11. MB level reduced
2.1. MB level 6.12. L0 no-stop = 2min
2.2. Dive mode 6.13. Entering deco at L0
2.3. Safety stop timer 7 Clock settings
2.4. ppO2max 7.1. Wake-up alarm
2.5. Water type 7.2. Time
2.6. Nitrox reset time 7.3. Time zone
2.7. Max surface time 8 Other settings
2.8. OTU settings 8.1. Device information
2.9. Desaturation reset 8.2. Gas integration
2.10. All-silent mode 8.2.1. Tank reserve
2.11. Sidemount 8.2.2. RBT = 0 min
2.12. CCR 8.2.3. Breathing sensitivity
2.13. Trimix 8.2.4. Bar graph
2.14. PDIS 8.2.5. Gas summary
2.15. PMG 8.2.6. Pairing
3 Apnea dive 8.3. Backlight duration
3.1. Maximum depth 8.4. Backlight intensity
3.2. Depth increment 8.5. Water contacts
3.3. Dive time interval 8.6. Factory settings
3.4. Surface interval 8.7. Feature upgrade
3.5. Low heart rate 8.8. Software update
3.6. Ascent speed 8.9. Format flash disk
3.7. Water density 9 Personalization
4 Digital compass 9.1. Screen configuration
4.1. Use compass 9.2. Language
4.2. Auto-off time 9.3. Start-up picture
4.3. Declination 9.4. Units
5 Altimeter 9.5. Workload
6 Warning settings 9.6. Show owner info
6.1. Maximum depth 9.7. Emergency info
6.2. CNSO2 = 75% 9.8. Display color
6.3. No-stop = 2min 10 Pictures
6.4. Entering deco 11 Dive planner
6.5. Dive time 11.1. Plan a dive
6.6. Tank pressure 12 Help
6.7. RBT = 3min 13 Bluetooth
6.8. Pressure signal 13.1. Enable Bluetooth
6.9. Entering level stops 14 Logbook
18 GALILEO 2 (G2) USER MANUALBy surfing these menus you can quickly
become familiar with them. Following are
English
short descriptions for each selection.
F NOTE: To make it easier to understand
the menu system in accordance
with your current level of diving, the
G2 has a feature upgrade function.
More advanced level functions and
selections do not appear in the menu
unless you want them to. (This is why
you might find some menu numbers
missing from the MAIN menu screen.)
For example, if you are not diving with 2 .1 .2 Multigas (PMG)
rebreathers or using more than one gas, If PMG is enabled, the O2 setting will
it’s not necessary to enable the CCR or appear as follows. See chapter: Diving
PMG menu modes. This keeps the menu with multiple gas mixtures to learn more
system simple and streamlined to suit your about this feature.
particular diving style.
2 .1 O2 settings
Here you can change the gas content of
the tanks that you are using as well as
the partial pressure limit of the gas. The
Maximum Operating Depth (MOD) limit
will be shown for the values that you have
selected. To learn more about diving with
Nitrox and MOD, see chapter: Diving with
nitrox.
2 .1 .1 Recreational (factory setting) T1 is always the default gas at the start of
the dive. Tank 2 through 8 values can be
For normal one-tank diving you can select a adjusted the same way as Tank 1.
gas mix from 21% oxygen (Air) up to 100%
oxygen. The ppO2 max value is required for
the MOD limit you intend to use for this gas.
The factory setting is 1.40bar.
WARNING
The MOD limit defines the warning depth
based on oxygen toxicity. However, depth
narcosis can affect a diver’s skills much
earlier, jeopardizing his or her ability to dive
safely at that depth.
GALILEO 2 (G2) USER MANUAL 19You can set a different ppO2 setting for WARNING
decompression gases.
The Absolute Minimum Depth (AMD) depends
on ppO2min value. If the alarm depth is
shallower than 0.8m/3ft which is the dive start
depth for the G2, the alarm will not activate
before a 0.8m/3ft depth is reached! This
situation is dangerous and may lead to death
by drowning.
WARNING
Engaging in heavy work while at the surface or
at shallow depths while breathing less than a
21% oxygen (hypoxic mix) fraction may cause
The maximum ppO2 limit can be modified
a loss of consciousness and lead to drowning.
at menu 2.4. ppO2max.
2 .1 .3 Trimix 2 .1 .4 CCR
If trimix is enabled the O2 setting will appear If the CCR mode is enabled the diluent tank
as follows. See chapter: Trimix to learn will appear as follows. Other tanks (T1 to
how to enable this feature. T8) can be configured as with PMG mode.
See chapter: CCR to learn how to enable
this feature.
Setpoint 1 can be selected from 0.2 to
0.95bar which defines the MOD.
In trimix mode the oxygen fraction can be
selected from 8% to 100%.
F NOTE: To ensure an adequate supply
of oxygen to the body, the gas used at Setpoint 2 can be selected from 1.0 to
the beginning of the dive must contain 1.6bar. Since higher values cannot be
enough oxygen (you can use a travel reached at the surface, an AMD will be
mix or one of the decompression calculated for the setting.
gases). Since the dive always starts
with tank T1, the minimum O2 setting
for tank T1 is 18%.
20 GALILEO 2 (G2) USER MANUALWARNING
English
Diving with a ppO2 higher than 1.4bar is
dangerous and may lead to unconsciousness,
drowning and death.
F NOTE: the ppO is fixed to 1.6bar
2
when the selected oxygen content is
80% or higher.
2 .2 Dive settings
2 .1 .5 MOD setting
2 .2 .1 MB level
It is possible to disable the MOD setting
(- - - shown in the field) like on the screen Here you may select the preferred
below. Microbubble (MB) level that you want to
follow during your dives. Level 9 is the
most conservative, Level 0 is the least
conservative.
This requires a change at menu 2.4. ppO2
max.
F NOTE: For more about diving with the
MB levels, see chapter: Diving with
MB levels.
GALILEO 2 (G2) USER MANUAL 212 .2 .2 Dive mode (Algorithm 2 .2 .3 Safety stop timer
selection) Safety stop timer duration and start mode
Your G2 allows you to choose between can be edited in this menu.
Scuba, Gauge and Apnea modes.
When the G2 has not been submerged
for a while the display appears as shown
below:
See chapter: Safety stop timer to learn
how this feature is used while diving.
2 .2 .4 ppO2 max
The ppO2max setting defines the maximum
F NOTE: Since Gauge and Apnea
modes do not track tissue saturation,
limit for oxygen partial pressure. Gas O2
settings higher than this limit cannot be
a 48-hour locking interval occurs selected for any tank.
between the time the last dive is
made in Gauge or Apnea mode and
a change to Scuba mode is possible.
Conversely, the G2 shown below
has been dived in Scuba mode and
cannot be changed to Gauge or
Apnea mode until the desaturation
time has elapsed.
2 .2 .5 Water type
The G2 measures pressure and converts it
to a depth value by using water density as a
constant. A depth of 10m/33ft in salt water
corresponds approximately to 10.3m/34ft
of depth in fresh water.
If you decide to change modes before
the 48-hour interval ends, or before full
desaturation occurs, you will have to go to
the desaturation reset menu and make a
manual desaturation reset.
22 GALILEO 2 (G2) USER MANUALEnglish
2 .2 .8 OTU settings
F NOTE: This setting will adjust the
depth on all modes: Scuba, Gauge Oxygen Toxicity Unit (OTU) information and
and Apnea. settings can be edited in this menu.
2 .2 .6 Nitrox reset time
If you are generally diving with air and want
to return to this setting after the occasional
nitrox dive, you can preset a default time
that will enable your G2 to reset back to air.
The OTU information screen below displays
the current OTU related information:
1. OTUs from the last dive.
2. OTUs from the dives today along with
the maximum allowed value.
3. OTUs allowed for tomorrow along with
Reset time can be selected from 1 hour up the maximum allowed value.
to 48 hours, or the nitrox reset time can be 4. Total OTU dose during the mission
disabled. Gas reset time is disabled when (series of diving days).
“no reset” is shown. 5. Exposure (how many days of diving
have occurred during this mission).
2 .2 .7 Max surface time 6. Interval (how many days have passed
Maximum surface time allows you to enjoy since the last dive day).
short orientations at the surface while
maintaining a single logged dive.
GALILEO 2 (G2) USER MANUAL 23Desaturation reset
The G2 allows you to reset the desaturation
in the computer. Any tissue saturation
information from a recent dives can be
reset to zero, allowing the G2 to treat the
next dive as a non-repetitive dive. This
function is useful when the G2 is loaned to
another diver who has not dived in the last
48 hours.
WARNING
OTUs are calculated per day, changing Resetting desaturation will affect the
at midnight (00:00) with limits changing calculations of the algorithm, which may
accordingly. lead to serious injury or death. Do not reset
You can define the reset interval, which desaturation without a valid purpose.
is the length of time without logged dives
required to clear the OTU counter. F NOTE: Some menu changes are not
possible while the G2 is counting
down desaturation. If you decide to
reset desaturation, the safety code
313 must be used. This procedure
prevents unwanted resetting, plus
the desaturation reset will be stored
to memory; in the next dive log the
desaturation reset warning will be
shown.
Also, if you wish to clear the OTUs manually
you can do this with the following menu.
Clearing the OTUs requires the confirmation
number 313.
24 GALILEO 2 (G2) USER MANUALWhen the safety code is correctly entered 2 .2 .9 All-silent mode
and confirmed by a press of the SAVE With the selection ON, the stealth mode
English
button, the desaturation reset is complete becomes active and no alarms or warnings
and the following screen will be shown. will emitting an audible signal. (The factory
setting is OFF.)
F NOTE: After a desaturation reset
the change between Scuba, Gauge
and Apnea modes are possible WARNING
immediately. However, since the
The sound OFF selection will disable all
Gauge and Apnea modes are not
audible dive mode alarms and warnings. This
tracking your tissue nitrogen loading,
is potentially dangerous.
it is recommended that you maintain
the initial intervals between mode
changes. F NOTE: The only exception to the silent
mode is the alarm clock, which will
beep when activated, even if the main
setting is sound off.
WARNING
Diving after a desaturation reset is extremely
dangerous and is very likely to cause serious
injury or death. Do not reset the desaturation
unless you have a valid reason to do so.
F NOTE: An
switch-off
automatic low battery
will not reset the
desaturation. The G2 stores tissue
saturation information in a non-
volatile memory. During the time
the computer is without power the
desaturation calculation is frozen.
During recharging, the display will light
up and desaturation calculation will
resume as soon as a sufficient level of
charge has been reached.
GALILEO 2 (G2) USER MANUAL 252 .2 .10 Sidemount 2 .2 .11 CCR
In sidemount diving there are normally The Rebreather mode can be selected (ON)
two tanks and two regulators, each set here if the feature is enabled.
mounted independently on each side of the
diver.
Independent redundant gas delivery
systems should be drawn down equally,
in small steps, so in case one system fails
the other system has maximum reserves to
complete the dive.
Enabling CCR changes the default open
circuit gas content settings to setpoint
settings. Also, the dive display will change
so that both O2 and Diluent tank pressures
are shown at the same time. See chapter:
CCR to learn more how the display is
configured in this mode.
Since the CCR dive unit is responsible for
When the G2’s sidemount mode is enabled the setpoint accuracy and the G2 is using
(ON), two tank pressures are displayed at that accurate number, you can select
the same time. See chapter: Sidemount some conservatism with an O2 and inert
to learn more about how the display is gas correction (it is shown as N2 but also
configured in this mode. influences He when the TMx option is
enabled).
F NOTE: For proper operation of the
sidemount mode, both tanks must be
For example, the % value of the O2
correction increases the nominally set
equipped with a transmitter.
ppO2 value for the CNS% clock value, and
The pressure step defines the pressure decreases the nominally set ppO2 value for
difference between tanks when the G2 the inert gas absorption (algorithm).
alerts you to switch from the lower to the
higher supply side. You can choose a step
between 10 and 50 bars or follow the rule
of thirds.
F NOTE: The Sidemount mode can be
used for backmount twin tank diving
as well.
26 GALILEO 2 (G2) USER MANUAL2 .2 .12 Trimix 2 .2 .14 PMG
Trimix can be set to ON here if the feature Predictive Multigas (PMG) mode enables
English
is enabled. the use of multiple tanks from 2 to 8.
When Trimix is on, the gas content See chapter: Diving with multiple gas
presentation follows the standard O2/He. mixtures to learn more about how to use
Also, the AMD (Absolute Minimum Depth) this feature.
for each gas is shown. See chapter: Diving
with multiple gas mixtures to learn more
about this feature.
F NOTE: PMG must be enabled for
sidemount and CCR diving modes.
2 .2 .13 PDIS
SCUBAPRO dive computers feature Profile 2 .3 Apnea dive
Depending Intermediate Stops (PDIS) If the Apnea feature is selected, the
which can be enabled in this menu. following settings for the Apnea mode can
be edited.
See chapter: PDIS (Profile Dependent
Intermediate Stop) to learn more about
this feature.
GALILEO 2 (G2) USER MANUAL 272 .3 .1 Setting the maximum dual
depth alarm F NOTE: The first alarm is short
sequence to get your attention, and
In Apnea mode all alarms can be either the second alarm is continuous. By
audible or disabled. setting the first alarm deeper than
the second, it will be masked by the
continuous alarm and you cannot hear
the first one.
2 .3 .2 Setting the depth
incremental warning
Independent of the maximum depth alarm,
you can set incremental depth warnings.
These depth warnings can be set for
descending (shown as Way down), for
ascending (shown as Way up), or for both
directions.
After enabling the maximum depth alarm
the limits can be selected. The first depth
alarm can be selected from 5-100m/20-
330ft.
The depth increment can be selected from
5-100m/20-330ft.
Equally, the second depth alarm may be set
from 5-100m/20-330ft.
28 GALILEO 2 (G2) USER MANUAL2 .3 .3 Setting the dive time interval 2 .3 .5 Setting the ascent speed
warning alarm
English
You can set a dive time interval warning You can select the value from 0.1-5.0m/
from 15 seconds up to 10 minutes. 1-15ft per second.
2 .3 .4 Setting the surface interval 2 .3 .6 Low HR alarm
warning The G2 can trigger an alarm if your heart
The surface interval warning can be set rate drops below a set level. The alarm
from 15 seconds up to 14 minutes and 45 can be set between 35 and 100 beats per
seconds. minute.
F NOTE: After 15 minutes on the
surface, the G2 automatically ends the
dive session and saves the dive in the
logbook.
GALILEO 2 (G2) USER MANUAL 292 .3 .7 Water density For Apnea diving, in which no
decompression calculation takes place, the
maximum depth reached by the diver may
be the main goal of the dive, so accuracy
in the depth measurement itself is the most
important factor. The G2 allows you to
define a water density between 1.000kg/l
and 1.050kg/l in 0.001kg/l increments.
(For reference, the density of the salt
water setting in Scuba or Gauge mode is
1.025kg/l.)
2 .4 Digital compass
There is a direct relationship between the
weight of a water column and the pressure On this screen, the settings related to the
it exerts, and the weight is given by the digital compass can be selected.
depth multiplied by the density of the water.
Hence, the depth displayed by a dive
computer is obtained by a measurement of
absolute pressure.
Water density, however, is a function of
salinity, so the same depth in a lake (fresh
water) and in an ocean (salt water) will yield
a different pressure measurement.
The difference is very small, with a
corresponding error in displayed depth
(approximately 3%). For this reason, in
Scuba and Gauge modes the G2 allows
you to define whether you’re diving in fresh
or salt water.
A decompression calculation is based on
absolute pressure, so setting the G2 to
fresh water when diving in salt water, or
vice versa, is acceptable. However, the
depth measurement will be slightly off
(approximately 1m/3ft every 40m/130ft),
although the decompression calculation
will be carried out correctly.
30 GALILEO 2 (G2) USER MANUAL2 .4 .1 Use compass 2 .4 .3 Declination
Activating menu 4.1 Use compass A compass points to the magnetic north
English
launches the compass screen, which looks pole of the earth. Geographic and magnetic
like the following: North Pole difference is corrected with a
declination setting. Declination depends on
your current location on the earth. You can
select a correction value from 0º to 90° in
1° increments and select the direction East
or West.
2 .4 .2 Auto-off time
With menu 4.2. Auto-off time you can
select a compass timeout, which is the
amount of time the compass is displayed
when activated at the surface or during
a dive. Timeout can be set from 5 to 60
seconds, or the selection “Push on/Push
F NOTE: The G2’s compass does not
normally need recalibration. If you
off” maintains the compass display until it note a significant permanent offset
is switched off by a button press. in compass direction, contact your
authorized SCUBAPRO dealer.
GALILEO 2 (G2) USER MANUAL 312 .5 Altimeter 2 .6 Warning settings
Here you can check your current elevation. Warnings represent situations that require
In the altitude menu, the current altitude is diver’s attention, but ignoring them does
calculated from the barometric pressure. not represent an immediate risk. It is up to
The altitude can be adjusted when current you to decide which ones you would like to
elevation is known. Adjusting the altitude have active and which ones not.
elevation has no effect on the altitude class.
2 .6 .1 Maximum dive depth warning
The maximum depth warning value can be
selected from 5-100m/20-330ft in 1m/5ft
increments.
F NOTE: Barometric pressure is
variable, changing with weather and
atmospheric pressure at any particular
elevation. Dive algorithms use altitude Warnings can be deactivated when OFF
classes which are directly derived is selected. The visual warning selection
from barometric pressure. Displayed displays the warning when the warning
altitude is determined based on the situation happens. The audible warning
current barometric pressure and is selection sounds the warning when the
therefore a relative value. warning situation happens. By selecting
BOTH you get a combination of audible
and visual warnings.
32 GALILEO 2 (G2) USER MANUAL2 .6 .2 CNS O2=75% 2 .6 .4 Entering deco
The G2 tracks your oxygen uptake via The G2 can activate a warning when
English
the CNS O2 clock. If the calculated value the first mandatory decompression stop
of CNS O2 reaches 75%, this warning appears. This alerts you to the fact that a
becomes active. direct ascent to the surface is no longer
possible.
2 .6 .3 No stop time = 2 min
If you wish to avoid unintentionally 2 .6 .5 Maximum dive time warning
performing a decompression dive, the G2 The value can be selected from 5 to 995
can activate a warning when the no-stop minutes in 1-minute increments.
time reaches 2 minutes. This applies to
current selected MB level no-stop time (see
chapter: Diving with MB levels, for more
information on MB level diving). It gives you
the opportunity to start ascending before
incurring a decompression stop or a level
stop obligation.
GALILEO 2 (G2) USER MANUAL 332 .6 .6 Tank pressure When 0 minutes RBT is reached, an alarm
The G2 can activate a warning when the is triggered: the G2 has computed that if
tank pressure reaches the value defined you start your ascent now and ascend at
here. the ideal ascent rate, you will arrive at the
surface with just the tank reserve, and any
further delay increases the risk that you will
run out of your gas supply before reaching
the surface.
2 .6 .8 Pressure signal
The G2 can activate a warning when the
wireless tank pressure signal has not
been received in the last 30 seconds. The
warning message is: NO PRESSURE
SIGNAL.
2 .6 .7 RBT = 3 min
The RBT (Remaining Bottom Time) is the
time you can spend at the current depth
and still have enough gas supply to make
a safe ascent and reach the surface with
the tank reserve. The RBT calculation is
based on your current breathing rate, and
it accounts for any existing and upcoming
decompression obligation as well as for
any temperature gradient in the water. It
assumes an ascent at the ideal ascent rate If after another 40 seconds the G2 still has
(defined in chapter: Ascent rate). When not received any signal from the transmitter,
the RBT reaches 3 minutes a warning is another audible sequence are emitted with
shown. the message: PRESSURE SIGNAL LOST,
after which the RBT is not displayed any
longer and the tank pressure is replaced
with - - -.
34 GALILEO 2 (G2) USER MANUALYou can also read