GENERAL MICROBIOLOGY LAB MANUAL - Pakpour & Horgan California State University East Bay - LibreTexts
←
→
Page content transcription
If your browser does not render page correctly, please read the page content below
GENERAL
MICROBIOLOGY LAB
MANUAL

Pakpour & Horgan
California State University
East Bay
California State University East Bay
General Microbiology Lab Manual

           Pakpour & Horgan
This text is disseminated via the Open Education Resource (OER) LibreTexts Project (https://LibreTexts.org) and like the hundreds
of other texts available within this powerful platform, it is freely available for reading, printing and "consuming." Most, but not all,
pages in the library have licenses that may allow individuals to make changes, save, and print this book. Carefully
consult the applicable license(s) before pursuing such effects.
Instructors can adopt existing LibreTexts texts or Remix them to quickly build course-specific resources to meet the needs of their
students. Unlike traditional textbooks, LibreTexts’ web based origins allow powerful integration of advanced features and new
technologies to support learning.

The LibreTexts mission is to unite students, faculty and scholars in a cooperative effort to develop an easy-to-use online platform
for the construction, customization, and dissemination of OER content to reduce the burdens of unreasonable textbook costs to our
students and society. The LibreTexts project is a multi-institutional collaborative venture to develop the next generation of open-
access texts to improve postsecondary education at all levels of higher learning by developing an Open Access Resource
environment. The project currently consists of 14 independently operating and interconnected libraries that are constantly being
optimized by students, faculty, and outside experts to supplant conventional paper-based books. These free textbook alternatives are
organized within a central environment that is both vertically (from advance to basic level) and horizontally (across different fields)
integrated.
The LibreTexts libraries are Powered by MindTouch® and are supported by the Department of Education Open Textbook Pilot
Project, the UC Davis Office of the Provost, the UC Davis Library, the California State University Affordable Learning Solutions
Program, and Merlot. This material is based upon work supported by the National Science Foundation under Grant No. 1246120,
1525057, and 1413739. Unless otherwise noted, LibreTexts content is licensed by CC BY-NC-SA 3.0.
Any opinions, findings, and conclusions or recommendations expressed in this material are those of the author(s) and do not
necessarily reflect the views of the National Science Foundation nor the US Department of Education.
Have questions or comments? For information about adoptions or adaptions contact info@LibreTexts.org. More information on our
activities can be found via Facebook (https://facebook.com/Libretexts), Twitter (https://twitter.com/libretexts), or our blog
(http://Blog.Libretexts.org).

                                                 This text was compiled on 02/18/2022
TABLE OF CONTENTS
Basic Microbiology laboratory for upper division college students with color diagrams and very simple instructions. The manual covers lab
safety, how to use a microscope, aseptic transfer of bacteria, simple, gram, capsule, acid fast, spore, and negative staining, environmental
requirements of bacteria, antibiotic susceptibility testing, bacterial control methods, membrane filtration, standard plate count, plaque assay,
biochemical tests for the identification of pathogenic Enterobacteriaceae.

  INTRODUCTION
  LABORATORY AND SAFETY RULES
  LAB 1: THE MICROSCOPIC WORLD
  LAB 1: WORKSHEET
  LAB 2: ASEPTIC TECHNIQUE
  You will be working with many pathogenic species of bacteria in the laboratory. Remember that bacteria are in the air as well as on the
  skin, the counter, and all objects and equipment that have not been sterilized. The most important tool for transferring cultures is the wire
  inoculating needle or loop. It can be quickly sterilized by heating it to red hot in a Bunsen burner flame.

  LAB 2: WORKSHEET
  LAB 3: SIMPLE, NEGATIVE, AND GRAM STAIN
  The Gram stain is the most important and universally used staining technique in the bacteriology laboratory. It is used to distinguish
  between gram (+) and gram (-) bacteria.

  LAB 3: WORKSHEET
  LAB 4: ACID-FAST, SPORES, AND CAPSULE STAINS
  Acid-fast stain is a differential stain used to identify acid-fast organisms such as members of the genus Mycobacterium. Acid-fast
  organisms are characterized by wax-like, nearly impermeable cell walls; they contain mycolic acid and large amounts of fatty acids, waxes,
  and complex lipids.

  LAB 4: WORKSHEET
  LAB 5: PIPETTE AND ENVIRONMENTAL REQUIREMENTS
  LAB 5: WORKSHEET
  LAB 6: ANTIBIOTIC SUSCEPTIBILITY TESTING
  In microbiology, McFarland standards are used as a reference to produce solutions that contain approximately similar numbers of bacteria
  for use in standardized microbial testing (Kirby Bauer). This is done by matching the turbidity (cloudiness) of McFarland standard with
  that of the test solution.

  LAB 6: WORKSHEET
  LAB 7: STERILIZATION

  LAB 7: WORKSHEET
  LAB 8: MEMBRANE FILTRATION
  Membrane filtration is a technique for testing water samples. In this procedure, water is drawn through a special porous membrane
  designed to trap microorganisms larger than 0.45 μm. Afterward, the filter is applied to the surface of Endo agar plates and incubated for
  24 hours. Endo agar is a selective media that encourages gram-negative bacterial growth and inhibits gram-positive growth. It also contains
  lactose for fermentation and a dye to indicate pH changes.

  LAB 8: WORKSHEET
  LAB 9: STANDARD PLATE COUNT
  LAB 9: WORKSHEET
  LAB 10: PLAQUE ASSAY AND BIOCHEMICAL TESTS (DAY 1)
  LAB 10: WORKSHEET
  LAB 11: BIOCHEMICAL TESTS (DAY 2)

  LAB 11: DATA SHEET
  LAB 12: STAPHYLOCOCCUS AND STREPTOCOCCUS
  LAB 12: WORKSHEET

                                                                       1   2/18/2022
LAB 13: ELISA
LAB 13: WORKSHEET
BACK MATTER
INDEX
GLOSSARY

                    2   2/18/2022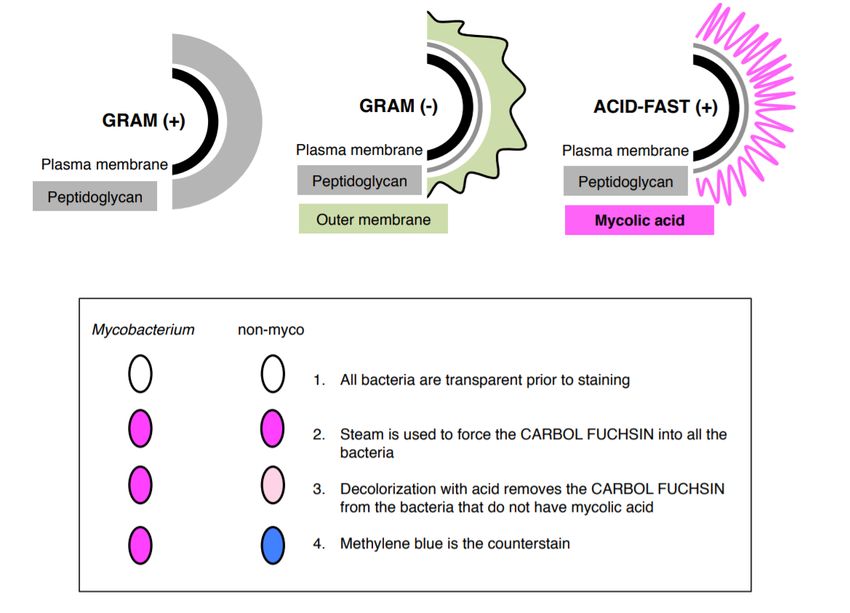
Introduction
Microbiology laboratory is designed to allow students to grow, characterize, and identify many bacteria. The laboratory
sessions will expose you to many potential pathogenic bacteria and listed below are many of the genera of bacteria that we
will use during the laboratory sessions.
Please consult your physician AND INFORM THE INSTRUCTOR if you have a medical condition, including but not
limited to being HIV positive, having an autoimmune disease, being an organ transplant recipient, undergoing cancer
treatments, being pregnant, or any other medical conditions that might be a concern. If you have such a condition, we can
take appropriate steps to accommodate your health situation.

Note
  Genera we may work with including but are not limited to:
  Staphylococcus, Streptococcus, Enterococcus, Escherichia, Bacillus, Listeria, Erysipelothrix, Coryne, Mycobacterium,
  Citrobacter, Klebsiella, Proteus, Shigella, Providencia, Yersinia, Vibrio, Campylobacter, Aeromonas, Plesiomonas,
  Acinetobacter, Stenotrophomonas, Shewanella, Alcaligenes, Neisseria, Haemophilus, Legionella, Bordetella,
  Pasteurella, Clostridium

                            Nazzy Pakpour & Sharon Horgan 1   1/9/2022                https://bio.libretexts.org/@go/page/23924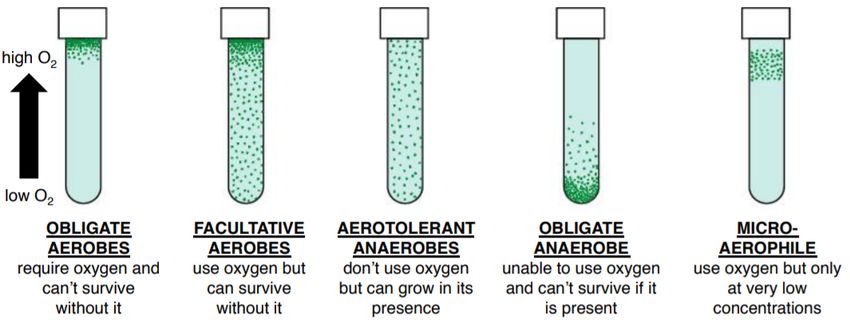
Laboratory and Safety Rules
Laboratory safety regulations will be strictly enforced. Repeated infractions will result in points lost. All organisms will be
considered pathogenic, and should be handled with aseptic technique and universal precautions when working in the
laboratory.
1. Wash your hands with soap and water before entering or leaving the lab.
2. Wear shoes that completely cover your feet, you cannot wear sandals or other open-toe OR open-heel
shoes (clogs are ok).
3. You must wear a lab coat when working in the microbiology lab. You must store your lab coat/shirt in the
lab. Your lab coat/shirt may NOT be removed from the room during the semester.
4. Long hair must be tied back in a ponytail, all hats must be removed or turned backward.
5. Accidents or injuries must be reported to your instructor as soon as possible. Know the location of the fire blanket, fire
extinguisher, shower and eyewash in case of emergency.
6. Do not eat, drink, or chew gum in the lab. Avoid hand-to-mouth activities such as nail biting or chewing on
the end of a pencil/pen.
7. Cell phones are not allowed in lab under any circumstances.
8. Do not put paper towels used to wipe down the bench in the bench top waste baskets.
9. Bunsen burners should never be left unattended
10. Disinfect your lab space at the start and end of each lab period. To disinfect your area wipe down the table
top thoroughly with laboratory disinfectant and a paper towel. When leaving the lab, apply disinfectant to the
bench area and leave to air dry (wet).
11. Remove any non-essential materials from your lab workspace, and keep only what you need for conducting the
laboratory activity on your bench. Store coats and backpacks where they will not be in the way.
12. At the end of the lab period return all equipment to its place of origin. It is important that we
maintain/improve our surroundings for other classes/students.
13. Dispose of wastes as instructed. Hazardous chemicals and microbial cultures must be properly discarded in designated
containers and kill areas. We will inform you of the proper disposal procedures. Do not discard any materials that have
contacted microbial cultures or hazardous chemicals in sinks or wastebaskets.
14. Treat each other with respect, you are all here to learn, you are all going to make lots of mistakes, be
patient with each other.

                             Nazzy Pakpour & Sharon Horgan 1     1/9/2022                https://bio.libretexts.org/@go/page/23953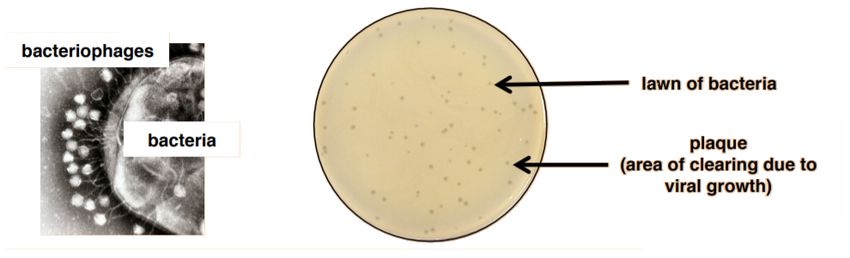
Lab 1: The Microscopic World
ACTIVITY 1: Getting to Know Your Microscope
1. Individually, get the combination from the instructor for your microscope drawer.
2. Open combination drawer and take out the microscope.
3. Label all the parts of the microscope with the provided post-its using the image below or the laboratory manual.

Note
  The image below does not match your microscope perfectly, you will be responsible for knowing the parts of your
  microscope on the lab practical.

Practice worksheet (this is not an assignment)

  Can you label all the parts of the microscope?

                             Nazzy Pakpour & Sharon Horgan Lab 1.1 2/15/2022               https://bio.libretexts.org/@go/page/23954
Complete the following:
  The magnification is = __________ multiplied by _____________

                    Ocular                                    Objective                        Total Magnification

ACTIVITY 2: How to Use Your Microscope
Note
  Microscope magnification: enlarging an object’s appearance
  The magnification is = (power of the oculars) multiplied by (power of the objectives)
  Our microscopes have 10X oculars and 4X, 10X, 40X and 100X objectives
  Never carry a microscope with just one hand!

FOCUSING:
1. Use one of the pre-made, gram-stained, bacterial slides.
2. Make sure the condenser is all the way up and the iris diaphragm is all the way open, letting the maximum amount of light
to contact your slide.
3. ALWAYS start at 4X, stage lowered, focus with coarse focus knob first.

                              Nazzy Pakpour & Sharon Horgan Lab 1.2 2/15/2022             https://bio.libretexts.org/@go/page/23954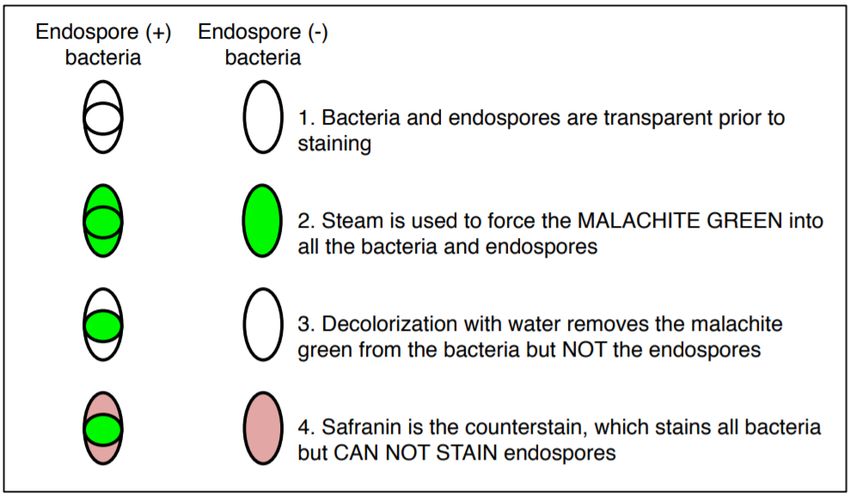
4. Once in focus move to 10X and focus using the fine focus knob.
5. Once in focus move to 40X and focus using the fine focus knob.
6. Move objectives half-way between 40X and 100X, add 1 drop of oil.
7. MAKE SURE THE 40X DOES NOT TOUCH THE OIL!
8. Move to 100x and SLOWLY focus with the fine focus knob If you do not see your image clearly, DO NOT go back to the
40X and try to refocus.

CLEANING A MICROSCOPE:
1. Lower stage.
2. Remove slide, turn the power off.
3. Wipe oil from all surfaces and 100X with lens paper.
4. With the second piece of lens paper, moistened with alcohol, wipe all surfaces. Never use Kimwipes to
clean microscope.
5. Wipe surfaces with a new dry piece of lens paper.
6. Return to the lowest lens (4x).
Once you are ready, invite the instructor over for your first skill tests.

 SKILL TEST #1 (2.5 PTS): FOCUSING MICROScope
  Under the supervision of the instructor or lab technician, bring your slide into focus under 100X. You can use your notes,
  books, etc. but you CAN NOT get help from other students.

 SKILL TEST #2 (2.5 pts): Cleaning your microscope
  Under the supervision of the instructor or lab technician, clean your microscope. You can use your notes, books, etc. but
  you CAN NOT get help from other students.

PLEASE READ THE FOLLOWING BEFORE PROCEEDING:
Stentors are a genus of single-celled eukaryotic organisms with cilia. They are usually horn-shaped are
among the biggest known unicellular organisms. They reproduce asexually through binary fission and found
in most freshwater lakes and streams.
Paramecia are a genus of single-celled eukaryotic organisms with cilia. They are usually oval shaped and
were some of the first microorganisms studied under a microscope. They reproduce asexually through
binary fission and found in freshwater, brackish, and marine environments.
Euglenas are a genus of single-celled eukaryotic organisms with flagella. They are cylindrical with bright
green chloroplasts inside. They are found in fresh and salt waters. Even though they have the ability to
photosynthesize (like plants) they can also feed on other organisms (like animals).
Giardia lamblia is a single-celled eukaryotic parasitic organism. The flagellated form of the parasite
colonizes and reproduces in the small intestine, causing giardiasis. Giardia trophozoites absorb their
nutrients from the lumen of the small intestine and are anaerobes (do not use oxygen). Human infection occurs via ingestion of
water contaminated with the dormant cyst form of the parasite or through fecal-oral contamination. The cyst form is very
hardy and can survive for weeks to months in cold water, and are resistant to chlorination. Giardia infects humans but is also
one of the most common parasites infecting cats, dogs, cattle, sheep, and birds. The life cycle begins with a cyst being excreted

                               Nazzy Pakpour & Sharon Horgan Lab 1.3 2/15/2022              https://bio.libretexts.org/@go/page/23954
in the feces of an infected individual. A distinguishing characteristic of the cyst is four nuclei. Once ingested by a host, the
trophozoite emerges from the cyst. This is the active stage of the parasite capable of feeding and movement. After the feeding
stage, the trophozoite undergoes asexual replication through longitudinal binary fission. The resulting trophozoites and cysts
then pass through the digestive system in the feces. While the trophozoites may be found in the feces, only the cysts are
capable of surviving outside of the host.
AFTER you have completed your skill tests, examine each of the following slides and sketch the organism you observe below.
1. Stentor
2. Paramecium
3. Euglena
4. Giardia cyst and trophozoite
Nazzy Pakpour & Sharon Horgan Lab 1.4 2/15/2022 https://bio.libretexts.org/@go/page/23954ACTIVITY 3 (with your lab partner):
1. Label 5 TSA plates.
2. Place plate #1 within 6 inches of Bunsen burner open for 2 min.
3. Place plate #2 FAR away from Bunsen burner open for 2 min.
4. Place plate #3 FAR away from Bunsen burner open for 10 min.
5. Place plate #4 FAR away from Bunsen burner open for 30 min.
6. Take plate #5 and use a wet swab (use the sterile water to wet) to swab something (your partner, outside, your nose, be
creative).
7. Take one touch plate and touch one place (face, walls, floor, shoes, bathrooms… be creative).
8. Put all your plates in the 37°C incubator, make sure your plates are agar side up.
Nazzy Pakpour & Sharon Horgan Lab 1.5 2/15/2022 https://bio.libretexts.org/@go/page/23954Trypticase soy agar (TSA)
Trypticase soy agar (TSA) is a growth medium for the culturing of bacteria. It is one of the most common general-purpose
media used in microbiology labs. TSA provides enough nutrients to allow for a wide variety of microorganisms to grow
and is used for storage (4°C), enumeration (counting), isolation of pure cultures, or just general culturing. TSA contains
enzymatic digests of casein and soybean meal, which provides amino acids and other nitrogenous substances, making it a
nutritious medium for a variety of organisms. Glucose is the energy source. Sodium chloride maintains the osmotic
equilibrium, while dipotassium phosphate acts as a buffer to maintain pH. Agar is used as a gelling agent.
Sometimes the medium is supplemented with blood to facilitate the growth of more fastidious bacteria or antimicrobial
agents (antibiotics) to permit the selection of various microbial groups. TSA is frequently the base media of other agar
plate types. For example, blood agar plates (BAP) are made by enriching TSA plates with defibrinated sheep blood, while
chocolate agar is made through additional cooking of BAP.
HOW TO LABEL SAMPLES:
In microbiology, it is important to properly label the media plates, broths, or slants PRIOR to inoculation with different
microorganisms to avoid contamination.
Label your samples with a SHARPIE with the following information:
1. Your name or initials or group name
2. Date
3. Medium type
4. Organism name or abbreviation
5. Temperature that plate/tube will be incubated at
6. Miscellaneous info (antibiotic, time point, etc.)
Nazzy Pakpour & Sharon Horgan Lab 1.6 2/15/2022 https://bio.libretexts.org/@go/page/23954Lab 1: Worksheet
Name: ______________________________
Section: _____________________________
Student ID#:__________________________
Work in groups on these problems. You should try to answer the questions without referring to your textbook. If you get stuck, try
asking another group for help.
1. What are two differences between the cyst and trophozoite form of Giardia? (1)
2. List two things the person in this picture is doing wrong. (1)
3. What are the energy sources of organisms in the genus Euglena? (0.5)
4. Using the figure above, describe the form, elevation, and margins of two different colonies on your touch plate. (1)
5. Of the plates placed open for different amounts of time which had the least growth, which had the most growth, and why? (2)
Nazzy Pakpour & Sharon Horgan Lab 1.1 2/18/2022 https://bio.libretexts.org/@go/page/23956Lab 2: Aseptic Technique
You will be working with many pathogenic species of bacteria in the laboratory. Remember that bacteria are in the air as
well as on the skin, the counter, and all objects and equipment that have not been sterilized. The most important tool for
transferring cultures is the wire inoculating needle or loop. It can be quickly sterilized by heating it to red hot in a Bunsen
burner flame. Adjust the air inlets of the burner so that there are a hotter inner cone and the cooler outer flame. A dry
needle may be sterilized by holding it at a 30-degree angle in the outer part of the flame. A wet loop with bacteria on it
should first be held in the inner part of the flame to avoid spattering, and then heated until red hot in the outer part of the
flame. Always flame the loop immediately before and after use! Allow it to cool before picking up an inoculum of bacteria
(or you will kill the bacteria). Hold the loop or wire handle like a pencil.
Remember to:
1. Always stand or carry tubes in a rack.
2. Not lay the cap down or touch anything with it.
3. Not remove the lid unnecessarily or for prolonged periods of time.
4. Always put the lid of plates face down.
How To Streak For Isolated Colonies (SFIC):
Mixed cultures (more than one species) can be isolated using the streak plate technique. The goal is to acquire a pure
culture of one species of bacteria, in a single colony, from a mixed culture We do this by separating the microbes on the
surface of agar with quadrant streaking, this method DILUTES the bacteria. The goal is not to have bacteria in all four
quadrants but rather to get single isolated colonies.
Exercise
Practice SFIC by using your pencil instead of the loop. Once you put your pencil down in the ‘plate’, don’t lift it again.
Make sure to flame between each quadrant.
Nazzy Pakpour & Sharon Horgan Lab 2.1 2/9/2022 https://bio.libretexts.org/@go/page/23965Different Types Of Media For Bacterial Growth:
SLANT: solid medium made with agar and various nutrients and indicators. Slanting gives the bacteria a greater surface
area on which to grow in a tube. Agar slants are also useful in maintaining bacterial cultures, more so than stacks of Petri
dishes. Multiple cultures are easily placed into test tube racks and stored under refrigeration. Bacteria are inoculated onto a
slant using a loop and grow in the surface of the agar.
SLANT/DEEP: solid medium made with agar and various nutrients and indicators. Similar to a slant but creates a deep
zone, commonly called the ‘butt’. This type of culture medium gives the ability to grow bacteria in both an aerobic,
oxygen-rich, environment (surface of the slant) and an anaerobic, oxygen deficient, environment (butt of slant).
Slant/deeps are inoculated by stabbing a needle into the butt and then immediately streaking across the surface of the slant.
DEEP: solid medium made with agar and various nutrients and indicators. This type of culture is used for the growth of
anaerobic bacteria which grow in the absence of oxygen and are inoculated by stabbing the media with a needle.
BROTH: liquid medium made with various nutrients and indicators. Allows for the growth of large volumes of bacteria,
the level of growth can be assessed based on the turbidity (cloudiness) of the culture. Bacteria are inoculated into a broth
using a loop.
Nazzy Pakpour & Sharon Horgan Lab 2.2 2/9/2022 https://bio.libretexts.org/@go/page/23965BROTH+DURHAM TUBE: liquid medium made with various nutrients and indicators in which an upside-down smaller
tube, called a Durham tube, is placed. Durham tubes are used to detect the production of gases, such as CO2 or N2, by
microorganisms. The tube is initially filled with the medium and then collects gas as the bacteria grow, creating a bubble.
Bacteria are inoculated into a broth+Durham tube using a loop.
PLATE: solid medium made with agar and various nutrients and indicators. Can be made in Petri dishes of various sizes.
Plates are particularly helpful in isolating a specific species of bacteria, which is not possible in a liquid medium. Using the
SFIC technique bacteria can be diluted until individual colonies are formed. Bacteria are inoculated onto a plate using a
loop
Note
Please be aware that a loop will collect much higher concentrations of bacteria from a plate than from a broth.
Therefore, when using the SFIC technique please consider what media/medium you are taking the bacteria from.
Aseptic Transfer Of Bacteria:
FOR THIS LAB YOU WILL BE WORKING INDIVIDUALLY
1. You will be provided with Staphylococus epidermidis in a broth and on a plate. These will be shared with the table and
will be found at the front of each table in a white plastic rack.
2. Label 2 broth tubes, 2 slant tubes, and 2 plates.
3. Aseptically transfer bacteria from your BROTH culture to a broth, a slant, and a plate using your loop.
Note
There will be a skills test on SFIC and & future extra credit opportunities will be based on this technique, make sure
you know how to do it!!
4. Aseptically transfer bacteria from your PLATE culture to a broth, a slant, and a plate
5. Plates will be placed in the 37°C incubator in the container labeled with your lab section. All tubes will be placed in the
provided racks at the end of your table. When your table is done, one of you will need to place that rack in the 37°C
incubator. (if you have read all the way to the last step before you started inoculating, write your name on a post-it and
bring it to the instructor for 1 pt. extra credit)
Nazzy Pakpour & Sharon Horgan Lab 2.3 2/9/2022 https://bio.libretexts.org/@go/page/23965Bacterial Shape and Arrangement:
Bacteria are described by three basic criteria: size, shape, and arrangement. The units used to measure organisms seen
under a microscope are micrometers (μm). A micrometer is one-millionth of a meter. Most microbes are around 1 μm in
size. Viruses are typically 1/10 that size. Animal cells are typically around 10 μm in size. The three most common shapes
are the rod (bacillus), the sphere (coccus), and the spiral type (vibrio).
Arrangement is the manner by which groups of bacteria appear together. Some common arrangement types are paired
(diplo), grape-like clusters (staphylo) or chains (strepto).
Nazzy Pakpour & Sharon Horgan Lab 2.4 2/9/2022 https://bio.libretexts.org/@go/page/23965Nazzy Pakpour & Sharon Horgan Lab 2.5 2/9/2022 https://bio.libretexts.org/@go/page/23965
Lab 2: Worksheet
Name: ______________________________
Section: _____________________________
Student ID#:__________________________
Work in groups on these problems. You should try to answer the questions without referring to your textbook. If you get
stuck, try asking another group for help.
1. Did you inoculate your broth, slant, and plate properly? How do you know? (0.5)
2. What is aseptic technique and why do we use it? (1)
3. You inoculate a plate from a plate, you see no growth the next day. You know the plate had live bacteria on it. What
went wrong? (1)
4. What is a Durham tube and what do we use it for? (1)
5. What is the difference between a slant and a slant/deep? (0.5) NOTE: do not just define the two terms, write an actual
sentence describing the difference.
6. Which plate, the one inoculated from a broth or the one from a plate, would you expect to see more bacteria on? Why?
(1)

                         Nazzy Pakpour & Sharon Horgan Lab 2.1 1/20/2022             https://bio.libretexts.org/@go/page/23967
Lab 3: Simple, Negative, and Gram Stain
PREPARING AN EMULSION:
1. Working in pairs, label each slide and draw a circle on the center of the slide with a wax pencil which is provided at
your table, DO NOT use a sharpie, this will keep the bacteria concentrated in one area on the slide.
2. Prepare an emulsion on each slide:
If you are taking a bacteria from a plate, place a small drop of water on a slide and aseptically add bacteria.
If you are taking a bacteria from a broth, place 3-6 loopfuls of bacteria onto a slide with no water added.
3. You and your lab partner will need to prepare the following slides:
3 slides of Staphylococcus epidermidis (one for simple stain, one for gram stain, one as back-up)
3 slides of Pseudomonas aeruginosa (one for simple stain, one for gram stain, one as back-up)
2 slides of S. epidermidis and P. aeruginosa mixed together (one for gram stain, one as back-up)
4. Mix gently until you get an even cloudy mixture (should look like skim milk)
Note
If you mix too aggressively, you will lose the bacterial morphology.
5. Allow the slide(s) to air dry on the slide warmer. While the slides are drying, start your negative stain.
6. Once the liquid has completely evaporated, heat fix by passing the slide through a flame three times.
Note
If you heat fix too little, the bacteria will wash off the slide. If you heat fix too much, you will cook the bacteria and
denature them.
7. Allow the slide to cool and then continue with your staining protocol.
NEGATIVE STAIN:
Definition
Nigrosin is a simple and indirect stain used for determining bacterial morphology. The shapes and sizes of the
organisms are seen as color-free outlines against the dark background. An advantage of using this method is that prior
fixation by heat is not needed, so the organisms are seen in more lifelike shapes. Nigrosin is an acidic stain which
becomes negatively charged. Since the surface of most bacterial cells is negatively charged, the cell surface repels the
stain. The glass of the slide will stain, but the bacterial cells will not.
8. If you need to, step outside and watch this video to make sure you understand how to do the procedure:
www.youtube.com/watch?v=avveXgPWVJ8 (you can also google “negative stain video”)
9. Add a small drop of nigrosin to the slide.
10. Aseptically transfer one loopful of your NEGATIVE STAIN MIX bacteria into the drop of nigrosin and mix gently.
11. Use a second slide, held at a 45-degree angle to smear across your slide.
12. Allow the slides to air dry on the counter. Do not use slide warmer!
Nazzy Pakpour & Sharon Horgan Lab 3.1 2/1/2022 https://bio.libretexts.org/@go/page/2398313. Repeat this procedure to make a slide of S. epidermidis and a slide of P. aeruginosa 14. Examine all three slides under
oil immersion and record your results on your worksheet.
SIMPLE STAIN:
Definition
Methylene blue is a simple and direct stain used for determining bacterial morphology (shape and arrangement). It is a
cationic dye (positive charge) which stains the cell a blue color. The presence of negatively charged molecules in the
cell (like DNA & RNA) causes the cell to stain blue.
15. Use the slides that you already prepared.
16. Add Methylene blue stain to heat-fixed slide and leave for 2 minutes.
17. Hold the slide in an angle and rinse gently with water from the squirt bottle.
18. Blot gently with bibulous paper to get rid of excess water.
19. Examine under oil immersion and record your results on your worksheet.
GRAM STAIN:
Definition
The Gram stain is the most important and universally used staining technique in the bacteriology laboratory. It is used
to distinguish between gram (+) and gram (-) bacteria. The difference between gram (+) and gram (-) bacteria lies in
the ability of the cell wall of the organism to retain the crystal violet.
18. Use the slides that you already prepared (1) S. epidermidis (2) P. aeruginosa (3) S. epidermidis and P. aeruginosa mixed
together.
19. Stain with crystal violet for 1 minute, then rinse gently with water.
20. Treat with iodine mixture for 1 minute, then rinse gently with water.
21. Rinse with ~3-6 drops of 95% alcohol to decolorize, then rinse gently with water.
Nazzy Pakpour & Sharon Horgan Lab 3.2 2/1/2022 https://bio.libretexts.org/@go/page/2398322. Counterstain with safranin for 30 seconds, then rinse with water.
Note
Proper gram stains of the mixed culture are worth 2 points extra credit!
Nazzy Pakpour & Sharon Horgan Lab 3.3 2/1/2022 https://bio.libretexts.org/@go/page/23983Lab 3: Worksheet
Name: ______________________________
Section: _____________________________
Student ID#:__________________________
Work in groups on these problems. You should try to answer the questions without referring to your textbook. If you get stuck,
try asking another group for help.
1. Why are S. epidermidis and P. aeruginosa the same color with the simple stain? (1)
2. What is being stained in a negative stain? (1)
3. How does the charge of bacterial cells impact the staining procedures used? (1)
4. Which plate had gram-negative bacteria? What color were these bacteria and why? (2)
5. Which plate had gram-positive bacteria? What color were they and why? (2)
Nazzy Pakpour & Sharon Horgan Lab 3.1 2/15/2022 https://bio.libretexts.org/@go/page/239846. Draw the membrane layers of a gram-positive and gram-negative bacteria making sure to label the plasma membrane,
peptidoglycan layers, periplasmic space, and LPS (3)
Nazzy Pakpour & Sharon Horgan Lab 3.2 2/15/2022 https://bio.libretexts.org/@go/page/23984Lab 4: Acid-Fast, Spores, and Capsule Stains
ACID-FAST
Acid-fast stain is a differential stain used to identify acid-fast organisms such as members of the genus Mycobacterium.
Acid-fast organisms are characterized by wax-like, nearly impermeable cell walls; they contain mycolic acid and large
amounts of fatty acids, waxes, and complex lipids. This type of cell wall is resistant to most compounds, therefore acid-fast
organisms require a special staining technique.
The primary stain used in acid-fast staining, carbol fuchsin, is lipid-soluble and contains phenol, which helps the stain
penetrate the cell wall. This is further assisted by the addition of heat in the form of heat (steam). Steam helps to loosen up
the waxy layer and promotes entry of the primary stain inside the cell. The smear is then rinsed with a very strong
decolorizer, which strips the stain from all non-acid-fast cells but does not permeate the cell wall of acid-fast organisms.
The decolorized non-acid-fast cells then take up the counterstain, which in our case is methylene blue.
1. Working in pairs, prepare THREE slides as directed below (2 for back-up and one to stain).
2. Label each slide and draw a circle on the center of the slide with a wax pencil.
3. Prepare an emulsion on each slide with 4 loopfuls of Staphylococcus epidermidis from your broth culture onto the slide
(these will be your acid-fast negative bacteria).
4. Then, add one loopful of Mycobacterium chelonae (these are your acid fast positive bacteria) and mix the two bacteria
together.
5. Allow the slide(s) to air dry on the slide warmers (while these slides are drying, prepare your slides for the spore stain).
6. Once the liquid has completely evaporated, heat fix the bacteria by passing it through your flame three times.
7. Make sure the slide rack on top of your beaker is completely level. Then, bring your water to boil while the slides are
drying.
Nazzy Pakpour & Sharon Horgan Lab 4.1 1/25/2022 https://bio.libretexts.org/@go/page/23985You only need about 200 milliliters of water. If you add more, you will be waiting all lab period for your water to boil.
8. Once the water is boiling, place your slide on the slide rack above the boiling water.
9. Cover the area of your smear on the slide with a square piece of PRECUT paper towel. Make sure none of the paper is
hanging off the slide.
10. Carefully apply the CARBOL FUCHSIN stain to the paper towel.
If a stain appears in the water you are boiling, please stop and discard the stained water in the liquid waste disposal.
The fumes from carbol fuchsin can be toxic.
11. Steam with the stain on the slide for 7 minutes while continuously applying more stain so the paper square never dries
out.
12. Gently remove the paper with forceps and discard it in the small waste paper cup that will be provided on your bench.
Then, rinse the slide with water.
13. Put the slide on your staining basin and gently rinse with water.
14. Decolorize with 6 drops of acid alcohol (not ethanol from your gram stain kit), then rinse with water.
15. Counterstain with methylene blue for 2 minutes.
16. Rinse with water and blot dry with bibulous paper (do not use the slide warmer).
17. Examine under the 100X objective lens with oil immersion and record your results.
The colors of this image may be slightly off due to printing/copying.
SPORE STAIN
The endospore stain is a differential stain used to visualize bacterial endospores. An endospore is a dormant form of a
bacterium, which some species of bacteria produce under stressful conditions such as poor nutrition, high temperatures, or
dry environments. The outer layer is composed of keratin which resists staining. The malachite-green stain is forced into
the spore using steam. Spores can be central, terminal, and subterminal. This stain is commonly used to detect spores
produced from the genera of Bacillus and Clostridium.
Nazzy Pakpour & Sharon Horgan Lab 4.2 1/25/2022 https://bio.libretexts.org/@go/page/2398518. Prepare two slides with emulsions one from plate A and one from plate B.
19. Heat fix the slides and place them on the slide rack above the boiling water.
20. Cover the area of your smear on each slide with a square piece of PRECUT paper towel.
21. Carefully apply the MALACHITE GREEN stain to the paper towel.
22. Steam for 10 minutes and keep the paper soaked with the stain during this time.
23. Gently remove the paper with forceps, discard in the small waste paper cup that will be provided on your bench, and
then rinse the slide with water.
24. Put the slides on your staining basin and gently rinse with water.
25. Counterstain with SAFRANIN for 1 minute and then rinse with water. Blot dry with bibulous paper.
26. Examine under the 100X objective lens with oil immersion and record your results.
The colors of this image may be slightly off due to printing/copying.
CAPSULE STAIN
Most capsules are composed of polysaccharides or polypeptides which are a thick, detectable, and discrete layer outside
the cell wall. Some capsules have well-defined boundaries while some have fuzzy, trailing edges. Capsules protect bacteria
from the phagocytic action of immune cells and allow pathogens to invade the body. If a pathogen loses its ability to form
capsules, it often ceases to be pathogenic.
Nazzy Pakpour & Sharon Horgan Lab 4.3 1/25/2022 https://bio.libretexts.org/@go/page/2398527. Label and prepare a slide with an emulsion of Klebsiella pneumoniae.
28. Let it air dry (DO NOT USE THE SLIDE WARMER, DO NOT HEAT FIX).
29. Stain with 1% crystal violet for 2 minutes (DO NOT USE CRYSTAL VIOLET FROM GRAM STAIN).
30. VERY GENTLY rinse with 6 drops of copper sulfate.
31. Let it air dry on the counter (do not use slide warmer).
32. Examine under the 100X objective lens with oil immersion and record your results.
Nazzy Pakpour & Sharon Horgan Lab 4.4 1/25/2022 https://bio.libretexts.org/@go/page/23985Lab 4: Worksheet
Name: ______________________________
Section: _____________________________
Student ID#:__________________________
Work in groups on these problems. You should try to answer the questions without referring to your textbook. If you get stuck, try
asking another group for help.
1. Label which bacteria are Staphylococcus and which are Mycobacterium. (2)
2. Why is it important to steam the slides for an acid fast stain? (1)
3. One of your plates contained manganese which is known
to induce the sporulation of Bacillus, which plate was it? (3)
4. Draw what you would expect to see for plate A and B if
you did not counterstain with safranin. (1)
5. Why did you not heat fix this
slide? (2)
6. How does the presence of a
capsule make a bacteria
potentially more pathogenic to
us? (1)
Nazzy Pakpour & Sharon Horgan Lab 4.1 2/18/2022 https://bio.libretexts.org/@go/page/23987Lab 5: Pipette and Environmental Requirements
Getting to Know Your Pipette:
1. Find the following parts on your pipette:
Volume adjustment dial
Tip ejector button
Plunger button
Stainless steel micrometer
Digital volume indicator
Stainless steel ejector arm (removable)
Plastic shaft
Disposable yellow or blue tip
2. Practice holding your pipette correctly, placing a tip on our pipette, and ejected the
tip. Do this at least three times.
3. The total volume a pipette can hold is stated on the top of the plunger. We will be
working with the following three volume pipettes:
P-20 0.02 μl – 20 μl
P-200 20 μl – 200 μl
P-1000 200 μl – 1000 μl
4. Based on the volume pipette you have the numbers in the digital display have a different meaning.
5. Rotate the volume adjustment knob until the digital indicator reaches the desired volume, then place a disposable tip on the shaft
of the pipette (practice all three volumes min, int, max)
6. Press down on the plunger to the First Stop. (You will be able to push past this point, but there is enough resistance to stop the
movement if you try to be aware of it.)
7. Hold the pipette vertically and immerse the disposable tip into the sample. Use the colored water and the microcentrifuge tubes
provided to you.
8. Allow the plunger button to return slowly to its original position. Do not allow the button to snap up.
9. To dispense the sample: place the tip against the side wall of the receiving tube and push the plunger down to the first stop. Wait
2-3 seconds, then depress the plunger to the second stop in order to expel any residual sample in the tip.
10. While the plunger is still pushed down, remove the pipette from the tube and allow the plunger to slowly return to its original
position.
11. Practice until you are ready and then call an instructor for your skills test. This skills test is worth 5 points.
Warning
Never rotate the volume adjustment knob past the upper or lower range of the pipetman.
Never lay the pipetman down on its side or hold it horizontally when it contains liquid.
Never immerse the shaft of the pipetman into the fluid.
Nazzy Pakpour & Sharon Horgan Lab 5.1 2/18/2022 https://bio.libretexts.org/@go/page/23988Environmental Requirements (Temperature)
How does temperature affect bacterial growth?
Organisms grow best over a certain temperature range, and this range has restrictions. The cardinal temperatures are the range
of temperatures over which an organism can grow. Every organism has evolved to live at a particular optimum temperature.
Minimum: lowest temp where reproduction occurs
Maximum: highest temp where reproduction occurs
Optimum: highest rate of reproduction
Organisms are classified based on the temperature ranges they live in:
Psychrophiles: less than zero
Psychrotrophs: 0-30°C
Mesophiles: middle temperatures 15-45°C
Thermophiles: 40-80°C
Extreme Thermophiles: above 65°C
WHAT ARE THE CARDINAL TEMPERATURES OF 3 DIFFERENT ORGANISMS?
1. Working as a table you will need 15 Tryptic Soy Broth (TSB) tubes.
2. Label your broth tubes with the bacterial species (3 species) and temperature (5 temps) = 15 tubes:
Escherichia coli (5 broth tubes)
Geobacillus stearothermophilus (5 broth tubes)
Pseudomonas fluorescens (5 broth tubes)
3. Mix each broth culture before using by gently tapping on the tube.
4. Using aseptic technique, use a sterile pipette to transfer 20 μl of each organism to appropriate test tube of broth.
Note
If you are not consistent with the volume you inoculate, your results will be undesirable.
5. Place all in the provided racks at the end of your table. When your table is done, one of you will need to place your rack in the
37°C incubator.
6. Each person at your table will streak for isolated colonies from a broth of Serratia marcescens onto a TSA plate.
7. Three people will incubate their plate at 30°C and the other half at 40°C. Containers for the plates will be placed on the
instructor's desk.
Environmental Requirements (pH)
Nazzy Pakpour & Sharon Horgan Lab 5.2 2/18/2022 https://bio.libretexts.org/@go/page/23988How does pH affect bacterial growth?
Hydrogen ions in a solution = pH. Organisms grow best at a specific pH range based, in part, on the environment they have
evolved to live in. If bacteria are outside their optimal pH range their proteins can become denatured. Ranges of pH over which
an organism can live place them in groups:
Acidophiles: below pH 5.5
Neutrophiles: pH 5.5 -8.5
Alkaliphiles: pH above 8.5
WHAT ARE THE pH RANGES OF 3 DIFFERENT ORGANISMS?
8. Working as a table you will need 15 TSB tubes of the following pHs:
3 tubes of pH 2
3 tubes of pH 4
3 tubes of pH 6
3 tubes of pH 8
3 tubes of pH 10
9. Label your broth tubes with the bacterial species (3 species) and pH (5 pH) = 15 tubes
Lactobacillus plantarum → pH 2, 4, 6, 8, 10
Staphylococcus saprophyticus → pH 2, 4, 6, 8, 10
Alcaligenes faecalis → pH 2, 4, 6, 8, 10
10. Mix the culture before using by gently tapping on the tube.
11. Using aseptic technique, use a sterile pipette to transfer 20 μl of each organism to appropriate test tube of broth.
12. Place all inoculated tubes in the provided racks at the end of your table. When your table is done, one of you will need to place
that racks in the 37°C incubator.
Environmental Requirements (Salinity)
How does osmotic pressure affect bacterial growth?
Water is essential to all organisms. The ability to control the movement of water across a membrane is necessary for the
survival of all cells. Osmotic pressure is the minimum pressure which needs to be applied to a solution to prevent the inward
flow of water across a semi-permeable membrane. The movement of water is controlled by the concentration of solutes
contained within the water (usually salt). Bacteria can be classified based upon the salinity they can tolerate:
Halophiles (prefer NaCl concentrations of 3% or higher)
Nazzy Pakpour & Sharon Horgan Lab 5.3 2/18/2022 https://bio.libretexts.org/@go/page/23988Extreme halophiles (prefer NaCl concentrations of 15%-25%)
Xerophile (prefer low salt concentrations)
WHAT ARE THE PREFERRED SALINITY RANGES OF 4 DIFFERENT ORGANISMS?
11. Working as a table you will need 28 TSB broths of the following salinities:
4 tubes of NaCl 0%
4 tubes of NaCl 2.5%
4 tubes of NaCl 5%
4 tubes of NaCl 10%
4 tubes of NaCl 15%
4 tubes of NaCl 20%
4 tubes of NaCl 25%
12. Label your broth tubes with the bacterial species (4 species) and salinity (7 concentrations) = 28 tubes:
Escherichia coli
Halobacterium salinarum
Staphylococcus epidermidis
Vibrio alginolyticus
13. Mix the culture before using by gently tapping on the tube.
14. Using aseptic technique, use a sterile pipette to transfer 20 μl of each organism to appropriate test tube of broth.
15. Incubate E. coli and S. epidermidis at 37°C in the racks at your table, H. salinarum at 42°C, and V. alginolyticus at 30°C. These
racks will be on the instructor's desk.
Environmental Requirements (Aerotolerance)
What is aerotolerance and how does it affect bacterial growth?
Bacteria can differ dramatically in their ability to utilize oxygen (O2). Under aerobic conditions, oxygen acts as the final
electron acceptor for the electron transport chain located in the plasma membrane of prokaryotes. Bacteria use this process to
generate ATP, the energy source for most cellular processes. In the absence of oxygen (O2), some bacteria can use alternative
metabolic pathways including anaerobic respiration and/or fermentation. During anaerobic respiration, other alternative
molecules are used as the final electron acceptor for the electron transport chain such as nitrate (NO3), sulfate (SO4), and
carbonate (CO3).
Nazzy Pakpour & Sharon Horgan Lab 5.4 2/18/2022 https://bio.libretexts.org/@go/page/23988WHAT IS THE AEROTOLERANCE OF THREE DIFFERENT SPECIES OF BACTERIA?
16. Working as a table you will need 2 yeast+glucose plates.
17. You will be using the following three bacterial species:
Alcaligenes faecalis
Staphylococcus epidermidis
Clostridium sporogenes
18. Divide both plates into three sections and aseptically transfer each bacteria species to a section, use your
loop to draw a circle instead of streaking.
You will be comparing the growth between the three sections so make sure your streaks are of equal size.
19. One plate will be placed in a Torbal Jar at 37°C (anaerobic conditions) and one plate will just go directly in the incubator at
37°C (aerobic conditions). The Torbal jar will be at the end of each table.
Environmental Requirements (Results):
How do we quantify bacterial growth?
Often in microbiology, we need to determine the number of bacterial cells in a broth. We can do this directly through spread
plates (we will do this in a later lab) or indirectly by assessing the turbidity (cloudiness) of broth tubes. We measure turbidity
using a spectrophotometer which gives us a reading of the light absorbance:
more bacteria = more cloudy = higher absorbance
less bacteria = less cloudy = lower absorbance
Nazzy Pakpour & Sharon Horgan Lab 5.5 2/18/2022 https://bio.libretexts.org/@go/page/239881. Make sure the screen of your spectrophotometer reads 600 nM followed by some set of numbers and then the letter A.
2. For the spectrophotometer reading, use a Kimwipe to wipe the outside of the “blank” tube. Each set of broths (temp, pH,
salinity) will have their own blank tube
3. Place blank tube in the spectrophotometer, close the lid, and press the “0 ABS / 100% T” button. This will set the background
level of absorbance present in the broth when there are no bacteria growing.
4. Remove the blank tube.
5. Mix each tube before using by gently tapping on the tube and wipe with Kimwipe.
6. Insert this tube into the spectrophotometer, and without pressing anything, record the absorbance.
7. Once you are finished add your data to the chart at the front of the class, you will need to copy the data for the entire class.
8. Calculate averages and standard deviation for each condition & make graphs for each bacteria per condition (refer to the
example provided on page 36).
Environmental Requirements (Graphs)
You will now graph the average and standard deviation of your salinity data on a computer on whatever graphing program you are
familiar with. Please make sure your graph resembles the one below and shows the following information:
graph title
axis labels with units
vertical error bars ONLY
average at each salinity
all FOUR species of bacteria on one graph
Nazzy Pakpour & Sharon Horgan Lab 5.6 2/18/2022 https://bio.libretexts.org/@go/page/23988Nazzy Pakpour & Sharon Horgan Lab 5.7 2/18/2022 https://bio.libretexts.org/@go/page/23988
Lab 5: Worksheet
Name: ______________________________
Section: _____________________________
Student ID#:__________________________
Work in groups on these problems. You should try to answer the questions without referring to your textbook. If you get
stuck, try asking another group for help.
1. Give the cardinal temperatures and descriptive group (page 31) for each bacterial species. (1.5)
Escherichia coli :
Geobacillus stearothermophilus :
Pseudomonas fluorescens :
2. Which bacterial species are acidophiles? (0.5)
3. Which bacterial species are extreme halophiles? (1)
4. Draw and label the growth on your plates. (1)
5. A sample from a patient suspected of being infected with Clostridium difficile is left out too long before being taken to
the lab for identification. Why would that be a problem? (1)

TEMPERATURE:
                                                                 Escherichia coli
                            10°C                    20°C              30°C                    40°C                   50°C

       Table 1

       Table 2

       Table 3

       Table 4

                                                           Geobacillus sterothermophilus
                            10°C                    20°C              30°C                    40°C                   50°C

       Table 1

       Table 2

       Table 3

       Table 4

                                                             Pseudomonas fluorescens
                            10°C                    20°C              30°C                    40°C                   50°C

       Table 1

       Table 2

       Table 3

       Table 4

pH:
                                                              Lactobacillus plantarum
                             pH 2                   pH 4               pH 6                   pH 8                   pH 10

                          Nazzy Pakpour & Sharon Horgan Lab 5.1 1/9/2022                   https://bio.libretexts.org/@go/page/23991
Table 1
Table 2
Table 3
Table 4
Staphylococcus saprophyticus
pH 2 pH 4 pH 6 pH 8 pH 10
Table 1
Table 2
Table 3
Table 4
Alcaligenes faecalis
pH 2 pH 4 pH 6 pH 8 pH 10
Table 1
Table 2
Table 3
Table 4
SALINITY:
Escherichia coli
0% 2.5% 5% 10% 15% 20% 25%
Table 1
Table 2
Table 3
Table 4
Halobacterium salinarum
0% 2.5% 5% 10% 15% 20% 25%
Table 1
Table 2
Table 3
Table 4
Vibrio alginolyticus
0% 2.5% 5% 10% 15% 20% 25%
Table 1
Table 2
Table 3
Table 4
Staphylococcus epidermis
0% 2.5% 5% 10% 15% 20% 25%
Nazzy Pakpour & Sharon Horgan Lab 5.2 1/9/2022 https://bio.libretexts.org/@go/page/23991Table 1
Table 2
Table 3
Table 4
Nazzy Pakpour & Sharon Horgan Lab 5.3 1/9/2022 https://bio.libretexts.org/@go/page/23991Lab 6: Antibiotic Susceptibility Testing
In microbiology, McFarland standards are used as a reference to produce solutions that contain approximately similar
numbers of bacteria for use in standardized microbial testing (Kirby Bauer). This is done by matching the turbidity
(cloudiness) of McFarland standard with that of the test solution. Therefore it is important to always mix the McFarland
standard before beginning. The standard can then be compared visually to a suspension of bacteria in sterile saline. If the
bacterial suspension is too turbid, it can be diluted with more diluent. If the suspension is not turbid enough, more
bacteria can be added.
McFarland used today will be 0.5 = ~1.5 × 10 CFU/mL.
8
Definition
Mueller-Hinton Plate (MH Plate): A growth medium that is commonly used for antibiotic susceptibility
testing and allows for even diffusion of the antibiotic in the medium. The Kirby-Bauer antimicrobial disk
diffusion procedure is used with MH plates. The impregnated disk is placed on an agar surface, resulting
in diffusion of the antimicrobial into the surrounding medium. Effectiveness of the antimicrobial can be
shown by measuring the zone of inhibition (ZOI) for a pure culture of an organism.
MAKING McFARLAND STANDARD
1. Working individually you will use a 0.5 McFarland Standard (1.5 x 10⁸ CFU/mL) as a visual standard to make your own liquid
standard from the plate provided to you (make sure to mix the standard tube before comparing turbidities).
2. Use a cotton swab to take a small amount of your bacteria from your plate and gently swirl it into your tube of saline until the
turbidity matches that of your McFarland Standard.
Hold both tubes up to the light as you are swirling to best match the turbidity.
KIRBY-BAUER
3. Create a full lawn from your liquid standard sample on Mueller-Hinton (MH) plate by dipping a new cotton swab ONCE into
your McFarland Standard you have made and then swabbing a single plate 4X in four different directions.
4. Place your plate on the diagram on the handout.
5. Dip your forceps into the ethanol, flame BRIEFLY, and wait for all the ethanol to evaporate. Repeat this step 3 times.
In this procedure, it is the ethanol (not the heat) that disinfects the forceps. So, there is no need to hold the forceps in the flame
for long periods of time.
6. Aseptically add the six standard antibiotics, incubate at 37°C.
7. Discard your saline tubes on the biohazard rack. DO NOT put them back with the unused saline!
The antibiotic discs are labeled; no additional labeling for the discs is necessary.
MAKING ZONES OF INHIBITION:
1. Measure the diameter of zones of inhibition is in mm. for each of your antibiotics and record your results below.
2. If you can’t get the diameter because of an inadequate lawn or zones overlapping, measure the radius and multiply by 2.
Nazzy Pakpour & Sharon Horgan Lab 6.1 2/18/2022 https://bio.libretexts.org/@go/page/240183. Compare your results to the chart provided to determine if your bacterial species is resistant or susceptible to the antibiotics we
used.
Bacterial
Species:___________________________________________________________________________________________________________________
_________
Antibiotic Species ZOI Resistant (R)/Susceptible (S)/Intermediate (I)
Penicillin (p10)
Chloramphenicol (C30)
Trimethoprim (TMP5)
Ciprofloxacin (CIP5)
Streptomycin (S10)
Augmentin (AMC30)
You do not need to turn in this sheet but you will need it to answer questions on the worksheet on the next page.
Nazzy Pakpour & Sharon Horgan Lab 6.2 2/18/2022 https://bio.libretexts.org/@go/page/24018Lab 6: Worksheet
Name: ______________________________
Section: _____________________________
Student ID#:__________________________
Work in groups on these problems. You should try to answer the questions without referring to your textbook. If you get
stuck, try asking another group for help.
1. What is your bacterial species and what antibiotic should you definitely not use on a patient that is infected with your
bacterial species? Why? (1)
2. What antibiotic should you use on a patient that is infected with your bacterial species? Why? (1)
3. Why do we use a Mueller-Hinton (MH) plate in this lab? (1)
4. Why do we use a McFarland standard for this lab? (1)
5. What would happen if you did not get a full lawn on your MH plate during this lab? (1)
Nazzy Pakpour & Sharon Horgan Lab 6.1 12/15/2021 https://bio.libretexts.org/@go/page/24019Lab 7: Sterilization
UV Radiation:
What effect does ultraviolet light exposure have on bacterial growth?
Ionizing radiation (e.g. x-rays, gamma radiation) carries enough energy to remove electrons from molecules in a cell.
When electrons are removed from molecules, free radicals are formed that damage the cell leading to DNA damage,
mutations, and cell death. Non-ionizing radiation, such as ultraviolet (UV) light, excites electrons in molecules. The
excitation of electrons in DNA molecules often results in the formation of extra bonds between adjacent pyrimidines
(specifically thymine) in DNA. When two pyrimidines are bound together in this way, it is called a pyrimidine dimer.
These dimers often change the shape of the DNA in the cell and cause problems during replication ultimately leading
to cell death. Both ionizing and non-ionizing radiation are used to control the growth of microorganisms in clinical
settings, the food industry, and in laboratories.
WHAT IS THE EFFECT OF UV LIGHT EXPOSURE ON 3 DIFFERENT SPECIES OF BACTERIA?
1. Each table will be given one of the following bacterial species/stages:
Staphylococcus aureus
Serratia marcescens
Bacillus cereus (vegetative)
Bacillus cereus (spores)
2. Working as a table, use a cotton swab to make a lawn on the following 8 plates:
no UV exposure (control)
15 seconds
30 seconds
1 min
3 min
5 min
10 min
10 min with the plate fully covered with a lid
3. Put your plates (with the half lids) under UV light for the appropriate exposure time. Make sure to mark on the bottom
of your plate which half of the plate was exposed to UV light and incubate them at 37°C.
Note
UV light can burn your skin and eyes. Take proper precautions to protect yourself.
Nazzy Pakpour & Sharon Horgan Lab 7.1 2/10/2022 https://bio.libretexts.org/@go/page/24020Steam Demo:
How does steam sterilization work?
Of the various methods we have developed to sterilize materials, steam is the most effective, common, and
economical. The device used most commonly for this purpose is an autoclave, also known as a steam sterilizer.
Autoclaves are relatively safe and easy to operate and extremely effective at killing microbial vegetative cells and
spores. Similar to home pressure cookers, which create pressure and high temperatures to shorten cooking times,
autoclaves use super-heated steam under pressure to kill microbes. Sterilizing temperatures are usually 121-127°C
(250-260°F) for at least 15 minutes.
We can test the effectiveness of an autoclave by using commercially available ampules (sealed glass capsules of
bacterial spores). Bacterial spores are used because they are the most difficult to kill and therefore the highest measure
of antimicrobial killing efficiency.
If the bacteria live after sterilization, they produce acid which turns the indicator yellow. If the bacteria are dead the
indicator will remain purple.
TESTING THE EFFICIENCY OF STEAM STERILIZATION:
4. Make sure you look at the tubes, know what they look like AND what they mean:
Negative Control = ampule autoclaved → not incubated = no growth = purple color
Positive Control = ampule not autoclaved → incubated = growth = acid produced = yellow color
Sterilization success = ampule autoclaved → incubated = no growth = purple color
Vial Placement of Vial Results (yellow or purple) Did the Spores Survive?
(-) control = autoclaved but not
A
incubated
(+) control = not autoclaved,
B
incubated at 55°C
Autoclaved then incubated at
C
55°C
Placed inside multiple containers,
D autoclaved, then incubated at
55°C
Nazzy Pakpour & Sharon Horgan Lab 7.2 2/10/2022 https://bio.libretexts.org/@go/page/24020You can also read