Guidance Notes for Year 1 & Year 2 Phonics Data Collection using SIMS 2019 - Southend Learning Network
←
→
Page content transcription
If your browser does not render page correctly, please read the page content below
Guidance Notes for Year 1 & Year 2
Phonics Data Collection using SIMS –
               2019

                                   1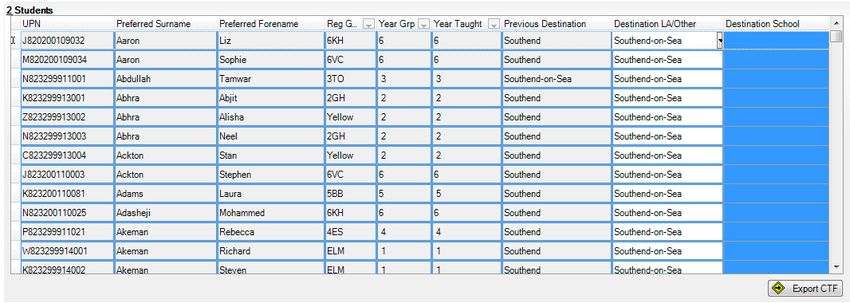
Contents

Introduction ..................................................................................................................................................3

Importing the Wizards ................................................................................................................................... 4

Running the Wizard Manager .........................................................................................................................7

Editing the Keystage Marksheets.................................................................................................................. 10

Previewing and Printing Individual Reports .................................................................................................. 14

Creating a Common Transfer File.................................................................................................................. 16

Appendix: Using ProofPoint ......................................................................................................................... 21

                                                                                                                                                              2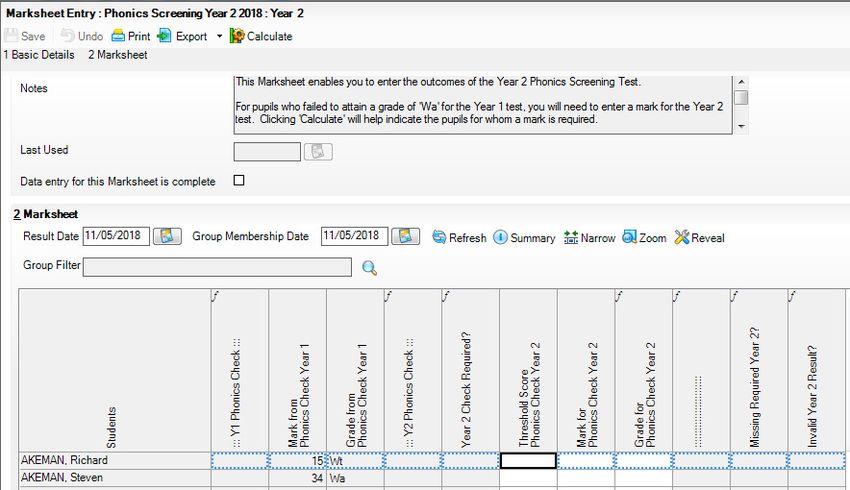
Introduction

Year 1 and Year 2 Phonics Data Collection

Please Note: - This year there are two phonics wizards to run in SIMS:
         1 Year 1 Phonics Screening Wizard
         2 Year 2 Phonics Screening Wizard - If you have new pupils in Year 2 and you are
            unsure of their Phonics grade you can check it using the Key to success website
            mentioned below.

The DfE advise how schools can check which Year 2 pupils should retake the test:-

In most cases schools should be aware which Year 2 pupils need to take the check. If schools are unsure
which Year 2 pupils need to take the check they can use the ‘Searchable data’ function of the Key to
success website at www.keytosuccess.education.gov.uk/schools/ to search for those pupils by their
Unique Pupil Number. Pupils who do not need to take the check again will be indicated by a phonics
outcome of ‘Wa

If a school is unsure if a pupil should take the check again and a search of Key to success finds no data
for the pupil they may wish to contact the pupil’s previous school direct.

SIMS Guidance for Phonics Data Collection – Deadline for Submission to the
Local Authority is Friday 21st June 2019.

Please also make sure you complete and return the Head teacher quality
assurance signing sheet available on the Southend Learning Network by Friday
21st June 2019.

Full guidance notes are available under ‘Documentation’ on the home page on SIMS.Net
> Handbooks > Performance & Analysis > End of Key Stage Data Processing (England).

The Wizard Manager provides an easy method of managing the Phonics reporting
procedures.
The Wizards contain Aspects and Templates that the system uses to create the necessary
Phonics mark sheets and Individual Reports. It is assumed that the Spring main release
version 7.180 upgrade has been carried out. (Check you are using the correct version by
selecting the ‘Help’ option on the home screen > about SIMs.net and check the version
number. If you are not using version 7.186 – contact your SIMs support.

                                                                                                            3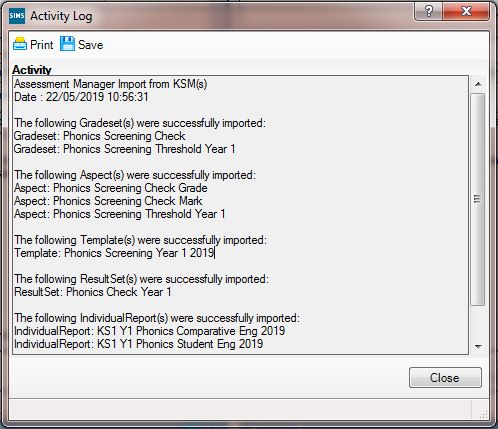
Step 1 - Importing the Phonics Wizards from Assessment Manager
Both the ‘Year 1 Phonics screening Wizard 2019’ and the ‘Year 2 Phonics screening
Wizard 2019’ should be imported into Assessment Manager.
For schools whose SIMS system is supported by the Local Authority, this should already
have taken place. Please go to page 7 - Running the Wizard Manager.
If the wizards have not yet been imported please follow the steps below:
Each wizard will have to be imported separately using the process below. (For the purpose
of the guidance notes we refer to the Year 1 wizard). Import the Key Stage Packs as
follows.
1. Select Routines | Data In | Assessment | Import to display the first page of the Import
wizard.
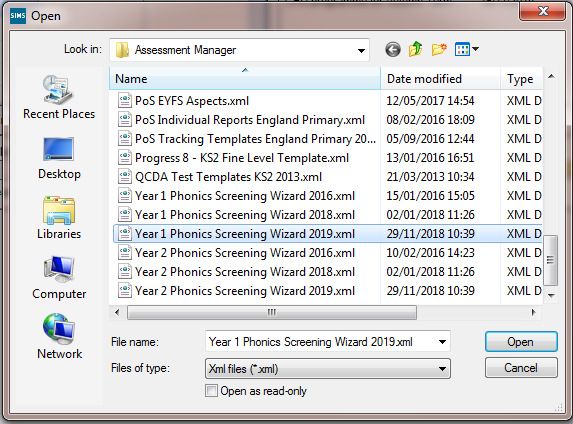
2. Select the file to import by clicking on the Field Browser button to display the Open dialog.
3. Both Phonics Screening Wizards are usually located in your C drive. Open your C Drive &
go to:
Program Files \ SIMS \ SIMS.net \ Ampa \ England Primary (and Middle Deemed Primary)
\ Assessment Manager. Select the file to import by clicking on the Field Browser button to
display the Open dialog. If you cannot locate the file here it may be in your S: Drive – please
contact your SIMs support desk for guidance.
Here you will find the two Phonics wizards to import into Assessment Manager.
4. Highlight the first one - Year 1 Phonics Screening Wizard 2019.xml to import and click the
Open button to return to the wizard. The name of the selected file will be displayed in the
Select the file to import from field.
4
5. Choose to overwrite defaults and click the Finish button.

6. A message dialog will ask you for confirmation to proceed with the import. Click the Yes
button to start the import process, which can take some time to complete.
                                                                                              5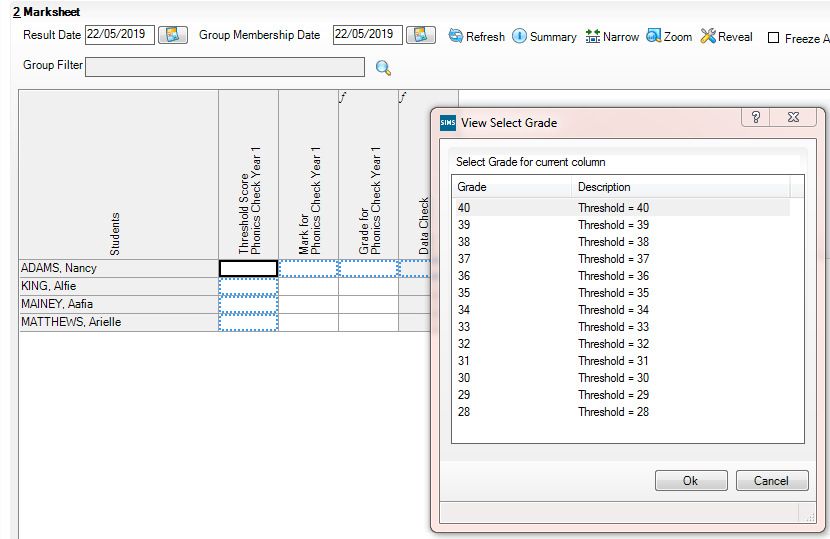
An Activity Log will be displayed when the import is complete. (If this doesn’t appear, press
the finish button and it should appear). You can print/save a copy of this if you wish.

  7. Select

REPEAT THIS PROCESS TO IMPORT THE ‘YEAR 2 PHONICS SCREENING WIZARD
2019’.

                                                                                                6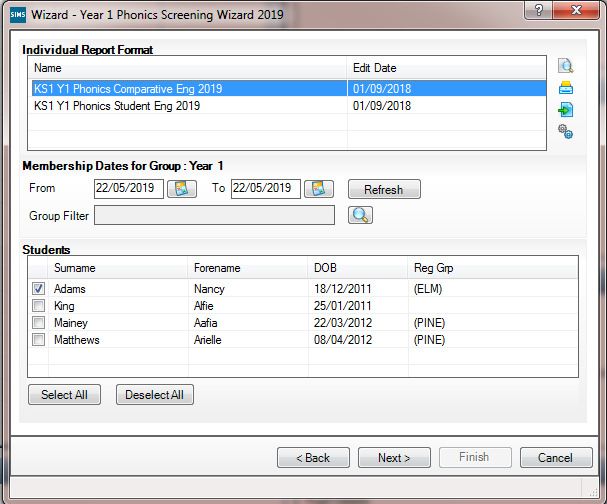
Step 2 - Running the Wizard Manager

The Wizard Manager guides you through the end of Phonics Data Collection process, from
selecting the Phonics Pack and pupil/student group, adding, editing and validating the
results.

Selecting the Phonics Pack
1. Select Tools | Performance | Assessment | Wizard Manager to open the first page of the
wizard.

2. Highlight the Year 1 Phonics Screening Wizard 2019 and click the Next button (Click the
Yes button if you are prompted to save).

Selecting the Pupil/Student Group

This page of the wizard enables you to select the group whose results you want to report. You
will be able to select any previously created user-defined groups if required. For information on
creating user defined groups please refer to the Documentation Centre in SIMS, this can be
accessed through the SIMS home page.

3. Click the Field Browser button to open the Group Selector window.
                                                                                                7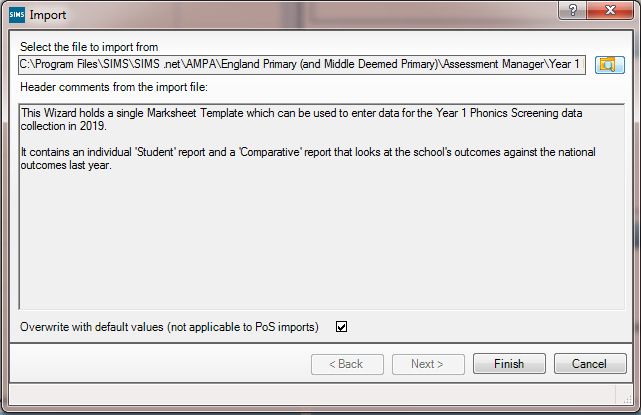
4. Click the + sign next to the year group symbol to expand the Year Group.

5. Highlight the required year and click the Apply Button

.

                                                                              8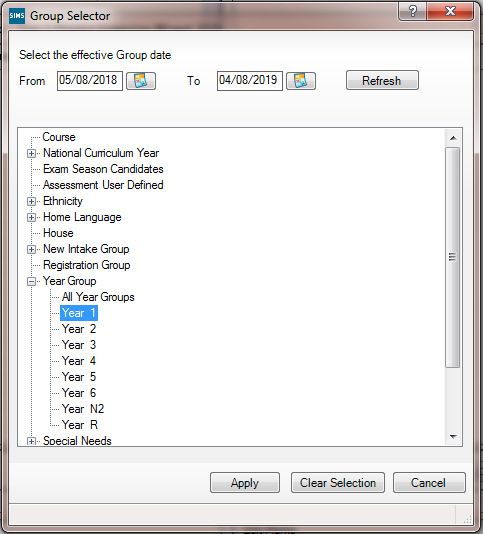
6. Once the year group is shown in the Screening Wizard window, click the Next button.

Selecting the Marksheet to enter/edit data
The next step will create the marksheet you need to enter your results.

1. Highlight the Year 1 Phonics Screening Marksheet and click the Edit Mark Sheet button.

                                                                                            9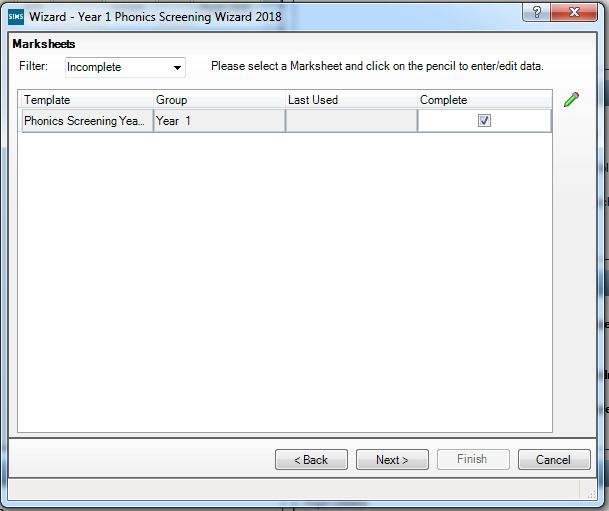
This will open your marksheet - IMPORTANT NOTE: Please read any text in the Notes field of
each mark sheet, as this will give advice and information related to the adding, editing and
validating of results in this particular mark sheet

3. Complete Marksheet.
Note: The first column enables you to enter the Threshold Score – this is the threshold which
determines whether a pupil is Working At or Working Towards. The DfE will release the
threshold mark on 24th June 2019 – You do not need to enter a threshold mark to submit
your worksheet. This value will be the same for all pupils – to enter this value in one step,
right-click on the column header and choose Select Grade for Column. You can then choose
the appropriate threshold mark when it is released.

4. The second column should be populated with the Mark.
Note. The columns with an   f   in the top left hand corner of the heading should be left blank,
as these cells contain formulae.

                                                                                                   10
5. If you enter an incorrect value in the Mark column the View Invalid Results dialog opens,
giving details of the valid grades for the specific column.
4. To amend any error, select the Close button on the View Invalid Results window and then
amend the errors in the mark sheet.
5. When all of the data has been correctly applied to the mark sheet, click the Calculate button
to obtain grades and check the data.
11IMPORTANT NOTE: If you enter results in a mark sheet it is recommended that you click the
Calculate button before saving the results so that if any entries are missing, they will be
highlighted in the Data Check column of the mark sheet. This will ensure that correct results
are recorded for delivery to your Local Authority (LA).
6. When you have completed the mark sheet, check the box by Data Entry for this Mark
sheet is complete
7. Select the Save button.
8. Close the mark sheet (using the icon at the top right hand corner of the mark sheet)
to return to the wizard
9. When your marksheet is complete, tick ‘complete’ then ‘Next’
1210. If you get the following message, click YES
You will be returned to the Wizard and the individual report format window.
Previewing and Printing Individual Reports
This page of the wizard displays the Individual Report templates from the selected Wizard and
from here you can print the Phonics Reports. Before printing you can preview an individual
pupil/student‘s report in Microsoft® Word.
The Comparative report displays the School and National Teacher Assessment and Test
results.
If you have previously saved your marksheet and want to access the ‘individual report
format’ screen, please go to Tools>Performance>Assessment>Wizard Manager. In the
Wizard window, change the Filter to ‘All’. Click on the relevant year’s phonics marksheet,
select ‘Next’. Select ‘Next’ again. Change the marksheet filter to ‘All’. (Make sure your
templates is ‘Complete’, if is isn’t go back to page 9 – make sure all results have been entered,
Click on the template name and select ‘Next’. Continue with the process below.
1
3
2
131. Highlight the required Individual Report Format.
2. The From and To date fields default to ‘Today’ displaying the pupil/students that are
currently on role. If you need to change these dates, e.g. you want to include pupil/students
who have left, directly enter the dates in did/mm/yyyy format, or click the down arrow adjacent
to the required field and select a date from the displayed calendar.
3. Click the Refresh button
Previewing Key Stage Reports
4. By default, only the first pupil/student in the list is selected. Click the Deselect All button to
clear all pupil/student selections then select the check box adjacent to the required
pupil/student names, or ‘Select All’ to generate reports for all students listed.
145. Click the Preview Report button to open the selected pupil/student’s report in Microsoft®
Word. Preview Report button
When you have finished previewing the report, close Microsoft® Word to return to the Wizard
Manager.
6. Click the Print Report button to print the selected pupil/students’ reports.
Print Report button
7. Select ‘Next’ this will take you to an export screen. Select the results aspect you want to
export & choose the ‘export’ arrow. Save your reports to your computer and select ‘Finish’
3. Click the Finish button and if a message asks you to confirm that you wish to close the
wizard. Click the Yes button to exit.
Please refer to the separate notes issued with the latest upgrade or module notes from Capita
(Previewing & printing individual reports). Contact Capita on 01245-213911 if you have any
problems with this.
REPEAT THIS PROCESS FOR ‘Year 2 Phonics Screening Wizard’
(‘Running the Wizard Manager’ on page 7 to page 10).
Please Note: - The year 2 Phonics Screening Marksheet enables you to enter the outcomes
of the Year 2 Phonic Screening Test for pupils who failed to attain a grade of ‘Wa in the Year 1
test. You will need to enter a mark for the Year 2 test.
When you open the ‘Year 2 Phonics Screening Marksheet’, a list of pupils and their Year 1 test
grade; of either ‘Wa’ or ‘Wt’ will be shown. A grade must be entered for any child with ‘Wt’.
Click ‘Calculate’ to indicate the pupils for whom a mark is required.
15If you have new pupils in Year 2 and you are unsure of their Phonics grade you can check it
using the Key to success website mentioned at the beginning of these guidance notes.
Repeat the steps on Page 11 to complete this process.
Year 1 Phonics Data Collection – Sending your file to the LA
Creating a Common Transfer File for Year 1 Pupils, then your Year 2 pupils
Set Southend LA as a destination school
To check if this has been set previously, click on Search and scroll to find Southend LEA or
Southend LA.
If already set up; proceed to ‘Create a Common Transfer File’ below otherwise continue with
the steps below.
1. Select Tools, Other Schools
2. Click on New
163. Enter the following details:
School Name: Southend LA and click on the magnifying glass button
Enter Southend in the LA name box and click Search
The name and LA number will be populated, click OK
17The details will show on the 1 Establishment section of the school details section.
Enter the Establishment number 9999
4. Click on Save then Close. If prompted to save click Yes
Create a Common Transfer File – (YOU WILL NEED TO REPEAT THE PROCESS BELOW
TO EXPORT YOUR YEAR 2 PHONICS FILE).
1. Select Routines, Data Out, CTF, Export CTF
182. Select the CTF export type to ‘Phonics Test Results’ and ‘Select’
3. In the Student Options section, select Current Students from the View box and tick the
Include students already exported box
4. Click on Refresh Students
5. Click on the drop down arrow in the Year Grp field header and select Year Group 1.
6. Click on the first pupil cell in the Destination LA / Other column and right click on the
mouse and ‘Select All’. All year 1 records should now be highlighted.
197. Click on the drop down arrow in the Destination School cell and select Southend LEA
from the list.
8. All Year 1 records should now have Southend-on-Sea as the Destination LA / Other.
Note. If you prefer, instead of following steps 6 - 8 you can manually select Southend as the
Destination school for each individual pupil (but this will take much longer).
9. Click on the Export CTF button (Scroll down to the bottom right hand
corner of the Students field to see the Export CTF button). If you receive a pop-up menu
asking if you want to continue, select . When the pop-up window appears Export
Complete, make a note of the file number and select .
10. Once completed, errors may be listed in the Exception Log screen. You can print a copy
of this log report if you want to keep a record. Check to make sure that all Year 1 pupils have
been exported (e.g. Number of students not exported = 0)
11. Click on the Close icon located at the top right of the screen.
12. The file should be called 882NNNN_PHO_8829999_001.XML (NNNN = Your school
number, the 3 digits at the end may be different to 001) and saved in your export directory.
20To check where your export directory is located – go to Tools | Setups | CTF and note the file
path for CTF Export Directory.
You have now successfully created a CTF which contains all of your Year 1 pupils. The final
stage is to upload and send this file via ProofPoint. Please follow the guidance notes below.
REPEAT THIS PROCESS TO EXPORT YOUR YEAR 2 PHONICS RESULTS.
Appendix: Using ProofPoint
ProofPoint is a simple web-based tool for transferring sensitive or confidential files across the
internet securely to other schools or the LA. This is a short guide on how to use this software
to transfer your Phonics Results.
1. Please follow the attached notes to send your two CTF files containing your pupils’ Year 1
Phonics and Year 2 Phonics results.
2. All phonics results should be sent to data@southend.gov.uk
3. SIMS would have exported your files to either S:\SIMS\STAR\CTFOut or
S:\SIMS\DataOut. (The pathway will depend on how your SIMS system was upgraded – if
you are unsure which path it is, open SIMS and go to Tools>SetUps>CTF and check your
export directory.
4. Go to the ProofPoint website (https://strong.southend.gov.uk/encrypt). The following page will be
displayed:
215. Enter your school email address select ‘Continue’. You will either be prompted to enter
your password or register for an account. This can be easily be created and used
immediately.
6. Once you have successfully logged in to ProofPoint you will be required to attach your CTF
file to the email, to do this please follow the steps below.
7. Please address your email to data@southend.gov.uk, in the subject box of the email
please include the name of your school.
8. To upload a file select “Attach a file”, followed by “Add…”
22Once you have done this browse to the location you have stored your CTF file, highlight it and
select ‘Open’.
Once the file has successfully been attached it should appear as below and you can
add/remove files.
Once you have attached your CTF files you can send the ProofPoint email. Once the email
has successfully been sent you should see this box.
23If you have any technical queries regarding ProofPoint please contact the ICT Service Desk on
01702 215158. If you are a SIMS supported school and experience problems please contact
the School Support Team on 01702 212005 and choose option 4. For any questions
regarding assessments please contact the Data & Performance Team on 01702 534255.
24You can also read