Infotainment System en Operating instructions - Suzuki SLDA Portal
←
→
Page content transcription
If your browser does not render page correctly, please read the page content below
Infotainment System en Operating instructions
2

Disclaimer

All information in this manual is based on the
latest product information available at the time
of publication. Due to improvements or other
changes, there may be discrepancies between
information in this manual and your Infotain-
ment System. SUZUKI MOTOR CORPORATION
reserves the right to make production/feature
changes/improvements at any time, without
notice and without incurring any obligation to
make the same or similar changes to Infotain-
ment Systems previously built or sold. This
Infotainment System may not comply with
standards or regulations of other countries, and
user discretion is highly solicited.
Controls                                                          en | 3

   1       2   3   4       1     button
                               When the device is in normal operating
                               mode:
                               Short tap: Mute the device / cancel mute
                               Long tap: Switch the device to standby
                               mode
                               When the device is in standby mode:
                               Switch the device to normal operating
                               mode
                           2   Display
                           3   SD card slot
                           4     button
                               Open the Home menu
                           5     button
                               Activate voice control
                           6      button
                               In the Home menu:
                               Open the menu for sound and system
                               settings
                               In the operating modes:
                               Open the settings menu
    7              6   5
                           7   Volume control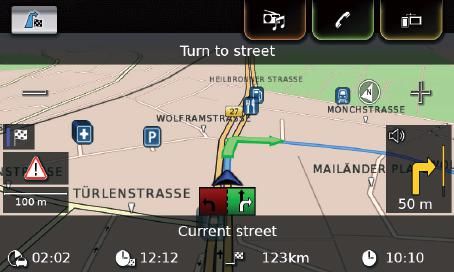
4 | en                                                                                                                                                                                           Contents

Contents
1        Features........................................ 8              4.6   Enabling the keypad lock while                                      4.10.8 Displaying the data carrier version.... 23
                                                                               driving............................................... 15         4.11 Connecting/inserting external
2        Symbols used in this document... 8
                                                                            4.6.1    Keypad lock setting during active                                devices and data storage devices..... 23
3        Important information.................. 9                                   Apple CarPlay session...................... 16                4.11.1   General information.........................          23
3.1      Cleaning information.......................... 9                4.7   Entering the security PIN.................. 16                      4.11.2   SD card............................................   23
                                                                                                                                                   4.11.3   USB storage device/Apple................              24
4        Operation.................................... 10                4.8   Sound settings.................................. 17                 4.11.4   AUX audio source.............................         25
4.1      Touchscreen controls....................... 10                     4.8.1    Adjusting the bass and treble..........                17     4.11.5   Enabling the external DVD input......                 25
                                                                            4.8.2    Adjusting the balance.......................           17     4.11.6   Connecting a device via Bluetooth®.                   25
     4.1.1    Tapping............................................   10
                                                                            4.8.3    Adjusting the fader...........................         17     4.11.7   Connecting a smartphone via
     4.1.2    Swiping............................................   10
                                                                            4.8.4    Selecting an equalizer preset...........               17              smartphone integration...................             27
     4.1.3    Zooming the map view.....................             10
                                                                            4.8.5    Adjusting the speed dependent
     4.1.4    Scrolling the visible map area..........              11
                                                                                     volume..............................................   17
4.2      Switching the device on/off.............. 11                       4.8.6    Volume adjustment for the AUX
     4.2.1    Switching on/off.............................. 11                      source..............................................   18
     4.2.2    Standby mode.................................. 11             4.8.7    Volume adjustment for an external
                                                                                     DVD source......................................       18
4.3      Adjusting the volume........................ 11                    4.8.8    System beep – on/off.......................            18
     4.3.1    Increasing/decreasing the volume... 11
                                                                         4.9   Setting the time and date................. 18
     4.3.2    Muting the device............................. 11
                                                                            4.9.1    Selecting the date format................              18
4.4      Home menu...................................... 11                 4.9.2    Selecting the time format................              19
     4.4.1    Calling up the display of a main                              4.9.3    Setting the time via GPS..................             19
              operating mode................................ 12             4.9.4    Setting the time manually................              19
     4.4.2    Directly selecting functions.............. 13
                                                                         4.10 Further system settings.................... 20
     4.4.3    Quick-access feature........................ 14
                                                                            4.10.1 Adjusting the display brightness......                   20
4.5      The displays of the main operating                                 4.10.2 Setting the language........................             20
         modes............................................... 14            4.10.3 Selecting the system of
     4.5.1    Radio listening and playing media....                 14             measurement...................................           20
     4.5.2    Telephone.........................................    15      4.10.4 Security PIN protection – on/off......                   21
     4.5.3    Navigation........................................    15      4.10.5 Changing the device’s security PIN..                     22
     4.5.4    Smartphone integration...................             15      4.10.6 Displaying information about open-
     4.5.5    Switching between the displays of                                    source software...............................           22
              the main operating modes...............               15      4.10.7 Reset to the factory settings............                22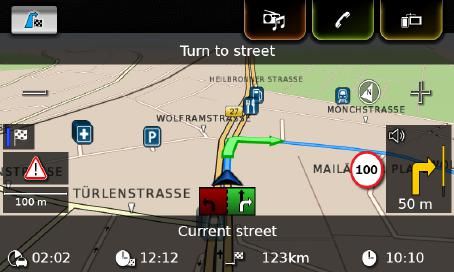
Contents                                                                                                                                                                                      en | 5

5        FM/AM radio mode.................... 28                           6      DAB radio mode.......................... 32            7      Playing media............................. 34
5.1      Listening to the radio....................... 28                  6.1    Listening to DAB............................... 32     7.1    Selecting a media source.................. 34
5.2      The tuner display.............................. 28                6.2    The DAB display................................ 32     7.2    Calling up the audio/video display... 35
5.3      Calling up the tuner display.............. 29                     6.3    Calling up the DAB display............... 32           7.3    Audio playback................................. 35
                                                                                                                                             7.3.1   The audio display............................. 35
5.4      RDS................................................... 29         6.4    DAB features..................................... 32
                                                                                                                                             7.3.2   Pausing playback.............................. 35
     5.4.1     AF mode – on/off............................. 29
                                                                           6.5    DAB service list................................. 32       7.3.3   Skipping to the next/previous title... 35
     5.4.2     Regional mode – on/off................... 29                                                                                  7.3.4   Selecting titles in the media
5.5      Selecting the waveband/memory                                     6.6    Selecting services............................. 33                 browser............................................ 35
         bank.................................................. 29         6.7    Storing services................................ 33        7.3.5   Fast forward/rewind......................... 35
                                                                                                                                             7.3.6   Skipping forwards/backwards in the
5.6      Tuning stations................................. 30                   6.7.1   Storing services manually................ 33
                                                                                                                                                     current title...................................... 36
                                                                               6.7.2   Storing services automatically......... 33
     5.6.1     Tuning stations manually..................             30                                                                     7.3.7   Repeat function................................ 36
     5.6.2     Starting seek tuning.........................          30   6.8    Listening to a stored service............. 33              7.3.8   Shuffle function................................ 36
     5.6.3     Station list........................................   30                                                                 7.4    Video playback.................................. 36
                                                                           6.9    Listening to a service’s secondary
     5.6.4     Scanning receivable stations...........                30
                                                                                  audio channel................................... 33        7.4.1   The video display............................. 36
5.7      Storing stations................................ 30                                                                                 7.4.2   Pausing playback.............................. 36
     5.7.1     Storing stations manually................. 30               6.10 Preselecting programme types......... 33                     7.4.3   Skipping to the next/previous title... 37
     5.7.2     Storing stations automatically.......... 30                                                                                   7.4.4   Selecting titles in the media
                                                                           6.11 Displaying DAB extra information..... 34
                                                                                                                                                     browser............................................ 37
5.8      Listening to a stored station............. 30
                                                                           6.12 DAB-FM switching............................. 34             7.4.5   Fast forward/rewind......................... 37
5.9      Radio-text display – on/off............... 30                                                                                       7.4.6   Skipping forwards/backwards in the
                                                                                                                                                     current title...................................... 37
5.10 Traffic announcement....................... 31                                                                                          7.4.7   Full-screen mode – on/off................ 37
     5.10.1 Traffic announcement priority –
                                                                                                                                         7.5    Media browser.................................. 37
            on/off............................................... 31
     5.10.2 Cancelling a playing traffic                                                                                                     7.5.1   The browser display......................... 37
            announcement................................. 31                                                                                 7.5.2   Selecting titles................................. 38
                                                                                                                                             7.5.3   Closing the browser without
                                                                                                                                                     selecting a title................................. 38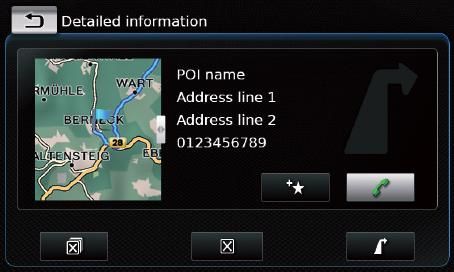
6 | en                                                                                                                                                                                         Contents

8        Navigation................................... 38                 8.7.9  Viewing details of a location on the                          8.10 Specifying custom route options...... 51
                                                                                 map.................................................. 46         8.10.1 Opening the route options...............              51
8.1      Starting navigation........................... 39
                                                                          8.7.10 Selecting a point of interest from                               8.10.2 Selecting the basic type of route.....                51
8.2      Entering a destination...................... 39                         the map............................................ 46           8.10.3 Activating dynamic route guidance
     8.2.1    Opening the Destinations menu.......                 39   8.8   Route guidance settings in the Route                                       with TMC..........................................    51
     8.2.2    Entering an address.........................         39         menu................................................. 46            8.10.4 Avoiding certain types of road and
     8.2.3    Selecting a point of interest.............           41                                                                                    transport..........................................   52
                                                                          8.8.1      Opening the Route menu.................              46
     8.2.4    Entering coordinates........................         42                                                                          8.11 Displaying information on the
                                                                          8.8.2      Cancelling route guidance................            47
     8.2.5    Selecting one of the previous
                                                                          8.8.3      Muting navigation announcements..                    47        current position................................ 52
              destinations or a destination stored
                                                                          8.8.4      Displaying destination information..                 47
              as a favourite....................................   42                                                                          8.12 Your own points of interest.............. 52
                                                                          8.8.5      Displaying the route list...................         47
8.3      Location details view........................ 42                 8.8.6      Displaying the list of waypoints.......              47      8.12.1 Data format...................................... 53
     8.3.1    Areas of the location details view.... 43                   8.8.7      Searching for a point of interest on                         8.12.2 Loading your own points of interest
     8.3.2    Options in the location details view. 43                               the route or near the destination.....               47             onto the device................................ 53
                                                                          8.8.8      Blocking route sections....................          47      8.12.3 Point of interest warnings displayed
8.4      Storing the home address................ 44                                                                                                     during the journey – on/off.............. 53
                                                                        8.9   Specifying guidance and map
8.5      Entering a waypoint.......................... 44                                                                                         8.12.4 Deleting your own points of interest
                                                                              settings............................................. 48                   from the device................................ 54
8.6      Changing the destination while route                             8.9.1  Opening the guidance and map set-
                                                                                                                                               8.13 Enabling the keypad lock while
         guidance is active............................. 44                      tings.................................................   48
                                                                          8.9.2 Displaying points of interest on the                                driving............................................... 54
8.7      Map view and map options............... 44                              map..................................................    48   8.14 Selecting the geo coordinate format. 55
     8.7.1    Opening the map view..................... 44                8.9.3 Selecting the map orientation..........                   48
     8.7.2    The map view during an active route                         8.9.4 3D map view – on/off.......................               49   8.15 Updating the map data..................... 55
              guidance session.............................. 44           8.9.5 Enabling automatic zoom.................                  49
                                                                          8.9.6 Lane guidance – on/off....................                49
                                                                                                                                               8.16 Retrofitting the navigation function.. 55
     8.7.3    Repeating the current navigation
              announcement................................. 45            8.9.7 Voice guidance – on/off...................                49
     8.7.4    Changing the map scale................... 45                8.9.8 Visual driving recommendations in
     8.7.5    Changing the map view mode.......... 45                            other operating modes– on/off........                    50
     8.7.6    Displaying TMC messages................ 45                  8.9.9 Acoustical traffic information...........                 50
     8.7.7    Changing the displayed section of                           8.9.10 Show speed limit information..........                   50
              the map............................................ 46
     8.7.8    Selecting a destination or waypoint
              from the map................................... 46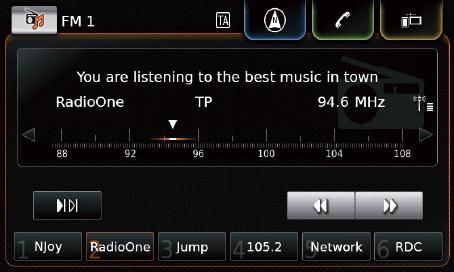
Contents                                                                                                                                                                                                 en | 7

9       Telephone................................... 56                   10       Smartphone integration............. 60                        12       Voice control............................... 64
9.1     Starting phone mode........................ 56                    10.1 Calling up the smartphone display... 62                           12.1 Voice control – start/stop................. 64
     9.1.1     Opening the phone menu................ 56
                                                                          10.2 Selecting a particular application                                12.2 How voice control works.................. 65
9.2     Answering/rejecting a call................ 57                          on a smartphone.............................. 62                       12.2.1 The main menu.................................         65
     9.2.1     Answering a call............................... 57                                                                                     12.2.2 Saying voice commands...................               65
                                                                          10.3 Smartphone integration settings...... 62
     9.2.2     Rejecting a call................................. 57                                                                                   12.2.3 Opening the menu for an operating
                                                                               10.3.1 Android™ connection priority........... 62                             mode................................................   65
9.3     During the current call...................... 57                       10.3.2 Enabling the keypad lock while                                  12.2.4 Selecting from a list.........................         65
     9.3.1     Ending the call................................. 57                    driving.............................................. 63
     9.3.2     Muting the call................................. 57                                                                               12.3 Help for voice control....................... 66
     9.3.3     Switching the call to the mobile                           11       Rear-view camera....................... 63
               phone............................................... 57                                                                           13       Steering wheel remote control.. 66
                                                                          11.1 Picture settings for the rear-view
9.4     Dialling a number.............................. 57                     camera.............................................. 63           14       Points of interest – symbol
                                                                               11.1.1 Guide lines – on/off......................... 63                    overview..................................... 67
9.5     Calling a contact from the phone
                                                                               11.1.2 Adjusting the picture brightness
        book.................................................. 57                     and contrast..................................... 64
9.6     Calling an entry in the call list.......... 57
     9.6.1     Tone dial feature (DTMF)................. 58
9.7     Second call....................................... 58
     9.7.1     A second incoming call.................... 58
     9.7.2     Switching between two calls........... 58
9.8     SMS text messages........................... 59
     9.8.1     Reading an incoming text message.. 59
     9.8.2     Incoming text message display –
               on/off............................................... 59
9.9     Activating the voice control system
        of the connected mobile phone........ 59
9.10 Further settings................................ 60
     9.10.1 Ringtone of the mobile phone.......... 60
     9.10.2 Phone-book sort order..................... 60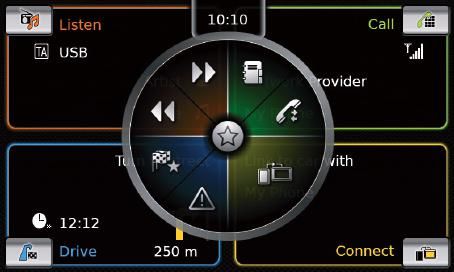
8 | en                                                                                                Features | Symbols used in this document

1 Features                                 2 Symbols used in this                             In addition to these warnings, the following
                                                                                              symbols are also used:
ff AM/FM tuner                               document
   –– 18 FM and 12 AM manual presets                                                                   Note:
ff DAB tuner (optional)                    Symbols linked with text within a grey box are              Additional details for the application
   –– 12 manual presets                    warnings and always indicate an immediate or                and further useful information.
ff USB/SD/iPod                             potential hazard to the user and/or other per-
   –– Supports MP3, WMA, AAC, WAV, 3GPP,   sons and/or damage of objects:                     ff Single-step procedure – instructions for a
      audiobooks, MPG, AVI                                                                       procedure that can be completed in just one
   –– Playlists                                     Safety notice                                step.
   –– Browsing                                      ff Immediate danger that could cause
   –– Shuffle/repeat                                   serious personal injury or death.      ff Bulleted list.
ff Aux audio input & DVD video input                ff Potentially dangerous situation that
ff Bluetooth® phone                                    could cause serious personal injury    Italic letters like Balance indicate such elements
   –– Hands free                                       or death.                              as the name of a menu or menu item.
   –– Phone book access                             ff Potentially dangerous situation that
   –– Music streaming                                  could cause personal injury or dam-    Bold letters like Language indicate a button or
ff Smartphone integration                              age to property.                       menu item that you can tap in order to access a
   –– Apple CarPlay                                                                           function or to display further options.
   –– MirrorLink™                                   Important note:
   –– Android Auto™                                 Warns of a potentially hazardous situa-
ff Sound adjustments                                tion in which the device or any other
   –– Bass, treble, balance, fader                  object in the vicinity could be dam-
   –– 6 equalizer presets                           aged.
ff Voice control
ff GPS navigation
ff Steering wheel control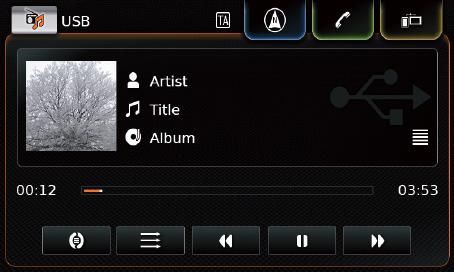
Important information                                                                                                                       en | 9

3 Important informa-                                  ff The usage of the navigation system      ff Only use appropriate connecting cables and
                                                         does not absolve the driver of the         external devices in regard to safety, electro-
  tion                                                   responsibility of a correct and vigi-      magnetic compatibility and grade of shield-
                                                         lant attitude. The relevant traffic        ing.
Hereby, Robert Bosch Car Multimedia GmbH                 regulations must always be fol-         ff The device must not come into contact with
declares that this radio navigation system is in         lowed. If a navigation instruction         hot or burning objects (e.g. cigarettes).
compliance with the essential requirements and           contradicts traffic regulations, the
other relevant provisions of Directive 1999/5/           traffic regulations always apply.                Note:
EC.                                                   ff The route guidance provided by the               Some pixels in the display are darker or
                                                         device may not be completely accu-               brighter than others. This condition is
         Road safety                                     rate. Ensure that all driving manoeu-            an inherent characteristic of liquid
         ff Operating the device is only permit-         vres are legal and safe in order to              crystal displays, and it is not a malfunc-
            ted when the driving and traffic             avoid accidents.                                 tion.
            situation allow you to do so. Before
            starting to use the device, make          Risk of electrical shock or                3.1 Cleaning information
            sure that you, your passengers and        fire                                       ff To clean the device, never use hard or sharp
            other road users are not put in           If you disassemble the device, it might       objects that could damage the protective
            danger, hindered or inconven-             result in electrical shock or fire.           pane or housing.
            ienced. The road traffic regulations      Do not open the device.                    ff Do not use aggressive cleaning agents, such
            apply at all times.                                                                     as thinners, benzine, abrasive cleaners,
         ff The device has to be used so that         Malfunctions                                  spray cleaners, acidic or alkaline solutions, or
            the vehicle can be driven safely at all   Do not use the device if you notice any       wax.
            times. If in doubt, stop your vehicle     malfunctions such as a frozen screen or    ff Do not spray any liquids onto the device.
            and operate the device while the          poor audio quality. Continued use of a     ff To clean the housing and protective pane /
            vehicle is stationary.                    malfunctioning system may result in           display, moisten a soft cloth with tepid water
         ff You must always be able to hear           accidents, fire or electrical shock.          and wipe off the dirt. Make sure that no liquid
            police, fire service and ambulance                                                      enters the inside of the display. Afterwards,
            sirens in good time from inside your      Important note:                               wipe the cleaned surface with a clean, dry
            vehicle. For this reason, when using      In standby mode, the device may drain         cloth.
            your device, make sure the volume         the battery when the vehicle’s engine is
            is set at a level that is appropriate     not running.                                        Note:
            for the particular driving and traffic    For further details on this, please read            Dust on the display may impair the
            situation.                                the section entitled “Switching the                 functioning of the touchscreen. If the
                                                      device on/off” (page 11).                           device detects that the display is dirty,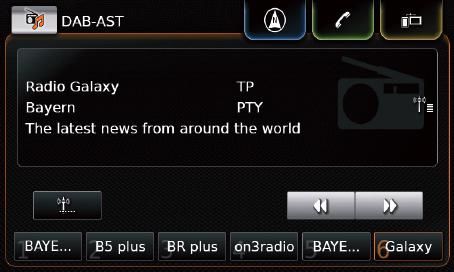
10 | en                                                                                                                 Important information | Operation

          a corresponding notification will         4 Operation                                         You do not need to exert pressure on the display
          appear. In this case, clean the display                                                       surface.
          to ensure reliable functioning of the
          touchscreen.                              4.1 Touchscreen controls                            4.1.1 Tapping
                                                                                                        ff Short tap: A short tap on the display surface
                                                             Important note:                               is sufficient to operate most controls.
                                                             Do not use pointed or hard items such      ff Long tap: Some functions require a long tap.
                                                             as ball-point pens or pencils for touch       In this case, keep your fingertip on the dis-
                                                             screen operation.                             play surface for around 2 seconds.

                                                             Note:                                      4.1.2 Swiping
                                                             The figures in this manual depicting the   Some functions require you to swipe your finger
                                                             device’s displays and front panel are      over the display surface, e.g.:
                                                             for reference purposes only. The dis-      ff Scrolling lists and tabs
                                                             plays shown here may differ from the       ff Adjusting sliders (e.g. volume control)
                                                             actual displays on the device.             Touch the display surface and let your finger rest
                                                                                                        on the surface. Then move your finger over the
                                                    The device is equipped with a touchscreen that      surface.
                                                    provides all the controls:
                                                                                                                 Note:
                                                                                                                 Tap an area of the scroll bar to skip to
                                                                                                                 the corresponding section of the list.

                                                                                                        4.1.3 Zooming the map view

                                                                                                                 Note:
                                                                                                                 This function is only available if the
                                                                                                                 device is equipped with a navigation
                                                                                                                 system.
                                                    When you want to operate a control, such as an
                                                    on-screen button, all you need to do is gently      Place two fingers on the map display area and
                                                    touch the relevant area of the display surface.     let your fingers rest on the surface. Then move
Operation en | 11
your fingers towards one another (zoom out) or read the section entitled “Entering the 4.3 Adjusting the volume
away from one another (zoom in). security PIN” (page 16).
4.3.1 Increasing/decreasing the
4.1.4 Scrolling the visible map area 4.2.2 Standby mode volume
When the device is switched on, you can switch To increase or decrease the volume incremen-
Note: it to standby mode. In standby mode, the device tally,
This function is only available if the is muted and the display is turned off. ff tap the top or bottom half of the volume
device is equipped with a navigation control 7.
system. To switch to standby mode, To increase or decrease the volume continu-
ff long-tap 1. ously,
Touch the map display area and let your finger ff swipe up or down over the volume control
rest on the surface. Then move your finger over To return from stand-by mode, 7.
the surface to scroll the displayed section of the ff short-tap 1.
map. The last display will appear. 4.3.2 Muting the device
To mute the switched-on device,
4.2 Switching the device on/off Note: ff short-tap 1.
When you switch the vehicle’s ignition To cancel mute,
4.2.1 Switching on/off lock from ACC to OFF while the device ff short-tap 1 again.
The device is switched on automatically when is in standby mode, it will remain in
you switch the vehicle’s ignition lock from OFF standby mode when you switch the 4.4 Home menu
to ACC. ignition lock to ACC again. If you tap The Home menu gives you access to all the main
After switching on, the Home menu will appear. 1 the Home menu will open. operating modes:
ff Listen: Radio listening and playing media
The device is switched off automatically when Important note: ff Call: Telephone
you switch the vehicle’s ignition lock from ACC In standby mode, the device may drain ff Drive: Navigation
to OFF. the battery when the vehicle’s engine is ff Connect: Smartphone integration
not running. Note: If your device is not
Note: equipped with a navigation
If the security PIN input screen system, you will be able to
appears, enter the device’s security access these main operating modes:
PIN. For further details on this, please ff Radio: Radio listening
ff Call: Telephone12 | en Operation
ff Media: Playing media gramme or media title (e.g. frequency and 4.4.1 Calling up the display of a
ff Connect: Smartphone integration station name or artist and title name) main operating mode
ff Call: To call up the display of a main operating mode,
Notes: –– Phone status indication (e.g. signal ff tap the screen area of the main operating
ff Information about which smart- strength) mode.
phones the device supports is –– Missed call indication Listen area Call area
available at www.suzuki-slda.com. –– Name of network provider
ff If your device is not equipped with a –– Name of the connected mobile phone
navigation system you may be able ff Drive:
to retrofit the navigation function –– Name of the current or next street
(see the section entitled “Retrofit- –– Distance to next driving manoeuvre
ting the navigation function” (page –– Symbol of the next driving manoeuvre
55)). Please contact your Suzuki –– Estimated time of arrival
dealer regarding this. ff Connect:
The most important information for each main –– Type of smartphone integration
operating mode is displayed:
Notes:
ff Traffic announcement priority and Drive area Connect area
radio station names are RDS fea-
tures and must be supported in your You can access these functions by tapping the
reception area or by the current screen area of the main operating modes:
station. ff Listen: Open the active tuner or audio/video
ff Artist and title names must be pro- display
vided by the media source. ff Call:
–– If a phone is connected: Open the phone
You can open the Home menu at any time: menu
ff Tap 4. –– If no phone is connected: Open the Select
ff Listen: Bluetooth device menu
–– TA symbol (traffic announcement priority ff Drive: Open the map view
status) ff Connect: Open the application interface
–– Current tuner or media source (e.g. USB)
–– Details about the current radio pro-Operation en | 13
Note: 4.4.2 Directly selecting functions Note:
If your device is not equipped with a You can select a main function belonging to any If your device is not equipped with a
navigation system, you will be able to of the operating modes directly from the Home navigation system, you will be able to
access these functions: menu: access these functions:
ff Radio: Open the tuner display ff Tap the direct-select button within the screen ff Radio: Open the source menu for
ff Call: area of the main operating mode. radio listening
–– If a phone is connected: Open ff Call: Open the Select Bluetooth
the phone menu device menu
–– If no phone is connected: Open ff Media: Open the source menu for
the Select Bluetooth device playing media
menu ff Connect: Open the application
ff Media: Open the audio/video dis- interface or the list of applications
play (depending on the type of smart-
ff Connect: Open the application phone that is connected)
interface
You can access these functions using the direct-
select feature:
ff (Listen): Open the source menu for radio
listening and playing media
ff (Call): Open the Select Bluetooth device
menu
ff (Drive):
–– When route guidance is activated: Open
the Route tab in the Destinations menu
–– When route guidance is not activated:
Open the New tab in the Destinations
menu
ff (Connect): Open the application inter-
face or the list of applications (depending on
the type of smartphone that is connected)14 | en Operation
4.4.3 Quick-access feature You can access these functions using the quick- 4.5 The displays of the main operat-
You can access further functions for each main access feature: ing modes
operating mode using the quick-access feature: ff Listen:
ff Tap the quick-access button in the centre of –– Radio: Start ascending/descending seek 4.5.1 Radio listening and playing
the Home menu. tuning media
–– Playing media: FM tuner display:
Short tap: Skip to the next/previous title
Touch and hold: Fast forward/rewind
ff Call: Open the Contacts menu / open the
Calls menu
ff Drive: Open the Favourites menu / display
TMC messages
ff Connect: Quit the running smartphone appli-
cation
Note:
The quick-access wheel appears. If your device is not equipped with a
navigation system, you will be able to USB display:
access these functions:
ff Radio: Start ascending/descending
seek tuning
ff Call: Open the Contacts menu /
open the Calls menu
ff Media:
–– Short tap: Skip to the next/
previous title
–– Touch and hold: Fast forward/
rewind
ff Tap the desired function. ff Connect: Quit the running smart-
phone applicationOperation en | 15
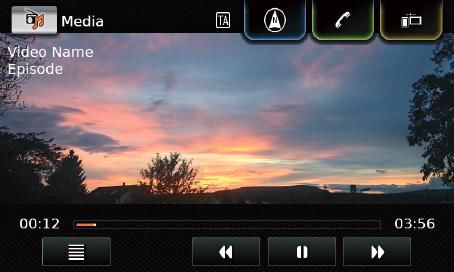
4.5.2 Telephone Map view: ff Tap the corresponding button at the top edge
Phone menu, Calls list: of the display.
4.5.4 Smartphone integration
Note: Display of the active application (example): 4.6 Enabling the keypad lock while
If provided by your mobile phone, the driving
Calls list will show the number or
contact name of the caller. Note:
When the Lock keypad while driving
4.5.3 Navigation setting is enabled, certain features of
the device’s navigation and smart-
Note: phone integration functions are disa-
Only if your device is equipped with a bled to avoid driver distraction.
navigation system.
You can set whether the keypad should be disa-
bled for destination input while the vehicle is
4.5.5 Switching between the dis- moving. If the keypad lock is activated, you will
plays of the main operating only be able to use the keypad while the vehicle
modes is stationary.
You can switch from the display of one main To enable the Lock keypad while driving setting,
operating mode directly to the display of ff first switch to the Home menu, if necessary.
another main operating mode: ff Tap 6.
The system settings are displayed.16 | en Operation
To enable the Lock keypad while driving setting, If security PIN protection has been enabled, the
ff first switch to the Home menu, if necessary. security PIN input screen will appear whenever
ff Tap 6. the device has been separated from the operat-
The system settings are displayed. ing voltage of the vehicle (e.g. in case of the
ff Tap Lock keypad while driving. replacement of the vehicle battery):
ff Tap Lock keypad while driving.
The keypad lock is activated when the check
mark is displayed in the checkbox.
Note:
Tap 6 to close the options display. A pop-up appears to inform the user to recon- Note:
nect the iPhone after the keypad setting has You have 5 attempts at entering the
4.6.1 Keypad lock setting during been changed. security PIN correctly.
active Apple CarPlay session
If you change the Lock keypad while driving Note: ff Enter the device’s four-digit security PIN.
setting during an active Apple CarPlay session, Tap 6 to close the options display.
the setting will not take effect immediately. You Note:
will need to reconnect the iPhone manually in If you enter a wrong digit, you can
order for the keypad setting change to take 4.7 Entering the security PIN delete it by tapping .
effect.
Note: ff Tap .
Note: You can enable or disable security PIN
A pop-up appears to inform the user to protection and change the device’s Note:
reconnect the iPhone after the keypad security PIN. For further details on this, ff If you have not entered the correct
setting has been changed while an please read the section entitled “Fur- security PIN for the device, the
Apple CarPlay session is active. ther system settings” (page 20). “Wrong security PIN” notification
appears briefly and the number ofOperation en | 17
remaining input attempts is dis- Note: ff Tap the desired preset.
played. ff To scroll through the available sound
ff If you enter an incorrect security PIN settings, touch the list area and Note:
5 times, the device will be blocked swipe up or down. Tap to return to the sound settings.
and an appropriate notification ff Tap 6 to close the sound set-
displayed. Please contact your tings or tap to return to the 4.8.5 Adjusting the speed depend-
dealer to get the device unblocked. system settings. ent volume
This function automatically adjusts the volume
4.8 Sound settings 4.8.1 Adjusting the bass and treble of the car sound system to the speed driven and
To adjust the sound settings, ff In the Bass or Treble item, tap or to the associated driving noises. For example, at
ff tap 6. decrease or increase the value. an increased speed, the volume is automatically
The system settings are displayed. increased to compensate for the increased
4.8.2 Adjusting the balance driving noise (e.g. due to the airstream).
ff In the Balance item, tap or to shift the The automatic increase in volume can be
sound towards the left or right. adjusted in 4 increments (OFF, 1-3).
ff Tap Speed dependent volume control.
4.8.3 Adjusting the fader
ff In the Fader item, tap or to shift the
sound towards the front or rear.
4.8.4 Selecting an equalizer preset
ff Tap Equalizer presets.
ff Tap Sound settings.
ff Tap the desired option: Off or Level 1 - 3.
Note:
Tap to return to the sound settings.18 | en Operation
4.8.6 Volume adjustment for the 4.8.8 System beep – on/off Note:
AUX source The system confirms certain actions with a ff To scroll through the available set-
ff Tap Aux level. beep. You can enable or disable this confirma- tings, touch the list area and swipe
tion beep. up or down.
ff Tap System beep. ff Tap 6 to close the settings or
The system beep is enabled when the check tap to return to the system
mark is displayed in the checkbox. settings.
4.9 Setting the time and date 4.9.1 Selecting the date format
To adjust the time and date settings, The selected date format refers to the display of
ff first switch to the Home menu, if necessary. the date, e.g. in the Calls list of the phone mode.
ff Tap 6. ff Tap Date format.
The system settings are displayed.
ff Tap the desired option: Quiet, Normal or
Loud.
4.8.7 Volume adjustment for an
external DVD source
ff Tap External DVD level.
ff Tap the desired date format.
ff Tap Clock.
Note:
To scroll through the available date
formats, touch the list area and swipe
up or down.
ff Tap the desired option: Quiet, Normal or ff Tap to return to the time and date set-
Loud. tings.Operation en | 19
4.9.2 Selecting the time format Activate or deactivate summer time:
The selected time format refers to the display of ff Tap Summer time.
the time, e.g. in the Home menu. Summer time is activated when the check mark
ff Tap Time format. is displayed in the checkbox.
4.9.4 Setting the time manually
First select “Manual” as the time setting, if nec-
essary:
ff Tap Clock setting mode.
Select your time zone:
ff Tap Time zone.
ff Tap the desired option: 12 h or 24 h.
4.9.3 Setting the time via GPS
First select “GPS” as the time setting, if neces-
sary:
ff Tap Clock setting mode. ff Tap Manual.
The options for setting the time manually are
displayed.
ff Tap the desired time zone.
Note:
To scroll through the available time
zones, if necessary, touch the list area
and swipe up or down.
ff Tap GPS. ff Tap to return to the time and date set-
The options for setting the time via GPS are tings.
displayed:20 | en Operation
ff In the Hour or Minute item, tap or to You can manually adjust the display brightness
adjust the hours or minutes. of the current mode:
ff In the system settings, tap Display.
4.10 Further system settings
To adjust the system settings,
ff first switch to the Home menu, if necessary.
ff Tap 6.
The system settings are displayed.
ff Tap the desired language.
Note:
ff In the Brightness item, tap or to To scroll through the available lan-
decrease or increase the value. guages, touch the list area and swipe
up or down.
Note:
The vehicle’s brightness level control 4.10.3 Selecting the system of meas-
Note: function is available on the vehicle’s urement
ff To scroll through the available sys- instrument cluster. If you use this func- The device can use metric or imperial units of
tem settings, touch the list area and tion to change the vehicle’s brightness measurement.
swipe up or down. level to maximum, the map display in
ff Tap 6 to close the system set- navigation mode will stay set to day Note:
tings. mode. Please refer to the car owner’s The selected system of measurement is
manual for details about the vehicle’s used by the navigation system.
4.10.1 Adjusting the display bright- brightness level control and how to
ness use it. ff In the system settings, tap Unit of measure-
The display is equipped with a day and night ment.
mode. The display switches between day and 4.10.2 Setting the language
night mode automatically when the vehicle Set the language used by the device.
headlights are switched on or off. ff In the system settings, tap Language.Operation en | 21
If you disable security PIN protection, you will be
prompted to enter the device’s current security
PIN:
ff Tap the desired option: Metric or Imperial. ff Enter a four-digit device security PIN and tap
.
4.10.4 Security PIN protection – on/ ff Enter the new security PIN again to confirm
off it, and tap . ff Enter the device’s four-digit security PIN.
ff In the system settings, tap Security PIN.
Note: Note:
If the security PIN you entered as con- If you enter a wrong digit, you can
firmation differs, a notification is dis- delete it by tapping .
played, and you can enter the new
security PIN again, starting from the ff Tap .
very beginning.
Note:
If you have not entered the correct
security PIN for the device, the “Wrong
security PIN” notification appears
ff Tap Security PIN protection. briefly, and you can enter the security
Security PIN protection is enabled when the PIN again.
check mark is displayed in the checkbox.
If you enable security PIN protection, you will be
prompted to enter a new security PIN for the
device.22 | en Operation
4.10.5 Changing the device’s secu- ff Tap . 4.10.6 Displaying information about
rity PIN open-source software
ff In the system settings, tap Security PIN. Note: The device uses open-source software. To view
If you have not entered the correct information about it,
security PIN for the device, the “Wrong ff in the system settings, tap Open-source
security PIN” notification appears software.
briefly, and you can enter the security
PIN again. Notes:
ff To scroll through the available infor-
You will be prompted to enter the new security mation, touch the list area and
PIN for the device. swipe up or down.
ff Tap to return to the system
settings.
ff Tap Change security PIN.
You will be prompted to enter the device’s cur- 4.10.7 Reset to the factory settings
rent security PIN.
Note:
Resetting to the factory settings will
erase all the settings you defined previ-
ously.
ff Enter a four-digit device security PIN and tap ff In the system settings, tap Reset to factory
. settings.
ff Enter the new security PIN again to confirm ff Tap to confirm that you want to reset the
it, and tap . device to the factory settings.
Wait for a short time for the factory settings to
ff Enter the device’s four-digit security PIN. Note: be restored.
If the security PIN you entered as con-
Note: firmation differs, a notification is dis-
If you enter a wrong digit, you can played, and you can enter the new
delete it by tapping . security PIN again, starting from the
very beginning.Operation en | 23
4.10.8 Displaying the data carrier ff Audiobooks AAC
version ff MPG ff Codecs
ff AVI for H.264/MPEG4 ASP (Xvid) –– AAC-LC
Note: ff Bitrates
The data carrier version will provide The following restrictions apply for the data –– 8kBit/s to 256kBit/s with VBR and CBR
you with information about the release stored on SD cards and external devices con- ff Sample Rates
year of the navigation system’s map nected to the USB port: –– 8-48kHz
data carrier. ff File system: FAT16/32
ff Max. 11 folders in depth hierarchy are sup- WMA
To view the navigation system’s data carrier ported. ff Codecs
version, ff Maximum file / song number: 10000 –– WMA 9 Lossless
ff open the system settings and scroll to Data ff Maximum URL / file path length: 1024 –– WMA 10 Std, 44.1kHz, 64-161 kBit/s
carrier version. ff ID3 tags: Version 1 and 2, max. length 256 –– WMA 10 Pro, 48 - 192kBit/s
ff WMA files with Digital Rights Management
(DRM) from online music shops cannot be 4.11.2 SD card
4.11 Connecting/inserting exter- played.
nal devices and data storage ff WMA files can only be played back, if they Inserting and removing an SD card
devices were created with Windows Media Player
Important notes:
version 9 or 10.
Note: ff Never insert anything other than an
ff Applicable playlist extensions:
Only use appropriate connecting SD card into the SD card slot. Doing
–– .m3u
cables and external devices in regard to so could damage the device.
–– .pls
safety, electromagnetic compatibility ff Never use excessive force when
–– .wpl
and grade of shielding. removing an SD card or else the
card slot or the card itself may be
MP3
4.11.1 General information damaged.
ff Codecs
The device supports the following media file ff When inserting an SD card into the
–– MPEG-1: Layer-1, Layer-2, Layer-3
formats: device, make sure the card is
–– MPEG-2: Layer-1, Layer-2, Layer-3
ff MP3 aligned and positioned correctly
–– MPEG-2.5: Layer-3
ff WMA (the correct side must be facing
ff Bitrates
ff AAC upwards, and you must insert the
–– 8 kBit/s to 448 kBit/s with VBR and CBR
ff WAV correct end of the card). If you use
ff Sample rates
ff 3GPP force to insert an incorrectly aligned
–– up to 48kHz24 | en Operation
and positioned SD card into the containing the navigation system’s map 4.11.3 USB storage device/Apple
slot, you may damage the card and data first.
the slot. As long as the SD card containing the Note:
ff If the “No Card” notification appears navigation system’s map data is Information about which Apple devices
in the display despite your having removed, you will not be able to use the the device supports is available at
inserted an SD card into the SD card navigation function. www.suzuki-slda.com.
slot, this means that the device
does not recognize the card for To insert an SD card, General information
some reason. Try removing the card ff slide the SD card with its printed side facing ff The external devices connected to the USB
and inserting it again. Please bear in upwards and its contacts pointing towards port must comply with the USB Mass Storage
mind, however, that some SD cards the device into the SD card slot 3. Class specification (USB MSC).
may not be compatible with this A notification appears briefly in the display ff Devices connected via USB are supported
device. when the device detects the SD card. according to USB specification V 2.0.
ff Ensure the label on the SD card is Devices with USB specification 1.0 and 3.0
fully attached. Otherwise the SD To remove an SD card, are compatible.
card may become stuck in the slot ff press the SD card gently with your fingertip ff Devices without FAT16 / FAT32 file system
or particles from the label may be into the SD card slot 3. are not supported.
left inside the device leading to the The SD card is released and ejected, and a ff Hard Disk Drives (HDD) are not generally
possible failure of SD-card function- corresponding notification appears briefly in the supported.
ality. display. ff USB hubs are not supported.
ff Do not use an SD card that has been ff Pull the SD card out of the SD card slot 3.
cracked, deformed or repaired Connecting and removing a USB storage device
using adhesive tape. Use of a dam- Note: or Apple device
aged SD card may damage the Remove the SD card as soon as it is To connect a USB storage device or Apple
device. ejected. If an ejected SD card remains device,
in the card slot, it may lead to the ff connect it to the USB port.
touchscreen not functioning properly. A notification appears briefly in the display
Note:
If your device is equipped with a navi- when the device detects the USB storage device
gation system: or Apple device.
If you want to insert a media SD card, To remove a USB storage device or Apple
you may have to remove the SD card device,
ff pull it out of the USB port.Operation en | 25
An appropriate notification appears briefly in ff Tap 6 to close the menu. ff If a smartphone is already con-
the display. nected to the device via smartphone
4.11.5 Enabling the external DVD integration, it is not possible to
4.11.4 AUX audio source input establish a Bluetooth® connection
ff In media mode, tap 6. to another mobile phone.
Note: ff An existing Bluetooth® connection
Only applicable if your vehicle is fitted will be disconnected automatically
with an AUX input. as soon as another smartphone is
connected via smartphone integra-
Connecting an AUX source
tion.
ff Use a suitable cable to connect the AUX
source to the AUX input. General information
The device supports Bluetooth® 3.0 + HS and
Note: the following Bluetooth® profiles and standards:
If you want to play a connected AUX ff A2DP 1.2
source, you must first enable the AUX ff AVRCP 1.3
ff Tap DVD active.
input (see below). ff HFP 1.6
The external DVD input is enabled when the
check mark is displayed in the checkbox. ff MAP 1.0
Enabling the AUX input
ff Tap 6 to close the menu. ff PBAP 1.1
ff In media mode, tap 6.
ff SPP 1.1
4.11.6 Connecting a device via Blue- ff Vcards 2.1, 3.0
tooth® Opening the Select Bluetooth device menu
ff Tap the direct-select button in the Home
Notes:
menu.
ff Information about which external
devices the device supports is or:
available at www.suzuki-slda.com. ff Tap the Call area in the Home menu.
ff The procedures described in this ff Tap .
chapter apply to Bluetooth® mobile The Select Bluetooth device menu is displayed:
ff Tap Aux active. phones as well as to Bluetooth®
The AUX input is enabled when the check mark audio streaming devices such as a
is displayed in the checkbox. Bluetooth® MP3 player.26 | en Operation
8
< Indication of Bluetooth® device type and Note:
currently connected device: Please refer to your mobile phone’s
ff : Telephone instruction manual for information on
ff : Audio streaming device how to set up a Bluetooth® connection
on your mobile phone.
Pairing and connecting a mobile phone for the
first time ff Method 1:
ff In the Select Bluetooth device menu, tap Add Perform the connection setup process on
device 8. your mobile phone. On your mobile phone,
The device is now available for setting up a enter the displayed PIN.
connection (pairing). The Bluetooth® PIN of the
device is displayed. Next, please follow the ff Method 2:
12 11 10 9 instructions provided by the device and your The connection setup does not require you to
mobile phone. enter a PIN on the mobile phone. A notifica-
You will find the following information and con- tion appears in the display informing you that
trols in the Select Bluetooth device menu: Notes: the mobile phone wants to connect.
ff The Bluetooth® name of the device ff Tap .
Note: is “Suzuki”. The rest of the connection setup process is
The currently connected device is ff If 10 mobile phones are already performed automatically. An appropriate
always the first item in the device list. paired with the device, it will not be notification appears in the display.
possible to pair and connect a fur-
ther mobile phone. In this case, first ff Method 3:
8 Add device button: Start pairing a new
delete one of the paired mobile The mobile phone receives the device’s PIN
mobile phone
phones (see the section entitled and displays it.
9 button: Delete a paired mobile phone ff Check that the mobile phone is displaying
“Deleting a paired mobile phone”
: Supported Bluetooth® functions of the (page 27)). the correct PIN and then tap .
connection: ff Confirm on your mobile phone that you
ff : Telephone There are 3 methods of establishing a Blue-
want to set up a connection.
tooth® connection. Please proceed according to
ff : Audio streaming the method employed:
ff : Telephone and audio streaming If connection setup was successful, the mobile
phone will connect to the device.
; Bluetooth® name of the deviceOperation en | 27
Notes: Notes: necting a smartphone using the
ff If the connection attempt fails, a ff If the mobile phone is unpaired smartphone integration function.
notification is displayed. Make during an active call, the call is If, however, you want to continue
another attempt at setting up a interrupted. The call can then be using an existing Bluetooth® con-
connection from the mobile phone. continued on the mobile phone if nection, you should cancel the
ff As soon as a new mobile phone is the mobile phone supports this. smartphone integration setup pro-
connected to the device, the list of ff When the mobile phone is unpaired, cess.
calls appears in the display, and the its phone book and call lists are also ff If a smartphone is connected via
phone book and call lists are down- deleted from the device. MirrorLink™ or Android Auto and a
loaded from the mobile phone onto ff To connect the mobile phone to the Bluetooth® connection from the
the device. The time required to device again, proceed as described same smartphone already exists,
download the phone book and call in the section entitled “Pairing and the Bluetooth® connection will be
lists may vary depending on the connecting a mobile phone for the maintained.
connected mobile phone. first time” (page 26). ff Smartphones that are integrated via
MirrorLink™ or Android Auto require
Connecting an already paired mobile phone 4.11.7 Connecting a smartphone via a Bluetooth® connection in addition
The device stores the information for the 10 pre- smartphone integration to smartphone integration via USB
viously paired mobile phones. These mobile in order to provide full support for
phones are displayed in the Select Bluetooth Notes: the telephone functions.
device menu. ff Information about which smart- Users can use the non-phone fea-
To connect a mobile phone shown in this list, phones the device supports is avail- tures of MirrorLink™ or Android
ff tap the relevant item in the Select Bluetooth able at www.suzuki-slda.com. Auto without a Bluetooth® connec-
device menu. ff A smartphone can be connected to tion.
If connection setup was successful, the mobile the device using the smartphone If there is no Bluetooth® connection
phone will connect to the device. integration function. The connec- established before you integrate a
Deleting a paired mobile phone tion can be made via the USB port. MirrorLink™ or Android Auto smart-
To delete a paired mobile phone, ff A simultaneous Bluetooth® connec- phone, you will have to establish the
tion with another smartphone is not Bluetooth® connection manually
ff tap 9 in the corresponding item of the
allowed when a smartphone is (see the section entitled “Connect-
Select Bluetooth device menu.
connected using the smartphone ing a device via Bluetooth®” (page
The selected mobile phone is unpaired and
integration function. 25)).
deleted from the list.
ff You should disconnect any existing
Bluetooth® connection before con-28 | en Operation | FM/AM radio mode
ff Smartphone integration via Apple 5 FM/AM radio mode ff Tap the memory bank of the desired wave-
CarPlay does not allow any parallel band.
Bluetooth® connection. If an Apple The tuner display for the selected memory bank
CarPlay smartphone is already Notes: is displayed and you can hear the radio broad-
connected via Bluetooth®, this ff AM reception: Generally, strong AM cast.
Bluetooth® connection will be can- signals provide stable sound quality
celled. with low signal noise. At night, 5.2 The tuner display
however, atmospheric conditions
To connect a smartphone, 13 14 15 16 17
may sometimes lead to interference
ff connect it to the USB port.
from other stations.
The smartphone is detected automatically and
ff FM reception: The FM waveband
connected via smartphone integration.
offers the highest sound quality;
however, the signal may be suscep-
To disconnect the smartphone from the device,
tible to noise due to:
ff unplug the smartphone from the USB port.
–– The limited reach of some trans-
An appropriate notification appears briefly in
mitters.
the display.
–– Distortion caused by signals
reflected off local buildings and
other obstructions.
–– “Shadow zones” wherein the 23 22 21 20 19 18
signal reception is obstructed or
restricted. You will find the following information and con-
trols in the tuner display:
5.1 Listening to the radio = button: Change frequency
ff Tap the direct-select button in the Home > button: Open the source menu
menu. ? Current memory bank
@ Station information area
Note:
You will also find the button in the A button: Change frequency
display of the currently playing media. B button: Start seek tuning
C button: Start seek tuning
ff Tap the Radio tab, if necessary. D Tuning scaleFM/AM radio mode en | 29
E Frequency pointer The convenient RDS functions “Alternative ff Tap 6 to close the menu.
F Memory preset buttons Frequency” and “Regional Mode” enhance the
G button: Start scan function performance of your tuner: 5.4.2 Regional mode – on/off
In memory bank FM-AST and AM-AST: ff Alternative frequency (AF): The device auto- ff Call up the tuner display.
button: Start autostore function) matically performs a background search for ff Tap 6.
the best reception frequency for the tuned
Note: station.
The information displayed in the sta- ff Regional mode: Some radio stations divide
tion information area @ depends on their schedule at certain times into regional
whether RDS is supported in your programmes offering different content. You
reception area or by the current sta- can enable or disable regional mode. With
tion. regional mode enabled, the device is pre-
vented from switching to alternative frequen-
5.3 Calling up the tuner display cies for the tuned station that have different
While you are listening to the radio: programme content.
ff Tap the Listen area in the Home menu. ff Tap Regional programme.
5.4.1 AF mode – on/off Regional mode is enabled when the check mark
5.4 RDS ff Call up the tuner display. is displayed in the checkbox.
ff Tap 6. ff Tap 6 to close the menu.
Note:
If RDS is not supported in your recep- 5.5 Selecting the waveband/mem-
tion area or by the current station, you ory bank
will not be able to experience these While you are listening to the radio:
functions. ff Tap > in the tuner display.
This device is equipped with an RDS radio Note:
receiver. Many FM stations transmit a signal that You will also find the button in the
not only carries the radio programme but also Home menu.
information like the station name. The station
name appears in the display as soon as the tuner ff Tap Alternative frequency search. ff Tap a memory bank of the desired waveband.
receives it. AF mode is enabled when the check mark is The tuner display for the selected memory bank
displayed in the checkbox. is displayed.30 | en FM/AM radio mode
5.6 Tuning stations ff Tap the station information area @. ff Tap G.
The FM station list is displayed. The six stations offering the strongest reception
5.6.1 Tuning stations manually ff Tap the desired radio station. in the current waveband are stored automati-
ff Tap = or A once or several times to cally. The stations are sorted according to their
adjust the frequency incrementally. To return to the tuner display, reception strength; the station with the strong-
ff tap . est reception is stored on memory preset 1.
Or:
Afterwards, the station stored on memory pre-
ff Tap any position on the tuning scale D to set 5.6.4 Scanning receivable stations set 1 will be played.
the corresponding frequency.
Or: Note: 5.8 Listening to a stored station
ff Touch the frequency pointer E and swipe This function is only available in the AM ff First select the desired memory bank, if
left or right along the scale to adjust the waveband. necessary.
frequency continuously. ff Short-tap one of the memory preset buttons
ff Tap G. F.
5.6.2 Starting seek tuning The receivable stations are played one after The stored station is played.
ff Tap B or C to tune to the next or another for around 10 seconds each.
previous station in the reception area. To continue listening to the station that is cur- 5.9 Radio-text display – on/off
rently being scanned,
Note: ff tap G again. Note:
By long-tapping B or C you If the stations in your reception area do
adjust the frequency continuously. 5.7 Storing stations not support RDS, you will not be able
After you release the button, the radio to use this function.
tunes to the next station automatically. 5.7.1 Storing stations manually
ff First select the desired memory bank, if ff Call up the tuner display.
5.6.3 Station list necessary, and tune to the desired station. ff Tap 6.
ff Long-tap one of the memory preset buttons
Note: F.
This function is only available in the FM The currently tuned station is then stored to the
waveband. memory preset button.
All currently receivable radio stations are dis- 5.7.2 Storing stations automatically
played in the FM station list. ff Select the autostore memory bank FM-AST or
AM-AST.You can also read