Kronos User's Guide Specifically For Timekeepers and Supervisors in Kronos Workforce Timekeeper 8.1.3 May 2019
←
→
Page content transcription
If your browser does not render page correctly, please read the page content below
Kronos User’s Guide

                              Specifically For

                       Timekeepers and Supervisors

                                     in

                     Kronos Workforce Timekeeper 8.1.3

                                 May 2019

Updated 6/11/19 JC                                       Page 1 of 79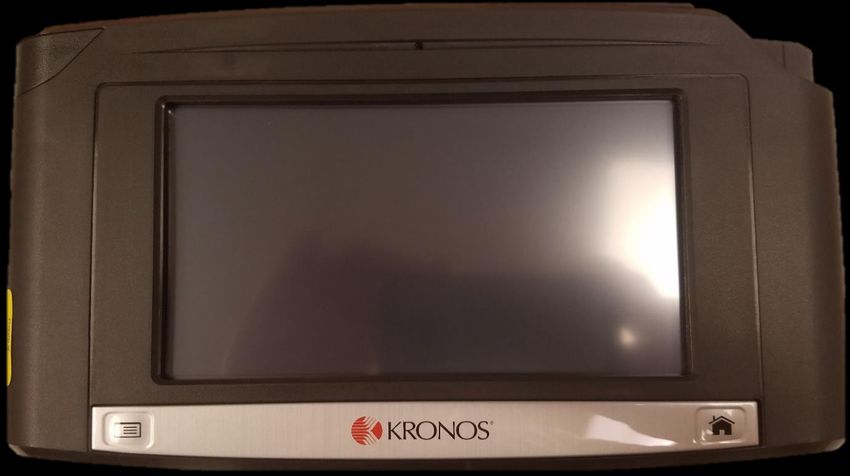
Table of Contents
Table of Contents……………………………………………………….2-3
Introduction………………………………………………………………4
Timekeeper and Supervisor Roles……………………………………5
Timekeeper and Supervisor Responsibilities………………………..5-6
Payroll Processing Information………………………………………..7
Using Kronos Workforce Timekeeper
Navigation Basics
o Log On Information……………………………………….8
o Log On Instructions……………………………………….9
o Default Home Screen Information………………………10
o Log Off Instructions……………………………………….11
Genie Basics
o Purpose of a Genie - Accessing Employee Data…….12
o QuickFind Genie Instructions…………………………….13-14
o Genie (Not QuickFind) Instructions………………………15-16
o “Ad Hoc” Hyperfind Query Instructions…………………17-19
People Basics
o Purpose of the People Record………………………….20
o Information about Labor Accounts……………………..20
Timecard Basics
o Purpose of the Timecard………………………………..21
o Timecard Indicators and Colors………………………..22
Updated 6/11/19 JC Page 2 of 79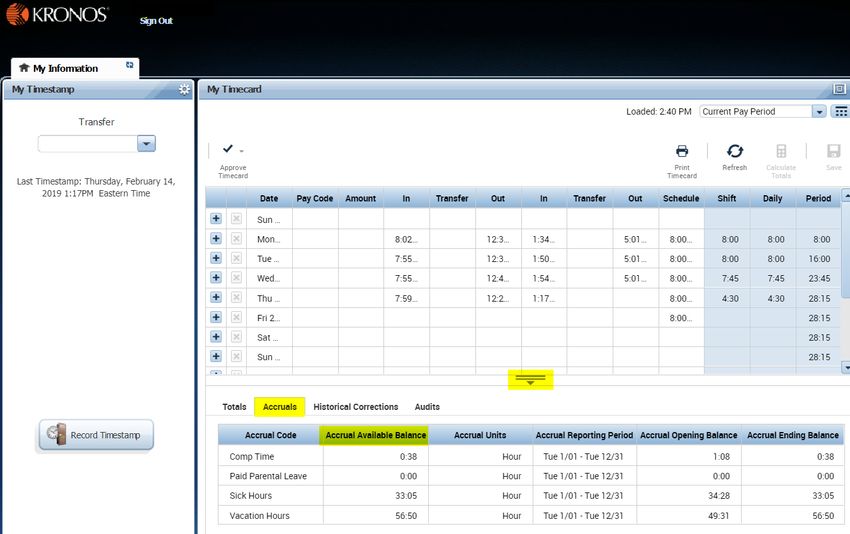
o Definition of an Exception in Kronos…………………..23
o Timecard Tabs and Go To……………………………...23
Timekeeping Basics
o Types of Timecards………………………………………24
o Punch Information & Tips……………………………….24-25
o Add Punch Instructions………………………………….26-27
o Edit Punch Instructions………………………………….28-30
o Delete Punch Instructions……………………………….31-34
o Comments & Notes Instructions………………………..35-38
o Add Pay Code Instructions………………………………39-40
o Edit Pay Code Instructions………………………………41-43
o Add Job or Labor Transfer Instructions………………...44-46
o Edit Job or Labor Account Transfer Instructions………47-49
Report Basics
o Report Instructions……………………………………….50-52
Pay Period Close Basics……………………………………….53
o Pay Period Close – BSU Genie Instructions ……….…54-56
o Timecard Approval Process Instructions………………57-58
Appendix Information
Appendix A - Kronos Vocabulary…………………………….59
Appendix B - Kronos Available Resources………………….60
Appendix C - Kronos List of Comments……………………..61
Appendix D - Kronos Timekeeping Do’s & Don’ts………….62
Appendix E - Using the Kronos InTouch Clocks……………63-70
Appendix F – Supervisor/Timekeeper Required Actions….71-76
o Move Earned Comp Time to Overtime
o Holidays on Scheduled Day Off
o Enter Time Off
Appendix G – Leave Balances and Accrual Loads………...77
Updated 6/11/19 JC Page 3 of 79
Introduction
Timekeeping is a critical function, which may be performed by the individual
employee, a timekeeper, a supervisor, or a combination of these
individuals. The timekeeping function requires accurate and timely
recording of time and attendance. Timekeeping must be done in
accordance with federal and state guidelines as well as University policies.
Specifically, Indiana Code IC 35-44-2 “Perjury, False Reporting,
Impersonation, and Ghost Employment” makes it a criminal and civil law
offence to employ and pay an employee when the employee is not
performing duties related to the operation of the employer thus
emphasizing the critical role of the timekeeping function.

                       Timekeeping System
 Ball State University’s official timekeeping system is Kronos Workforce
Central. Kronos is used to report hours worked and time off. Every pay
period, an employee’s timecard should be reviewed for accuracy, edited as
necessary, and signed off on by an employee’s supervisor before being
sent to payroll for processing.

By giving every supervisor Kronos access, a hierarchy structure is created
thus providing a “back up” supervisor or next level approver to assist with
coverage for vacations or illness. See example below:

Updated 6/11/19 JC                                                   Page 4 of 79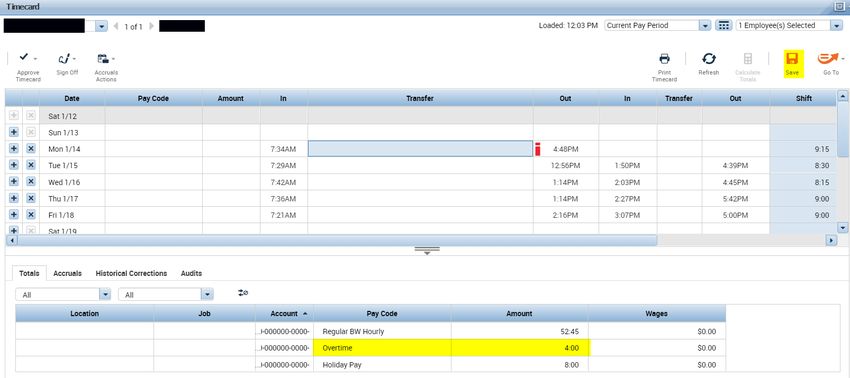
Timekeeping Roles
Employee Role – Each employee is given access to their timecard to view,
make limited edits (add a pay code, add a comment, etc.) and approve it.
Auditor Role - View only access given to an employee (or non-employee
like State Board of Accounts) to be able to view all timecards of the Ball
State employees as part of their job responsibilities.
Examples include Benefit Manager for PPACA tracking, Human
Resources for hours/shift/job information, Employee Relations for
discrepancies/complaints/grievances, and internal/external auditors.
Timekeeper Role - View, Edit, and Approve access given to a non-
managerial employee who is assigned the timekeeping functions for other
employees in their department. A timekeeper is not required in every
department; however, some larger departments may opt to enlist the help
of a timekeeper. This role does not have the final sign off authorization.
Examples include an Admin Coordinator, Office Coordinator,
Specialist, Assistants, etc.
Supervisor Role - View, Edit, Approve, and Sign Off access given to a
supervisor who is assigned the timekeeping functions and/or final sign off
authorization for employees that they supervisor in their department and/or
organization. A supervisor is responsible for the accuracy of their
employee’s timecards as well as ensuring the timecard sign offs are
complete by the assigned deadlines.
Examples include Supervisors, Managers, Deans, Chairs, AVPs,
VPs, etc.
Timekeeping Responsibilities
Employee Responsibilities:
Non-exempt employees are required to:
o Record time via timestamp or time clock
o Report time off
Updated 6/11/19 JC Page 5 of 79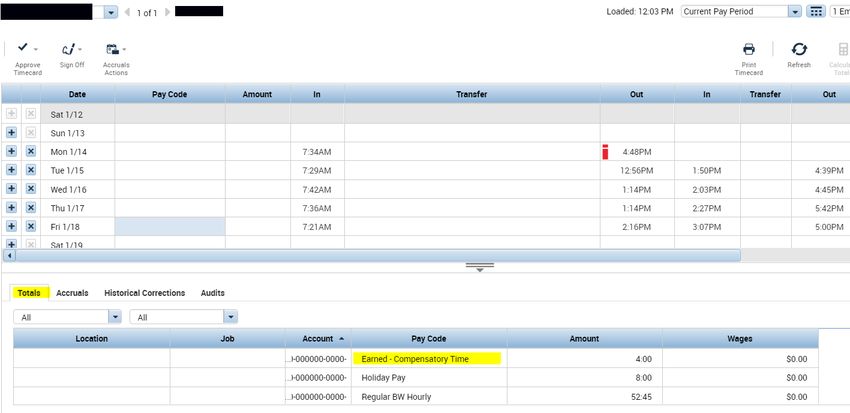
o Record time worked against the proper job, contract, or grant
fund
o Review and approve their timecard by the approval deadline.
Exempt employees are required to:
o Record exceptions (sick, vacation, or leaves)
o Review and approve their timecard by the approval deadline.
Timekeeper Responsibilities:
Review timecards to ensure the employee’s time is accurately
recorded and complete
Work with employees to resolve errors like missing punches and job
corrections
Approve the timecard by the approval deadline effectively locking the
timecard from any further employee edits and notifying the
employee’s supervisor that you have completed your timekeeping
responsibilities.
For corrections after the payroll has processed: complete a Kronos
Adjustment Form, obtain the employee and supervisor signature, and
email the form to the Payroll department.
Supervisor Responsibilities:
Review direct report timecards to ensure the time is accurate and
complete
Assist the Timekeepers and employees with edits or questions
Work with employees to resolve errors like missing punches and job
corrections
Sign off on the timecard by the sign off deadline effectively locking
the timecard from any further edits and notifying the Payroll
department that you have completed your supervisor responsibilities.
For corrections after the payroll has processed: complete and sign a
Kronos Adjustment Form, obtain the employee signature, and email
to the Payroll department
The Kronos system offers basic scheduling, time reporting, exceptions
reporting, and absence tracking online and in real time which provides timely
and accurate information to timekeepers and supervisors. All of these items
are covered in this document.
Updated 6/11/19 JC Page 6 of 79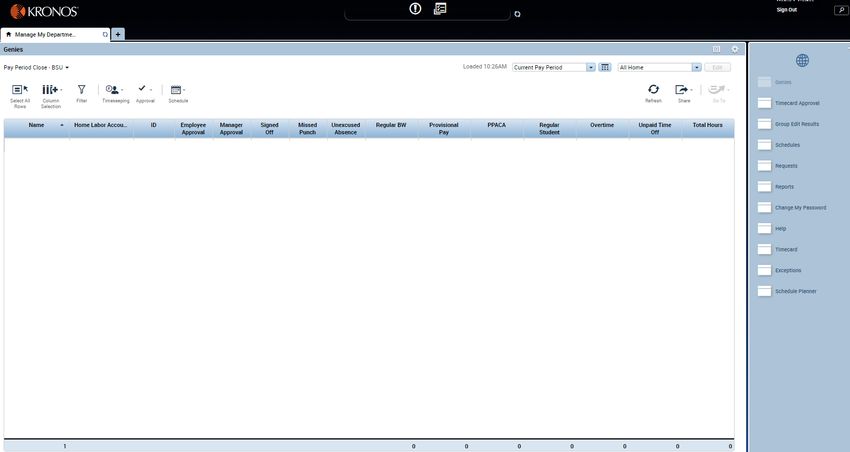
Payroll Processing Information
Biweekly Payroll:
Ball State University pays all employees on a biweekly pay cycle.
A pay week runs from Sunday 12:00 AM to Saturday 11:59PM.
A pay period runs for two consecutive weeks starting on Sunday and
ending on a Saturday.
Employees will be paid every other Friday, the Friday after the pay
period ends.
In order to ensure the payroll is completed in a timely manner, the following
schedule has been established:
The employee’s Supervisor will need to sign off on their employee’s
timecards by 2:00 PM on Monday (unless a holiday schedule applies)
after the pay period ends. (aka “Kronos Monday”)
Payroll recommends that the Supervisor set a biweekly reminder on
their calendar.
If the Supervisor fails to complete the sign-off by 2:00 PM, Payroll will
apply the sign off for you. Payroll will then notify you and your
supervisor of the failed sign-off. Please note, that multiple failed sign-
off notifications may result in your access being removed from Kronos
and/or disciplinary action being taken.
As a Timekeeper or Supervisor, you have access to Kronos at any time
during the pay period to view or make changes/corrections. The more
frequently the timecards are reviewed, the less time it will take on “Kronos
Monday” before submitting the information to the Office of Payroll and
Employee Benefits. Therefore, reviewing the information on a daily basis is
strongly recommended.
Updated 6/11/19 JC Page 7 of 79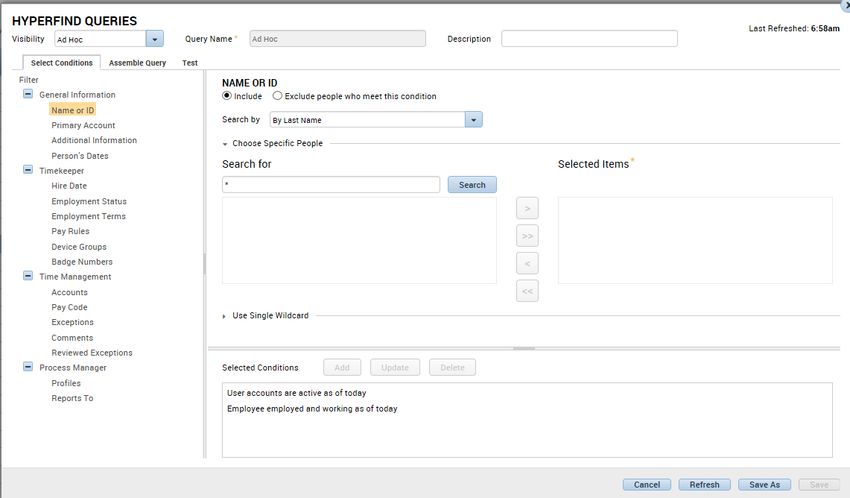
Log On Information
Important Information:
Kronos is JAVA and FLASH free which means you can use any type of
computer (MAC or Window’s PC) and any internet browser (Internet
Explorer, Google Chrome, Mozilla Firefox) to log on.
Kronos 8.1.3 utilizes single sign on (SSO) which allows you direct
access without logging on if you are already logged onto the BSU
network.
Kronos Username and Password are the same as your BSU network
account.
Log On Options:
BSU website/PEB webpage
https://cms.bsu.edu/about/administrativeoffices/payrolleb/payroll/kronos
BSU website/My.BSU under “Additional Tools”
https://my.bsu.edu/
Please contact the PEB@bsu.edu if you need special accommodations for
Kronos or assistance logging on.
Updated 6/11/19 JC Page 8 of 79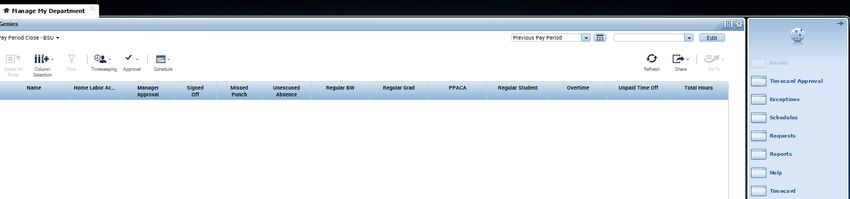
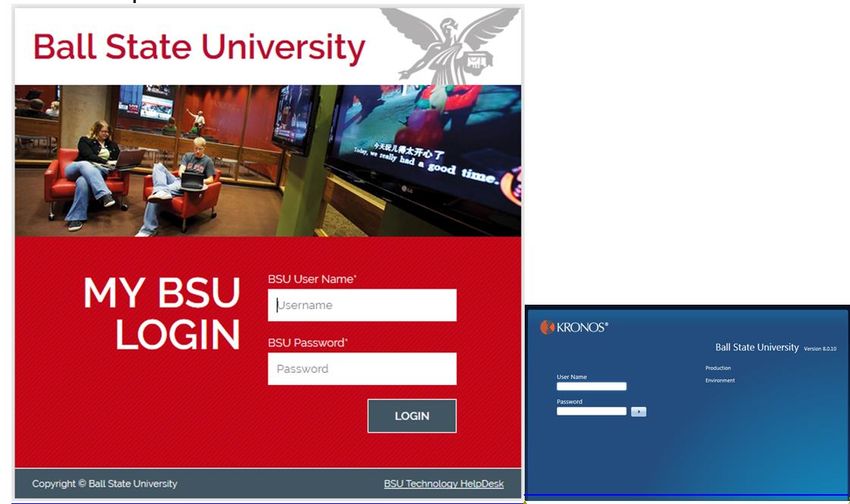
Log On Instructions
Log On Instructions:
Log On Step 1 - Click on one of the links provided above under “Log
On Options.”
o Log on Step 2 - If you are not already logged onto the BSU
secure network, you will be taken to the “MY BSU LOGIN”
screen and required to enter your BSU username and password.
o If you are already logged onto the BSU secure network, you will
be given direct access into Kronos without being required to
enter your BSU username and password. This log on feature is
called “single sign on” or SSO, it will open Kronos automatically
to your default home screen (see example below).
Updated 6/11/19 JC Page 9 of 79
Default Home Screen Information
Default Homepage for Kronos Timekeeper or Supervisor:
Key Areas of your Default Homepage:
In the middle of the screen is your primary “workspace.”
In the upper left-hand corner identifies the system and the employee
signed on.
The top center section of the screen allows you to refresh and alerts
you to timecard exceptions.
Next to Manage My Department is a “+” which allows you to change
your workspace from “Manage My Department” to “My Information.”
Along the right hand side of the screen are your “Related Items” which
allows you to navigate to other related areas in Kronos.
Updated 6/11/19 JC Page 10 of 79Log Off Instructions
Log Off Instructions:
Log Off Step 1 - When you are ready to log off of Kronos, simply click
on “Sign Out” just below your name in the upper left hand corner of the
screen.
Updated 6/11/19 JC Page 11 of 79Genie Basics
Purpose of a Genie:
A Genie is your starting point for viewing time and labor information in
Kronos. Genies appear as selections on a dropdown menu along the upper
left-hand side of the screen and once selected will display employee
information in a summarized, easy to read format.
The “Pay Period Close – BSU” is your default Genie upon log on.
By using a Genie, you can perform the following functions:
Locate employees and access their timecards.
Select specific employees and generate reports.
Review summarized information “at-a-glance” for analysis of data.
Perform group edits.
When you use a Genie, you can filter the data that appears so that it
answers the following questions:
Who – which employee or group of employees.
When – which time period or pay period.
What – what information.
Updated 6/11/19 JC Page 12 of 79QuickFind Genie Instructions
How to use “QuickFind” Genie:
QuickFind Step 1 - From the list of Genies, click on “QuickFind.”
o Once the QuickFind genie appears, enter your search
parameters (the “who” and the “when”) in the top section of your
workspace and click the “magnifying glass”/search button.
QuickFind Step 2 - Use the search box to the right of the Genie menu
to find your employees (the “who”).
o To find all the employees you have access to type: *
o To find last name of the employee with the last name type:
Last name*
Updated 6/11/19 JC Page 13 of 79o To find first name of the employee with the first name type:
*, (space) first name*
o To find first name of the employee with only the first initial type:
*, (space) first initial*
o To find the employee with BSU ID type:
BSU ID number*
QuickFind Step 3 - Use the search box on the right-hand side of the
workspace to find the time period (the “when”).
o Click on the drop down menu to select a predetermined time
frame.
o Click on the calendar to the right of the menu to enter a specific
date or date range.
QuickFind Step 4 - Once the “who” and “when” have been selected,
click on the “magnifying glass”/search button to obtain search results.
Updated 6/11/19 JC Page 14 of 79Genie Instructions
How to use the other Genies (not QuickFind):
Genie Step 1 - From the list of available Genies, click on the Genie
you wish to use.
Genie Step 2 - Use the search box on the right-hand side of the
workspace to find the time period (the “when”).
Updated 6/11/19 JC Page 15 of 79o Click on the drop down menu to select a predetermined time
frame.
o Click on the calendar to the right of the menu to enter a specific
date or date range.
Genie Step 3 - Use the search box on the right-hand side of the
workspace to find your employees (the “who”) using a hyperfind query.
Genie Step 4 - Once the genie, the time period, and the hyperfind
query have been selected (Genie Steps 1-3), Kronos will automatically
populate your workspace with the search results.
Genie Step 5 (Optional) - Once your selected genie has populated
your workspace, you can narrow or adjust your hyperfind query
(search results) by using the “edit” button in the upper right-hand
corner of the workspace. Follow the Hyperfind Query steps below.
Updated 6/11/19 JC Page 16 of 79Ad Hoc Hyperfind Query Instructions
How to edit the “Ad Hoc” Hyperfind Query:
Ad Hoc Step 1 – Be sure the “Edit Ad Hoc” hyperfind query is
selected.
o The “Hyperfind Queries” window will appear with “Ad Hoc” pre-
selected.
Ad Hoc Step 2 – Determine which “condition” along the left-hand side
of the window that you want to utilize to narrow your search and then
click on it. Once a condition is selected, it will give you options on the
right-hand side of the window to narrow search.
o For example, I only want to see employees with last name of
“Bryant,” select the “Name or ID” filter.
Updated 6/11/19 JC Page 17 of 79 Ad Hoc Step 3 – Update the selection criteria and add it to the
“selected conditions.”
o Select the radio button to “Include” or “Exclude people who meet
this condition.”
o In the “Search for,” type “Bryant*” and click “Search.”
o Once the search is completed, it will give you a list of employees
that meet that search criteria. You must decide if you want to
move all employees listed or just a few to the “selected items”
box.
o In my example, I want all employees with last name of “Bryant”
so I will click “>>” to move them all.
o Once the data is moved to my “Selected Items” box, you are
ready to “Add” the new condition by clicking the “Add” button.
Updated 6/11/19 JC Page 18 of 79 Ad Hoc Step 4 - Once the new condition has been added, you are
ready to test your new hyperfind query, click on “Test.”
o Once the new condition has been added, you are ready to test
your new hyperfind query, click on “Test.”
Ad Hoc Step 5 - Once the test is complete and you agree with the test
results, click “Save” to override your “Ad Hoc” query or “Save As” to
save your new query with a different name.
Ad Hoc Step 6 - Once the query is saved, you will need to refresh the
Genie to implement the changes on your screen.
Updated 6/11/19 JC Page 19 of 79People Basics
Kronos Workforce Timekeeper tracks hours that each employee works for a
defined period of time, and then places those hours into specific categories.
These categories contain explicit pay policies that determine how Workforce
Timekeeper calculates employee hours.
Purpose of the People Record:
The People Record stores each employee’s pay policy rules, as well as
personal information. This record contains employee name, badge, and ID
number, as well as job-related attributes, such a holiday pay rules and labor
account information, which ensures the employee is paid correctly for
worked and non-worked hours. Payroll along with Financial Information and
Technology Systems maintains this information behind the scenes.
Information about Labor Accounts:
Kronos Workforce Timekeeper uses a “labor account” to track payroll
expense. There are seven available levels in the labor account; Ball State
University currently uses 5 of the 7 available levels.
Level #1 TS-ORGN-CODE (Timesheet Organization Number)
Level #2 EE-POS-SUFF (Employee Position including Suffix)
Level #3 ECLS-CODE (Employee Classification Number)
Level #4 SUPV-POSN-SUFF (Supervisor Position incl Suffix)
Level #5 LABOR-TRANSFER (Fund-Org-Program-Activity)
Level #6 Blank, not currently used
Level #7 Blank, not currently used
These levels are important when performing a job or labor account transfer
in Kronos.
Updated 6/11/19 JC Page 20 of 79Timecard Basics
Kronos Workforce Timekeeper utilizes an employee timecard to track and
calculate hours worked/hours paid for a defined period of time. A timecard
can be viewed by an employee, a Timekeeper and/or a Supervisor because
they have been given the required licensure to access the Kronos System.
Purpose of a Timecard View:
The timecard view offers the ability to:
Review the timecard for exceptions
Monitor the employee’s total hours
Verify transfers
Access accrual balances
Perform pay code and punch edits
Record comments/notes
Review the audit trail details
Generate reports
Approve/sign off of the timecard
Updated 6/11/19 JC Page 21 of 79Timecard Indicators and Colors:
The appearance of the timecard cells changes to indicate different
conditions.
A blue speech bubble icon after a punch or amount indicates a
comment about the cell’s contents. Point to the icon or navigate to the
audits widget to view the comment.
A solid red cell indicates a missed in-punch or out-punch. Point to the
red box for more information.
A red line with one white bar indicates an exception, such as a late
punch, early punch, or long interval. Point to the cell for more
information.
A cell with a red line with one white bar and a blue speech bubble
icon indicates that a punch or amount has a comment and an
exception.
A cell with a green line with four white bars indicated an exception
that has been reviewed by a Timekeeper or Supervisor.
A date cell with a red line with one white bar indicates an unexcused
absence day.
A date cell with a blue line with four white bars indicates an excused
absence day.
A yellow cell indicated a Timekeeper or Supervisor has approved the
hours before the employee’s approval.
A green cell indicated an employee and a Timekeeper or Supervisor
have approved the hours.
A gray cell indicates that you cannot edit the contents.
A transaction shown in purple indicates that it was added to the
database by the system.
Updated 6/11/19 JC Page 22 of 79Definition of an Exception in Kronos:
Timecard exceptions (or alerts) are intended to identify discrepancies, just in
case they need to be fixed before the timecard information is sent to Payroll
for processing. Some exceptions, like a missing punch, are required to be
fixed before the timecard can be approved.
Timecard exceptions appear as blue or red highlights on the timecard and as
abbreviated codes in reports based on your business rules. Exceptions can
also appear as the subject of one or more columns in a Genie. Examples of
timecard exceptions are missing punches, short or long shifts, early or late
punches, unexcused absences, and unscheduled shifts.
Timecard Tabs and Go To:
In Kronos v8.1.3, Workforce Timekeeper, there are four tabs available at the
bottom of the timecard:
Totals & Schedule – Displays a summary of the employee’s worked
hours, categorized by labor account, jobs, and pay code amounts. The
Schedule section of the tab displays the employee’s schedule
assignment for the selected time period.
Accruals – Displays the employee’s accrued time, such as vacation or
PTO, as of the date selected in the time period. Check out Appendix G
– Leave Balances and Accrual Loads.
Historical Edits – Displays nothing as it is not currently in use.
Audits – Displays a complete audit trail of employee’s timecard
including who and when information was added/edited on the timecard
as well as where the information came from (time clock location,
timestamp/PC IP Address, timekeeper/supervisor ID attached to edits.
In Kronos v8.1.3, Workforce Timekeeper, there is a “Go To” widget that
gives you access to the following information from the timecard:
Audits
Rules Analysis
Exceptions
Scheduled
Requests
Reports
Updated 6/11/19 JC Page 23 of 79Timekeeping Basics
As a Timekeeper or Supervisor, it is your responsibility to review, edit, and
sign off on the employee timecards you manage. You can make changes in
one timecard or perform one edit to multiple timecards. Workforce
Timekeeper tracks all changes to a timecard in the audit trail.
Types of Timecards:
There are two timecard views in Kronos Workforce Timekeeper that Ball
State University utilizes:
Project View is used for exempt employees to report absences;
includes the following employee classifications:
o Exempt Staff (E1, E2)
o Faculty (F1, F2, F3, F4, F5, F6, TF)
o Professional (P1, P2, P3, P4, P5, TM)
Hourly View is used for nonexempt employees to record their time
stamp (aka punch); includes the following employee classifications:
o Affiliated Service (A1)
o Bargaining Unit (B1, B2)
o Nonexempt Staff (N1, N2)
o Students and Grad Assistants (S1, S2, S3, S4)
o Temporary Biweekly (TB)
Punch Information & Tips:
The nonexempt employees have an hourly view timecard because they are
required to timestamp (aka punch) via a computer or at a time clock.
Punches will appear in the timecard grid as an in-punch or out-punch.
Updated 6/11/19 JC Page 24 of 79 Punch Tips:
o When entering a punch, Kronos automatically assumes A.M.
hours.
If you key “730” and hit tab or save, it will display 7:30 AM.
If you key “730p” and hit tab or save, it will display 7:30 PM.
You must use the “p” for PM.
o You may need to REFRESH the page to update the date on the
page.
o If the SAVE icon is highlighted in red, the work has not been
saved yet.
A Timekeeper or Supervisor can add, edit, and delete punches on an
employee timecard.
Updated 6/11/19 JC Page 25 of 79Add Punch Instructions
How to add a punch on a timecard:
Add Punch Step 1 – Access the employee’s timecard via QuickFind
or other Genie.
Add Punch Step 2 – From the workspace, double click on the
employee’s name to open a new tab containing the employee’s
timecard.
Add Punch Step 3 – On the employee’s timecard, left click in the cell
you want to add the punch, then manually key in the time of the punch.
Updated 6/11/19 JC Page 26 of 79 Add Punch Step 4 - Once the punch has been entered, hit the “tab”
button or left click in a different cell to record the punch in the cell and
gain access to the “Calculate Totals” and “Save” icons.
o Notice when keying the desired punch, the “calculate totals” icon
and the “save” icon are gray (or not accessible), however once
the punch is recorded in the cell both icons becomes orange
(and available for use).
Add Punch Step 4 (Optional) - Click the “Calculate Totals” icon to
review the calculated timecard data before saving to ensure desired
results.
Add Punch Step 5 – Don’t forget to save your newly added punch,
click the “Save” icon.
Updated 6/11/19 JC Page 27 of 79Edit Punch Instructions
How to edit a punch on a timecard:
Edit Punch Step 1 – Access the employee’s timecard via QuickFind or
other Genie.
Edit Punch Step 2 – From the workspace, double click on the
employee’s name to open a new tab containing the employee’s
timecard.
Edit Punch Step 3 – On the employee’s timecard, right click in the cell
with the punch you want to edit and the “Punch Actions” window will
appear.
o In the example below, the employee forgot to clock back in from
lunch so their timecard is showing a missing punch. However,
the 4:02 PM punch needs to be edited to an out punch before
adding the missing punch.
Updated 6/11/19 JC Page 28 of 79 Edit Punch Step 4 – From the “Punch Actions” window, click “edit”
and the “Punch” window appears.
Edit Punch Step 5 – From the “Punch” window, change the “Override”
field to reflect “Out Punch” and click “OK.”
Updated 6/11/19 JC Page 29 of 79 Edit Punch Step 6 – The “Punch” window will disappear and take you
back to the updated employee timecard to review and save the
changes.
o If you agree with the changes on timecard, click “Save.” Then
you can follow the steps to add the missing in punch.
o If you disagree with the changes on the timecard, click “Refresh”
and “Yes” to proceed without saving the changes.
Updated 6/11/19 JC Page 30 of 79Updated 6/11/19 JC Page 31 of 79
Delete Punch Instructions
How to delete a punch on a timecard:
Delete Punch Step 1 – Access the employee’s timecard via QuickFind
or other Genie.
Delete Punch Step 2 – From the workspace, double click on the
employee’s name to open a new tab containing the employee’s
timecard.
Delete Punch Step 3 – On the employee’s timecard, right click in the
cell with the punch you want to delete and the “Punch Actions” window
will appear.
o In the example below, the employee accidentally clocked out
twice at the end of their shift making it appear as if there is a
missing punch when in fact there is a duplicate punch. The 4:05
Updated 6/11/19 JC Page 32 of 79PM punch needs to be deleted which will eliminate the missing
punch exception.
Delete Punch Step 4 – From the “Punch Actions” window, click
“comment” and the “Comment” window appears.
Updated 6/11/19 JC Page 33 of 79o Using the drop down menu, select the comment.
Delete Punch Step 5 – From the “Comment” window, select a
predefined comment, enter a note, and click “Add.”
Updated 6/11/19 JC Page 34 of 79 Delete Punch Step 6 – From the “Comment” window, review the
comment and note information, then click “OK.”
o At this point, it also gives you the option to add another comment
and/or note if you desire.
Delete Punch Step 7 – After the “Comment” window disappears, you
are taken back to the employee timecard where you should save your
comments and notes on the punch before deleting it, click “Save.”
Delete Punch Step 8 – Once your comments and notes are saved on
the punch, you will see a blue speech bubble appear in the cell with
the punch.
Updated 6/11/19 JC Page 35 of 79o You are now ready to delete the punch. Left click in the cell with
the punch you want to delete, then backspace to delete punch
time and click “Save” twice.
o Notice the 4:05 PM is deleted and your missing punch exception
is now gone from the timecard.
Updated 6/11/19 JC Page 36 of 79Comments & Notes Instructions
Comments and notes are available to Timekeepers and Supervisors; they
can be used to track various information or attach a reminder to a punch or
pay code amount. Kronos Workforce Timekeeper allows you to select from
a predefined comment list and add a free form note. In order to add a note,
you must first select a comment. You can have a comment without a note,
but you cannot have a note without a comment. Please use discretion when
enter a note, this information will be visible on reports. Also note that you
cannot delete a comment once it has been saved, so enter your comments
and notes cautiously.
How to add a comment and a note on a timecard:
Add Comment Step 1 – Access the employee’s timecard via
QuickFind or other Genie.
Add Comment Step 2 – From the workspace, double click on the
employee’s name to open a new tab containing the employee’s
timecard.
Updated 6/11/19 JC Page 37 of 79 Add Comment Step 3 – On the employee’s timecard, right click in the
cell with the punch or pay code amount you want to attach a comment
to and the “Punch Actions” or “Pay Code Actions” window will appear.
o In the example below, the employee entered 8 hours of vacation
on 6/22. As the Timekeeper or Supervisor, I want to add a
comment and a note to this pay code amount.
Add Comment Step 4 – From the “Pay Code Actions” window, click
“comment” and the “Comment” window appears.
Updated 6/11/19 JC Page 38 of 79o Using the drop down menu, select the comment.
Add Comment Step 5 – From the “Comment” window, select a
predefined comment, enter a note, and click “Add.”
Add Comment Step 6 – From the “Comment” window, review the
comment and note information, then click “OK.”
o At this point, it also gives you the option to add another comment
and/or note if you desire. Click either “Add Comment” or “Add
another note.”
Updated 6/11/19 JC Page 39 of 79 Add Comment Step 7 – After the “Comment” window disappears, you
are taken back to the employee timecard where you should save your
comments and notes on the pay code amount, click “Save.”
Add Comment Step 8 – Once your comments and notes are saved on
the pay code amount, you will see a blue speech bubble appear in the
cell with the amount.
Updated 6/11/19 JC Page 40 of 79Add Pay Code Instructions
Pay codes facilitate payroll processing by grouping specific types of worked
and non-worked hours to accurately track time data. Ball State University
uses pay codes to track various types of leaves as well as paid verses
unpaid time off work.
How to enter a Pay Code on a timecard:
Add Pay Code Step 1 – Access the employee’s timecard via
QuickFind or other Genie.
Add Pay Code Step 2 – From the workspace, double click on the
employee’s name to open a new tab containing the employee’s
timecard.
Updated 6/11/19 JC Page 41 of 79 Add Pay Code Step 3 – On the employee’s timecard, left click in the
“Pay Code” cell next to the date you wish to add the pay code. A drop
down list of available pay codes will appear.
o In the example below, the employee requested to use 8 hours of
vacation on 6/20. As the Timekeeper or Supervisor, you need to
enter this requested time off in Kronos Workforce Timekeeper.
Add Pay Code Step 4 – Once the pay code is selected, click “tab” to
navigate to the “Amount” cell to the right of the pay code field and enter
“8” to represent the number of hours used.
o Acceptable formats when entering a pay code amount:
8, 08, 8:00 = 8:00 hours
8.5, 8:30 = 8:30 hours
Add Pay Code Step 5 (Optional) – Once the pay code amount is
entered, click “Calculate Totals” icon to review the calculated timecard
data before saving to ensure desired results.
Add Pay Code Step 6 – Once the pay code amount is entered, click
“Save” to save it to the timecard.
Updated 6/11/19 JC Page 42 of 79Edit Pay Code Instructions
How to edit a Pay Code on a timecard:
Edit Pay Code Step 1 – Access the employee’s timecard via
QuickFind or other Genie.
Edit Pay Code Step 2 – From the workspace, double click on the
employee’s name to open a new tab containing the employee’s
timecard.
Edit Pay Code Step 3 – On the employee’s timecard, you can edit the
pay code or the amount by right clicking in the “Amount” cell next to the
Updated 6/11/19 JC Page 43 of 79date you wish to edit the pay code and the “Pay Code Actions” window
will appear.
o In the example below, the employee had originally requested 8
hours of vacation on 6/24. The employee wishes to change their
vacation request to only 4 hours on 6/24.
Edit Pay Code Step 4 – Once the “Pay Code Actions” window
appears, click the “Edit” icon and the “Amount” window will appear.
Updated 6/11/19 JC Page 44 of 79 Edit Pay Code Step 5 – Once the “Amount” window appears, you can
change either the “Pay Code” or the “Amount” fields. In this example,
you will change the 8 hours to 4 hours and click “OK.”
Edit Pay Code Step 6 – After the “Amount” window disappears, you
are taken back to the employee timecard where you should review and
save your changes to the pay code amount field, click “Save
Updated 6/11/19 JC Page 45 of 79Add Job or Labor Account Transfer Instructions
How to add a Job or Labor Account Transfer on a timecard:
Add Transfer Step 1 – Access the employee’s timecard via QuickFind
or other Genie.
Add Transfer Step 2 – From the workspace, double click on the
employee’s name to open a new tab containing the employee’s
timecard.
Add Transfer Step 3 – On the employee’s timecard, you can add a
job or labor transfer by left clicking in the “Transfer” column next to the
“in punch” on the date you wish to add the transfer and click “search.”
The “Transfer” window will appear.
Updated 6/11/19 JC Page 46 of 79 Add Transfer Step 4 – The “Transfer” window defaults to a job
transfer, however you perform both the job transfer and the labor
transfer from the “Labor Account” tab, click “Labor Account.”
Labor Account Levels:
Updated 6/11/19 JC Page 47 of 79o Level #1 TS-ORGN-CODE (Timesheet Organization Number)
o Level #2 EE-POS-SUFF (Employee Position including Suffix)
o Level #3 ECLS-CODE (Employee Classification Number)
o Level #4 SUPV-POSN-SUFF (Supervisor Position incl Suffix)
o Level #5 LABOR-TRANSFER (Fund-Org-Program-Activity)
In order to complete a job transfer, you will need to populate labor account
levels #1-4.
In order to complete a labor transfer, you will need to populate labor account
level #5.
Add Transfer Step 5 – Once the appropriate fields are populated for a
job or labor transfer, click “Apply” to add it to the employee’s timecard.
Add Transfer Step 6 – The “Transfer” window will disappear and take
you back to the employee timecard to review the transfer and save it to
the time card, click “Save.”
Updated 6/11/19 JC Page 48 of 79Edit Job or Labor Account Transfer Instructions
How to edit a Job or Labor Account Transfer on a timecard:
Edit Transfer Step 1 – Access the employee’s timecard via QuickFind
or other Genie.
Edit Transfer Step 2 – From the workspace, double click on the
employee’s name to open a new tab containing the employee’s
timecard.
Edit Transfer Step 3 – On the employee’s timecard, you can edit a job
or labor transfer by left clicking in the “Transfer” column next to the “in
punch” on the date you wish to edit the transfer and click “search.”
The “Transfer” window will appear.
Updated 6/11/19 JC Page 49 of 79 Edit Transfer Step 4 – Once the “Transfer” window appears, you can
update the appropriate fields (1-4 for a job transfer or 5 for a labor
transfer) to make the necessary changes, then click “Apply.”
Updated 6/11/19 JC Page 50 of 79 Edit Transfer Step 5 – The “Transfer” window will disappear and take
you back to the employee timecard to review the transfer and save it to
the time card, click “Save.”
Updated 6/11/19 JC Page 51 of 79Report Instructions
All information about an employee’s time and labor account is stored in the
Workforce Central database. Reports help you extract the information in
views that provide you with meaningful data. Reports can provide data that
helps you make timely business decisions, such as managing tardiness in
your department or providing information to help you investigate an incorrect
pay check.
How to generate a report in Kronos:
Reports Step 1 – You can access reports by clicking “Reports” from
the “Related Items” section on the right hand side of your workspace.
Reports Step 2 – Reports will open as a new tab in your workspace.
It contains all the standard reports you can access.
Updated 6/11/19 JC Page 52 of 79 Reports Step 3 – Reports will open as a new tab in your workspace.
It contains all the standard reports you can access. If you are unsure
which reports you can access, expand the “All” category by clicking on
the “+” next to “All” to display all reports you can access.
Reports Step 4 – Select a report from the list of available reports, by
left clicking on the report name. Once a report is selected, a list of
report option appears on the right hand side of the workspace.
Reports Step 5 – Once you have completed selecting your report
options, click the “Run Report” button.
Updated 6/11/19 JC Page 53 of 79 Reports Step 6 – While the report is running, you can click the
“Refresh Status” button to check the report status.
Reports Step 7 – When the status changes from “Running” to
“Completed” you can access your report by double clicking on the
report name or clicking on the “View Report” button.
Updated 6/11/19 JC Page 54 of 79Pay Period Close Basics
At the end of a pay period, you must ensure that all the time information is
accurate and complete. Timecards will not process when they contain
missing or incomplete information. Even though you might have edited
employee timecards on a daily basis, you need to perform a final check on
employee timecards to ensure the employees are paid correctly for their
worked and non-worked hours.
Once the pay period ends, you should review each employee’s timecard for
the following discrepancies:
Punch issues
Worked hour issues
Non-worked hour issues
Transfer issue
The Pay Period Close – BSU Genie helps you identify timecard
discrepancies at the of a pay period so you can perform final edits as
necessary and prepare the time records for payroll processing. This Genie
displays an analysis of time and labor information by employee, including
exceptions, approvals, and expected pay period hours.
The Missed Punch column will alert you to any missed punches that remain
in employee timecards. Using this Genie, you can sort information by the
“Missed Punch” column and then select the employees whose timecards
contain these discrepancies to display their timecards and reconcile the
discrepancies.
Ball State University promotes the practice of employees, who have access
in Kronos, to review and approve their own timecards. Ball State University
requires the Supervisor to “sign off” as an indication that they have reviewed
and edited employee timecards in preparation for submitting the timecards to
Payroll for processing.
Please note once an approval is applied to a timecard, that time data is
unavailable for further edits.
Updated 6/11/19 JC Page 55 of 79Pay Period Close - BSU Instructions
How to utilize Pay Period Close – BSU at the end of a pay period:
Pay Period Close Step 1 – On your designated “sign off” day, access
the Pay Period Close – BSU Genie by logging onto Kronos or navigate
to your Genies to return to the Pay Period Close – BSU Genie.
1. As a Timekeeper or Supervisor, your Kronos default homepage
is “Manage My Department” with the Pay Period Close – BSU
Genie populated.
Pay Period Close Step 2 – Review each column for exceptions and/or
completeness.
1. Missed Punch Column – This column will populate with a
checkmark if the employee has a missing punch that needs to be
corrected before sign off can happen.
2. Unexcused Absence – This column will only populate if the
employee has a schedule loaded and is not here on a day they
are scheduled to be at work.
3. Regular BW – This column will show a total of “regular” hours for
regular biweekly employees. All full time employees should have
Updated 6/11/19 JC Page 56 of 7980 hours listed, if not, they may need a pay code like vacation or
sick added to their timecard.
4. Regular Grad – This column is currently not being used.
5. PPACA – This column is for Graduate Assistants to record their
PPACA hours. All Grads should have PPACA hours listed if they
have worked during the pay period.
6. Regular Student – This column will show a total of “regular”
hours for student employees. Student employees should not
work more than 20 hours per pay week therefore their biweekly
totals should not be more than 40 hours per the pay period.
7. Overtime – This column will show the total number of overtime
hours per pay period.
8. Total Hours – This column will show the total hours (paid hours
plus nonpaid hours except PPACA) reported in the pay period.
Pay Period Close Step 3 – After reviewing the various columns for
exceptions and completeness, you may need to navigate to an
individual employee timecard to correct or finish their timecard.
Pay Period Close Step 4 – After you have finished reviewing and
correcting all timecards, you will need to “approve” or “sign off” on the
timecards depending on your current department structure and
responsibilities.
1. From the Pay Period Close – BSU Genie, click the “Select All
Rows” icon in the upper left-hand corner just below the genie
name.
2. Once all rows have been selected (highlighted in blue), click the
“Approval” icon to select “Approve Timecard” or “Sign Off”
depending on your current department process.
Updated 6/11/19 JC Page 57 of 79 Remember you have the ability to remove an approval but
not a sign off on a timecard.
Updated 6/11/19 JC Page 58 of 79Timecard Approval Process Instructions
How to utilize the Kronos “Timecard Approval” process:
Timecard Approval Step 1 – From anywhere within Kronos, click on
the “Timecard Approval” process in the “Related Items” along the right-
hand side of the screen.
Timecard Approval Step 3 – The “Timecard Approval” workspace will
open in another tab at the top of your workspace and bring you back to
the Pay Period Close – BSU Genie.
Timecard Approval Step 3 – To follow the “Timecard Approval”
process, simply follow the arrows across the top of the workspace by
clicking on each arrow.
1. Select Pay Period for Approval – Shows the time period (should
be prior pay period) and hyperfind query (should be All Home)
being used.
Updated 6/11/19 JC Page 59 of 792. Punch Issues – Lists employees with punch issues and allows
you to navigate to their timecard.
3. Approve Timecards – Click “Select All Rows” and then click
“Approval.”
4. Group Edit Results – Lists the “group edit” results. If there are
any failures, click on the “details” button to view errors.
Updated 6/11/19 JC Page 60 of 79Appendix A - Vocabulary
Accrual An amount of leave an employee earns over
time, based on BSU’s employment policies.
Examples include vacation time and sick time.
Combined Pay Code A single pay code that represents a selected
group of pay codes.
Labor Account Each employee is assigned a home labor
account to which hours accrue, unless a shift
is an account transfer. Labor accounts consist
of valid combinations of labor level entries,
such as account and job.
Pay Code A category that is used to organize time or
money, such as vacation or sick time.
Pay Period The period of time for which employees are
regularly paid.
Shift A span of time that has a start and end times,
usually in one 24-hour period.
For example - 7AM to 3:30 PM
Transfer Hours or pay code amounts transferred to a
different job or labor account.
Updated 6/11/19 JC Page 61 of 79Appendix B – List of Available Kronos Resources
Check out the Kronos page on the Payroll and Employee Benefits
website for access to a variety of Kronos resources:
Kronos - Payroll and Employee Benefits - Ball State University
1. Link to Kronos 8.1.3
2. Kronos v8.1.3 User’s Guide
3. Kronos Pay Codes
4. Kronos Punch Rounding Rules
5. Kronos Time Clock Instructions
6. Kronos Time Stamp Instructions
7. Kronos for Non-Exempt Employees
8. Kronos for Exempt Employees
9. Kronos for Students and Grads
Kronos Help Desk phone number is 765-285-6452.
Kronos Help Desk email is KronosHelpDesk@bsu.edu
Updated 6/11/19 JC Page 62 of 79Appendix C – Comments Updated 6/11/19 JC Page 63 of 79
Appendix D – Timekeeping Dos & Don’ts
Do:
Check your time/employee time throughout the pay period. It is easier
to correct a missed punch when it happens then at the end of the
payroll period.
Continue to meet both department and Payroll Kronos deadlines.
Understand the difference between ALL HOME and ALL WORKED.
o Everyone working in your department will show up under ALL
WORKED. Only those employees whose primary position is
with your department will show up in ALL HOME.
Keep Payroll records, including Kronos Adjustment Forms, for three
years.
Ensure employees are compensated for all hours worked.
Document all changes, deletions, and additions to timecards and who
made the change.
Use a Kronos Adjustment form to correct clocking errors.
Refresh your screen if you can’t see your changes.
Move compensatory time to overtime as needed. All hours over 40 in
a pay week default to compensatory time, which is earned at 1.5
hours for every hour worked.
Use the Audit tab to look at original punches that you have changed.
Use the “Rules Analysis” report to see how our rounding rules affect a
punch.
Contact the Kronos Help Desk with any questions: 285-6452,
KronosHelpDesk@bsu.edu.
Don’t:
Delete punches, right click and edit them instead.
Edit punches to prevent overtime, the timesheet is a legal document.
Make changes without documentation, such as a Kronos Adjustment
Form.
Updated 6/11/19 JC Page 64 of 79Appendix E - Using Kronos InTouch Clocks
This indicator will glow Card reader slot: Use your
GREEN when a swipe is Cardinal Card (BSU ID) with the
successful, RED when it fails. magnetic stripe facing the wall.
1
2 3 5
4
6 7
Use this button to
return to the
Main Menu
screen.
How to Clock-In (In-Punch)
o Regular (non-student) employees:
Do not select any options from the clock.
Swipe your Cardinal Card (BSU ID) through the card reader slot .
The new clocks uses the magnetic stripe of your Cardinal Card,
not a barcode.
Before swiping, the magnetic stripe should face the wall, and fit into
the card reader slot.
Confirm the indicator light blinked GREEN (or that you heard the
successful chime).
If the indicator light blinks RED (or you will hear a failed chime), the swipe
was unsuccessful.
Read the error message that is displayed. Most cases, re-swiping
will correct the issue.
You are not allowed to swipe more than once within a two minutes
period. If you accidentally swipe a second time within the two
minute period, you will receive the error “Punch rejected…You are
attempting to punch too soon after your previous punch…”. This
error can be ignored, since your first punch was already accepted.
Please check your Cardinal Card, and verify that the magnetic stripe
on your card is not damaged. If there is a scratch through the
magnetic stripe (or other damage), you will have to get a new ID.
Updated 6/11/19 JC Page 65 of 79o Regular (non-student) employees with a “Labor Transfer”:
Press the “Empl Lbr Transfer” option on the clock .
Swipe your Cardinal Card (BSU ID) through the card reader slot .
The new clocks uses the magnetic stripe of your Cardinal Card,
not a barcode.
Before swiping, the magnetic stripe should face the wall, and fit
into the card reader slot.
A list of valid labor accounts (starts with “LT-*”) will be displayed.
(Note: If no list is shown, or an error message is display, then you are not setup
to transfer to a different labor account.)
Select the labor account from the list.
Verify the labor account is correct then press on submit to
complete the clock-in process.
Confirm the indicator light blinked GREEN (or that you heard the
successful chime).
If the indicator light blinks RED (or you will hear a failed chime), the
swipe was unsuccessful.
o Read the error message that is displayed. Most cases, re-
swiping will correct the issue.
o You are not allowed to swipe more than once within a two
minutes period. If you accidentally swipe a second time
within the two minute period, you will receive the error
“Punch rejected…You are attempting to punch too soon after
your previous punch…”. This error can be ignored, since
your first punch was already accepted.
o Please check your Cardinal Card, and verify that the
magnetic stripe on your card is not damaged. If there is a
scratch through the magnetic stripe (or other damage), you
will have to get a new ID.
o Student employees:
Press the “Student In-Punch” option on the clock .
Swipe your Cardinal Card (BSU ID) through the card reader slot .
The new clocks uses the magnetic stripe of your Cardinal Card,
not a barcode.
Before swiping, the magnetic stripe should face the wall, and fit
into the card reader slot.
A list of active jobs will be displayed.
Select the job you are clocking into from the list presented.
Verify the job is correct then press on submit to complete the
clock-in process.
Confirm the indicator light blinked GREEN (or that you heard the
successful chime).
If the indicator light blinks RED (or you will hear a failed chime), the
swipe was unsuccessful.
o Read the error message that is displayed. Most cases, re-
swiping will correct the issue.
o You are not allowed to swipe more than once within a two
minutes period. If you accidentally swipe a second time
within the two minute period, you will receive the error
“Punch rejected…You are attempting to punch too soon after
Updated 6/11/19 JC Page 66 of 79your previous punch…”. This error can be ignored, since
your first punch was already accepted.
o Please check your Cardinal Card, and verify that the
magnetic stripe on your card is not damaged. If there is a
scratch through the magnetic stripe (or other damage), you
will have to get a new ID.
How to Clock-Out (Out-Punch) – ALL EMPLOYEES:
o Do not select any options from the clock.
o Swipe your BSU ID through the card reader slot .
o Did you see the indicator light blink GREEN and/or hear a successful
chime?
The InTouch Clocks are touch-screen enabled devices that allows
employees to perform various time-keeping functions:
o “Student In-Punch”
Students should ALWAYS select this option for when clocking-in
(In-Punch).
Only used for In-Punches. Do not select this option for clocking-
out (Out-Punch).
Once selected, student will swipe their ID, and a list of active jobs
for that student will be displayed.
Below the list of active jobs is a list of Labor transfers “LT-*”
Only available for student employees with a Primary job
assignment in Dining, Housing and Rec Services.
Labor transfer allows a student employee to work their
Primary job, but charge the labor to a different account
(FOAPAL).
Only works with student’s Primary job assignment.
Will not be available for Federal Work Study jobs.
The list of Labor transfer will start with “LT-*”
Once selected, the time will be charged to that FOAPAL until
the student clocks-out.
Updated 6/11/19 JC Page 67 of 79You can also read