Nexus 7 Troubleshooting - HINTS, TIPS & TROUBLESHOOTING
←
→
Page content transcription
If your browser does not render page correctly, please read the page content below

Nexus 7
            Troubleshooting

HINTS, TIPS & TROUBLESHOOTING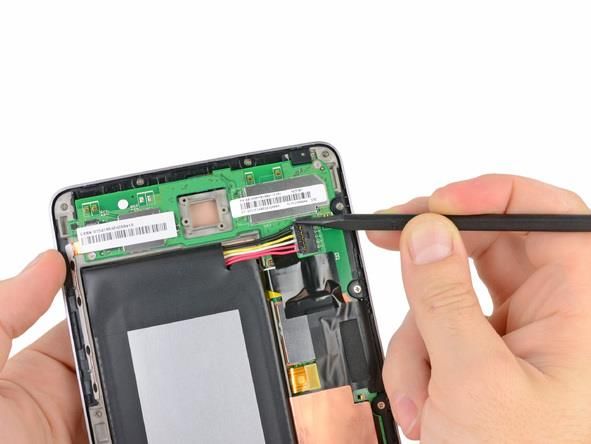
NOT CHARGING
    If your Nexus 7 is not charged for a long time, the battery can become completely drained
    and the tablet will appear to be lifeless even when plugged into the charger.

    This is normally not something to be concerned about and can often be resolved easily; often
    the battery will be charging, but as it is doing so from empty it has to do so very slowly to
    avoid overloading the system.

    NOTE – Please ensure you are using a cable and charger that you know work properly.

    Step 1

     -   Disconnect the USB cable if it is connected
     -   Press and hold the power button for about 15 seconds; the tablet should start to
         reboot
     -   If there is no change move to step 2

    Step 2

     -   Connect the USB cable to the Nexus 7 then charge it via the wall charger. Do not
         charge it via the computer at this point
     -   Leave it charging for several hours. Your tablet may now be in a state of “trickle
         charging” where it adds power at a slow level to begin with to avoid overloading
         the battery
     -   If the tablet still appears to not be charging, move to step 3

    Step 3

     -   Keep the USB cable connected to the wall charger
     -   Disconnect the cable from the Nexus 7
     -   Press and hold the POWER + VOLUME DOWN buttons at the same time
     -   Connect the USB cable whilst still holding the 2 buttons
     -   Keep the buttons pressed for about 5 seconds
     -   If you see an Android boot loader menu appear, press the volume down button
         repeatedly until you see the Power Off Device option
     -   Press the power button once to select it
     -   Once the tablet has switched off, connect the USB cable again and check the
         battery charge indicator has appeared
     -   If not then go to step 4

    Step 4

    *** Only complete this step if you feel comfortable removing the back cover ***

     -   Remove the back cover of the Nexus 7. This is easily done if you hold the tablet
         at the top and gently prise the back cover off using even pressure all the way
         round

KNOWHOW™ : A SERIES OF COMMON ISSUES & TROUBLESHOOTING TIPS                            Page |2
- Disconnect then reconnect the
battery cable, being careful to
ensure it is full connected
- Reattach the back cover, making
sure it has properly snapped into
place
- Press the power button to turn the
tablet back on
- If this still does not work, the tablet is
likely to be faulty and should be
taken in for repair
DISPLAY ISSUES
If you experience the following issues, it may appear there is a fault with the screen.
However, these can often be resolved easily.
- No display, random twinkling pixels
- No display, dim pulsing backlight
- No display, band down the LCD
This can be caused when the tablets (particularly the 8GB WiFi models) are bumped and the
battery becomes dislodged. This causes the cable that connects to the logic board to
become unseated, producing the display issues.
Step 1
*** Only complete this step if you feel comfortable removing the back cover ***
- Remove the back cover of the Nexus 7. This is easily done if you hold the tablet
at the top and gently prise the back cover off using even pressure all the way
round
- Disconnect and reconnect the
battery cable making sure that it is
fully connected
- Replace the back cover, making sure
it has snapped back into place
properly
- Press the power button to turn the
tablet back on
- If the symptoms persist, the tablet is
may be faulty and should be taken in
for repair
KNOWHOW™ : A SERIES OF COMMON ISSUES & TROUBLESHOOTING TIPS Page |3POOR WIFI SIGNAL
If you encounter a situation where 1 or 2 tablets receive a poor wireless signal but the rest of
the devices are fine, double check the back cover is fitted correctly and snapped shut firmly
all the way round. The back cover being loose or not replaced correctly is a known cause of
poor WiFi reception.
NEXUS 7 CONSTANTLY RESTARTING
Sometimes your tablet may become stuck in a loop of restarting when you try to turn it on.
This can be caused by two things:
1) There is not enough charge in the battery
The tablet starts up, but when it gets to the main screen it will switch off again.
In this case, simply leave the Nexus 7 connected to the mains charger for 30 minutes and try
again. At this point you should be able to use the tablet as normal while it continues to
charge.
2) The boot loader is stuck
- Disconnect the cable from the Nexus 7
- Press and hold the POWER + VOLUME DOWN buttons at the same time. You will
see the word Start with an arrow drawn around it.
- Connect the USB cable whilst still holding the 2 buttons
- Keep the buttons pressed for about 5 seconds
- When the Android boot loader menu appear, press the volume down button
repeatedly until you see the Power Off Device option
- Press the power button once to select it
- Turn Nexus 7 back on
HOW TO RESET THE NEXUS 7
There are a couple of ways to reset your Nexus 7 back to its factory default setting
should you ever need to.
From within Android
- Go to Settings and choose Backup & reset.
- Select Factory data reset.
- Select Reset tablet.
- If your tablet is password protected, you'll be prompted to enter your Pattern,
PIN, or Password.
- Select Erase everything to confirm.
KNOWHOW™ : A SERIES OF COMMON ISSUES & TROUBLESHOOTING TIPS Page |4If Android does not load
- If your tablet is on, power it off.
- Press and hold the POWER + VOLUME DOWN buttons at the same time. You will
see the word Start with an arrow drawn around it.
- Press Volume Down twice to select Recovery mode.
- Press Power to restart into Recovery mode. You will see an image of an Android
robot with a red exclamation mark.
- Hold down Power and press Volume Up.
- Use the volume keys to scroll to Wipe Data/Factory Reset and press Power to
select it
- Scroll down to Yes - Erase All User Data and press Power to select it
Note: If at any point during the above steps your tablet becomes unresponsive, you
can restart by holding down the power button for several seconds.
HOW TO FIND THE SERIAL NUMBER
The serial number is available in 3 places.
1) The serial number label on the back
2) In the Settings menu, choose About Tablet then Status
3) Inside the back cover if you carefully remove it. Please note, this method is not
guaranteed to be present as the back cover may have been swapped
KNOWHOW™ : A SERIES OF COMMON ISSUES & TROUBLESHOOTING TIPS Page |5You can also read