ROCKS 'R' RESOURCES - Education Program Curriculum Sponsored By: In Partnership With: Summit Materials
←
→
Page content transcription
If your browser does not render page correctly, please read the page content below
ROCKS ‘R’ RESOURCES

                 Education Program
Curriculum Sponsored By:

In Partnership With:            &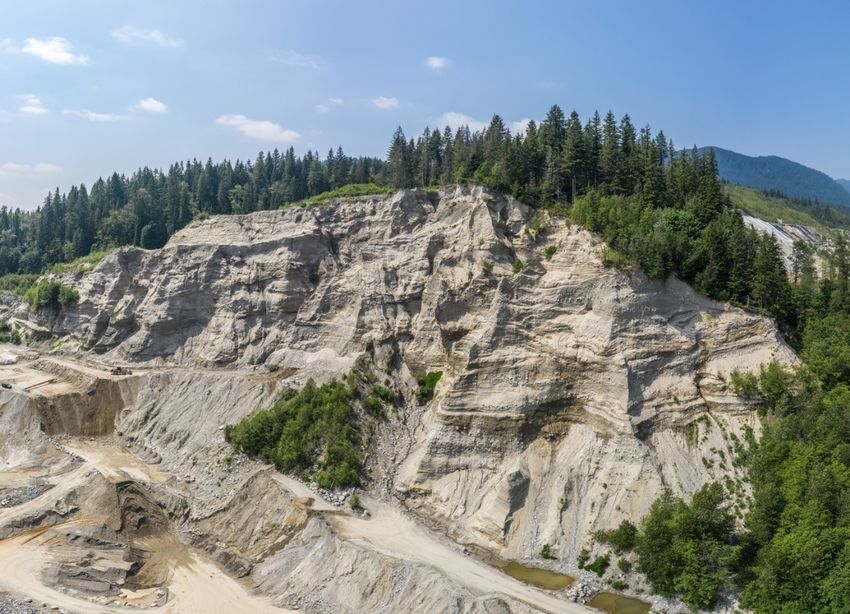
Rocks ‘R’ Resources - 2 -

June 2020

Dear Educator or Parent/Guardian

Welcome to Rocks ‘R’ Resources. You are entering the fascinating world of aggregates – the
stone, sand, and gravel we use to build our communities. It’s in virtually all of our construction
materials – asphalt, concrete, glass, and brick. Knowing about our reliance on aggregates for
constructing our roads, sidewalks, and buildings helps us appreciate the good fortune of living on
our unique rocky planet. It also helps us ensure that we use these earth resources sustainably.

We know that during this time of COVID-19 student education may be online, at home, or in
classrooms with limited attendance. We know that teachers and parents are planning for the
coming year and are seeking remote learning solutions. Rock ‘R’ Resources was developed to
help meet these challenges. Student learning can happen at home, at school, or in the community.
This resource will help unlock this learning potential. Included here are video links, background
information, and hands-on activities that can be completed anywhere.

Rocks ‘R’ Resources is based on mandated curriculum across North America – the Rocks and
Minerals science unit. Here is a sample of how this resource meets curriculum standards:

Texas – Rocks and the Rock Cycle - Grade 6
Kansas – Earth’s Landscape - Grade 4
Virginia - Earth Resources – Grade 6
Utah - Basic Properties of Rocks - Grade 4
North Carolina – Matter: Properties and Change - Grade 4
Colorado – Earth Systems Science – Grade 6
British Columbia – The Rock Cycle and Earth Materials – Grade 5

Everyone loves rocks. They are a way to touch and feel the history of our planet. They tangibly
connect us to the primal elements of life here on Earth. Through this connection, Rocks ‘R’
Resources helps to foster the study of earth sciences and geology.

It has been a pleasure using our industry knowledge to create this resource for you. We hope
Rocks ‘R’ Resources helps you and your children/students gain a new appreciation for this planet
and our earth resources. And we hope you have fun doing so.

Yours,

The Rocks ‘R’ Resources Development Team
Rocks ‘R’ Resources - 3 -

Introduction
The planet Earth, our home in the solar system, is a unique and precious rocky planet that
provides all that we need to thrive. We use earth resources to build our cities and communities.
We have to ensure that we use these resources in a sustainable way. This is the only home we
have.

Rock ‘R’ Resources is an educational program that aims to help students gain a tangible hands-on
understanding of our Earth, and the stone, sand and gravel resources it provides. We stand in the
Goldilocks’ zone of good fortune with this planet. Learning about what makes Earth and it
resources so unique will help us take better care of what we have.

Rocks ‘R’ Resources is a curriculum-based classroom-ready educational resource aimed to
support the Rocks and Minerals expectations in schools across North America. The resource is
useful for the classroom, facilitated by teachers, but it is also an effective home learning tool with
rich activities that can be completed around the home, and in the neighbourhood and community.

Acknowledgements
Rocks ‘R’ Resources was developed and written by CGC Educational Communications.
www.cgced.com

The authors wish to thank the aggregate industry team that made this possible:

Sita Daavettila , Summit Materials
Dani Miller, Mainland Sand and Gravel
Dan Allard, British Columbia Stone Sand and Gravel Association

Index
Lesson 1 – Our Rocky Planet                                            p. 4

Lesson 2 – How Rocks Are Resources                                     p. 8

Lesson 3 – Rock Smart                                                  p. 13

Lesson 4 – Our Changing World                                          p. 18

Lesson 5 – Local Earth Materials                                       p. 22

Lesson 6 – Sustaining Our Earth                                        p. 29

Lesson 7 – Borrowing the Land                                          p. 35

Extension – Be an Earth Scientist                                      p. 40
Rocks ‘R’ Resources - 4 -

Lesson 1 - Our Rocky Planet

Where do rocks come from?

What questions do you have about rocks? Think of three. Write them here.

1.

2.

3.

To find out where rocks come from, let’s look at our planet.
Rocks ‘R’ Resources - 5 -

Earth is called a “rocky planet.” What do you think that means?

Let’s look at the most common theory about how planet Earth was formed.

Watch the following video to answer the questions: How Planet Earth was formed | Down to Earth
https://www.youtube.com/watch?v=-7eTxxy9yvA

Answer these questions.

1.How did the Earth start to form?

2. How was the Earth’s crust formed?

3. What’s under the Earth’s crust?
Rocks ‘R’ Resources - 6 -

Watch the video a few times. After viewing, reflect on what you saw. Earth is called “The Third
Rock from the Sun” for a reason. It perfectly describes our planet.

Earth is in the “Goldilocks” zone – not too hot, not too cool, just right. How has this made our rocky
planet such a great place for life to grow?

                                           ___________________________________________

Think About It
The Earth is constantly changing. The crust of the Earth is like the crust on a loaf of bread. It’s
quite thin – as thin as 3 miles or 5 km. beneath to the ocean floor, up to 40 miles or 70 km on the
continents where there are mountains. This thin crust cracks and moves, allowing what is beneath
it to erupt to the surface.

• Run, walk or cycle 3 miles or 5 km. You have now crossed the distance between the surface of
the earth and the molten mantle underneath!

The crust is divided into huge plates that float on the mantle, the next layer, which is a thick, sticky
material like peanut butter. The plates are constantly in motion; they move at about the same rate
as fingernails grow. Earthquakes occur when these plates grind against each other. Mountains
form when the plates collide and deep trenches form when one plate slides under another plate.

• Make your own fold mountains, like the Rocky Mountains. You will need two shoe boxes and ten
hand towels or different coloured paper towels. Lay the towels on top of one another on a table.
Place the shoe boxes or either side. Push the shoe boxes together. What happens?

The mantle is a thick layer of molten rock about 1,800 miles deep (2 890 km). Intense heat causes
the rocks to rise, then cool and sink back down to the core. The mantle seems to cause the plates
to move. When the mantle is squeezed through the crust, volcanoes erupt and magma flows onto
the Earth’s crust.

• What things do you use on your daily life where a substance is squeezed out? (think in terms of
food, or personal care products, or other things you use.)

To learn more, go to: https://www.scienceforkidsclub.com/earths-crust.html

Thinking About Rocks – Definitions
• The crust of the Earth first consisted of lava flowing from volcanoes. When this magma cooled on
the surface, it became a hard, solid material. The resulting rock is called igneous.

Define this word: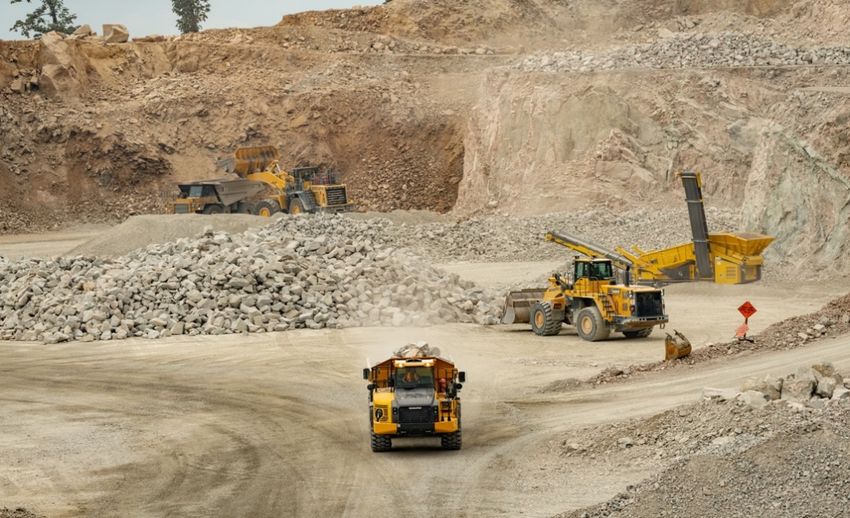
Rocks ‘R’ Resources - 7 -

• After water covered much of the Earth, layers of material like sand from eroded rock and dead
animals and plants sunk to the bottom of the seabed, built up and became a new kind of rock. This
type of rock is called sedimentary.

Define this word:

• When the crust buckles and folds, rock is pressurized and heated. This mixes into a new type of
rock called metamorphic.

Define this word:

The Birth of The Earth
The Earth was born about 4.6 billion years ago. Here’s how scientists have organized time
throughout the Earth’s history:

Source: https://www.sciencenewsforstudents.org/article/explainer-understanding-geologic-time

1. How long ago did dinosaurs roam the Earth?

2. When did the Earth see its first living organisms?

3. How long has mankind walked on Earth?

READ MORE ABOUT IT

The Pebble in My Pocket: A History of Our Earth Paperback – 5 Nov 2015
by Meredith Hooper (Author), Chris Coady (Illustrator)
Where do pebbles come from? How were they made? This book tells the story of a pebble, from
its origins in a fiery volcano 480 million years ago to a busy, modern landscape. Readers follow
the processes of rock formation and erosion that create new pebbles all over the world.
Rocks ‘R’ Resources - 8 -

Lesson 2 - How Rocks Are Resources
We are fortunate to live on our rocky planet – a unique and precious environment that gives us all
we need to thrive. We use the rocks on Earth to build the world we live in.

How does that happen? Let’s explore how rocks are used to build the man-made environment
around us – our schools, neighbourhoods, playgrounds, roads and hospitals.

Rock Facts
Aggregate is the technical name for stone, sand and gravel used in construction.

An average 2000 square foot house requires over 300 tonnes of aggregate, which equals 15
truckloads. This includes the driveways and service trenches but not the road or the sidewalk out
front.

An average school needs 13,000 tonnes of aggregate, or 650 truckloads.

Investigation
Conduct an investigation into how stone, sand and gravel are the essential earth resources for
common building materials such as bricks, asphalt, glass and concrete.

View the following videos. For each one, answer these questions:

• What are the natural resources used to make this product?
• What are the benefits of using this building product?
• What are the environmental costs of making this product?
Rocks ‘R’ Resources - 9 -

How It's Made: Bricks - Discovery
https://www.youtube.com/watch?v=SbKvhHzn4hQ

The Big Ideas
       • Bricks are one of the world’s oldest building materials – fireproof, pest resistant and
weather resistant – that’s why we still use them.
       • Bricks are often made from shale - a lightweight rock that splits easily. Topsoil is removed
for two years at the quarries before the shale is extracted and processed.
       • At the factory, the shale is ground to a powder, which is screened and mixed with water
and extruded into one long continuous rectangular “slug”. Coloured sand coats the slug and it is
patterned. The slug is cut into five-foot lengths which are again cut into 20 – three-inch bricks. The
three holes in the middle reduce weight and add insulation value.
       • The bricks are stacked for two days of drying. Then the bricks are fired in a kiln (a big
oven) for 1.5 days at 1040 degrees C., requiring a lot of heat energy.
       • The bricks are quality checked before transport. They are placed in water to see if they
absorb too much water or are too water resistant for the mortar.
       • Each brick weighs 2.5 kg. Bricks are some of the sturdiest building materials and are
energy efficient. They retain heat in winter and stay cool in the summer.

How It's Made: Paving Asphalt – Discovery
https://www.youtube.com/watch?v=HZGfzyWKldw

The Big Ideas
       • Asphalt is best-known paving roads. The main ingredient of asphalt is stone, sand and
gravel or “aggregate”, which is mixed with a petroleum by-product to make it stick together.
       • It begins in a pit or quarry where gravel is dug up or boulders of granite is blasted off the
rock walls. The paving plant is sometimes placed on the quarry site to be more efficient. The rocks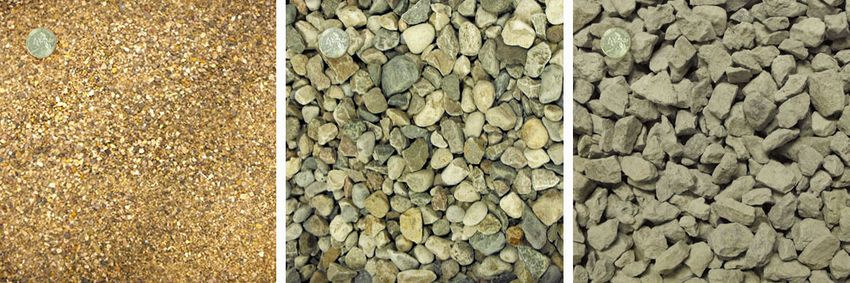
Rocks ‘R’ Resources - 10 -

are crushed into different sizes – less than 20 cm. at first, screened for 10 cm. and then crushed a
second and third time until all the stones are smaller than 2 cm. in size.
       • The rocks are separated by size into different piles. The four basic ingredients for asphalt
are: sand, stone dust, 5 – 10 mm. stone and 10 – 14 mm stone. This is 95% of the mix; the
remainder is liquid asphalt - an adhesive. The stone mixture is dried before mixing so that it
adheres better to the asphalt.
        • Asphalt is what's left after crude oil is processed for gasoline. Hot asphalt is mixed with
the stone mixture. It is trucked to where it is being used. Hot asphalt cools within one hour, so it
has to be used quickly. Asphalt-making plants need to be close to where asphalt is being used.
Having a pit or quarry nearby, with all the stone extraction and crushing ability and the energy
needed, is essential.

How Concrete Is Made - Knowledge Videos
https://www.youtube.com/watch?v=QmQuBM0H2PQ

The Big Ideas
       • Concrete is the most used building material on earth. It built the Roman Empire. Today, it
builds our gravity-defying skyscrapers and virtually everything else. It starts as a liquid then
hardens into stone; it’s called “liquid rock.” Concrete is everywhere. How does it do it all?
       • The basic formula for concrete is sand, rock, water and cement.
       • Cement is the glue that coats all the material and binds it together. Cement is made from
limestone, clay, iron and other materials that must be extracted from the ground. It’s crushed into a
powder and then heated in a long, rolling cylindrical kiln at 1500 degrees C. It becomes molten like
lava. The resulting “clinker” is ground into a powder we call cement. This process requires a lot of
heat energy.
       • When cement is mixed with water, it undergoes a chemical transformation called
hydration. Concrete doesn’t “dry” in the traditional sense; the water causes the concrete to harden.
The water causes it to release energy (an exothermic reaction) in the hardening process.
       • New innovations in concrete are allowing it to transmit light, so that concrete buildings are
not dark. Glass fibres are added to concrete to allow light to pass through it. This could transform
the way we live.

How Glass is Made
https://www.youtube.com/watch?v=IjNusHQOhTM

The Big Ideas
       • How do you go from silica sand to a perfectly clear window? The main ingredient of glass
is sand. It is mixed with soda ash and lime – sodium carbonate and calcium carbonate. This
mixture makes glass easier to work with.
       • The mixture is heated in conveyor belt oven up to 1650 degrees C. over three days. Over
time, the mixture becomes like lava. For 10 hours, it is super-heated into liquid glass. Making glass
requires a lot of heat energy.
       • There is only one way to create plate glass that is flat on both sides without having any
bubbles. Since 1959, glass makers have used a process where molten glass is poured on liquid
Rocks ‘R’ Resources - 11 -
tin so it can become entirely flat. The glass cools over the liquid tin reaching 540 degrees C. over
a 400 m process (nearly half a kilometre).
• The river of glass is cut into sheets of different lengths to make windows.
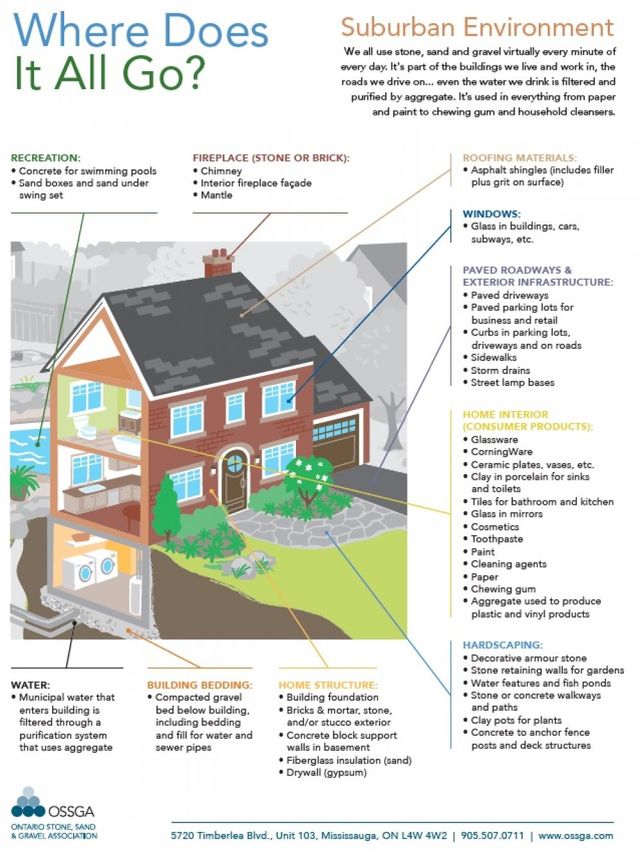
Worksheet - Rocks Around Home
Investigate the rocks around your home. For reference, look at https://www.gravelfacts.ca/where-
does-it-all-go
Use the following sheet to record all the uses of rocks at home. Describe them.
i. Look around the outside of your home for building materials: asphalt, brick, concrete.
ii. Look inside for how the home is finished: tiles, glass, mirrors, sinks and toilets
iii. Look at what you use every day: glassware, china plates, paper, paint
iv. Look at the labels on toothpaste, cleaning powders, cosmetics, chewing gum – look for: silica,
calcium carbonate (limestone)
Sand Gravel Stone
0.0625 mm - 4 mm 4 mm and 75mm >75 mm
i. OUTSIDE ii. INSIDE iii. WHAT WE USE IV. DAILY
PRODUCTSRocks ‘R’ Resources - 12 - Think About 1. Name one item from each column that requires stone, sand or gravel that surprised you. Why? 2. What would happen if we could not access stone, sand and gravel as raw materials? How would that affect our human-made environment? 3. The asphalt video shows how stone, sand and gravel are extracted. What are some environmental concerns we need be aware of in accessing these earth materials? Look Locally Visit local facilities that make bricks, asphalt or concrete to see the process in action. Or for home learning: 1. What was used to pave your driveway? Asphalt, brick or concrete? Who are the local suppliers of this material? 2. Over time, how has nature interacted with these materials? Draw a picture of what you observe in your driveway. Explain how they have become part of your home’s ecosystem. 3. Are these materials long-lasting? Are they sturdy when compared to wood or plastic? Why is that important when constructing a home?
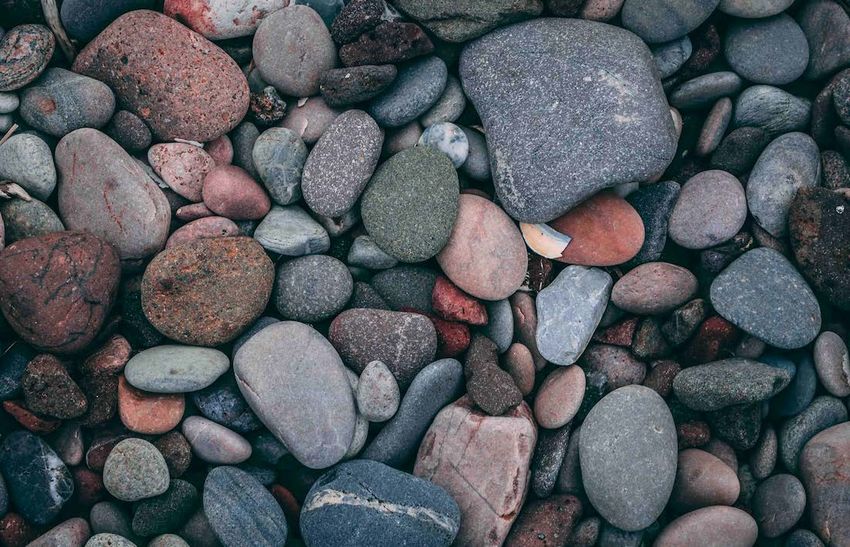
Rocks ‘R’ Resources - 13 -

LESSON 3 – ROCK SMART
Our rocky planet is made from three different types of rocks.

• cooled molten rock
• deposits from lakes and oceans; and weathering from rivers and streams
• pressurized and heated rock made from other kinds of rock

How can you tell the difference? Conduct this investigation. Become rock smart.

Investigation - Backyard Prospector
We have rocks outside around our homes. Collect a range of rocks from your backyard or local
area.
Rocks ‘R’ Resources - 14 -

Fill a small box with rocks that you think are unique or attractive.

Note where you found each rock: the garden, around the outside of the house, a local stream or
vacant lot. Be safe. ONLY COLLECT THE ROCKS WITH THE SUPERVISION OF A PARENT OR
GUARDIAN.

Now, let’s find out what you found.

Test Your Rocks
Predict
Do you think that all the rocks you found are the same type of rock? Yes or no?

Explain why:

Materials
• the piles of stones sorted in the previous lesson
• a nail
• a copper penny
• a masonry drill bit
• diluted vinegar
• eye dropper
Rocks ‘R’ Resources - 15 -

• the Mohs scale for hardness

Procedure
1. Physical properties - Choose 8 to 10 of the largest stones from your assortment. Look for a
range of different stones. Number each stone and identify its characteristics. Use the following
descriptors. Add your own if they are different.

 Property       Definition                  Descriptors
 Lustre         The way it shines or        Glitter, sparkle, sheen, gloss
                reflects light
 Texture        How the quality of the      Rough, smooth, gritty, bumpy
                surface feels
 Shape          A specific form             Round, oval, square, diamond

 Size           Volume, dimensions          Small, large, pea size, wide, thin

 Weight         Heaviness or mass           Heavy, light, medium
 Colour         Colour of the light         Tan, grey, white, pink, clear
                reflected

2. Type of rock. Use this description to help you identify and describe your rocks.

• Igneous rock has random crystals and is heavy.
Rocks ‘R’ Resources - 16 -
• Sedimentary – rub it to break off sand; see if it is easily breakable; look for stacks or layers in the
rock.
• Metamorphic rock has crystals that are lined up; look for visible stripes, bands or rings.
3. Test each rock for hardness. Scratch each rock with a) your fingernail b) the penny c) the nail
and d) the masonry drill bit. Record which one first makes a scratch. Use Mohs hardness scale to
give it a hardness number. Record your results.
4. Use the eyedropper to put a drop of diluted vinegar on each rock. Record what happens.
Observations
Complete the following charts to record your test results.
1. Physical Properties
Rock # Lustre Texture Shape Size Weight Colour
1.
2.
3.
4.
5.
6.
7.
8.
9.
10.
2. To help identity the types of rocks in your pile,
visit https://geology.com/rocks/
Hint: sedimentary rock usually reacts or fizzes when vinegar is dropped on it.
Record your observations in the table:
Rock # Type of Rock Mohs Hardness Reaction to
Scale Number Vinegar
1.
2.
3.
4.
5.
6.
7.
8.
9.
10.Rocks ‘R’ Resources - 17 - Conclusions 1. Did you find more of one type of rock than any others? Which one – igneous, sedimentary or metamorphic? 2.What does this tell you about the type of habitat or natural area your rock was found in? 3. What did you learn about how to identify rocks and minerals as a result of using the different tests? Go Deeper We learn about the history of our natural world through investigating rocks. Learn more about the rocks around you. “Most of the solid surface of our planet (roughly 70%) is represented by sedimentary rocks, but if you go deep enough beneath the Earth’s surface, there are plenty of igneous and metamorphic rocks to be found.” Source: https://www.zmescience.com/science/geology/types-of-rock/ The deeper rock is mined in quarries. Loose surface rock is mined in pits. From what you know about how Earth was formed, why do you think this is so? Look Locally With a parent or guardian, collect rocks from other areas in your neighbourhood. Conduct the same tests on them. Are your findings the same as what you found in your backyard? Are they different? Are you near local landmarks such as streams, exposed bedrocks or cliffs? What does that tell about the natural history of your area? Check out Making North America: https://www.pbs.org/wgbh/nova/assets/swf/1/explore-north-america/#/intro Click on the Menu and then Explore. This interactive map allows you to explore landmark natural sites to find out how they were made. Take the opportunity to visit a local quarry. Conduct a web search for the closest location and request permission. Many offer tours.
Rocks ‘R’ Resources - 18 -

If in the area, contact British Columbia Stone, Sand and Gravel Association for more information:
https://gravelbc.ca

LESSON 4 – OUR CHANGING WORLD
It took over 4.6 billion years for our planet to form and change to this point. We can see this in how
rocks are constantly changing.

Let’s look at how rocks change.

Video Resources
Bill Nye does a great job of showing the different types of rocks and how they are formed.

Bill Nye – The Rock Cycle
https://www.youtube.com/watch?v=BsIHV__voMk

Watch the video stopping between the two segments – the rock cycle and types of rock. Pause the
video after the first part.
Write some notes summarizing what you viewed.

View the second part on types of rocks.
Review Lesson 1 on how to identify these rocks.
Rocks ‘R’ Resources - 19 -

Investigation – Rock Changes
Rocks take thousands of years to change. How can you show how these changes work?

Here is a drawing that shows how:

Source - https://www.nasa.gov/sites/default/files/rockingtherockcycle.pdf

Show How
a) Tell or show the story of a rock. Use the rock cycle as your guide.

Start at any point in the cycle. Identify your rock, then explain how it changes from one form to
another.

You can write this as a story or draw it as a comic.

b) You can show this physically. Here is one way. Take wax crayons apart and put them back
together to simulate the entire rock cycle.

Materials
• 3-5 wax crayons (with paper wrapping removed)
• plastic knife
• aluminium foil

Procedure
1. The whole crayon represents an igneous rock.
2. To show weathering: shave the crayons with the plastic knife.
3. Demonstrate erosion: pick up the crayon shavings and move them to another part of your table
4. To show deposition, where rock pieces stop moving: spread the crayon shavings around;
scatter them in various places
5. Rock pieces can be deposited underground, where compaction occurs. To show this put the
crayon shavings onto some aluminum foil and fold into a packet.
6. Compaction forms sedimentary rocks: put the packet between your hands and apply light
pressure.
Rocks ‘R’ Resources - 20 -

7. Add heat and pressure to form metamorphic rocks: put the packet between your hands and
apply heavy pressure.
8. Melting and cooling brings us back to the form of an igneous rock.

WITH THE HELP OF A PARENT OR GUARDIAN, melt the compressed crayon shavings.

NOTE: Crayons begin to soften at around 105 degrees Fahrenheit (40 degrees Celsius) and they
have a melting point between 120-147 degrees Fahrenheit (49 – 64 degrees Celsius)

Two safe ways to melt the crayon in the aluminum foil packet:
      1) place the foil packet in a small pot of just boiled water. Turn off the heat. Let the hot
water melt the crayons.
      2) use a blow dryer on high heat to melt the crayon shavings.

DO NOT PUT THE ALUMINUM FOIL PACKET IN THE MICROWAVE!

Extension
Explore different type of igneous rock. Pour the melted crayon:
• over ice cubes to form "pumice," (https://mineralseducationcoalition.org/minerals-
database/pumice/)
• into ice water to form "obsidian," (https://mineralseducationcoalition.org/minerals-
database/obsidian/) or
• over warm or hot water to form igneous rocks, such as "diorite"
(https://mineralseducationcoalition.org/minerals-database/diorite/) and
granite." (https://mineralseducationcoalition.org/minerals-database/
granite/) Adapted from - https://serc.carleton.edu/sp/mnstep/activities/34972.html

Source: https://eschooltoday.com/learn/the-rock-cycle/
Rocks ‘R’ Resources - 21 - Definitions Look at the diagram of the rock cycle. Define the terms and describe where the following occur in the cycle. • weathering • erosion • deposition • cooling • melting • pressure • compaction • cementation • heat Conclusions 1. What will you remember most from learning about the rock cycle? 2. Granite is the most common igneous rock. It underlies most of the continent of North America. (It is the most common construction aggregate in British Columbia.) Have you seen granite used in homes? Where and how? 3. Limestone is the most common sedimentary rock. It is the main material used in construction. It is used to make paper, plastics, glass, paint, gravel, steel, cement, carpets, and building stone; it is used in water treatment and purification plants and in the processing of various foods and household items (including medicines). List three things in your home that used limestone: 1. 2. 3.
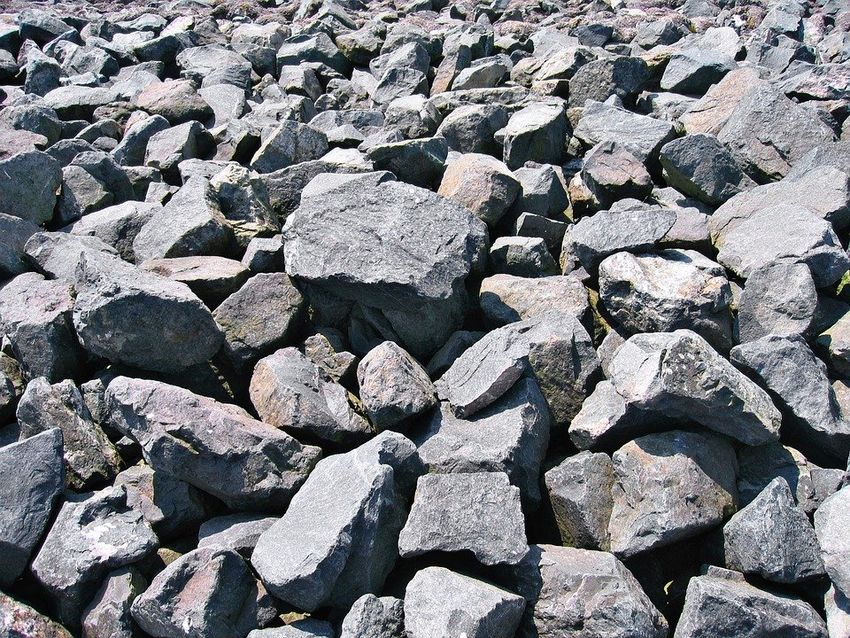
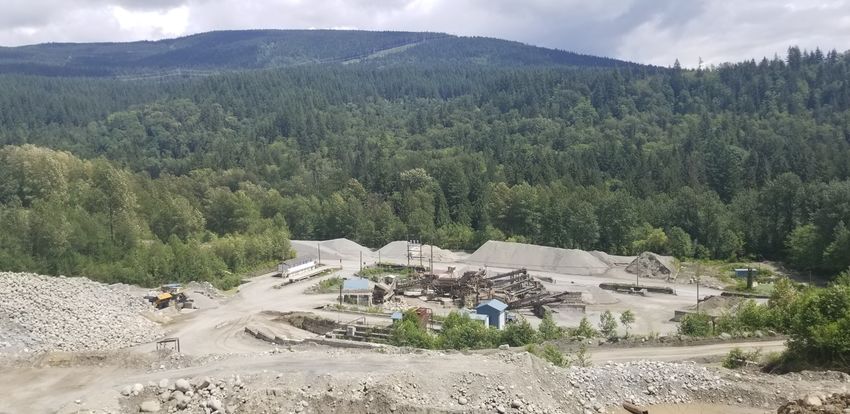
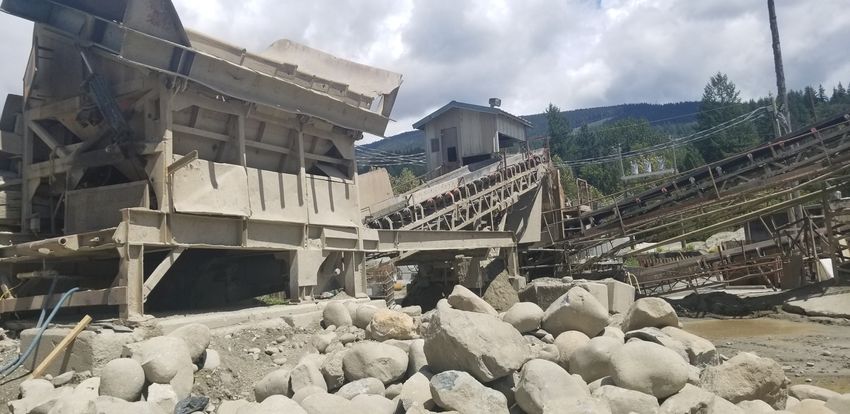
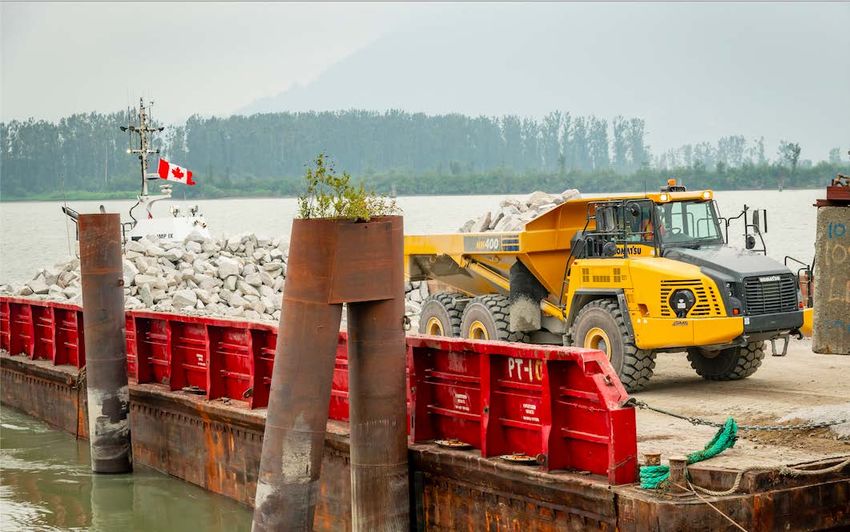
Rocks ‘R’ Resources - 22 -

Look Locally
Explore a local conservation area or park where you can observe rocks undergoing change: in a
stream, erosion down a hill, on a shoreline or wherever there is exposed bedrock.

LESSON 5 - LOCAL EARTH MATERIALS
Rocks are resources. We use stone, sand and gravel to construct our roads and communities.
Where do these resources come from?

Rock Facts
Aggregate is the technical term for stone, sand and gravel. Sand and gravel come from pits; stone
from quarries. What’s the difference between a pit and a quarry?
Rocks ‘R’ Resources - 23 -

A pit is where the sand and gravel are loose. It can be easily accessed once the top layer of soil is
removed, or it can be dredged from sandy deposits in rivers.

A quarry is where the stone has to be blasted apart or cut using giant saws. This is typically
igneous rock like granite. Quarries are also located close to the surface. In fact, many rarely reach
a depth greater than 100 feet.

Like other types of rocks and minerals, aggregates are only found in places where nature put
them.

60% of the cost of aggregate is transportation. Most of these earth resources are used in larger
cities, so it is most sustainable to find a pit or quarry closest to where the aggregate is being used.
Rocks ‘R’ Resources - 24 -

Stone, sand and gravel are heavy. Moving them requires the use of fossil fuels, which emit carbon
dioxide and other air pollution. The greater the distance aggregate needs to be moved the greater
the use of fuels - the greater the cost and the greater the emissions.

Natural Deposits
Natural deposits of loose stone, sand and gravel occur as a result of melting ice or flowing streams
or rivers.

When a glacier melts, it leaves behind a moraine – loose stone, boulders, sand and gravel that it
ground up and pushed to the front and side

Inside a glacier, melting ice forms rivers. Eskers are the banks of sand and gravel left behind from
the erosion caused by the flowing water.

Alluvial fans are the deposits of sand and gravel at the mouth of rivers.

These natural processes provide the sites for pits, where stone, sand and gravel can be dug up for
use in constructing our communities.

The common element in all these processes? Flowing water that causes erosion and deposition of
rock.

Sand and gravel are available in or near the rivers or creeks. Stone can be mined in the hillside.
Each has its own ecosystem.
Rocks ‘R’ Resources - 25 -

INVESTIGATION - ROCKIN’ YOUR YARD
The natural world of rock resources is right under our feet.

Here’s a typical cross-section of the soil in a backyard or park.

SOIL JAR TEST
Find the stone, sand and gravel in your backyard or local park. Conduct a soil test.

Materials
• a 16 oz. (1l) mason jar with screw-on lid
• permanent marker
• watch
• 1 teaspoon (5 ml) of dishwashing detergent

Procedure
1. Collect a soil sample. With the help of a parent or guardian, use a hand trowel to dig a small
hole in your backyard (or at the edge of a local park, field or grassy verge, somewhere it is safe
and permissible.) Try to dig as deeply as you can while not widening the hole.

Dig below the root line of the plants. The soil sample should include clay, rocks and sand.

2. Mix the soil sample so it is a consistent mixture of all the elements of the soil.

3. Measure 2 cups (500 ml) of the mixed soil and place it in the jar.

4. Fill the jar with clean water, leaving a little space at the top.

5. Add 1 teaspoon (5 ml) of dishwashing detergent.
Rocks ‘R’ Resources - 26 -

6. Screw the lid on the jar and shake vigorously until it is uniform “mud shake”.

7. Place the jar on the table. Observe what happens. After one minute, write down your
observations. What do you see happening in the jar?

8. Leave the jar in one spot for two hours. Observe what happened. Write down your observations.

9. If distinct bands have appeared, mark them with the permanent marker.

10. Leave the jar overnight. Observe what happened. Write down your observations.

Observations

1. After one minute, I observed

2. After two hours, I observed

3. After waiting overnight, I observed

4. What kind of organisms did you observe in the mixture?

Conclusions
1. What did this investigation show you about what’s in your local soil?

2. If you found sand in your soil, what does that tell you about the natural processes that created
that soil?

3. Sand is associated with what type of rock?

4. Would you call your soil rocky, sandy or mostly clay?

5. What does that tell you about the natural habitat of your area?
Rocks ‘R’ Resources - 27 -

Investigation - Erosion in Action
Build a 3D model that simulates how erosion creates alluvial fans for sand and gravel resources.

Research Questions
How does the force of moving water cause erosion?
Why does the eroded material fan out when it is deposited?

Materials
• a clear plastic storage container
• different sizes of pebbles – large and small – separated out (available from a hardware or
aquarium store)
• sand
• dirt
• cup of water
• eyedropper

Procedure
1. Build a slope of the largest stones in the plastic container to form a hill at one end and a lake at
   the other.
2. Build up the layers of stones with the largest stones at the bottom and the smallest stones on
   top.

3. Add a layer of sand on top of the stones. Add a sprinkle of soil on top of the sand

4. At the top of the “hill”, use the eyedropper to start a flow of water down the centre of the sand.

5. Slowly add more water to the same location, creating a stream of water down the centre of the
hill.

6. As the water starts to reach the bottom of the hill, in the space when a “lake” forms, observe
what happens.

7. Use as much water as needed to create a deep trench where the water flows. Observe the end
result in the lake area.
Rocks ‘R’ Resources - 28 -

Observations
1. What is the effect of the running water on the hill?

2. As more water runs down the hill, what happens at the bottom of the hill?

Conclusions
1. How do the forces of nature help us access sand and gravel resources?

2. How does this model show the action of erosion and deposition?

Look Locally
a) Use Google maps to locate where you live. Zoom out until you locate nearby pits and quarries.

b) Conduct a search. Use the key words: local pits and quarries. Identify their location.

How close are they to your community? What is benefit of having a pit or quarry close by?

c) Go to the web site of the local pit or quarry you have identified. Collect any photographs that
show how it operates.

What kind of rock products do they provide?

What does that tell you about the natural history of your area?
Rocks ‘R’ Resources - 29 -

LESSON 6 – SUSTAINING OUR EARTH
Our Earth is our only home. We have to do everything we can to use our resources carefully and
always support nature’s way of restoring itself.

Removing stone, sand and gravel from pits and quarries has environmental impacts. There are
several ways to limit these impacts.

Pits and quarries are closely monitored for their impact on the land – changes in habitat, species
at risk, water use and noise.

Moving the rock is done in the most sustainable way - the closer the pit or quarry is to the
construction, the less the amount of fuel needed to move the rocks.

Rehabilitation of the sites is planned from the start.

                             A gravel pit near a community under construction.
Rocks ‘R’ Resources - 30 - Moving Rock A big challenge is moving the rock from where nature deposited it to where we want to build our communities. Stone, sand and gravel are extremely heavy. They are measured in tons (tonnes). The average gravel truck carries 22 tons (20 tonnes). What’s the most sustainable way to move rock in your area? Questioning and predicting Name three different modes of transportation in your area. 1. 2. 3. Predict the most sustainable way to carry rock. List three questions you have about moving rock from a pit or quarry to a construction site. 1. 2. 3. Planning and conducting Explore your local pit or quarry. Find the closest pit or quarry on Google Maps. Zoom into the site. • How far away is it from your community? miles (km) • What is the name of the facility? Visit the web site of the stone, sand and gravel provider. Look for pictures or videos of their operations.
Rocks ‘R’ Resources - 31 -

What did you find most interesting?

Best Routes
Check out the local pit or quarry on the map again.

Look for the closest route to move the rock to your community.

Which is closest to your local pit or quarry?

• a roadway:

• a railway:

• a river or lake:

If you can, print out the map. Draw what you think is the best route to move the rock to your home.

                             Moving rock often requires two modes of transport.
Rocks ‘R’ Resources - 32 -
LESS IS MORE
Most of the cost for stone, sand and gravel is for transportation. If we can travel less, all of the
costs are lessened. When we lower transportation costs, we lower environmental costs.
Large gravel trucks sometimes use tandem trailers.
Math Activity – How Far is Too Far?
We want to minimize the environmental consequences of transportation. And yet our communities
need the stone, sand and gravel from pits and quarries.
Moving rock requires energy. Every mode of transport uses a fossil fuel – most often, diesel fuel.
Burning fossil fuels produces CO2 – a greenhouse gas that contributes to global warming and
climate change.
The less fuel burned to move the rock; the lower the environmental impact. There are two ways to
reduce the use of fuel:
• reduce the distance travelled
• use modes of the transport that burn less fuel.
Explore this relationship. Complete the following worksheet to investigate.Rocks ‘R’ Resources - 33 -
Worksheet – How Far is Too Far?
“Payload distance” - how far a vehicle travels carrying a certain mass is measured in tons per mile
in the US and tonnes/kilometre in Canada and Europe.
For each unit of mass/distance, a certain amount of energy is required to move the rock. Here is
the amount of carbon dioxide (CO2) emitted:
• A freight train emits an average of 32g CO2/ton-mile or 22g CO2/tonne-km.
• A barge on inland waterways emits an average of 45g CO2/ton-mile or 31g CO2/tonne-km
• A gravel truck emits an average 91g CO2/ton-mile or 62g CO2/tonne-km.
Do the math. Complete the table with your calculations.
Name of Pit Distance to Barge Rail Truck
or Quarry Town (g. CO2/ (g. CO2/ (g. CO2/
(miles/km) ton/mile or ton/mile or ton/mile or
tonne-km) tonne-km) tonne-km)
1. 100
miles/160km
2. 50 miles/80
km
3. 10 miles/16
km
Evaluate and Draw Conclusions
Think about the environmental impact of moving the rock.
The location of a pit or quarry depends where nature deposited the rock.
How we move the rock depends upon how close the location is to the community and the
availability of roads, railways or rivers that are close by.
1. If there is no river nearby, what kind of transportation choices do we have?
2. If there is no river or railroad nearby, what kind of transportation choices do we have?
3. How does the amount of fuel used to move the rock affect the environment?Rocks ‘R’ Resources - 34 - Extension – Media Literacy In this infographic, CO2 emissions are presented to support an argument for using one form of transport over the others. Use your critical thinking skills to detect what it is trying to tell you and why. Source: Texas Transportation Institute, Center for Ports and Waterways. 1. Which way to move rocks does this graphic prefer? 2. Why do you think this is so? 3. Is it always possible to move rocks this way? Why or why not? 4. Why do we need all three forms of transport to move stone, sand and gravel? Communicate – Assessment Write what you learned about how decisions are made about moving rocks from pits and quarries to our communities. Use these questions to guide you. . • Why is it necessary to gather data? • How does the data help you make decisions? • How does this help you determine the trade-offs between extracting earth resources and protecting the environment?
Rocks ‘R’ Resources - 35 -

LESSON 7 - BORROWING THE LAND
Quarries and pits are used for a short period of time.

After the stone, sand and gravel are removed from a pit or quarry, the site is returned to one of a
wide range of end uses: wildlife habitats, wetlands, recreational parks, forestry or farmlands.

Reclaimed
Explore some of the ways the land from a pit or quarry can be reclaimed. Take a look at the
following four examples. Click on the before and after pictures. Explain how the land was
reclaimed.

1. CalPortland
https://mineralseducationcoalition.org/reclamation-stories/calportland/

2. Beckman Quarry
https://mineralseducationcoalition.org/reclamation-stories/beckman-quarry/

3.Louisville Mega Cavern
https://mineralseducationcoalition.org/reclamation-stories/louisville-mega-cavern/

4. Investigate the transformation of a quarry into the famous Butchart Gardens. Visit
https://www.butchartgardens.com/our-story/
Rocks ‘R’ Resources - 36 -

If you visited any of these reclaimed sites today, could you tell if this was once a pit or a quarry?
Why or why not?

How Land Is Reclaimed
Boxley Creek – Washington State
We borrow the land to access earth reeources. Then we return it to become a local habitat.

Ground prepared for reclamation.                  The contours of a creek in place.

                                              Vegetation starting to grow.                   The
creek carving its own path.
Rocks ‘R’ Resources - 37 - Local habitat springing up. The creek today fully reclaimed. Worksheet - Reclaiming the Land View the video of how one stone, sand and gravel company reclaimed the land it was using. In some places, the land is being reclaimed while it is being worked. Valley Gravel Sales Ltd - Land Reclamation https://www.youtube.com/watch?time_continue=16&v=1la_sPbf3hs&feature=emb_logo What is the most memorable thing this video told you about how land is being reclaimed?
Rocks ‘R’ Resources - 38 -

Be a Reclaimer

Find one of the pits or quarries closest to you. Use Google Satellite Maps.

Zoom into the map to see the features of this pit or quarry.

• How large is it?
• Is it shallow or deep?
• How much of a lake is there? Is it large?
• What are some of its most striking features?

There is a difference between a pit and quarry. The way it can be reclaimed will differ too.

For example, if there is a deep lake left over from the excavation, what could it be used for?

What about a vast area that was a not-very-deep gravel pit? What could that be used for?

Think It. Plan it. Draw it.
You are in charge of reclaiming a pit and/or quarry closest to your community.

Determine the most useful purpose for the land. Here are some examples:

1. An undisturbed wild area (forest)
2. A lake, river or pond
3. Grasslands
4. A farm
5. Homes – a residential neighbourhood

Think about or research important species in your area. What kind of habitat do they need?
How could this pit or quarry help support any of these species?

Design the finished project. To design the reclaimed local pit/quarry, consider the following:

• Depth of the pit or quarry
• Water
• Surrounding Lands
• Community Needs
• Species who could use the habitat (pollinators for local flowers; trees for bobcats.)
• Local industry
Rocks ‘R’ Resources - 39 -

Choose your favourite art form: drawing, painting, digital art, collage, etc.

Using the outline of the pit or quarry from the satellite image, draw your vision of what this
reclaimed pit or quarry could be.

When you have completed your artwork, write a paragraph about the best features of your
reclamation project, and how it will suit the needs of the surrounding ecosystem, local species and
community.

Look Locally
Explore local historical sites that have been reclaimed from a pit or quarry.

Look at local online archives to see how stone, sand and gravel was extracted to build your
community. Use the local library or city hall. Speak to local historical associations.

Research its current use: an attraction (gardens), park or recreation site, a conservation area, etc.

Look to the Future
How can we balance our increasing need for stone, sand and gravel while balancing the need for
environmental stewardship?

Research new technologies to meet this demand, such as “living concrete” to reduce CO2 impact.

https://www.businessinsider.com/living-brick-material-bacteria-regenerates-2020-1

How does this innovation help balance the protection of the Earth with our need to extract stone,
sand and gravel?
                                                             ___________________________

                             Reclaimed quarry becomes Butchart Gardens.
Rocks ‘R’ Resources - 40 - EXTENSION - BE AN EARTH SCIENTIST Investigating the birth of the Earth helps us understand the uniqueness of our planet; how it provides all we need to build our lives, if we take care of it, How do we prove the theories about how the Earth was formed? Watch this video. It profiles eight scientists who are working to prove how the Earth was born 4.6 billion years ago. Naked Science - Birth of the Earth https://www.youtube.com/watch?v=XYHe5wQeA28 List three new things that you learned from the video: 1. 2. 3. Go Deeper How did nature build an Earth for humans to live? Choose one of the letters below corresponding to the theory and scientist you wish to explore in depth. Watch that specific segment of the video. Summarize what you’ve learned. Think about how you could demonstrate how this works. A. How a vast cloud of gas, sand and dust in space came together under the force of gravity to form our sun and solar system. (Time 2:18) Astronomer, Dr Tom Fleming, The University of Arizona How did this work? How did Tom demonstrate how our solar system evolved? What is another way to demonstrate this? (Think about sports or what you have experienced in a playground.) Conduct your demonstration. Explain what happened.
Rocks ‘R’ Resources - 41 -

B. How the dust circulating the sun was turned in our planet 4.6 billion years ago. (Time 6.26)
Astronaut, Dr Stanley Love, NASA

How did this work?
How did Stan use the space stations videos to prove how planets form?

How can you demonstrate this on Earth? Watch the video closely for clues.

Conduct your demonstration. Explain what happened.

IDEA: Use cereal science to show how objects clump together. Have a bowl of Cheerios or similar
cereal in milk. As you get down to the last few bites, observe what happens to the remaining
Cheerios floating in the milk.

What did you see happening?

Place a single Cheerio in a bowl of milk. What does its weight do to the milk beneath it?

Place a second Cheerio in the bowl. Allow the two Cheerios to drift close to each other. Describe
what happens.

NOTE: they will appear to "fall into" one another, as if pulled together by an attractive force.
How does this show how planets form?

C. How the Earth has been protected from solar (Sun)storms and why this is necessary for life on
Earth. (Time 8.53)
Dr. Rodney Viereck, Space Environment Centre

How do storms on the sun affect us on Earth?

What damage can solar winds do to a planet?

Where has this happened?

How does our atmosphere protect us?

D. How does the Earth survive solar winds and keep its atmosphere? (Time 14:20)
Dr Daniel Lathrop, University of Maryland

What makes up the Earth’s core?
Rocks ‘R’ Resources - 42 -

How does the Earth’s core protect our planet from solar winds?

What is a dynamo?
How can you demonstrate the dynamo action of the Earth’s core?

Conduct your demonstration. Explain what happened.

IDEA: Build a model of the Earth’s core. You’ll need:
• a large nail
• a length of wire
• a battery
• paper clips.

Wind the wire tightly around the nail, leaving some of each end of the wire free to connect to the
battery. Connect the wound wire to the battery. Place the paper clips nearby.

Observe what happens. How does this show the action of the Earth’s core?

Explain how the northern and southern lights prove how the Earth’s magnetosphere protects life
on Earth.

E. How the creation of the moon tells us how the Earth evolved. (Time 20:08)
Dr Robin Canup, Southwest Research Institute

How was the moon created, according to Robin’s research?

What were the two major effects on Earth of the creation of the moon?

When the moon was created, the Earth was tilted on its axis. The tilt of Earth's axis is about 23.5
degrees.

“Earth's tilted axis causes the seasons. Throughout the year, different parts of Earth receive the
Sun's most direct rays. So, when the North Pole tilts toward the Sun, it's summer in the Northern
Hemisphere. And when the South Pole tilts toward the Sun, it's winter in the Northern
Hemisphere.”
   - https://spaceplace.nasa.gov/seasons/en/
Rocks ‘R’ Resources - 43 -

Imagine what our lives would be like without the seasons. Write a paragraph about a day in the life
of a “world without seasons.”

F. How the Earth got its water, which is needed for life. (Time 27:27)
Dr Michael Zolensky, NASA

What did Michael find out about what is in a meteorite?

What is Michael’s theory about how the Earth got its water?

How does this differ from the theory shown in the first, shorter video?

What does this tell us about how our knowledge about our planet changes, just as our planet itself
is changing?

G. How do we prove the theory of how the Earth got its water? (Time 38:16)
Geologist, Dr Stephen Mojzsis, University of Colorado

What did Stephen do to find out when the Earth got its water?

4 billion years ago, our early oceans were rich in iron. The sky was thick with methane.

Paint, draw or colour a landscape of our early Earth showing what it looked like. Use the colours of
the iron ocean and methane skies.

H. How did the Earth get its oxygen? (Time 41:20)
Geologist, Dr. Martin Van Kranendonk, Geological Survey of Western Australia

Explain Martin’s theory about how the Earth got its oxygen.

What are stromatolites?

How did the oxygen produced by the stromatolites change the iron oceans and provide the
building block for life on Earth?

What is a way to demonstrate this? (Think about how plants use chlorophyll to convert carbon
dioxide into oxygen. How can you show that this happens?)
Rocks ‘R’ Resources - 44 -

                                    _________________________________________________

Conduct your demonstration. Explain what happened.
                                                                 _______________________

IDEA: Here’s one way to show how plants emit oxygen. Use a small aquatic plant – a green one
you would put in an aquarium or find in a pond. Put it in an 8 oz. (250 ml) jar. Fill the jar with water.
Fill a 16 oz (500 ml) jar half full of water. Put the small jar inside the large jar, trying to keep the
small jar as full of water as possible. Put in the light. Observe what happens over a few days.

What happens to the water in the small jar? What is it filling up with?

Explore Earth
Visit NASA Science Solar System Exploration to learn more about our planet.
https://solarsystem.nasa.gov/planets/earth/in-depth/
You can also read