SAR Online User Guidance - National Crime Agency
←
→
Page content transcription
If your browser does not render page correctly, please read the page content below

SAR Online User Guidance
This is a United Kingdom Financial Intelligence Unit (UKFIU)
Guidance Note. Its aim is to assist users of the SAR Online
portal in submitting reports in line with the Suspicious Activity
Reports (SARs) regime.

February 2021

V 4.1

                                     1
        Leading the UK's fight to cut serious and organised crime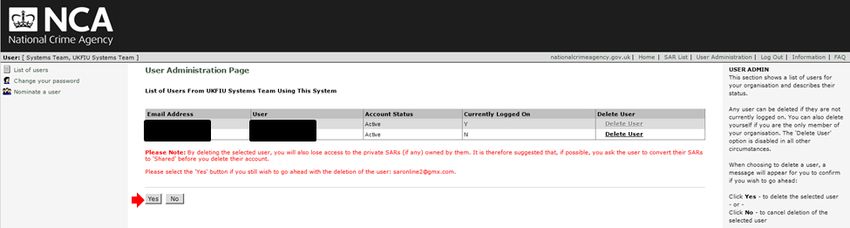
SAR Online User Guidance
This guidance document provides a quick overview of the SAR Online registration
process and outlines the steps required to submit Suspicious Activity Reports
(SARs) to the NCA.

Please see the links below to proceed to the relevant sections.

 1. What is SAR Online?
 2. How to register for SAR Online
 3. Entering new user registration details
 4. Activation codes
 5. Activating a SAR Online account
 6. Navigating SAR Online
 7. User administration page
 8. Submitting a SAR
          Step 1 – SAR header
          Step 2 – Main subject
          Step 2 – Main legal entity
          Step 3 – Associated subject
          Step 4 – Transaction
          Step 5 – Reason/submit
 9. SAR submission acknowledgement
10. SAR submission acknowledgement
11. Glossary Codes
12. SARs IT Transformation
Annex A – Valid Character List

1.     What is SAR Online?

SAR Online is a secure web-based system through which you can register and
submit SARs to the NCA. Registering with SAR Online is a very simple process and
ensures that SARs are submitted to the NCA securely.

SAR Online is the NCA’s preferred means of SARs submission and provides a
standardised and structured approach to assist reporters with their submissions.
The portal can be utilised by anyone including members of the general public
and/or organisations (regulated and unregulated).

The use of SAR Online is recommended as it will:

     • provide you with an automated acknowledgement of receipt on successful
       submission
     • assist you in structuring your SAR to ensure that your report is
       comprehensive and detailed, thereby improving processing time in the NCA
     • offer you the opportunity to flag the SAR as a request for a Defence Against
       Money Laundering (DAML) or Defence Against Terrorist Financing (DATF).

                                           2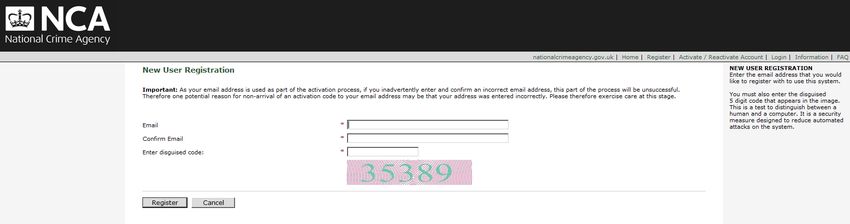
There is a SAR Online Support Team available Monday to Friday during office
hours (0900 to 1700) to assist with any SAR Online enquiries, contactable on 0207
238 8282. On contacting the UKFIU, you will be directed to an automated voice
message. Please ensure that you clearly provide your name, contact number and a
brief summary of your enquiry. We endeavour to respond back to all enquiries and
a member of the SAR Online Support Team will be in touch with you at their
earliest convenience. Alternatively, if your enquiry is of an urgent or complex
nature, you can email the team at ukfiusars@nca.gov.uk
If your enquiry relates to a DAML/DATF SAR, we recommend that you email the
UKFIU DAML Team directly at DAML@nca.gov.uk. Please note that the DAML Team
does not deal with enquiries via telephone but only via email. The SAR Online
Support Team will be unable to connect you to anyone within the DAML
Team or ask anyone to call you back.
Further resources are available via the NCA website
(www.nationalcrimeagency.gov.uk) or through your regulator or professional body.
PLEASE NOTE: The SAR Online Support Team will be unable to provide you with
any advice relating to if or when a SAR should be submitted. If you require such
advice, please contact your regulator or professional body:
The Law Society of England and Wales
Solicitors Regulatory Authority (SRA)
Financial Conduct Authority (FCA)
HM Revenue & Customs (HMRC)
If you are not part of a regulated sector, then please contact Citizens Advice on
03444 111 444 or seek independent legal advice.
2. How to register for SAR Online
2.1 To register for SAR Online, navigate to the SAR Online web portal. This can
be accessed via the NCA’s website (www.nationalcrimeagency.gov.uk).
2.2 Click on ‘Reporting SARs’ in the top right hand corner (Note: if using a
mobile or tablet device the link may appear at the bottom of the
homepage).
2.3 The SAR Online portal is compatible for use on the following browsers:
Microsoft Edge, Mozilla Firefox, Google Chrome and Safari. Microsoft Internet
Explorer and other browsers not listed above will still allow access to SAR
Online; however, users may experience compatibility issues. To minimise any
potential compatibility issues, it is always recommended that you use the
latest version of your browser.
2.4 Please ensure that you read the information available on the landing page of
SAR Online prior to registration. This will assist in answering any questions
you may have. Once you have read the relevant information, click on
‘Register’ (Figure 1).
3Figure 1 – Registration Button
2.5 The next page offers more information specific to the registration process.
Once you have thoroughly read this information, click on ‘Proceed to
Registration’ (Figure 2).
2.6 Throughout the Registration and Activation process, hints will be visible on
the right hand side of the page (Figure 2, box highlighted in red).
Figure 2 – New User Registration
3. Entering new user registration details
3.1 On the ‘New User Registration’ page, please enter an email address which is
not currently associated with an active SAR Online account. This email
address will serve as your username, and will be used to send SAR receipt
acknowledgement auto-notifications. All other correspondence between the
NCA and the reporter will be made using the email address listed in the ‘Main
Contact Details’ shown at Step 3.3. It may be more convenient to register
using a group email address, but please note that group email addresses
should only be associated to the main SAR Online account and not to
nominated accounts.
3.2 Once an email address has been entered and confirmed, you will then need to
enter the five-digit disguised code displayed at the bottom of the page and
click ‘Register’ (Figure 3). (Note: if the disguised code does not appear,
4refresh the page by pressing F5. Please also make sure you are using
the recommended browser).
Figure 3 - New User Registration
3.3 You will then need to enter the details of a reporting institution that you are
registering (Figure 4, box highlighted in red) and the main contact details for
the individual who is to be appointed as the main point of contact (Figure 4,
box highlighted in blue). (Note: please include as much information as
possible; the fields marked with a red asterisk are mandatory and
must be filled in, otherwise the registration will not continue).
Figure 4 - Reporting Institution Registration
3.4 Reporting institution registration
Reporting institution details:
a. Reporting institution name: Enter the name of the organisation
you are reporting under, e.g. Big Bank PLC. If you are a private
individual, enter your personal name. (Note: please do not
enter your regulator’s name and/or agency name in this field
(i.e. NCA, HMRC, DWP, etc.) unless you are submitting a
report on behalf of these organisations).
5b. Type: Select the category that the organisation falls under, e.g.
bank. If you are a private individual, select any of the following from
the dropdown menu: ‘Private Individual’, ‘Other’ or ‘Unknown’.
(Note: please do not register for an account using your
personal email address (e.g. userone@hotmail.com) when
acting on behalf of an organisation).
c. Regulator: Select the regulating authority of your organisation, e.g.
Financial Conduct Authority. If you are not regulated or if you are
submitting as a private individual, select ‘Other’ from the dropdown
menu.
d. Regulator ID: Enter your regulator ID (if not known or if you do not
have one, leave blank).
e. Professional/trade body: Select the professional/trade body your
organisation is a member of, e.g. Financial Conduct Authority (if not
known or if you do not have one, leave blank).
f. Professional/trade body ID: Enter your professional/trade body ID
(if not known or if you do not have one, leave blank).
g. Additional information/comments: Enter any additional details
that you would like to disclose to us in relation to your organisation.
(Note: please do not enter your reason for suspicion here).
Main contact details:
a. Surname: Enter the main contact’s surname.
b. Forename: Enter the main contact’s forename.
c. Position: Select the main contact’s position within the organisation,
e.g. MLRO. If you are a private individual, simply enter ‘Private
Individual’ in this field.
d. Address 1-5: Enter the organisation’s address. If you are a private
individual, enter your residential address. (Note: please ensure
that the address entered is complete and accurate).
e. Postcode: Enter the postcode.
f. Phone number: Enter a phone number for the main contact.
(Note: please ensure that the phone number provided is
complete and accurate).
g. Fax number: Enter a fax number (if you do not have one, leave
blank).
h. Email address: This field should have been automatically populated
with the email address entered in 3.2. (Note: you do have the
6option to continue with this email or amend this field with
another registration email. This email address will be used for
any correspondence between the NCA and the reporting
institution).
Alternative contact details:
a. Surname: Enter the alternative contact’s surname.
b. Forename: Enter the alternative contact’s forename.
c. Position: Select the alternative contact’s position within the
organisation, i.e. Deputy MLRO.
d. Address 1-5: Enter the organisation’s address if different to the
address details provided for the main contact.
e. Postcode: Enter the postcode if different to the postcode details
provided for the main contact.
f. Phone number: Enter a phone number for the alternative contact.
(Note: please ensure that the phone number provided is
complete and accurate).
g. Fax number: Enter a fax number (if you do not have one leave
blank).
h. Email address: Enter the alternative contact’s email address.
3.5 Upon completion, if you are happy that the details are accurate, click on
‘Register’. A ‘Success’ page should then be displayed (Figure 5).
3.6 Should any of the main contact details change in the future, please inform us
at the earliest via email on ukfiusars@nca.gov.uk, so that we can update our
records. A new account containing these updated details must then be
registered.
PLEASE NOTE: We can change/update an email address for a main contact,
as long as the main contact is the registered user of the account. If the
individual who is the main contact is due to leave or change roles within the
organisation, a new main contact will need to register for a new SAR Online
account.
All correspondence, especially in relation to DAMLs/DATFs between
the NCA and the reporting institution, will only be made via the main
contact details provided at registration. Therefore, it is vital that
these details are kept up to date, in order to ensure receipt of all
correspondence.
74. Activation codes
4.1 The ‘Success’ page includes your ‘Activation Code 1’; please take a
screenshot or otherwise note this case-sensitive code as it appears on the
screen, as it cannot be retrieved at a later time.
Figure 5 - Registration Success Screen
4.2 ‘Activation Code 2’ will be emailed to you. Please allow up to one hour for
the email to arrive and ensure that you also check your junk/spam folder.
However, if after undertaking the above, you do not receive your ‘Activation
Code 2’ email, please contact the SAR Online Support Team at
ukfiusars@nca.gov.uk, stating the date, time and the email address you used
to register. We will then retrieve your ‘Activation Code 2’ email for you.
(Note: activation codes are only valid for seven calendar days from
the date of their creation).
4.3 When you have received your ‘Activation Code 2’ email (Figure 6), you can
then move on to activating your SAR Online account.
Figure 6 - ‘Activation Code 2’ Email
85. Activating a SAR Online account
5.1 To activate your SAR Online account click on ‘Activate/Reactivate
Account’. Enter the registered email address followed by the activation codes
(as provided) and the disguised code in their respective boxes and click
‘Activate’ (Figure 7).
Figure 7 - Activate/Re-Activate Screen
5.2 You can then set your personal user details, including your password and
password hint. (Note: passwords must be between 8 and 15 characters
long and contain a mix of UPPERCASE, lowercase and numbers. They
should not contain any symbols, i.e. ‘- / _ %’).
Figure 8 - User Registration Screen
5.3 Once you are happy with your details set, click ‘Submit’ (Figure 8). You will
then be automatically logged on to SAR Online. (Note: any accounts
inactive for over six years will be reviewed and deleted).
96. Navigating SAR Online
6.1 When you log on to SAR Online you will be presented with a landing page
(Figure 9).
Figure 9 - SAR Online Landing Page
6.2 At the top of the page you will find a simple, easy to navigate menu bar
(Figure 10).
Figure 10 - SAR Online Menu Bar
6.3 On the left it should show the account’s registered user and the organisation
(Figure 10, Box Highlighted in Red).
6.4 On the right, you have the following options:
1. The NCA Website: this should take you back to the NCA website.
2. Home: this will navigate you back to the SAR Online landing page.
3. SAR List: this will navigate you to your SAR List.
4. User Administration: this will navigate you to your account details
and allow you to nominate colleagues.
105. Log Out: this will log you out of SAR Online.
6. Information: this will list a few important items of information, i.e.
terms and conditions.
7. FAQ: this will list some of the frequently asked questions.
6.5 At the bottom, you will find a site footer which contains (Figure 9):
1. Accessibility: this will show all of the keyboard shortcuts that can
be used to navigate SAR Online.
2. Site Map: this will display a Welcome Page with all the available
pages on SAR Online, as well as a process map of SAR Online.
3. Session Timeout: this displays the amount of time you have until
SAR Online times out, logging you out of SAR Online automatically.
(Note: clicking on a section will reset the session timer).
7. User administration page
7.1 The User Administration section allows you to change your password,
nominate users and delete users.
Figure 11 - User Administration Page
7.2 On the left, you will be presented with three options (Figure 11):
1. List of users: this will navigate you to a list of all your nominated
users. Within this page, you can delete users that are nominated on
your account. To delete a user:
a. Click ‘Delete User’ on the user you wish to remove (Figure 12).
Figure 12 – Delete User Button
11b. You will be presented with the following confirmation command
(Figure 13):
Please note: By deleting the selected user, you will also lose access to the private
SARs (if any) owned by them. It is therefore suggested that, if possible, you ask the
user to convert their SARs to ‘Shared’ before you delete their account.
Please select ‘Yes’ button if you still wish to go ahead with the deletion of user.
c. We recommend that all private SARs are converted to ‘Shared’
before confirming deletions.
d. Once you are happy and in agreement with the above statement,
click ‘Yes’ (Figure 13).
Figure 13 – Delete User Confirmation
2. Change your password: this will allow you to change your account
password (Figure 14). To change your password:
a. Enter your current password in the top box.
b. Enter your new password. (Note: passwords must be between 8
and 15 characters long and contain a mix of UPPERCASE,
lowercase, and numbers, should not contain any symbols, i.e.
‘- / _ %’).
c. Confirm your new password.
d. Enter a password hint. (Note: do not type your password as a
password hint).
Figure 14 – Change Password
123. Nominate a user: this will allow you to nominate a user for access
to SAR Online (Figure 15). To nominate a user:
a. Enter the email address of the user you wish to nominate.
b. Confirm the email address.
c. Click ‘Submit Nomination’.
Figure 15 – Nominate User
d. Similar to the process of initial registration, you will receive the
’Activation Code 1’ on screen. ‘Activation Code 2’ will be emailed directly
to the nominated colleague’s registered email address.
e. You will need to provide the nominated user with ’Activation Code 1’.
The nominated user will then be required to activate their SAR Online
account.
8. Submitting a SAR
8.1 Click on ‘SAR List’ on the menu bar.
8.2 On the left, click ‘New SAR’ (Figure 16).
Figure 16 – SAR Explorer - New SAR
8.3 In order to submit a SAR, there are five steps to complete. These steps can
be found on the SAR header (Figure 17). (Note: you will need to complete
all fields marked with the red asterisks; all other fields can be left
blank if you do not have the needed information).
SAR Online has an automatic timeout session of 20 minutes. You should save
your work at regular intervals to re-set the timeout clock before the session
expires. The ‘Save’ and ‘Save and Exit’ options are available on every
13screen. There will be a notification warning you of pending timeout; you will
be provided with five minutes to save the session.
Figure 17 – Steps to Complete
8.4 Step 1 – SAR header
Figure 18 – SAR Header
a. Your reference: Enter a reference for personal use. This will allow
ease of identifying a report.
b. SAR type: Select the category the report falls under, i.e. Proceeds
of Crime or Terrorism.
c. SAR creation date: Enter the date of when you created the SAR.
This will be the day you start filling out the SAR submission steps.
d. Related disclosure IDs: If this is a SAR in relation to a previous
SAR/s that was submitted, enter the previous SARs Unique
Reference Numbers (URNs) in this field (maximum of three SAR
URNs).
e. Consent required: Click to check this box if you wish to seek a
defence from the NCA to a principal money laundering offence
(sections 327-329 Proceeds of Crime Act 2002 [‘POCA’]) under
sections 335 and 336 of the POCA and/or a terrorist financing
offence (sections 15-18 Terrorism Act 2000 [‘TACT’]) under section
21ZA of the TACT.
f. Reporting institution: This would have been entered
automatically. It shows the institution under which you are
reporting, e.g. Big Bank PLC.
g. Branch/office/outlet: Enter the branch, office or outlet in which
the reporter is located.
14h. SAR access level: Select whether you would like this SAR to be
private (only accessible to the reporter) or shared (accessible to all
users).
Once you are happy with all information provided, click ‘step 2 >>’ to proceed to
the next step.
8.5 Step 2 – Main subject
a. Select whether the main subject is a person or a legal entity (Figure
19). (Note: you can only have one main subject; any other
subjects will be associated subjects).
Figure 19 – Main Subject
Main person (Figure 20):
a. Subject status: Select whether the person in question is a suspect,
victim or unknown.
b. Surname: Enter the subject’s surname.
c. Forename: Enter the subject’s forename (if not known, leave
blank).
d. Other names: Enter any other name(s) that the subject is also
known as.
e. Title: Enter the title of the subject, e.g. Mr.
f. Date of birth: Enter the subject’s date of birth as ‘dd-mm-yyyy’ (if
not known, leave blank).
g. Gender: Select the subject’s gender, e.g. male.
h. Occupation: Enter the subject’s occupation (if not known, leave
blank).
Figure 20 – Main Person
15i. If you have an address for the subject or any other information,
select the appropriate ‘Add Address’ or ‘Add Info’ (Figure 21). If
you do not have any additional information, click ‘step 3 >>’ to
proceed to the next step.
Figure 21 – Add Address/Add Info
Address details (Figure 22):
a. House number/name: Enter the house number or name of the
property.
b. Street: Enter the name of the street.
c. City/town: Enter the city or town, e.g. London.
d. City/town/county: Enter the city, town or county, e.g. Greater
London.
e. Country: Enter the country, e.g. United Kingdom.
f. Postcode: Enter the postcode.
g. Address type: Select from the drop down the appropriate type, e.g.
home address.
h. Current address: Check this box if the subject currently resides in
the address entered; if not, click to uncheck/untick this box.
Figure 22 – Address Details
i. If you have another address for the subject or any other information,
select the appropriate ‘Add Another Address’ or ‘Add Info’
(Figure 23). If you do not have any additional information, click
‘step 3 >>’ to proceed to the next step. (Note: SAR Online
allows a maximum of 200 intelligence values [Subjects,
Transactions, Addresses and Information] in total)
16Figure 23 – Add Another Address/Add Info
Information details (Figure 24):
a. Information type: Select from the drop down the appropriate type,
e.g. mobile number.
b. Unique information identifier: Enter the details here, i.e. if you
have chosen type ‘mobile number’, enter the number in this field.
c. Extra information description: Enter any additional details here
that are associated to the above information, e.g. a UK-based mobile
number. (Note: this field is restricted to a maximum of 255
characters).
Figure 24 – Information Details
d. If you have any other information, select the appropriate ‘Add More
Info’ (Figure 25). If you do not have any additional information,
click ‘step 3 >>’ to proceed to the next step. (Note: SAR Online
allows a maximum of 200 intelligence values [Subjects,
Transactions, Addresses and Information] in total).
Figure 25 – Add More Info/Add Address
8.6 Step 2 – Main legal entity
a. Select whether the main subject is a person or a legal entity (Figure
19). (Note: you can only have one main subject; any other
subjects will be associated subjects).
Main legal entity (Figure 26):
a. Subject status: Select whether the entity in question is a suspect,
victim or unknown.
b. Legal entity name: Enter the entity’s name.
17c. Legal entity number: Enter the entity’s registered number – UK
Enterprises registered under Companies House will have a unique
registration number (if not known, leave blank).
d. VAT number: Enter the entity’s VAT number (if not known, leave
blank).
e. Business type: Enter the type of business the entity is, e.g.
solicitors.
f. Country of registration: Select the country where the entity is
registered, e.g. United Kingdom.
Figure 26 – Main Legal Entity
g. If you have an address or any other information, select the
appropriate ‘Add Address’ or ‘Add Info’ (Figure 27). If you do not
have any additional information, click ‘step 3 >>’ to proceed to the
next step.
Figure 27 – Add Address/Add Info
Address details (Figure 28):
a. House number/name: Enter the house number or name of the
property.
b. Street: Enter the name of the street.
c. City/town: Enter the city or town, e.g. London.
d. City/town/county: Enter the city, town or county, e.g. Greater
London.
e. Country: Enter the country, e.g. United Kingdom.
f. Postcode: Enter the postcode.
g. Address type: Select from the drop down the appropriate, e.g.
registered office.
18h. Current address: Check this box if the subject currently trades in
the address entered; if not, click to uncheck/untick this box.
Figure 28 – Address Details
i. If you have another address for the subject or any other information,
select the appropriate ‘Add Another Address’ or ‘Add Info’
(Figure 29). If you do not have any additional information, click
‘step 3 >>’ to proceed to the next step. (Note: SAR Online
allows a maximum of 200 intelligence values [Subjects,
Transactions, Addresses and Information] in total).
Figure 29 – Add Another Address/Add Info
Information details (Figure 30):
a. Information Type: Select from the drop down the appropriate
type, e.g. mobile number.
b. Unique information identifier: Enter the details here, i.e. if you
have chosen type ‘mobile number’, enter the number in this field.
c. Extra information description: Enter any additional details that
are associated to the above information here, e.g. a UK-based
mobile number. (Note: this field is restricted to a maximum of
255 characters).
Figure 30 – Information Details
d. If you have any other information, select the appropriate ‘Add More
Info’ (Figure 31). If you do not have any additional information, click
‘step 3 >>’ to proceed to the next step. (Note: SAR Online
19allows a maximum of 200 intelligence values [Subjects,
Transactions, Addresses and Information] in total).
Figure 31 – Add More Info/Add Address
8.7 Step 3 – Associated subject
a. If there are associated subjects, select whether the associated
subject is a person or a legal entity (Figure 32), if not click ‘step 4
>>’ to proceed to the next step.
Figure 32 – Associated subject
Associated subject:
a. This section is near identical to the steps taken when completing
‘Step 2 – Main subject’, except for two differences. (Note: if you
are unsure how to complete this section, please refer back to
Step 2).
b. The first difference with ‘Step 3 – Associated Subject’ is the ‘Reason
for association’ field (figure 33).
c. Reason for association: Enter the link between the main subject
and the associated subject here. (Note: there is a limited range
of special characters and symbols you are able to use in this
field. Certain characters (including % and !) will cause an
error message to display, and your SAR will not be entered
into the database until it is amended).
Figure 33 – Reason for association
d. The second difference with ‘Step 3 – Associated Subject’ is the ability
to add multiple associated subjects. Unlike ‘Step 2’, you are not
limited to one subject (Figure 34). (Note: SAR Online allows a
maximum of 200 intelligence values [Subjects, Transactions,
Addresses and Information] in total).
Figure 34 – Additional subjects
208.8 Step 4 – Transaction
If you have access to transaction history and transaction details, you can enter all
details in this step. (Note: this is not a mandatory step and can be skipped.
To skip, firstly clear any data you might have entered and then click, ‘Step
5 >>’ to proceed to the next step).
Box 1 – What are the details of the transaction?
a. Date: Enter the date of the transaction.
b. Amount: Enter the amount of the transaction.
c. Currency: Select from the drop down menu which currency the
transaction is in, e.g. GBP (Pound Sterling).
d. Credit/debit: Select from the drop down menu whether the
transaction was a credit or debit.
e. Type: Select from the drop down menu the type of transaction it is,
e.g. cash.
f. Notes: Add any additional notes that you might have, e.g. if the
payment was for accountancy services.
Box 2 – What are the details of this subject’s account?
a. Account holder: Name of the account holder (this would be in the
name of the main subject).
b. Account number: Main subject’s bank account number.
c. Institution name: Name of the banking institution, e.g. Big Bank
PLC.
d. Sort code: Banking institution’s sort code (if not known, leave
blank).
e. Date opened: Date the account was opened.
f. Date closed: Date the account was closed (if still active, leave
blank).
g. Account balance: Amount of capital left in the account.
h. Balance date: Date of when the balance was taken.
i. Turnover credit: If you have knowledge of this please enter as
appropriate.
21j. Turnover debit: If you have knowledge of this please enter as
appropriate.
k. Turnover period: Period during which these transactions happened
(relates to ‘i’ and ‘j’).
Box 3 – What are the details of the third party account?
a. Account holder: Select the subject from the drop down menu (this
will list the main subject and all associates).
b. Account number: Enter the bank account number.
c. Institution name: Name of the banking institution, e.g. Big Bank
PLC.
d. Sort code: Banking institution’s sort code (if not known, leave
blank).
If you have more than one transactions, click ‘Add Another Transaction’ (Figure
35, Red Arrow); if not please click ‘step 5>>’ to proceed to the final step. (Note:
SAR Online allows a maximum of 200 intelligence values [Subjects,
Transactions, Addresses and Information] in total).
Figure 35 – Transaction
8.9 Step 5 – Reason/submit
a. What is your reason for suspicion/knowledge? (Figure 37)
Provide as much detail as possible on why you are submitting this
report, outlining the suspected money laundering activity and how
22all subjects entered are involved. Please also include SAR glossary
codes if they are applicable to your SAR. (Note: this field is
restricted to a maximum of 8,000 characters and use of
certain characters or symbols within this field can cause an
Elmer (SARs national database maintained by the UKFIU)
data processing failure and your SAR may not be entered into
the database. Therefore, please ensure that your reason for
suspicion field contains plain text formatting and doesn’t
contain, for example; URLs (http://www.) and/or symbols
(>, *,~, #). Please refer to Annex A for a list of accepted
characters).
If you are copying and pasting directly into Step 5, you will be
presented with the following option (Figure 36). We recommend that
you copy and paste from Notepad as opposed to Microsoft Word.
Figure 36 – Invalid Character Paste Window
The pop-up automatically provides you with your text and all invalid
characters removed. An option of either ‘Continue with Paste’ or
‘Reject Paste’ is provided. You will not be able to proceed with the
submission until all invalid characters have been removed.
If the SAR you are submitting is a DAML/DATF request, please
ensure that it adheres to the below criteria. Additionally, there is a
more detailed guidance available via the NCA website on requesting
a defence under POCA/TACT:-
Necessary Information:
I. the information or other matter which gives the basis for your
knowledge or suspicion;
II. a description of the property that you know, suspect or believe is
criminal property; and
III. a description of the prohibited act for which you seek a defence.
If your knowledge or suspicion has come to you in the course of a
business in the regulated sector, your SAR should also contain the
following:
23IV. the identity of the person or persons you know or suspect is involved
in money laundering and/or terrorist financing, if you know it;
V. the whereabouts of the property you know or suspect is criminal
property so far as you know it; and
VI. if you do not know (IV) and/or (V), any information you have which
you believe or it is reasonable to expect you to believe may assist in
identifying (IV) or (V) or both.
Note: the NCA is not in a position to provide any form of
advice on what to disclose in your report; it must be
completed after careful consideration by the reporter.
Guides are available on the NCA website to help you through
this process, e.g. ‘Guidance on Submitting Better Quality
SARs’. If you require any such advice on whether a SAR
should be submitted, please contact your regulator,
professional body or Citizens Advice, contacts for which are
available on page 4.
The system does not allow you to attach any correspondence, e.g.
spreadsheets or Word documents. If you have any further
correspondence/documentation, include a line in step 5 along the
lines of; “We hold further information that is available upon
request by contacting….”.
b. Report activity assessment: this section is redundant, as SARs
are now classified using glossary codes. You can skip this.
c. Once you are happy with all the details provided, you are ready to
review your SAR. Click ‘Submit SAR>>’ (Figure 37, Red Arrow).
Please note – this button may change to ‘View SAR>>’ in the
future.
Figure 37 – Reason for Suspicion/Submit
24d. You will be presented with a ‘Check SAR details and retain a copy’
screen. Please read through this and ensure that all details are as
accurate as possible. Before your final submission, we advise that
you print a copy for reference. (Note: we do not provide copies
of SARs as once we receive a SAR, it is classified as restricted
data).
e. When you are ready, click ‘Submit SAR’ (Figure 38, Red Arrow).
Figure 38 – Final Submission
9. SAR submission acknowledgement
9.1 Once you have submitted your SAR you will receive a submission
acknowledgement email (Figure 39).
Figure 39 – Acknowledgement Email
259.2 Your acknowledgement email will contain a reference number; this should be
used for any correspondence in relation to the SAR between yourself and the
NCA. The email contains two reference numbers - a seven-digit SAR Online
reference and a seven-digit Unique Reference Number (URN) (Figure 39,
Highlighted in Red). (Note: You should only quote the URN in all
correspondence with the NCA).
9.3 Please also note that SAR Online does not allow attachments and additional
information/updates cannot be made available to us via email after
submission. If you have any further correspondence/documentation, we will
contact you if required.
10. SAR Online password reset
10.1 If you have forgotten your password for SAR Online you can request a
password reset.
10.2 Firstly, it may be easier to request a password hint to help you remember
your password. Enter your registered email, a wrong password (please ensure
this fulfils the password criteria – we advise the following: Password1) and
the disguised code.
10.3 A ‘Password Hint’ button will appear located next to ‘Log In’ and ‘Cancel’
(Figure 40, Red Arrow).
Figure 40 – Password Hint
10.4 Enter the disguised code and click ‘Password Hint’; a password hint will be
emailed to your registered email.
10.5 To reset your password, complete the steps above again. This time a ‘Reset
Password’ button will appear, replacing the previous ‘Password Hint’ button
(Figure 41, Red Arrow).
Figure 41 – Password Reset
10.6 Enter the disguised code and click ‘Reset Password’.
2610.7 Similar to the process of activation outlined in Section 4, you will receive
‘Activation Code 1’ on screen. ‘Activation Code 2’ will be emailed to you.
10.8 To reset your password, click on ‘Activate/Reactivate Account’. Enter the
email address you are resetting the password for, followed by the activation
codes (as provided) and the disguised code in their respective boxes and click
‘Activate’ (Figure 42).
Figure 42 - Activate/Re-Activate Screen
10.9 You can then set your new password and password hint. (Note: passwords
must be between 8 and 15 characters long and contain a mix of
UPPERCASE, lowercase and numbers. They should not contain any
symbols, i.e. ‘- / _ %’).
Figure 43 – Password Reset Screen
Once you are happy with your details set, click ‘Submit’ (Figure 43). You will
then be automatically logged on to SAR Online. (Note: any accounts
inactive for over six years will be reviewed and deleted).
2711. Glossary Codes
The use of SAR glossary codes is considered good practice. They are crucial for
enabling the NCA UKFIU and wider law enforcement to conduct analysis to identify
money laundering trends and high risk cases for development, and to take
immediate action where necessary. They also enable the production of feedback to
reporters on trends and patterns identified in SARs.
Please refer to the latest version of the Suspicious Activity Report (SAR) Glossary
Codes and Reporting Routes. This is available through the NCA website
(www.nationalcrimeagency.gov.uk).
12. SARs IT Transformation
The UKFIU is currently in the process of implementing upgrades on selected
components of the core SARs IT systems. The purpose of this is to reduce risk of
failure and outage to the existing SARs systems until a new IT solution is
implemented. In parallel, the UKFIU has continued to work closely with the Home
Office SARs Reform Programme to set up the SARs IT Transformation Project,
which aims to strengthen the UK’s response to money laundering and terrorism
financing, as well as improving policing outcomes across all crime through use of
the information captured in SARs.
The NCA is developing a modern suite of IT services which includes a redesigned
and improved means for the reporting of SARs electronically (bulk and SAR Online),
delivering a new technical architecture that will support enhancements to the
existing SARs regime and allow us to retire the old IT systems.
For more information on anything contained in this document, please
direct your query to ukfiusars@nca.gov.uk or contact the SAR Online
Support Team on 0207 238 8282.
28Annex A – Valid Character List
Character Unicode Character Unicode
'' Space ' Apostrophe
! Exclamation mark ( Left parenthesis
“ Quotation mark ) Right parenthesis
# Number sign * Asterisk
$ Dollar sign + Plus sign
% Percentage sign , Comma
& Ampersand - Hyphen minus
. Full stop / Solidus
1 Digit one : Colon
2 Digit two ; Semi colon
3 Digit three < Less than sign
4 Digit four = Equals sign
5 Digit five > Greater than sign
6 Digit six ? Question mark
7 Digit seven @ Commercial at
8 Digit eight [ Left square bracket
9 Digit nine \ Reverse solidus
A Capital letter A ] Right square bracket
B Capital letter B ^ Circumflex accent
C Capital letter C _ Low line
D Capital letter D ` Grave accent
E Capital letter E a Small letter a
F Capital letter F B Small letter b
G Capital letter G C Small letter c
H Capital letter H D Small letter d
I Capital letter I E Small letter e
J Capital letter J F Small letter f
K Capital letter K g Small letter g
L Capital letter L h Small letter h
M Capital letter M i Small letter i
N Capital letter N j Small letter j
O Capital letter O k Small letter k
P Capital letter P l Small letter l
Q Capital letter Q m Small letter m
R Capital letter R n Small letter n
S Capital letter S o Small letter o
T Capital letter T p Small letter p
U Capital letter U q Small letter q
V Capital letter V r Small letter r
W Capital letter W s Small letter s
X Capital letter X t Small letter t
Y Capital letter Y u Small letter u
Z Capital letter Z v Small letter v
{ Left curly bracket w Small letter w
| Vertical line x Small letter x
} Right curly bracket y Small letter y
29~ Tilde z Small letter z
€ Euro sign £ Pound sign
Problems with non-Latin scripts
If you use old, pre-Unicode Arabic, Greek, Hebrew, Russian or Thai versions of
Microsoft Windows to view a file that uses Latin script and includes accented
characters, then the accented characters may be replaced or omitted.
30You can also read