SECUREGUARD USB Through Remote Management Console - ADMIN GUIDE - SecureDrive
←
→
Page content transcription
If your browser does not render page correctly, please read the page content below
SECUREGUARD USB
Through Remote Management Console

ADMIN GUIDE

                                    26.01.2021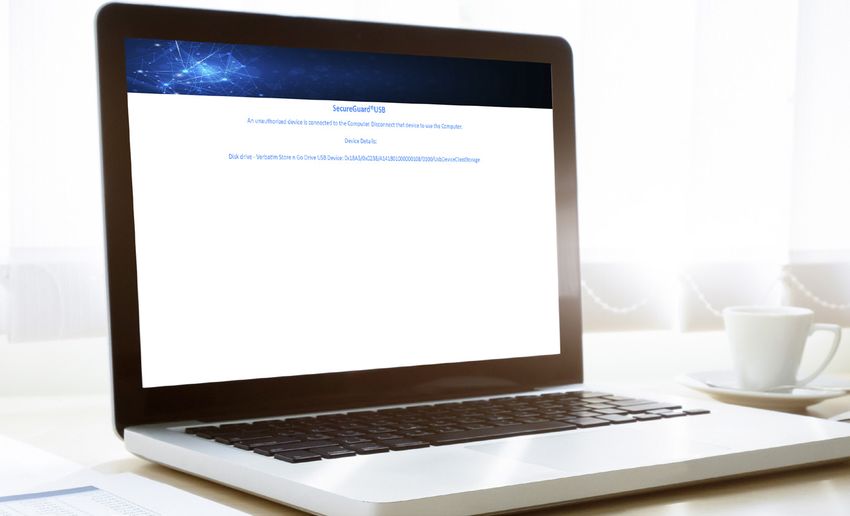
TABLE OF CONTENTS

             SecureGuard Overview. . . . . . . . . . . . . . . . . . . . . . . . 3

                   Glossary. . . . . . . . . . . . . . . . . . . . . . . . . . . . . . . . . . . 3
                   Requirements. . . . . . . . . . . . . . . . . . . . . . . . . . . . . . . 3

             Section 1: Remote Management. . . . . . . . . . . . . . . . 4

                   Enrolling in RM. . . . . . . . . . . . . . . . . . . . . . . . . . . . . . 4
                   Logging In. . . . . . . . . . . . . . . . . . . . . . . . . . . . . . . . . . . 5
                   Account Information. . . . . . . . . . . . . . . . . . . . . . . . . 5

             Section 2: Installation. . . . . . . . . . . . . . . . . . . . . . . . . 7

             Section 3: Computer Management. . . . . . . . . . . . . 11

                   Computers Dashboard. . . . . . . . . . . . . . . . . . . . . . . 11
                   Create New Record. . . . . . . . . . . . . . . . . . . . . . . . . 12
                   View Device Details. . . . . . . . . . . . . . . . . . . . . . . . . 13
                   Report Log. . . . . . . . . . . . . . . . . . . . . . . . . . . . . . . . . . 14

             Section 4: SecureGuard USB in Use. . . . . . . . . . . . 15

26.01.2021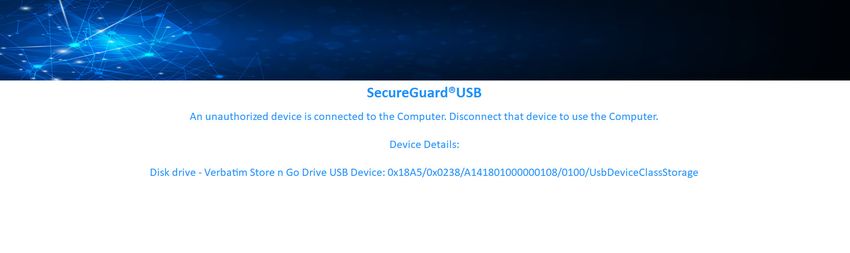
SecureGuard USB through Remote Management Console
  SecureGuard USB through Remote Management Console (hereafter “RM”) is a Data
Loss Prevention (hereafter “DLP”) service that is managed through the SecureData
Remote Management Console/Services. It blocks unauthorized USB devices from
accessing sensitive files by limiting computer access to whitelisted USB devices
and allows individually blacklisting and whitelisting specific devices. RM provides IT
Managers (hereafter “Admin”) control of computers and their allowed drives throughout
an organization.
  When authorized devices are inserted into a USB port, a user may have access to
the computer and both upload and download data to the device. When unauthorized
devices are inserted into a USB port, the SecureGuard program locks the computer
and blocks the user from further access until the device is removed, preventing
uploading and downloading files as well as preventing potential viruses and malware
from entering the computer. It safeguards sensitive information by whitelisting and
blacklisting USB devices for computers with the program installed, including: an
external hard drive, flash drive, mouse, keyboard, phone, tablet, card reader, camera,
and other devices.
  Remote Management (RM) allows Admin to manage SecureGuard USB through
the internet from a remote computer. It is a user-friendly interface that allows remote
control and management of the program on all computers with SecureGuard USB
installed on them. Once installed, SecureGuard client will not require the internet to
function.

                                          Glossary
Admin:              IT Manager, Admin, or corporate manager
HID:		              Human Interface Devices
The License:        SecureGuard USB License
PID:			             Product ID
RM: 			             Remote Management Console
SN: 			             Serial number
VID: 			            Vendor ID

                                        Requirements
Windows 7 SP3, 8, or 10
Internet access (for initial install)
                                                                                 26.01.2021
SECTION 1: REMOTE MANAGEMENT
  Enrolling in RM
  1. To set up your Remote Management account, visit:
     https://rm.securedata.com/Account/Register
  2. Enter the License Key provided to you in the email, and enter the email, password
     and mobile phone number used when purchasing SecureGuard USB.

                                                           Note: The password must be between 7
                                                           and 15 characters long and will be utilized
                                                           throughout the process.

                                                           Note: Be advised that whenever you log
                                                           into the Remote Management Console, you
                                                           will be sent a six-digit security code to the
                                                           mobile phone number provided and must
                                                           enter it to proceed.

                      Figure 1.1: Enrollment

 3. On the Enable Two-Step Verification page, enter the six-digit security code
    in the field.
 4. Click Next.
 5. On the verification page, click Done.

Note: To enter multiple Admins to the account, begin with Step 1 of this section and enter a new email
address, password and mobile phone number. However, enter the same License Key. Follow steps
2–5, and repeat for all Admins who need access to RM.

26.01.2021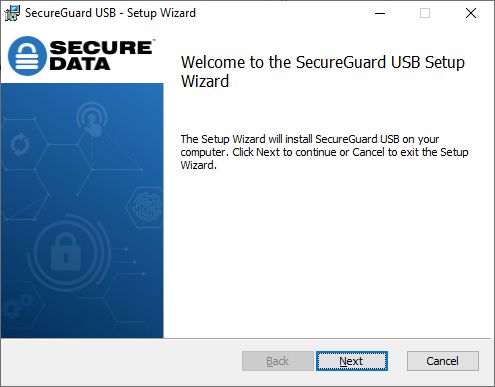
Logging In
 1. After enrolling, to manage ports through RM, visit the login link:
    https://rm.securedata.com/Account/Login
 2. In the Email Address and Password fields, enter the Admin credentials used in the
    enrollment process.

                                       Figure 1.2: Login Page

 3. Click Log In.
 4. On the Verify Security Code page, enter the six-digit code sent to the mobile
    phone number used when enrolling for RM.

                          Figure 1.3: Login Security Code Verification Page

 Account Information
1. After logging in, click the underlined License holder’s name next to
   Account Summary.

2. The Summary tab shows details regarding the License. It includes how many
   computers on this License Key have been used, how many are still available for use
   and the expiration date for this License.

                                                                               26.01.2021
3. The Admin tab shows the email addresses, mobile numbers and last login time for
   each Admin on the account.

To change the Admin password, follow these steps:
   1. Next to Admin, click the admin email address.
   2. In the Current Password field, enter the current password.
   3. In the New Password and Confirm New Password fields, enter a new password.
   4. Click Change Password.

             To access the user guide, click the question mark icon.

             To log out of the system, click Log Out.

26.01.2021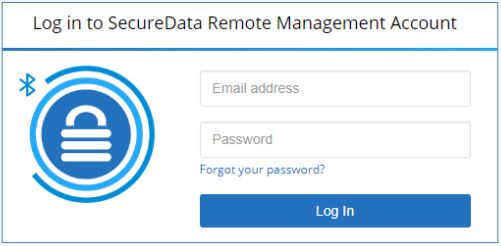
SECTION 2: INSTALLATION
  1. After purchase, a downloadable installation pack will be sent to the
     email provided.
  2. Open link and download file when prompted.
  3. Program may be installed on a specific computer through any distribution seen fit,
     such as external drive or in an Active Directory environment.

CAUTION: If moving the program to a USB device for installation on additional computers, copy the
installation file from the device to the desktop, then remove the device and install the program directly
from the desktop. During installation, the program will recognize the unauthorized device, stop the
installation and prevent further action.

  4. Open the launcher and click Next.

                                             Figure 2.1: Launch

  5. When the SecureGuard USB Installation prompt appears click Next to start the
     Setup Wizard.

                                                                                               26.01.2021
Figure 2.2: Installation

Note: SecureGuard USB will check the .NET Framework version installed. If it is a lower version, a
warning window will appear. Click Yes to open an internet browser to download and install .NET. This
will terminate installation of SecureGuard. Once .NET Framework has been updated, begin installation
again. Clicking No will terminate SecureGuard installation.

  6. Read the End-User License Agreement. Check the box in the lower left to accept
     the terms, then click Next.

                                     Figure 2.3: License Agreement

26.01.2021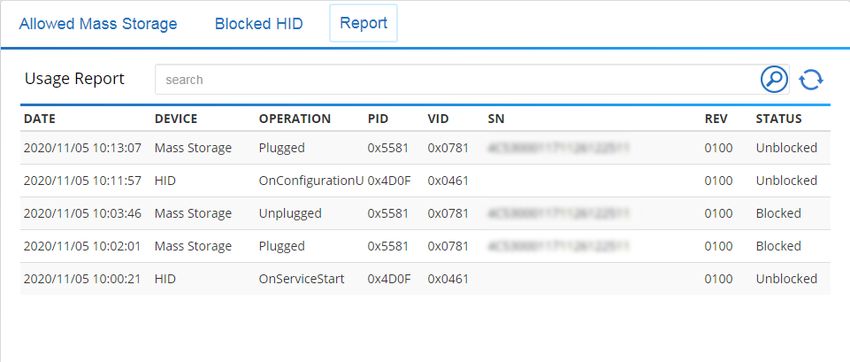
7. Choose the Destination Folder provided or manually enter a new path. Click Next
     to continue.

                                       Figure 2.4: Destination Folder

Note: We recommend leaving the Enable Safe Mode Support box checked. When a computer with
SecureGuard installed on it is started in Safe Mode, the program continues to keep ports blocked.

  8. At the Administrator Authentication prompt, enter the email and password used
     when creating the administrator account, and choose a Computer Name for this
     individual computer. Click Next to continue.

                                 Figure 2.5: Administrator Authentication

Note: This Computer Name will appear in the Remote Management Console, discussed in Section 3:
Computer Management. This makes the target computer identifiable when managed remotely.

                                                                                           26.01.2021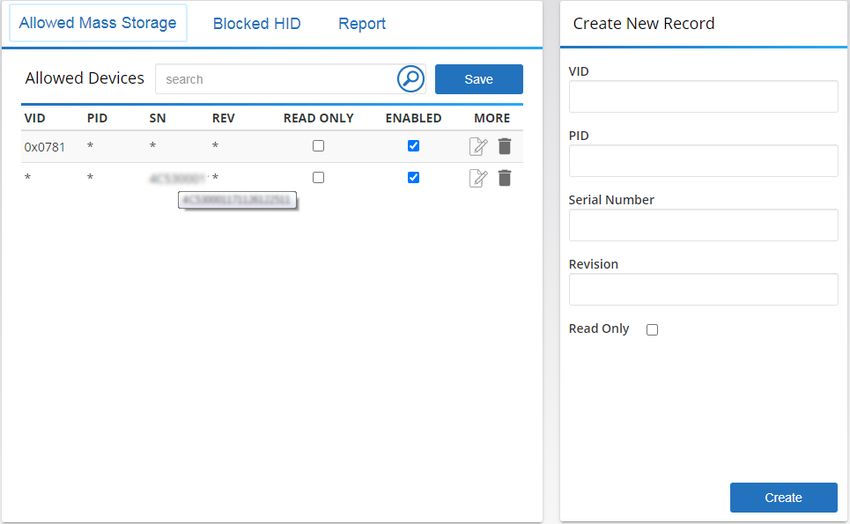
9. Click Finish to complete the setup.

                                    Figure 2.6: Completion

26.01.2021
SECTION 3: COMPUTER MANAGEMENT
To begin managing computers, log into RM.
1. After logging in, click Computers to reach the Computers Dashboard. This shows
all computers on which SecureGuard USB is installed.
Figure 3.1: Computers Dashboard
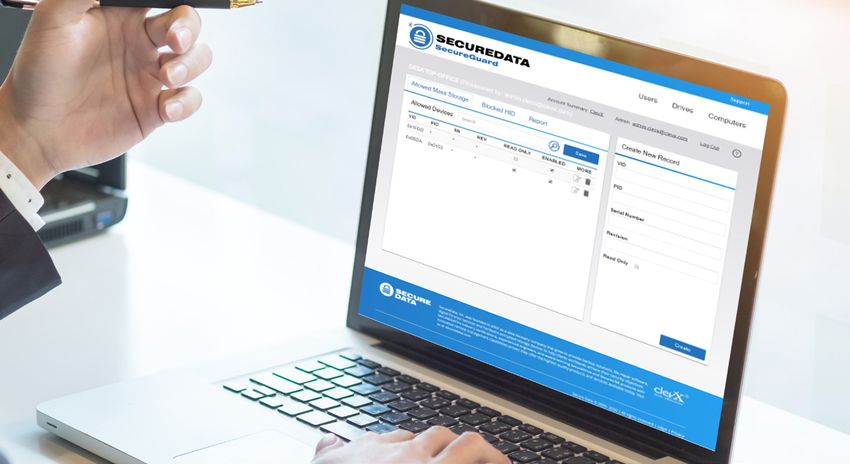
2. To customize a computer, select one of the names or use the Search Field.
3. By default all mass storage devices are blacklisted. To create a list of authorized
devices, select the Allowed Mass Storage tab.
Figure 3.2: Allowed Mass Storage
26.01.20214. To customize whitelisted devices, enter information in the Create New Record field
by filling out at least one field:
VID: To allow a series of USB devices by vendor ID, enter the vendor ID
PID: To allow a series of USB devices by product ID, enter the product ID
Serial Number: To allow individual USB devices only, enter each device’s serial
number. You will need to create a separate record for each SN
Revision: To allow USB devices by revision number, enter the revision number
For help locating identification numbers for mass storage devices, see Step 9 and
Figure 3.5 below.
After filling out information, click Create to authorize a device to this computer.
Note: SecureGuard will not need internet access to function. However, a computer will need internet
access for any changes made via RM to go into effect.
Figure 3.3: Create New Record
CAUTION: When entering authorized devices, entries apply to selected computer only. Select another
computer and enter the same or alternate devices for use. Not authorizing devices on a computer with
SecureGuard installed will block all USB mass storage devices
26.01.20215. By default HID are allowed, including a mouse, keyboard and headset. To make
exceptions to authorized devices, select the Blocked HID tab.
6. Under the Blocked HID tab, enter a VID, PID, Serial Number or Revision for the
device, then click Create. For help locating identification numbers for HID, see
Step 9 and Figure 3.5 below.
7. To view device details, click the Allowed Mass Storage or Blocked HID tabs.
Figure 3.4: Whitelisted Devices
8. Under either tab, you may revise details for applicable devices within this field:
Read Only: this prevents saving files from the desktop to the drive and will prevent
from editing files on device; check this box to put the disk in Read Only mode or
uncheck to allow it to function in normal mode, then click Save
Enabled: under the Allowed Mass Storage tab, check this box to whitelist these
devices, uncheck to blacklist them, then click Save; in Blocked HID view check to
blacklist these devices, uncheck to whitelist, then click Save
Edit: click the paper and pencil icon to edit a line
Delete: click the trashcan icon to remove this line
26.01.20219. To see a detailed log of user actions on a USB port, click Report.
Figure 3.5: Access Log Report
RM provides an access log for Admin to review:
Date: provides date and time action was taken (Note: this is adjusted to Admin’s
local time)
Device: this shows the type of device detected
Operation: this is the action taken on a USB port on this computer
PID, VID, SN, REV: these identify the specific device used, whether it has been
entered into RM or not
Status: this shows SecureGuard USB’s action on the device
10. The access log updates within seconds. To get an updated view click the Refresh
icon next to the search bar.
Figure 3.6: Report Refresh
26.01.2021SECTION 4: SECUREGUARD USB IN USE
1. Insert unauthorized drive into USB port.
2. If installed properly, the following message will appear.
Figure 4.1: Blocked Access Screen
The computer should completely lock now, including the mouse cursor’s location on
the screen and display information about the unauthorized device, which is stored on
the access log in RM.
3. Remove unauthorized device to regain access to the computer.
4. While a whitelisted device is inserted, plugging in an unauthorized device will
override the authorization and lock computer until unauthorized device is removed.
Figure 4.2: Simultaneous Use of Authorized and Unauthorized Devices
26.01.20215. If a whitelisted device is inserted and becomes remotely blacklisted through RM,
within seconds the target computer will lock. If an unauthorized device is inserted
and locks the computer, then becomes remotely whitelisted through RM, the
computer will unlock.
6. When charging an unauthorized phone or tablet via the computer’s USB port, the
computer will lock until the device is removed. The device also will not charge
when the computer is locked.
26.01.2021You can also read