Service tools Version 7.18 - Creatio Academy
←
→
Page content transcription
If your browser does not render page correctly, please read the page content below
Service tools Version 7.18
This documentation is provided under restrictions on use and are protected by intellectual property laws. Except as
expressly permitted in your license agreement or allowed by law, you may not use, copy, reproduce, translate,
broadcast, modify, license, transmit, distribute, exhibit, perform, publish or display any part, in any form, or by any
means. Reverse engineering, disassembly, or decompilation of this documentation, unless required by law for
interoperability, is prohibited.

The information contained herein is subject to change without notice and is not warranted to be error-free. If you
find any errors, please report them to us in writing.

© 2023 Creatio. All rights reserved.
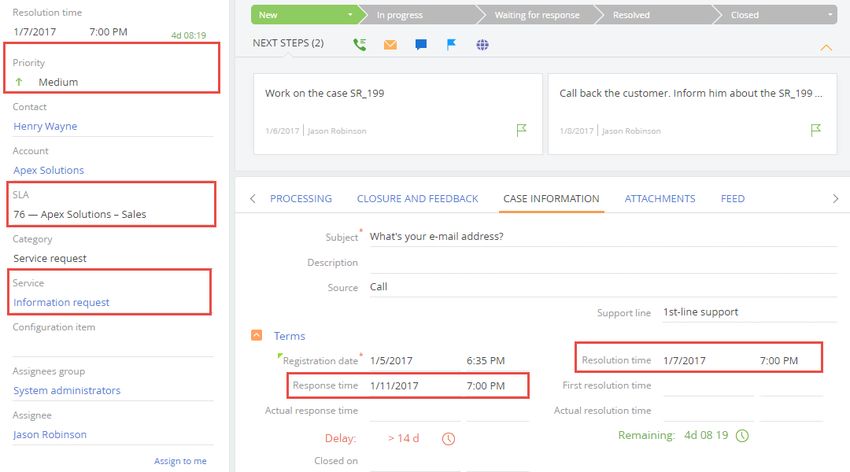
Table of Contents | 3

Table of Contents

Regular queue workflow                                                               6
General Agent Desktop settings                                                       7
  The working area of the agent                                                      8
  Agent desktop feed channel                                                         8
  Agent desktop dashboards                                                           9
  Manage records in the Agent Desktop                                                9
Set up a support mailbox                                                            10
  Add a support mailbox                                                             11
  Set up the language of the support mailbox                                        11
Manage service catalog                                                              12
  Add services                                                                      12
  Create a service model                                                            14
Create a case                                                                       15
  Create a case from the [Cases] section                                            16
  Create a case from an existing case communication email thread                    17
  Create a case from the Communication Panel                                        18
  Automatic registration of cases based on incoming emails                          19
  Process incoming cases                                                            21
Blind queue workflow                                                                21
Manage queue objects                                                                23
Manage service agreements                                                           24
  Add service agreements                                                            24
  Default service agreement                                                         25
  Add service objects to SLA                                                        26
  Add services to SLA                                                               26
  Modify service provision terms in SLA                                             26
  Set service providers for UC                                                      27
Set up “Junk” case registration                                                     27
Service agreement selection                                                         28
Incoming call workflow                                                              29
  Case registration process                                                         29
  Advising on an existing case process                                              30
Create dynamic queue                                                                31
Manage configuration items (CI)                                                     34
  Add configuration items                                                           35
  Link assets with services to create a service model                               37

© 2023 Creatio. All rights reserved.
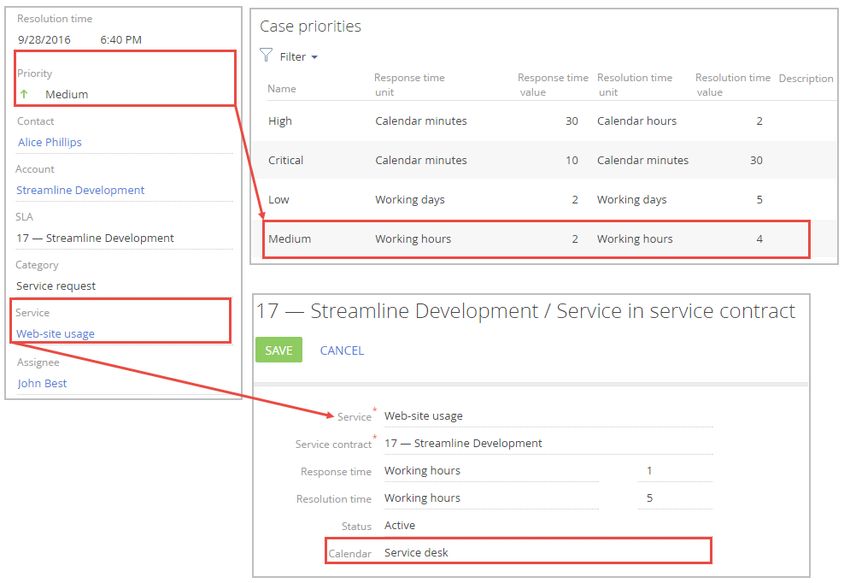
Table of Contents | 4

Set up automatic categorization of cases registered from email                                                   38
  Set up case registration from emails from mailbox alias                                                        39
Search for similar cases                                                                                         40
  Run the search for similar cases                                                                               41
  How predictive search for similar cases works                                                                  41
Case FAQ                                                                                                         42
  Why doesn’t the list display all cases even when you scroll all the way down?                                  42
  Why can’t I select a service in a case, though there are records in the [Services] section?                    42
  Why was the case reopened?                                                                                     42
  Why after reopening a case, the [Assignee] field is cleared?                                                   42
  Why can’t I attach an email or publish a message for a case in a final stage?                                  43
  In what cases and why does the system send automatic notifications to contacts?                                43
  How do I add new case notifications?                                                                           43
  What happens to a case that was not evaluated?                                                                 43
  How do I disable case re-evaluation request?                                                                   43
  How do I disable reopening cases by emails?                                                                    44
  Why can’t I escalate a case?                                                                                   44
  Why the searching for similar cases is disabled for me?                                                        44
Supervisor workflows                                                                                             44
  Monitor contact center performance                                                                             45
  Manage progress on specific queues                                                                             46
  Manage current workload of an agent                                                                            46
  Plan agent workload                                                                                            46
  Assign agents                                                                                                  47
Create static queue                                                                                              47
Manage problems                                                                                                  48
  Identify problems                                                                                              49
  Determine the scope of a problem                                                                               50
  Resolve and close problems                                                                                     51
Set up case customer feedback                                                                                    52
  General procedure for setting up case feedback evaluation                                                      52
  User satisfaction scale setup                                                                                  53
Calculate response and resolution time                                                                           55
  Calculate the response and resolution time for cases                                                           55
  Overdue/remaining time indicators                                                                              58
  Response and resolution time calculation rules                                                                 58
  Response and resolution time calculation rules                                                                 62
Set up regular and blind queues                                                                                  68
Manage changes and releases                                                                                      68

© 2023 Creatio. All rights reserved.

Table of Contents | 5

  Plan changes                                                         69
  Determine the scope of a change                                      71
  Release changes                                                      73
Set up email notifications                                             74
  Set up contact case notification rules                               75
  Set up the email notification templates                              76
  Set up case resolution notification                                  77
Predictive case routing                                                77
  Train the assignee group prediction model                            77
  Predict the assignee group of a case                                 78
Sort queue elements                                                    78
Set up response and resolution deadlines                               80
  Set up time values for deadline calculation rules                    80
  Select a case deadline calculation rule                              82
  Set up case response and resolution deadlines                        83
Process and close cases                                                87
  Start processing a case                                              87
  Communicate with the customer                                        89
  Resolution and feedback                                              91
  Cancel a case                                                        93
Set up case statuses                                                   93
Diagnose cases using service model                                     94
  Open a service model of a case                                       95
  Open a service model of a case configuration item                    96
  Filter the service model                                             97

© 2023 Creatio. All rights reserved.
Regular queue workflow | 6

Regular queue workflow
PRODUCTS:         SERVICE CREATIO

Let's take a look at the typical procedure to process cases via the agent desktop using a regular queue. When an
agent takes a case from a queue to process it, the “Agent desktop: Queue cases processing” business process
starts.

    Note. You can set up custom business processes to handle the cases in your company.

To start working on a case from a regular queue:

1. Select the necessary record from the list and click the [ Open ] button (Fig. 1). When the agent takes a case, it
   is no longer visible on the agent desktop for other agents.

    Fig. 1 Taking a case from a regular queue

    The page of the selected case (Fig. 2) will open with the following information:

        The value in the [ Status ] field changed to “In progress”
        The agent who took the case is specified as the assignee
        The [ Actual response time ] field is filled in with the current date.

    Fig. 2 Page of a case in progress

© 2023 Creatio. All rights reserved.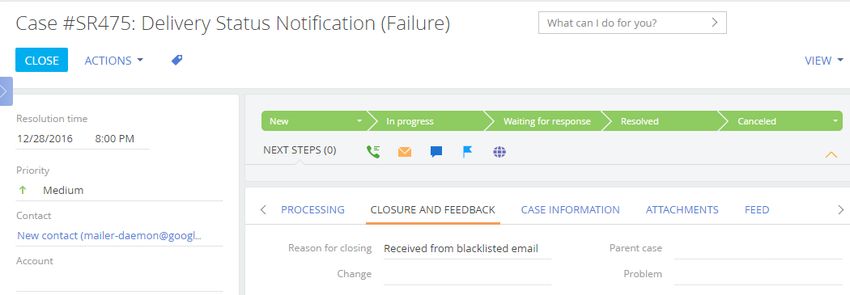
General Agent Desktop settings | 7
2. Perform one of the following actions:
To process the case, change its status. For example, specify the “Resolved” status.
After you save the page, the [ Agent desktop ] section will be displayed again. The processed case will be
removed from the queue.
To postpone processing the case to another specific time, click the [ Postpone till ] button and enter the
date and the time.
Click the [ Submit ] button to return to the agent desktop. The case will not be displayed on the agent
desktop until the specified processing time comes. After that, it will be displayed at the top of the list in the
queue of the agent who initially took this case.
To put off processing the case, click the [ Re-queue ] button.
The [ Agent desktop ] section will be displayed again. The postponed case will be placed at the end of the
queue regardless of the set record sorting rules in the queue.
To cancel processing the case, click the [ Cancel ] button.
You will return to the agent desktop and the case will be queued back to the same position it had before
you started processing it.
General Agent Desktop settings
PRODUCTS: SERVICE CREATIO
The Agent desktop section is designed to facilitate the work of contact centers and helpdesk agents. Use the
agent desktop to manage cases in a single window with the help of out-of-the-box best practice processes, get
instant access to customer's profile, and improve customer experience.
Using the agent desktop an agent can quickly process tickets in the omnichannel mode, manage incoming and
outgoing calls, and work with other queue items. In the agent desktop, the employee can read the messages
posted on the feed and analytical KPI dashboards of a single employee or the whole team are available.
Note. To allow the employees to receive incoming calls from the agent desktop, set up a connection
between Creatio and your phone provider.
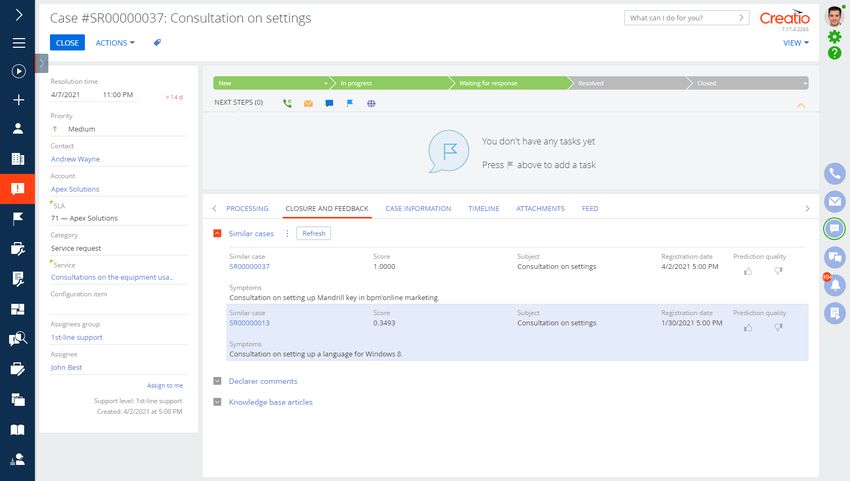
The [ Agent desktop ] (Fig. 1) section consists of the following areas:
© 2023 Creatio. All rights reserved.
General Agent Desktop settings | 8

    The working area of the agent (1) displays the list of records for processing.
    The feed area (2) displays posts from your enterprise social network.

    The analytics area (3) displays aggregate data on agent performance.

Fig. 1 The [ Agent desktop ] section

The working area of the agent
The working area of the contact center agent or helpdesk agent on the agent desktop is a number of tabs with
the records that are displayed in the agent desktop according to the conditions of pre-configured queues.
The agent desktop tabs are created automatically, based on the queue teams of which the current agent is a
member. Each agent desktop tab corresponds to a system object regardless of the number of the configured
queues. For example, all records coming from the “Case” type will be displayed in the [ Cases ] tab of the agent
desktop.
By default, the [ Cases ] tab displays incidents, service requests, claims, and complaints, that come from the
[ Cases to be processed ] queue. These are unresolved requests.

    Note. You can set up custom agent desktop queues in the [ Queues ] section.

    Note. Use the [ Agent desktop queues upload interval ] system setting to change the update cycle for
    agent desktop records.

Agent desktop feed channel
Use the feed channel for prompt notification of the helpdesk agents or agents about noteworthy events of the
company. The agent desktop feed displays posts and comments from a specific feed channel. Use the [ Agent
desktop - Channel ] system setting to select this channel.

© 2023 Creatio. All rights reserved.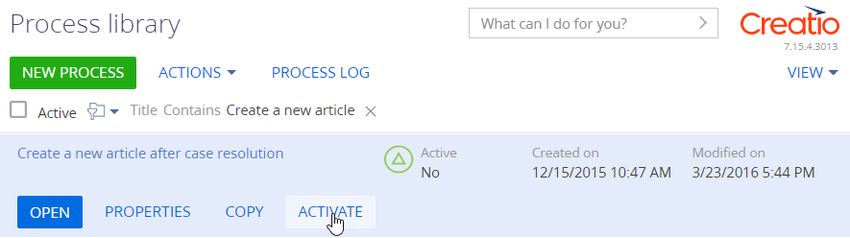
General Agent Desktop settings | 9

Agent desktop dashboards
The agent desktop dashboard displays. The agent desktop analytics consists of two tabs. One tab displays the
agent’s personal achievements and the other tab displays the team's achievements. These dashboards display
summary data for the current day.

Manage records in the Agent Desktop
The list of records displayed on the agent desktop tabs depends on the queue type, which can be "regular" or
"blind."

Display records in regular queues
Regular queues display lists of records and the agent can select which record to process. The order of the
records depends on the sorting rules of the agent desktop records.

Display records in blind queues
Blind queues display:

    The [ Next record ] button initiates the processing of the next record in the queue. The processing order
    depends on the sorting rules of the agent desktop records.

    The list of records for which the processing started, but has not been completed yet.

Use the [ Maximum number of records in progress for a blind queue ] system setting to limit the maximum
number of records that can be displayed in the list of a blind queue. By using this system setting, you can limit
the number of cases in progress shown to the agent in order to increase the case resolution efficiency.
By default, the [ Maximum number of records in progress for a blind queue ] system setting is set to “1”. Thus,
the agent desktop working area shows either the [ Next record ] button or a single record if the processing of
this record has not been completed.
If you increase the value of this system setting, the agent will be able to continue working with the record in
progress or take the next record in the queue for processing as long as the number of displayed records is not
at maximum. When the number of displayed records reaches the maximum, the [ Next record ] button becomes
unavailable.
For example, the value of the [ Maximum number of records in progress for a blind queue ] system setting has
been set to “3”.
The agent who has started processing one or two cases on the agent desktop will see both the list of his cases in
progress and the [ Next record ] button (Fig. 1). The agent can choose to continue processing the cases in the
list or take a new record.

If the agent takes a third case, it will be added to the list in the agent desktop working area and the [ Next record
] button will be unavailable, so in order to be able to take another new case for processing, the agent must
resolve at least one of the currently open cases.

Fig. 1 Blind queue example

© 2023 Creatio. All rights reserved.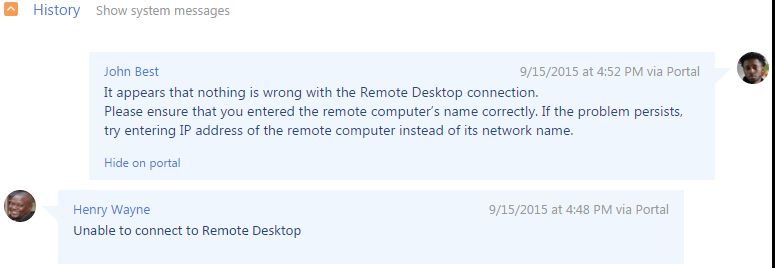
Set up a support mailbox | 10

Sort records on the agent desktop
The records on the agent desktop tabs are sorted based on certain rules. These sorting rules are identical for
both regular and blind queues.

    The records whose due date has been reached are displayed at the top of the list.

    These records are followed by more records from the existing queues.
    If multiple queues have been created for an object, then the records from a higher priority queue will be closer
    to the top of the list.
    If multiple queues with the same priority have been created for an object, their records will be sorted based on
    the internal sorting settings of the corresponding queues. Therefore, the records from multiple queues may
    take turns on the agent desktop. If the records which are coming from different queues should not be mixed
    in the list, create additional priorities in the [ Agent desktop queue priority ] and assign a separate priority for
    each queue specified for the object.

    The records in the queues are sorted based on the object columns first, and then – by the number of calls
    connected to each record (the less repeated calls there are, the higher the record's position in the list will be).

    Note. More information on how to sort queue records by object columns is available in a separate article.

Set up a support mailbox
PRODUCTS:         SERVICE CREATIO

Add support mailboxes to Creatio to accelerate communication with your customers:

    Creatio will register new cases automatically based on the incoming emails.
    Customers will receive case notifications.

    All case emails will be saved to the case history.

© 2023 Creatio. All rights reserved.
Set up a support mailbox | 11
Add a support mailbox
1. Click the button to open the System Designer.
Attention. Before you begin, set up the mail service provider integration either via the IMAP/SMTP
protocol or using the Microsoft Exchange service.
2. Go to the “System setup” block → “Lookups.”
3. Open the [ List of mailboxes for case registration ] lookup.
4. Click [ New ].
5. Select the support mailbox added during the email integration setup in the [ Mailbox ] field. The field is
required.
6. Specify the name of the mailbox you use to receive emails in the [ Mailbox alias ] field. Fill out the field only if
you receive emails in the mailbox that differs from the mailbox you set up originally.
7. Specify the relevant category in the [ Case category ] field. For example, “incident.” The field is required.
8. Enter the mailbox description in the [ Description ] field.
9. Select the language Creatio will use for the email if the mailbox language selection rule is triggered in the
[ Message language ] field. Learn more: Set up the language of the support mailbox.
10.Select the [ Always use the mailbox language ] checkbox to send emails in the specified language regardless of
the other rules (Fig. 1).
11.Repeat steps 4–11 if you are using more than one support mailbox.
Fig. 1 Set up the support mailbox language
As a result, Creatio will process all emails received by the mailboxes in the case registration system.
You can also set up a shared support mailbox for communicating with customers and sending case notifications.
Learn more: Configure a shared mailbox.
Set up the language of the support mailbox
Set up the mailbox language to send localized emails to customers. In Creatio, you can set up the language for:
© 2023 Creatio. All rights reserved.Manage service catalog | 12
the case notification mailbox
the email notification template language
the notifications sent to customers without the preferred language specified
Creatio determines the email language based on the following rules:
If you do not select the [ Always use the mailbox language ] checkbox during the email setup, Creatio will
use the following variables to determine the language, from highest to lowest priority:
The preferred language of the recipient contact.
The email language specified during the mailbox setup.
The value of the “Default language for messages” (“DefaultMessageLanguage” code) system setting.
If you select the [ Always use the mailbox language ] checkbox, Creatio will send emails in the mailbox
language regardless of the other rules.
Manage service catalog
PRODUCTS: SERVICE CREATIO BANK CUSTOMER JOURNEY
Creatio implements the “Service catalog management” ITSM process in the [ Services ] section. This section is
designed to manage the list of services you provide. Here, you can set the parameters of services, assign
employees to process the related cases, as well as view the history of services provided.
Add services
To add a new service in Creatio:
1. Open the [ Services ] section and click [ New service ] in the section list.
2. Populate the service page:
© 2023 Creatio. All rights reserved.Manage service catalog | 13
Name Service name.
Status Current service status. For example, “Active” or “Under testing.”
Response The time units used to measure the case response time, e.g., “Working days,”
time unit “Calendar days,” etc.
Resolution Time units used to measure the case resolution time, e.g., “Working days,” “Calendar
time unit days,” etc.
Owner The employee responsible for the quality of the provided service. The field is only
available for Service Creatio, enterprise edition.
Category The service category, for example, “Hardware” or “Internal support.” The field is only
available for Service Creatio, enterprise edition.
Case The category that will be assigned to the cases based on this service: “Incident,”
category “Complaint,”“Claim,” “Consultation” (available for The Financial Services Creatio,
customer journey edition), “Service request.” When you create a new case and
populate the [ Service ] field, Creatio will specify the selected category in the [ Category
] field of the case page.
Calendar The calendar that defines the work of the support team. Creatio calculates the
response and resolution time for the service-related cases based on the selected
calendar. By default, the field is populated with the value specified in the “Base
calendar” (BaseCalendar) system setting. Custom calendars can be set up in the
corresponding lookup
3. On the [ Service profile ] tab → [ Service team ] detail, click and populate information about the service
team providing support within the service. The detail is only available for Service Creatio, enterprise
edition.
Note. The [ Service team ] detail contains information about the employees or employee groups
responsible for resolving cases related to a service, e.g., “Contact center agents,” “System
administrators” or “2nd line of support.”
Information on this detail is used to select assignees and assigned teams on the case page.
Populate the record data directly in the detail list.
Member/team Employees or employee groups that can resolve the service-related case. The field
lookup contains the list of administration objects: system users and user groups.
Support line Support line whose employee is assigned to provide service-related support.
4. Populate information about the service-related agreements on the [ Users ] tab. The tab is only available for
© 2023 Creatio. All rights reserved.Manage service catalog | 14
Service Creatio, enterprise edition.
Note. The [ Service agreements ] tab displays a list of service contracts from the [ Service agreements ]
section that include the service. To connect a service to a service contract, populate the [ Services ]
detail of the service agreement page. The information on the detail is available in the “read-only” mode.
5. On the [ Attachments and notes ] tab, add attachments and links to the web resources related to the service.
Read more >>>
6. Click [ Save ] to save the service record.
As a result, the new service record with the specified parameters will appear in the list of the [ Services ]
section.
Create a service model
A service model is a diagram that displays connections and dependencies between various IT infrastructure
items. The model is generated based on the connections between the services and the configuration items.
Note. The service models are only available in Service Creatio, enterprise edition.
To add a service to the service model:
1. In the [ Services ] section, open the record to specify the connected services and configuration items.
2. Click the [ Connected to ] tab.
3. Click on the [ Configuration items ] detail. A new record with blank fields will appear on the detail.
4. Select the connection category with the configuration item in the [ Category ] field (Fig. 1).
Fig. 1 Selecting the connection category
1. Select the "Influencer" connection category to add a link to a configuration item that affects the current
service delivery.
2. Select the "Dependent" connection category to add a link to a configuration item whose operation depends on
the current service.
3. In the [ Configuration item ] field, select the linked configuration item. For example, the "WiFi access" service
depends on the "Router" configuration item (Fig. 2).
© 2023 Creatio. All rights reserved.Create a case | 15
Fig. 2 Selecting the connected configuration item
4. In the [ Type ] field, select a short description of connections between the current service and the selected
configuration item. For example, the "Required for" connection type can be specified for the "WiFi access"
service and the "Router" configuration item (Fig. 3).
Fig. 3 Selecting the connection type
As a result, a connection between the service and the configuration item will be specified. If the
“Influencer” category was selected upon specifying the connection, the configuration item, whose
connection has been specified will contain inverse relation with the “Dependent” category on the
[ Connected to ] tab of the [ Services ] detail. The [ Type ] field of the inverse relationship will be
automatically populated with the inverse connection type according to the “Object dependency type”
lookup content. For example, if the type of the connection is “Required for,” the inverse relation is
“Installed on.”
5. Specify other connections to the configuration items.
6. Add connections to the relevant services by clicking on the [ Related services ] detail. The procedure for
linking services is similar to that of linking configuration items (see steps 3-6).
7. If required, open the [ Configurations ] section and add the missing connections between the configuration
items.
As a result, Creatio will add connections between the services and configuration items which make the visual
display of the service model possible when handling the cases or planning the changes.
Create a case
PRODUCTS: SERVICE CREATIO BANK CUSTOMER JOURNEY
Creatio uses the [ Cases ] section to manage any incoming requests from the customers.
© 2023 Creatio. All rights reserved.Create a case | 16
Service Creatio, enterprise edition uses the [ Cases ] section for managing ITSM incidents and service
requests.
Service Creatio, customer center edition uses the [ Cases ] section for managing contact center inquiries,
including incidents, claims, suggestions, feedback and service requests.
In Creatio a case can be created in the following ways:
Customers can register on your self-service portal on their own. Read more >>>
The system can automatically create a new case upon receiving an email sent to the specified support email
address. Read more >>>
Agents can add cases based on the incoming calls using the communication panel Read more >>>
Employees can create new cases directly in the [ Cases ] section Read more >>>
Employees can create cases based on the incoming emails Read more >>>
Create a case from the [Cases] section
To manually register a new case:
1. Go the Cases section.
2. Click the New case button. The case page will open.
3. Enter the case data.
4. Populate the case profile:
a. Select the customer for this case in the [ Contact ] or [ Account ] field. One of these fields must be
populated.
b. Select a service to which the case is connected. Service Creatio, enterprise edition will also automatically
populte the [ Service agreement ] field.
c. The [ Response time ] and [ Resolution time ] fields will also be populated automatically.
d. Specify the case category.
e. Specify the assignee or assignees group for the case. If you set up the predictive case routing, the
[ Service ] and [ Assignee group ] fields will be populated automatically.
5. Save the case.
As a result, a new Creatio case will be added (Fig. 1).
Fig. 1 Example of a new case page (Service Creatio, enterprise edition)
© 2023 Creatio. All rights reserved.Create a case | 17
The date and time of a case registration display according to the time zone, specified in the user profile. If the
time zone is not specified in the profile, Creatio uses the value from the “Default TimeZone” system setting. If the
time zone is not specified neither in the user profile, nor in the “Default TimeZone” system setting, Creatio sets
the date and time on the case page based on the time of the user browser.
Note. To set a specific time zone manually, specify the needed value in the “Default TimeZone” system
setting.
More information about system settings is available in The [ System settings ] section article.
Similarly, you can set the resolution time value.
Create a case from an existing case communication email
thread
You can create a new case from the email thread of an existing case. For example, if you need to solve an
additional task concerning another service during processing a specific case. To create a case from an existing
case communication email thread:
1. Open an existing case and go to the [ Processing ] tab.
2. Highlight a message text or portal post containing customer request. The button will appear in the top
right corner of the highlighted text.
3. Click the button that appears (Fig. 2). As a result, a new case will be created with the following values:
[ Subject ], [ Description ], [ Source ], [ Contact ], [ Account ], and [ Category ] of the new case will be
© 2023 Creatio. All rights reserved.Create a case | 18
populated automatically. Service Creatio, enterprise edition will also automatically populate the [ Service
agreement ] field.
Fig. 2 Creating a new case from the communication thread
Create a case from the Communication Panel
You can register cases while receiving or making phone calls. To do this, use the [ Processes ] block on the
communication panel (Fig. 3).
Note. Actions in the [ Processes ] block are only available to users in the "CC agents” organizational role.
Fig. 3 Processing cases during a phone call
© 2023 Creatio. All rights reserved.Create a case | 19
Create a new case
Click [ Create a new case ]. A new case page opens.
If the call contact has been identified, Creatio populates the [ Contact ] and [ Account ] fields automatically.
If the call contact was not identified, populate the case contact and account manually.
If you create a new contact, you will need to populate the contact data manually. If you click [ Yes ], the
contact page will open.
Consulting for an existing case
Click [ Consult on an existing case ]. As a result:
If the call contact was identified, this contact’s page will open. Go to the [ History ] tab, select a previously
created case, and continue your consultation.
If the call contact is not found, a new contact page will open. Fill in the fields and save the contact. Continue
processing the case by filling in the data on a new case page.
Automatic registration of cases based on incoming emails
Creatio adds a new case for any valid incoming email that is not a part of an existing case thread.
Case registration by email requires email integration. Additionally, set up at least one support mailbox and junk
email processing rules.
Add a new case from an email
Creatio will add a new case in the following cases:
© 2023 Creatio. All rights reserved.Create a case | 20
The email address of the recipient is in the [ List of email addresses for case registration ] lookup.
The email address from which the letter was received is in not the blacklist;
The email subject does not contain a case number; The system identifies the case number in the subject of an
incoming email according to the [ Case number mask ] system setting.
The email subject contains a case number, but no corresponding case can be found;
The email subject contains a case number, but the corresponding case is in its final state i.e., “Closed” or
“Cancelled”.
If the email address from which the letter was received is in the blacklist, and if the system is configured to
check the unwanted messages and automatically assign them the status specified in the [ Junk case default
status ] lookup.
Link an email to an existing case
For cases created by email, Creatio automatically links follow-up emails to the corresponding case.
Messages from mailboxes specified in the [ List of mailboxes for case registration ] lookup will be associated with
cases.
If an email cannot be connected to existing cases, Creatio automatically creates a new case. Creatio identifies the
contact and account of the created case based on the sender's email address. All incoming emails are connected
to accounts and contacts in the same manner.
Creatio finds the corresponding case using the following methods:
1. By email thread. If the email message is a part of an email thread, it inherits all links from the previous email
in the thread, including case links.
2. By the case number in the email subject. If no cases are linked to an email thread, Creatio checks the
message subject for a case number. The “Case number mask” system setting is taken into account. If the
email subject contains a valid case number, Creatio searches for cases with this number. If the case number
mask in the email subject is different from that in the “Case number mask” system setting, the email will not
be liked to that case automatically. For example, if the current case number mask is “SR-{0}”, there is a case
with number “SR_2”, the email that has “SR_2” in its subject will not be connected to this case. A new case will
be created instead.
3. By the case number in the message body. If there is no valid case number in the email subject, Creatio
checks the email body for the case number. Creatio checks both the message text and email markup. You can
disable linking emails to cases by case number in the email body by changing the value of the following system
setting: “Connect emails to cases by case number in the email body” (ConnectEmailsByCaseNumberInBody).
If a case was not found by any of the methods, Creatio creates a new case based on the email.
If a case was found, Creatio checks its status:
If the case status is “New” or “In progress,” the email will be linked to the case and display on the [ Processing
] tab of the case page.
If the case is in a final status (e.g., “Closed”), Creatio will add a new case and link the email to it. The email will
also be displayed in the processing history of the closed case.
If the case is in a non-final resolved or paused state (e.g., “Resolved” or “Waiting for response”), Creatio will
change its status to “Reopened” and link the email to the case.
© 2023 Creatio. All rights reserved.Blind queue workflow | 21 Process incoming cases Creatio analyzes all the incoming emails for auto-replies and spam, which helps to reduce the workload of support agents who initially process email messages, and increase the efficiency of their work. You can control the system behavior when "junk" emails are received and determine whether cases should be registered based on these emails. If the sender’s email address or its domain is included in the blacklist (Fig. 4), the system will either create a case or ignore the email, depending on the value of the [ Create cases from "junk" emails ] system setting. Fig. 4 The [ Blacklist of email addresses and domains for case registration ] lookup By default, the system assigns the “Canceled” status with “Received from blacklisted email” reason for closing for all cases created from “junk” emails (Fig. 5). The “junk” case status can be changed in the [ Junk case default status ] system setting. Fig. 5 Case registered by “junk” email Read more in the Set up “Junk” case registration article. Blind queue workflow © 2023 Creatio. All rights reserved.
Blind queue workflow | 22

Blind queue workflow
PRODUCTS:         SERVICE CREATIO

Let's take a look at the typical procedure to process cases via the agent desktop using a blind queue. When an
employee takes a case from the queue, the “Processing order in Agent desktop queue” business process is run.

    Note. You can set up another business process to handle your cases.

To start working on a case from a regular queue:

1. On the corresponding tab of the agent desktop, click the [ Next record ] button (Fig. 1).
    When an agent takes a case, other agents will not be able to process the case on the agent desktop.

    Fig. 1 Taking a case from a regular queue

    As a result, the page of the case to process next will open. The algorithm used to select a case takes into
    account the queue priorities and inner sorting rules of a given queue. (Fig. 2).

        Note. Learn more about elements sorting order on the agent desktop from a separate article.

    On the opened case page:

        The value in the [ Status ] field is changed to “In progress”
        The agent who took the case is specified as the assignee
        The [ Actual response time ] field is filled in with the current date.

    Fig. 2 — Page of the case in progress

© 2023 Creatio. All rights reserved.
Manage queue objects | 23
2. Perform one of the following actions:
To process the case, change its status. For example, specify the “Resolved” status.
After you save the page, the [ Agent desktop ] section will be displayed again. The processed case will be
removed from the queue.
To postpone processing the case to another specific time, click the [ Postpone till ] button and enter the
date and the time.
Click the [ Submit ] button to return to the agent desktop. The case will not be displayed on the agent
desktop until the specified processing time comes. At the scheduled time, the case will be displayed on the
agent desktop tab only for the agent who has started handling the case. Along with this, the [ Next record
] button will be available or unavailable based on the maximum number of cases that can be assigned with
the “In progress” status simultaneously for the blind queue. This value is specified in the [ Maximum
number of records in progress for a closed queue ] system setting.
To put off processing the case, click the [ Re-queue ] button.
The [ Agent desktop ] section will be displayed again. The case will be placed at the end of the queue
regardless of the record sorting rules of this queue. Time for processing such case will come after having
processed the cases which are on the higher positions in the queue.
To cancel processing the case, click the [ Cancel ] button.
The [ Agent desktop ] section will be displayed again showing the case which has been canceled. Along with
this, the [ Next record ] button will be available or unavailable based on the maximum number of cases that
can be assigned with the “In progress” status simultaneously for the blind queue. This value is specified in
the [ Maximum number of records in progress for a closed queue ] system setting.
Note. The way the records from a blind queue are displayed on the agent desktop is described in a
separate article.
Manage queue objects
PRODUCTS: SERVICE CREATIO
The [ Queues ] section enables you to manage calls and case processing sequence. Increase the efficiency of
your contact center by creating queues tailored to your company-specific features, customer history, and case
priority.
© 2023 Creatio. All rights reserved.Manage service agreements | 24
The [ Queues ] section provides contact center or support team supervisors with the instruments to efficiently
manage incoming and outgoing communications. Customization enables you to plan for a constant flow of cases,
define priorities, and assign employees. Although typical queue elements are cases you can set up queues for
other system objects, such as accounts and contacts.
After the queues have been set up, the agent desktop will display the list of records for processing. The content
of the list depends on the following:
the object the queue is created for;
queue population type (static or dynamic);
queue display type (regular or blind).
Default queue objects include “Contact”, “Account”, “Case”. You can set up queues for other objects. A list of
the queue objects can be found in the [ Queue objects ] lookup. The content of all queues for each object will be
displayed on a separate tab on the agent desktop. For example, cases are displayed on the [ Cases ] tab of the
agent desktop.
Queues can be populated manually or automatically. Static queues are populated manually and are commonly
used for campaigns with a set timeframe and target audiences, such as limited-time promotional offers. DYNAMIC
queues are filled in automatically as the records are created or modified in the system. Such queues are a good
option, e.g., for prioritizing the CC incoming cases. The type of queue population is determined when a queue is
created.
You can also control whether the agents can choose which record to take next. When working with open
queues, agents can choose which record to take next. The order of the records depends on the record sorting
rules on the agent desktop. Agents who work with blind queues can take only the next record in queue. In a blind
queue, an agent can take the next record only after processing the previous one.
Queues with one display type (open or closed) can be created for one object.
Manage service agreements
PRODUCTS: SERVICE ENTERPRISE
Creatio implements the "Service level management" ITSM process in the [ Service agreements ] section. Use this
section to determine the customer service requirements, manage your agreements, and in-house service
agreements. For each agreement, you can define the individual terms of service and view the statistics.
Add service agreements
To add a new service agreement:
1. Open the [ Service agreements ] section and click [ New ] in the section list.
2. Populate the service agreement page:
© 2023 Creatio. All rights reserved.Manage service agreements | 25
Title Name of the service agreement. By default, it consists of the service agreement number
and the name of the account: “24 – Axiom”.
Number Service agreement number. Creatio automatically generates numbers according to the
pattern specified in the “Service agreement current number" (ServicePactLastNumber)
system setting. This is a non-editable field.
Type Type of service agreement:
SLA – service level agreement. This type is used to define the service parameters for
the end-users.
OLA – operational level agreement. This type is used to indicate the internal service
agreements of your company. For example, the agreements between departments or
employee groups.
UC – underpinning contract. These are the agreements between your company and
its suppliers. If you select the “UC” type on the [ Contract provisions ] tab, additional
fields will be available to enter information about the service provider.
Status Current status of the service agreement, for example, “Draft” or “Active”.
Start/End The start and end dates of the service agreement validity.
Owner Name of the user responsible for managing and updating information about the service
agreement.
Calendar The calendar that determines workdays and business hours of the support team.
Creatio uses calendars to calculate the response and resolution time for service-related
cases. By default, the field is populated with the value specified in the “Base calendar“
(BaseCalendar) system setting. Use the [ Calendars ] lookup to set up custom calendars.
Support The support package that is provided according to the service agreement. Creatio
level calculates the response and resolution deadline values based on the support level.
3. On the [ Contract provisions ] tab, populate information about the service objects and services.
4. On the [ Attachments and notes ] tab, enter additional information about the service agreement and related
links to web resources. For example, attach a photocopy of the signed agreement. Read more >>>
5. Click [ Save ] to save the service agreement.
As a result, the new service agreement record with the specified parameters will appear in the list of the
[ Service agreements ] section.
Default service agreement
In addition to the agreements with the specific service consumers, the [ Service agreements ] section must
include an agreement that includes the minimum set of services, provided to any consumer i.g., a “default service
agreement.”
© 2023 Creatio. All rights reserved.Manage service agreements | 26
This agreement can be used to obtain customer support service when no appropriate service agreement is found
for a particular case.
The default service agreement should be specified in the “Default service agreement” (DefaultServicePact)
system setting.
Add service objects to SLA
Information about the service objects is represented on the [ Service recipients ] detail of the service agreement
page.
To specify service objects for a service agreement:
1. Open the [ Service agreements ] section, select the needed record and click [ Open ].
2. Add accounts and contacts to the [ Service recipients ] detail:
a. Click → [ Account ] or [ Contact ].
b. In the window that opens, select the needed account or contact and click [ Select ].
3. Add departments of the service recipient accounts, if only specific departments can use this service level:
a. Select an account under [ Service recipients ], then click → [ Select department ].
b. In the window that opens, select the departments that will receive services under the service agreement →
click [ Select ].
4. Click [ Save ] on the service agreement page.
As a result:
Creatio will use the information on the [ Service recipients ] detail when selecting a service agreement on the
case page.
If you added departments, a record for each selected department will appear on the [ Service recipients ]
detail. The service agreement will be valid for the selected departments only.
Add services to SLA
Set up a list of services provided under a service agreement on the [ Services ] detail of the service agreement
page.
To add a service to a service agreement:
1. Open the [ Service agreements ] section, select the needed record and click [ Open ].
2. Go to [ Contract provisions ] → [ Services ] → click . A lookup window opens, displaying a list of all services
from the [ Services ] section.
3. Select the services provided under this service agreement and click [ Select ].
As a result, the service(s) will be added to the [ Services ] detail list with the default terms of service provision.
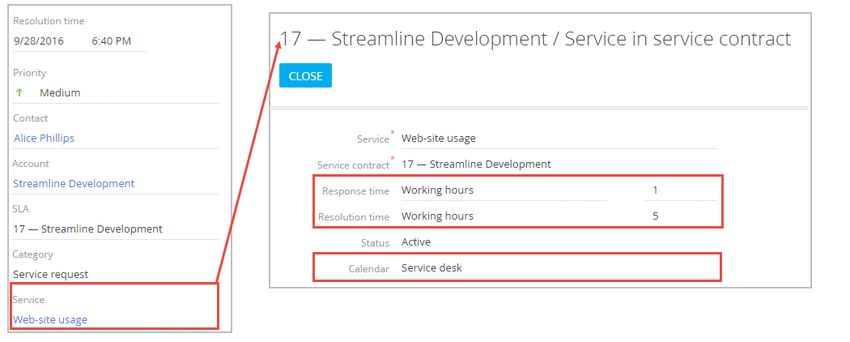
Modify service provision terms in SLA
© 2023 Creatio. All rights reserved.Set up “Junk” case registration | 27
Services are added to the service agreements with their default terms of provision: calendars, response, and
resolution deadlines. You can modify the terms within the framework of a specific SLA:
1. Open the [ Service agreements ] section, select the needed record and click [ Open ].
2. Select a service on the [ Services ] detail, click → [ Edit ]. A [ Service in service contract ] page opens.
3. Specify the service provisions within the selected service agreement:
Service Name of service provided under the selected agreement. It is defined after adding the
service to the agreement. This is a non-editable field.
Response Estimated response and resolution time used for processing service-related cases
time under the corresponding service agreement. By default, the fields are populated with
the response and resolution time values specified on the service page of the [ Services ]
Resolution section. However, you can set other values for the selected service. Creatio will use the
time entered data to calculate the response and resolution time values for cases under the
selected service agreement.
Status Status of the service provided under the selected service agreement.
Calendar The calendar that is used for providing services under the selected service agreement.
If this field is empty, Creatio will calculate the case-related response and resolution time
values using the calendar specified in the [ Calendar ] field of the service agreement
page.
4. Click [ Save ].
As a result, Creatio will use the information of the [ Services ] detail when selecting customer service
provisions and calculating the response and resolution time for cases.
Set service providers for UC
If you add an “Underpinning contract” in the [ Service agreements ] section by selecting “UC” on the [ Type ]
field, additional fields for entering information on the subcontractor service provider become available in a
separate [ Service provider ] group on the [ Contract provisions ] tab of the service agreement page:
Populate the Service provider → Account field by specifying the company that provides services under the
corresponding service agreement. If you populate the [ Contact ] field, the [ Account ] field will be
automatically populated with the account specified on the page of the selected agreement.
Populate the Service provider → Contact field by specifying the contact person of the supplier that you
work with under the agreement. If you populate the [ Account ] field, the contact lookup will contain contacts
of the selected company only.
Set up “Junk” case registration
© 2023 Creatio. All rights reserved.Service agreement selection | 28
PRODUCTS: SERVICE CREATIO
Creation can process incoming “junk” emails, e.g., spam, auto-replies, and internal emails so that the agents do
not spend time on them.
The setup procedure is as follows:
1. Specify email addresses, address strains or email domains of “junk” emails in the Blacklist of email
addresses and domains for case registration lookup. By default, the lookup contains the following
values commonly used in the bulk emails: postmaster, noreply, no-reply, mail-daemon, mailer-daemon.
2. Specify the processing routine for “junk” emails in the “Create cases from junk emails”
(CreateCasesFromJunkEmails) system setting.
a. Clear the [ Default value ] checkbox to disable creating cases based on “junk” emails.
b. Select the [ Default value ] checkbox to create cases based on “junk” emails.
3. If you select the [ Default value ] checkbox in the “Create cases from junk emails” system setting, populate
the [ Default value ] field of the “Junk case default status” (JunkCaseDefaultStatus) system setting. For
instance, select “Canceled” to automatically cancel any cases created from “junk” emails.
Service agreement selection
PRODUCTS: SERVICE ENTERPRISE
The service agreements are available in Service Creatio, enterprise edition. Creatio selects applicable service
agreement automatically, based on the values in the [ Contact ] and [ Account ] fields. Only active service
agreements whose expiration date exceeds or is equal to the current date can be selected. Service agreements
in the statuses that are marked as [ Active ] in the [ Service agreement statuses ] lookup are considered open.
The list of agreements available for selection depends on the values in the [ Contact ] and the [ Account ] fields of
the case page, as well as on information on the [ Service recipients ] detail that is located on the [ Contract
provisions ] tab on the service agreement page. The list of service agreements will display only the ones that have
the specified contact and/or account added to the [ Service recipients ] detail. So the field is filled in with one of
the agreements according to the following priorities:
1. If the [ Contact ] field is filled in, the [ Service agreement ] field fills in with the agreement that meets one of the
requirements:
a. A contact specified on the case page is found on the [ Service recipients ] detail of the service agreement.
b. A department of the account that the specified contact is connected to is found on the [ Service recipients
] detail of the agreement.
c. An account that the specified contact is connected to is found on the [ Service recipients ] detail of the
agreement.
2. If the [ Contact ] field is empty and the [ Account ] field is filled in, the [ Service agreement ] field will be filled in
with the one that has the specified account added to the [ Service recipient ] detail.
3. If no service agreements meet the required conditions, the [ Service agreement ] field is filled in with the base
© 2023 Creatio. All rights reserved.Incoming call workflow | 29
service agreement. The base service agreement provides the minimum number of services. You can set it up
using the "Default service agreement" system setting.
If several service agreements meet the required conditions, the one with the higher priority will be specified in the
[ Service agreement ] field. The rest of the service agreements are available in the list. If multiple service
agreements apply to the case, the following is selected as the primary agreement:
1. Contact’s service agreement (the contact is specified on the [ Service objects ] detail of the service
agreement).
2. The service agreement of the contact’s department.
3. The account’s service agreement.
When you change the value in the [ Contact ], [ Account ] or any other field that govern the process of
selecting a service agreement, the list of available service agreements is reconsidered.
Note. Information about the account and department that the contact is connected to can be found on
the contact page. The portal user’s account and department are specified on the [ Service objects ]
detail.
The [ Service agreement ] field is available for editing at any case processing stage.
Incoming call workflow
PRODUCTS: SERVICE CREATIO
Creatio provides two out-of-the-box business processes to handle cases received by a call. The processes start
when an agent receives a call from a customer.
Attention. Telephony setup is needed to work by the processes. Furthermore, the processes are available
only for the users included in the folder specified in the [ Folder – Contact Center agents ] system setting.
When taking a call, an agent can choose to run one of the Creatio business processes, depending on the call
purpose: create a new case or start consultation for an existing case.
The process flow depends on whether the subscriber is identified or not. The system allows identifying the
contact or creating a new one. According to the customer's request, a new case will be created or the contact
page will open. On this page, the agent will be able to see the history of communication with the customer and
provide consultations regarding the existing cases.
When a call is received, the [ Calls ] tab becomes active on the communication panel. On the [ Processes ] detail
of the [ Call ] tab, the following actions become available: [ Add new case ] and [ Advice on existing case ]. Each
action starts the corresponding business process.
Case registration process
To register a new case when taking a call, select the [ Add new case ] action. This action will trigger the
© 2023 Creatio. All rights reserved.Incoming call workflow | 30
corresponding process. The process can have different flows based on different conditions. These flows and
conditions can be summarized in the following table.
Condition Agent actions
The contact is Clicking the [ Add new case ] button opens a new case page where you should
uniquely enter the information provided by the customer. On the case page, the [ Contact ]
identified by a field is automatically populated.
phone number
registered in the
system.
The system The call panel displays the [ Search results ] detail that contains the list of contacts
detected multiple with the phone number from which the call has been received. Click the record of
contacts with the the right contact and then click the [ Add new case ] button, so a new case page
same phone will open. The [ Contact ] field on the page will be automatically populated.
number from
which the call has
been received
The contact is Clicking the [ Add new case ] button opens the contact identification page. On this
not identified by page, you can search for the contact by name, by communication options, or by
the phone the name of the company where the employee works. Select proper contact and
number, but the then click the [ Add new case ] button, so a new case page will open. The [ Contact
call has been ] field on the page will be automatically populated. The phone number from which
received from a the call has been received will be added to the [ Communication options ] detail of
customer already the selected contact.
registered in the
system
The contact is Clicking the [ Add new case ] button opens a contact identification page where you
not identified by should select the [ Add case and contact ] action. On the opened page, enter
the phone contact data. Click the [ Next ] button, so a new case page will open. The [ Contact
number and the ] field on this page will be automatically filled in. If needed, you can edit the record of
call has been the new contact after saving the record of the new case.
received from a
new customer
Advising on an existing case process
To advice a customer on an existing case, select the [ Advice on existing case ] action. This action will trigger the
corresponding process. The process can have different flows based on different conditions. These flows and
conditions can be summarized in the following table.
© 2023 Creatio. All rights reserved.Create dynamic queue | 31
Condition Agent actions
The contact is Clicking the [ Advice on existing case ] button opens the page of the caller
uniquely identified by a contact. Open the [ History ] tab to view the list of cases connected to the
phone number given contact.
registered in the
system.
The system detected The call panel displays the [ Search results ] detail that contains the list of
multiple contacts with contacts with the phone number from which the call has been received. Click
the same phone the record of the needed contact and then click the [ Advice on existing case ]
number from which button. The page of the selected contact will open. Open the [ History ] tab to
the call has been view the list of cases connected to the given contact.
received
The contact is not Clicking the [ Advice on existing case ] button opens the contact identification
identified by the phone page. On this page, you can search for the contact by name, by
number, but the call communication options, by the number of the registered case, or by the name
has been received of the company where the employee works. Select proper contact and then
from a customer click the [ Add new case ] button, The page of the selected contact will open.
already registered in Open the [ History ] tab to view the list of cases connected to the given
the system contact.
The contact is not You will need to proceed to the process of creating a new case. Clicking the
identified by the phone [ Advice on existing case ] button opens a contact identification page where
number and the call you should select the [ Add case and contact ] action. On the opened page,
has been received enter contact data. Click the [ Next ] button, so a new case page will open. The
from a new customer [ Contact ] field on this page will be automatically filled in. If needed, you can
for whom registered edit the record of the new contact after saving the record of the new case.
cases have not been
found
Create dynamic queue
PRODUCTS: SERVICE CREATIO
Dynamic queues are populated automatically. The queue will be populated with records that match a specific filter
condition. For example, dynamic queues can be used to process new cases that have not yet been assigned a
responsible.
Let's take a closer look at how to create and populate dynamic case queues. To create a dynamic queue for
cases where the resolution deadline is today or falls within the nearest three days: To do this:
1. Go to the [ Queues ] section.
2. Open the [ Queues setup ] view and add a new element.
3. Specify the name of the queue in the opened window.
© 2023 Creatio. All rights reserved.Create dynamic queue | 32
4. Select the priority for the queue. The queue priority influences the display order of the queue elements on the
agent desktop.
Note. Learn more about elements sorting order on the agent desktop from a separate article.
5. Select a system object in the [ Queue type ] field. In our case, it is “Case”. You can customize queue objects in
the [ Queue objects ] lookup by clicking the [ Queue sorting setup ] action in the [ Queues ] section. After
saving the queue you cannot change its type.
Note. The selected object defines the queue type - regular or blind.
6. Select the "In progress" queue status.
Note. The agent desktop displays only active queues. The status of active queues is “In progress”. By
default, the status is "Active".
7. Select a business process in the [ Process ] field. The selected business process will be run each time an agent
takes an element from the queue. Select the “Agent desktop: Queue cases processing” business process for
cases.
Note. To be able to use a process in a queue, add two global parameters to it: “queueelementId” and
“entityRecordId” with the "Unique identifier” type. The record ID from the ([ Queue element ] object) is
passed to the “queueelementId” parameter, and the contact/case/application record ID is passed to the
“entityRecordId” parameter.
8. Select the [ Automatically by filter conditions ] option in the [ Queue population type ] field group on the
[ Queue population ] tab.
9. Specify the filter conditions in the filter area.
a. Click the [ Add condition ] link and select the [ Resolution time ] column in the opened window. Select the
value of the condition: "Day → Today”(Fig. 1).
Fig. 1 Setting up the "Resolution time = Today” filter condition
© 2023 Creatio. All rights reserved.You can also read