Sidekick Your Motorhome - UK.COM
←
→
Page content transcription
If your browser does not render page correctly, please read the page content below
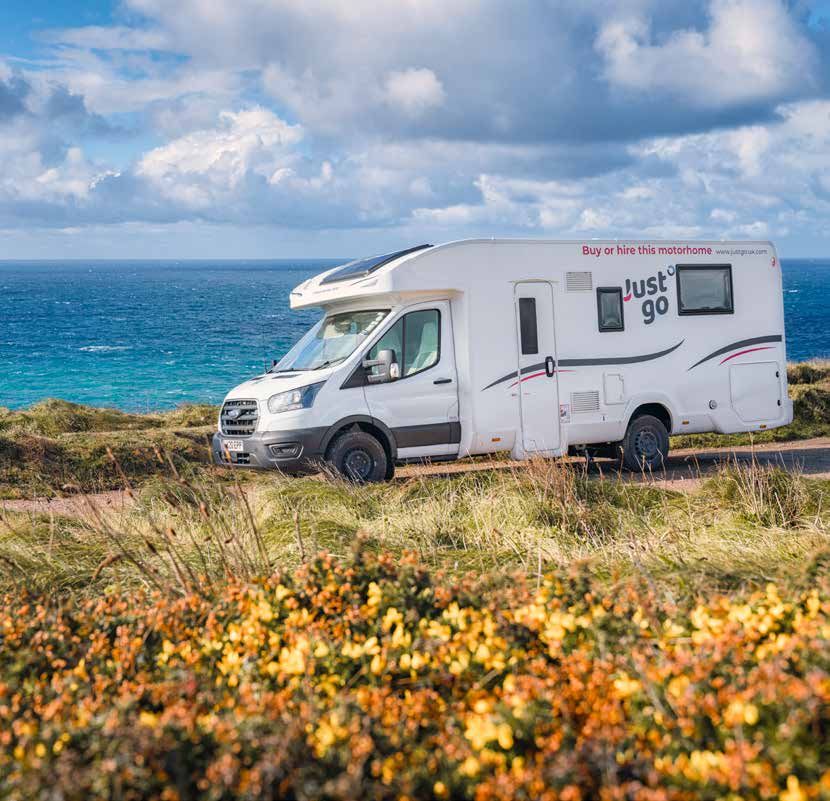
Your Motorhome
                           Sidekick

                                Your Essential Guide
Welcome to your motorhome sidekick manual. In this guide you
will find guidance and tips to help you settle into your motorhome.
At the back of the guide are some FAQ’s and our contact details
should you need them.
Please take the time to read this guide.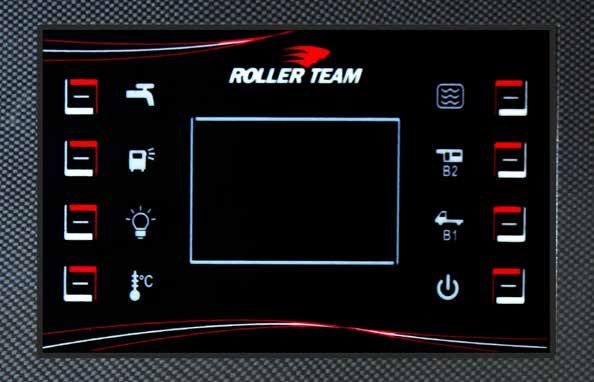
Keen to get your motorhome adventure started?

Keys
You have 2 keys on your coloured key ring fob:
    One for the ignition and diesel cap
    One for all the exterior lockers and habitation door
    Last 3 digits of your reg is displayed on the key fob

To avoid locking the keys in the motorhome always use
the keys to lock the habitation door last when leaving.

Power
To connect the motorhome to mains electric you need to
use the hook-up cable located in the gas locker. Plug this
into the motorhome and the power supply as soon as you               Turning on heating & hot water
get to your pitch at the campsite to enable power to your
motorhome.                                                            Please make sure you turn on your gas at bottle or you
                                                                      are hooked up to main supply at your campsite. Tap
Once you have arrived at your location try to position the            rotary push button to activate your screen.
motorhome on level ground. Un-wind the hook up cable
                                                                      Follow the below instructions in the order shown to get
fully from the reel to avoid overheating due to electric
                                                                      the best results. When you have finished using heating
current.
                                                                      system it’s important to make sure that you have
Fridge                                                                turned off your Truma control panel before you turn off
Fridge just needs to be turned on 1 star or Moon setting.             your gas / disconnect your electric supply.
Try to let the fridge cool before filling it with food and buy
                                                                     Energy Source
chilled food as this will help keep the food cooler.
                                                                         Press rotary button once, turn rotary button two clicks
*For Webasto under counter fridges use 1 light only
                                                                         to the right so you are selecting the energy setting,
                                                                         press to select, turn left for gas or right for electric
Tip: These compressor fridges are super cool so turn off                 then press once to confirm.
each night this will help conserve your leisure battery                  EL1 is for 6 amp sites (mostly in EU)
power especially if you are not on 240v hook up supply.e                 EL2 is for 10 amp sites (mostly in UK)
                                                                     Important Note: Do not select ‘Mix’ option.
Gas on
                                                                     Room Temperature in C
If you do not have electric hook up then to enjoy the luxury
of warm heating, hot water or to cook your favourite meal,              Press rotary button once & then the motorhome
you will need to make sure you have turned on the gas. To               symbol will flash, press rotary button to select this,
do this you need to go to your gas locker and turn the tap              turn rotary button to desired temperature and press
on the top of the bottle anti-clockwise. Please remember                once to confirm.
to turn the gas off at the bottle after you have finished            Fan Level
using it. Keep the gas turned off when you are travelling,               Press rotary button once, turn rotary 3 clicks to the
asleep and when the motorhome is left unattended.                        right to the fan symbol, press once to select then
                                                                         adjust the fan setting to the desired level and press
                                                                         rotary button once to confirm.
  Look out for the helpful ‘find it sticker’
                                                                     Hot water
  which has been placed in your vehicle
                                                                         Press the rotary button once, turn rotary button
  which is a quick guide to find various                                 one click to the right, press to select the hot water
  items on board.                                                        symbol, turn rotary button to select the desired
                                                                         temperature; Eco at 40c or hot 60c, press rotary
                                                                         button to confirm.
                                                                         Important Note: Do not select the ‘Boost’ option.
                                                                     Timer Set
                                                                         We do not recommend that you use this feature.
                                                                     Fault
                                                                         See troubleshooting in the back of the sidekick
                                                                         manual or contact our ‘On Road Support Team’
                                                                         during office hours.
                                                                     Please contact the depot you collected the vehicle from.
                                                                     Edinburgh Depot: +44 (0) 1525 878 006
                                                                     Toddington Depot: +44 (0) 1525 878 005

                                                                      Don’t forget our handy video tour located on a
                                                                      USB stick - it can be found already in your TV

                                                                 2                                       Justgo.uk.com
Control Panel

                                                                                 This appears when 240V supply is
                                                                                 present.

                                                                                 This appears when motohome is
                                                                                 travelling and both batteries are
                                                                                 coupled.

                                                                                 This appears when a fuse has
                                                                                 blown.

1                                                                                                                               5

2                                                                                                                               6

3                                                                                                                               7

4                                                                                                                               8

    1   Water Pump                                                  6 Leisure Battery charge B2
        Use for shower/sinks/toilet. Remember to turn off             Press this once to display voltage and twice to display
        when not required.                                            remaining charge %.

    2 External lights on/off                                        7 Starter Battery charge B1
        May not be present on your motorhome.                         Press this once to display voltage and twice to display
                                                                      remaining charge %.
    3 Internal lights on/off
        This needs to be on for the TV to operate*.                 8 On/Off
                                                                      Turns the control panel on or off. Make sure you turn
    4 Internal temperature                                            off before leaving motorhome.
        Press this once.

    5 Water tank level                                             Depending on your model your control panel may look
        Press once for fresh water and twice for grey water.       different but the icons will be the same.

    NB. Always turn the control panel off when you leave the motorhome.
    Also ensure the water pump is off when not in use as it will empty all water from motorhome
    & burn out the pump if the frost protection switch trips.

©Just go motorhomes 2021                                       3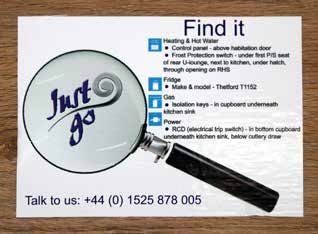
LPG (Gas) Bottle

How to use and re-fill your LPG (Gas)
bottle

Turning on

There are two types of tap,
both of which you turn
anti-clockwise to open, and
clockwise to close.

The gauge only gives you
a rough indication of the
quantity of gas that is left in the bottle and this should not
be relied on as an accurate measure of gas left.                     As a rough guide, a full bottle will last as follows;

The black line will indicate the level of gas. If you cannot         Summer 2 berth 10-14 days, 4-6 berth 7-10 days
fill the bottle up then this is more often than not that the         Winter 2 berth 7 days, 4-6 berth 5 days
bottle is full.

  Type 1                                                               Type 2

 NB. Make sure tap is closed when vehicle is moving, unattended or when you are sleeping.

Re-filling and returning full
 1   Make sure the tap on the bottle is closed (turned
     clockwise).

 2   Remove filler cap (turn anti-clockwise).

 3   Put pump nozzle handle into Gaslow point and twist
     (bayonet fitting).

 4   Squeeze nozzle handle and lock in open position.

 5   Push and hold flow button on LPG pump.

 6   Pump will automatically stop when full.
                                                                                                  Please return full (unless
 7   Release filler nozzle (it will make a whoosh sound).                                          pre-paid fuel package
                                                                                                  has been taken out prior
                                                                                                       to collection)
 When re-filling in Europe, use adaptors attached
 to the bottle, find the correct one and screw in
 firmly to the filler nozzle.                                         Please be aware there are very few filling points
 Please be aware there are very few filling points                    in North Scotland and Ireland.
 in Spain. EU filling locations can be found at:                      Information about UK filling locations can be
 www.mylpg.eu                                                         found at www.drivelpg.co.uk

                                                                 4                                      Justgo.uk.com
Heating & Hot Water

                                                                  Note
                                                                  Above line = Setting selected
                                                                  Below line = Selection menus

                                                                                     2     4       1        3

Turning on heating & hot water
Turn on gas at bottle or connect to external power supply
                                                                                     5
at campsite and turn on power in your motorhome. Tap
rotary push button to activate your screen. Follow the
below instructions in the order shown to get the best
results. When you have finished using heating system
it’s important to make sure that you have turned off
your Truma control panel before you turn off your gas /
disconnected your electric supply.

             Energy Source
              1   Press rotary button once, turn rotary
             button two clicks to the right so you are
                                                                               Timer Set
             selecting the energy setting, press to select,
                                                                                5    We do not recommend that you use
             turn left for gas or right for electric then
                                                                               this feature.
             press once to confirm.
             EL1 is for 6 amp sites (mostly in EU)
             EL2 is for 10 amp sites (mostly in UK)
                                                                               Fault
             Note: Do not select ‘Mix’ option
                                                                               If fault code is not shown on screen, scroll
                                                                               down to triangle, press to select triangle, and
             Interior heating menu – temperature °C
                                                                               fault code appears on screen. To clear fault
              2 Press rotary button once & then the
                                                                               see Troubleshooting / FAQ section
             motorhome symbol will flash, press rotary
             button to select this, turn rotary button
             to desired temperature and press once to
             confirm. Once confirmed top line symbol              Window Sensor
             will flash when heating and will go solid            (Fault Code 412)
             once temperature has been reached
                                                                  The heating will not function if the window is open, close
                                                                  the window fully for it to work.
             Fan level
                                                                  (Dependant on model, refer to the find it sticker)
              3 Press rotary button once, turn rotary 3
             clicks to the right to the fan symbol, press
             once to select then adjust the fan setting
             to the desired level and press rotary button
             once to confirm.

             Hot water menu
               4 Press the rotary button once, turn
             rotary button one click to the right, press to
             select the menu, turn rotary button to select
             the desired setting – ECO = water at 40C,
             HOT = water at 60C. Do not select BOOST.
             Then press rotary button once to confirm.
             Once confirmed the top line symbol will
             flash when heating and will go solid when
             temperature has been reached.
                                                                   NB. Never leave combi boiler on when vehicle is
NOTE: The boiler heats the van first and then once
                                                                   moving, unattended or when you are sleeping.
temperature reached, switches over to heating the water.
If you want hot water as a priority, turn off the interior
heating so boiler only heats up the water and then turn
on the van heating later.

©Just go motorhomes 2021                                      5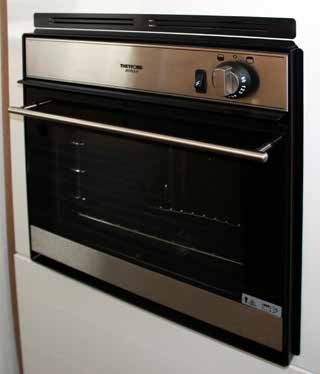
Heating & Hot Water Troubleshooting

Troubleshooting

 1   If your motorhome has a window
     switch, make sure the window it
     is fitted to is fully closed. Refer to
     your "Find it" sticker for the location
     if applicable for your model of
     motorhome.

 2   If using gas as your power source
     for your heating ensure gas is on at
     bottle and isn't empty.

 3   Ensure there is water in your fresh water tank.
                                                                   Frost protection switch
 4   Turn on the water pump on control panel.
                                                                   This is a safety device which releases your water to avoid
 5 Ensure leisure battery has charge if not on                     burst pipes and boiler failure from freezing.
     hookup.
                                                                   If you have refilled with freezing cold water and/or during
     Contact our on road support team if warning light             colder months this button may pop out.
 6
     persists.Please contact the depot you collected the
                                                                   If you experience no water through the taps when
     vehicle from.
                                                                   you have fresh water in the tank and the water pump
Edinburgh Depot: +44 (0) 1525 878 006                              is turned on, loss of pressure or find water running
Toddington Depot: +44 (0) 1525 878 005                             underneath your motorhome it is likely that your frost
                                                                   protection switch has tripped. During the colder months
The general rule is a flashing code needs to wait 15               this switch may pop out and automatically empty the
minutes until it stops flashing, and then once solid, press        water from the boiler to prevent it from freezing. (fig 1).
rotary knob twice to reset. E.g. 517 no gas
                                                                   To reset the unit and restore normal functioning, the blue
A code that appears on screen solid without flashing,              button A needs to be pressed in flush with the unit.
needs fault correction in order to clear and restart boiler.       The blue switch B on the top of the unit needs to be as
E.g. 412 window open                                               pictured below. This is a manual override and should not
                                                                   be turned unless it is opposite to the below picture. Check
If black triangle appears with no fault code, scroll down to       the "find it" sticker in your motorhome to find the location
triangle, press to select and code will appear on screen.          of this switch.
See FAQs for regular codes and how to solve.

                                                                    If the blue button keeps popping out then the
                                                                    temperature inside and/or the water inside the tank is
                                                                    still too cold.

                                                                    Don’t panic, make sure you have water in your fresh
                                                                    water tank and put your heating on for a few minutes
                                                                    and then try to reset the button again.

                                                                                           Look out for this sticker which
                                                                                           has been placed in the area
                                                                                           that the device is located or
                                                                                           alternatively please use the Find
                                                                                           it sticker which will also point
                                                                                           you to the correct location.

                                                               6                                      Justgo.uk.com
Using the stove

                                                    Using the stove

                                                     1   Turn on gas at bottle.

                                                     2   Turn and hold the relevant knob.

                                                     3   Keep knob depressed for 10-15 seconds then ignite.

                                                     4   Once ignited, flame size can be altered with the dial.

 NB. Do not close the glass cover when the stove is still hot

Gas isolation taps

                                                     If you ever need to isolate the gas, check the "find it
                                                     sticker" in your motorhome to locate these taps.

                                                     To isolate turn horizontal (on the image they are
                                                     shown vertical). Contact the office so we can guide
                                                     you through this.

                                                     NB. Dependant on the model of your motorhome you
                                                     may have fewer taps because the fridge does not run
                                                     on gas
     Stove           Oven   Boiler   Fridge

©Just go motorhomes 2021                        7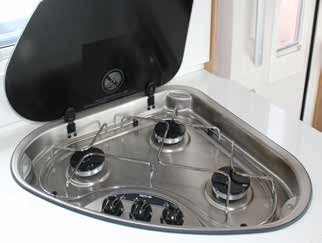
Gas Oven & Grill

Thetford

    1   Turn on gas at bottle.

    2   Push in and turn dial to left for oven and right for grill,
        hold dial in for 10-15 seconds.

    3   Press ignition button to light the gas.

    4   Once ignited, oven temperature can be altered with
        the dial (gas mark).

    Tip: remove the grill pan from oven whilst travelling to
    reduce noise

.

                               Oven               Grill

                                                                      8   Justgo.uk.com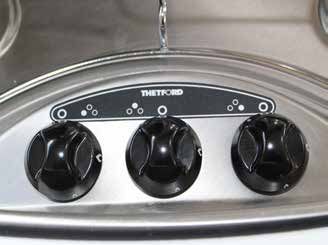
Fridge

                                                                Dometic Isotherm (Fridge under counter & freezer
                                                                recessed in worktop).

                                                                The fridge is switched on by turning the rotary thermostat
                                                                dial, and then setting it to the desired temperature. To
                                                                switch off simply rotate the thermostat dial to OFF. There
                                                                is no ECO setting.

 The Thetford compressor fridge does draw a lot of
 electric power which is why to reduce consumption
 we advise to have the Moon button set. (not applicable
 to the Dometic model) and on the Webasto fridge to
 have this on 1 light setting.
 If you are not on hook up, you should check your
 leisure battery level regularly on the Habitation panel.
 If it looks low, then to conserve battery power, we
 advise to turn off the fridge at night. The fridge will
 keep perfectly cool as the door is not being opened
 and closed.

Your fridge is a compressor type fridge which runs
directly from the 12v leisure battery.

There are three makes of fridge used in our vehicles, and
their operation is given below.

Thetford (tall upright fridge).

Press on/off button to operate. Press snowflake button
to set temperature. If more than 1 blue light shows then
keep pressing snowflake till only one blue light shows.

Then press Moon button to illuminate blue light.

To switch off, press on/off button till all blue lights
disappear.

©Just go motorhomes 2021                                    9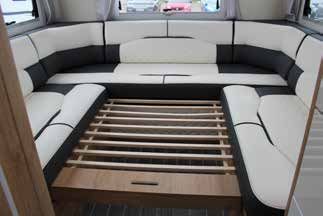
Webasto (under counter) fridge

Press on/off button to turn on. Five bright lights will show,
because the door is open. To check the settings press
the snowflake button and the dim lights will show. We
recommend you set it to 1 light.

To change the settings, repeatedly press the snowflake
button until the bottom dim light only is showing.

Note: Do not use ECO setting as this uses more power
and may freeze the whole fridge.

Once the settings have been completed, if the door
is kept open, the lights will change from dim lights to
5 bright lights. This is nothing to do with the settings
changing but simply to help you see inside the fridge.
When you next open the door the five bright lights will
automatically show.

To switch off press the on/off button at the top and hold
for approx. 5 seconds till all lights go out.

                                                                10   Justgo.uk.com
Toilet
Using the toilet
1 Ensure vent to cassette is open when in use, and
closed at all other times. This is controlled by the grey
lever on the side of the toilet.
2 The seat swivels if required, and the water pump
needs to be turned on from the control panel for the
flush to function.
3 The green light behind the toilet will turn orange/
red when the cassette is full.
Emptying the cassette
1 Unlock toilet cassette door with key and push both
buttons in to open.
2 Lift blue lever and pull the cassette out using handle,
see (fig 1).
We recommend that you don’t wait till this light comes
3 Rotate grey arm straight and unscrew blue cap. see on as cassette can be quite heavy. Dependant on how
(fig 2). many people are on-board we advise to empty every day
or every other day.
4 Pour contents in a designated waste disposal area
and rinse with water.
You will need your water Flush
5 Use blue cap to measure 150mls of chemical and pump turned 'ON' on your
pour into grey arm then add up to 2 litres of water to control panel in order to
mix. Then screw blue cap back on and return grey flush.
arm to original position.
Fig 1
Fig 2
Grey lever to
open/close vent
Please remember there is a charge of £150 if you don't NB. You will not be able to remove the
return it empty. There are no emptying facilities at Just go. cassette if the vent is open.
©Just go motorhomes 2021 11Dinette Table Bed Conversion
Basic principles for converting to a bed
1 The dining area converts into a bed. To convert it
you need to lift off the table top (fig. 1) and press the
button on the leg to fold (fig. 2).
2 Hook the table on the lower table support to form
the base of the bed.
3 Take the seat cushions and place them on top of
the base and use the rectangular cushion (stored in
wardrobe) and place in the middle section.
For more leg space you can remove the back rest cushions
Dinette Area Dinette Area Assembled
A
B
D B
C
C
Extension Option 1 Extension Option 2 E
Enlarging the bed
4 Add table extension (stored inside cupboard or
exterior locker) and lower the table by pressing the
button on the leg. Remove backrest B and C and
head rest D .
5 Position supplementary cushions E , back rests B
and C and head rest D which must be positioned
at the base of seat C .
If you do not have the panels which slide out then the
extender boards will either be in your wardrobe or in
Extension option 1
your exterior locker.
These are stored in either the wardrobe or exterior lockers
and slot into the holes into the base of the seating area. .
Pull the legs down to the floor.
Extension option 2
These pull out and the legs are lowered into place.
NB. The dinette side extensions are suitable for children
only to sit on, and may break if sat on by adults.
12 Justgo.uk.comU Shaped Lounge Bed Conversion
U Shaped Lounge Area (dependant on model) Enlarging the bed
1 Remove the left hand side seat cushion and back rest
cushion to expose the bed frame.
2 Lift this up and over to fill the gap in the middle of
the lounge area.
3 Use the long cushion found in the wardrobe to fill
the gap.
Fully assembled bed
Place the remaining excess seat cushions underneath
the bed for storage.
.
©Just go motorhomes 2021 13U Shaped Lounge Area (dependant on model)
Converting to a bed
1 If you are using the portable table A first remove
Fully assembled bed (using existing cushions) this and place back into the wardrobe.
2 Underneath the rear cushion B pull the wood slats
out towards you, making sure you pull them out
evenly C
3 Use the existing seat cushions to make the base of
your bed D E then use the cushions in the under
seat compartments to fill the remaining gaps F G
B C
A
Fully assembled bed (using existing cushions)
B
F
D
E G
Place the remaining excess cushion/s underneath the
bed for storage.
There are several ways to make up the bed by either
using the existing cushions or by making it with the
additional cushions instead.
Fully assembled bed (using additional stored cushions) You should be sleeping width ways to the motorhome.
14 Justgo.uk.comUsing the TV, USB & DVD System
To operate TV turn on internal lights
Using the TV
1 Ensure lights are turned on via the control panel
(same circuit as TV).
2 Ensure on/off rocker switch on the TV is on. Located
either on the back panel of the TV or on the bottom
of the screen surround.
3 Turn on TV using the red button at the top of the
remote.
The Remote
4 Hold down tune button (AQT).
Select the country you are in using the side arrows,
On / Off 5
then press OK (tuning can take up to 15 minutes).
Button
6 A target region box will then appear; use arrow
controls to select appropriate options then press OK.
7 Use channel selection button or guide button to
browse channels.
Dependant on model either
pull up or pull unit down
Channel
Selection
Source
Selection
Tune Push the silver lever up and
pull unit towards you
Button
Using the USB input / DVD player
1 Insert USB drive into the back of the TV or DVD into
the slot on the right side of TV.
2 Use source button on remote to select USB or DVD (if
it doesn’t automatically play).
3 If using USB drive select desired video using left and
right arrows, then press OK button to play.
You may have to retune when you enter different
counties or countries.
We cannot guarantee reception in some areas due to
poor / weak signal strength
©Just go motorhomes 2021 15Fitting Snow Chains
Fitting your snow chains
1 Unfold chain with red plastic end of cable towards
the left.
2 Pass flexible cable around back of tyre, from left to
right.
3 Pull the flexible cable up around the back of the tyre
and fasten the steel ends together. Pull the chains
around the front of the tyre.
4 Hook the outside flat green connector to the last link
of the red end chain.
Removing
5 Pass the red chain into the red self-locking slide gear
then hook on to the opposite side (if not possible 1 Unhook the red elastic tensioner and bring back
fasten to another link). through the slide gear.
6 After initial fitting drive a few metres, stop and 2 Unfasten the cable at the red point..
check the snow chains for correct adjustment and
positioning, incase it is necessary to re-adjust, tighten 3 Roll forward slightly to release the chain underneath
or improve upon the positioning. the tyre.
1 2 3
4 5 6
Always install the chains on the front wheels
Snow chains are for emergency use only; to get you out of trouble or danger. They are not designed for prolonged use
and you should not exceed 30mph/50kmh
16 Justgo.uk.comThe Ford Dashboard
FORD Assistance
0800 111 234
0033 47217 2200
A
E B
C D
A Information display
B Speedometer
F
C Engine coolant temperature
D Fuel gauge
E Rev counter
F Automatic Transmission position indicator
Air conditioning system Do not open when hot Engine warning lamp Requires registered technician
Air conditioning system Engine air filter Glow plug indicator Safety Alert
lubricant type
Anti-lock braking system Engine coolant Interior luggage compartment See owners manual
release
Avoid Smoking Engine coolant temperature Jack Shield eyes
Battery Engine oil Keep children out of reach Stability control and traction
Battery acid Explosive gas Lighting control Stability control and traction OFF
Brake fuild - non petroleum Fan warning Air conditioning system lubricant Windscreen wash and wipe
based type
Braking system Fasten seatbelt Note operating instructions Windscreen wiping control
Cabin air filter Flammable Panic Alarm Heated windscreen
Side air bag Front airbag Passenger airbag deactivated Low windscreen washer fluid
Child safety door lock or unlock Front fog lamps Parking brake Heated rear window
Child seat lower anchor Flue pump reset Power steering fluid Service engine soon
Child seat tether anchor Fuse compartment Power windows front/rear See service manual
Child booster seat anchor Hazard warning flashers Power window lockout Door ajar warning
Leaving lane departure light Hill descent control Water in fuel warning light AdBlue fault
Tow Haul Trail control Lamps on indicator Mesage centre indicator
Cruise control Direction indicators Parking aid Check fuel cap
Low tyre pressure
IMPORTANT: In the event of any red or amber warning lights staying on or flashing continuously please
call Ford assistance in the first instance (number above), then please contact the depot you collected the
vehicle from. Edinburgh Depot: +44 (0) 1525 878 006 or Toddington Depot: +44 (0) 1525 878 005
©Just go motorhomes 2021 17For the below functions use left hand steering wheel
Controls A
Cruise Control – setting cruise speed
1 Press cruise control button E
2 Drive to desired speed
3 Press SET = or SET –
B 4 Take your foot off the accelerator pedal.
A
Changing the set speed
1 Press SET+ or SET – to change the set speed in small
increments.
Left hand steering wheel controls 2 Press the accelerator or brake pedal until you reach the
desired speed
3 Press and hold SET+ or SET- and release the control
when desired speed is reached.
E Cancelling the set speed
Push CAN button C or tap the brake pedal, the set
D speed does not erase
C
F
Resuming the set speed
Push RES button D
Switching cruise control off
Press OFF when the system is in the standby mode, or
switch the ignition off
Right hand steering wheel controls Speed Limiter
1 Press F Set + or Set –
2 Push the RES button D to set
G B
Applying the parking brake (handbrake)
1. Firmly press the brake pedal
2. Pull the parking lever (handbrake) upwards to its fullest
extent
3. Whilst the engine is on the red handbrake light will
appear on the dash to confirm the handbrake is on.
4. Once set the parking lever (handbrake) will naturally fall
back down into position.
Note: Do not press the release button while pulling the
A Cruise control / Speed limiter controls
parking lever (handbrake) level upwards
B Information display control menu
Always fully apply the parking lever (handbrake) and
C Cancel button
make sure you shift the gear lever into Park position (P)
D Reset button
Releasing the parking brake (handbrake)
E Cruise Control
Speed limiter 1. Firmly press the brake pedal
F
G Back menu button 2. Pull the parking brake lever (handbrake) upward to its
fullest extent.
Resetting the Trip Computer use the right hand 3. Press the release button and push the brake lever
steering wheel controls B (handbrake) downwards
Press and hold OK B on the trip screen to reset 4. Whilst the engine is on the red handbrake light will
the respective trip, distance, time and average fuel disappear on the dash to confirm the handbrake is off.
consumption information
Parking Brake (handbrake) warning sound. This will
If you are set in a different screen and need to come out to sound if the parking lever (handbrake) has not been
perform the above then use the back menu button G released fully and your vehicle is moving.
18 Justgo.uk.comThe Fiat Dashboard
FIAT Assistance
0161 332 1043
0044 161 332 1043
A B C
A Speedometer
B Multifunction display
C Rev counter
E D
D Engine coolant temperature
E Fuel level gauge with reserve warning light
Multifunction display control
buttons
Brake fluid Low (Red) / ESP-ASR system /traction plus To scroll up through the screen and
Handbrake engaged (red) failure(amber) - Hill holder
failure (amber) the related options or to increase
Brake Pad Wear (amber) Air Bag failure (red the display value press UP.
Press MODE briefly to access the
Injection system failure (amber) Self levelling suspension failure menu and/or to go to the next screen or confirm the
(red)
desired menu selection
Excessive enging coolant Seat belts not fastened (red) Hold down MODE to go back to the home screen.
temperature (red)
Use DOWN to scroll down through the screen and the
Lefthand direction indicator Righthand direction indicator related options or to decrease the displayed value.
(green intermittent) (green intermittent)
Speed Limiter Stalk
Low Battery (red) Front passenger air bag
deactivated (amber) To activate the device, turn the ring
nut A to bottom symbol.
Cruise Control (green) On constantly: Insufficient engine
oil pressure (red) Flashing engine oil
deteriorated (red) (multijet versions with
Activation of the device is indicated
DPP only)
by the symbol warning light. To
ABS System Failure(amber) Power Steering failure (red) store a speed value higher than
displayed move stalk upwards (+) to desired speed
Incomplete doorlaod Fuel Reserve (amber) value. To store a lower value than displayed move the
compartment closure (red)
stalk downwards (-) to decrease the value. To activate/
deactivate the device press CANC RES button B .
Automatic transmission failure/ EBD failure (red)
transmission oil maximum (amber)
temperature (red) Trip control button
glow plug heating/glow plug Generic failure indication Located on the stalk near the
heating failure (amber) (amber)
steering wheel, it can be used to
Fiat code protection system Water in diesel filter (amber) set your mileage options on long
failure (amber)
journeys.
Rear fog lights (amber) External light failure (amber) Cruise control
To switch on cruise control, turn the
Fog Lights (green) Main beam (blue) ring nut A to on (top symbol).
Cruise control cannot be used in
Dipped Beam headlights Parking sensor failure (amber) 1st or reverse gear, we advise you to
(green) - Follow me home
(green) engage it in 4th gear or higher.
Storing vehicle speed
Turn ring nut A to ON and press accelerator until vehicle
reaches desired speed, then move the stalk upwards (+)
for at least one second then release.
IMPORTANT: In the event of any red or amber warning lights staying on or flashing continuously please call Fiat assistance in the first
instance (number above), then please contact the depot you collected the vehicle from. Edinburgh Depot: +44 (0) 1525 878 006 or
Toddington Depot: +44 (0) 1525 878 005
©Just go motorhomes 2021 19Returning your motorhome
We hope you have had an amazing time
on your motorhome adventure and
created some memories to treasure.
Unfortunately, it is time to make your way
back to us and return your motorhome.
For a quick and easy return, please make
sure you do the following things:
1 Return on time 5 Remove rubbish, tidy motorhome & remember
Your return time is marked on the rear view mirror your belongings.
hanger given to you and on your rental agreement & Whilst we don’t expect it to be spotless, we do ask
handover form signed upon collection. you to bring your motorhome back in a clean, tidy
state with all rubbish removed. Please remember
Normal return time is between 8am and 10am. This to take all your personal belongings with you when
is the window you have to hand your motorhome you leave the motorhome. If you do leave anything
back so we can clean it for the next guests, so please behind, we will let you know and return it to you as
return with plenty of time so you can unpack and we soon as possible.
have time to check over your motorhome with you.
Should there be any difficulties, please phone us as
soon as possible as your motorhome will be going
straight back out on hire. We hope you had a thoroughly enjoyable trip and
we would love to hear about it or see any photos of
2 Empty the toilet cassette & grey water tank at the your trip away. Email us on joinin@justgo.uk.com
last campsite visited
Please be aware that we do not have any toilet
emptying facilities at Just go. Please ensure you
return the toilet cassette completely empty. There is
a fine of £150.00 if we have to do this for you.
3 Fill the LPG (GAS) tank
Your LPG gas needs to be returned completely full.
Please try and fill up close to your last campsite the
day before you return to Just go. Do not rely that
the local filling stations close to the depot will have
adequate supplies on the day of your return. Because
of this we do have to pass on a charge if the gas tank
is not full: £40.00 no matter how much gas Is left.
Fill the diesel, fresh water & AdBlue* tanks (*Ford We love feedback and would be grateful if you
4
and 20 plate Fiats) would fill in a feedback form on your return. This
Please return the diesel, fresh water and AdBlue helps us to continuously improve our services.
tanks completely full so that the next guests are
We are also grateful if you could leave us a review
ready to set off. If the diesel tank is not completely full
on Google.
and the diesel gauge is within the highlighted areas
below, the following charges apply. Follow us on :
Just go Motorhomes
Just go Motorhomes
We look forward to welcoming you back very soon
£140 £120 £90 £75
20 Justgo.uk.comGood Neighbour Guidance
Campsite
Make sure that you tidy your pitch prior to leaving
and you do not leave any items of rubbish.
If you still have to check out at reception and pay
site fees please do so prior to leaving, this is an
agreement between you and the campsite.
If you are leaving your pitch for a day out with the
motorhome perhaps use a flag as a marker so you
can easily identify your pitch upon return.
Fire precautions
You have all the necessary safety measures inside the
motorhome, familiarise yourself with these
General
Be aware of your campsite fire meeting points and
Pots, pans and cutlery can sometimes make a noise alarms
so pack items around them
Wild camping
Take the grill pan out of the oven and store elsewhere
or wrap in a tea towel Do not wild camp if the signs do not allow it.
Park on as level ground as possible We do recommend you stop at campsites but if you
find yourself wild/informal camping or camping
Before each journey it is recommended to check the
off grid (festivals) the motorhomes are fairly self-
oil and water levels prior to long distance driving (see
sufficient but one item is purely charged by the
re-cap for oil type)
leisure battery which is the fridge so check your
General road behaviour leisure battery regularly and switch off your fridge at
Please familiarise yourself with UK road signs and night to conserve battery power.
regulations. Always abide by the highway code: When camping off grid, it is important to check the
https://www.highwaycodeuk.co.uk/ leisure battery voltage level on the control panel on a
Use passing places to pull over to allow traffic behind regular basis, and consider using a site with hook up
you to pass, these are more common in Scotland & every third or fourth night if possible.
Cornwall If you are free camping then be aware your plug
Make sure you respect the speed limit and drive sockets will not work as these do need 240v supply
accordingly on motorways, built up areas etc Make sure the ground is firm for parking
Use your direction indicators where appropriate The rule for wild camping is ‘Take nothing but
Parking photographs. Leave nothing but footprints’
Protecting the environment
Check for height barriers at parking areas
Check for signs in case motorhomes are not Where possible use eco-friendly dog bags
permitted Use eco-friendly toilet chemicals
Make sure that you read the rules which will be sign Remove and dispose your rubbish in appropriate bins
posted You must empty your toilet cassette at chemical
Pay and have your ticket clearly visible in the disposal points, which will be clearly marked at
windscreen campsites, any other location is an offence and if
Pay for the appropriate allocated time caught you will be given a hefty fine.
Use appropriate larger spacing for larger vehicles, Pets
you are at risk if you occupy more than one space. If you are taking a pet you should have already
Paying for 2 spaces is rarely accepted by the parking advised Just go prior to collection and agreed to the
authority pet policy
Use common sense do not obstruct driveways Double check the campsite allow pets
Do not park on private land Most campsites do not object to well behaved pets
Be aware of road markings but they should be kept well under control and on a
Where possible use park and ride facilities to visit lead at all times.
highly populated tourist areas where the roads may Dogs must not be allowed to foul sites, roads or green
be unsuitable for a motorhome. areas.
Reversing Carry a supply of disposable bags in your motorhome
in order to clean up any mess made by your dog.
We do recommend that you take care and have
Then dispose of it in an appropriate bin.
someone outside to help guide you
Do not rely on the reversing camera this is an aid only
©Just go motorhomes 2021 21Talk to us
General Office Opening Hours
Summer: 2nd March – 31st October
Monday – Saturday: 08:00 – 17:00
Sundays Closed
Winter: 1st November – 1st March
Monday – Saturday 08:00 – 16:00
Sundays, Christmas & New Year Closed
Alternatively, you can send an email to: On Road Support team (during office hours)
If you need assistance with the vehicle whilst you are out,
enquiries@justgo.uk.com
please feel free to contact our dedicated on road support
team from 09:00 on the following numbers depending
Breakdown Assistance (For engine / Chassis Issues) on which depot you collected from:
If you have a mechanical issue whilst out on the road Please contact the depot you collected the vehicle from
please contact the relevant assistance line. Both Fiat & during the stated office hours
Ford offer a 24-hour service.
Edinburgh Depot: +44 (0) 1525 878 006.
Fiat Assistance: 0161 332 1043 or 0044 161 332 1043 Toddington Depot: +44 (0) 1525 878 005
Ford Assistance: 0800 111 234 or 0033 472 172 200
Alternatively, you can send an email to:
Please be aware that any assistance call outs relating to a onroadsupport@justgo.uk.com
key locked inside the vehicle, incorrect or insufficient fuel,
flat chassis battery or flat tyres that need to be towed will
incur a charge that the hirer will need to cover.
Emergency text line
Should you have an emergency whilst out on hire then
we have a text only service that you can use to contact a
member of our team. The service is manned from when
the office closes until 8pm Monday to Saturday and 9am –
12 midday on Sundays.
It is for Emergencies only so should your text message
come in outside the manned hours or deemed a non-
emergency a staff member may not get back to you until
the office is next open.
Text: +44 (0) 7860 002 076
Please be aware that the staff member manning the
emergency text line is not a key holder and is unable to
open the office so please do not request to return your
motorhome outside of the office hours.
22 Justgo.uk.comFrequently Asked Questions
- Check the electric isolation key is in the ON position.
This is the big red key found under one of the cab
seats and when turned off will isolate all power
to the motorhome. When the switch is ON it will
be pushed in and to the right, when in the OFF
position it will be out and to the left.
- Try plugging in and using another appliance as
there may be a fault with either the appliance or
item you are trying to use.
- If you are experiencing issue with the power, please
contact our on road support team by contacting the
depot you collected the vehicle from. Edinburgh
Depot: +44 (0) 1525 878 006 or Toddington Depot:
My Lights are not turning on. +44 (0) 1525 878 005.
Is the master light switch on the control panel switched
There is water coming out underneath my motorhome.
on?
- If there is water coming out from underneath
No Turn on the master light switch then you will be able
the motorhomes this means the frost protection
to turn all lights on and off individually.
switch has tripped. The frost protection switch is
Yes (Move on) there to avoid any damage to the boiler or pipes.
When the weather is cold, the switch may trip and
Is the Leisure battery charged?
release all the water from the pipes underneath the
No You need to have power in your leisure battery to
motorhome.
power the lights. Hook the motorhome up to the
mains electric at your campsite to recharge the If you have your water pump on when this trips it
battery. The battery will also charge while you are will continue to drain all water from your tank until
driving. there is none left and will eventually burn out the
pump. Push the frost protection switch back in,
Yes Give us a call at the office and a member of the Just
refer to frost protection page for reference. Refill
go team will be happy to help you.
the tank making sure the water pump is switched
There is no water coming out of the taps. off. If the motorhome is too cold you may need to
Does the control panel show there is water in the tank? warm the interior before you can reset the switch.
No Fill tank with water using hose provided My Gas hob is not working.
Is the gas bottle switched on?
Yes (Move on)
No Turn the gas bottle into the ON position
Is the water pump switched on? Yes (Move on)
No Turn on water pump on control panel, this
pressurises the water around the system. Please Do you have enough gas in the bottle? Sometimes the
make sure you turn the pump off when not in use to gas bottle gauge can get stuck, give the bottle a good
avoid burning the pump out shake to see if the reading changes.
Yes (Move on) No Fill up with LPG gas at your nearest filling station.
Yes (Move on).
Is the frost protection switch set?
No Push in the frost protection switch and refill the Is the isolation tap (located in the kitchen area) in the
tank, make sure the pump is switched off. If the ON position.
motorhome is too cold you may need to warm up No Turn the isolation key to the on position.
the interior before you are able to reset the switch. Yes Give us a call at the office and a member of the Just
Yes Give us a call at the office and a member of the Just go team will be happy to help.
go team will be happy to help.
My fridge is not turning on.
My 240v points are not working. Webasto (under counter) – open the fridge door. At the
- Check the hook up cable is connected properly to top of the control panel is a button with a circle and dot in
the motorhome and the campsite power point. the middle. Press and hold this button for about 3 seconds,
- Check the power is on at the power point as not all and the setting lights will appear (dim lights) Once its on, if
campsites will include electric hook up as standard; the door is kept open, the dim lights will change to bright
you may need to pay to have the electric as an lights, to help you see inside the fridge. This has nothing to
extra facility to your pitch. Alternatively, some power do with the settings changing, and is normal for this make
points may require you to switch them on first. of fridge.
- Check the motorhomes RCD unit has not tripped. Thetford (tall upright fridge) At the top of the fridge is the
Use the ‘Find It’ sticker to locate the RCD unit which control panel. The on/off button is the lowest of the three
is normally found in one of your kitchen cupboards. buttons. Press and hold till the blue light appears.
This is a grey box with a black switch that can
Dometic (under-counter) Rotate thermostat dial inside of
sometimes trip if the electrical system is overloaded.
fridge.
Make sure this switch is in the ON (up) position.
©Just go motorhomes 2021 23My fridge still won’t turn on. Is the window where the safety switch is located fully
Are other 12 volts electrics working (such as water pump, closed? (if applicable)
lights etc). If not check the leisure battery reading on the Error code 412
Habitation panel. If the level is too low to power the 12v No Make sure the window is fully closed while using the
system, then either connect to 240v hook up to charge boiler and the switch is fully depressed
leisure battery or run the van engine to recharge the Yes (Move on)
leisure battery. Also check the Habitation panel in case the
Fuse Blown light is showing. If so then the fuse in the fuse I have an error code appear and/or is flashing on my
box will need checking / changing. Please contact our on heating panel.
road support team by contacting the depot you collected Error code 412
the vehicle from. Edinburgh Depot: +44 (0) 1525 878 006 or This means that the window with the safety switch is not
Toddington Depot: +44 (0) 1525 878 005. fully closed.
What setting should I have my fridge? Solution
The Webasto should be on 1 star. To check this, press the The window is required to be fully closed.
snowflake button at the bottom of the control panel, and Error code 407, 420 & 514
the dim lights will show the setting. This means that there is no 240V power to the boiler.
The Thetford should be on 1* Moon. Press the top button to Solution
check how many blue lights are lit and keep pressing until Either connect your power cable to a 240V supply or
just one light is on. Then press the Moon button (middle change the power source to gas
button) to light up the moon setting. Error code 17 / 401
The Dometic can be set to your preference and adjusted This means the boiler reservoir is empty of water.
accordingly Solution
My fridge is too cold and freezing the food. Check your frost protection switch and refill fresh water
Check you are on 1 star or moon setting. If so, then turn tank. Switch on pump to refill boiler
off the fridge at night, as the door is not being opened for Error code 408, 507, 516, 517
access. The fridge will stay cool, and then if necessary turn These all mean that the gas supply has been interrupted.
it back on in the morning. Solution
My fridge was working and has now switched off. The general rule is a flashing code needs to wait 15
See the section above about ensuring the leisure battery minutes until it stops flashing, and then once solid, press
has sufficient power. rotary knob twice to reset. E.g. 517 no gas
My Webasto fridge is set on 1 star but keeps jumping A code that appears on screen solid without flashing,
up to 5 stars. needs fault correction in order to clear and restart boiler.
E.g. 412 window open
The five bright lights illuminate to let you see into the
fridge when the door is open. They have nothing to do If black triangle appears with no fault code, scroll down to
with the settings. If the bright lights are lit and you want triangle, press to select and code will appear on screen.
to check the settings, then press the snowflake button and See above for codes, if your error code is not listed please
the dim lights will show you the settings. You can then contact our on road support team by contacting the
make any adjustments to the settings using the snowflake depot you collected the vehicle from. Edinburgh Depot:
button as described above. Once the changes have been +44 (0) 1525 878 006 or Toddington Depot: +44 (0) 1525
made, if you keep the door open, the lights will go bright. 878 005
My boiler is not working, I can’t get any heating or hot .My TV will not switch on.
water working*? Do you have the master light switch on the control
Is the gas bottle switched on or are you hooked up to panel switched on?
an external supply? No Turn on the master light switch, this needs to be on
No If using gas -Turn the gas bottle into the ON to allow power through to the TV
position Yes (Move on)
No If using hook-up - Make sure you have connected Is the leisure battery charged?
the cable to external power supply point. No You need to have power in your leisure battery to
Yes (Move on) power the TV. Hook the motorhome up to the mains
Do you have enough gas in the bottle? Sometimes the electric at your campsite to recharge the battery.
gauge on the gas bottle can get stuck, give the bottle a The battery will also charge while you are driving
good hard shake to see if the reading changes. (see there is no electric or power in my motorhome
section)
No Fill up with LPG gas at your nearest filling station
Yes (Move on)
Yes (Move on)
Are there batteries in the TV remote control?
Is there power to the external supply?
No Try turning the TV on at the screen as the batteries
No Ask the campsite to switch on
may have run out of power
Yes (Move on)
Yes (Move on)
24 Justgo.uk.comFrequently Asked Questions
Is there a blue light on the white aerial box? If you
follow the aerial wire you will find the location of the
box.
No Check the white aerial box is turned on, there will be
a separate on/off switch on the box.
Yes (Move on)
Is signal strength dial on the white aerial box turned
up to full?
No Find the dial on the box which adjusts signal
strength, ensure this is on full then try retuning the
TV.
Do you have the master TV rocker switch turned on? Yes You may be in an area where there is very poor
No Find the rocker on/off switch and turn on signal, try asking other campers on the site if they
Yes (Move on are experiencing any problems. One last thing
to check before giving us a call is if there is any
Are the connections & wires securely plugged into the
noticeable damage to the aerial, if everything looks
TV?
OK give us a call at the office and one of our team
No Make sure all wires and connections are plugged in will help.
securely
I can’t remove the toilet cassette from the locker.
Yes Give us a call at the office and a member of the Just
Is the grey lever on the toilet inside the bathroom
go team will be happy to help.
closed?
My TV will not tune in.
No This lever needs to be in the closed position before
Do you have the master light switch on the control you will be able to remove the cassette.
panel switched on?
Yes Make sure you are also lifting the blue lever on the
No Turn on the master light switch, this needs to be on cassette up when trying to remove it. If you are still
to allow power through to the TV experiencing problems give us a call at the office
Yes (Move on). and a member of the Just go team will help.
Is the leisure battery charged? Dashboard warning light.
No You need to have power in your leisure battery to All of our motorhomes are well maintained and are
power the TV. Hook the motorhome up to the mains serviced regularly however if a warning light appears
electric at your campsite to recharge the battery. on your dashboard, pull over as soon as it is safe to
The battery will also charge while you are driving do so and refer back to the Fiat/Ford dashboard
(see there is no electric or power in my motorhome page. Alternatively, if you are also experiencing any
section) loss of power or anything out of the ordinary feel free
Yes (Move on) to contact Fiat/Ford assistance directly. The number
can be found on the dashboard pages in this booklet
Have you tried retuning the TV?
and on a sticker on the windscreen. You just need to
No The TV will need retuning every time you move into
give the vehicle registration number when you call.
a different region or area.
Yes (Move on)
©Just go motorhomes 2021 25Greater London
Just go
Redhill Farm
Harlington Road
Toddington
Bedfordshire
LU5 6HF
Edinburgh Airport
Just go
2 Drovers Road
East Mains Industrial Estate
Broxburn
West Lothian
EH52 5ND
All information is correct at the time of printing and is subject to change without notice.
©Just go motorhomes 2021 27 Justgo.uk.com©Just go motorhomes 2021
The content displayed in this document is the
intellectual property of Just go.
You may not reuse, republish, or reprint such
content without our written consent.
26 Justgo.uk.comYou can also read


