SOLAR HOT WATER SYSTEM - BY DAN GRETSCH, P.E.
←
→
Page content transcription
If your browser does not render page correctly, please read the page content below

CORPORATION
                                       Guide to Selecting and Installing A

                                              Solar Hot Water System
                                                                              By Dan Gretsch, P.E.

                                                        Renewable Energy Made Simple.

USA: R.W. Beckett Corporation • ph: (800)645-2876 • fax: (440)327-1064 | Canada: R.W. Beckett Canada Ltd. • ph: (800)665-6972 • fax: (519)763-5656 | www.beckettcorp.com
Guide to Selecting and Installing A

                   Solar Hot Water System
Introduction
        There has been a lot of press lately about the growth of renewable energies and the need for
energy independence. There have been articles written about Solar Electric (PV), wind, ethanol, bio-
diesel, and hydroelectric. At heart a pragmatist, I have researched each of these technologies in turn
and been disappointed to find that for whatever reason these technologies have little to offer me at the
current time. I thought solar electric offered a lot of promise until I researched the cost vs. the savings.
It takes 20+ years (with government incentives) to pay back the cost of the investment! While the
economics of wind are very attractive, the fact is that I live in a state (North Carolina) where wind is only
viable (according to the government energy office) along a tiny sliver of the coast and ridgelines of the
mountains. Unfortunately, I don’t live in the 1% of the state that has adequate wind speed to generate
electricity. It was at this point in my investigation that my job took me south.

         Brazil is a developing economy. Because of this, their government maintains a very high import
tariff on items that are/can be manufactured in the country. They do this to protect the jobs of the
workers in the country. The policy has the added effect of increasing the cost for many goods since
foreign competition is virtually eliminated as a result of the high tariffs. In 2004, Brazilian per capita
income was one-fifth of the United States. Because of lack of development in the financial markets,
it is uncommon for people in Brazil to take out a mortgage to buy a house. Rather, they build their
home and pay for it out of their earnings (remember they are making one-fifth of what we make in the
U.S.). Finally, as I visited various friends and co-workers who were building houses in Brazil, I noticed
that they were all installing solar hot water systems in a country where the wage rate is relatively low,
financing is virtually non-existent, and many goods are priced higher than in the U.S. How can this be
happening? When I asked a friend, he replied, “Because it makes economic sense.” Clearly, I had to
get more information.

        When I returned home, I researched solar hot water systems and found that he was correct.
Where solar electric systems take 20+ years to get a payback, solar thermal systems pay back in 5-7
years. If you consider the added value to the home ($4000 - $5000 according to a recent study by the
American Institute of Architects, Washington Post-August 6, 2006) the payback can be instantaneous.
If you roll in the federal (and many state) tax credits available, you end up with an investment that

© SOLARHOT 2006-2009 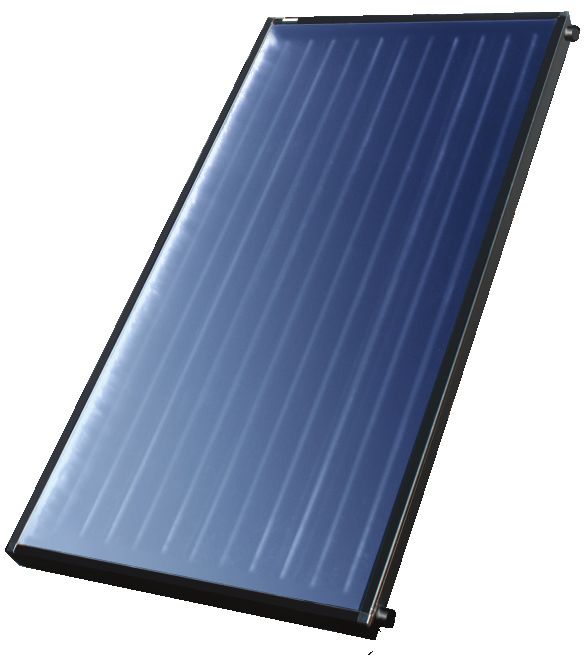
increases the value of your home dollar for dollar, pays you 30-50% back on your next tax bill, and pays
     you back 14% per year. I can think of no other investment that even comes close. So why haven’t
     people jumped on the bandwagon?

             Unfortunately there are many reasons. First, lack of familiarity with the technology. When
     many people think of solar they are interested in powering their microwave or refrigerator. However,
     anywhere from 12-30% of a home’s energy bill is used for generating hot water. If you consider hot
     water plus space heat, that number goes up to as high as 50%. I would attribute the confusion over
     solar to the amount of press that has gone into covering the solar electric industry.

             Second, they think the collectors look ugly on the roof. I have included a number of pictures of
     installed solar collectors in this book and will let you decide. In a country where we didn’t think it too ugly
     to run power lines everywhere, didn’t think television antennae, satellite dishes, and roof penetrations
     for vent pipes were too ugly, I find the inconsistency in this argument to be challenging. I will address
     one approach to make them more cosmetically appealing in the section “Siting of Collectors.”

             Third, people don’t know where to go to get one installed. This is a very real concern. There
     are two websites: www.findsolar.com and www.sourceguides.com that will point you in the direction of
     solar installers in your area. The number of people doing installations is pretty low. The number of
     people advertising that they do installations is even lower. This shortage of installers drives the cost
     and aggravation up. Part of the motivation for writing this book is to help eliminate this concern. I am
     hoping to do that in two ways. For those of you that are interested in installing a system, I am hoping
     that I will provide the details and encouragement to go out there and do it. There are a few who will
     have this installed on their own home and feel called to spread the word by getting out there and helping
     others install systems. I applaud this group and want to be here to support you as you try to change
     the world.

             Finally, there are people who will claim they want to install one, but can’t because of zoning
     rules. Many states have solar access laws where the ability to install a solar hot water system is written
     into state law and trumps any local zoning regulations. If your state doesn’t have solar access laws,
     I encourage you to contact your state representative to make sure it gets addressed during the next
     session.

     			                     					                                         -Dan Gretsch

ii                                                  © SOLARHOT 2006-2009
Section 1: Selecting a Solar Hot Water System
Chapter 1: What is Solar Thermal?
There are many people who are confused about what solar thermal is. It is exactly what its name
implies, heat from the sun. From our youngest days we learn that the sun makes things hot. Many of
us have tried to walk across blacktop with bare feet in the summertime and realize how hot the ground
actually is. Some have concentrated the sunlight through a magnifying glass to burn a leaf. These are
experiences that most people can relate to. Solar thermal seeks to take the heat that the sun naturally
provides and tries to channel it in ways that make it useful for our day-to-day energy needs. In this
book, I am not going to give you instructions on how to paint a water tank black and stick it in a box
so you can be amazed at how hot it gets. I will walk you through what you need to know to install a
modern, state-of-the-art, solar hot water system. A quality system today will provide 40-80% of your
hot water needs for free. Don’t worry; the other 20-60% will be supplied by a backup energy source so
you won’t ever have to take a cold shower.
Solar hot water, also called solar thermal or Solar DHW (domestic hot water), is the process where the
sun heats water and then you store the heated water in a storage tank. Almost everyone has tried to
take a drink from a hose in the yard in the summertime and gotten very hot water coming out of the hose
at first. That is all solar thermal is, with a little more attention on trying to collect that heat.
        Like the magnifying glass for burning the leaf, the solar collectors manufactured today are finely
tuned to capture and store the sun’s energy so you don’t have to think about it. A properly installed
system should be unnoticeable to the hot water users in the house, with a few exceptions. First, we
generally use larger tanks for storage than an average 40-gallon tank for a home. An 80-gallon tank is
pretty standard. The larger tank means we have more hot water available before we run out. That’s
right, you will have more hot water with a solar hot water system than you will with a conventional hot
water heater. Second, the utility bill will be noticeably smaller. Third, you will start to notice how many
other people have solar hot water panels on their homes or businesses. There are 1.5 million homes/
businesses in the United States that use solar hot water. Of those, over 94% say that it was a good
investment.
There is not a renewable technology available today that provides a better combination of environmental
and financial benefits than investing in a solar hot water system.

       News Flash: The federal government provides a 30% tax credit with no limit for solar hot
       water systems that are installed on primary residences after January 1, 2009. In addition,
       a number of states provide either tax credits or rebates for a solar hot water system. A
       standard Beckett SolarHot system will pay for itself in 5 to 7 years, depending on usage.

Chapter 2: Siting the Collectors
Proper placement is all about the sun. The solar electric world has developed many complicated
schemes to ensure that the solar collectors are always pointed as directly at the sun as they can be.
They do this because the efficiency (the amount of energy striking the surface that turns into usable
energy) of solar electric panels is in the teens. That’s right, their ability to convert sunlight to electricity
is generally around 17% efficient. With a panel that is only 17% efficient you need to make sure it

                                                © SOLARHOT 2006-2009
is maximizing the direct sunlight. However, a solar thermal panel can be as high as 80% efficient at
transmitting direct sunlight into usable energy. Because of the much higher efficiency, siting is not as
critical, although it is still important.
You want to install your solar panels in a spot that receives direct sunlight from 9 a.m. to 5 p.m. on
December 21st. Ideally, you would also like to install your collectors facing directly south and angled
to match the latitude of your site. It is at this point that many people get discouraged. Some of the
common problems with finding an ideal location are: wrong tilt, wrong angle, and shading. I will address
each in turn.
Issue #1—Wrong tilt: Many solar collectors installed in the past sought to get the perfect angle for
solar collection by using special mounting hardware to incline the collectors at the “perfect” angle. This
is almost entirely unnecessary. While it is true that if you tilt the collectors at exactly the same angle
as your site’s latitude you will maximize the solar radiation on the collector, the difference between
perfect and not perfect is virtually immeasurable. Running the numbers in a simulation, I found that
for Raleigh, North Carolina (latitude 35.70), if you mount the collectors between 00 and 600 the worst
performance is only 9% off of optimal. While the ideal angle for my solar collectors is 35.70, I installed
my solar collectors flush to the 12/12 pitch roof with roughly the same annual performance I would have
achieved had I mounted them at the “ideal” angle.
The general rule states that if your collectors are mounted at an angle less than your latitude you will
receive more heat in the summer and less in the winter. If your collectors are mounted at an angle
greater than your latitude your winter heat gain will be higher and your summer lower. That is the rule,
but as you can see from the previous example, the actual annual performance difference is small.
Issue #2—Wrong Direction: “My house sits on my lot in such a way that the section of roof I want to
install the collectors on points southeast or southwest or due east or due west.” While it is true that due
south is the optimal orientation, a solar thermal system is pretty forgiving in this regard as well. Your
collectors can be pointed within 450 of south and not see more than a 3.5% reduction in their output. If
you get much beyond 450 off of south, I would recommend increasing the area of your collectors before I
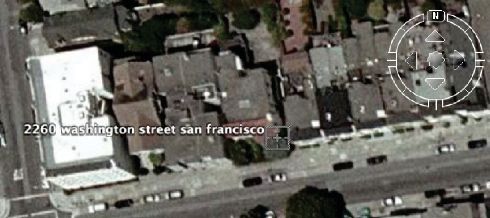
would recommend angling your collectors perfectly toward the sun. If you don’t have a compass handy,
I would suggest downloading a copy of Google EarthTM free from the Internet. With this software you
can get a satellite image of your home that includes the compass rose. Using this snapshot, you will
know the exact orientation of your home.
Picture 1: This is a snapshot from Google EarthTM showing a street address and how that building sits relative to South. As
you can see from the picture, the street is almost due south from the building so any collectors should be be installed facing
the street.
© SOLARHOT 2006-2009
If you want to know the exact impact of your tilt and direction on the performance of your system you
can go to www.retscreen.net and go through their solar calculator. They have weather data from every
weather station in North America, as well as a database of most solar collectors available today. You
simply enter the weather station that is most appropriate for your location, indicate the tilt of the collector as
well as the orientation (azimuth), and the software will spit out the overall energy produced. You compare
that with the perfect orientation and you can see what impact your siting decision has on the overall
output of the system. Feel free to play around with this database. It provides a wealth of information.
Don’t be discouraged if you can’t figure out all of the other inputs because they are not pertinent to the
question of what impact your siting has on the performance of your system.
Note: Later in the book we will discuss sizing of the collector area. The rules of thumb that we go over
are based on collectors being pointed south and angled to match the latitude of the site. If you need to
use an angle and pitch that significantly reduces the solar gain of your collectors (as measured by the
Retscreen database), I recommend adding collector area to get back to the same quantity of energy
collected.
Issue #3—Shading: If you mount your collectors in a location where they are shaded during a portion
of the solar day or are shaded during a portion of the year, you will reduce the output of the system.
There are no exceptions to this rule. While you can increase the number of collectors to increase your
heat gain while the sun is shining, a shaded solar collector won’t collect any heat. Now you are torn.
You want to do the right thing for the environment by going with solar energy but it seems like you are
moving in the wrong direction if you have to cut down trees to get there. I can help with this a little. The
BP solar website can show you that the environmental benefits of installing a system equals the impact
of planting 1 acre of trees. So unless you live in the forest, the environmental benefit of adding a solar
hot water system is greater than the harm of removing a few trees. We removed 2 trees from our site
(1 pine and 1 walnut) and it broke my heart to do it, but I knew pollution-wise we would be better in the
end. An unexpected benefit was that by removing those two trees, our yard and smaller trees in it have
flourished.
Chapter 3: Sizing a System
In this chapter we will only cover sizing of systems for domestic hot water. While these same principles
and systems work well for space heating, the bulk of initial applications lie in the hot water sector.
There are a couple of rules of thumb that are useful for sizing solar hot water systems. Granted,
these rules of thumb apply for the average person/families water usage. If you bathe once a month
and wash all of your dishes in the creek, they will provide more hot water than you need. If you have
teenagers who participate in sports and like to take multiple 30-minute hot showers per day, the sizing
will probably provide a smaller fraction of your hot water. Depending on your location, the size of the
system, and your usage patterns, you should expect a solar hot water system to provide between 40-
80% of your hot water needs. This is also a rule of thumb. Personally, we have turned off the back-up
elements in our hot water tank so that the sun is providing 100% of our hot water. This may lead to a
few showers that aren’t quite as hot as some would like, but the environmental and financial benefits
are worth it for us.
       The Beckett SolarHot Advantage: Our systems are scalable. It is easy to add additional
       collectors to the system. It’s just as easy to use a larger hot water tank or put two standard
       tanks together in case you decide that you need additional hot water storage.
                                                 © SOLARHOT 2006-2009
Sizing the collector area: The maximum energy you can get out of your system is controlled by a
few things, including the square footage of collectors on your roof (or in your yard). The more square
footage of collectors you have, the more potential you have for collecting solar energy. The rule of
thumb says that if you live in the South, you should have 20 sq. ft. of collector area for the first two
people in the household and 8 sq. ft. of collector area for each person after the first two. The truth is that
the farther north you are, the less sunlight you receive and the colder your groundwater is (therefore
requiring more heat to get it to 1200F). If you live farther north than Virginia, you would want to install 20
sq. ft. of collector area for the first two people and 14 sq. ft. per person for any additional people.
For example, a typical family would need:
Northern climate:
Occupants Ft.² per person Total Ft.²
1 20 ft.² 20 ft.²
2 20 ft.² 40 ft.²
3 14 ft.² 54 ft.²
4 14 ft.² 68 ft.²
5 14 ft.² 82 ft.²
6 14 ft.² 96 ft.²
Southern climate:
Occupants Ft.² per person Total Ft.²
1 20 ft.² 20 ft.²
2 20 ft.² 40 ft.²
3 8 ft.² 48 ft.²
4 8 ft.² 56 ft.²
5 8 ft.² 64 ft.²
6 8 ft.² 72 ft.²
This rule of thumb doesn’t take into consideration the quality of the solar collector that you use. It is
possible to have a solar collector that only produces 2/3rd of the potential energy because the absorber
is painted black vs. using a selective coating, or because it uses lower quality glass that doesn’t allow
as much light to pass through. This rule of thumb is appropriate for high quality solar collectors, such as
the Beckett SolarHot’s Platinum collector series. I am defining a high quality solar collector as having
either black chrome plated absorber or having some form of selective surface. The glazing (glass) on
the collector needs to be high-transmission tempered glass. Avoid plastic glazed collectors since the
clarity of the plastic will degrade quickly over time and ruin the value of your investment.
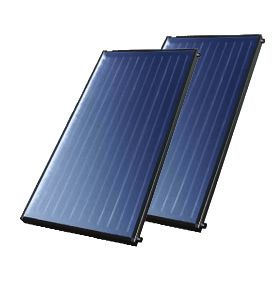
The Beckett SolarHot Advantage: Our platinum series collectors use selectively
coated all-copper absorbers with high transmission solar glass. Flat-plate collectors
will perform well while laying flat on most rooftops and are considered by many to be
far more aesthetically attractive than evacuated tube collectors.
System performance is based on three factors:
• First, the amount of energy absorbed by the collectors, which is controlled by the collector area
as well as their efficiency at absorbing the solar energy.
© SOLARHOT 2006-2009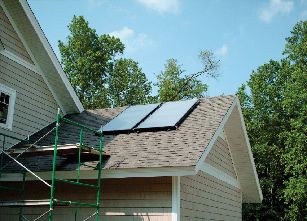
• Second, the size of the storage tank controls how much of the heat that you absorb in from the
   collectors that you can keep. If you have a storage tank that is too small for your collector area, you
   will heat the tank up very quickly and then the system will either need to dump the heat (in a glycol
   system) or just sit there. If the storage is too small (40 gallons), you will rapidly deplete the heat
   you have stored and then switch over to auxiliary heat. Because a solar hot water system is just
   that – a system – if you cut corners on a single piece of the system you are impacting the overall
   performance of the system. An 80-gallon water heater is only $100 more than a 40-gallon water
   heater so no need to put $3000 into an installation and only get 50% of what you could have gotten
   had you put in $3100.

   • Third, how efficiently the heat from the collectors is transmitted to the storage tank.

Sizing the Storage Tank: The size of the storage tank is also dictated by where your geographic
location. If you live in the Sunbelt, you should have 2 gallons of storage for every 1 sq. ft. of collector.
In northern climates, we have seen systems as low as 1 gallon of storage for every sq. ft. of collector,
but you should aim for 1.5 gallons or more of storage for every sq. ft. of collector.

         The Beckett SolarHot Advantage: Our system integrates hot water tanks of multiple
         capacities into the solar system. This creates a scalable, economical solution for your
         hot water storage needs. These tanks come with built-in electric heating elements
         for those days when the system needs auxiliary heat to meet the hot water needs.

We have covered the guidelines for sizing collectors as well as the storage tank. There are a couple of
overriding factors to consider when trying to size an installation. It will take the same pumps, controls,
piping, pipe insulation, and valves for a small system that it will take for a large system. Be careful of
sizing a system for the minimum when you could cover a larger % of the hot water load and allow for
future family growth or the sale of the home to a larger family for only a slight increase in incremental
cost.
    Example: A couple decides they want to do their part and install a solar hot water system. Based
    on the calculations they need 40 sq. ft. of collector area and a 60-gallon tank. To cover a larger
    percentage of their hot water load and to take into consideration future family growth or sale of
    the home to a larger family, I would recommend installing 64 sq. ft. of collector and 80 or 119 gal-
    lons of storage. The incremental cost would be around $500, but the additional usability of the
    system would be much greater.

Tanks come readily available in 40, 50, 80, and 119 gallons. They can be combined to make storage
systems of whatever configuration you want, (i.e. two 50s to make 100 gallons of storage). When you
start using components of a non-standard size, the cost (particularly the cost per KW) of your system
rises pretty quickly. I have found on hot water tanks it is significantly cheaper to use groups of standard
size hot water tanks (40, 50, 60, 80, 119 gallons) rather than use specialty tanks or tanks larger than
119 gallons. So, for a household that requires 64 sq. ft. of collector area, I would use 2-4’x8’ collectors
and either an 119-gallon storage tank or an 80-gallon tank plumbed with a 40-gallon tank.
                  Total Ft.²              Gallons per ft.²           Gallons of Storage Rqd.
                     64                         1.5                             96
                     64                          2                             128
                                              © SOLARHOT 2006-2009
Sizing the heat exchanger: There are several different types of heat exchangers available on the
    market today, including hot water tanks that have integral heat exchangers built in. Each one of these
    methods works by moving the cold storage tank water past the heat exchanger before being deposited
    back into the storage tank. At the same time, the hot water from the collector loop is pumped on the
    other side of the heat exchange surface and then back up to the collectors. A system with a properly
    designed heat exchanger will transmit the heat from the collector loop to the storage tank quickly.
    Generally speaking, the larger the surface area, the better the heat transfers. If you undersize the heat
    exchanger, your pumps will run longer to extract the heat from the collectors and reduce the energy
    saved with the system. The larger the heat exchanger, the higher the cost. You want as much heat
    exchanger surface area as you can afford.

            The Beckett SolarHot Advantage: SolarHot has uniquely created the SolVelox
            package, which pre-assembles and integrates an oversized, stainless steel heat
            exchanger along with the pumps and valves necessary to drive a two-loop solar
            system. The heat exchanger and pumps are sized to meet the heat output of up to 6
            solar collectors, so one SolVelox appliance provides an economical solution as you
            scale the solar system to meet your particular needs. It is externally mounted in order
            to reduce maintenance issues.

    Chapter 4: Choosing a System
    The first question you have to answer before you can accurately choose a system is to determine
    whether it freezes in your location. Go to http://www.ncdc.noaa.gov/oa/climate/online/ccd/lowtmp.txt.
    This website covers the lowest temperature on record for all of the government’s major weather stations
    throughout the country. If it never freezes in your area, then the best system you could own is an open
    loop system. This system has no heat
    exchanger between the storage tank and
    the collector. Based on a sensor mounted
    on the collectors and a sensor mounted on
    the bottom of the storage tank, it detects
    when there is more heat in the collectors
    and activates a pump to capture that heat.
    It circulates water from the bottom (which
    is colder than the top) of the storage tank
    through the collectors to pick up the heat
    and then back to the storage tank. Once
    the collectors are close to the same

                                                © SOLARHOT 2006-2009
temperature as the storage tank bottom, the pump automatically turns off.
If your location experiences freezing conditions, even if it is only once every 5 years, I recommend
installing a freeze protected system to eliminate the concerns of having pipes or collector freeze up
during a “freak” cold snap that catches you off guard. There are two basic types of freeze-protected
systems: drainback and glycol. The chart below covers some of the points of difference between
them.
Drainback Glycol
Heat Transfer Fluid: Water Propylene glycol*
High Limit: Has it Doesn’t have it
Fluid Life: Forever 3-5 years
Pump Energy Requirements: Higher Less
Heat Exchange Performance: Best Less Effective
Initial Cost: More expensive system initially because of the cost Higher installation costs from glycol and
of a drainback tank piping requirements
Location Limitations: Requires gravity draining Can be mounted anywhere
* Note: Use only buffered propylene glycol for your heat transfer fluid. Never use toxic ethylene glycol.
A freeze-protected system works by having two loops. The first loop circulates your heat transfer fluid
through the collectors and then to one side of a heat exchanger. The second loop circulates your
potable water on the other side of the heat exchanger by using either forced circulation with a pump or
passive circulation through convection. Basically, you are trying to maximize the amount of heat that
you take from your collectors and put in your storage tank.
Drainback System: With efficient heat exchange being the objective, I would recommend a
double-pumped drainback system. Water is a better heat transfer medium than the water/glycol mix
and a double pumped heat exchange is 20-60% more efficient than a single-pumped heat exchange.
On both points, drainback wins. In addition, drainback has the added feature of allowing the system to
shut off once you have put as much heat as you want in your storage tank. The differential control will
automatically shut your pumps off once you have reached the high limit on the control. If you did this
with a glycol system, the pressure would spike (opening your pressure relief valve) and the additives in
the glycol would be destroyed, requiring it to be replaced.
A drainback system works by using a reservoir (drainback tank) that you fill with water. That reservoir
is located below the collectors. When the differential control says there is heat to be harvested in the
collectors, the pumps turn on and force the water from the reservoir through the heat exchanger and
© SOLARHOT 2006-2009
up to the collectors. Once the water reaches the highest point on the collectors, the water then falls
    back to the reservoir where it starts its journey all over again. Since water finds its own level, when the
    pumps turn off, if all the piping is angled from the collectors towards the storage tank, water will drain
    out of the collectors, pass through the pump and heat exchanger and then ultimately lift the level in the
    drainback tank (hence the name).

            The Beckett SolarHot Advantage: Our system uses a double-pumped efficient design
            as mentioned above. It comes with the two closed loops already pre-assembled in the
            SolVelox package in order to reduce both your installation effort and potential assembly
            issues. As a result, this should reduce the overall cost of the system.

    Caution: The primary design principle behind a drainback system is that the water in the collectors is
    able to drain back when the differential control turns the pumps off. In order to accomplish this, the
    collectors must be inclined 1/4” per foot towards the inlet line. In addition, all the piping must also be
    angled to facilitate the flow of water towards the drainback reservoir. If you violate this principle, you
    jeopardize rupturing your pipes to/from the collector or the absorber in the collector itself should it freeze
    with water still in it.
    There are several different styles of drainback systems out there. Double-pumped external heat
    exchange, double-pumped with an integral heat exchange in the drainback reservoir, and single-
    pumped with an integral heat exchanger in the storage tank. The argument for the last is generally that
    the pump requirements of that system are the lowest so the parasitic losses of running the pumps are
    minimized. This is not necessarily the case. Of the two pumps in a drainback system, the larger one
    is the one that runs the water through the collectors. That pump will run as long as it takes to bring the
    temperature differential between the storage tank bottom and the collectors within a preset limit. If you
    make your heat exchange between the storage loop and the collector loop worse, you will require the
    large pump to run for a longer period of time to put the heat in storage. So the argument that you have
    less pump horsepower is correct although you may be significantly increasing the running time of the
    pump and thereby eliminating or even reversing the “benefit” of having only one pump. While having
    a single pump system will reduce pump maintenance, the added cost for the special heat exchange
    tank and its maintenance make a double pump system a better approach than a single pump drainback
    system.

    I recommend an externally mounted heat exchanger. Either shell and tube or brazed plate heat
    exchangers work well with their own unique advantages. I prefer the brazed plate heat exchanger
                                                  © SOLARHOT 2006-2009
because of it’s cost-to-performance ratio, as well as its compact size. A 5”x12” heat exchanger can be
mounted on the side of a standard 80 gallon tank and all of the piping be run from there. With a profile
of only 3” off the tank, it is ideal for tight spaces as well.
The Beckett SolarHot Advantage: Complete systems include an oversized external
heat exchanger which can be easily mounted on the exterior of an unmodified standard
hot water tank. The hot water tank will provide additional water for those times when
solar alone will not meet all of the hot water needs. Our package eliminates the costs
and lead times associated with custom tanks. The external positioning of the heat
exchanger also reduces maintenance difficulties down the road.
A standard 8-20 gallon hot water tank can be used as the
drainback reservoir in this configuration as well as using a
standard electric water heater for the storage tank/back-
up.
Glycol system: If your site requires that you install a glycol system, you need to consider a number
of the options presented in the section on drainback systems. You can go with a single pump heat
exchange system or a multi-pump external heat exchanger. The same relative advantages apply as
listed before. The only option that is not available for a glycol system is a system where the heat
exchanger is integrated with the drainback tank (there is no drainback tank).
Key differences when installing a glycol system:
First, the size requirements of the pump for the
collector loop are lower than the same pump on
a drainback system. Second, copper is the only
piping material suitable for a glycol system although
you can use ½” pipe rather than ¾”. Third, you
cannot use the high limit function of the differential
controller. The high limit function of the control
turns the differential control off once your storage
tank reaches a certain pre-determined set point.
Finally, you need to change your heat transfer fluid
every 3-5 years to keep it from turning acidic.
© SOLARHOT 2006-2009
You don’t require a drainback tank in this system but you will require an expansion tank. The expansion
     tank should be sized to the overall volume of the piping and collectors. For proper sizing of your
     expansion tank, see http://www.amtrol.com/thermxtrol.htm. The expansion tank that you use should be
     mounted below or beside the connection to the piping. Never mount it above its connection to the pipe.
     Polypropylene-lined expansion tanks are preferred for longevity. A pressure relief valve should also be
     installed on the system. The pressure relief valve can be mounted on the roof, in the boiler room, or
     anyplace in between, but you need to make sure that there are no isolating valves between the collector
     and the pressure relief valve. Violate this principle and you are creating a potential safety hazard.
     Heat exchangers: Many companies will tout their individual product, whether it is the best performing
     product or not (no fault there). You should understand a few concepts before you decide which heat
     exchanger makes the most sense for you. The more surface area, the shorter the heat transfer path,
     and the more flow (on each side of the heat exchanger), the better the performance. There are systems
     on the market today that take advantage of individual pieces of this equation trying to convince the
     buyer that their way is better, e.g. aftermarket submerged heat exchangers. The claim is that you can
     feed a spiral tube into the port of an existing tank to provide the heat exchange. This product takes
     advantage of a short heat transfer path (being immersed in the storage tank) but isn’t able to get around
     the limitation of surface area (you can only get so much surface area on a tube installed through the
     existing, small, port on the top of the tank). These rules can be applied to any heat exchange process
     that someone tries to sell.
     While there are no exceptions to the heat exchanger rules given above, there are some other
     considerations that might be worth noting. There are tanks on the market today that have ceramic-
     coated heat exchanger coils immersed in the tank. These tanks eliminate the need to clean the heat
     exchanger since scale won’t adhere to the ceramic coating. The same can be said for the heat exchange
     tanks that are wrapped with a coil to provide the heat exchange. Both of these methods eliminate the
     maintenance that may (not necessarily) be required on heat exchangers that don’t protect the heat
     exchanger from scale. Understand, by selecting a lower maintenance option you will be sacrificing
     performance.
     Choosing a collector: “Caveat Emptor” – Buyer beware. There are (as in all industries) people selling
     their product that make claims about the performance of the product that aren’t backed up with any
     data. In the solar market there is a single independent rating agency that rates the performance and
     durability of collectors the SRCC, Solar Rating and Certification Corporation. They are co-housed with
     FSEC, Florida Solar Energy Corporation. Don’t believe the sales hype; believe the numbers. There are
     several high-quality collectors on the market today as well as a number of lower quality options. The
     SRCC provides a minimum requirement for the quality of solar collectors sold today. You can find the
     list of collectors and collector manufacturers that meet this threshold at http://www.solar-rating.org/.
     A few points to consider in selecting a solar collector: You should choose a solar collector that has a
     selectively coated surface to maximize the heat that your panel collects. Most manufacturers produce
     both a black painted absorber model as well as a selectively plated absorber model (generally black
     chrome). The supplier will generally charge $50-$100 more per collector for the selectively plated model
     since it produces as much as 20% more energy. This is money well spent. If you look at the overall
     cost of materials for your system plus the time and money to install it, this incremental investment is a
     small price to pay for a significant improvement in your energy savings. Among the choices you make
10
     on your system, this one is a no-brainer.
                                                  © SOLARHOT 2006-2009
There are manufacturers that produce collectors that have plastic glazing (covers) rather than tempered high
transmission glass. While plastic has come a long way (copper pipes being replaced with PEX), the plastic
glazing isn’t ready for prime time yet. The glazing looses its clarity over time, compromising performance.
Each collector manufactured on the market today has different mounting hardware. If you want your
collector to have an asthetically pleasing look on your roof, I would suggest choosing a collector and
mounting hardware that are either black anodized or black painted, as a matter of taste. There are
collectors supplied today that have a mill aluminum finish with mill aluminum mounting feet. If you
prefer that look, that is your call. I prefer that collectors appear unobtrusively on the roof rather than
having them as a stylistic feature.
The Beckett SolarHot Advantage: The SolarHot collectors come in an extruded
black aluminum casing which provides an attractive look on the roof, similar to a low-
profile skylight. The collector glass is patterned to minimize sunlight reflection and
tempered to maximize strength. The absorber plate is selectively plated over copper
for maximum heat absorption. Layered insulation within the collector minimizes heat
loss. The result is top performing flat plate collectors as measured by the SRCC.
Section 2: Installing a Solar Hot Water System
Chapter 5: Piping
Depending on whether you are installing a glycol system or a drainback/open loop system, you may
have two choices for piping.
Option 1 – run your entire pipe in ¾” copper.
Advantages:
• This option has the advantage of being time-tested. Most systems installed throughout the
country (approximately 1.5 million systems) are piped this way.
• With copper you don’t have to worry about the extremely high pressure and temperature you
might get from that first surge of water going through the collector after it has been sitting in
the sun.
Option 2 (only available for Drainback and open loop systems) – run the lines from the drainback tank
to the heat exchanger and from the heat exchanger to just before you penetrate the roof in ¾” Pex
(cross-linked polyethylene) and then run your roof penetrations, collector connections, and collector-
drainback leg in copper.
Advantages:
• The cost of Pex is roughly ¼ of the cost of copper.
• Pex is easier to work with than copper.
• Since Pex is plastic it is naturally more thermally insulating than copper (assuming the same
amount of insulation, you should loose less heat with Pex along your pipe run).
Disadvantages:
• Pex can’t handle the pressure or the temperature that copper can. High limiting the system at
1600F can circumvent this difference.
• If you use Pex that doesn’t have an oxygen barrier in it, you will need to use a bronze pump on
the collector side to keep the pump from corroding.
© SOLARHOT 2006-2009
11Whether you plan to upscale your system and go with copper or stick with Pex be sure to use ¾” I.D.
pipe for all of your runs to and from the collector for a drainback system to insure good drainage when
the pumps are off. Referring back to the basic design principle of a drainback system, make sure that
all of your pipe runs are sloped to allow gravity flow of water from the highest point in the system (the
top of the collectors) to the lowest point in the system (the storage tank). If you have to run the pipe
through an attic or crawlspace where a long sloped run is required, be sure to support the piping to
insure that it doesn’t sag (and thereby violate the drainback design principle). It is pointless to install a
high quality system only to have it fail two years after installation because the pipes weren’t supported
and started to sag over time.
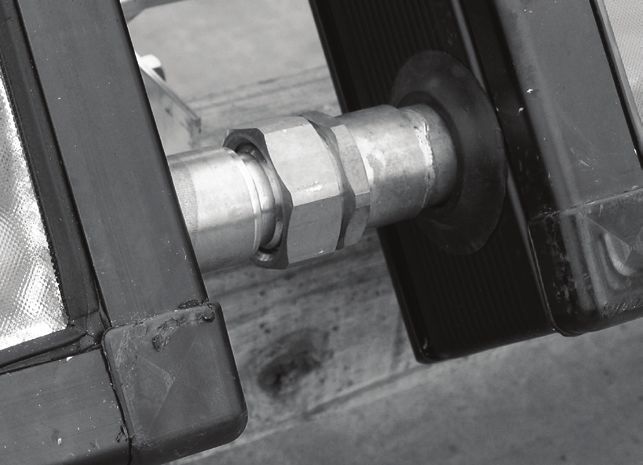
If you are installing a glycol system, you need to use copper for all of your piping runs (with glycol you
only need to use ½” I.D. copper.). You want to give special consideration to how you flash your copper
piping as you penetrate the roof. Use copper pipe flashing (see photo). Use roofing tar underneath the
copper base and on top of the base underneath the shingle. Once you have placed the ¾” pipe through
the receiver pipe and ring you will sweat the ring to the pipe to eliminate any chance of leaking.
The Beckett SolarHot Advantage: The Platinum series of collectors includes unions
with gaskets to facilitate installation on the roof. The mounting hardware is designed
to allow you to easily snap the collectors into their lower mounting clips, reducing your
handling time once on the roof.
Chapter 6: Insulation
By installing a solar water heater, you are trying to reduce your energy
requirements. Whether you are doing this to reduce your power bill
or to be a better steward of the resources we have been given, the
objective is the same. The last thing you want to do is spend a few
thousand dollars installing a solar hot water system only to have the energy that you have harnessed
squandered as it reradiates your collected heat back through un-insulated pipes or storage tanks.
There are a few considerations when it comes to how much insulation. More is better, but it is subject to
the law of diminishing returns: more insulation will cost more and there are physical limitations to how
much insulation you can have. For any outside pipe runs, I would recommend insulating them to the
greatest thickness that you can find and will fit. Any pipes running through interior walls will be limited
by how much insulation can be installed (generally not more than ½” wall insulation on a ¾” pipe). Any
pipes not running through walls should have 1” wall thickness insulation.
12 © SOLARHOT 2006-2009If you are installing a glycol system, or a drainback/open loop system with a relatively high limit on the
storage tank (1700 F+), you will need to use rubberized insulation for insulating the pipes. The more
common polyethylene insulation can’t handle the high heat and will melt. If you use a lower high limit
on your tank you can use the less expensive insulation. If you use a 1500F high limit on your open
loop or drainback system you can save money by using Pex piping and polyethylene insulation. When
the insulation is exposed to the sunlight, you need to provide jacketing for the insulation. Visit your
local HVAC supply house and ask what size and styles of jacketing they have for their insulation. If the
exterior insulation is not protected from U.V. it will disintegrate over time.
It is also a good idea to make sure that you have extra insulation on the storage tank(s) as well. You
can purchase a water heater blanket from the hardware store for $30. I would also recommend that you
insulate about 4 feet of the cold line coming in to the storage tank. By taking these extra precautions,
you will insure that you keep as much of the solar energy as possible.
Chapter 7: Temperature Sensors and Control Wires
All solar hot water systems should have a differential control to turn the pumps on and off. A differential
control uses a temperature sensor mounted on the collector as well as a temperature sensor mounted
on the bottom of the tank. The control detects when the collectors are hotter than the storage tank and
turns the pumps on to circulate the heat transfer fluid through the collectors to harness the heat that has
been gained. When the storage tank temperature matches or is greater than the collector temperature,
the pumps are turned off. The differential control is the brains of the solar hot water system.
In order for a differential control to work, it has two sensors wired to the control. The first sensor (the
collector sensor) should be attached to the pipe leading out of the top of the collector array. Use a strap
clamp to secure the sensor to the pipe. Be sure to provide adequate insulation around the sensor and
pipe to allow an accurate reading of the temperature in the collectors. The second sensor should be
stuffed under the insulation at the base of the tank. If you are using a standard 80 gallon, two element
electric water heater as your storage tank/back-up heater, then the tank bottom sensor can be mounted
under the insulation under the lower element tucked between the insulation and the tank wall.
You should use 18/2-shielded wire with a high temperature jacket for running the sensor wire to the
differential controller. Never run control wire within 12” and parallel, or in the same wire way as power
wires. If you have to pass power wires, run the control wire perpendicular to the power wire as you cross
their paths. By following this rule, you should avoid intermittent problems with the control temperatures
sensed.
Chapter 8: Pumps
Pumps circulate the heat transfer fluid through the collectors and the heat exchanger. Depending on
whether you install a single pump or dual pump system you will require a small amount of knowledge
about pumps to make an appropriate selection. If your pump is exposed to a supply of air, you should
use bronze pumps rather than cast iron. (Note: if your pump is on the storage tank side of the loop it
will be regularly exposed to air entrained in the water coming from the city or your well. If your pump is
on the collector side of a freeze protected system you can use a cast iron pump and flanges). Bronze
pumps are not necessary if the pump is not regularly exposed to air although you may desire one for
overall pump body longevity. The pump that you require is also based on the head requirements of
your system.
© SOLARHOT 2006-2009
13Two things to note here: head and flow rate of a pump. The head represents how high the pump can
lift a column of water. They measure flow by how much water (gallons or liters) a pump can push at a
given head. A pump head/flow curve for the Armstrong Astro series pumps looks like this.
This graph shows that an Astro 70 would push 4 GPM at 23 feet of head.
See the chart below to find which pumps are appropriate for which application. Different manufacturers
pumps can be cross-referenced with this list or the above head/flow graph.
The Beckett SolarHot Advantage: The pumps for both loops come already packaged
into the Solvelox assembly. This gives you confidence that your customer will have the
right pumps at the time of installation.
14 © SOLARHOT 2006-2009Chapter 9: Placing the collectors
Warning: All work more than 5’ above the ground should be conducted with the appropriate fall protection
equipment.
We have already covered the proper siting and sizing of the solar collectors, now we will delve into the
proper placement. Assuming they will be roof mounted, the collectors should be located at least 18”
below the ridge and 18” in from the edge of the roof. This is a guideline to prevent the collector from
seeing abnormal uplift during high winds. (See picture below)
The tops of the collectors are 18” down from the ridge.
Once you have identified the general area where the collectors will be mounted, use a chalk line to
mark the upper and lower edge of the collector. These lines should be parallel and spaced apart the
same distance as the collector length. The collectors must be mounted with the headers parallel to the
ridgeline for a drainback installation.
Note: You want to make sure that these chalk lines are inclined down the slope at least 1/16” per
foot to insure drainage in a drainback installation.
The next step will be to identify where the rafters are under the shingles. You can do this using several
different methods.
If you have access to the attic underneath:
1. Find an existing roof protrusion and measure the distance from that protrusion to the nearest
rafter from underneath. Return to the roof and make a chalk line perpendicular to the roof slope
that goes through that point.
2. If you have no roof protrusion drill a hole through the roofing into the attic space. With the
drill through the roofing measure the distance from the end of the drill to the nearest rafter from
underneath. Return to the roof and make a chalk line perpendicular to the roof slope that goes
through that point. Be sure to fill the drilled hole with roofing tar when you are finished.
© SOLARHOT 2006-2009
15If you do not have access to the attic from underneath:
1. Peel back the shingles from the edge of the roof to determine where the roof decking sheets
are joined. Make a chalk line perpendicular to the roof slope that goes through that point.
2. Now that you have identified a single rafter you should snap chalk lines parallel to your
perpendicular line (spaced to coincide with the rafters underneath) until you have all of the
rafters marked underneath the area where you will be placing the collectors.
3. Using your mounting feet placed over the intersection of your chalk lines, mark where you will
drill your holes. Drill a ¼” 2” deep where you have for each of the mounting feet. Note:
You want to maximize the space that you have between your feet on the upper and lower
edge of the collector. Depending on your rafter spacing you will be placing the mounting feet
either 32” apart under the collector or 24” apart under the collector. Between the collectors
use a single rafter as the spacing between mounting feet.
4. Once you have drilled for you mounting feet, inject roofing tar into each one of the drilled
holes.
5. Using the mounting foot and 3/8-16 x 2.5” stainless steel lag screws, stainless steel flat
washers, and stainless steel lock washers, place the foot over the pre-drilled holes.
6. Inject roofing tar underneath the flat washers and screw the foot assembly through the
roofing material to the rafter. You should see roofing tar ooze out from underneath the
mounting foot. Repeat this process for all of the mounting feet.
Placing the collectors:
Prior to bringing the collectors to the roof you should sweat the following items on the collectors while
they are still on the ground:
For a right to left flow (reverse for left to right):
• 2 – 1” couplings or unions to the side(s) between the collectors
• 1 – 1” pipe cap on the upper right header pipe of the collector
to be mounted on the right
• 1 – 1” pipe cap on the lower left header pipe of the collector to
be mounted on the left
• 1”- ¾” elbow (elbow pointed straight down) lower right header
• 1”- ¾” elbow (elbow pointed straight down) on the upper left
header
With the mounting feet in place, place the collectors over the mounting feet securing the bottom of the
collectors with the mounting feet. Slide the collectors together so the unions are touching. With the
1”x3/4” elbows, mark where the piping should penetrate the roof. Move the collectors and drill the roof
penetrations for both the incoming and outgoing copper pipe.
16 © SOLARHOT 2006-2009Chapter 10: Charging the system
I recommend that prior to filling the system you pressurize it with compressed air (to 60 p.s.i.) to check
for leaks. The system should be able to hold pressure for 15 minutes without pressure loss. Once you
have ensured that the system doesn’t leak, you are ready to fill the system.
Drainback:
1. If you have used a standard hot water tank for your drainback tank, with the use of a funnel
(if there is a top-mounted port) or the use of an inverted boiler drain, pour distilled water into the
drainback reservoir until the reservoir is filled.
2. If you are using a top-mounted port for filling, use a dipstick to determine when the water is
close to the top of the drainback tank.
3. Once the drainback tank is filled, insert the brass plug or Pressure/Temperature valve prior
to turning the system on.
4. Turn the system on and let it run for a few minutes.
5. Listen for the fall of water into the drainback tank to ensure that the system is working, then
turn the pumps off.
6. Wait a few minutes. Check to make sure that the water returned to the same level that it was
when you filled the tank. If it doesn’t, you need to double check to make sure you have enough
slope on all of your components to allow proper drainage.
Glycol:
1. Using the shraeder valve on the bottom of the expansion tank, release the pressure to 30
lbs.
2. Open both boiler drains on the collector side of the loop.
3. Using a high head style piston pump, connect the outlet side of the pump with a washer hose
to a boiler drain on the system.
4. Connect a flexible hose from the inlet side of the pump to a 5-gallon pail that contains a
pre-mixed solution of inhibited propylene glycol and water. The maximum freeze temperature
of your site determines the concentration of the mixture. Reference NOAA weather data and
http://www.raypak.com/afreeze.htm to determine the correct concentration. Typically a 50/50
ratio is sufficient.
5. Connect a hose from the other boiler drainback to the 5-gallon pail.
6. Turn the pump on and start charging the system. As the pump runs you should see air come
out of the hose into the bucket. The air should quickly change to air mixed with glycol. If you
keep the pump running you should see over time the amount of air coming out of the system
reducing. Ultimately, you should not see any more air bubbles coming through the system.
7. Once the air bubbles have stopped close the exiting boiler drain valve.
8. Continue charging the system until the pressure (as measured by the pressure/temperature
gauge on the system) reaches 15 psi + 2 psi for every foot of head.
© SOLARHOT 2006-2009
17Appendix A: Destratification
One of the real concerns that people should consider when installing a solar hot water system is what to
do about destratification. Your hot water heater (or any body of water) naturally has the hot water rise
to the top. This is useful in a hot water heater since it allows the homeowner to enjoy the hottest water
the tank has to offer since the hot out to the house comes from the top of the tank. In a solar hot water
system where you use a single tank with a back-up element or where you have a pump circulating the
water in the storage tank you have a chance to stir up the tank by over-pumping. This stirred up water
can cause two problems; 1) by moving the colder bottom water around in the tank it can cause your
element to fire (using energy) when you don’t really need it, 2) by moving the colder water to the top the
owner who thinks they are taking a hot shower gets water that is colder than they would like.
Three ways to handle destratification:
1. Use a special solar dip tube on the return of any heated water back into the tank. This
dip tube has a closed end and multiple perforations down the length. This allows the return
water to seep out rather than gush.
2. Use a storage tank prior to feeding the pre-heated water into a tank with the back-up
elements. This is a great solution for a retrofit since it allows you to hook up the solar system
without taking out the existing hot water tank. (If you do this, be sure to turn off the lower
element of the existing tank and turn back the upper element to maximize your solar gain.)
3. Pump the water really slowly on the tank side of any two-pump system. I think this
idea stinks!!! Remember the rules of how a heat exchanger works, speed is good. If you slow
down to a crawl on the storage tank side of the equation, you are destroying the exchange rate
through your heat exchanger.
The Beckett SolarHot Advantage: The SolVelox package comes with a special dip
tube to prevent destratification. The system is also designed to pull the coldest water
from the bottom of the tank or (if water is coming into the tank) the cold incoming water,
thus improving the overall efficiency of the system.
18 © SOLARHOT 2006-2009Appendix B: Evacuated Tube Collectors
Many times I have been asked, “What about evacuated tube collectors?”
Evacuated tube collectors are long cylindrical glass vacuum tubes that have a copper filament that
extends down the length of them. A collection of these is connected to a separate header. The collection
fluid flows through the header, which is coupled to each of the vacuum tubes.
The theory behind an evacuated tube is that since it is a vacuum it will resist shedding its gained
heat back to the atmosphere. The argument is that it is much more efficient than flat plate collectors
because of the vacuum. There is some truth to that claim.
SRCC has tested and certified a number of evacuated tube collectors. In the rating process they
perform much better than flat plate collectors when the difference between the water’s temperature
going into the collector and the outside air is very high (1440 F) and when that temperature differential
is very high and the weather is cloudy. When the difference between the outside temperature and the
water going into the collectors is not great, evacuated tube collectors perform much worse than flat
plate collectors. Those are the published facts of the testing.
Studies have been run on the performance of evacuated tube collectors in Germany and the tests have
shown that because of the superior vacuum that they possess they don’t slough frost or snow well at
all.
When you combine these published test results you end up with a conundrum. Evacuated tube collectors
outperform flat plate collectors during the same conditions when evacuated tube collectors are likely to
not perform at all. Huh? That’s right. They perform best on the coldest of winter days, which happens
to be the time when they are likely to be covered in frost and not perform at all. Even if they didn’t have
frost on them, think about it this way. With a temperature differential of 1440 F between the outside air
and the water inlet temperature (generally around 1200 F), the outside temperature would have to be
-240 F for evacuated tube collectors to outperform flat plate collectors. Don’t forget that would need to
be the temperature when the sun is shining. No solar collector collects any heat at night. Based on the
reality of when it is coldest (at night) plus the problems with frost, I can’t see evacuated tube collectors
outperforming flat plate collectors.
Therefore, I can’t recommend them to anybody for use in hot water or space heat applications. If
somebody is interested in using them to power an adsorption chiller, then they might be a good
selection.
Appendix C: Environmental Impact
These numbers represent the environmental impact of installing two 35,000 BTU per hour 4’x8’ black
chrome collectors.
Per year, this system will eliminate the production of:
8,496 lbs. of CO2
20.4 NOX
34.8 SO4
Over a 20-year lifetime, this system will eliminate the production of:
169,920 lbs. of CO2
408.0 NOX
696.0 SO4
© SOLARHOT 2006-2009
19You can also read