Spar ks for energy - University Of Worcester
←
→
Page content transcription
If your browser does not render page correctly, please read the page content below

i n g
 creat                    y
           f o r e n er g
 spa r ks

                                                                                       Interactive PDF instructions:
                                                                                       The 'home' icon will take you back to the contents page
                                                                                       The content titles will take you to the relevant page
                                                                                       The 'print' icon will open your print dialogue window
2nd Floor, Weston House, 246 High Holborn, London WC1V 7EX
Science, Engineering, Technology and Mathematics Network, Registered in the UK No. 3236201 Registered as a Charity No. 1058056
eat i n g
cr er gy
f o r e n
spar ks
contents
There is a lot of material in this pack. Teachers might find it useful to first read the Teacher notes introduction,
and the student Challenge brief.
getting started
Challenge brief 2-4
Presentaion advice 3
factsheets
Fire 5-6
Energy Stores and Energy Transfers 7-8
Mechanical Devices 9-11
Electricity 12-14
Human Power 15-16
Teacher notes
Introduction 17-19
Curriculum Links (England) 20
Curriculum Links (Northern Ireland) 21
Curriculum Links (Scotland) 22
Curriculum Links (Wales) 23
Starter Activity 24-26
role models
Phillipa Cassie 27-28
Chris Abetianbe 29-30
page 1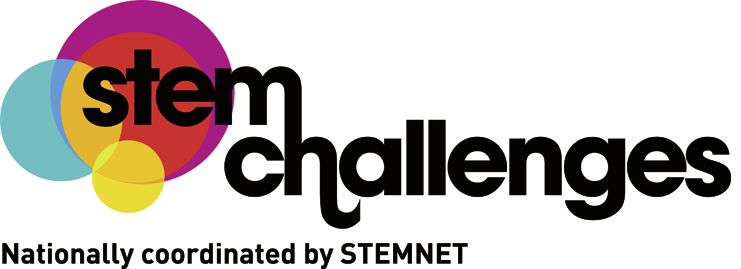
eat i n g
cr                 er gy
         f o r e n
spar ks
        challenge brief

 your challenge
 Imagine that a new state-of-the-art, eco-friendly house has just been built in your local area. The
 house has been described as the best of its kind. Not only were all the building materials recycled or
 sustainable, the house is also designed to be powered by renewable energy sources only.
 The council are so impressed with this achievement in design and engineering, that they want to invite
 all local residents to the unveiling of the building and to watch the lighting of the bio-fuel power
 generator.
 Such an occasion requires a suitably spectacular method of lighting ...
 Your challenge is to design a human-powered invention for creating the spark that will light the
 generator.
 You need to produce a presentation of your design with evidence that your device will work. The
 evidence could include working models of the device, diagrams, calculations and results from
 experiments. See the Things to consider section that follows, and the Presentation advice, for some help
 and guidance.

 Things to consider
 * You will need to work in teams of four to six people.
 * Think carefully about the task ahead and manage your time and workload effectively.
 * The device should require a considerable amount of human effort to create the spark. How will the human
    energy be provided? Consider if one person or several people will provide the energy?
 * How will you convert the human energy into a spark? The Starter Activity will introduce you to different ways
    of starting a fire. The Fire Factsheet gives more information about fire.
 * Fire can be dangerous. You will need to consider how to keep the people lighting the flame and the
    spectators safe. This may affect the materials you choose, and where the sparks will be generated. If you
    intend to create an electrical spark you will also need to consider electrical safety.
 * You may need to change the speed, direction and force provided by the humans powering the device. The
    Mechanics Factsheet gives an introduction to some of the mechanisms you might use to do this.
 * How can you make the lighting of the generator exciting to watch?
 * In keeping with the new eco-house, it is important to consider sustainability during the Challenge. Where do
    materials come from? Would it be possible to use some recycled components?
 However impressive your design, it won’t be any use if it doesn’t work! You need to demonstrate that your
 design will be reliable. Although you don’t need to build your invention, you need to show evidence that it will
 work, for example by providing diagrams and calculations, building a model of some, or all, of your device, and
 giving results of the experiments you have carried out to test your design.
 The Factsheets provide information that could help you with the Challenge. You may want to carry out further
 research yourself. Some suggestions for websites that you may find useful are provided on various Factsheets.

                                                                                 page 2
eat i n g
cr er gy
f o r e n
spar ks
challenge brief
Presentation advice
Teams must show, clearly, how they arrived at their final choices. All proposals and recommendations must be
justified - these justifications should form the main part of the presentation.
Communicating and, where possible, modelling ideas in a range of ways, is important to achieve this.
Some hints and tips
Before starting the challenge, think about how to record and log experimental work as it is carried out.
* Think about how to present useful information – remember the process is just as important as the final
proposal.
* Use a mixture of verbal, written and visual communication.
* Present scientific and technological information, rather than emotive arguments.
* Use scientific and technological language and terminology correctly.
* Be able to talk knowledgeably about every aspect of your challenge.
* Be prepared to answer any questions the judges might have about your design.
Consider
* Video recordings.
* Photographs.
* Other forms of ICT.
* Diagrams and sketches – originals as well as ‘worked up’ final copies.
Your designs must be clearly labelled and annotated.
* Charts and graphs – if you need to present findings from any testing you may have carried out.
* Posters, leaflets, handouts.
* Making a prototype.
You may wish to attempt to make a prototype of your invention. It does not have to be ready for use, or even
made from the correct materials – it can just be another way to illustrate your design.
Rather than making the whole device, you may attempt to model specific aspects of your design.
* Live demonstrations.
Rather than just using secondary research findings to justify your design choices, can you show how certain
features work?
Remember: It is important, wherever possible, to test your ideas during the design process. The results can then
inform your final decisions.
These are just some things to think about – you may think of more!
page 3eat i n g
cr er gy
f o r e n
spar ks
challenge brief
Health and Safety
STEMNET and those carrying out work on behalf of STEMNET cannot be held responsible for any accidents
or injuries that occur as a result of this challenge. It is the responsibility of the teacher to ensure a full risk
assessment is carried out before starting any practical work and that the correct health and safety measures are
in place.
Always draw up plans before you start experimenting. The plans should include a risk assessment. This means
you list the hazards (anything that could cause harm, e.g. some chemicals, heavy objects, fire). Then make a
judgement about the risk from each (how likely is it to go wrong; how serious would it be if it did go wrong;
how many people could be injured; would disabled people be at greater risk?). Finally decide what safety
precautions (control measures) you need to adopt to reduce the risk of serious harm to an acceptable level.
Make sure you discuss the plans with your teacher before starting any practical work.
Working with fire
The following will give you some ideas about the risk assessment when experimenting with fire.
* Make sure you know the location of fire extinguishers and fire exits in the room.
* Make sure there is nothing flammable near the experiment.
* Check that there are no smoke sensors in the room (heat sensors will probably not be affected).
* Work on a heat resistant surface.
* Do not attempt to burn materials which might give off toxic fumes, for example plastics.
* Work in a well ventilated environment.
* Be aware of anyone with breathing difficulties.
* Make sure any long hair is tied back and loose clothing secured.
* Wear eye protection.
* Make sure that all fires are completely extinguished at the end of your experiment.
* Be careful not to dispose of smouldering material or something which might ignite spontaneously into
waste bins.
* Handle any equipment which may become hot with tongs, or allow it to cool before touching.
* For burns, quickly cool the affected area under running water until first aid help arrives.
* For hair set alight, smother with a fire blanket, cloth or similar.
* For clothing set alight, remember stop, drop and roll (i.e. stop moving around, drop to the floor and roll so as
to smother flames or, with flames on top, cover with fire blanket, coat or similar).
In your design
* Make sure that the spectators and any people operating your invention are protected from any sparks.
* Any materials that will be near a heat source should be heat-resistant and non-flammable.
* Be aware of any areas that might get hot, and make sure that no one will come into contact with them.
* Make sure you consider other hazards as well as fire, for example chemicals if used, moving parts (which
might trap fingers), heavy objects (which might topple over or drop on toes).
page 4eat i n g
cr er gy
f o r e n
spar ks
{factsheet} fire
What is Fire?
Fire is a rapid chemical reaction between oxygen and fuel which releases heat and light.
Heat is needed to start the reaction. After the fire is started, the reaction generates enough heat to keep itself
going.
The fire triangle
The fire triangle shows the three components needed for fire. When one of
these is taken away, the fire will go out. For example:
* A wood fire will go out when all the wood (the fuel) has been burnt.
* A fire blanket works by reducing the supply of oxygen to a fire.
* Cooling a fire with enough water will make it go out.
The most common way to put out a fire is to use water. This works by having
a cooling effect – the heat turns the water into steam instead of keeping the
fire going. The steam also reduces the supply of oxygen. However with some
fires, adding water will make things worse, for example, with an electrical fire,
water will conduct the electricity, increasing the danger. With a chip pan fire, the burning oil and the water will
not mix, and adding water is dangerous. The water sinks below the oil, and then rapidly heats up, vaporises and
expands, causing a fireball of burning oil to explode out of the pan.
Fuels
Something which is easy to set on fire is described as highly flammable.
Different fuels start burning at different temperatures and will give off different amounts of heat. The surface
area of the fuel will also make a difference to how easily it burns. The larger the ratio of surface area to volume,
the more oxygen the fuel is exposed to, and the more easily and quickly it will burn. This is why small twigs burn
more easily than thick logs. Powders have a very high surface area and if suspended in the air and ignited can
even explode.
If a flammable gas mixes easily with air, it should burn readily.
Lighting fires
To light a fire you have to get the fuel to a high enough temperature to ignite. But you only need to light a
small volume of fuel to start a much bigger fire. A small spark is often all you need. When a fuel burns, the
temperature of its flame is higher than the temperature that was needed to light the fuel. This can light fuels/
materials which need a higher temperature to ignite. This is why fire can spread so easily. Although problematic
in accidental fires, this principle is used in fire lighting methods.
For example, when building a log fire, usually some material which lights easily (tinder) is lit first. Some
examples of tinder are birch bark, grass and paper. This is used to light small sticks, and finally these can set
larger logs alight.
Matches also use this principle. The head of a match consists of chemicals which ignite at a fairly low
temperature. When the match head is struck against sandpaper, the resulting friction heats it enough to ignite.
The match head will then burn at a high enough temperature to set the wooden matchstick on fire.
page 5eat i n g
cr er gy
f o r e n
spar ks
{factsheet} fire
Burning metal
Sparks made with a flint and steel can be used to light a fire. The flint is very hard (other hard materials can also
be used) and cuts tiny pieces from the steel. As these tiny pieces are chipped off they are also heated by the
friction between the flint and the steel. If the steel is hot enough, it will catch alight, and these tiny pieces of
burning metal can be used to start a fire. You can also see steel burning if you set some steel wool on fire. Steel
wool will catch fire more easily than a solid lump of steel because it has a higher surface area compared to its
volume.
An easier way to create sparks is to use a special material called ferrocerium. Ferrocerium is a combination of
rare earth metals, which ignite at low temperatures (around 150 °C), and some other metals to make it harder
and more easy to use. Because ferrocerium ignites at a lower temperature than steel, less friction is needed to
make a spark. Ferrocerium is used in disposable cigarette lighters and you can also get rods of it. Confusingly,
ferrocerium is sometimes called flint. As with the flint and steel method, striking the ferrocerium with steel will
create sparks, but in this case it is the ferrocerium burning rather than the steel. Ferrocerium rods are sometimes
called firesteels or fire sticks, and can be obtained from shops which sell outdoor and survival equipment.
Other methods for lighting fires
Friction is also used to light fires by rubbing two sticks together. This is an ancient way to start fires, and
requires not only a great deal of effort, but also expertise.
Fortunately the heat from sun is usually not strong enough to start fires, however by using either a parabolic
mirror or a magnifying glass to focus the sun’s rays on to a flammable material a fire can be started.
When air is compressed quickly, it will heat up. This is another ancient method for starting fires. It can be
demonstrated using a fire piston. Diesel engines use the same principle.
Electrical sparks can contain enough heat to ignite a fire, this is why it isn’t a good idea to use an electrical
switch when there has been a gas leak. Electricity can also be used to generate heat by passing current through
a material with a high resistance, this is how electric fires and toasters work. If you’ve ever set your toast on fire,
you’ll know that it’s possible to start a fire this way.
Useful resources
There is a useful educational video of a fire-piston in action at:
http://www.nationalstemcentre.org.uk/elibrary/resource/4101/fire-piston
page 6eat i n g
cr er gy
f o r e n
spar ks
{factsheet} energy stores and energy transfers
For the challenge you need to find a way to use energy stored in a human body to light a bio-fuel generator. It
doesn’t necessarily take a great deal of energy to create a spark, so you also might think about how any surplus
energy might be used to make the lighting more exciting.
Energy and Power
Energy is needed to make things happen. Remember, energy cannot be created nor destroyed. Power is the rate
at which energy is transferred from one place to another.
Power = energy ÷ time, where energy is measured in joules (J) and power is measured in watts (W).
There is a limit to the power a human can generate, so you may need to find a way to store this energy and
release it suddenly to create your spark.
Energy stores
Energy can be stored in many ways and released when needed, sometimes slowly and other times very quickly.
Energy stores include:
Chemical – energy stored in chemical compounds and released when reactions happen, e.g. combustion (fuel
and oxygen) and batteries.
Kinetic – the energy stored in a moving object given by the equation: KE = ½mv2, where KE = kinetic energy
(joules), m = mass (kilograms) and v = velocity (in metres per second).
Gravitational potential energy – the energy stored in an object by its position. Kinetic energy used to lift
an object is stored as gravitational potential energy. Dropping the object releases energy. The gravitational
potential energy is given by the equation: PE = mgh, where PE = potential energy (joules), m = mass
(kilograms), g = acceleration due to gravity (10 Newtons per kilogram) and h = height (metres).
Elastic – it takes energy to stretch an elastic band and to stretch or squash a spring. This energy is stored in the
elastic band or spring until they are released.
Thermal – energy stored in hot objects.
Magnetic – it takes energy to pull attracting magnet apart or pushing repelling magnets together. This energy
is stored in the pairs of magnets.
Electrostatic – it takes energy to pull attracting electric charges apart or pushing repelling electric charges
together.
Nuclear – energy stored in atomic nuclei released through radioactive decay, fission or fusion.
Mechanical – flywheels are given energy and spin. When the input of energy stops, the flywheel continues to
spin and be a store of energy.
Transferring energy
Energy can be transferred in various ways, including:
Mechanically – moving an object using forces and levers.
Electrically – an electric current is the movement of electrons through a conductor.
Heating – a hot object will warm a colder object (the hotter object cools). This can happen by conduction,
convection or radiation.
Radiation – electromagnetic waves such as light, sound and microwaves transfer energy from place to place.
page 7eat i n g
cr er gy
f o r e n
spar ks
{factsheet} energy stores and energy transfers
Energy stores and transfer
What matters is not the amount of energy stored, but the rate at which energy is transferred.
Efficiency
An electric light bulb produces light. In a filament light bulb, energy is transferred to the metal filament which
gets very hot and glows. So some energy is ‘useful’ in that it produces light, but some is ‘wasted’ because it only
causes the bulb to get hot. It is the same with all devices – not all of the energy put in produces useful energy,
some is wasted.
The efficiency as a measure of a device can be calculated using the equation:
Efficiency = (useful energy out) ÷ (energy in)
In a laptop, energy is input by an electric current. Some is used to produce light (so that you can see what is on
the screen) and sound (so that you can listen, for example, to podcasts and videos). However, some is wasted
because it simply makes the laptop hot.
Useful Resources
www.energyeducation.tx.gov/energy/section_1/topics/what_is_energy/index.html
page 8eat i n g
cr er gy
f o r e n
spar ks
{factsheet} mechanical devices
You may want to store the energy from human power and release it in a concentrated burst. You may want to
build a mechanical device and be able to change the direction and speed of the motion.
Mechanical advantage
Lifting a mass of 250 kg needs a force of nearly 2500 Newtons (for more about force see the Human Power
Factsheet). Believe it or not, you can lift 250 kg, but you will probably need a bit of help. Simple machines such
as levers and pulleys can take the force we put into them and output a higher force. Dividing the output force
by the input force gives the mechanical advantage, so a mechanical advantage of 2 means that you get out
twice the force that you put in. There is a catch. We can’t get any more energy out of a machine than we put in.
The work equation tells us:
work = force x distance
So if we are getting twice the force out, the force will only be able to travel over half the distance. We can also
make this trade-off in the opposite direction, if we want to make something quickly, we can use a machine that
outputs less force over more distance.
Friction
Friction is an important force to consider when designing machines.
Friction occurs when two surfaces are in contact. When they are not moving relative to each other, friction is
preventing movement. For example, if you try to slide a heavy piece of furniture across the floor the friction will
create a force in the opposite direction to the direction you are pushing. The force due to friction has an upper
limit, so if you push hard enough against a piece of furniture it starts to slide across the floor.
This type of friction (called static friction) can be useful because it means that we can get a grip on objects. To
increase static friction you can increase the force pushing the two surfaces together, or you can change the
texture or composition of one or both of the surfaces. For example, someone trying to open a jam jar might grip
the lid more tightly, and put a dishcloth over the lid to stop their hands slipping.
When two surfaces are moving relative to each other, friction creates a force in the opposite direction to the
movements which slows it down. Kinetic energy is transferred and heats up the surroundings. This may be
the way you want to generate the spark for this challenge, but it might also make your device less efficient. In
mechanisms with moving parts, surfaces which are in contact with each other are generally smooth, and often
lubricated with oil to reduce friction. In joints which move a lot, for example in the axles of wheels, ball bearings
are often used. The balls in a ball bearing are free to move, so that rather than surfaces rubbing against each
other, the balls turn.
page 9eat i n g
cr er gy
f o r e n
spar ks
{factsheet} mechanical devices
Levers
For a lever you need a rigid object and a fixed pivot point
(the fulcrum). The lever shown has the input force and the effort load
output force on opposite sides of the fulcrum (known as a deffort dload
class 1 lever), but you can also get levers where the input and
output forces are both on the same side of the fulcrum. The
mechanical advantage is given by the equation:
Mechanical advantage = load ÷ effort = dload ÷ deffort fulcrum
Pulleys
A pulley is a wheel (also sometimes called a drum) which usually has a
groove round the edge to hold a rope.
Using a rope and a single fixed pulley can change the direction of a
force, but pulleys really come into their own when you either allow the
pulley to move, or combine more than one pulley. Pulleys can then give
a mechanical advantage. This type of rope and pulley system is often
called a block and tackle. They are used in cranes and sailing boats.
Pulleys can also be used in drive-belt systems. Two pulleys are connected
by a loop (the drive-belt), often made of rubber. If the loop is pulled tight
enough turning one of the pulley wheels will make the other turn as
well. A mechanical advantage can be gained if the two wheels are different sizes.
Pulleys depend on having a good grip between the pulley wheel and the rope or belt in contact with it. There is
also the possibility that the rope or belt will stretch.
Gears
Gears work in a similar way to drive-belt systems, but instead of using friction,
gear wheels have teeth which can mesh with the teeth belonging to other gear
wheels. Turning one wheel will then cause the other wheel to turn as well. The
meshing teeth prevent slipping which can give an advantage over a pulley
system.
Gear wheels which are designed to work together will have teeth of the same
size, so that gear wheels with a larger diameter will have more teeth. In the
diagram, the large wheel on the left has 20 teeth and the small wheel on the
right has 10 teeth. When both wheels have turned by 10 teeth, the small wheel will have made a full rotation,
and the big wheel will only have made a half rotation. This means that the smaller wheel will spin at twice the
speed of the larger wheel. Notice that the wheels spin in opposite directions. If you want to increase the speed
of rotation (but end up with less force) you can drive a smaller wheel with a larger one. If you want more force
and less speed, you can drive a larger wheel with the smaller one.
page 10eat i n g
cr er gy
f o r e n
spar ks
{factsheet} mechanical devices
The gear ratio is the ratio in number of teeth between the
gear wheel doing the driving and the gear wheel giving
the output. You can combine several gear wheels to make
a gear train with a higher gear ratio.
The two photos show other ways to use gears (built with
Lego™). On the left are gears which mesh at right angles
to each other. On the right is a rack and pinion system
which can be used to translate rotational motion into http://science.howstuffworks.com/
linear motion. transport/engines-equipment/gear.htm
Hydraulics and pneumatics
Hydraulic systems use liquids to move objects, pneumatic systems use gases. If you blow up a balloon (not too
much) and squeeze one part of it, then the part you aren’t squeezing will get bigger. You can do the same with
a balloon filled with water. The advantage of using a liquid rather than a gas is that gases change volume under
pressure and liquids don’t, so a hydraulic system will be more responsive than a pneumatic one. As well as
giving mechanical advantage, hydraulic and pneumatic systems are also very good for transferring force from
one place to another.
Useful resources
Construction toys such as Lego™ and Knex™ are good for experimenting with gears.
Levers and pulleys are examples of simple machines. For more about simple machines see
* http://hyperphysics.phy-astr.gsu.edu/hbase/hframe.html
More detailed description of how pulleys work can be found here
* http://science.howstuffworks.com/transport/engines-equipment/pulley.htm
For more about hydraulics see
* http://science.howstuffworks.com/transport/engines-equipment/hydraulic1.htm
* http://www.ehow.com/list_6639308_school-projects-hydraulics.html
For some inspiration see
* http://www.nucleuslearning.com/content/hydraulics-and-pneumatics-projects
page 11eat i n g
cr er gy
f o r e n
spar ks
{factsheet} electricity
Electrical charges
Have you ever rubbed a balloon against your jumper then got it to stick to the wall? If so, you have experienced
the build up of electrical charge. There are two types of electrical charge, positive and negative.
An atom consists of a nucleus with electrons moving around it. The nucleus contains protons and neutrons.
Protons have a positive charge. Electrons have negative charge. An atom has the same number of protons and
electrons, so that charges cancel each other out. Some atoms transfer one or more of their electrons to other
atoms. Those that transfer the electrons now have a positive charge and are called cations. Those that gain
electrons have a negative charge and the particles are called anions. Cation and anions are called ions.
Some materials give up electrons very easily, others pick up electrons more easily. For example, if you stroke
a balloon several times on your hair, the hair gives up electrons and the balloon captures them. Your hair
becomes positively charged and the balloon becomes negatively charged. Opposite charges attract one
another. Charges of the same type are repelled. Since your hair and the balloon have opposite charges, your
hair will stick to the balloon when you try to take it away. When you take the balloon away completely, your hair
may still stick out because they have the same charge and repel one another. If you bring the balloon close to
the hair again, the hair will move towards it. A supermarket carrier bag, a plastic ruler or even a fleece should
all have the same effect, however, stroking the hair with your hand, or a piece of woollen or nylon clothing will
leave the hair flat. This is because skin, wool and nylon do not capture electrons easily.
Current
Current is the flow of electric charge. For a current to flow, the electric charges in a material need to be able to
move. Conductivity is a measure of a material’s ability to carry electrical current. Electrons are free to move in
metals, which makes them very good conductors. In water there are usually some ions which are free to move.
This means that although water is not a good conductor, it can conduct enough current to make it dangerous
to mix electricity and water. Salt water has more ions in it, and therefore is a better conductor of electricity.
Materials which don’t conduct current are called insulators. The coverings on electrical wires in the home need
to be very good insulators to prevent us getting electrocuted. Air is usually a good insulator, but under some
conditions it can break down and become a conductor, and this is when we get sparks.
For a current to flow you also need a potential difference (sometimes called voltage) to get the charges moving.
A potential difference is always measured between two points. For example, a battery’s potential difference is
measured across its two terminals. Often the potential difference is given relative to a reference point called the
earth or ground. As the name suggests, the earth is usually connected to real earth, for example using a metal
rod with one end in the ground.
It is not high voltages which are usually dangerous, but the currents they can cause, which can cause burns
and interfere with the electrical signals your body uses to work properly. If you touch a conductor which was
at a high voltage relative to earth, you would be fine as long as you were not touching anything at a different
voltage. If you were to come into contact with a connection to earth, there would be a big voltage across your
body, and this would result in a current flowing through your body.
page 12eat i n g
cr er gy
f o r e n
spar ks
{factsheet} electricity
Generating electricity
Devices like the Van de Graaff generator use a similar principle to rubbing a balloon on a jumper. The surface
of a moving rubber belt collects charge, which is then transferred to a metal sphere. Although this is a good
method for creating sparks and making people’s hair stand on end, it isn’t so good for providing electricity for
people’s homes.
Certain materials acquire electric charge when stress is applied to them. This is the piezoelectric effect. The
piezoelectric effect is used to create sparks in gas lighters, and also in some microphones and speakers.
The main method for converting movement into electrical energy is to use the fact that a changing magnetic
field will induce a voltage in a loop of wire. So if you move a magnet near a wire, a voltage will be induced in it.
To increase the voltage you can increase the number of loops of wire, making a coil.
The same principle is used in generating most of the electricity used in the UK.
Storing electricity
The most common way to store electricity is by using batteries. Batteries store chemical energy. With rechargeable
batteries the chemical reactions are reversible by inputting energy when the battery’s store is used up.
Another way to store electrical energy is to use a capacitor. A capacitor consists of two electrical conductors
(often called plates) with an insulator between them. A Van de Graaff generator acts as a capacitor, with the
metal dome as one plate, and the ground as the other plate. The amount of energy a Van de Graaff generator
can store depends on the diameter of the dome. For safety it is recommended that the dome should not
be more than 25 cm in diameter. Also, the dome should not be connected to any other capacitors because
dangerous levels of energy might be accumulated. Van de Graaff generators with large domes have been used
as sources of very large voltages.
Resistance
When current passes through most materials, some energy is transferred to the surroundings and warms them.
How much depends on the material’s resistance. Materials with high conductivity have low resistance. The
resistance of a wire depends on what it is made of, its length and its thickness. Steel wool can be set on fire with
a battery because it is made of very thin wires with a high resistance.
The heating effect of a current can cause problems, for example, heating up TVs and computers wastes energy.
But it can also be useful, for example, in toasters, kettles and electric ovens. All these appliances contain heating
elements which are made of materials with a high resistance that will not burn or melt at the high temperatures
required. Fuses in plugs contain a thin wire which will heat up and melt if the current passing through it is
above the rating of the fuse. This breaks the circuit, so the current cannot reach the appliance attached to the
plug and damage it.
page 13eat i n g
cr er gy
f o r e n
spar ks
{factsheet} electricity
Electrical sparks
Air is an insulator, but there is always a few ions and free electrons in it. The presence of a high voltage will
make these charged particles move faster and faster. If they are moving fast enough there may be collisions
between the charged particles and gas molecules, breaking the molecules up to create more free electrons and
ions. In this way the number of charged particles can multiply very quickly. Also, when the charged particles
hit a conductor this will also release even more charged particles. If the conditions are right there can be an
avalanche effect with more and more charged particles being created until there are enough of them to allow a
considerable current. This is when you get a spark.
Electrical safety
Don’t experiment with mains electricity. It can kill. In this challenge remember the only power source should be
human.
The sorts of shocks you get from a Van de Graaff generator should not present any risks to students unless they
have any of the following unusual medical conditions: coronary heart disease (e.g. angina, history of heart
attack); cardiac rhythm disorders; intra-cardiac conduction pathway anomalies; presence of an implanted
cardiac pacemaker; hypertension (high blood pressure).
When working with electricity: remove any metal jewellery, such as rings and bracelets; remember that
electricity and water are never a good mix; avoid touching any bare wires.
The dome of a Van de Graaff generator should not be more than 25 cm in diameter and should not be
connected to any other capacitors because dangerous levels of energy might be accumulated. Van de Graaff
generators with large domes have been used as sources of very large voltages.
Useful resources
* http://faraday.theiet.org/posters-print/posters/index.cfm
* www.physics4kids.com/files/elec_intro.html
For more about Van de Graaff generators see
* http://science.howstuffworks.com/transport/engines-equipment/vdg.htm
An example of a very simple electric generator you can build is given here
* http://www.creative-science.org.uk/gensimple1.html
page 14eat i n g
cr er gy
f o r e n
spar ks
{factsheet} human power
In this challenge, you are creating a human-powered fire lighter. To do this the person (or people) must provide
a force (a push or a pull) to something. But how much force needs to be applied, where, and in what direction
should it be applied, and for how long?
Forces
A force can change the speed an object is moving at, its direction, or its shape. Force has magnitude and
direction, for example a force upwards is clearly not the same as a force downwards. Force is measured in
newtons (N).
Force is given by the equation: force = mass x acceleration
The mass of an object is the amount of matter it contains, and is measured in kilograms (kg). Be careful when
talking about mass and weight. In physics, the weight of an object is the force that gravity is applying to that
object and is measured in newtons. On the moon, the weight of an object would be lower because the gravity
is lower, but the mass would be the same. When buying groceries or baking, it’s fine to talk about something’s
weight being measured in kg, but never do this in a science context. The equation tells us that the heavier an
object is, the more difficult it is to change its speed, for example it is much easier to push a toy car than a real
one.
Often, when people talk about acceleration they mean an increase in speed, but in physics, acceleration can
also mean a decrease in speed or a change in direction. So you need to apply a force to slow a moving object
down or to change its direction. For an object travelling in a straight line, you can work out its acceleration
using the equation:
Acceleration = (final speed - initial speed) ÷ time
speed is measured in metres per second (m/s1).
acceleration is measured in metres per second per second (m/s2).
When considering how much force is needed to move an object, you also need to consider what other forces
are acting on it. On Earth, the force of gravity pulls everything downwards. You can see this every time you drop
an object. The gravity will make the object get faster, and faster, so that an object dropped from the top of a
building will hit the ground faster than an object dropped from a ground floor window. Falling objects don’t
keep accelerating forever because they will reach a speed called the terminal velocity, where the downward
force from gravity is balanced out by the upward force of air resistance.
The acceleration due to gravity (g) is 10 m/s2. This means that the force due to gravity is approximately ten times
the mass of an object. So a 10 kg suitcase experiences a downward force of 100 N.
Air resistance is an example of friction which is another type of force. For more about friction see the
mechanical devices factsheet.
You can also get forces due to magnetic field (e.g. a magnet sticking to a fridge) and electric fields (for more
information see the electricity factsheet).
Measuring Forces
To measure forces you can use a force meter. Most of the weighing scales that we use, for example, bathroom
scales and kitchen scales are actually types of force meter. These measure the downward force due to gravity in
Newtons and then convert this into kg.
page 15eat i n g
cr er gy
f o r e n
spar ks
{factsheet} human power
Work and Power
The energy (measured in joules) used to move things is called work. It is given by the equation:
Work = force x distance
Using this we can work out that lifting a 10 kg suitcase (which needs 100 N of force) a metre from the ground
needs 100 J of energy.
Power is the rate at which energy is used. It is calculated by dividing the energy used by the time taken to use it.
Remember, energy cannot be created or destroyed, so when we talk about using energy, we are talking about
transferring it from one place to another.
Efficiency
You might have noticed that although the work equation tells us that you don’t need to do any work (use any
energy) if you are holding a 10 kg suitcase and not moving, it certainly doesn’t feel that way. This is because we
are not working efficiently.
We use food to provide us with energy. This energy enables us to move, but most of it is used, for example,
to keep our hearts beating, digest food and keep our bodies warm. If you compare the energy in the food we
consume with the amount of physical work we do, we are not very efficient.
The human body
We can apply forces because we have a rigid skeleton, which supports the muscles which allow us to move. Our
joints allow us a range of movement. Because of the way the body is constructed, some movements are easier
to make than others. There is also a great deal of variation between different people.
Muscles are made up of bundles of fibres which can contract. You have muscles which automatically do the
things that keep you alive, like making your heart beat and digesting your food, and muscles that you use to
move around (skeletal muscle). There are two main types of muscle fibre, slow twitch and fast twitch. Fast
twitch fibres can contract quickly and with more force than slow twitch fibres but quickly tire. Slow twitch fibres
cannot contract so quickly, but they can keep going for longer before becoming tired. We all have a mixture of
both these types of muscles, but in different proportions.
* www.wanderworks.com/simply_muscle/muscle_groups.htm
* www.bbc.co.uk/science/humanbody/body/factfiles/muscle_anatomy.shtml
* www.teachpe.com/gcse_anatomy/muscles.php
Activities
Although your flame lighting device should require a decent amount of physical effort to work, you don’t want
to design something that no one is strong enough to power. You might do some experiments to determine the
most effective way for your human power source to provide the energy for your flame-lighting method. Is it
better to use short, high-power bursts of energy, or to require less power, but keep going for a longer time? The
type of experiments you perform will depend on how you want to power your invention, for example, if you are
using bicycle-style pedalling you might want to measure how fast your team members can pedal, and how long
they can sustain a certain rate of pedalling. You might also want to consider how long the lighting should take.
Ideally, it should take long enough to build some suspense, but not so long that the spectators get bored.
page 16eat i n g
cr er gy
f o r e n
spar ks
{teacher notes} introduction
The challenge is for 11-14 year olds to design a spectacular human-powered invention for creating the spark
which lights the bio-fuel generator of a newly built state-of-the-art, eco-friendly house.
The students need to produce a design for their invention and enough evidence to convince the judges that the
device will work. This could include working models of part, or the entire device, diagrams, calculations and results
from experiments. The experiments should demonstrate that the device is reliable, for example by successfully
repeating a test of the spark-generating method a number of times. The students should bear in mind that the
lighting might take place in an outdoor setting, so the effects of wind and rain should be considered. The students
do not have to design all the components of the invention themselves, for example a bicycle dynamo might be
used to generate electricity. However, the device shouldn’t use any power sources other than human effort.
The Starter Activity and the Fire Factsheet should give the students some ideas about how the spark might be
created to light the generator. They can then consider how to provide the energy to achieve their chosen method.
The Energy Transfer Factsheet gives methods for converting one type of energy to another. The Electricity Factsheet
gives some information about using electricity but the students don’t have to use electricity in their invention.
The design should make the lighting enjoyable for an audience. The students should also address the safety of the
spectators and the person or people providing the energy.
Students should work in teams of four to six people. Teams will need to manage their time effectively, sharing out
different tasks. They must make sure they meet the Challenge Brief but not take on more than can be realistically
completed in the time available. Careful planning is required.
Starter activity
The Starter Activity could be used to introduce the students to the Challenge. It is designed to introduce students
to different methods for lighting fires and start them thinking about which methods would be suitable for lighting
the bio-fuel generator. It should also get the students to think about fire safety.
the factsheets
The Factsheets provide information that may help the students when starting the Challenge. The information
could be used to give the students an introduction to some of the concepts they might use in their design and to
get students to start thinking about how they can demonstrate that their design will work. They also provide some
links to other useful and interesting resources.
It is important to stress that the students should explore their own thoughts and ideas, and will need to carry out
further research once they have started to design their flame-lighting method.
The Factsheets do not always need to be printed out. They are there as a reference for students. Where possible,
encourage students to look at the resources online.
presentation
The Challenge Brief provides guidance for students on what they need to do and how to present their work.
When developing their presentations, students should be reminded about features of good communication:
* Using a mixture of verbal, written and visual communication.
* Presenting mathematical and scientific information, rather than emotive arguments.
* Using mathematic and scientific language and terminology correctly.
* Being able to talk knowledgeably about every aspect of the Challenge.
page 17eat i n g
cr er gy
f o r e n
spar ks
{teacher notes} introduction
Health and safety
Although students are asked to make a risk assessment as part of their plans, teachers must check this before
students start any practical work. In particular, teachers should check that what students propose doing is
covered by the model risk assessments commonly used in schools and that they are adopting all relevant
control measures (safety precautions). Alternatively, if the proposal is not covered by model risk assessments,
teachers must follow their employer’s procedure for obtaining a special risk assessment; usually this will involve
contacting CLEAPSS on 01895 251496 (or e-mail science@cleapss.org.uk) or, in Scotland, contacting SSERC
on 01383 626070 (or e-mail at sts@sserc.org.uk). Work will probably not be possible in laboratories fitted with
smoke sensors, unless they can be switched off temporarily, because they may be triggered by the smoke
generated. Heat sensors will probably not be affected because of the small scale of working, but it would be
prudent not to experiment directly underneath a heat sensor.
Be vigilant in case plans get changed (without you being consulted!) as work progresses.
Note that if STEM Ambassadors are used they may, unknowingly, suggest procedures that are unsuitable for use
in schools, or bring in equipment for which risk assessments are not available. If in doubt, contact CLEAPSS or
SSERC.
The following commentary is based on the list in the Challenge Brief, which is intended to give students
some ideas to think about when experimenting with fire but it is far from comprehensive because the project
is so open-ended. There may well be some non-fire-related hazards, for example physical hazards if heavy
equipment is used to generate electricity. Again, if in doubt, contact CLEAPSS or SSERC:
* Students must discuss their plans with the teacher before starting the experiment.
* Students should know the location of fire extinguishers and fire exits in the room but you would not normally
expect them to know how to operate fire extinguishers. Wrongly used, they can do more harm than good.
* Make sure there is nothing flammable near the experiment – beware of decorations and posters.
* If fitted, make sure smoke sensors are switched off.
* Work on a heat resistant surface.
* Students must not burn materials which might give off toxic fumes, for example some plastics (if in doubt,
do a small scale test in a fume cupboard).
* Work in a well ventilated environment.
* Be aware of anyone with breathing difficulties.
* Make sure any long hair is tied back and loose clothing is secured.
* Wear eye protection.
* Make sure that all fires are completely extinguished at the end of your experiment.
* Handle any equipment which may become hot with tongs, or allow to cool before touching.
page 18eat i n g
cr er gy
f o r e n
spar ks
{teacher notes} introduction
Emergency measures
* For burns, quickly cool the affected area under running water until first aid help arrives.
* For hair set alight, smother with a cloth.
* For clothing set alight, remember stop, drop and roll (i.e. stop moving around, drop to the floor and roll so as
to smother flames or, with flames on top, cover with a fire blanket, coat or similar).
In their designs students should:
* Make sure that the spectators and any people operating their invention are protected from any sparks.
* Any materials that will be near a heat source should be heat-resistant and non-flammable.
* Be aware of any areas that might get hot, and make sure that no one will come into contact with them.
* Make sure they consider other hazards as well as fire, for example chemicals if used, moving parts (which
might trap fingers), heavy objects (which might topple over or drop on toes).
page 19eat i n g
cr er gy
f o r e n
spar ks
{teacher notes} curriculum links (england)
Programme of study for key stage 3
Design and technology * the
impact of products beyond meeting their
original purpose and how to asses products in
Key concepts terms of sustainability.
Designing and making * aesthetic, technical, constructional and relevant
a. Understanding that designing and making has wider issues that may influence designing,
aesthetic, environmental, technical, economic, ethical selection of materials, making and product
and social dimensions and impacts on the world. development.
b. Applying knowledge of materials and production
processes to design products and produce practical
Science
solutions that are relevant and fit for purpose. Key concepts
Creativity Scientific thinking
a. Making links between principles of good design, b. Critically analysing and evaluating evidence from
existing solutions and technological knowledge to observations and experiments.
develop innovative products and processes. Practical and enquiry skills
c. Exploring and experimenting with ideas, materials, b. Assess risk and work safely in the laboratory, field
technologies and techniques. and workplace.
Critical evaluation c. Plan and carry out practical and investigative
a. Analysing existing products and solutions to activities, both individually and in groups.
inform designing and making. Critical understanding of evidence
b. Evaluating the needs of users and the context in a. Obtain, record and analyse data from a wide range
which products are used to inform designing and of primary and secondary sources, including ICT
making. sources, and use their findings to provide evidence for
Key processes scientific explanations.
a. Generate, develop, model and communicate ideas b. Evaluate scientific evidence and working methods.
in a range of ways, using appropriate strategies. Communication
b. Respond creatively to briefs, developing their own Use appropriate methods, including ICT, to
proposals and producing specifications for products. communicate scientific information and contribute to
c. Apply their knowledge and understanding of a presentations and discussions about scientific issues.
range of materials, ingredients and technologies to Range and Content
design and make their products.
Energy, electricity and forces
g. Solve technical problems.
a. Energy can be transferred usefully, stored, or
Range and content dissipated, but cannot be created or destroyed.
b. Understanding of users’ needs and the problems b. Forces are interactions between objects and can
arising from them. affect their shape and motion.
c. The criteria used to judge the quality of products, c. Electric current in circuits can produce a variety of
including fitness for purpose, the extent to which they effects.
meet a clear need and whether resources have been
used appropriately.
page 20eat i n g
cr er gy
f o r e n
spar ks
{teacher notes} curriculum links (northern ireland)
Key Stage 3 areas of learning
Technology and Design Science
Developing pupils’ Knowledge, Developing pupils’ Knowledge,
Understanding and Skills Understanding and Skills
Design Forces and energy
identifying problems; investigating, generating, * forces and energy transfer
developing, modelling and evaluating design * using electricity
proposals; giving consideration to form, function and
safety.
Communication
use of free-hand sketching and formal drawing
techniques and ICT tools (including 3D modelling).
Manufacturing
selecting and using materials fit for purpose; safe
use of a range of tools and processes; appropriate
to materials, demonstrating accuracy and quality of
outcome.
Learning outcomes
* demonstrate practical skills in the safe use of a
range of tools, machines and equipment;
* research and manage information effectively to
investigate design issues, using Mathematics and
ICT where appropriate;
* show deeper understanding by thinking critically
and flexibly, solving problems and making
informed decisions, using Mathematics and ICT
where appropriate;
* demonstrate creativity and initiative when
developing ideas and following them through;
* work effectively with others;
* demonstrate self management by working
systematically, persisting with tasks, evaluating and
improving own performance;
* communicate effectively in oral, visual (including
graphic), written, mathematical and ICT formats
showing clear awareness of audience and purpose.
page 21eat i n g
cr er gy
f o r e n
spar ks
{teacher notes} curriculum links (scotland)
curriculum for excellence
Technologies Science
By applying my knowledge and skills of science
Forces, electricity and waves
and mathematics, I can engineer 3D objects which
demonstrate strengthening, energy transfer and By contributing to investigations of energy loss due to
movement. TCH 2-12a / TCH 3-12a friction, I can suggest ways of improving the efficiency
of moving systems. SCN 3-07a
page 22eat i n g
cr er gy
f o r e n
spar ks
{teacher notes} curriculum links (wales)
Programme of study for key stage 3
Design and technology Science
SKILLS: Designing Skills: Communication
2. Identify and use appropriate sources of information Communicate logically by speech, writing, drawings,
to help generate and develop their ideas and diagrams, charts, tables, bar charts, line graphs, videos
products. and ICT packages using a wide range of scientific
3. Be creative and innovative in their thinking when vocabulary, terms, symbols and conventions.
generating ideas for their products. 3. Work quantitatively, using appropriate
4. Identify and apply knowledge and understanding mathematical conventions and using S.I. units
about technological, sustainability and health and appropriate to their work, e.g. kg, s, N, m, J, w.
safety issues to develop ideas for products that are
SKILLS: Enquiry
achievable and practical.
Pupils should be given opportunities to carry out
5. Develop a specification for their product.
different types of enquiry, e.g. pattern-seeking,
6. Explore, develop and communicate design ideas exploring, classifying and identifying, making things,
in a range of ways, including annotation, drawings fair testing, using and applying models, by:
and CAD.
Planning
Pupils decide on the most suitable type of enquiry to
carry out and outline the planned approach/method,
recognising, deciding upon and justifying each of the
following when appropriate:
1. the choice of success criteria
2. predictions using previous knowledge,
3. understanding and preliminary work
Developing
Use a range of apparatus and equipment safely
and with skill, taking action to control the risks to
themselves and others.
2. Make sufficient relevant observations and accurate
measurements, using ICT as appropriate, to a degree
of precision appropriate to the enquiry.
Range: How things work
1. the behaviour of current in electrical circuits
2. the conservation of energy and ways in which
energy can be stored
3. how familiar devices/machines work by using
electricity, light, sound and other energy transfers
4. the forces in devices and their relationship to work
done and power
page 23eat i n g
cr er gy
f o r e n
spar ks
{teacher notes} starter activity
This activity should get the students thinking about the different ways a flame can be lit, and help them decide
which method to use for their challenge invention.
Preparation
You will need a range of equipment to demonstrate different methods of starting fires. Some methods are
described in the activity section. It isn’t necessary to use all the methods described here, but ideally there
should be at least one method to demonstrate the use of
* friction * chemical reactions * an electric spark
If you are familiar with any other fire lighting methods, these can be used instead of, or as well as the methods
described here.
To use some of the fire lighting methods described here, you may need some tinder i.e. a material which
catches a spark easily. Birch bark or dry grass are often used as tinder. For the fire starting methods described
here, you could use cotton wool as tinder.
Activity
Ask for suggestions on how a flame can be lit. Introduce the fire triangle and fire safety (see the Fire factsheet.)
The aim of the activity is to create fire using different methods.
Health and safety
Always consult your employer’s risk assessment before starting experiments and consider whether it needs
modification to suit the special circumstances of your school, room, equipment or students.
When experimenting with fire:
* Make sure you know the location of fire extinguishers and fire exits in the room.
* Make sure there is nothing flammable near the experiment.
* Work on a heat resistant surface.
* Do not attempt to burn materials which might give off toxic fumes, for example plastics.
* Work in a well ventilated environment.
* Be aware of anyone with breathing difficulties.
* Make sure any long hair is tied back and loose clothing secured.
* Wear eye protection
* Make sure that all fires are completely extinguished at the end of the experiment and that nothing
smouldering or which might ignite spontaneously is discarded into waste bins.
* Handle any equipment which may become hot with tongs, or allow it to cool before touching.
* For burns, quickly cool the affected area under running water until first aid help arrives.
* For hair set alight, smother with a cloth.
* For clothing set alight, remember stop, drop and roll (i.e. stop moving around, drop to the floor and roll so as
to smother flames or, with flames on top, cover with fire blanket, coat or similar).
page 24eat i n g
cr er gy
f o r e n
spar ks
{teacher notes} starter activity
Friction and chemical energy
Matches
* Get students to light a Bunsen burner with a match.
* Ask them to write down the mechanism by which the match ignited.
* Matches should always be struck away from the body.
Ferrocerium and steel – disposable lighter
* An empty disposable lighter can be used to demonstrate the sparks which usually ignite the fuel.
* The mechanism by which the fuel is released at the same time as the sparks are created can be discussed
(this is also relevant for gas lighters which use piezoelectricity).
* Ask students to find out about the properties of ferrocerium and why it is used in lighters.
Ferrocerium and steel – ferrocerium rod
* Ferrocerium rods (also known as fire steels) can be bought from outlets which sell outdoor and survival
equipment.
* Either use some tinder, or gently scrape some of the ferrocerium to make a heap of ferrocerium powder on
to a heat-resistant surface. Some ferrocerium lighters come with a block of magnesium which creates a small
pile of magnesium shavings on the tinder.
* Hold the ferrocerium rod to the tinder and using either the steel provided with the rod, or another hard,
sharp object, for example, a knife, quickly scrape downwards. Strike the ferrocerium so that the sparks land
on the pile of ferrocerium powder or tinder.
* If you don’t get sparks at first, try striking faster and with more force.
* To light a wooden splint, blow gently on the spark and add more tinder until there is enough of a flame.
Electric spark
Piezoelectric lighter
These are often found in the gas lighters used to light gas cookers and candles. A gas lighter which has run out
of fuel could be used so that the students can see the spark created by the piezoelectric effect more easily. This
could also be used to directly light a Bunsen burner but note that you need to have the air-hole partly open,
unlike normal practice when lighting Bunsen burners. Older style piezoelectric gas lighters which don’t use fuel
can also be used in this way.
Gas compression
Fire piston
* Fire pistons can be bought from education suppliers such as Cochranes of Oxford Ltd, or Timstar.
http://www.timstar.co.uk/Item/NA/HE43250/HYMAN_FIRE_PISTON.html
http://www.cochranes.co.uk/show_product.asp?id=474&catid=217
page 25You can also read