State Examinations Commission - Coimisiún na Scrúduithe Stáit Leaving Certificate 2018 Marking Scheme Construction Studies Higher Level - Studyclix
←
→
Page content transcription
If your browser does not render page correctly, please read the page content below
HL cover 2 colour v9.qxp_BOOKS CVR SETUPS EV 10/08/2018 15:34 Page 1

                         Coimisiún na Scrúduithe Stáit
                         State Examinations Commission

                                 Leaving Certificate 2018

                                             Marking Scheme

                                       Construction Studies

                                                   Higher Level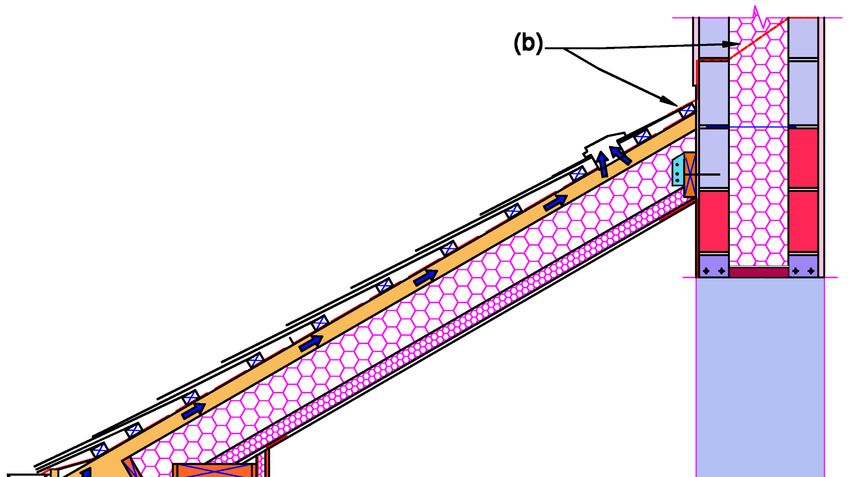
Note to teachers and students on the use of published marking schemes
Marking schemes published by the State Examinations Commission are not intended to be
standalone documents. They are an essential resource for examiners who receive training
in the correct interpretation and application of the scheme. This training involves, among
other things, marking samples of student work and discussing the marks awarded, so as to
clarify the correct application of the scheme. The work of examiners is subsequently
monitored by Advising Examiners to ensure consistent and accurate application of the
marking scheme. This process is overseen by the Chief Examiner, usually assisted by a Chief
Advising Examiner. The Chief Examiner is the final authority regarding whether or not the
marking scheme has been correctly applied to any piece of candidate work.

Marking schemes are working documents. While a draft marking scheme is prepared in
advance of the examination, the scheme is not finalised until examiners have applied it to
candidates’ work and the feedback from all examiners has been collated and considered in
light of the full range of responses of candidates, the overall level of difficulty of the
examination and the need to maintain consistency in standards from year to year. This
published document contains the finalised scheme, as it was applied to all candidates’ work.

In the case of marking schemes that include model solutions or answers, it should be noted
that these are not intended to be exhaustive. Variations and alternatives may also be
acceptable. Examiners must consider all answers on their merits, and will have consulted
with their Advising Examiners when in doubt.

Future Marking Schemes

Assumptions about future marking schemes on the basis of past schemes should be
avoided. While the underlying assessment principles remain the same, the details of the
marking of a particular type of question may change in the context of the contribution of
that question to the overall examination in a given year. The Chief Examiner in any given
year has the responsibility to determine how best to ensure the fair and accurate
assessment of candidates’ work and to ensure consistency in the standard of the
assessment from year to year. Accordingly, aspects of the structure, detail and application
of the marking scheme for a particular examination are subject to change from one year to
the next without notice.
Scrúdú na hArdteistiméireachta, 2018                                   Staidéar Foirgníochta, Ardleibhéal
___________________________________________________________________________________________________________

                 Coimisiún na Scrúduithe Stáit
                 State Examinations Commission

      Scrúdú na hArdteistiméireachta 2018

      Staidéar Foirgníochta
      Teoiric – Ardleibhéal

      Construction Studies
      Theory – Higher Level
Note: Notes and graphics are for illustration and are not exclusive or exhaustive, other relevant
     notes and graphics are acceptable as responses and will be credited accordingly.

                                                   -1-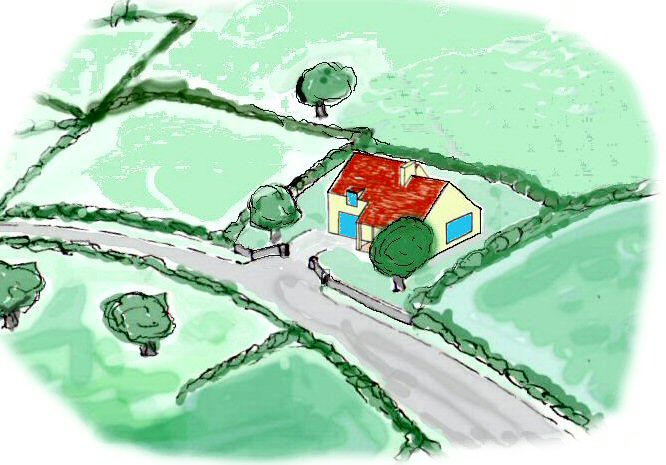
Scrúdú na hArdteistiméireachta, 2018                                   Staidéar Foirgníochta, Ardleibhéal
___________________________________________________________________________________________________________
Ceist 1. Typical best practice details of cavity wall, sloping roof and timber clad wall – such as:

                                                   -2-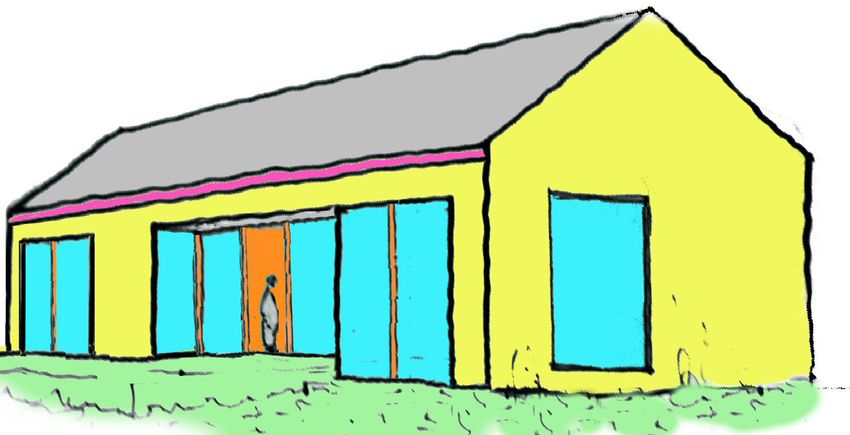
Scrúdú na hArdteistiméireachta, 2018                                   Staidéar Foirgníochta, Ardleibhéal
___________________________________________________________________________________________________________
Typical best practice details of flat roof to front porch – through and through ventilation
cavity wall – typical details
 • external plaster finish, scud coat, undercoat, floated sand /cement finish coat
 • 100 mm concrete block outer leaf
 • 200 mm full-fill insulated cavity
 • basalt coated low conductivity wall ties
 • 100 mm concrete block inner leaf
 • 15 mm internal skim coat or cement /sand render– 2 coats or lime plaster internal render.

 external wall, timber clad - typical details
 • vertical cedar cladding on
 • 50 × 35 mm battens and counter battens on
 • thermal breather membrane on
 • 10mm OSB on
 • frame consisting of 250 × 50 mm studs, packed with 250 mm sheep/mineral wool/cellulose insulation
 • 10mm OSB to inside face with vapour control layer taped and sealed,
 • service cavity formed of 38 mm battens
 • 12.5mm plasterboard taped and filled or with a skim coat.

typical details - roof
• galvanised steel wall brackets secured with resin anchored bolts to wall or
• 150 /200 × 50 mm wallplate secured to wall with resin anchored bolts
• galvanised steel wall brackets secured to wallplate
• 200 × 50 mm sloping rafters @ 400 mm centres
• OSB 10 mm secured to rafters for windtightness
• vapour diffuse barrier laid over OSB
• slate, battens and counter battens 35 × 50 mm fixed on top of OSB for ventilation to roof
• flashings and counter flashings at abutment to wall, lead, zinc, pressed aluminium, copper etc.
• insulation 200 mm min between roof joists
• vapour control layer on warm side of insulation, taped at wall junctions or
• insulated plasterboard with integral vapour control layer fitted to underside of pitched roof joists
• scrim/tape at wall and ceiling junction to ensure airtightness
• internal skim coat to wall to ensure airtightness
• fascia, soffit and gutter with proprietary vents on soffit and vent slate for roof ventilation
    Any other relevant points.

Ceist 2 (a) one possible safety risk associated with each of the following tasks on a construction site:

excavating where there are underground electrical cables
• risk of exposing live electrical cables
• safety risk of damaging cables
• safety risk of electric shock or electrocution
• safety risk of coming into contact with live cables of any voltage - including low voltage
• contact with cables of any voltage, even low voltage, can cause fatal injuries and heart damage
• risk of explosion, fire or flames if a cable is pierced or crushed causing the outer cable sheath and the
   inner conductors of the cable to connect
• risk of severe, potentially fatal burns to hands, face and body
• safety risk of electrical fires due to oil-filled high-voltage cables igniting
• safety risk of spread of fire to other nearby services such as gas pipes
• damage to cables can cause loss of power supply - risking serious consequences for emergency services
   such as hospitals

                                                      -3-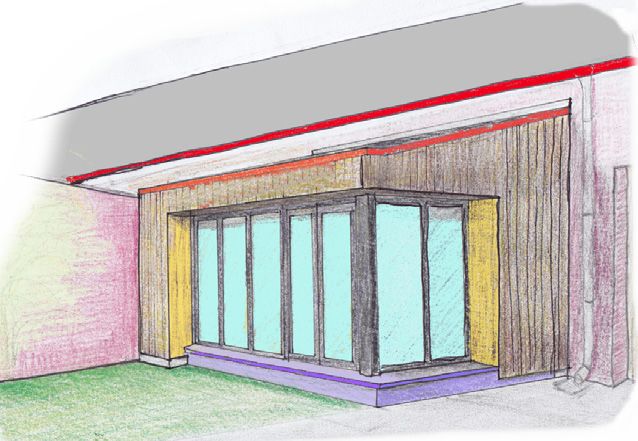
Scrúdú na hArdteistiméireachta, 2018                                   Staidéar Foirgníochta, Ardleibhéal
___________________________________________________________________________________________________________
working in a deep trench
• sides of trench collapsing leading to risk of workers being crushed or buried or fatally injured due to
  instability of trench
• risk of neighbouring structures being undermined leading to collapse of structures
• risk of injury or death resulting from workers or others falling into unguarded trench
• risks from materials falling into trench and injuring or killing workers
• plant or machinery falling into unguarded deep trench
• materials stored too near trench, leading to collapse of walls of trench and injury or death of workers
working at height when slating a roof
• risk of workers falling from roof
• risk of workers falling from scaffold/ladders
• risk of workers slipping when working on the slated surface
• risk of workers falling when working near the verge of the roof
• risk to workers below due to falling materials or tools from above
(b) two best practice guidelines that should be observed to reduce the possibility of injury to a worker
excavating where there are underground electrical cables
• dial before you dig – contact supplier for information regarding cable location
• access plans of cable layout from supplier of electrical services, use correctly to help locate power cables
• plans may not show cable depths, never assume you know how deep the cables are, always be cautious
    as cables may be found at shallow depths
• always check the area for signs that might suggest the presence of
    service cables
• locate buried cables using cable location devices, such as hum
    detectors, radio frequency detectors
• mark position of all cables on the ground using waterproof paint
• treat all cables found anywhere as ‘live’ cables
• hand dig carefully near cables, cable position marked with sand, timber
    and colour tape over a cable as an indicator of depth and position
• always use insulated hand tools - with wooden or fibreglass handles
• take special care when digging by hand or machine
• do not use hand held power tools within 0.5 m of marked position of electrical cables
• do not use handheld power tools directly over a marked line of a cable unless:
     • you have already found the cable by careful hand digging beneath the surface and
     • it is a safe depth (at least 300mm) below the bottom of the surface to be
         broken or
     • you have used a physical barrier to prevent the tool striking the cable
• use the cable locator frequently and repeatedly during the work
• excavate trial holes before using a mechanical excavator near electricity cables
• do not operate the excavator within 300mm of the cable
• keep everyone clear of the bucket - bucket without teeth - and the excavator
    while digging near cables
• where cables become exposed for any reason, take suitable precautions to
    prevent damage while other works are going ahead, e.g. using timber boarding or sand bags
• never handle or move exposed cables
• take extreme care where joints in the cables have been exposed
• have an emergency contact number for ESB and other relevant utilities readily available for immediate
    contact – dial before you dig
• follow the legal requirements to ensure a safe place of work as set out in the:
     • safety health and welfare at work act
     • safety health and welfare at work construction regulations
     • safety, health and welfare at work (general application) regulations; and
     • health and safety authority (HSA) code of practice for avoiding danger from underground services
                                                     -4-
Scrúdú na hArdteistiméireachta, 2018                                   Staidéar Foirgníochta, Ardleibhéal
___________________________________________________________________________________________________________
working in a deep trench - guidelines
• use a trench box, as shown, or shuttering to support trench sides and protect workers
• do not dig deep trench in poor weather conditions – risk of side wall slippage
• batter (slope back) the trench walls
• survey neighbouring structures, walls, scaffolding etc. and provide extra
  support where needed
• provide guard and toe boards
• do not heap spoil, blocks etc. close to the edge of the trench
• do not park or position plant or machinery close to the edge of trench
• use personal protection equipment(hard hat and eye protection, insulated footwear)
• arrange a clearly marked exclusion zone – barrier and tape - around
  open trench
• use appropriate safety signage – in multilingual form and with easily
  understood graphics
• provide temporary cover for vacant trench.

working at height when slating a roof
• ensure a safe work platform at eaves level
• ensure the required safety rails and toe boards are fitted to the scaffold
• use slating jacks and boards if needed on slope of roof (traditional roof on heritage building)
• use safety harness or other fall protection as necessary, not necessary if fall prevention measures are
  effective
• properly secured ladders
• use safety netting as a protection for workers and for others below
Note: duty on all workers to observe best practice safety regulations
Any other relevant points

                                                    -5-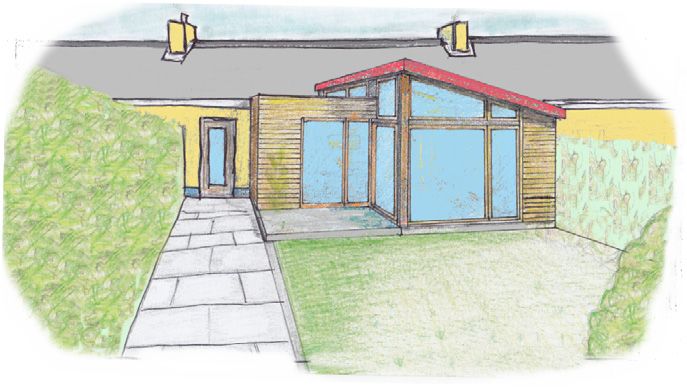
Scrúdú na hArdteistiméireachta, 2018                                   Staidéar Foirgníochta, Ardleibhéal
___________________________________________________________________________________________________________
2(c) – promoting a culture of safety among workers - three strategies
• buddy system, a new employee be paired with a more experienced worker
• ensure all workers are fully trained to carry out required tasks
• regular appraisal by management to ensure safe practice by all workers
• safe pass course mandatory for all workers
• all workers look out for one another and alert to possible risks
• manual handling course mandatory for all workers
• operators’ licences for machinery e.g. forklift, telly porter etc.
• hazardous goods training course
• frequent site safety meetings
• a safety statement must have an emergency plan outlined in the case of an accident. In the event of an
   emergency immediate action can be taken to ensure the treatment of the injured party
• ensure that all workers and visitors to the site are familiar with the safety statement
• provide visitors to the site with appropriate PPE
• ensure all signage and directional signs are clearly visible
• provide a safer working environment
• identify hazards and to reduce the associated risk of injury
• employers are obliged to provide appropriate information, training and supervision
• scaffolders are required to be qualified and certified as are crane drivers, banksmen, advanced
   scaffolders and operators of certain mechanical plant
• regarding safety consultation, all sites with more than 20 workers are required to actively facilitate the
   appointment of a safety representative to facilitate effective consultation
• employers are also obliged to appoint a designated safety officer who has responsibility for reviewing
   and updating the safety plan on a regular basis. This is to identify new hazards and develop safe working
   practices to remove or reduce the associated risk
• sites of today are very multi-cultural and it is imperative that all understand each other, and that an
   interpreter be available - especially in the event of confusion or an accident.
Other relevant information
Ceist 3 (a) - Terraced Cottage – addition of extension not greater than 18 m2:
     Three design considerations that enhance the health and well-being of the occupants – such as
• putting the health and well-being of the occupants at the centre of the design process - biophilic design
• people have phototropic tendencies, move to the light, sit in light-filled
   spaces, enjoy sitting and working in a naturally lighted space –
   enhances health and well-being, so consideration of daylight central to
   design
• purposeful design – to connect with nature - being able to see plants,
   hear birds, observe change of seasons etc. reduces stress, improves
   mental health - a positive impact on health and well-being
• increased glazing to the south increases natural solar gains, reduces
   heating costs and improves health and well-being
• natural light and shade evoke feelings of drama and intrigue as well as a
   sense of calm
• using materials that have a strong connection with the local ecology
   creates a distinct sense of place - genius loci - and peace and gives a
   feeling of connectedness and well-being
• decking to extend the inside to outside with seating to enjoy nature and
   the surroundings, enhances health and wellbeing
• a space with good thermal and airflow variabilities is both invigorating and comforting – provide
   openable windows, skylight windows to provide airflow and purge overheating in hot weather
• providing a sense of safety reduces stress and anxiety levels, solid walls give security
• providing a multi-sensory experience of nature is both stimulating and calming, flowers, trees and plants
   Any other relevant points

                                                    -6-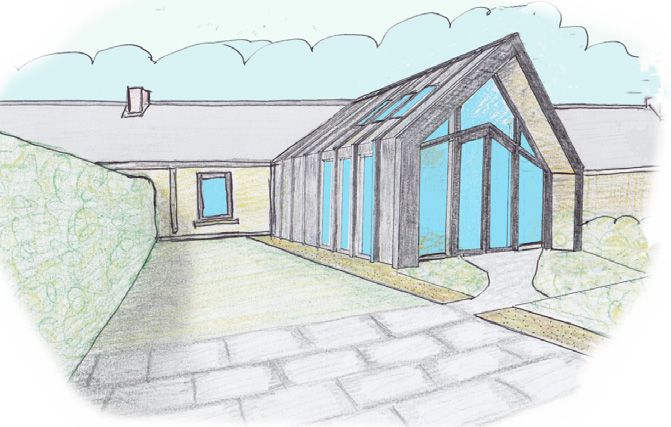
Scrúdú na hArdteistiméireachta, 2018 Staidéar Foirgníochta, Ardleibhéal
___________________________________________________________________________________________________________
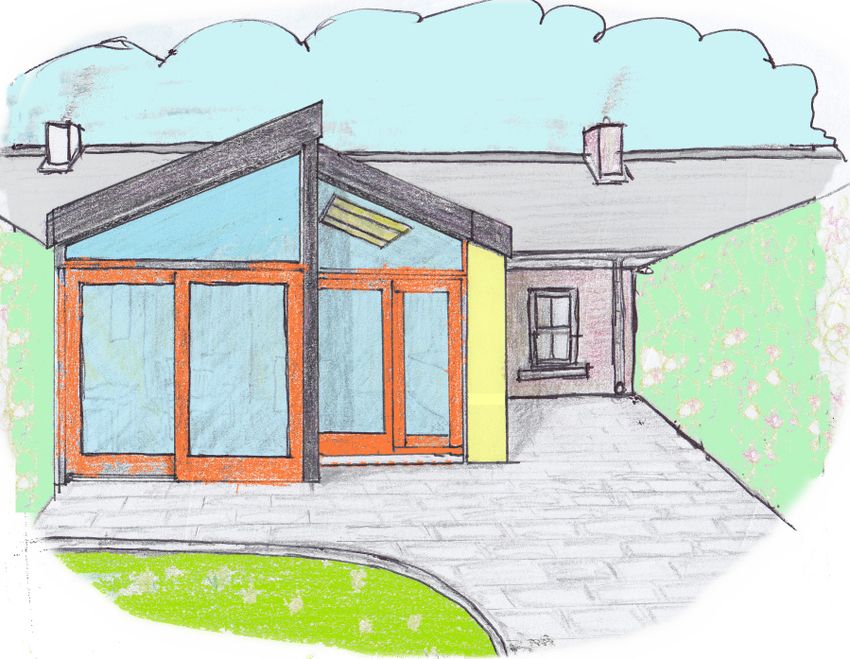
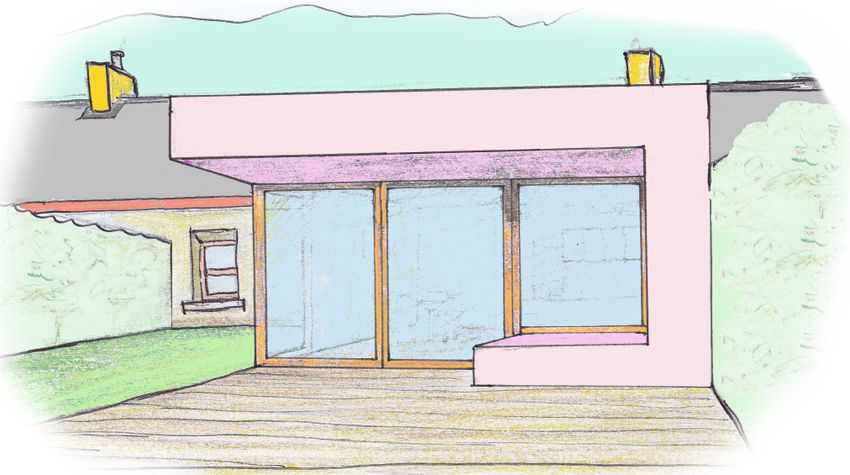
(b) Proposed modifications to the design - such as
• glazed openings that allow a visual connection to nature – biophilic design
• access to the garden through opening / sliding doors, bi-fold doors, floor
to ceiling glazing and provide external decking
• glazing to the floor so that the nature can be seen from seated level
• creating an internal planted courtyard in buildings with limited views to
nature
• open-plan layouts so the daylight and sunlight can penetrate into the
house
• high performance - triple and quadruple low-e glazing - maintains thermal
comfort internally and reduces glare
• opening windows allowing natural airflow and fresh air inside that mimic
the outside environments - occupants in control of temperature and
ventilation and can open to purge overheating
• construction of high thermal mass so that its regulatory properties can increase the internal comfort
levels and reduce overheating
• overhangs/brise soleil to the south to reduce glare and overheating
during summer
• lower cill levels to allow daylight and sunlight to penetrate deeper
into the house
• glass panels to the side of or in the door itself to brighten hallways
or main living areas
• bright colours to internal walls and window frames to increase
natural light and thus well-being
• strategically placed mirrors can reflect light further into the house
• high ceiling levels or double height spaces can vary the intensity of
light and shade and instil fascination
• do not over glaze a façade – light can only be appreciated if there is
also shade
• varying intensities of light and shadow change over time to create
conditions that occur in nature and increase well-being of
occupants, roof lights to increase natural light and provide natural
ventilation
• create a place to relax where the individual is not overlooked by
neighbours
• construction should be secure to protect against the elements and
the risk of intruders
• provide adjustable screens or shades/blinds
• deep overhangs create privacy to single storey extensions that are
overlooked by two storey houses
• use natural materials where possible which have fewer toxins than
highly processes products
• use local materials to reduce carbon emissions and the embodied energy of that material – embodied
energy is the energy required to get a product from its natural state
to its final delivery
• natural materials provide a rich sensory environment for the
occupants
• take inspiration from local vernacular and use natural stone and
timber in the extension
• a water-pond close to the building can collect storm water for
reuse and add a relaxing feature to the garden
• a water feature, water fountain, stimulates the senses through its auditory and tactile nature
textured and colourful planting to visually enhance the surroundings. any other relevant points
-7-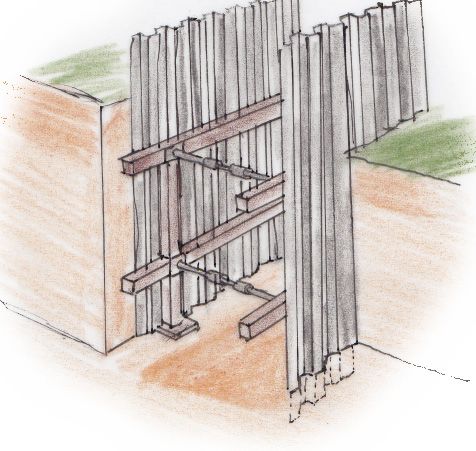
Scrúdú na hArdteistiméireachta, 2018                                   Staidéar Foirgníochta, Ardleibhéal
___________________________________________________________________________________________________________
(c) How the design meets the considerations identified in A – such as
• large south facing windows to maximise light, solar gains and create a visual connection with nature
• sliding, folding or swing doors to garden to bring outside in and to link garden to extension brings visual
   delight and fosters the health and wellbeing of the occupants
• open plan layout, windows with low cill levels and roof lights all allow
   sunlight to enter further into the dwelling
• bringing the outside in through sliding/swing doors and low level glazing
   fosters visual delight
• flexible open-plan layout allows penetration of light and spaces can be
   reconfigured to meet changing needs
• open-plan layout facilitates ease of movement for all and especially for persons with reduced mobility
• high ceilings, cathedral ceilings, increase volume and give a sense of spaciousness in a small extension
• opening windows or similar approach to allow natural
   ventilation
• construction of wall and windows to have high thermal
   performance to maintain thermal comfort
• shading added to prevent overheating, increase privacy
   and facilitate close contact with nature
• external materials used that are tactile and connected to
   the ecology of the country
• water feature and planting added to stimulate the senses
any other relevant points
See: 14 Patterns of Biophilic Design – Improving Health and Well-Being in the Built Environment:
Terrapin Bright Green LLC - https://www.terrapinbrightgreen.com
The Eco-Home Design Guide: Christopher Day - ISBN: 978 0 85784 304 3 /ISBN: 978 0 85784 306 7 (ePub)

Ceist 4 (a) Discuss the importance of each of the following when choosing a site
Characteristic of existing dwellings - such as
• care should be taken so that scaling and volume is relative
   to existing dwellings
• the shape of the proposal should be informed and
   reflective of the local built vernacular
• the materials to be used on the new proposal should
   reflect those of buildings in the local area
• natural materials are preferred over synthetic products
• existing forms simple and geometrically regular, the new
   design should follow similar patterns
• how existing dwellings relate to surrounding building should inspire a new development
• the direction and position of vernacular dwellings in the landscape should inform new builds so that
   they too can maximise sunlight and shelter
• proposals should be sensitive to existing dwellings so as
   not to invade privacy or overshadow them in size and
   scale
Characteristics of proposed site – such as
• the layout of the road along the site should inform the
   positioning of the entrance so that sufficient sightlines
   can be achieved – safe for vehicular access to main road
   from site
• if an existing road is not in contact with the site, the
   construction of a long driveway will greatly increase costs
• new proposals should be sensitive to prevent the destruction of existing features, such as stone walls,
   mature planting, field boundaries
• existing trees can provide a shelter belt as these have taken up to 100 years to mature

                                                       -8-
Scrúdú na hArdteistiméireachta, 2018 Staidéar Foirgníochta, Ardleibhéal
___________________________________________________________________________________________________________
• the topography of the site should be used as inspiration for the form of a new house
• existing mounds, slopes, contours on a site should not be removed to facilitate a new proposal but
should be used to their potential as a natural shelter or privacy barrier
• sites on top of hills may not get planning permission as a new proposal may break the skyline
• the name of an area – often in Irish, may hint towards the
previous use of the land and its soil conditions e.g. bog road and
may inspire the new house design
• the orientation and shape of the site will indicate if the new
build will maximise solar gain by having a glazed elevation facing
south
• the presence of plants which only grow in wet land may be an
indication of poor soil percolation
• proximity to services such as water, broadband and electricity
to the site - the further the distance the greater the costs
• the presence of rivers, lakes or streams nearby may cause flooding and will inform the siting of the
wastewater treatment plant and percolation area
(b) Choose a site A or B and discuss why you selected it
Why site A may be considered suitable for a new house - such as
• the site is located away from the main road so there is less noise
pollution
• the site is not overlooked by existing houses
• there is greater privacy as it is not adjacent to the main road
• minimum traffic on the side road would also reduce the risks when
accessing and exiting the site
• access can be achieved onto the preferred minor road
• it is a smaller site so the existing site boundary can be maintained
• the smaller site would result in minimum area for manicured lawns in the countryside
• smaller site means that less arable land is used
• minimal visual impact on the environment
• there are no existing dwellings to the south of the site so larger
windows could be facilitated without compromising privacy
• the building should be designed so that the glazed elevation faces
South
• house is positioned close to the perimeter fence, so maximum
garden space is available to supply house with garden produce –
fruit and vegetables grown on site
Why site B may be considered suitable for a new house - such as
• access can be gained from the main or minor road, so little
roadworks are required – environmentally sustainable
• greater proximity to dwellings with existing connections to services
such as waste management facilities, water, electricity and
broadband, bin collection - resulting in cost-effective provision of
public services
• long sightlines can be achieved on the straight road, which increase
safety when entering or exiting the site – usually for a 60 km/hour speed limit, 90 metre sightlines are
required for safe access
-9-Scrúdú na hArdteistiméireachta, 2018 Staidéar Foirgníochta, Ardleibhéal
___________________________________________________________________________________________________________
• houses adjacent to site B are in clusters, thus cluster developments
are a favourable development and reflect the existing development
patterns
• reduced distance from leisure facilities, schools and employment
• sufficient space exists to facilitate waste-water treatment and
percolation area on the site
• the long southerly aspect of the site increases design possibilities to
optimise solar gain.
(c) Location and orientation on site A and B entrance and driveway.
The house is to be positioned so that:
• the side of the house with the greatest surface area is south facing to
maximise solar gains which will increase its sustainability and reduce
energy costs
• it is close to the road where services are located
• it is set back from the road to reduce the environmental impact on the
landscape
• house placed so that greater privacy can be achieved
• the form and layout of the proposal is similar to the characteristics of existing vernacular structures.
The layout of the entrance and driveway:
• is short to reduce the need for hard paving and surface water disposal
facilities which will save money
• allows shrubs to be planted to help integrate the house into the landscape
and increase privacy
• enables the driver to clearly see oncoming traffic from both sides
• follows the contours of the site instead of cutting into the landscape
• is set back – 5 metres - so that a car waiting to enter closed gates is not
obstructing traffic, sidewalls splayed at 45° for clear vision
• meets the criteria set out by the local authority – in design and measurements
• house is positioned close to the perimeter fence, minimum driveway, reducing hard surfaces and cost
and allows maximum garden space to supply house with garden produce – fruit and vegetables
Any other relevant points
- 10 -Scrúdú na hArdteistiméireachta, 2018 Staidéar Foirgníochta, Ardleibhéal
___________________________________________________________________________________________________________
Ceist 5 (a): U-value of wall A
Material Element Conductivity k Resistivity r Thickness T(m) Resistance R
Internal Top Surface 0.1040
Screed 0.720 0.71 0.05 0.0355
Concrete Floor Slab 1.280 0.78125 0.1 0.0781
Radon Barrier 0.250 0 0.00025 0.0010
Sand Blinding 0.160 0.040 0.2500
Hardcore 1.350 0.2000 0.1481
Subsoil 1.600 0.300 0.1875
Total R Rt = 0.8042
Floor U-value 1/R 1.2434
New floor Given U-value 0.15
5(b) Cost of heat lost annually through the wall Formulae: R=T/k R=T × r U= 1/Rt
U-value: U = 1 / 0.8042 = 1.2434 W/m2 ° C.
Heat lost through uninsulated floor
• Heat loss formula: = U -Value × area × temp. diff
• Floor area = 72m2
1.2434 × 72 × 16 = 1432.3968 Watts (Joules / sec)
• Heating period p/a:
60 × 60 × 10 × 7 × 38 = 9,576,000 seconds (2,660 hours)
Kilo joules p/a:
9,576,000 × 1432.3968 = 13,71663. 17568 kJ/sec
1000
13716631.17568 = 367.24 litres
37350
• Litres p/a: (Note: Calorific value of 1 litre oil = 37350 kJ) Cost p/a: (Note: 1 litre of oil costs 96c)
Cost p/a: 367.2 × 0.96 = €352.5
Cost of heat loss annually through floor = €352.5
Alternative method:
Formula: U-value × Area × Temp Diff. × Time (secs) × Cost (Euros)
Calorific value × 1000
= 1.2434 × 72 × 16 × 9,576,000 × 0.96
37,350 x 1000
= 13167966486.528
37,350,000
= €352.5
- 11 -Scrúdú na hArdteistiméireachta, 2018 Staidéar Foirgníochta, Ardleibhéal
___________________________________________________________________________________________________________
Q.5 (c) thickness of expanded polystyrene insulation required to give a floor U-value of 0.15 W/m2 ° C.
Determine the Resistance for a U-value of 1.2434 W/m2 K
Use formula U= 1/Rt. & solve for R.
R = 1/ U-value R = 1/ 1.2434 = 0.8042 m2 K / W
Resistance for required U-value of 0.15 = 1/0.15 = 6.6666 m2 K / W
Difference in Resistance = 6.6666 - 0.8042 = 5.8624 m2 K / W
Use the formula R= T/k & solve for T.
5.8624 = T/0.037
T = 5.8624 × 0.037 = 0.2169088 metres to achieve U value of 0.15 W/m2 °C.
Thickness of required Expanded Polystyrene insulation = 216.9 mm - accept 216/217 mm.
Alternative calculation methods acceptable.
Ceist 6.
Two advantages and two disadvantages of self-build as a method of building a house.
Advantages – such as:
• reduced costs – help from family, friends and neighbours
• avoids need to acquire a large mortgage
• enhanced control over build quality and finish
• personal satisfaction, enhanced wellbeing from physical and creative
involvement in the project
• can be built over longer period as budget allows
• building skills capacity with self and friends
• built in conjunction with friends as gift or on an exchange of labour basis
Disadvantages – such as:
• possible skills deficit through inexperience
• building control management required, compliance may be challenging
• longer construction period
• demanding on personal time
• lack of building guarantee scheme
• no contractual agreements with friends
• all responsibility for maintaining quality standards falls on self-builders
• extra statutory responsibilities on self-builders, e.g. health and safety provision,
public liability, adherence to building regulations
• materials bought in small quantities, extra expense
Any other relevant points
(b) Three features of the design shown that make the house suitable as a self-build
project – such as
• ecologically friendly design - can be built mainly from locally sourced materials
• the house, except for foundations, chimney stack and internal plasterboard for fire-
proofing is entirely constructed from wood
• wood is renewable, carbon neutral, is easy to cut and shape using hand tools and has
low embodied energy
• the use of native wood, locally sourced such as native larch finish on the exterior, is
carbon neutral and reduces the embodied energy of the house, giving a low-carbon
construction
• simple building form - easy to set out foundations, obtain levels
- 12 -Scrúdú na hArdteistiméireachta, 2018 Staidéar Foirgníochta, Ardleibhéal
___________________________________________________________________________________________________________
• the house is small and compact, facilitating ease of construction by self-builders
• no need for specially designed beams or supports
• one and-a-half storey build maximises living space with minimum of materials
• narrow width – can be spanned with standard wooden joists without need for
structural steel
• lighter building simplifies foundation design and earthworks – environmentally
friendly
• straightforward roof design for ease of marking-out and erection
• light timber frame and external rainscreen cladding obviates need for mechanical
lifting equipment
• framework can be constructed on site, can be easily cut by hand or with chop saw
• early closing-in of frame provides a dry workspace at an early stage of construction
• indoor trades can commence early in build process – electrical and plumbing
• low moisture, short drying out time, house can be lived in more quickly due to
design of construction.
(c) two modifications to the existing design that would further reduce the environmental impact of the
house and help meet the nearly Zero Energy Building (nZEB) requirements.
The Energy Performance of Buildings Directive (EPBD) defines a nearly zero energy building as follows:
A nearly zero energy building is a “building that has a very high energy performance … the nearly zero
or very low amount of energy required should to a very significant extent be covered by energy from
renewable sources, including renewable energy produced on-site or nearby.”
The EPBD does not prescribe a uniform approach for implementing nearly Zero-Energy Buildings and
neither does it describe a calculation methodology for the energy balance. nZEB standards are to be
introduced from 2019 for all publicly-owned buildings and from 2021 for all buildings.
Modifications – such as
provide a storm porch or inner entrance hall with doors -
• reduce heat loss when front door is opened
• extra insulation at door
Increase the thickness of insulation in the external walls –
• the insulation can be fixed to the inside of external leaf
• the rainscreen can also be fixed outside the insulation
• modifications may be needed at the eaves to accommodate the increased wall
thickness
increase window area in south-facing wall to boost solar gain
• a glazed south-facing area attached to the outer wall
• increased solar gain and greater thermal comfort
• sheltered seating area for all-year use
• add on a purpose designed sunroom
erect a partition with glazed doors to separate kitchen and dining areas
• allows both the living and kitchen areas to be zoned for space heating
• reduces demand for heating and improved thermal comfort
• increases acoustic comfort and increases privacy
• sliding doors or bi-fold doors for ease of access
• install air-to-water heat pump and integrate space and hot water heating in conjunction
with under-floor space heating
• replaces the fuel-burning stove shown and reduces environmental impact reduces CO2 emissions – no
burning of fossil fuels
- 13 -Scrúdú na hArdteistiméireachta, 2018 Staidéar Foirgníochta, Ardleibhéal
___________________________________________________________________________________________________________
install evacuated tube / solar panels on the roof surface
• place closest to south-facing for domestic water heating
• to reduce dependency on mains electricity and carbon footprint
• roof pitch of 45° most advantageous
install photovoltaic (PV) panels to supplement electricity from the grid
• photovoltaic panels reduce the use of mains electricity generated from
fossil sources by replacing some of the energy with electricity from a
renewable source, the sun
install rainwater harvesting system
• collect rainwater from roof
• simply store in rainwater butts or containers or
• use larger capacity underground tank
• water from large capacity tank filtered and pumped into house
• water for flushing, watering plants, etc. replaces chlorinated treated mains water for these uses
• separate distribution system for drinking water and recovered rainwater
install wind generator to provide off-grid electricity
• wind speed and height of turbine are critical for electricity generation
• should be a minimum of 10.0 m above the roof /obstruction within 100.0 m - such as buildings or trees
to avoid air turbulence which reduces efficiency and causes wear.
- 14 -Scrúdú na hArdteistiméireachta, 2018 Staidéar Foirgníochta, Ardleibhéal
___________________________________________________________________________________________________________
Ceist 7.
Ceist 7
Floor, wall and door detail - typical details – floor details
• 20 mm floating floor on 20 mm plywood decking
• breather membrane sealed and taped
• ceiling joists 200 × 40 mm min at 400 mm centres
• hangers with resin anchored bolts and
• plasterboard to ceiling – fireproofing and heat retention
• airtightness tape at junction of wall and ceiling
walls
• 18 mm external render and 100 mm solid concrete block
• Reinforced concrete lintels to head
• PIR or similar high-density insulation as cavity closer
• cavity ties, stainless steel wall brackets set in blockwork
• external render and external plaster
• stepped dpc
door
• Thermally broken frame and door
• Double rebated door for draught proof
• Continuous draught strip - double
• Vertical sheeting and insulation
Other appropriate detailing accepted
- 15 -Scrúdú na hArdteistiméireachta, 2018 Staidéar Foirgníochta, Ardleibhéal
___________________________________________________________________________________________________________
Ceist 8
Ceist 8 (b) - Safety features of system
thermostatic control of the burning rate
• thermostatic control of the burning rate based on temperature of water in the boiler where the
appliance uses a boiler
• thermostatic radiator valves (TRVs) should be wired electronically to provide boiler
interlock
hot water cylinder - thermostatic control
• fitted about one third of the way up the cylinder
• should have clean contact with the metal on the cylinder
• avoids overheating thus ensuring safe temperature of water in taps
• thermostat should be as accessible as possible
• the cylinder thermostat should be wired to provide a boiler interlock
vent valve to boiler
• a safety feature that stops too much pressure from damaging the plumbing system
and causing injury to a person
• helps to prevent the risk of an explosion due to build-up of pressure
ease of cleaning/maintenance
• the opening for this purpose should have a rigid, non-combustible and gastight cover, or a removable
section in condensing type appliances
carbon monoxide
• the heating appliance must be correctly installed and serviced at regular intervals to ensure efficient
combustion and removal of products of combustion
• a carbon monoxide alarm be fitted in vicinity of burning appliance
• detector should have both a visible and audible alarm to alert occupants of the presence of carbon
monoxide
- 16 -Scrúdú na hArdteistiméireachta, 2018 Staidéar Foirgníochta, Ardleibhéal
___________________________________________________________________________________________________________
expansion of hot water
• expansion pipe provided to allow safe expansion of water (vented system)
• closed system incorporates expansion vessel to allow for expansion
pressure release valve
• often fixed on the boiler or as near as possible to the boiler
• spring loaded valve releases water if there is a build-up of pressure
• pressure gauge indicates pressure in bars
(c) location of chimney
• stove to be located on internal wall to maximise thermal mass of chimney stack and heat retention and
to maximise dispersal of heat
• chimney centrally located and near to bathroom to avoid wasting water
• stove may use system-built chimney or connect to new build or existing chimney
• prefabricated chimney system should be insulated and double-walled
• metal chimney system passing through any part of the building should be encased in non- combustible
material
Ceist 9
(a) Functional Requirements of attic space
It must be feasible to achieve the following outcomes within the building envelope in line with current
building regulations:
adequate floor area with suitable ceiling height
• ceiling level 2400 mm minimum above floor level
• area at 1500 mm above floor level at least 50% of total floor area
adequate natural lighting and ventilation
• roof lights flush with the roof surface may be fitted
• dormer style lighting may require planning permission if on main elevation of
house
• permanent ventilation/mechanical ventilation with heat recovery in keeping with the rest of the
dwelling
• use of vapour barrier on warm side of insulation/air continuity barrier
• ensure adequate ventilation of the roof structure to avoid condensation
- 17 -Scrúdú na hArdteistiméireachta, 2018 Staidéar Foirgníochta, Ardleibhéal
___________________________________________________________________________________________________________
fire safety
• fire grade high density plasterboard with half hour fire resistance taped, jointed and skimmed
• smoke detection system and alarm, connected to electrical mains
• fire resistant floor construction
• high density fireproof doors with min 0.5 hours fire rating and fitted with
self-closing mechanism
• structural members provided with required level of fire resistance, e.g.
steel beams, columns encased
• fire retardant thermal insulation
• means of escape in case of fire, roof lights may suffice - as shown
sound insulation
• floating floor to avoid transfer of impact sound
• isolation of floor from joists
• ensure completeness of structure to avoid air borne sound penetration
adequate access
• secure, permanent stairway access with landing and self-closing fire door
at head of landing
• ladder access suitable for occasional use only
thermal insulation
• avoid thermal bridging in design
• achieve minimum U-value of 0.16 W/m2 K for the roof
• ensure ventilation space for roof members – vapour diffuse layer and
counter battens
• OSB or Smartply externally for windtightness
electrical installation
• carried out to required standards by a qualified electrician
Any other relevant points
(b) Structural Stability – typical detailing
• floor joists of sufficient size for the full span
• purlins need to be strutted from a suitably mounted wall plates
• ceiling joists/collar ties to be fitted at a height of 2400 mm above the
finished floor level – triangulation of roof structure
• backing to rafters to accommodate thickness of thermal insulation
and ventilation
• doubling of rafters to provide sufficient support for roof lights
• slates on battens typically 50 × 35 mm
• counter battens 50 × 35 mm to provide ventilation space
• breather membrane sealed and taped
• hygroscopic layer – wood fibre board, OSB or Smartply or similar for
wind tightness
• rafters 200 × 40 mm at 400 - 600 mm centres
• collar ties 200 × 40 mm to each rafter
• ceiling joists 200 × 40 mm to each rafter
• vertical struts 200 × 40 mm
• runner at foot of strut - 150 × 70 mm
• struts 150 × 50 mm perpendicular to slope of roof
• purlin 200 × 75 mm
• service cavity at ceiling
- 18 -Scrúdú na hArdteistiméireachta, 2018 Staidéar Foirgníochta, Ardleibhéal
___________________________________________________________________________________________________________
• insulation 200 mm min at slope of roof
• insulation 600 mm – two layers to ceiling
• 2 × 12.5 mm gypsum plasterboard to ceiling with vapour barrier on
warm side of insulation
• airtightness tape
• fascia, soffit and gutter with continuous vent at soffit
(c) air leakage at the junction of the side wall and the sloped ceiling
• the continuous airtight membrane is overlapped and then sealed by
taping at the joint with proprietary adhesive tape
• the joining is kept clear of the angle formed by the studded wall and the
sloping ceiling to make an airtight seal achievable.
Ceist 10 (a)
(a) space heating energy demand
• minimising space heating demand central to achieving passive house standard
• space heating energy demand refers to the energy required to maintain an optimum indoor
temperature of 20 °C throughout the year – for heating the space only
• space heating demand for a passive house is specified at ≤ 15 kwh/m2 /a
• required to maintain an indoor temperature of 20° all year round
• space heating demand determined by the effectiveness of insulation and air-tightness
• in Ireland space heating, not cooling, is the major energy demand in dwellings
• approximately 60% of energy use in dwellings in Ireland is for space heating
• Passive house design principles require that “primary energy demand” must not exceed 120Kw/m2/a
• change of energy source from fossil fuels to renewable sources needed
• space heating energy use must be reduced to meet renewable energy goals
• viable solutions include efficiency of energy conversion, heat distribution through living spaces, zoning
of spaces, insulation and airtightness
• roof suitable for generating energy by installation of solar panels – orientation and pitch
• solar gain maximised by means of optimal placing of fenestration
• shading and controlled ventilation must be included to avoid overheating in summer
building form
• crucial in Passive House design – see sketch of complex and simple forms
• simplicity of design is best practice, without compromising quality of aesthetics
• building form should take account of local
tradition/vernacular architecture
• should respect aesthetic of surroundings
• compact form is best for economical use of materials
• fewer materials and lower labour costs
• compact form is easier to heat
• clean lines in walls and roof to facilitate easy achievement of air-tightness
• avoid complex roof layout – hips/valleys - which are difficult to insulate adequately
• wall-floor junctions minimised to avoid possible cold bridges and air-leakage points
• building envelope area minimised to reduce energy loss through external walls
• smaller surface area reduces the wind-chill factor
• reduced building envelope reduces the volume of air to be heated and the resulting space heating
• energy demand
• degree of compactness is shown by the ratio of the surface area to the volume contained (A/V)
• ideally the A/V ratio is 0.7 or less
• aim to have the required volume enclosed by the smallest possible surface area
- 19 -Scrúdú na hArdteistiméireachta, 2018 Staidéar Foirgníochta, Ardleibhéal
___________________________________________________________________________________________________________
• a building with the same U-values, air change rates and orientation as another may have a different
heating demand depending on their respective A/V ratios
• should take full advantage of site aspect, potential solar energy gain, potential for energy conservation
• main windows/elevation South-facing
• windows minimised on North facade
• providing lobby and porch at entrance to conserve energy
• heating appliances kept on inside walls to reduce heat energy loss
• steeper 45° roof pitch to accommodate increased living space and roof-mounted photovoltaic and/or
passive solar panels, evacuated tubes
thermal bridging
• a thermal /cold bridge is an area of a building that has a higher
conductivity than surrounding materials
• and significantly detrimental rate of heat transfer than the surrounding
materials, resulting in a significant reduction in the thermal
insulation/performance of a building thermal energy flows from a higher
to a lower temperature
• flow increases with greater temperature difference
• materials that are more efficient conductors of heat and penetrate the
outer envelope lead to greater thermal energy transfer – increase heat loss overall
• local areas of greater energy flow provide cold spots on the inner surfaces and
troublesome condensation, including interstitial condensation
• more of a risk where Passive House standard is achieved
• greater risk surrounding openings and where floors and ceilings abut outer walls
• continuity of thermal insulation of great importance
• passive house design attempts to eliminate all thermal/cold bridges and includes
this as one of its seven principles
• thermal/cold bridging reduces the buildings energy efficiency which increased energy costs per annum
• thermal/cold bridging reduces the thermal comfort of a building for its occupants
• the presence of thermal bridging locations in a building’s external envelope significantly increases the
energy costs for the occupants in attempting to maintain thermal comfort
• the presence of thermal/cold bridging in residential building can adversely affect
the health and wellbeing of the occupants
• the presence of thermal/cold bridging’s can lead to hazardous mould growth
which may also lead to the deterioration of the buildings fabric
• where thermal bridging is present in a building a significantly higher proportion
of heat energy passes through the bridge in the external envelope to the outside – where the
temperature is lower - this differential heat loss creates colder and warmer surfaces within the building-
on the internal surface of the external wall and may lead to condensation and mould growth
• these damp locations encourage the growth of mould – which can be harmful
to the occupant’s health and can also contribute to the deterioration of the
building fabric
• where significant heat loss through the presence of thermal/cold bridges
exists and thermal comfort needs to be maintained there will be a greater
energy demand
• where the increased energy demand is maintained using fossil fuels then the
building is not sustainable and increases the release of CO2 + SO2 which are
harmful to the environment
• all openings for windows and doors, junction between the external wall and the floor, junction between
the external wall and the ceiling, the eves detail, window cill, window and door head details together
with projecting balcony details are typical locations where thermal/cold bridges are found in poor house
design. any other relevant details
- 20 -Scrúdú na hArdteistiméireachta, 2018 Staidéar Foirgníochta, Ardleibhéal
___________________________________________________________________________________________________________
10 (b) Three modifications to this design to meet the Passive House standard- such as:
provide draught lobby at entrance
• minimise air movement when opening external door
• reduce heat loss and fossil fuel demand
• outside the front door in the existing recess
ensure suitable aspect and fenestration
• long axis in East-West direction
• south facing principal elevation maximises solar gain
• At 12 noon, angle A in sketch = 90° - latitude of site, 90° - 52° = 38° in
Cork, 90° - 55° = 35° in Letterkenny)
• increase the window sizes on the front elevation
• taller, larger South-facing windows maximises solar gain to living areas
• fewer and smaller North-facing windows reduces heat loss
• passive heating reduces costs and fossil fuel demand
• large eaves overhang or brise-soleil over South-facing windows
increase the window area in kitchen and dining room
• East-facing windows enable morning solar gain to the sitting room
• increases daylighting
• reduces artificial lighting requirement
• reduces heating requirement
provide roof lights
• increase daylight
• give longer daylighting period
• reduce need for artificial light
• reduce lighting costs and fossil fuel use
provide wood-burning stove
• carbon neutral
• up to 70% efficiency - open fire 30% efficient at best
move space heating appliance and chimney stack to an inner wall
• radiates stored heat to adjoining spaces
• reduces energy loss through external surfaces
• remove chimney and stove from design and replace with MHRV
• increase thickness of wall insulation
provide heat exchange technology
• space heating by means of geothermal, air to water, ground to water
systems connected to underfloor heating system
take advantage of solar heat source for water heating
• install solar photovoltaic panels on south-facing roof
• provide evacuated tube solar collector panels on South-facing roof
(c) a preferred orientation for the upgraded design, with the sun path included and discussion
• large glazed area to South or South-West leads to greater solar gain and decreased thermal energy
demand
• ideally the long glazed facade of a Passive House should face directly
South but not more than 30° off the East-West axis
• a smaller glazed area to North leads to less thermal energy loss
• south-facing roof provides suitably aligned surfaces for solar panels for
domestic water heating and photovoltaic panels for energy generation
• South-West elevation provides for greater solar gain in the evenings in Ireland
• if the ideal orientation not possible, insulation has to be increased
• careful positioning of the fenestration to ensure maximum solar gain
and minimum heat loss through the building fabric
Any other relevant details
- 21 -Scrúdú na hArdteistiméireachta, 2018 Staidéar Foirgníochta, Ardleibhéal
___________________________________________________________________________________________________________
Ceist 10.
Green design is about being green, rather than simply appearing to be green. So greening your house is
about more than just buying all sorts of expensive ‘eco-bling’ and adding it to your house. Ironically, that
could be just another display of consumerism. Rather, greening your house is about making responsible
environmental choices based on what you want to do, what you can do and what you can afford. This
means that - before we get into the minutiae of sustainable building materials - we should address some
fundamentals, chief among which is the need to build modestly and source locally.
From: contemporary design secrets: the art of building a house in the countryside. Jane Burnside (2013)
Discussion of the above statement and three best practice guidelines that would promote green,
sustainable housing in Ireland.
Discussion of the above statement– such as:
• building green means making responsible building choices from the start and at the heart of the building
process – not as a last resort when the building choices have been made
• building green means putting a green building ethic and environmental considerations at the heart of
every design decision
• building green means making eco-responsible choices about all aspect of the building - size, scale,
materials, running costs, lifetime use, end of life use
- 22 -You can also read