TECHNICAL DOCUMENTATION - Version 2021.10.08 - ENG - JUUNOO
←
→
Page content transcription
If your browser does not render page correctly, please read the page content below
TECHNICAL
DOCUMENTATION
Version 2021.10.08 - ENG

Technical documentation
Version 2021.10.08 - ENG

Preface

In the next 100 years our global population will grow to 12 billion people. All these people will
need houses, schools, offices, and more. Current construction methods have an immense
ecological impact and are responsible for one of our largest financial costs. This impact and
cost are increasing even more as a result of globalisation and the speed at which society lives
and moves. As a result, buildings and spaces are changing more and more often.

In order to protect our planet as well as cope with a growing population, we will need to
totally reinvent architecture. This is where the principles of the circular economy are crucial
so that ecological necessity can be combined with economic reality.

JUUNOO gives you the opportunity to put this into practice when it comes to the
compartmentalisation of spaces; in this respect, growth and adjustments should not result
every time in greater quantities of construction waste or higher costs.

JUUNOO does this by cleverly arranging spaces, using a patented system for interior walls. It
has been developed entirely according to the principles of the circular economy. The result
is a system with a very high residual value and low labour costs that ensures that the total
lifecycle cost of a building is lower than that achieved using conventional systems.

The speed of construction, simplicity and limited number of components guarantee a
faultless and smooth assembly. All modules can be extended in terms of height, are
interchangeable, or can simply be placed in a different layout. The spaces you use are
therefore always adaptable .

The 'look & feel' of a JUUNOO wall is then entirely up to the architect and property owner. All
standard finishing panels can be reversibly and securely mounted on JUUNOO. It is also no
problem to install insulation materials and utilities. This freedom in finishing ensures that
your spaces not only perform & look great today, but also meet all future demands & trends.

Here at JUUNOO we have already taken the first step with the development, certification and
launch of this product. Now is the time for us to start working together as partners and
ensure that we become the generation that makes a real success of the circular economy.

Chris Van de Voorde
Founder JUUNOO
Contents
Preface                                               0
Contents                                               1
1   Introduction                                       3
2   Dimensions                                         5

3   Modules                                           11

4   In the wall                                       33

5   Panels                                            37

                      Technical documentation
                   Version 2021.10.08 - ENG | 1/ 93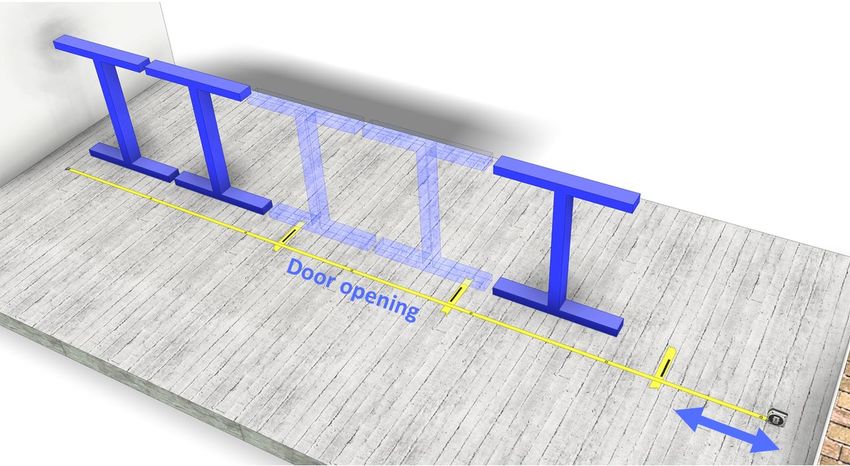
6    Finishes                                          51

7    Doors                                             70

8    Probox                                            75

9    Glass                                             82

10   Test reports                                      86

                       Technical documentation
                    Version 2021.10.08 - ENG | 2/ 93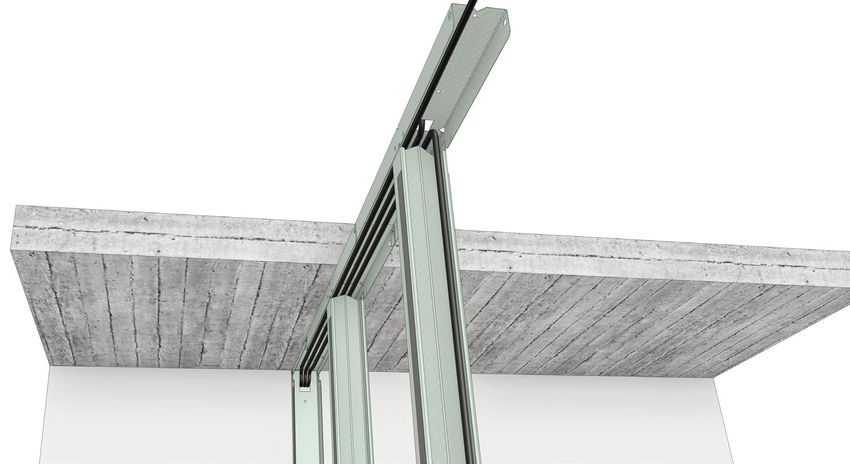
1       Introduction
1.1.1     General installation method using BaseClick panels

        Place the laser on the centre of the wall.                      Place the first I-module.

    Centre the horizontal and vertical profile on the        Align the second module with the first.
                laser. Fix this module.

    Snap the modules together and centre the end         Continue this across the wall using I-modules.
              in line with the laser.Fix it.

                                        Technical documentation
                                     Version 2021.10.08 - ENG | 3/ 93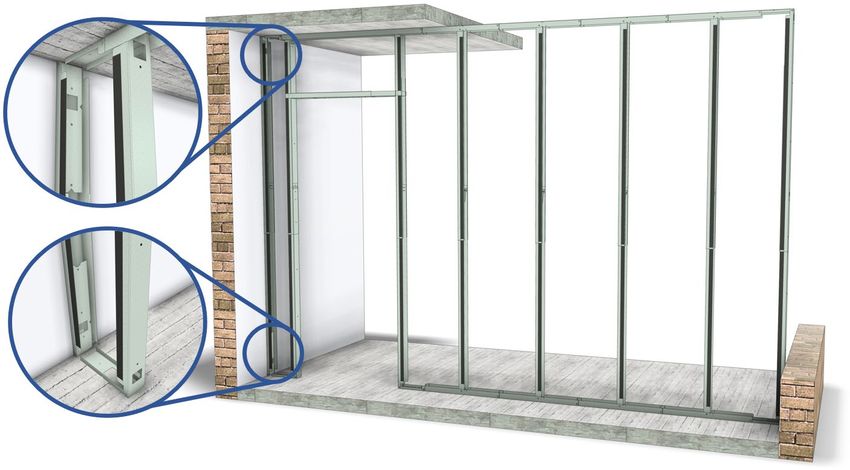
Remove the laser and fix the C-modules.                           Fix all the modules.

Saw the first panel to the right size and glue it,   Hook the 2nd panel into the first at 30°. Move the
     perfectly vertical, onto the modules.            panel forwards and backwards until it clicks.

Press the panel firmly onto the JUUNOO tapes.         Put the rest of the panels in place. Use an extra
                                                         strip of JUUNOO tape for the last panel.

                                     Technical documentation
                                  Version 2021.10.08 - ENG | 4/ 93
2   Dimensions
    I-module dimensions

    C-module dimensions

                             Technical documentation
                          Version 2021.10.08 - ENG | 5/ 93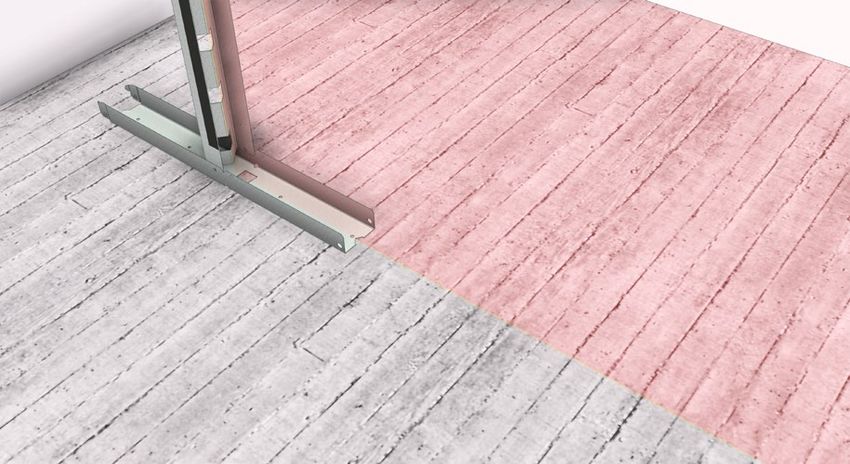
D-set dimensions: for a single door
The door set consists of 1 horizontal top profile above the C-modules, which is then
completed with 1, 2 or 3 cross profiles depending on the height of the C-modules.
The top profile has the fitting dimension of 2 adjacent I-modules, thereby ensuring that the
pattern of 600 mm is maintained over the entire wall.

      DD-set dimensions: for a double door
The DD-door set consists of 1 horizontal top profile above the C-modules, which is then
completed with 1, 2 or 3 cross profiles depending on the height of the C-modules.
The top profile has the fitting dimension of 3 adjacent I-modules, thereby ensuring that the
pattern of 600 mm is maintained over the entire wall.

                                 Technical documentation
                              Version 2021.10.08 - ENG | 6/ 93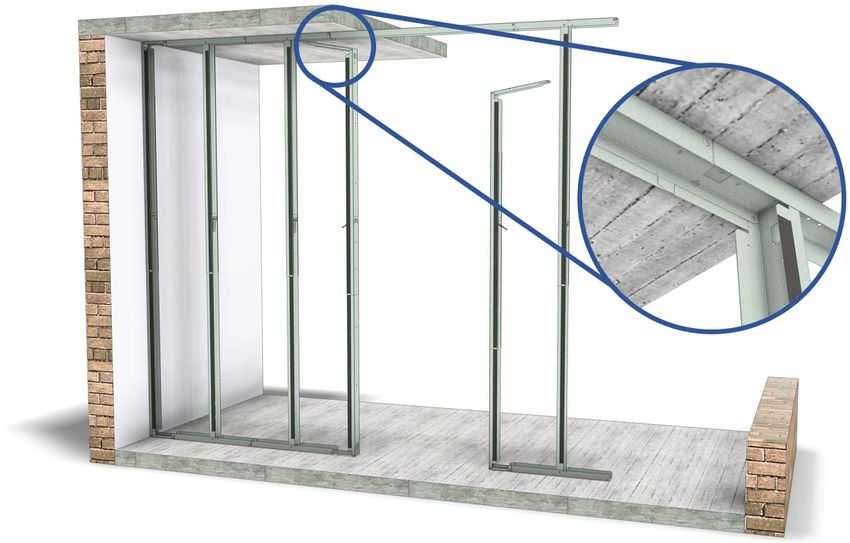
BaseClick dimensions

BaseClick panels come in sizes of 2780 and 3500 mm. These are delivered cut to height
according to the project. The panels come with JUUNOO blue tapes.

                                Technical documentation
                             Version 2021.10.08 - ENG | 7/ 93
AcouClick dimensions

                      Technical documentation
                   Version 2021.10.08 - ENG | 8/ 93
Generic dimensions of a wall
Wall thickness with BaseClick panels
Wall thickness with AcouClick panels
Technical documentation
Version 2021.10.08 - ENG | 9/ 93Materials used
JUUNOO modules are made from S250GD – galvanised steel. Our guarantee to you is that
at least 40% of this steel comes from recycling processes. The material consumption of the
medium modules is as follows:
Medium size New material Recycled Total
material
C-module 2.3 kg 1.5 kg 3.8 kg
I-module 2.9 kg 2.0 kg 4.9 kg
D-set 1.5 kg 1.0 kg 2.5 kg
AutoCAD, Revit, BIM models
All components can be delivered in either 2D or 3D format for detailing requirements.
Please contact info@juunoo.com for technical drawings.
We can also offer you assistance in designing projects using the JUUNOO system.
Technical documentation
Version 2021.10.08 - ENG | 10/ 933 Modules
Working with I-Modules
3.1.1 Top and bottom of an I-module
Top edge: contour in the shape of a "roof". Bottom edge: contour in the shape of a “house".
3.1.2 Installing the I-Module
The modules are delivered folded. Unfold the horizontal profiles.
Open the Quickspan and slide the module open. Clamp the module between the floor and ceiling
by closing the Quickspan
Technical documentation
Version 2021.10.08 - ENG | 11/ 93Connect the second module to the first. Click the horizontal profiles together.
The profiles have 'flaps' to facilitate the
alignment
Open the Quickspan and slide the module open. Click the top horizontal profile into the previous
parts.
Clamp and fix the module. Carry on building!
Technical documentation
Version 2021.10.08 - ENG | 12/ 933.1.3 Height adjustments: Quickspan
With an open Quickspan you can infinitely The Quickspan acts as a lever so you can work
adjust the height of a module. smoothly.
The modules slide open and clamp between Using a closed Quickspan, the modules are
floor and ceiling. From this point onwards, the tensioned and fixed in place.
module is fixed.
Technical documentation
Version 2021.10.08 - ENG | 13/ 93Working with C-Modules
3.2.1 Top and bottom of a C-module
Top edge: contour in the shape of a "roof". Bottom edge: contour in the shape of a “house".
3.2.2 Installation of a C-module
Unfold the horizontal profiles. Insert the C-module into the I-module.
Slide the C-module against the corner. Click the C-module into the I-module at the top
and fix into place.
Technical documentation
Version 2021.10.08 - ENG | 14/ 933.2.3 Height adjustments: Quickspan
With an open Quickspan you The modules slide open and Closed Quickspan:
can infinitely adjust the height clamp between floor and the height is fixed.
of a module. ceiling.
Starting point
3.3.1 Symmetrical construction
With a JUUNOO wall the I-modules are distributed centrally over the wall so that the distance
to the I- and C-modules is the same at both ends of the wall.
I-modules are central. Start and stop panels are cut to size.
Technical documentation
Version 2021.10.08 - ENG | 15/ 933.3.2 Determining where to place the start module with a tape measure
Using a tape measure means that a group of I-modules can be theoretically shifted along
the length of the wall to see how they can be built up symmetrically.
On a tape measure, circle all the multiples These distances represent the widths of the
of 60 cm. horizontal profiles of the I-modules.
Once the tape measure is in place, place the first
I-module at the beginning of the tape measure.
Technical documentation
Version 2021.10.08 - ENG | 16/ 933.3.3 Using a tape measure to easily plan a wall
A tape measure is the perfect tool for placing modules around doors or pipings. By laying out
and moving the tape measure, you can very quickly see how everything interacts with each
other.
Mark doorways and ends of walls on the floor. Note that only 2 theoretical I-modules overlap
the doorway. If the base of a third I-module
remains in the doorway, trim the base of that I-
module.
.
Insert the I-modules. Insert a door top profile in Now place the C modules on the floor marking.
the place of the door opening.
3.3.4 Calculate where to place the start module
If the tape measure is too short it can be useful to determine the start position manually as
follows:
a) Measure the length of the wall in cm
example: length = 260 cm
b) Divide this length by 60 cm
example: 260cm/60cm = 4.33
c) Multiply the numbers after the decimal point by 30
cm
example: 0.33 x 30 cm = 9.9 cm
Technical documentation
Version 2021.10.08 - ENG | 17/ 93Fixing the modules
Quickspan is really effective in temporarily securing the modules. However, it is not strong
enough to act as a replacement for individually fixing the modules into their surroundings.
3.4.1 Fixing with screws
The modules have pre-drilled holes at the top and bottom (Ø 6 mm). All that is needed for
each module is to fix it once at the top and once at the bottom with screws. Depending on
the application, several screws can be used.
Depending on the material against which the modules are being fixed, you might need to
use a specific type of screw. Tip: use screws without countersunk heads.
Type of screw (suggestion) Substrate
Hammer fixings 5 x 30 mm Concrete, tiles, etc.
Wood screw 3.5 x 13 mm Wood, laminate, etc.
Self-drilling screws 4 x 25 mm Technical floor with metal layer
Tek screw 4.2 x 13 mm Metal studs, other JUUNOO modules
Technical documentation
Version 2021.10.08 - ENG | 18/ 933.4.2 Fixing with JUUNOO blue tapes
The wall can be fixed to the floor and ceiling without causing any damage. JUUNOO blue
tapes are used to do this. To avoid damage when removing the tapes, you can first apply
high-quality masking tape.
The tensioned modules ensure that the adhesive bonding of the tapes is fully compressed,
and they are therefore fixed into place very firmly.
Optional: apply painter's tape to First apply the hook side of the JUUNOO tapes,
all fragile or delicate surfaces. then the loop side. Partially remove the backing
sheet.
Insert the I-module as you would normally. In order to be able to disassemble it easily later,
we recommend cutting the tape at the level of
each module.
Complete the structure. When disassembling,
the JUUNOO tape can be removed from its
surroundings. It can also be removed from the
modules if desired.
Technical documentation
Version 2021.10.08 - ENG | 19/ 93Corners
3.5.1 Mounting angle: detail
Two JUUNOO C-modules can easily be placed at an angle. It is recommended that the panels
of one wall continue between the 2 C-modules.
3.5.2 Construction method
We recommend that you only fix the C-module of the connecting wall in the corner once the
panel has been mounted. For example, one construction team can install modules, and
another can install the panels.
Position and fix 1 module structure. Position the angled structure, but do not fix the
adjacent C-module (blue) yet; slide it into the left.
Mount the panels to the 1st structure. Slide the C-module against the panels and fix
where necessary.
Technical documentation
Version 2021.10.08 - ENG | 20/ 93Doorway: D-set
3.6.1 General principle for creating a doorway
A doorway is created by installing two C-modules and a door-set at the place where two I-
modules would normally be installed. The two C-modules are on the left and right of the
doorway. The doors-et will be mounted above the doorway. The click-in panels continue
along, with the JUUNOO blue tapes on the panels to the left and right of the door matching
up with the tapes on the modules.
Technical documentation
Version 2021.10.08 - ENG | 21/ 933.6.2 Positioning of standard doorway: D-set
Click the large 120 cm door profile Click the next I-module into the door profile.
(= 2 I-modules) into the I-modules and fix it. Make sure it is level again.
Place the 2 C-modules into position on the door. The placement of the C-modules/width of the
These slide into the door profile at the top, and door opening can be adjusted.
slide into the I-modules at the bottom.
The C-module should preferably be screwed into When fixing the modules with JUUNOO blue
the floor and ceiling. tapes, you will need to use two additional strips
of tape at the height of the C-modules next to
When working with a doorway of 90 cm, the the doorway.
holes in the I- and C-modules will match. For
other widths, you will need to drill a new hole.
Technical documentation
Version 2021.10.08 - ENG | 22/ 93If it is not possible to screw into the ceiling, Attach the telescopic cross section to the C-
the horizontal top edge of the C-module must modules at the desired height. The cross profile
be fixed to the door module using JUUNOO blue has a flap that can be fixed with self-tapping
tapes. screws.
Complete the structure.
Technical documentation
Version 2021.10.08 - ENG | 23/ 933.6.3 Door shifts to the left/right
In certain situations (wide doors, specific positioning of doors, etc.) the horizontal profile of
the I-module may be inside the door opening. This can be cut off if necessary.
Door shifts to the left: this causes the I-module to There will be no problems with the structure at
the left of the door to protrude into the doorway. the top.
This piece must be cut off before the module is
installed.
To cut the I-modules, proceed as follows:
Unfold the last Cut the raised edges on Fold the profile piece This way you will end
I-module. the horizontal profile at over and cut the up with an I/C-module.
the mark indicated. bottom edge.
Technical documentation
Version 2021.10.08 - ENG | 24/ 933.6.4 Installing a door close to the wall
If the door is less than 60 cm from the wall, two C-modules will face each other without there
being an I-module between them. In this case, we recommend folding the C-module against
the wall and possibly shortening the C-module against the door.
You shorten the C-module in a similar way in which you shorten the I-module.
Cut the raised edges on the Fold the profile piece over Of course, the profile can also
horizontal profile at the mark and cut the bottom edge. be shortened in an unmarked
indicated. area.
Technical documentation
Version 2021.10.08 - ENG | 25/ 93Combining with glass windows, glass doors and special components
3.7.1 Generic dimensions: open wall with two C-modules
Small modules (Small, S) are optional.
3.7.2 Installation of a combination wall
A JUUNOO wall can be easily combined with glass walls, windows, large doors or other types
of openings. In locations where you must install other systems, the JUUNOO wall simply ends
with a C-module.
Technical documentation
Version 2021.10.08 - ENG | 26/ 93High walls
The installation process for a high wall is identical to that of a normal wall.
3.8.1 Generic dimensions: high walls
Technical documentation
Version 2021.10.08 - ENG | 27/ 933.8.2 Door in high wall
Several cross sections are provided depending on the height. These give extra support to the
joints of the panels that come above the doorway.
Technical documentation
Version 2021.10.08 - ENG | 28/ 93Connection to a false ceiling
3.9.1 Basic connection
If the wall is to be placed on a profile of the false ceiling, the modules can be fixed to this
profile.
If the wall is not to be placed on a profile of the false ceiling, a wooden batten can be first
fixed to the ceiling and then all the modules will be positioned against it.
Technical documentation
Version 2021.10.08 - ENG | 29/ 93The modules are usually extended against the ceiling and only at that point are they
tensioned. With a suspended ceiling, however, this would be difficult since the suspended
ceiling would be pushed upwards. The following method is therefore used:
FIXED CEILING SUSPENDED CEILING
Slide out until it is completely against the ceiling. Slide out to ±1 cm below the ceiling.
The module is tensioned against the ceiling. Clamp the Quickspan shut.
The module is tensioned against the ceiling. The module stops just below the suspended
ceiling. The suspended ceiling is not pushed
upwards. Fix with a self-tapping screw
Technical documentation
Version 2021.10.08 - ENG | 30/ 933.9.2 Acoustic connections
When installing the JUUNOO wall under a false ceiling, vertical and horizontal
reinforcements are recommended where necessary. It is also recommended that you work
with bandraster grids.
To avoid acoustic insulation problems, the space above the wall should be filled with an
acoustic barrier and the joints should be sealed with aluminium tape. When installing the
acoustic barrier, the manufacturer's instructions must be followed.
For an alternative arrangement, the false ceiling can be installed after the installation of the
JUUNOO wall. This is a more robust structure, but less easy to adapt.
Technical documentation
Version 2021.10.08 - ENG | 31/ 93Walls under a pitched roof
JUUNOO walls can be placed under a pitched or sloping roof if they are within the minimum
and maximum range of the modules. If the dimensions are outside these limits, you will need
to customise the solution.
When installing under a sloping roof, the I-modules must each be mounted vertically. They
therefore do not click together in this set-up. At the top of the modules there must be at least
2 fixation points per module.
3.10.1 Minimum and maximum range under a pitched roof
Technical documentation
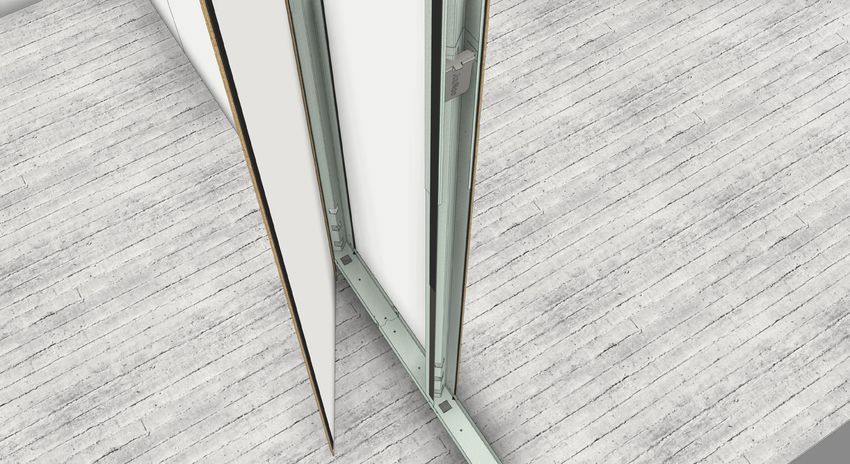
Version 2021.10.08 - ENG | 32/ 934 In the wall
Acoustic insulation
Standard panels fit perfectly between the vertical profile of the JUUNOO modules.
Technical documentation
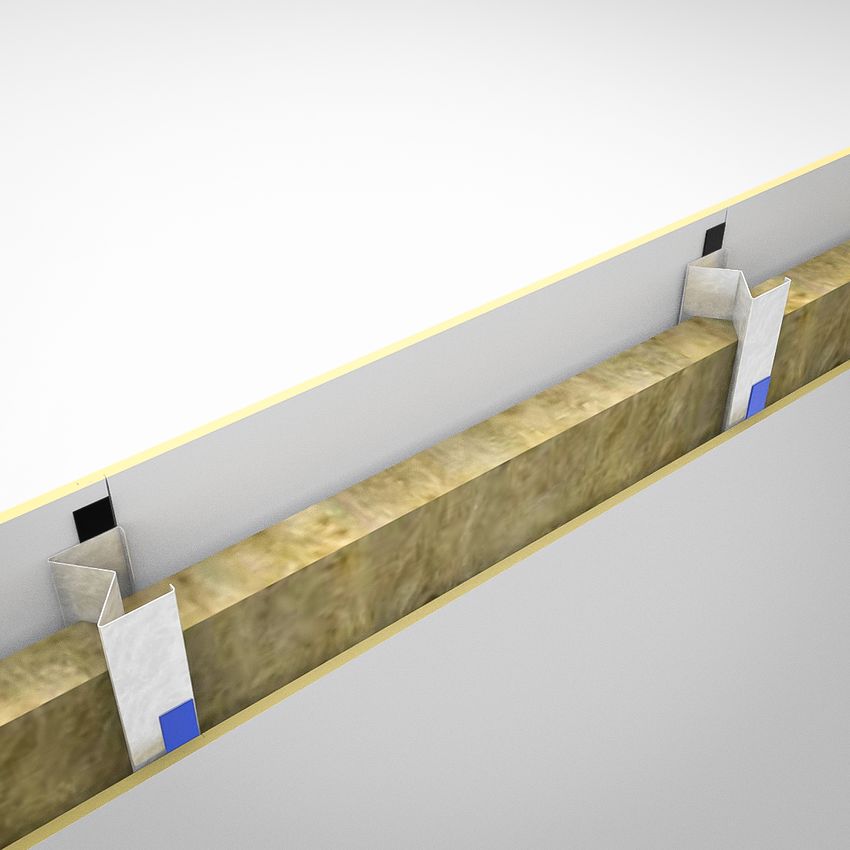
Version 2021.10.08 - ENG | 33/ 93Cabling
In JUUNOO modules, we have provided 40 mm x 40 mm square openings for utility
pipings. There is one opening each in the horizontal sections of the modules, and three
openings in the vertical profile.
Through the openings in the horizontal profiles, it is possible to pull cables through from a
technical floor or false ceiling into the JUUNOO structure.
Cables can run above and below the vertical profiles; the maximum height between the
horizontal and vertical posts is 39 mm.
Technical documentation
Version 2021.10.08 - ENG | 34/ 93Sockets
4.3.1 Placement
Sockets can be easily installed in the JUUNOO wall.
Provide the necessary cables. Attach the click panels to the modules.
Make a hole at the desired position. Fix the flush-mounted socket in front of the
socket.
4.3.2 Optimise reusability
It is recommended that the socket is inserted in the central area of a panel, and not on a joint.
This way you will not need to make a cut-out in the modules.
Poor option
✗
Making a cut-out in the module will make
it less usable. Also, due to the positioning,
a hole is made in 2 panels.
Good option
✓
A hole is only made in 1 panel. The
module is not affected, which increases
its reusability.
Technical documentation
Version 2021.10.08 - ENG | 35/ 934.3.3 Acoustic positioning
Take care when installing electrical outlets in an acoustic wall.
Sockets along both sides of a wall are a major 'acoustic leak' when installed directly opposite
each other.
It is better to leave some space between two opposite outlets.
Poor option:
✗
Sound can pass through the wall in one
straight line.
Better option:
✓
The sound must travel a greater
distance through the acoustic wool
inside.
Best option:
✓✓
The sound must travel a long way and
will be partially absorbed by the
modular style.
There are plenty of pastes and foams, etc. on the market that you can use to make the back
box etc. completely soundproof.
Technical documentation
Version 2021.10.08 - ENG | 36/ 935 Panels
Mounting of panels on JUUNOO
5.1.1 Fastening with JUUNOO blue tapes
If using both JUUNOO and click panels, you can use JUUNOO blue tapes. We recommend
using screws for higher loads (> 25 kg per panel).
The advantage of using the JUUNOO tapes is the speed at which you can install them and
how easy and simple it is to dismantle the panels from the wall.
If you want to install other finishing panels with JUUNOO tapes, we recommend you contact
the JUUNOO technical service or info@JUUNOO.com.
JUUNOO tapes can be provided by JUUNOO as standard on the modules and clicker panels.
The contractor also has the option to purchase the tapes in rolls of 25m.
JUUNOO tapes, hook & loop JUUNOO tapes, 25m roll
Installation should be carried out on a dust-free, degreased surface, at a temperature above 20 °C and
at a humidity between 40% & 60%. After assembly, the JUUNOO tape must be pressed on firmly. The
JUUNOO tape should be allowed to rest for at least 24 hours before loading.
Technical documentation
Version 2021.10.08 - ENG | 37/ 935.1.2 Fastening with screws
When screwing in the finishing panels, use the appropriate screws and spacing as prescribed
by the panel manufacturer. This is the case, for example, with fire-resistant walls.
JUUNOO strongly recommends that you use a self-drilling version of these screws This
ensures that no lip is formed in the screw hole so that the profiles can continue to slide
smoothly over each other after removal of the screw.
Self-drilling wood screw Self-drilling Self-drilling Fermacell screw
drywall/plasterboard screw
5.1.3 Additional information on acoustics and fire
In terms of acoustics, there is no noticeable difference between using screws or tape for fixing
because the industrial JUUNOO blue tapes provide a very rigid connection. Information
about test results can be found in chapter 10.1. For a fireproof wall, screws must be used on
the panels against the structure since JUUNOO blue tapes are not made for this purpose.
Technical documentation
Version 2021.10.08 - ENG | 38/ 93Mounting BaseClick & AcouClick
Measure the width of the wall up to the overall Mark this on the starting panel.
edge of the I-module.
Shorten the panel. Test to check the sawn panel fits.
Stick JUUNOO tape (hook) on the C-modules. Tear the backing sheet in two and fold 2 flaps
over against the wall.
Install the first panel against the left wall and Using a spirit level, hang the first panel as
ceiling. Do not press the panel against the tape straight as possible. Shims can be used to
yet. guarantee they are fully connected to the ceiling.
Technical documentation
Version 2021.10.08 - ENG | 39/ 93The panels are not placed directly on the floor to Pull off the backing sheet of the JUUNOO tape
avoid possible problems with rising damp. and press the panel.
Once level, press the panel firmly.
Apply the 2nd panel at an angle of ±30°. The tongue of the 2nd panel hooks into the groove
of the first panel. Move back and forth until
closed.
Put the rest of the panels in place. Saw the last panel to width. Provide at least 2 mm
clearance between the wall and the panel.
Technical documentation
Version 2021.10.08 - ENG | 40/ 93Disassembling BaseClick & AcouClick
A putty or filling knife will be needed to loosen Hook the putty knife behind the click panel and
the JUUNOO tape between the first panel and score it up and down while pulling the panel
the JUUNOO modules. backwards (using a suction cup if necessary).
The panel can now be unfolded. The rest of the click panels can be loosened with
a straight spatula. Insert this between the panel
and the module.
.
Move up and down to loosen the JUUNOO tape. The panel can now be unfolded and clicked
loose from the adjacent panel.
Technical documentation
Version 2021.10.08 - ENG | 41/ 93Plasterboard panels
Plasterboard can be perfectly screwed into the JUUNOO modules using black coated self-
drilling screws.
Plasterboard can rarely be reused after being filled and installed. If the screws can be removed from
the modules, the modules are perfectly reusable.
Technical documentation
Version 2021.10.08 - ENG | 42/ 93OSB and plasterboard
Screw the first panel only into the uprights. Make Attach the next panels, using the remainder of
sure there is ±5 mm clearance between the floor the right panel as the start of the first panel.
and the panel and that the panel is level. There is no need for the joint to be over a vertical
strut.
.
Fix the plasterboard with standard black screws Finish as you would a standard plasterboard wall.
(not self-drilling). Make sure the screws do not go
through the OSB.
Technical documentation
Version 2021.10.08 - ENG | 43/ 93Chipboard / wood particle board + click panels
A thicker chipboard of 12 mm or 18 mm, whether FR or not, provides even higher acoustic
performance and increased fire resistance. This is finished with click panels. These cannot
(yet) be combined with a click panel in 1 structural sandwich construction like the AcouClick.
The whole thing is screwed onto the modules.
For modules that do not have JUUNOO blue tape The edge of the panel will be on the centre line of
on them, the panels can be fixed using self- the vertical struts. Note: if you use screws that are
drilling screws. too long, they may destroy the interior structure.
Complete the surface with chipboard. The click panel can be fixed in the groove with
small screws and/or with structural adhesive.
Use structural adhesive for the last panel. To dismantle the panels, use a multi-tool to saw
off the edge of the last panel.
The rest can be unscrewed.
Technical documentation
Version 2021.10.08 - ENG | 44/ 93Wooden panels 120 cm
5.7.1 Wooden panel with tongue and groove
A variation of the type of boards noted are wooden boards with a tongue and groove joint.
These then click into each other.
Glue a black MDF strip (30x10 mm) to the With this set-up, the normal modules are used
bottom of the modules using double-sided together with 1 strip of JUUNOO tape. 1 strip of
adhesive tape. This creates a shadow gap. tape is also applied to the wooden boards.
Place the panel with the groove against the wall Leave the next panel hooked in to the first. Align
on the shadow gap and level the board using the height with the first panel and rotate the
shims. Then press the panel against the panel to close it. Make sure the joint is firmly
modules. pressed shut.
The panels connect to the modules in the Finish the wall. Break off the shims under the
following way. panels, leaving a small piece under the panel.
This ensures that the panel does not start to sag.
Technical documentation
Version 2021.10.08 - ENG | 45/ 935.7.2 Wooden panel with flat edge
Glue a black MDF strip (30x10 mm) to the Here, the modules are provided with 2 strips of
bottom of the modules using double-sided JUUNOO tape instead of 1 strip. The wooden
adhesive tape. This creates a shadow gap. panels also have tape on them.
Place the wooden board on the shadow gap and Place the next panel and create a joint between
level the board using shims. Then press the the 2 panels using shims at the bottom and top.
panel against the modules.
Press the panel in place. Break off the bottom Finish the wall.
shims, leaving a small piece under the panel. This
ensures that the panel does not start to sag.
Technical documentation
Version 2021.10.08 - ENG | 46/ 93Painting of BaseClick or Acouclick
In addition to a variety of decorative finishes, the BaseClick and AcouClick panels also come
in an option that is easy to paint over without the need to pre-treat it.
It is recommended that an acrylic primer is applied as a first layer and a high-quality solvent
paint as the second layer. Brands like Levis and Bosch have a good range of these products.
If the surface of a click panel with a decorative finish has been damaged over the years, it is
possible to apply a coat of paint to these panels. To do this, sand the wall finely with a scouring
pad and some water with ammonia in it. After cleaning, you should apply a primer and then
finish with the appropriate varnish or paint. To achieve the best result, contact the
manufacturer for information about the best paint or varnish to use, as well as the ratio of
water to ammonia.
Textile finish or whiteboard sheets
JUUNOO can be covered with different materials, like textiles or a whiteboard sheet. Panels
that can be painted are available for this purpose, or it is also possible to give a new lease of
life to old panels where the finish has been damaged over the years.
Textiles. Whiteboard sheets.
Ensure the panels are dust-free, apply wallpaper Make the panels dust free and laminate the
glue, and then smooth the textile over the whiteboard sheets over them.
panels.
Technical documentation
Version 2021.10.08 - ENG | 47/ 93Panel around a door
Mark the doorway on the back of the click Apply JUUNOO blue tape to the uprights of the
panels. Do the same for each panel adjacent to door and fold over the backing sheet.
the door. Saw off any excess.
After sawing, thoroughly dust and degrease the Finish the following panels using the same
back of the panel so that the JUUNOO tape will method.
stick properly to the panel.
Technical documentation
Version 2021.10.08 - ENG | 48/ 93Fixing items to a JUUNOO wall
A certain amount of weight can be mounted to a JUUNOO wall, e.g. a TV, table, etc.
Installation can be done directly on the click panels. For weights above 250 kg, an
additional reinforcing panel must be fitted behind the click panels.
Air-conditioning on click panels
To avoid deformation before and after installation of the click panels, the following is
recommended:
• Acclimatise the panels for at least 48 hours in their unopened packaging in the room
where they will be installed. This should be at normal room temperature (15-20°C) and
room humidity (50-60%). Keep the temperature and humidity constant during
installation. The environment must be wind and watertight in order to control
temperature and humidity.
• Do not remove the packaging until installation of the click panels has begun.
• The click panels are not suitable for use in damp and/or humid rooms, extremely dry
rooms or rooms that are at extremely high temperatures.
• When cleaning the click panels, avoid using excessive amounts of water.
Differences in temperature and in the moisture levels present in the room can cause the
wood of the click panels to expand and contract. It is therefore necessary to ensure there is
an expansion joint of 1 mm for each metre of wall. For walls that are shorter than 8m, this
can be done at the outer ends of the wall. The expansion joint can be finished with an
aluminium profile or elastic sealant. For walls that are longer than 8m, it will be necessary to
use extra expansion joints.
Technical documentation
Version 2021.10.08 - ENG | 49/ 93Walls shorter than 8 m: Walls 8 m or longer:
Expansion joints can be provided at the outer An extra expansion joint is required.
ends of the wall. This can be finished with sealant combined with
Calculate 1mm per meter of wall. a small T-profile.
Finish with sealant and/or with an alu-profile.
Without an expansion joint, there is a chance
that panels will come loose and thus form
irregularities in the wall.
Technical documentation
Version 2021.10.08 - ENG | 50/ 936 Finishes
Outer corners
6.1.1 Types of outer corners
Outer corners are finished with an aluminium outer corner profile.
The recommended method to use on an outer corner with BaseClick & AcouClick panels is
an aluminium profile with a visible 5x5mm side.
The profiles are delivered in white, black or anodised.
Option 1: Aluminium outer corner 5 x 5mm Option 2: Aluminium outer corner 20 x
20mm.
Technical documentation
Version 2021.10.08 - ENG | 51/ 936.1.2 Mounting of aluminium corner profile 90°
Saw a panel at 45°. Apply JUUNOO tape (hook), pull the backing
paper off, and degrease the panel on the back.
Apply sealant to the 'legs' of the corner profile, Slide the profile over the panel.
where there is contact with the panel. The profile
does not need to be glued to the C-module.
Fold the panel. Slide the profile leg between the To allow it all to dry, clamp the 2 panels together
already mounted panel and the C-module. using masking tape.
Technical documentation
Version 2021.10.08 - ENG | 52/ 936.1.3 Acouclick corner profile 90°
The standard corner profile for the click panel can also be used to create a finished corner
with AcouClick. Because the AcouClick panels are thicker than the standard click panels, an
extra cut-out is made in the bottom layer of the AcouClick.
First cut the mitre to the Make an 8 mm deep cut in the The remaining strip can easily
correct width. back layer with a plunge saw be loosened with a chisel.
±30 mm from the corner.
Technical documentation
Version 2021.10.08 - ENG | 53/ 936.1.4 Installation of L-profile 90°
Apply sealant in the corner of Tip: If you attach the profile to 1
the L-profile panel, it is easier to reuse
afterwards.
Technical documentation
Version 2021.10.08 - ENG | 54/ 93Corner > 90°
The construction of this corner is like a 90° angle.
6.1.5 Corner < 90°
The construction of this corner is the combination of a 90° angle and a >90° angle. So, the effect is
similar to both.
Technical documentation
Version 2021.10.08 - ENG | 55/ 93Inner corners
6.2.1 Aluminium inner corner profile
This profile is pushed between the panels. This can stay in place with tension alone and is easy to reuse
afterwards.
6.2.2 Sealing
Sealing the inside corner is a quick and inexpensive method that gives the best acoustic result.
Technical documentation
Version 2021.10.08 - ENG | 56/ 93Acoustic decoupling of a wall
To meet technical fire and acoustic requirements, it is important to decouple the JUUNOO
modules from the floor and ceiling. Furthermore, the perimeter of the wall must be sealed
(including the top and bottom of the skirting board). A 3 x 30 mm PE foam tape is needed to
ensure decoupling.
The modules should be fixed at the top and bottom, in the horizontal U-profiles, every
600mm with a screw or nail plug (6mm > Ø > 4mm). They should be ideally fixed in the
openings provided by JUUNOO, as close to the upright struts as possible.
For vertical connections, they must be fixed every 750mm.
The connection between the finishing panels and the floor must be carried out according
to the instructions provided by the manufacturer of the finishing boards.
Technical documentation
Version 2021.10.08 - ENG | 57/ 93Floor connection
6.4.1 Skirting boards
Skirting boards can be bonded in various ways. For straight floors, it should be enough to use
silicone glue. Apply only small dots of glue, so that they can be easily cut loose later. In this
way, both skirting boards and panels can be reused. For a nice finish on uneven floors, we
recommend a nail gun or a professional hot glue gun.
6.4.2 Recessed skirted board
A recessed skirting board is a skirting board that is fitted under the panels instead of on them.
This has a flush finish and provides extra load bearing capacity for the panels. Attachment is
with silicone glue or double-sided tape.
6.4.3 Shadow gap
A shadow gap can be used as a decorative element. A black MDF strip (30 mm x 10 mm) is
glued to the bottom of the modules, next to the floor. The panels are then installed on top of
this. Attachment is with silicone glue or double-sided tape.
Technical documentation
Version 2021.10.08 - ENG | 58/ 93Edge finishing
If a wall has a free end, the end of this wall must be finished. Depending on visual preference,
different finishes are possible.
6.5.1 Finishing with aluminium profile
Apply a BaseClick panel on both sides. The panels should extend ±5 mm beyond the C-
module.
Apply small dabs of silicone adhesive to the Position the profile and press.
inside corners of the cover profile.
Cross section Finish the wall with aluminum skirting
(thickness 2 mm)
Technical documentation
Version 2021.10.08 - ENG | 59/ 936.5.2 Finishing with melamine bar (18 mm x 126 mm)
Leave at least one side of the module structure Cover the C-module with JUUNOO tape.
open, so that the bar can be fixed along the Remove the backing sheet
inside of the structure.
Completely seal the wall. Attach the skirting boards.
Finish off the joint between the click panel and
end bar with sanitary silicone sealant.
Technical documentation
Version 2021.10.08 - ENG | 60/ 936.5.3 Finishing with click panels
The advantage of this construction method is that the décor at the end is the same as the
décor on the wall. The construction of this is like the construction of a corner with a click
panel.
Technical documentation
Version 2021.10.08 - ENG | 61/ 93Ceiling and wall connection
6.6.1 Shadow gap
A shadow gap is used for decorative effect or when the ceiling must not be glued. EPDM rubber is
applied to the modules before the panels are put against them.
A shadow gap of 5 mm looks very visually appealing, but for this to work properly, the ceiling needs to
be very even so that the gap is the same width over the entire length.
A shadow gap of 20 mm gives more leeway for uneven ceilings or false ceilings, for example.
6.6.2 Sealing
Sealing the top joint is the most commonly used finish today. The benefits in terms of speed and
acoustic qualities are usually the deciding factors.
The prerequisite for this to work is that the ceiling is relatively flat so that the gap between the panels
and the ceiling is not too large when the ceiling goes up.
Technical documentation
Version 2021.10.08 - ENG | 62/ 936.6.3 Aluminium corner profile
In addition to an internal corner profile between 2 walls, a corner profile can also be used as a finish
against the ceiling. For this to work properly, the profile must extend between the ceiling and the
panels, and the ceiling needs to be flat.
6.6.4 Angle moulding
The corner moulding is an MDF strip available in the same decorative finishes as the click
panels. It is simple to apply with transparent sealant and can accommodate large gaps
between the ceiling and the panels.
6.6.5 Half angle moulding
The angle moulding can easily be cut in 2 for a closer finish on false ceilings, for example.
Technical documentation
Version 2021.10.08 - ENG | 63/ 93Connection to an existing building
6.7.1 Finishing on an existing skirting board
Place the C-module against the skirting board. Fix the top and bottom of the C-module as
closely as possible to the wall.
Note: the C-module may be angled slightly, just as long
as the first I-module starts out level.
.
Make a cut-out in the click panel for the skirting Let the click panel fit fully against the wall.
board.
For acoustic reasons or if JUUNOO tapes are used, it is best if the C-module completely fits
against the wall. Other possibilities for attaching the C-module to the wall are below.
Make a recess in the skirting board the width of The wall fits into the recess.
the wall.
Technical documentation
Version 2021.10.08 - ENG | 64/ 936.7.2 Finishing around a recess
Fix the C-module under the recess. Ensure the I- Fix the C-module bearing, cut I-module if
module is level. You may need to cut a piece of necessary.
this.
Technical documentation
Version 2021.10.08 - ENG | 65/ 936.7.3 Finishing around pipes
Ideally, ventilation pipes etc. should be installed after the wall is in place. Then, you will only
need to make a hole in the wall and insert the pipe through it. It goes without saying that
this makes the finishing process nice and easy. However, it may be the case that there are
already pipes in place. Follow the method below as an example of how this can be dealt with.
Insert all modules. In most cases, piping comes After installing the first click panel, cut off a piece
between the studs and you can attach the of the groove of the 2nd panel.
horizontal profiles above the pipes to the ceiling.
A piece of the JUUNOO tapes is also cut off. This panel is attached to the first panel in the
normal way.
Apply a fine line of transparent silicone glue in From the 3rd panel, make a cut-out for the pipe
the groove. with a tolerance of 3 mm. Apply it from below,
but do not press it against the tape of the I-
module yet.
Technical documentation
Version 2021.10.08 - ENG | 66/ 93Without the pipe, the panel could rotate to snap The cut groove allows the tongue of the 3rd panel
into the 2nd panel. The pipe prevents this to slide sideways into the2nd panel. This requires
movement. a 3 mm clearance around the pipe itself.
The silicone glue holds the connection in place. Put in place the top piece of the panel.
Slide the panel into the groove of the left panel Construction can then continue as usual.
before pressing down on the tape.
If the profile of the I-module cannot be inserted above the pipe, a piece of the profile can be
cut off.
Technical documentation
Version 2021.10.08 - ENG | 67/ 936.7.4 Pipes ending on struts
If the strut of the I-module ends in a pipe, it is not usually possible to fix the module to the
pipe.
Position timber under the pipes and between Fix the timber with self-drilling screws.
the I-modules on the left and right of the central
module.
As described above, cut a strip from the groove Make a cut-out in the panel. Again, cut a strip off
of the first panel. Apply transparent silicone glue the tongue. Apply it as described above. Finally,
in the groove. slide the panel to the left to lock in place.
Follow the same procedure for the next panel. Slide to the left to fix. Continue building.
Technical documentation
Version 2021.10.08 - ENG | 68/ 93Connection to the window
Fix the C-module as close to the window as Fix a wooden bar to the window to support the
possible. click-in panel. Apply JUUNOO tape to the C-
module.
Tip: if the window is deep enough, a small C-module
can also be used.
Cut the contour of the windowsill and pipes out Be sure that everything is in the right place
of the panel, measured from the first I-module. properly before pulling off the backing sheet
from the tape.
Tip: before pulling the backing sheet from the
JUUNOO tape, fit the panel to the contour
Different types of sealant
To achieve the best results, the correct sealant should be used for each application.
• Assembly sealant: gluing
• Sanitary sealant: finishing of the joints
• Acrylic sealant: finishing of the joints before painting
Technical documentation
Version 2021.10.08 - ENG | 69/ 937 Doors
JUUNOO standard unpainted doors
It is very easy to install a door using the JUUNOO modules. Due to the flexible nature of the
modules, they can be fixed to a free-standing door frame. The combination of the frame
and sliding C-modules is easier to install than when the frame is mounted in a pre-made
opening. This method works for both standard doors and frameless, flush doors.
The method has the following advantages:
• Easier to install
• No need for ribs
• No need for spacer screws, door wedges or installation foam
• Screws not visible
JUUNOO provides a total package with all parts needed to install a standard, ready-to-paint
door. The frame and architrave are delivered to measure.
Technical documentation
Version 2021.10.08 - ENG | 70/ 93Installation of a standard, unpainted door
Position and fix the I-modules and the 120 cm Place the C-modules in the doorway, but do not
door profile. fix them yet.
Assemble the frame with the screws provided. Place the frame between the C-modules and
slide the C-modules against the frame.
Level the top slat and fix both C-modules to the Hang the door leaf.
frame. Level the C-module on the hinge side.
A more detailed explanation of the installation is
described below.
Technical documentation
Version 2021.10.08 - ENG | 71/ 93Fix the C-module at the bottom and the top. Align the C-module and frame on the strike side
of the door with the door leaf. Fix this C-module
in place.
Place the header on the frame and slide it open. Attach the click panels to the modules.
No need to screw it on.
If the door frame has an architrave, the click The architraves are prefabricated and cut to size.
panels do not have to be perfectly aligned with Attach them to the frame.
the frame. A margin of 4 cm is possible.
Technical documentation
Version 2021.10.08 - ENG | 72/ 93Levelling a door
When installing a door, it is important to pay attention as to whether the floor slopes. This
can cause the door to drag or leave an unsightly gap between the door leaf and frame. By
using JUUNOO modules, the door frame can easily be levelled to avoid these
problems. Below are some additional steps to align the door frame perfectly in a horizontal
orientation.
When fitting the C-modules: leave ± 5 mm First screw the top vertical profiles of both C-
clearance between C-modules and door modules to the frame.
profile. Leave the Quickspans open.
Level the top side of the frame. Raise the side Screw the frame on the bottom against both C-
that is hanging lower by gradually tightening the modules. If necessary, fold down the Quickspans
Quickspan. completely.
Hang the door leaf in the door frame. Level the bottom of the C-module on the hinge
side and fix the base.
Technical documentation
Version 2021.10.08 - ENG | 73/ 93Level and fix the top of this C-module. Put a Set the bottom edge of the door frame to the
wooden block between the C-module and the correct width. Fix the base of the C-module.
door profile if there is too much play.
Finally, fix the C-module to the door strike side. Finish the wall with the header, architrave and
Put a wooden block in between if necessary. click panels.
Technical documentation
Version 2021.10.08 - ENG | 74/ 938 Probox
JUUNOO walls can also be used in a box concept: Productivity Box (Probox for short). These
are stand-alone rooms in an office and therefore acoustically isolated from their
surroundings. Possible uses could be: meeting rooms or individual call cells.
3 types of Probox are offered as standard: the Probox UNO (for one person), the Probox
DUO (for 1 or 2 persons) and the Probox Quattro (for 4 persons).
These are equipped with insulation, ventilation, power points, a work surface, etc.
It is of course possible to have a customised Probox. Please feel free to contact us for more
information and options.
The size, colour and finish can be customised.
The Probox can be converted into a wall and vice versa.
Technical documentation
Version 2021.10.08 - ENG | 75/ 93General principle of made-to-measure Probox Quattro and ProBox
Larger Proboxes (e.g. for 4 persons) have a wooden frame as the supporting structure; this
is called an interlocking frame. After building this interlocking frame, fill it with modules
and snap panels in a similar way to building a wall.
Lay the base slats on the ground. Screw on adjustable feet at each corner point.
At each corner there is a hole.
Rotate the struts on their feet so they are on the construct the interlocking cube with 4 identical
same level. plates
Technical documentation
Version 2021.10.08 - ENG | 76/ 93Put a cube on each strut. Fix the cube with 2 taper pins.
Attach the transverse cross bars to the cube and Fold the outer flaps so they do not interfere with
fix them with the taper pins. the BaseClick.
Attach CLS's around the ceiling contour. The Place the JUUNOO modules between the wood
suspended ceiling will later be attached to this. structure in the same way as a normal JUUNOO
wall.
Temporarily brace the structure at right angles. Attach the outer BaseClick panels to the
Do this for each wall. modules. These will ensure the structure is rigid.
Technical documentation
Version 2021.10.08 - ENG | 77/ 93Mount the front small panels using JUUNOO Place acoustic insulation between the modules.
tape.
Attach the inner BaseClick panels. Fill up the ceiling with JUUNOO modules.
Fix the finishing slats with sealant. Fill the top edge of the ceiling with OSB.
Install a suspended ceiling with the proper Finish off with plinths, glass and furniture
lighting, ventilation and motion sensor.
Technical documentation
Version 2021.10.08 - ENG | 78/ 93General principle Probox UNO & DUO
With the Proboxes UNO and DUO, the modules and panels are assembled using a ceiling
plate so that they form a sturdy, stand-alone structure.
Click the wooden base slats together. Screw the Lay the I-modules out on the ground and slide
metal slat to the underside of these slats. them out to the appropriate height.
Fix them with self-tapping screws. Close the Place the I-modules on the base slats and fix in
Quickspan. the pre-drilled holes.
Place the ceiling plate on top of the I-modules. Position and fix all C-modules except the 2 to be
Fix the I-modules in the pre-drilled holes in the placed against the rear wall
plate.
Technical documentation
Version 2021.10.08 - ENG | 79/ 93Level the reverse side and glue the Petac panels Place the remaining 2 C-modules against the
to the modules on the inside. Petac panels.
Level the side of the Probox and attach the Glue the Petac panels to the sides inside the
reinforcement panels between the modules Probox.
Click and screw the end bars to the front of the Attach the pre-made click panels to the reverse
Probox. side.
Technical documentation
Version 2021.10.08 - ENG | 80/ 93Attach the pre-made click panels to the sides. Finally, mount the table top and glass wall.
Technical documentation
Version 2021.10.08 - ENG | 81/ 939 Glass
180° connection with glass
9.1.1 180° connection with single U glass profile
Start applying panels to the JUUNOO structure. Glue 2 L-profiles on the end. Leave a joint of ±5
mm.
Screw the glass frame through the joint into the
C-module. Install the skirting boards.
Technical documentation
Version 2021.10.08 - ENG | 82/ 939.1.2 180° connection with double U glass profile
When using a wide glass frame in a set-up that has acoustic requirements, this frame can
cover the entire end of the JUUNOO wall.
Start applying click panels to the JUUNOO Attach the glass frame to the end. The screw for
structure. this is built into the profile.
Fix the skirting boards and seal the connection
between the click panel and the glass frame.
Technical documentation
Version 2021.10.08 - ENG | 83/ 9390° connection with glass
9.2.1 Glass pane and aluminium end-profile
9.2.2 Working with a glass pane and melamine bar
9.2.3 Melamine bar against the glass
Technical documentation
Version 2021.10.08 - ENG | 84/ 93Integrate glass window
The connection with a glass frame can be carried out in various ways, e.g. using a melamine
bar or with a U-profile.
The construction of these pieces is similar to the construction of how to finish the end of a
wall.
Melamine bar 18 mm Aluminium U-profile 3 mm
Additional information on acoustics
When choosing a wall with higher acoustic properties, it is important that the glass also has
higher acoustic properties. If this is not the case, most of the sound will escape through the
glass, irrespective of how efficiently the wall insulates the sound. In general, the difference in
acoustic attenuation (Rw) should not exceed 10 dB.
Technical documentation
Version 2021.10.08 - ENG | 85/ 9310 Test reports
Acoustic test reports – summary – daidalos peutz
Technical documentation
Version 2021.10.08 - ENG | 86/ 93Detailed reports can be requested from the JUUNOO technical service department via email
info@juunoo.com.
Technical documentation
Version 2021.10.08 - ENG | 87/ 93FEM analysis – strength – Indurium
Technical documentation
Version 2021.10.08 - ENG | 88/ 93Fire resistance classification – Warrington Fire – EI60
Technical documentation
Version 2021.10.08 - ENG | 89/ 93Unilin click panel – JUUNOO technical validation
Technical documentation
Version 2021.10.08 - ENG | 90/ 93Equivalent replacement of Gyproc® Metal Stud® by JUUNOO
Technical documentation
Version 2021.10.08 - ENG | 91/ 93QUICK
Quick and easy
installation with no dust
or noise
ATTRACTIVE
Great quality and a great
look
matched with
top acoustics
CIRCULAR
Endless options to reuse
in other set-ups, spaces
or buildings
Based on your feedback, we are constantly updating our technical info. Therefore, this edition is probably
already out of date when you get it in your hands. For the most recent version, we would like to refer you to
www.juunoo.com/technical
Or scan:
JUUNOO NV
BLOKKESTRAAT 51
B – 8550 ZWEVEGEM
+32 (0)56 44 18 90
INFO@JUUNOO.COM
WWW.JUUNOO.COMYou can also read