USING ONLINE DESIGN MANUAL - Walsworth
←
→
Page content transcription
If your browser does not render page correctly, please read the page content below
DESIGN MANUAL
USING ONLINE

             1       walsworthyearbooks.com
INTRODUCTION

Using Online Design
The process for creating that one book that tells the
story of your school’s year and captures all the precious
memories is constantly evolving.

Today, many yearbook staffs build their book entirely
online using the power and convenience of the Internet.
Walsworth’s Online Design harnesses that power and
provides the advanced tools and capabilities you need to
build the yearbook you want.

This manual will give you an overview of Online Design,
cover all the basics and get you well on your way to
creating your masterpiece. But it’s just the beginning.
Throughout the year, continue to reference the Online
Design section at yearbookhelp.com for answers to
your questions.

                                    2                       walsworthyearbooks.com
Contents Using Online Design
Section 1 – Getting Started
      •   System requirements                              3
      •   Logging in to Online Design                      5
      •   Creating user accounts and setting permissions   5
      •   Online Design’s home page                        7
      •   Online Design’s spread color coding              8
      •   Using the Message Center                         8
      •   Using To-Do’s                                    10
Section 2 – Getting Organized with Plan Book
      •   Choosing fonts                                   13
      •   Setting up color styles                          14
      •   Enter spread details                             15
      •   Assign staff to spreads                          17
Section 3 – Working with Photos
      •   Create photo albums                              18
      •   Uploading images                                 18
      •   Tagging images                                   20
      •   Recommending images                              21
      •   Using the Photo Tray                             22
      •   Searching for photos                             22
      •   ClikArt and Backgrounds                          24
Section 4 – Getting to Know Page Editor
      •   Launching a Page Editor session                  25
      •   Page Editor tools and menus                      26
      •   Page Editor palettes                             27
      •   Adding photos to a page                          30
      •   Editing your photos                              32
      •   Adding text to a page                            36
      •   Cover and endsheet creation                      37
Section 5 – Applying Templates and Master Pages
      •   Creating a custom template                       38
      •   Assigning templates                              39
      •   Creating and editing master pages                40
      •   Assigning master pages                           42
Section 6 – Portraits
      • Uploading portraits                                43
      • Editing student information                        44
      • The Portrait Flowing process                       47
Section 7 – Indexing
      • Adding organizations to the index                  51
      • Indexing from spreads                              53
      • The Index Flowing process                          55
Section 8 – Proofing and Submitting Your Pages
      •   Creating PDF proofs                              58
      •   Approving a proof                                60
      •   Submitting your pages                            61
      •   Submitting blank pages                           62

                                    3                           walsworthyearbooks.com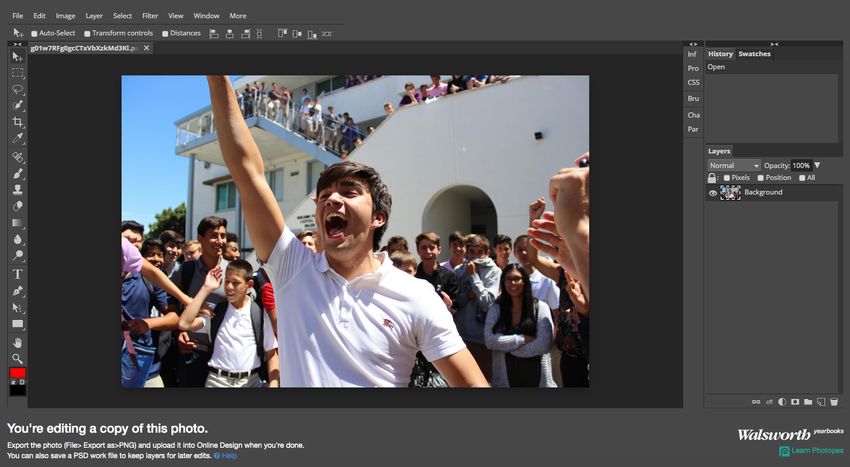
SECTION 1
GETTING STARTED
To begin working on your yearbook with Online Design, you need to get organized. This
section outlines the following:

       • The list of system requirements your computers must be ready to handle in order
         to run Online Design
       • How to log in, create staff user accounts and set permission levels
       • Functionality on the Home page, which provides a snapshot view of your entire
         book’s progress in one spot
       • Online Design’s internal messaging system, which will allow your staff to stay in
         constant communication

System requirements
Meet with your school’s network administrator at the beginning of the year and review what
your computers will need to run Online Design. Share this list of system requirements.

Required Internet Bandwidth
Minimum of one Megabit per second, or better, inbound and outbound, available to any
workstation connecting to Online Design

Web Caching
Walsworth URLs should be exempted from the school district’s web-caching policy.

Required Firewall Ports
Online Design requires a persistent connection for a two-way exchange of data. Port 443
must be open both directions in the firewall or proxy.

Supported Browsers
(Recommended in order of best performance)
Google Chrome 70 or newer, Safari 10.11 or newer, Internet Explorer 11 and EDGE and
Mozilla Firefox Quantum 65 64-bit or newer. (FrontMotion Firefox is also not supported.)
All browsers must be TLS1.2 compliant.

Supported Hardware and Operating Systems
Windows, Apple, Chromebooks. NOTE: Images stored on Google Drive cannot be directly
uploaded to Online Design, except through network managed Chromebooks.

Required URLs for Firewall and Content Filter
https://*.walsworthyearbooks.com (recommended)
https://portal.walsworthyearbooks.com
https://ui.walsworthyearbooks.com
https://session.walsworthyearbooks.com
https://candid.walsworthyearbooks.com
https://s3.amazonaws.com/sto.walsworthyearbooks.com

                                    4                                walsworthyearbooks.com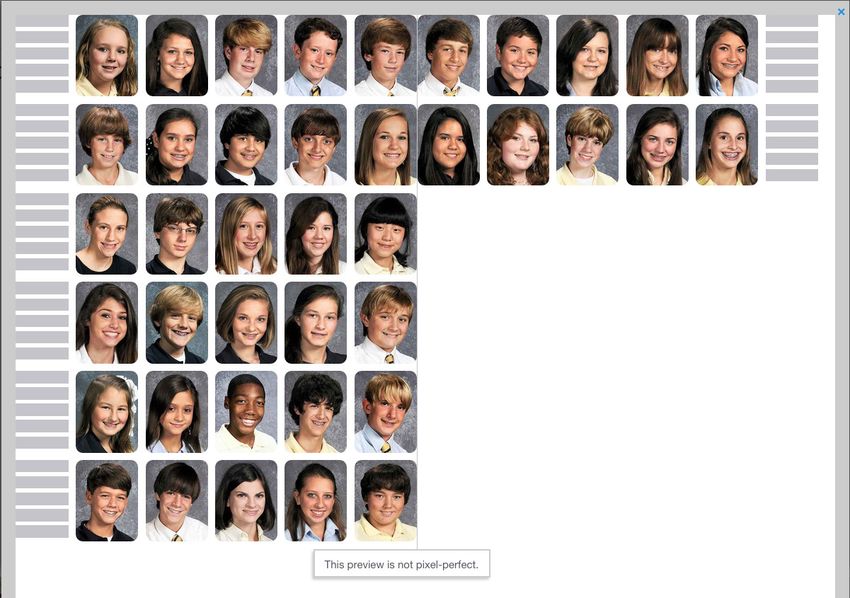
SECTION 1
https://res.cloudinary.com
https://odcp.walsworthyearbooks.com
https://www.yearbookhelp.com
https://yearbookforever.com

If your school is using Yearbook AR, please allow these URLs below:
https://*.blippar.com
https://accounts.blippar.com
https://blipps.blippar.com
Https://builder.blippar.com
https://api.blippar.com
https://img.blippar.com
https://builder.blippar.com

*.walsworthyearbooks.com may be used to replace all walsworthyearbooks.com individual
URIs in the content filter. Please contact Walsworth Computer Support if your web content
filter or firewall must use Host IP addresses, or CIDR IP ranges.

Security note: If implementing an Intrusion Prevention System (IPS), please add Walsworth
URLs to the exception list. Online Design does pass data in the form of XML, which can be
misinterpreted by some IPS as malware.

Adobe Acrobat/Reader PDF
At minimum, Adobe Acrobat Pro DC or Reader DC should be installed and activated for
your browser.

Proxy Servers and Proxy PAC Files
Members Only and Online Design have not been written to be proxy auto-config (PAC) file
aware. Also, it is recommended that Walsworth URLs be exempted from proxies.

Recommended Network Connection
Cat5e or newer wired connections: Wired connections will remain more stable than wireless
connections. Wired connections, in general, have a greater throughput than wireless
connections. If using wireless connections, we recommend being in close proximity to
the wireless access point. The wireless access point should be strong enough to handle
many connections.

Wireless Networks and Online Design
It is highly recommended that Online Design users connect over a standard network
cable at 100 Mbps or better. While the program can be accessed and run over a wireless
connection, any interference with the wireless signal can result in lost connections and very
slow performance. Whenever possible, use a cabled connection over a switch.

Recommended Basic Browser Settings*
Empty Temporary Internet Files folder when browser is closed. Modify or disable “Pop-up
Blocker” for Walsworth URLs. Use TLS 1.2; Enable Adobe Flash Player to Allowed; Enable
Java scripting. Third party blockers such as AdBlock+ and UBlock can interfere with normal
functionality of Online Design

                                    5                                  walsworthyearbooks.com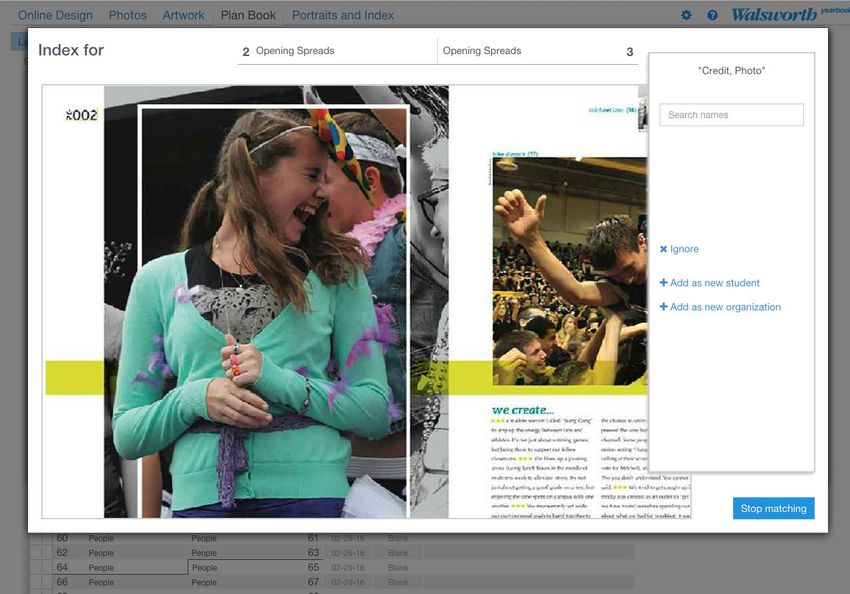
SECTION 1
Logging in to Online Design
Getting logged in to Online Design should be the easy part.

All new customers and new advisers will receive a welcome email with their username
and password, which they can use to log in to Online Design for the first time. Existing
customers maintain their username and password. To log in:

    1. Go to walsworthyearbooks.com.
    2. In the upper right corner, click Login.
    3. Type in your username and password. Click Login. You will now be directed to your
       Members Only page.
The link to access Online Design can be found near the top left portion of the Members
Only home page, labeled “Online Design Create my yearbook.”

Creating user accounts and setting permissions
Before the yearbook staff can get started working on pages in Online Design, the adviser
must set up user accounts. This is done through the Members Only area.

Use the following steps to create staff accounts.

    1. Once logged in to Members Only, click the Staff and Permissions link near the top
       left corner.

                                    6                                  walsworthyearbooks.com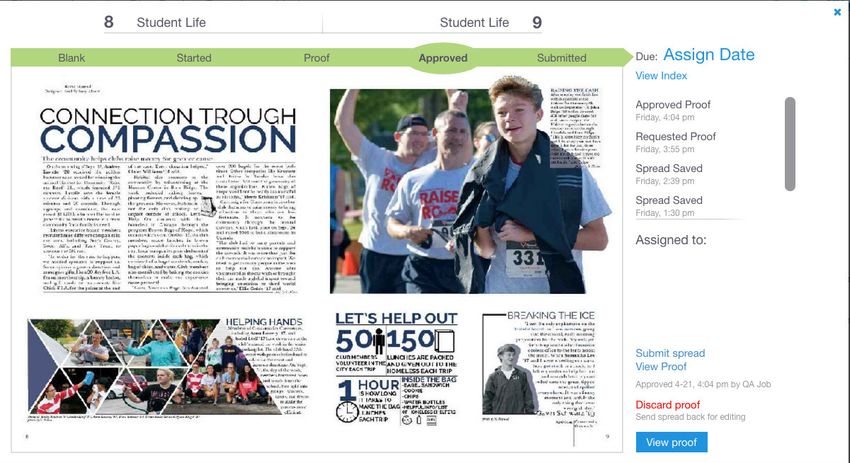
SECTION 1
 2. On the Staff and Permissions page, click the Create new user link at the bottom of
    the page.

 3. Fill in the new user’s Name, a User ID and Password for them, then click the radio
    button to set the proper permission level. There are three default permission levels
    for Online Design accounts:
     • Administrator – High level of access that can do anything within Online Design;
         typically for a co-adviser
     • Editor – This level can edit any spread and use most management features
         in Online Design, but they can’t change the status of the Adviser or an
         Administrator
     • Staff – Level typically given to most staff members; they have access to work on
         their assigned spreads

 4. You can choose a custom set of permissions for a user by clicking Set custom
    permissions.

                                 7                                 walsworthyearbooks.com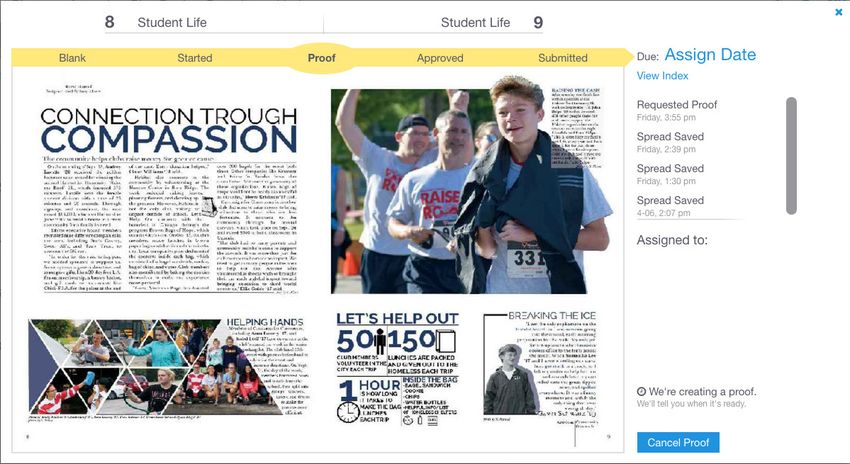
SECTION 1
    5. Click the Members Only or Online Design tab at the top to select the area you would
       like to set custom permissions for. Then simply click the checkboxes and radio
       buttons for the areas you would like that user to have permission to access. When
       you are finished, click Save.

    6. You can also add a profile photo for the user that will display within Online Design.
       Click Add photo in the upper left corner.

    7. Navigate to where the user’s mug shot photo is located on your computer and select
       it. Click Open. The photo should now appear in the top left corner.

    8. Once all the account information has been filled in, click Create user in the lower
       right corner.

Once a user has been created, a badge for the account should be visible on the Staff
and Permissions page under My yearbook staff. These users will also now appear within
Online Design.

At the time you create a new user, you will create a user ID and an initial password. The
user will be required to change the password when logging in for the first time. If you need
to reset the password or delete a user, head back to Staff and Permissions to perform
those tasks.

Online Design’s home page
After logging in, each Online Design session starts on the home page, which functions
like a dashboard and provides quick access to the most important information about your
yearbook.

Take a look around the home page:

        • Primary navigation – The main navigation menu in the top left corner is
          persistent throughout Online Design and takes you to the five areas of the site:
          Online Design (home page), Photos, Artwork, Plan Book, and Portraits and
          Index. Each of these areas are outlined in this manual.

                                     8                                 walsworthyearbooks.com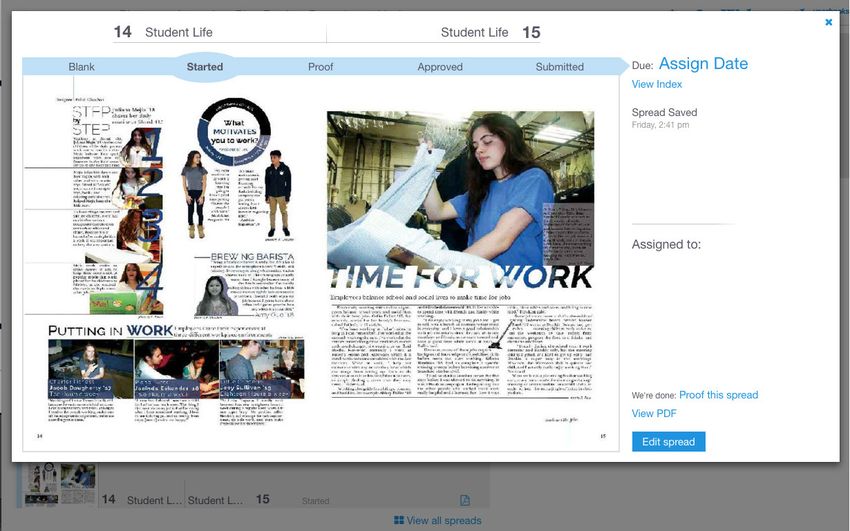
SECTION 1
        • Ladder – A snapshot view of your ladder is front and center on the home page,
           showing you the current status of every spread. It features a drop-down menu
           of staffers at the top of the ladder for advisers, so they can zero in and see what
           work is being done.
        • Calendar – Located in the top right corner, the calendar always displays the
           current month. Plus, any upcoming due dates will be indicated on the calendar in
           bold.
        • Book Progress/Live Yearbook – Also in the top right corner, the Book Progress
           pie chart provides a constant graphic reminder of your book’s progress. Clicking
           Live will open a Live Yearbook window, and show the current status of your
           spreads in a page flipper preview.
        • To-Do’s – You can leave notes reminding staffers about certain assignments or
           tasks that need to get done in the To-Do’s area.
        • Footer navigation – Within Online Design’s persistent navigation along the
           bottom of the page, there are links to open messaging, To-Do’s, upload photos,
           access spreads and notifications sent by Walsworth Yearbooks.
        • Logout – Click here when you are done working to exit Online Design.

Online Design’s spread color coding
You can track the progress of the spreads in your Ladder on the home page using Online
Design’s color coding system, which assigns a specific color to each spread depending on
its status.

A color tab appears next to the thumbnail of a spread in the Ladder, representing these
levels:
        • Started – Blue
        • Proof – Yellow
        • Approved – Green
        • Submitted – Purple
        • Blank – No color

This color coding is used in the links that appear at the top of the home page Ladder.
Clicking the links allows you to display that specific set of spreads.

The colors are also used to graphically illustrate spread progress in the pie chart that
appears on the home page.

Using the Message Center
As you work throughout the year, your yearbook staff needs ways to communicate. Online
Design provides a couple of different ways for users to communicate in real time right
within the program.

                                     9                                  walsworthyearbooks.com
SECTION 1
Staff members can send instant messages about a deadline, a question about a spread or
a story, or any other topic using the Message Center.

Messaging in Online Design resembles chat sessions used on most social media sites or
smartphones so it’s easy to follow.

To send a new message:
    1. Click Messages in the lower right corner of the screen in the footer navigation.
    2. In the window that pops open, click +New.

    3. In the new message window, all users will be displayed under the To: menu. Scroll
       through and click to select who will be receiving the message. You can click more
       than one person to receive a message.
    4. Type your message in the text field.
    5. Click Send.

                                    10                                walsworthyearbooks.com
SECTION 1
To read existing messages:
1. Click Messages in the lower right corner of the screen in the footer navigation.
2. In the window that pops open, your list of past conversations will be displayed in the
left column. Click to highlight the conversation you want to read.
3. The highlighted conversation will be displayed in the column on the right. You can
continue the conversation by typing a message in the text box and clicking Send.
4. You can hide a conversation by clicking the check box next to it in the left column
and clicking Hide. Click the Hidden tab at the top of the column to view these
hidden messages.
Using To-Do’s
Another quick, easy method of communication that Online Design users have at their
disposal is the ability to leave To-Do notes for other yearbook staffers. To-Do’s come in
handy whenever you need to leave a reminder about an assignment or deadline, or edits
on a spread. Administrators and Editors can leave To-Do’s for anyone while Staff-level
members can make assignments to themselves.
Where are my To-Do’s?
A user’s To-Do area is visible on the Online Design home page as well as along the footer
navigation.
To open a new To-Do:
1. Click the +New button in the To-Do’s section on the Online Design home page.
2. All users will be displayed under the To: menu. Scroll through and click to select who
will be receiving this To-Do. More than one user can be selected.
3. Type a message into the text field.
11 walsworthyearbooks.comSECTION 1
4. If needed, a deadline can be added by clicking the Add due date checkbox and
entering a date in the Assign date field.
5. Click Create.
Once created, To-Do’s will appear on a user’s Online Design home page under one of two
categories, Open or Completed. However, the status of a To-Do can be updated in just a
couple of steps.
To mark as Completed:
Click the checkbox next to the completed To-Do. The To-Do will automatically be moved to
the Completed column.
You can view your list of completed To-Do’s by clicking on the Completed heading.
12 walsworthyearbooks.comSECTION 1
To delete a To-Do:
The Completed list can be emptied at any time by clicking the checkboxes for the To-Do’s
you would like to permanently delete and then clicking Clear All.
13 walsworthyearbooks.comSECTION 2
GETTING ORGANIZED WITH PLAN BOOK
A ladder is an at-a-glance look at how the pages of your yearbook are organized. If you
have worked on the yearbook before, you are probably familiar with a ladder poster or
diagram hanging on the wall.
Within Online Design, your complete ladder exists within a section called Plan Book. It
serves the same basic purpose as that ladder poster, but it can also do much, much more.
You were first given a snapshot of your ladder on the home page, but Plan Book shows the
entire ladder and allows you to do the following organizational tasks:
• Set up your preferences for fonts and color styles
• Enter in titles, due dates and color information for spreads
• Assign spreads to staff members
Choosing fonts
A wide selection of Walsworth’s fonts are available to use with the creation of your
yearbook in Online Design, and you can select up to 30 of those fonts within Plan Book.
To choose fonts:
1. Click Fonts in the Plan Book task menu.
14 walsworthyearbooks.comSECTION 2
2. Scroll through the list of available fonts in the menu on the left. Click to select a font
you would like to use and it will appear in the main list of selected fonts in the middle
of the page.
3. You can remove a font by clicking the red x that appears in the top right corner of
the font’s preview box. Please note that Helvetica and Times, the two default fonts,
can’t be removed.
Setting up color styles
Creating custom color styles using combinations of Walsworth’s Formula Colors can
be helpful when you start designing pages. Assigning color styles will help with book or
section continuity.
To create custom color styles:
1. Click Color Styles in the Plan Book task menu.
2. Click the New button.
3. In the new window that displays, scroll through the color selector on the left to view
the different Walsworth Formula Color options. Click to select the colors that you
want in the custom style and they will appear in the window on the right.
4. In the text field on the right, enter a name for the custom color style for example,
“Sports section.” When you are finished, click Create.
15 walsworthyearbooks.comSECTION 2
Enter spread details
Planning coverage will be one of the first, and most important, tasks your staff will need
to get done. You can enter your spread details, including topics, due dates and color
information through your Ladder in Plan Book.
When you click to enter the Plan Book area, you will always arrive on the Ladder in the task
menu.
To enter spread titles:
For a single spread –
1. Click on a spread within the Ladder preview. The spread details screen will open in a
new window.
2. Enter a title for the spread in the Assign Page Title text fields, located just
below the page numbers. For example, “Opening Spreads,” “Academics Divider” or
“Homecoming Football Game.” Information will automatically save as you enter it.
3. When you are finished, close the window by clicking the x in the top right corner.
For multiple spreads –
1. Under Assign in the right sidebar, click Titles.
2. Enter page numbers in the Start and End fields to select a page range for the pages
you would like to label. Or click the radio buttons to choose all left pages or all right
pages.
3. Enter a title for the spreads in the Assign Page Title text field. Then click Apply.
16 walsworthyearbooks.comSECTION 2
4. You can also choose to click pages in the Ladder preview on the left side of the
screen and enter titles in the text field.
5. When you are finished, click Done.
To enter deadline dates:
For a single spread –
1. Click on a spread within the Ladder. The spread details screen will open in a new
window.
2. Use the calendar to enter a date in the due date field.
3. When you are finished, close the window by clicking the x in the top right corner.
For multiple spreads –
1. Under Assign in the right sidebar, click Due Dates.
2. Enter page numbers in the Start and End fields to select a page range for the pages
you would like to select, or click spreads in the Ladder preview screen to highlight
them.
3. Use the calendar pull-down to choose a deadline date. Then click Apply.
4. When you are finished, click Done.
To enter color information:
For a single spread –
1. Click on a spread within the Ladder. The spread details screen will open in a new
window.
2. Use the drop-down menus to choose the color information for your pages, either
Four Color, Black and White, or a custom color style that has been created.
3. When you are finished, close the window by clicking the x in the top right corner.
17 walsworthyearbooks.comSECTION 2
For multiple spreads –
1. Under Assign in the right sidebar, click Color styles.
2. Enter page numbers in the Start and End fields to select a page range for the pages
you would like to select, or click spreads in the Ladder preview screen to highlight
them.
3. Click the color style you would like to apply, Four Color, Black and White, or a
custom color style that has been created. Then click Apply.
4. When you are finished, click Done.
Assign staff to spreads
To help with workflow, staff members can be assigned to work on specific spreads in
Online Design in just a couple of clicks.
To assign staff members to spreads:
1. Under Assign in the right sidebar, click Staff.
2. Choose the spreads to assign, either by clicking to highlight them in the ladder
preview window or entering a page range.
3. In the Select staff menu on the right, scroll through and click to highlight the staff
members you want to assign to the chosen spreads. Note that more than one staff
member can be selected at a time. When you are finished, click Apply.
4. After your assignments have been made, click Done.
The Plan Book area is also the home of several other important Online Design features,
including working with master pages and templates and submitting your spreads
once they are finished. Those topics will be covered later in this manual and at
yearbookhelp.com.
18 walsworthyearbooks.comSECTION 3
WORKING WITH PHOTOS
One of the first steps in your creative yearbook process will be to get photographers on
assignments to document the year.
Once those images are taken, they need to get uploaded and processed. Within Online
Design, you will be getting your images organized in the Photos area, which can be found
in the main navigation bar.
In this section, you will learn how to:
• Create photo albums
• Upload photos
• Tag images
• Recommend images to a spread or a staff member
• Edit images
• Work with Walsworth ClikArt and Backgrounds
Create photo albums
Online Design’s Photos area offers you the ability to create photo albums, which provides
the structure to keep your yearbook images organized as the year progresses.
You have the ability to name your photo albums whatever you want, in a way that makes
sense for the workflow of your yearbook staff – by date, by event, by section. It’s up to you.
To create a photo album:
1. Once logged in to Online Design, click Photos in the main navigation.
2. Click +New Album.
3. Enter a name for the photo album in the text field. Click Save.
Uploading images
Online Design’s image uploading window can always be accessed by clicking the Upload
Photos link in the footer navigation, which is persistent on every screen.
The only file types that can be uploaded to Online Design are those with a .tif, .tiff, .jpg,
.jpeg or .png extension. Only grayscale or RGB color images can be uploaded.
19 walsworthyearbooks.comSECTION 3
For the best quality, you should upload photos with a resolution of 300 dpi.
Walsworth has a 25 MB size limit on photos that can be uploaded. Very large image files
could take much longer to upload, or even time out on your school’s network.
To upload images:
1. Click Upload Photos in the footer navigation.
2. In the window that opens, you will have two ways to select images. You can drag and
drop photos on to the Drag photos area. Or you can click the Choose Photos
button.
3. If you click Choose Photos, navigate to the location on your computer that has the
image or folder of images that you would like to upload and click to select them.
4. Use the Choose album drop-down menu to pick a Photo Album for the images. You
can also create a new album for these images by clicking New album, naming and
saving it. The new album will automatically be selected.
5. If you want, you can type in a topic for the photo in the Add a topic text field. Click-
Photo topics to see the current list of topics. Adding a topic to a photo will allow
you to search for a photo by topic later.
20 walsworthyearbooks.comSECTION 3
6. Click Upload.
7. Progress of the upload will display on the right side and will notify you when it is
completed. Then you can choose to start another upload or close the window by
clicking the x in the top right corner. Please note that you can’t close out of the
upload window until all of your images are uploaded, or the upload process will stop.
Note that Online Design allows you to have multiple batch uploads going at one time.
Tagging images
The image management tools in Online Design are geared toward helping improve your
coverage and creating an index. You can tag images to identify the students who appear
in the photos. To avoid needing to merge student records later, it is recommended that you
not tag until after the Portrait CD/DVD has been processed and uploaded to your account.
To tag an image:
1. Click Photos in the main navigation.
2. If photos have been uploaded, you will see them organized by photo album under
My Photos or Photo Albums areas. Scroll through the images and click to select an
image you want to tag.
3. The photo you selected will open in a new window, showing the image details
screen in Slideshow view. Click on the Add a student text field in the lower right
corner.
4. Type the name of the student who appears in the photo. As you type, matching
names from your student list will populate and appear in a drop-down menu. When
the correct name appears, click to select it. The name will appear in the window
above, and the image is now tagged.
21 walsworthyearbooks.comSECTION 3
Recommending images
Once images are uploaded and sorted into photo albums, you can recommend them to be
used on specific spreads or by specific staff members.
Although all uploaded images are available for use when editing pages, the extra step of
recommending can be useful since it places images with the spreads they’re best suited
for, and with the users who need them.
To recommend an image for a spread:
1. Click Photos in the main navigation.
2. If photos have been uploaded, you will see them organized by photo album under
My Albums. Scroll through the images and click to select an image you want to
recommend.
3. The photo you selected will open in a new window, showing the image details
screen in Slideshow view. Click Recommend in the menu below the photo.
4. In the drop-down menu, choose Recommend for spread.
5. In the new window, click in the ladder preview to select the spread(s) you would like
to recommend this image for. You can choose a single spread or multiple spreads.
When you are finished, click Recommend.
To recommend an image for a staff member:
1. Click Photos in the main navigation.
2. If photos have been uploaded, you will see them organized by photo album under
My Albums. Scroll through the images and click to select an image you want to
recommend.
3. The photo you selected will open in a new window, showing the image details
screen in Slideshow view. Click Recommend in the menu below the photo.
4. In the drop-down menu, choose Recommend to someone.
5. In the new window, use the drop-down menu to select the staff member you would
like to recommend the image for. When you are finished, click Recommend.
22 walsworthyearbooks.comSECTION 3
Using the Photo Tray
The Photo Tray, located in the footer navigation, always provides you quick, easy access
to your images when working in Online Design.
The Photo Tray is accessible from anywhere in Online Design, but it will most commonly be
used while you are working in Page Editor in order to add photos to your spreads.
Here’s a quick look around the Photo Tray’s capabilities:
• Once you click to open the Photo Tray, by default you will see thumbnail images
of photos that have been put in your My Favorites album. You can select different
thumbnails using the drop-down menus on the left.
• The drop-down menus allow you to pull up photos that have been recommended
for you by choosing Recommended for me, or scrolling through your full list of
photo albums in a new window by selecting Other albums.
• Once you have placed an image on a page, it will be indicated on a Photo Tray
thumbnail with the word “Placed” in the lower left corner. If you only want to see
thumbnails of images that have not yet been placed on the page during your
searches, you can click the Not placed checkbox.
• By clicking the File Name checkbox on the upper left side of the tray, thumbnails
will be sorted into alphabetical order.
• You can also search for photos by file name using the Find file name field on
the right side of the Photo Tray. If your search results don’t bring up what you’re
looking for, simply hit Clear to return to the default.
• For any image, you can hover over the thumbnail and see any tags that have
been placed on the photo, as well as a Details link that opens a larger version of
the photo in the image details window.
Searching for photos
Online Design allows you to organize your uploaded images in Photo Albums, label them
with Topics and Tag them with student names.
There are a couple of different ways you can use these features to search through your
photos, which will be useful since your staff will likely accumulate hundreds of images as
the year progresses.
23 walsworthyearbooks.comSECTION 3
To search for an uploaded photo:
There are two places within the Photos area you can search: Photo Albums and Search
Photos. In both locations, the search area is on the left side of the page. You can use all of
the steps below, or only the ones you need.
1. Use the Search Topics drop-down menu to choose a photo Topic to search for.
Once selected, the Topic will appear in the frame above the menu. It can be deleted
from the search by clicking the x next to the name. You can choose more than one
Topic for a search.
2. Use the Search Students field to search for photos that have been tagged with a
student name. Simply type the student’s name in the field and it will populate, as
long as it is a name that appears on your student list.
3. If searching on the Photo Albums page, you can search by specific Photo Album
name by typing it in the Search by album name field.
4. If searching on the Search Photos page, you can search by specific image name by
typing it in the Search by file name field. You can also click the File name checkbox
and your images will be listed in alphabetical order by name.
24 walsworthyearbooks.comSECTION 3
5. The Search Photos page also has additional radio buttons that allow you to refine
the search based on orientation, whether an image has been placed on a page, if it
has been recommended and if it has been tagged.
The thumbnail results of your search will display on the right side of the page.
ClikArt and Backgrounds
Two other groups of images that will already be present in Online Design the first time you
log in are ClikArt and Backgrounds. You can find them in the Artwork section, which is
located in the main navigation menu.
ClikArt is a collection of pre-designed line art, grayscale and color artwork graphics that
you can use on your pages. The Backgrounds are Walsworth’s professionally designed
background images that are already properly sized to fit on the page.
You can scroll through the ClikArt and Backgrounds in the Artwork section and download
the images for your pages.
25 walsworthyearbooks.comSECTION 4
GETTING TO KNOW PAGE EDITOR
Once you are ready to begin building your yearbook spreads, it’s time to learn all about the
engine that makes Online Design run – Page Editor.
This section will cover all the Page Editor basics, including:
• How to launch a Page Editor session
• All the primary menus, tools and palettes within Page Editor
• Adding text to a page
• Adding images to a page
• Editing images
Launching a Page Editor session
Online Design provides multiple ways to open one of your spreads in a Page Editor session.
• On the home page, click the boxes on the left side of the Ladder. As long as you
have permission to edit the spread, it will open in Page Editor. Once you have
begun work on a spread, a thumbnail preview of those pages will appear in those
boxes.
• When working with the Ladder in the Plan Book section, when you click the
thumbnails on the left side, a spread’s status window will open. You can then
click the Edit Spread button to open the spread in Page Editor.
• The footer navigation includes a Spreads tray, which pulls up thumbnails of all
your spreads. It also includes a menu that allows you to sort by deadline date
and a link to open a window with thumbnails of all your spreads. Clicking the
thumbnail of a blank or in progress spread in the tray will open it directly in the
Page Editor.
26 walsworthyearbooks.comSECTION 4
• On the home page, click the View All Spreads button located at the bottom of
the Ladder. Thumbnails of all your spreads will open in a new window. Clicking
the thumbnail of a blank or in progress spread will open it directly in the Page
Editor.
Page Editor tools and menus
As you begin working on pages, you need to become familiar with Page Editor’s tools,
menus and workspace.
Tools:
Online Design’s main tools appear on the left side of the screen. Here is a description of
each one and how it can be used in yearbook production.
• Undo/Redo – Remove, or repeat, the most recent action
you’ve taken on the page
• Selection tool – Select an item on the page and move it
around, or resize it
• Text tool – Create text boxes by clicking and dragging across
the page; this tool must also be selected to type or paste text
• Draw tool – Draw free-form objects on the page, either
angled or curved
• Shapes tool – Opens a fly-out menu with squares, circles,
polygons and starbursts; allows you to drag and drop the
shapes on to the page
• Pan tool – Allows you to pan around the page simply by
clicking, holding and dragging
• Zoom tool – Zoom in closer to an area of the page
27 walsworthyearbooks.comSECTION 4
Menus:
Many of Page Editor’s basic commands can be found in menus along the top of the screen.
File >
The File menu contains the common commands to Save and Close your spread. Save as
Custom Template allows you to take an attractive spread that you would like to re-use,
such as a divider page, and make it a template. View PDF gives you the option to
produce a low-res PDF version of your spread for quick proofreading, or a hi-res PDF
for final proofing.
Edit >
The commands under the Edit menu come in handy once you start working with type
or start moving objects around on the page. Undo/Redo can be found here. Cut, Copy,
Paste and Delete work just as they do in most word processing programs. However, in
Page Editor, these functions only work with objects, not text. Check spelling will scan the
spread for spelling errors.
Object >
Options under the Object menu allow you to Group and Ungroup objects, as well as Lock
and Unlock objects. Convert Text to Shape is a popular design effect that allows you to
turn your text into an object.
View >
The View menu will adjust the visual settings as you work around a spread. Fit to page
always adjusts the view back to 100% if you have zoomed in or out. Show Grid and Show
Guides display different graphical aids to help you while designing. Show Bleed Bars
shows the area outside of the page shaded in blue, called the “bleed.” Text should not
enter the bleed bar area or it may be trimmed off during production, while objects intended
to bleed off the spread must extend to at least the outer edge of the bleed bar. Set
Columns allows you to adjust the number of column guides displayed on the page.
Page Editor palettes
The Page Editor has five palettes that appear along the right side of the screen and control
more advanced settings and adjustments.
28 walsworthyearbooks.comSECTION 4
Object palette
Whenever an object, such as a photo or a shape, is selected, this palette will be open. The
Object palette allows you to adjust the width and height of a shape or add a border. From
this palette, you can also add text on a path and freeze the location of image frames and
text boxes.
Type palette
If you are working with copy within a text box, the Type palette is where you can adjust
font, type size, leading, kerning or add a drop cap.
29 walsworthyearbooks.comSECTION 4
Photo palette
While working with a photo on the page, the Photo palette gives you a quick, easy way to
see the photo’s details and launch into the Photo Effects photo editor to make adjustments
if needed. From this palette, you can also work on more advanced techniques like a
clipping path.
Layout palette
The Layout palette contains tools that align and distribute objects evenly on the page. Text
Wrap is also located here.
30 walsworthyearbooks.comSECTION 4
Effects palette
The Effects palette allows you to apply graphic effects like drop shadow, transparency and
gradients to your page elements.
Adding photos to a page
In Section 3, you learned how to upload images into Online Design. Once you start working
in Page Editor, adding images to your pages can be done in only a few steps by using the
Photo Tray, which is located in the footer navigation at the bottom of the screen.
To add a photo to a page:
1. Open a spread in a Page Editor session.
2. Click Photo Tray in the footer navigation.
31 walsworthyearbooks.comSECTION 4
3. Thumbnails of your images will display in the Photo Tray. Use the Photo Tray menus
to sort photos by whether they’ve already been placed on a page and to find images
recommended for you or the spread. You can also search by topic, tagged student
name and file name.
4. Once you find the image you would like to place, drag and drop it from the tray on to
the page. If you have already created image windows on your spread, drag an image
over the window to highlight it, then drop it into that window.
5. Images placed in windows will likely need to be cropped. To crop an image,
double-click the image or select Crop Photo in the Photo palette.
Editing your photos
Updates to photos in Online Design are essentially done in two ways – via the Photo Editor
and using Photo Effects.
Photo Editor
You can access the Online Design Photo Editor, powered by Photopea, from the Photo
details screen of any image or you can click the Photo Editor icon in the right corner of the
Online Design home pase.
If you are in the Photos area, you can get to the Photo details screen by double-clicking on
any uploaded image. If you are working in the Page Editor, you can reach the same place
by clicking on Photo details in the Photo palette. From there, use the steps below.
32 walsworthyearbooks.comSECTION 4
To edit an image using Photo Editor:
1. From the Photo details screen, click Edit photo.
2. The Photo Editor will open in a new window. As the message at the bottom of the
window explains, you will be editing a copy of the photo that you will be able to
upload back into Online Design when you are done.
3. You can edit the photo using the tools on the left side of the screen, the menus at
the top and the palettes on the right side of the screen. Full definitions of the entire
Photo Editor workspace can be found here.
4. Once you are done working with the image, you can go to File > Export as, then
choose the format. In most cases, you should use JPG unless your image is a
transparency, then use PNG.
5. Choose the dimensions you want to save the new, edited photo in. Click Save.
6. The new, edited photo will be saved on to your computer and you will need to up-
load it back into Online Design.
33 walsworthyearbooks.comSECTION 4
Photo effects
Photo effects are a simple, fun tool that can be used within the Page Editor .
To edit an image:
1. Once a photo is placed on the page while working in Page Editor, click on it using the
Select tool.
2. In the Photo palette on the right side of the screen, click the Photo effects link.
3. The Photo effects window will open, with a drop-down menu of all the adjustments
that can be applied to your photo. They include:
4. Select the effect you want to apply, then click Add. For most of the effects, there will
be a sliding scale that allows you to adjust the level.
• Auto Brightness
• Auto Color
• Auto Contrast
• Blur
• Brightness
• Cartoonify
• Contrast
• Fill Light
• Gamma
• Grayscale
• Improve – Indoor
• Improve – Outdoor
• Oil Painting
• Red Eye
• Saturation
• Sepia
• Sharpen
• Vibrance
34 walsworthyearbooks.comSECTION 4
5. As effects are added to an image, they will appear in a list within the Photo effects
window. You can remove the effect at any time by de-selecting the checkbox next to
the effect’s name.
6. When you are finished editing a photo, you can close the Photo effects window by
clicking the x in the top right corner.
35 walsworthyearbooks.comSECTION 4
Adding text to a page
Headlines, captions and articles are all fundamental pieces of a yearbook spread. Follow
these steps to add copy within Page Editor.
To add text to a page:
1. Open a spread in a Page Editor session.
2. Click the Text tool in the Tool menu on the left side of the screen.
3. Create a text box on the page by clicking and dragging your pointer arrow. Once you
release, your text box will be created with a blinking cursor inside to indicate where
text will appear. Note that you can also make a shape a text box by clicking inside
with the Text tool.
For fun tips and tricks you can do with your photos and text in Online Design’s Page Editor,
visit yearbookhelp.com throughout the year.
Cover and Endsheet creation
Your staff might have an amazing idea or inspiration for the yearbook cover. In Online
Design, they will be able to create the cover and endsheets using Page Editor functionality.
The Cover and Endsheets area within Plan Book lets you work on your cover and
endsheets the same way you work on any other yearbook spread.
36 walsworthyearbooks.comSECTION 4
To create cover or endsheet:
1. Go to the Plan Book area. Click on Cover and Endsheets.
2. To work on the cover, click on the Cover thumbnail. A Page Editor session will open,
allowing you to design your cover.
3. To work on the endsheet, click on the Front endsheet or Back endsheet thumbnail. A
Page Editor session will open, allowing you to design your endsheet.
Once your cover or endsheet has been completed, it must still go through the proof process
before it can be submitted.
To submit cover or endsheet:
1. On the Cover and Endsheets screen, hover your cursor over the thumbnail of the
pages you want to submit, either the Cover, Front endsheet or Back endsheet. When
you do, a Details link will appear. Click Details. If you have already gone through the
proofing process and approved the page, you can skip to step 5.
2. Click Proof this spread.
3. Once your proof is ready, click the View proof link.
4. If the page has no changes and is ready to be submitted, click Approve Proof.
5. Click Submit spread.
For staffs that have cover and endsheet artwork created outside of Online Design, you can
click the Upload cover and endsheet art link in the Cover and Endsheets area. Then
upload the files using Yearbook Connect.
37 walsworthyearbooks.comSECTION 5
APPLYING TEMPLATES AND MASTER PAGES
Once you have made all the decisions associated with planning your yearbook, and you
have reviewed the basics of the Page Editor, it’s time to start building spreads. A good
place for many yearbook staffs to start is with templates.
A template is a standard design created or selected by the staff to appear throughout
each section of the book. Staffs use templates to build unity and consistency in theme and
design. In Online Design, templates are managed in the Plan Book area. This section of the
manual will outline:
• Creating custom templates
• Assigning templates to pages
• Working with master pages
Creating a custom template
If your yearbook staff is fortunate enough to have designers who want the blank slate and
free rein to create their own templates, Online Design allows them to convert an original
spread into a custom template within Page Editor.
To save a spread as a custom template:
1. Open a spread in a Page Editor session.
2. When your template is complete and ready to be saved, go to File > Save As
Custom Template.
3. Name your custom template in the text field, then click Save. Your new custom
template will now appear in the Apply Templates area within Plan Book.
38 walsworthyearbooks.comSECTION 5
Assigning templates
The process of assigning templates to your yearbook pages is done in Plan Book. Within
Plan Book, you will be able to see thumbnails of all the pre-designed templates Walsworth
makes available, as well as any custom templates you created in Page Editor.
To assign a template:
For a single spread –
1. Go to the Plan Book section.
2. From the Ladder view, click Apply Templates in the right sidebar. Note that
templates can also be applied to spreads in the Plan Book > Custom Templates
task area.
3. In the new window that opens, click to select a spread within the Ladder preview.
4. Use the drop-down menus to search for the template you want to assign. You can
scroll through thumbnails for Walsworth’s pre-designed templates, or any custom
templates you have created. In the text field, you can also search for templates by
name. Click to highlight the template you choose.
5. Click Apply.
For multiple spreads –
1. Go to the Plan Book section.
2. From the Ladder view, click Apply Templates in the right sidebar.
39 walsworthyearbooks.comSECTION 5
3. In the new window that opens, enter page numbers in the Start and End fields to
select a page range for the pages you would like to select, or click spreads in the
Ladder preview screen to highlight them.
4. Use the drop-down menus to search for the template you want to assign. You can
scroll through thumbnails for Walsworth’s pre-designed templates, or any custom
templates you have created. In the text field, you can also search for templates by
name. Click to highlight the template you choose.
5. Click Apply.
Creating and editing master pages
Much like templates, a master page is a document intended to serve as a building block
for your yearbook. It can be used to set up elements you want to remain consistent
throughout, like folios, thematic design elements and backgrounds.
Using master pages allows for design consistency and time savings. You set up repeating
elements once, rather than on every file.
All Online Design users should note that two master pages, called Master A and Master
B, already exist the first time you log in. Master A contains only page numbers and will
automatically be assigned to every page in your yearbook, for those users who never get
around to using master pages. Master B is a quick and easy master page that can be
assigned, which contains only page numbers and topics pulled directly from your titles on
the page ladder.
To create a new master page:
1. Go to the Plan Book section.
2. Click Master Pages in the Plan Book task menu.
3. Click the New button.
4. In the text field at the top of the screen, enter a name for your master page. Then
click Save. The new master page will now appear in the list.
40 walsworthyearbooks.comSECTION 5
To edit a master page:
1. Go to the Plan Book section.
2. Click Master Pages in the Plan Book task menu.
3. Find the master page you want to edit in the list. Then click Edit.
4. The document will open in a master page session in Page Editor. Once you
complete your work, go to File > Save & Close.
It’s important to note that while working on a master page session in Page Editor, the main
layer and the folio layer are indicated in the top right corner of the screen. Any time you
insert folio layer items, which includes page number and page topic information and folio
artwork, they are always arranged on top of all other items on the master page. This way,
the folio can never be inadvertently covered by another item on the page.
41 walsworthyearbooks.comSECTION 5
Assigning master pages
Once you have created master pages, applying them to your spreads only takes a few
easy steps.
To assign a master page:
For a single spread –
1. Go to the Plan Book section.
2. Click Master Pages in the Plan Book task menu.
3. Click Assign master pages in the right sidebar.
4. In the new window that opens, click to select a spread in the Ladder preview.
5. Under Select Master Page on the right, click to highlight the master page you want
to assign.
6. Click Apply.
For multiple spreads –
1. Go to the Plan Book section.
2. Click Master Pages in the Plan Book task menu.
3. Click Assign master pages in the right sidebar.
4. In the new window that opens, enter page numbers in the Start and End fields to
select a page range for the pages you would like to select, or click spreads in the
Ladder preview to highlight them.
5. Under Select Master Page on the right, click to highlight the master page you want
to assign.
6. Click Apply.
42 walsworthyearbooks.comSECTION 6
PORTRAITS
The portraits section will always be among the most-read pages in your yearbook. Creating
the portrait pages will be an important part of your process.
Before you can edit or place portrait images onto your pages, you will need to work with
your school photographer to have your portraits taken and a portrait CD/DVD created,
according to the proper specifications.
The portraits and information on your portrait CD/DVD will then need to be uploaded. You
can do that by following the instructions in this section. Once your portraits have been
processed and uploaded into Online Design, you will be able to work with them in the
Portraits and Index area of the site. After student record edits are complete, you can begin
the process of tagging candid photos.
In this section, we’ll outline how you can:
• Upload your portraits
• Edit student information
• Customize the style and adjust the settings of your portraits
• Flow your portraits on to a spread(s)
Uploading portraits
Users who have been given the proper permission to do so will be able to upload portrait
images quickly and easily within the Portraits and Index section. Use the steps below.
To upload portrait images:
1. In Online Design, go to the Portraits and Index section. Click Portraits in the
sub-menu.
2. In the upper right corner of the screen, click the Upload a portrait disc or folder
link.
3. The window that opens will give you two options to start the upload: you can click
Choose disc or folder and navigate to the location on your computer where your
portrait folder is and select it. Or you can drag and drop your portrait disc or folder
over to the window.
43 walsworthyearbooks.comSECTION 6
4. Once an upload begins, a status bar will display showing you the progress of your
upload. Your upload might be stopped for a variety of reasons, such as missing or
duplicate images, at which time you will be notified with a specific error message.
5. When the upload is complete, the confirmation screen will display to let you know
how many student records and portraits have been uploaded. Click OK.
Once your portraits have been uploaded, the images and student information should be
visible under the Students and Portraits tabs in the Portraits and Index sections.
Editing student information
After your portraits have been uploaded, they are ready for your use. Then, when you click
to enter the Portraits and Index section from the main navigation, you will see a list of your
students with a thumbnail portrait image, first and last name, and grade.
Any of this information can be edited for an individual student or a group of students. You
can also search for duplicates and entries can be merged.
To edit student information:
For a single student –
1. Go to the Portraits and Index section.
2. From either the Students or Portraits menu, scroll through the student list to find the
entry you would like to edit. Click the thumbnail image.
44 walsworthyearbooks.comSECTION 6
3. The student’s entry will open in a new details window. Click Edit.
4. Make changes using the text fields and drop-down menus. Note that you can enter
a new Homeroom for a student by typing it in, and that Homeroom will then appear
in the drop-down menu.
5. When you are finished, click Save.
For a group of students –
1. Go to the Portraits and Index section.
2. From the Students menu, click the link in the right sidebar that you plan on updating
for multiple students: Grades, Homerooms or Custom.
3. Scroll through the student list and click to select the students whose information you
are updating.
45 walsworthyearbooks.comSECTION 6
4. In the text field on the right, enter the new information you are updating for the
selected students. Then click Apply.
To delete a student:
1. Go to the Portraits and Index section.
2. From either the Students or Portraits menu, scroll through the student list to find the
entry you would like to delete. Click the thumbnail image.
3. The student’s entry will open in a new details window. Click Delete Student.
4. You will be asked to confirm that you want to permanently delete the student’s
portrait and information. If you do, click Delete. Note that deleted student records
can be restored by typing the deleted student’s name in the Search Students text
field in the Students task area.
Students who had portraits retaken can appear twice in your portrait list. In this case,
you will want to search for duplicates, select the correct photo and merge the student
information.
To search for duplicates:
1. Go to the Portraits and Index section.
2. From the Students menu, click the Show duplicates only checkbox on the right
side of the page. Duplicate listings will display.
To merge two students:
1. After you have performed a search for duplicates, click to select the two entries you
want to merge.
2. Click Merge in the right sidebar.
46 walsworthyearbooks.comSECTION 6
3. In the details window, click on the correct portrait image. Then click Make Primary.
4. Make any additional edits needed using the text fields and drop-down menus.
When you are finished, click Merge. The two previous student entries will now be
combined into one.
The Portrait Flowing process
Once you are finished editing your portrait information and you are ready to place your
portrait images on the page, the portrait flowing process in Online Design provides you with
a variety of customization options and settings.
To flow your portraits on to a page:
1. Go to the Portraits and Index section.
2. Click Flow Portraits in the task menu.
3. You will be given two options. If this is the first time you have placed portraits, the
Start from scratch radio button will be selected. Otherwise, you have the option
to select the Base on radio button and pre-select the same settings as one of your
previous portrait flows from the drop-down menu. Then click Create.
47 walsworthyearbooks.comSECTION 6
4. Use the radio buttons on the left to select whether you are flowing one or more
groups, and which group you want to flow (by grade, homeroom, etc.).
5. Use the drop-down menus on the left to choose the number of rows and columns
you want to appear on your portrait pages. Based on the selections you make,
Online Design will calculate how many pages will be needed for your portrait flow.
That number will appear in the lower right corner.
6. Once you know how many pages are needed, click to select your portrait spreads
in the ladder preview on the right. When you have selected enough pages, the blue
Next button will become active. Click Next.
7. You will now be able to make adjustments to the layout and text. Under Layout, click
the radio buttons to select portrait names to appear on the side or below images.
48 walsworthyearbooks.comSECTION 6
8. Under Portraits, click to select the shape of your portrait images. Click the check-
box if you want to put a border around the images.
9. Under Names, use the drop-down menus to apply text changes.
10. Under Spacing, adjust the amount of white space between images. By default,
there will be 3 pt. of space placed between rows and columns unless the setting
is adjusted.
11. At the top of the window, you can scroll through the different design options for
applying knock-outs (or pockets of white space) to your pages. Click to select one.
Remove it by clicking Clear knock-outs. You can also apply knock-outs to your
pages by clicking the individual image windows in the preview screen.
Note that each setting you choose will automatically update the preview screen, as well as
the “Students to flow” and “Portrait spaces” numbers in the upper left corner. If any setting
causes the Portrait spaces to go lower than the Students to flow number, you will be given
a warning and asked to update your settings or add an additional portrait page.
49 walsworthyearbooks.comSECTION 6
If you prefer to build your pages using manual settings, click the Switch to manual spacing
link near the bottom of the window. This will allow you to set the portrait width and height, text
box width, as well as page margins and spacing to your specific settings. All numbers entered
are in points. A red box around a field means you have entered a number too big for your
current page size.
12. To view what your portrait page layout will look like at any time, click the Preview
button in the lower right corner.
13. When your pages are set the way you like, click Flow portraits.
50 walsworthyearbooks.comYou can also read