AutoCAD 2019 Preview Guide
←
→
Page content transcription
If your browser does not render page correctly, please read the page content below
AutoCAD 2019 Preview Guide
Subscribe to Autodesk® AutoCAD® including specialized toolsets and get access to
industry-specific functionality, greater mobility with the new web and mobile apps, and
the latest feature updates. Speed up your work with specialized features & libraries for
mechanical design, architecture, 3D mapping, and more while working in a familiar
AutoCAD interface. Only AutoCAD, with the new web and mobile apps, gives you the
freedom and flexibility to work on anything, anywhere, at any time. Design and draft using
the latest features and functionality included in subscriber-only updates.
Contents
Specialized Toolsets ................................................................................................................................ 3

   Architecture Toolset ............................................................................................................................ 3

   Mechanical Toolset .............................................................................................................................. 3

   Electrical Toolset .................................................................................................................................. 3

   MEP Toolset ........................................................................................................................................... 3

   Plant 3D Toolset .................................................................................................................................... 3

   Map 3D Toolset ..................................................................................................................................... 3

   Raster Design Toolset ......................................................................................................................... 4

   Installing Toolsets ............................................................................................................................... 4

AutoCAD Anywhere .................................................................................................................................. 5

   AutoCAD Web App................................................................................................................................. 5

   AutoCAD Mobile App ............................................................................................................................ 6

   Save to Web and Mobile ..................................................................................................................... 8

New Features & Enhancements ............................................................................................................ 9

   DWG Compare ........................................................................................................................................ 9

   Shared Views ....................................................................................................................................... 15

   Views and Viewports* ........................................................................................................................ 20

   Layer Property Overrides* ................................................................................................................ 24

   Performance Enhancements ............................................................................................................ 27

   High-Resolution (4K) Monitor Support* ...................................................................................... 29

   Standards Checking * ........................................................................................................................ 29

   Object Selection* ................................................................................................................................ 29

*Functionality first made available to AutoCAD subscribers via the AutoCAD 2018.1 Update.
                                                                                                                                                    2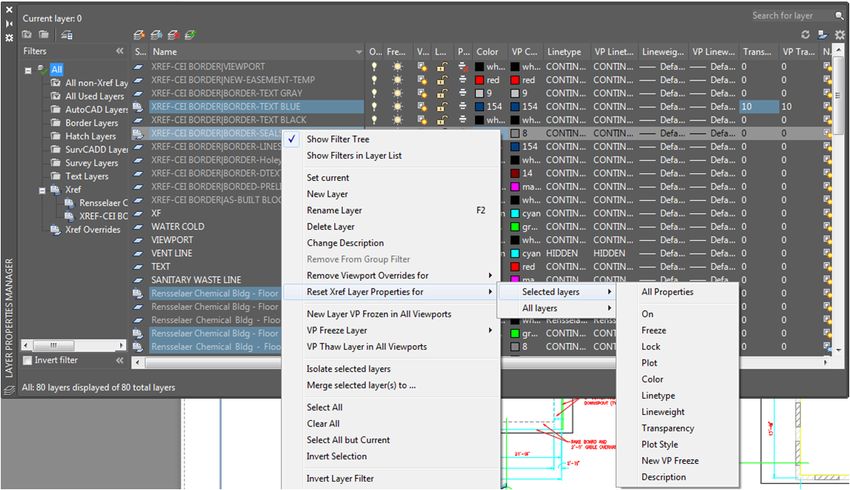
Specialized Toolsets
Our specialized toolsets for architecture, mechanical design, 3D mapping, and more are
now available when you subscribe to AutoCAD 2019.
Speed up your work with specialized functionality & libraries. Beyond the core AutoCAD
2019 features, each toolset gives you industry-specific capabilities to:
Automate the creation of annotations, layers and properties
Easily create details and views from 3D models, and simply generate schedules,
lists and tables
Create rules-driven workflows to enforce standards throughout the design process
Track updates of associated views, tables, and other content as designs change
When you subscribe to AutoCAD 2019, you will gain access to the following toolsets:
Architecture Toolset
Use specialized building design features and 8,000+ intelligent architectural objects and
styles to speed architectural drawing and documentation. Automate floorplans, sections,
elevations, and other drawings with our architectural toolset.
Mechanical Toolset
Use specialized mechanical design features and 700,000+ intelligent manufacturing parts,
features and symbols to speed product design. Automate tasks, such as generating
machine components and creating bills of material.
Electrical Toolset
Use specialized electrical design features and 65,000+ intelligent electrical symbols to
boost productivity for creating, modifying, and documenting electrical controls systems.
Quickly design panel layouts, schematic diagrams, and other drawings with our electrical
toolset.
MEP Toolset
Use specialized MEP engineering features and 10,500+ intelligent mechanical, electrical,
and plumbing objects to draft, design, and document building systems. Easily design
ductwork, electrical conduit, and circuiting for HVAC, plumbing, and electrical with our MEP
toolset.
Plant 3D Toolset
Use the specialized plant design and engineering toolset to efficiently produce P&IDs and
then integrate them into a 3D plant design model. Quickly create schematic diagrams,
plant layouts, and other drawings with our 3D plant toolset.
Map 3D Toolset
Incorporate GIS and CAD data to support planning, design, and data management. Access
spatial data stored in files, databases and web services, and aggregate it with your
AutoCAD design data. Easily manage your GIS data with standard data schema, automated
*Functionality first made available to AutoCAD subscribers via the AutoCAD 2018.1 Update.
3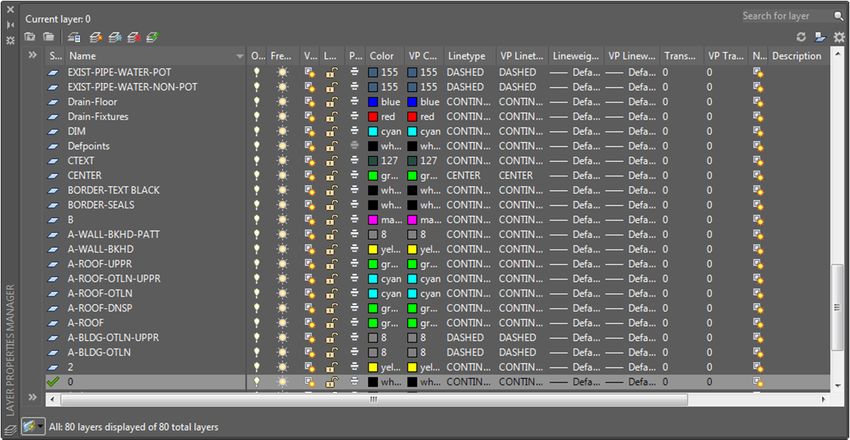
business workflows, and report templates for Electric North America, Electric Europe,
Water, Wastewater, and Gas industries in our 3D mapping toolset.

Raster Design Toolset
Use raster to vector tools to help you edit scanned drawings and convert raster images
into DWG objects. Quickly edit, cleanup and transform images, manipulate raster entities
(images, lines, arcs, and circles), create vector shapes (lines and polylines), and more with
our raster design toolset.

Installing Toolsets
To take advantage of the industry-specific features and functionality include in the
toolsets, you must download each of the toolsets individually. You can do this in two ways
— the Autodesk Account, and Autodesk desktop app.

The Autodesk Account portal is ideal for administrators who need to download complete
software packages to create deployments. Alternately, the Autodesk desktop app is the
ideal way to access products, toolsets and updates right on your desktop.

Autodesk Account
Go to accounts.autodesk.com to sign in. From there you will be able to pick and choose to
download AutoCAD or any of the specialized toolsets. For more information about getting
started with Autodesk Account, please see the Get Started guide within the Autodesk
Knowledge network.

Autodesk desktop app
You can also install the specialized toolsets from the Autodesk desktop app. When a
toolset becomes available, the app displays a notification on the system tray. Open the
app and click My Products and Tools to see all of the toolsets included with your
subscription that are available to install, then click any of the toolsets to install them
individually.

*Functionality first made available to AutoCAD subscribers via the AutoCAD 2018.1 Update.
                                                                                             4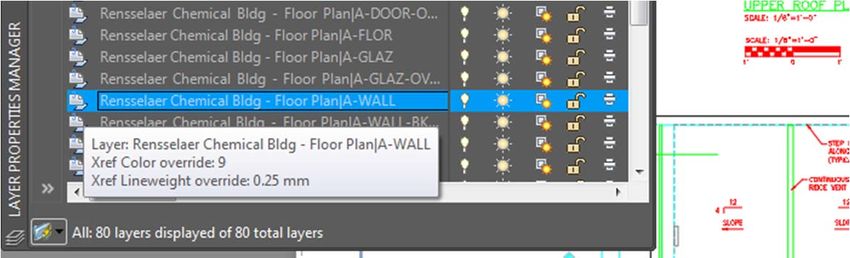
AutoCAD Anywhere
When you subscribe to AutoCAD 2019, you gain access to the new AutoCAD web and mobile
apps. These apps provide fast, seamless access to DWG files wherever you are, from
virtually any device. Files load quickly, and you can draft, edit, measure, and annotate with
the core tools and technology of original AutoCAD. These powerful features make it
possible to continue your CAD work with the most up-to-date files while on-the-go.

AutoCAD Web App
The new AutoCAD web app is included when you subscribe to AutoCAD 2019 including
specialized toolsets.

For the first time, you can access original AutoCAD directly in your web browser. With the
AutoCAD web app, edit, create, and view your CAD drawings in a simplified web interface
from any laptop. There’s nothing to download — just type in web.autocad.com and login
with your Autodesk account.

Some of the key features are highlighted below:

DWG File Access
Get quick access to your rich DWG files—not just flat PDFs—from the cloud. Once you
upload any DWG to web and mobile, the DWG can be easily accessed in the browser with
the web app. This lets you access your drawings to make quick edits or present projects to
clients on any laptop.

Core 2D Drafting and Editing Tools

The commands in the AutoCAD web app use the same technology as AutoCAD, so you can
get started right away using familiar, powerful tools. You get core 2D drafting and editing
commands so you can work on drawings even when you’re away from your desktop. Use
these commands, such as Polyline, Arc, Revcloud, Offset, Trim, Dimension, and more, and
check back for new tools often.

*Functionality first made available to AutoCAD subscribers via the AutoCAD 2018.1 Update.
                                                                                              5
Original AutoCAD Technology

A DWG in the AutoCAD web app has same authenticity and precision as it does in AutoCAD.
In the AutoCAD web app, you can view layouts, access basic object properties, and manage
layers, units, and Osnaps. The AutoCAD web app also supports xrefs, so if you upload a
drawing with xrefs in it, you can see those xrefs in the drawing. And what you see in the
drawing area—graphics, lineweights, and colors—are what you expect to see when you’re
using desktop AutoCAD.

AutoCAD Mobile App
The AutoCAD mobile app is included when you subscribe to AutoCAD 2019 including
specialized toolsets.

With the AutoCAD mobile app, you can view, edit, create, and share CAD drawings anytime,
anywhere. Available across Windows, Android and iOS phones and tablets, the AutoCAD
mobile app is also optimized for the iPhone X, iPad Pro and Windows Surface ensuring the
best mobile experience.

Designed specifically for users working onsite, our mobile app has adapted many of the
traditional desktop AutoCAD tools, and developed new mobile-only tools to extend the
power of AutoCAD to mobile. Some of the key features are highlighted below:

DWG File Access—Even Offline

*Functionality first made available to AutoCAD subscribers via the AutoCAD 2018.1 Update.
                                                                                            6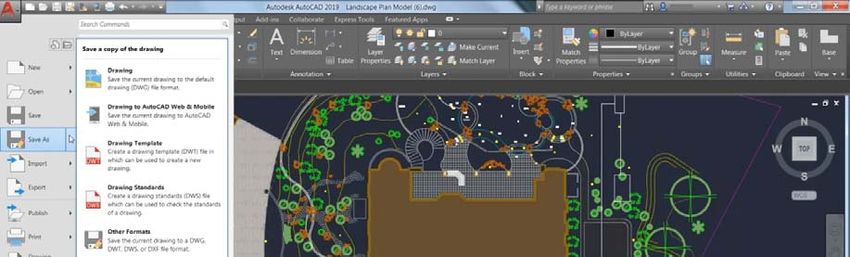
Get full access to your rich DWG files—not just flat PDFs—from the cloud. Access your DWGs
saved to your Autodesk account, any cloud storage service (ex: Dropbox, Box, or Google
Drive), even from email and messaging applications. Your DWGs can also be downloaded
locally on your device so you can work offline without internet connectivity. This
eliminates the need to carry heavy blueprints in the field, and lets you easily make edits
on-the-go, or present projects to clients.

Magnifier and Object Snap
Make accurate edits and measurements with Magnifier and Object Snap. While your finger
or Apple Pencil is touching the screen, a magnification window appears to show you a
zoomed-in view of where you are pressing. The magnifier window appears in the corner of
the screen so the view is not obstructed by your finger. For additional precision, objects
snap to a grid in the mobile app. While drafting or editing this makes it easy align or join
objects, create angles, and take measurements.

Quick Trim and Measure
Make quick edits and measurements with Quick Trim and Quick Measure, respectively.
With a single tap on the screen, quickly take the measurements of an entire space. Quick
Measure automatically finds the boundaries of a space and displays the distance between
those boundaries.

*Functionality first made available to AutoCAD subscribers via the AutoCAD 2018.1 Update.
                                                                                               7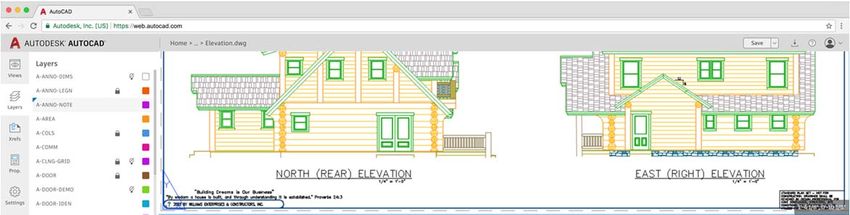
Laser Measurements
Add laser measurements directly to your drawings by connecting the Leica DISTO to your
mobile device via Bluetooth. It makes taking real-world and as-built measurements
incredibly easy. The drawing is updated in real-time as you take a measurement with the
Leica DISTO.

Annotations and Photo Attachments
Log quick observations from the field using annotation tools like shapes, arrows, text,
highlights, even photos directly on your drawings. For greater onsite clarity of progress
and issues, take a photo from your device’s camera, or add a photo from your camera roll.

Mobile Device Optimizations
The AutoCAD mobile app is available on a wide breadth of mobile devices, and takes
advantage of the latest mobile technologies. On devices like iPad Pro and Windows
Surface, the mobile app takes advantage of the high-resolution display to ensure drawings
are easy to read and work with, and supports the stylus for more precise drafting, editing,
and annotations. It even supports external keyboards like on the Windows Surface. As new
mobile devices evolve, we continue to push the boundaries of what you can do on the
AutoCAD mobile app.

Save to Web and Mobile
To make the most of AutoCAD on web and mobile, AutoCAD 2019 includes new “Save To
Web & Mobile” and “Open From Web & Mobile” capabilities. Together, these commands
enable you to move files between your desktop, and web and mobile so you can work
anywhere.

For example, you can take a drawing you were working on at your office, view and edit it in
the field on the AutoCAD web or mobile app, and save it back to your local network drive to
continue working at your office.

*Functionality first made available to AutoCAD subscribers via the AutoCAD 2018.1 Update.
                                                                                              8
Specifically, “Save To Web & Mobile” lets you save your drawings from your desktop to be
edited, viewed, or shared on mobile apps and the web. When you save with this option, a
dialog box will open and you can select where to place your files. Now that file is available
in AutoCAD on web or mobile.

Conversely, “Open From Web & Mobile” lets you access the latest drawings created or
edited on the AutoCAD web or mobile app. When you open a file with this option, this
drawing is stored in the cloud and not on your local computer. To bring the drawing to
your local storage, you will need to Save As a new version or replace the old version on
your local network.

These commands can be accessed from the App Menu as options within Open & Save, or
the Quick Access Toolbar. The first time you use these commands, you will have to install
our “Save to Web & Mobile” extension. Once the extension is loaded, you’re all set.

New Features & Enhancements
This year we have made a number of updates to AutoCAD. The new features and
enhancements below are available in AutoCAD.

Refreshed Icons

As part of our continuous efforts to provide a great visual experience to our customers,
AutoCAD 2019 has new ‘flat designed’ icons in the Ribbon, Status Bar, Quick Access Toolbar
(QAT) and Application Menu. The flat designed icons provide a better visual experience
when using AutoCAD, especially on a high-resolution monitor. AutoCAD 2019 also
dynamically matches icon sizes to your monitor resolution or pixel density.

DWG Compare
New DWG Compare tools in AutoCAD 2019 enable you to easily identify graphical
differences between two revisions of any drawing. This new functionality is particularly

*Functionality first made available to AutoCAD subscribers via the AutoCAD 2018.1 Update.
                                                                                            9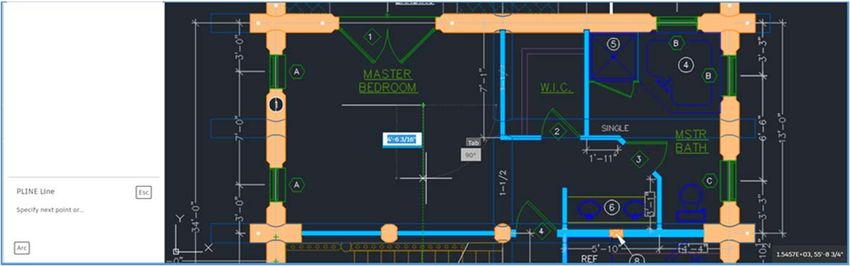
helpful for quickly viewing changes, identifying clashes, reviewing constructability, and
more. For example, consider these two versions of a floor plan. What is different between
them? The change is small, but critical.

With the DWG Compare functionality, this is what you can see:

The green and red graphics highlight the differences between the first version of the
drawing (green) and the second version (red). All unchanged elements are shown in grey.
Having displayed this important difference, now you can adjust the positions of the
cubicles adjacent to this exit stair to maintain the required clearance.

Starting a DWG Comparison
DWG Compare can be accessed from AutoCAD’s Application menu, the Collaborate Tab on
the ribbon, or directly from the command line (“COMPARE”). It’s available in the main
Application menu when no drawing is active or under Drawing Utilities when there is a

*Functionality first made available to AutoCAD subscribers via the AutoCAD 2018.1 Update.
                                                                                            10
drawing active.
You can also access it from the new Collaborate ribbon tab.
If the current drawing has been saved, it is used as DWG1 in the DWG Compare dialog box.
The dropdown list provides easy access to currently and recently opened drawings. You
can also use the browse buttons […] to select a drawing from the file navigation dialog.
*Functionality first made available to AutoCAD subscribers via the AutoCAD 2018.1 Update.
11Viewing Results
The results of the comparison are displayed in a third drawing. Three categories of
objects, or parts of objects, are displayed – those which are located only in the first
drawing, those which are located only in the second drawing, and those which are identical
in the two drawings. The default name of the new drawing is “Compare_DrawingOne vs
DrawingTwo” (where these are the names of the two drawings being compared), but you
can change it, if and when you save the comparison result drawing.
A contextual Compare ribbon tab lets you to control the appearance of results.
This tab has three groups of controls–Comparison, Compare Filter and Change Set.
Comparison
To show or hide any of the three categories of comparison graphics, click the lightbulb
icon in front of the appropriate category.
To change the color of one of the categories, click on the adjacent color tool. This will
allow you to select any color for that category.
*Functionality first made available to AutoCAD subscribers via the AutoCAD 2018.1 Update.
12To change which drawing is displayed in front, click “Draw Order.”
When you click the folder icon, the drawing will be opened (if it is found with the same
name, in the original folder path) or it will be set as the current drawing if it is already
open.
Click “Drawing Information” to display a dialog that contains the identity of the two
drawings being compared. From this dialog, you can add a table to the compare result
drawing with this information, or copy the text to the clipboard for use in other
documents. The identity of these drawings (folder path, date saved and saved by) is
preserved with the result drawing.
Compare Filter
To include text in or exclude text from the comparison result, click the Text button. This
covers all text, such as block attributes and dimension text.
To include or exclude hatch in the comparison result, click the Hatch button. The boundary
of the hatch (if any) will still appear and will be compared.
The settings for these two filters are saved with the drawing, but the default is to have
Text included, and Hatch not included.
Change Set
The first button controls whether the automatic Revision Clouds are displayed or not.
Even when they are turned off, the change sets remain.
The bottom line of the tools contains the number of the current change set, and the total
number of change sets, based on the other controls. Use the left and right arrow buttons
to zoom from one group of differences to another.
Adjust “Margin” to determine how Revision Clouds (change sets) combine with one
another. This represents extra space around the bounding box of the individual difference
graphics. When individual differences plus the margin overlap, they will be merged into a
single change set. Dragging the slider to the left will separate changed entities from each
other, resulting in more total change sets. Dragging the slider to the right will merge them
together, resulting in fewer total change sets.
*Functionality first made available to AutoCAD subscribers via the AutoCAD 2018.1 Update.
13The Revision Cloud Shape controls whether the merging of individual changes results in a
single larger rectangle, or whether the individual rectangles of each change are merged
into a polygonal shape.
Rectangular Polygonal
This setting defaults to Rectangular, but is saved with the comparison result drawing.
Commands and System Variables
To support the powerful new DWG Compare functionality in AutoCAD 2019, the following
new commands and system variables have been added:
Command Name Meaning
COMPARE or -COMPARE Begin the calculation of differences between two drawings
COMPAREINFO Display the dialog with information about the two source drawings
Sysvar Name Meaning Value
COMPARECOLOR1 Color of the objects that are unique to String, depending on
DWG1 color setting – Index,
True Color or Color
Book
COMPARECOLOR2 Color of the objects that are unique to String, depending on
DWG2 color setting – Index,
True Color or Color
Book
COMPARECOLORCOMMON Color of the objects that are common to String, depending on
both drawings color setting – Index,
True Color or Color
Book
COMPAREFRONT The number of the drawing that is Integer (1 or 2)
drawn in front
*Functionality first made available to AutoCAD subscribers via the AutoCAD 2018.1 Update.
14COMPAREPROPS If zero, objects are not marked as Integer (0 to 127)
different when properties are different. 1 = color
If non-zero, property changes will be 2 = layer
marked as differences, according to the 4 = linetype
bit codes 8 = linetype scale
16 = lineweight
32 = thickness
64 = transparency
COMPARESHOWCOMMON Show/hide objects that are common to ON/OFF
both drawings
COMPARESHOW1 Show/hide objects that are unique to ON/OFF
DWG1
COMPARESHOW2 Show/hide objects that are unique to ON/OFF
DWG2
COMPAREHATCH Show/hide hatch in the comparison ON/OFF
result drawing
COMPARETEXT Show/hide text in the comparison result ON/OFF
drawing
COMPARETOLERANCE The decimal point below which entities Integer (0 to 14)
are considered identical
COMPAREMARGIN The margin between the bounding box Integer (1~25)
of differences and the boundary of the
change group, from very tight to very
loose.
COMPARERCSHAPE Shape of the automatically generated Integer(0/1)
revision clouds 0 = Rectangular
1 = Polygonal
COMPARESHOWRC Show/hide the automatic revision ON/OFF
clouds
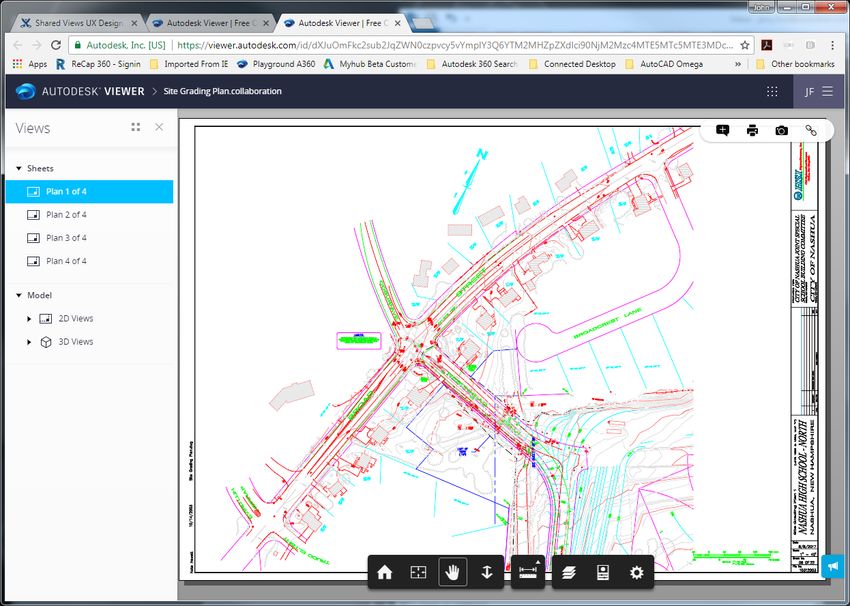
Shared Views
The Shared Views feature makes it easier for you to share your designs with stakeholders
within or outside your company without releasing your original drawing files. This feature
is intended to replace the commonly used workflow of publishing DWF or PDF files, and
then emailing them. Instead, views and data are extracted from your drawing, stored in
the cloud, and a shareable link is generated that allows the design to be viewed in a
browser and commented on from any web enabled desktop, tablet, or mobile device.
The recipients of the link can view, review, measure, comment and markup the design from
the Autodesk Viewer in their web browser, and they can share their feedback with you. You
can access the feedback from within AutoCAD. Shared views automatically expire after 30
days, but you can extend or terminate the link at any time.
*Functionality first made available to AutoCAD subscribers via the AutoCAD 2018.1 Update.
15Creating a Shared View
The Share View tool can be accessed from AutoCAD’s Application menu, under Publish.
To create shared views, you must be signed in to your Autodesk account and be an
AutoCAD subscriber. If you’re running off a multi-user subscription license, your
administrator may control whether you have access to Shared Views.
The Share View dialog informs you that you are about to publish a view of the opened file
to share online. There are settings in the dialog to control what design views you are
sharing.
View name
The default name of the shared view is the same as the drawing, but you can change it.
Views to share
*Functionality first made available to AutoCAD subscribers via the AutoCAD 2018.1 Update.
16You can share the current view only - the extents of the model tab or a layout tab,
whichever is current, or you can share views of the entire drawing including the model tab
and all layouts. Any named views in the drawing for the model or layouts can also be
accessed in the Autodesk Viewer.
Create 2D views only
The Create 2D views only check box controls whether only 2D views are created or whether
3D views will be created as well.
Share object properties
When Share object properties is checked, properties will be extracted with the shared
view. Similar to the AutoCAD Properties palette, these properties can be listed by the
recipients when they click on objects in the Autodesk Viewer. Note that processing views
will take longer when properties are shared.
Background Publishing and Notification
After clicking the Share button, you are notified that background processing has started,
and that you will be notified when the shared view is ready for viewing.
While the shared view is being created, an animated icon appears on the status bar and
you can continue working in AutoCAD. To cancel the processing, right click the button and
choose Cancel Share View from the menu.
After processing is complete and the shared view has been uploaded to the cloud, a bubble
notification displays on the status bar.
*Functionality first made available to AutoCAD subscribers via the AutoCAD 2018.1 Update.
17Clicking on the “View in Browser” link in the notification bubble opens your browser and
displays the shared view in the Autodesk Viewer.
From the Autodesk Viewer, you can inspect the view, add comments, and get the
temporary link to share with others.
Recipients of the link will also be able to view the design in the Autodesk viewer, respond
to comments, and add comments of their own.
Shared Views Palette
From the new Collaborate tab on the ribbon, you can display the Shared Views palette in
AutoCAD, which displays a history of the shared views that you have published. You can
also create a new shared view from the palette.
The latest comments and other information is retrieved when the palette is opened, and
the palette can be refreshed at any time by clicking the Refresh button. Each view in the
list displays a thumbnail image, a title, date created, day until it expires, and whether there
are comments with the views.
*Functionality first made available to AutoCAD subscribers via the AutoCAD 2018.1 Update.
18Sorting and Managing Views
You can sort the list of views by Title, Date created, or Expiration date. You can also filter
the view list from the search control.
Each view listed in the palette includes a [. . .] button in the upper-right corner. Clicking
the button displays a menu to manage the view. The menu options include:
View in browser – displays the view in the Autodesk Viewer
Copy Link – copies a link to the clipboard so you can share it with others
Extend – resets the view to expire in 30 days
Delete – deletes the view; shared links will no longer display the view
Viewing Comments and Responding
*Functionality first made available to AutoCAD subscribers via the AutoCAD 2018.1 Update.
19You can expand any view in the list to read or post comments, and to reply to any
comments received from stakeholders with whom you have shared the view. Clicking to
the right of the thumbnail displays comments and a thumbnail of the area commented on.
Clicking Back returns to the list of views.
Views and Viewports*
In AutoCAD 2019, views and viewports are easier than ever to create and edit!
Named Views
A new Named Views panel is added to the View ribbon tab with tools to easily create,
restore, and edit named views.
The View dropdown list in the panel allows you to easily restore named views by selecting
it from the dropdown list:
*Functionality first made available to AutoCAD subscribers via the AutoCAD 2018.1 Update.
20The New View tool offers a simplified version of the New View/Shot Properties dialog box
with only the most basic controls for creating a new view. You can expand it to access the
full set of View and Shot Properties.
The View Manager button displays the View Manager dialog box. From there, you can edit
and manage named views.
Inserting Named Views as Viewports
Now for the cool part: inserting named views onto a layout!
The Layout ribbon tab is a contextual tab that is displayed when a layout is made active. If
you click on the Layout ribbon tab, you will see that it now includes a new Insert View tool.
The Insert View tool displays all the named model views in the drawing as either a gallery
with thumbnail preview images, or a simple list (depending on whether you have
GALLERYVIEW enabled).
*Functionality first made available to AutoCAD subscribers via the AutoCAD 2018.1 Update.
21Simply select a view from the gallery and place it onto your layout. The result is the same
as the multi-step process of creating a layout viewport, making it active, selecting a view,
setting the scale, resizing the viewport, and locking it. Now, you can do it in a single step—
enabling you to add many views quickly!
AutoCAD applies the annotation scale of the view to the viewport scale if it will fit on the
sheet. If it doesn’t fit, AutoCAD estimates and applies a standard scale based on the size of
the named view and the layout so it fits on half the sheet. A preview of the view is
displayed as you drag it onto the layout helping you visualize an appropriate scale. You
can easily change the scale during insertion by selecting the desired scale from the right-
click menu with an existing viewport selected.
Viewport Grip Enhancements
You can easily change the scale of or move a paper space viewport at any time by selecting
it and then using the move grip or the triangular scale grip. You can also use viewport
grips at the corners to modify the viewport boundary—but you’re much less likely to need
them as viewport boundaries automatically resize when you change the viewport scale!
*Functionality first made available to AutoCAD subscribers via the AutoCAD 2018.1 Update.
22Inserting a New View as a Viewport
You can quickly create new model views—even while working on a layout—by selecting the
New View tool from the Insert View gallery control.
This allows you to specify the view area in model space and then immediately place the
view on the layout. If the drawing contains no named views, selecting the Insert View tool
from the Layout ribbon tab automatically launches the New View behavior.
*Functionality first made available to AutoCAD subscribers via the AutoCAD 2018.1 Update.
23With these enhancements to views and viewports, you can reduce clicks and save time!
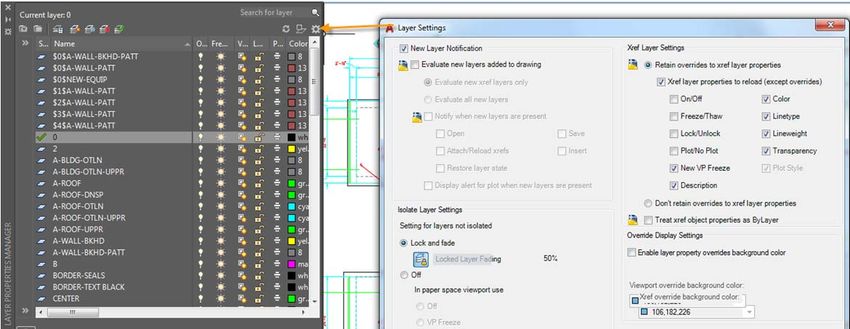
Layer Property Overrides*
Improvements to the Layer Manager and other Layer controls make it easier to identify
overrides and to restore them to their default values.
Layer Properties
The Layer Properties Manager includes a new status icon to indicate when an Xref layer
contains overrides. Passing the cursor over the icon displays a tooltip listing all of the
applied the layer overrides.
A new toggle in the Layer Properties Manager makes it even easier to identify Xref layer
overrides by applying a background color to any and all layers and properties with
overrides—including both Xref and viewport overrides.
To further aide in identifying Xref layers with overrides, a new Xref Overrides layer filter is
available. Simply select the Xref Overrides filter to see a list of all the Xref layers in the
drawing with applied overrides. A right-click menu option enables you to easily reset any
or all of the Xref layer properties to their original values.
*Functionality first made available to AutoCAD subscribers via the AutoCAD 2018.1 Update.
24A similar option is available when you right-click on any layer in the layer list with Xref
layer overrides. You can choose to reset Xref layer properties for just the selected layers or
for all layers.
Additionally, a new XREF option in the -LAYER command offers command line access to
remove Xref overrides, and a previously hidden option in the VPLAYER command for
removing Viewport Overrides [reMoveoverrides] has been exposed.
To help you quickly identify if layer property overrides have been applied to an Xref or
viewport, the Layer Property Overrides option has been added to the Properties palette for
selected Xrefs as well as the rollover tooltip for viewports.
*Functionality first made available to AutoCAD subscribers via the AutoCAD 2018.1 Update.
25Note: The order of the columns in the Layer Properties Manager has changed for Layouts
and the Global and VP properties for each Layer property are now grouped together. To
simplify the Layer Properties Manager, the Plot Style and VP Plot Style columns are no
longer displayed for drawings in Color Dependent mode (PSTYLEMODE-1).
Layer Settings
The Layer Settings dialog box is updated to include new controls for managing Xref layer
properties. Access it from the Settings icon in the upper right-hand corner of the Layer
Properties Manager. The option to Retain changes to Xref layers (VISRETAIN system
variable) has moved from the Options dialog box (Open and Save tab) to the Layer
Settings dialog box.
With the option to retain overrides to Xref layer properties enabled (VISRETAIN = 1), you
can now specify which, if any, Xref layer properties you want to reload, offering you more
flexibility to control Xref overrides. The various layer property options are stored in the
registry via the new VISRETAINMODE system variable.
*Functionality first made available to AutoCAD subscribers via the AutoCAD 2018.1 Update.
26Another new control in the Layer Settings dialog box, treat Xref object properties as
ByLayer, offers easy access to the XREFOVERRIDE system variable (which enables you to
force object properties of Xref objects to use ByLayer properties).
Xref Layers
A new XREFLAYER system variable enables you to specify a default layer on which new
Xrefs are inserted. The Xref layer is only displayed in the Layer Manager when an Xref is
attached to the drawing.
When you rename or delete an Xref layer in the Xref drawing, it is automatically
renamed/deleted when you reload it in the host drawings.*
Performance Enhancements
AutoCAD 2019 offers many performance enhancements.
2D Graphics Performance
Operations that typically require AutoCAD to redraw or regenerate 2D graphics have been
streamlined in AutoCAD 2019 offering substantial performance improvements. For
example, changing draw order, zooming, panning, and changing layer properties,
particularly in large drawings or drawings with raster images, can be up to twice as fast!
New controls in the Graphics Performance dialog box enable you to configure 2D graphics
behavior with minimal effort. A dropdown list offers three settings for the mode used by
capable graphics cards – those which are DirectX 11 compatible – Basic, Intermediate, and
Advanced. The controls for Smooth line display and High-quality geometry as well as a
new control for setting how much of the GPU memory will be used for display caching, can
be accessed by expanding the Details section. Depending which of the three preset modes
you select, the controls in the Details section are automatically turned on or off.
*Functionality first made available to AutoCAD subscribers via the AutoCAD 2018.1 Update.
27You can access the Graphics Performance dialog box with the GRAPHICSCONFIG command.
This tool is also available from the status bar. However, in AutoCAD 2019 the display of the
tool on the status bar is turned off by default. You can turn it on from the Customize menu.
Plot and Preview Performance*
Plot and Preview offer major performance improvements for drawings with missing SHX
fonts.
3D Navigation Performance*
The navigation speed of 3D models (when viewing with common visual styles) continues
to improve with the AutoCAD 2018.1 Update. The 3D graphics performance for the
Wireframe, Realistic, and Shaded visual styles has increased significantly, depending on
the content of the DWG files tested. Measuring the frames-per-second (FPS) performance
in six large benchmark models, the median FPS increase in AutoCAD 2018 Update was 1.37x
faster than before AutoCAD 2018 Update, and 2.75x faster than the FPS in AutoCAD 2017.
For best results, use these 3D visual styles in their default states on a 64-bit machine with
a compatible graphics card. The commands offering the greatest benefit from these
performance improvements include those that are most used: 3DORBIT, ZOOM, PAN, and
VSCURRENT.
*Functionality first made available to AutoCAD subscribers via the AutoCAD 2018.1 Update.
28High-Resolution (4K) Monitor Support*
Support for high-resolution monitors continues to be improved. More than 200 dialog
boxes and other User Interface elements have been updated to ensure the best possible
viewing experience on 4K displays and higher. Just a few examples include the Edit Layer
State and Insert Table dialog boxes as well as the Visual LISP editor.
Standards Checking *
Custom line type properties are supported when checking STANDARDS with multiple
custom line type definitions in drawing.
Object Selection*
Crossing window and Fence selections are supported when trimming or extending lines
that are not on the current UCS plane.
*Functionality first made available to AutoCAD subscribers via the AutoCAD 2018.1 Update.
29You can also read