Avid Maestro | Engine 4K - Administrator's Guide Version 2021.3
←
→
Page content transcription
If your browser does not render page correctly, please read the page content below

Avid® Maestro™ | Engine 4K
              Administrator’s Guide
                     Version 2021.3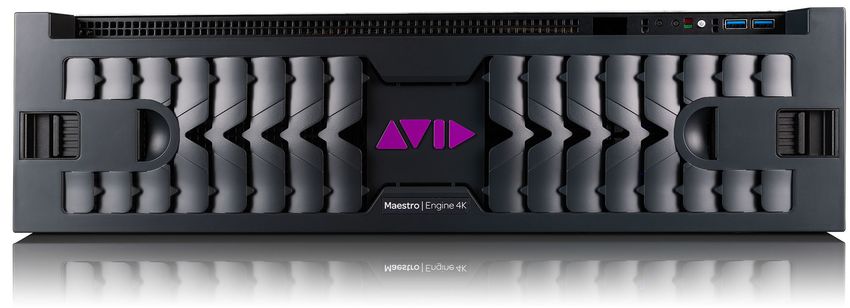
Legal Notices
Product specifications are subject to change without notice and do not represent a commitment on the part of Avid Technology, Inc.

This product is subject to the terms and conditions of a software license agreement provided with the software. The product may only be used in
accordance with the license agreement.

This product may be protected by one or more U.S. and non-U.S patents. Details are available at www.avid.com/patents.

This document is protected under copyright law. An authorized licensee of may reproduce this publication for the licensee’s own use in learning how to
use the software. This document may not be reproduced or distributed, in whole or in part, for commercial purposes, such as selling copies of this
document or providing support or educational services to others. This document is supplied as a guide for . Reasonable care has been taken in preparing
the information it contains. However, this document may contain omissions, technical inaccuracies, or typographical errors. Avid Technology, Inc. does
not accept responsibility of any kind for customers’ losses due to the use of this document. Product specifications are subject to change without notice.

Copyright © 2021 Avid Technology, Inc. and its licensors. All rights reserved.

Copyright 2003-2007 of MOG Solutions

The following disclaimer is required by Apple Computer, Inc.:
APPLE COMPUTER, INC. MAKES NO WARRANTIES WHATSOEVER, EITHER EXPRESS OR IMPLIED, REGARDING THIS PRODUCT,
INCLUDING WARRANTIES WITH RESPECT TO ITS MERCHANTABILITY OR ITS FITNESS FOR ANY PARTICULAR PURPOSE. THE
EXCLUSION OF IMPLIED WARRANTIES IS NOT PERMITTED BY SOME STATES. THE ABOVE EXCLUSION MAY NOT APPLY TO YOU.
THIS WARRANTY PROVIDES YOU WITH SPECIFIC LEGAL RIGHTS. THERE MAY BE OTHER RIGHTS THAT YOU MAY HAVE WHICH
VARY FROM STATE TO STATE.

The following disclaimer is required by Sam Leffler and Silicon Graphics, Inc. for the use of their TIFF library:
Copyright © 1988–1997 Sam Leffler
Copyright © 1991–1997 Silicon Graphics, Inc.

Permission to use, copy, modify, distribute, and sell this software [i.e., the TIFF library] and its documentation for any purpose is hereby granted
without fee, provided that (i) the above copyright notices and this permission notice appear in all copies of the software and related documentation, and
(ii) the names of Sam Leffler and Silicon Graphics may not be used in any advertising or publicity relating to the software without the specific, prior
written permission of Sam Leffler and Silicon Graphics.

THE SOFTWARE IS PROVIDED “AS-IS” AND WITHOUT WARRANTY OF ANY KIND, EXPRESS, IMPLIED OR OTHERWISE, INCLUDING
WITHOUT LIMITATION, ANY WARRANTY OF MERCHANTABILITY OR FITNESS FOR A PARTICULAR PURPOSE.

IN NO EVENT SHALL SAM LEFFLER OR SILICON GRAPHICS BE LIABLE FOR ANY SPECIAL, INCIDENTAL, INDIRECT OR
CONSEQUENTIAL DAMAGES OF ANY KIND, OR ANY DAMAGES WHATSOEVER RESULTING FROM LOSS OF USE, DATA OR
PROFITS, WHETHER OR NOT ADVISED OF THE POSSIBILITY OF DAMAGE, AND ON ANY THEORY OF LIABILITY, ARISING OUT OF
OR IN CONNECTION WITH THE USE OR PERFORMANCE OF THIS SOFTWARE.

The following disclaimer is required by the Independent JPEG Group:
This software is based in part on the work of the Independent JPEG Group.

This Software may contain components licensed under the following conditions:
Copyright (c) 1989 The Regents of the University of California. All rights reserved.

Redistribution and use in source and binary forms are permitted provided that the above copyright notice and this paragraph are duplicated in all such
forms and that any documentation, advertising materials, and other materials related to such distribution and use acknowledge that the software was
developed by the University of California, Berkeley. The name of the University may not be used to endorse or promote products derived from this
software without specific prior written permission. THIS SOFTWARE IS PROVIDED ``AS IS'' AND WITHOUT ANY EXPRESS OR IMPLIED
WARRANTIES, INCLUDING, WITHOUT LIMITATION, THE IMPLIED WARRANTIES OF MERCHANTABILITY AND FITNESS FOR A
PARTICULAR PURPOSE.

Copyright (C) 1989, 1991 by Jef Poskanzer.

Permission to use, copy, modify, and distribute this software and its documentation for any purpose and without fee is hereby granted, provided that the
above copyright notice appear in all copies and that both that copyright notice and this permission notice appear in supporting documentation. This
software is provided "as is" without express or implied warranty.

Copyright 1995, Trinity College Computing Center. Written by David Chappell.

Permission to use, copy, modify, and distribute this software and its documentation for any purpose and without fee is hereby granted, provided that the
above copyright notice appear in all copies and that both that copyright notice and this permission notice appear in supporting documentation. This
software is provided "as is" without express or implied warranty.

Copyright 1996 Daniel Dardailler.

Permission to use, copy, modify, distribute, and sell this software for any purpose is hereby granted without fee, provided that the above copyright
notice appear in all copies and that both that copyright notice and this permission notice appear in supporting documentation, and that the name of
Daniel Dardailler not be used in advertising or publicity pertaining to distribution of the software without specific, written prior permission. Daniel
Dardailler makes no representations about the suitability of this software for any purpose. It is provided "as is" without express or implied warranty.

Modifications Copyright 1999 Matt Koss, under the same license as above.

Copyright (c) 1991 by AT&T.

                                                                          2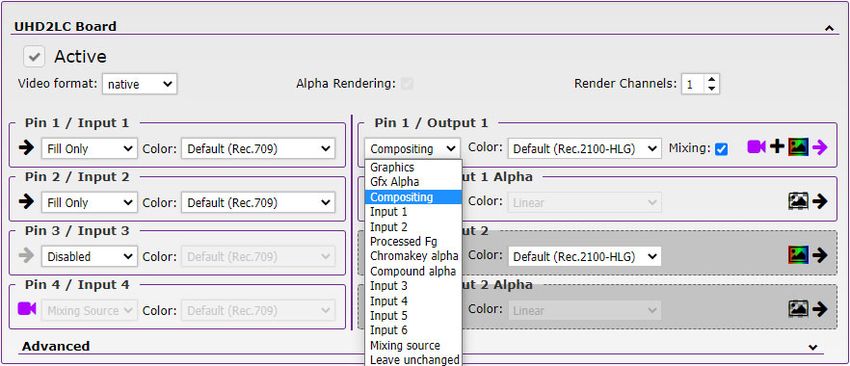
Permission to use, copy, modify, and distribute this software for any purpose without fee is hereby granted, provided that this entire notice is included in
all copies of any software which is or includes a copy or modification of this software and in all copies of the supporting documentation for such
software.

THIS SOFTWARE IS BEING PROVIDED "AS IS", WITHOUT ANY EXPRESS OR IMPLIED WARRANTY. IN PARTICULAR, NEITHER THE
AUTHOR NOR AT&T MAKES ANY REPRESENTATION OR WARRANTY OF ANY KIND CONCERNING THE MERCHANTABILITY OF
THIS SOFTWARE OR ITS FITNESS FOR ANY PARTICULAR PURPOSE.

This product includes software developed by the University of California, Berkeley and its contributors.

The following disclaimer is required by Nexidia Inc.:
© 2010 Nexidia Inc. All rights reserved, worldwide. Nexidia and the Nexidia logo are trademarks of Nexidia Inc. All other trademarks are the property
of their respective owners. All Nexidia materials regardless of form, including without limitation, software applications, documentation and any other
information relating to Nexidia Inc., and its products and services are the exclusive property of Nexidia Inc. or its licensors. The Nexidia products and
services described in these materials may be covered by Nexidia's United States patents: 7,231,351; 7,263,484; 7,313,521; 7,324,939; 7,406,415,
7,475,065; 7,487,086 and/or other patents pending and may be manufactured under license from the Georgia Tech Research Corporation USA.

The following disclaimer is required by Paradigm Matrix:
Portions of this software licensed from Paradigm Matrix.

The following disclaimer is required by Ray Sauers Associates, Inc.:
“Install-It” is licensed from Ray Sauers Associates, Inc. End-User is prohibited from taking any action to derive a source code equivalent of “Install-It,”
including by reverse assembly or reverse compilation, Ray Sauers Associates, Inc. shall in no event be liable for any damages resulting from reseller’s
failure to perform reseller’s obligation; or any damages arising from use or operation of reseller’s products or the software; or any other damages,
including but not limited to, incidental, direct, indirect, special or consequential Damages including lost profits, or damages resulting from loss of use or
inability to use reseller’s products or the software for any reason including copyright or patent infringement, or lost data, even if Ray Sauers Associates
has been advised, knew or should have known of the possibility of such damages.

The following disclaimer is required by Videomedia, Inc.:
“Videomedia, Inc. makes no warranties whatsoever, either express or implied, regarding this product, including warranties with respect to its
merchantability or its fitness for any particular purpose.”

“This software contains V-LAN ver. 3.0 Command Protocols which communicate with V-LAN ver. 3.0 products developed by Videomedia, Inc. and V-
LAN ver. 3.0 compatible products developed by third parties under license from Videomedia, Inc. Use of this software will allow “frame accurate”
editing control of applicable videotape recorder decks, videodisc recorders/players and the like.”

The following disclaimer is required by Altura Software, Inc. for the use of its Mac2Win software and Sample Source Code:
©1993–1998 Altura Software, Inc.

The following disclaimer is required by Ultimatte Corporation:
Certain real-time compositing capabilities are provided under a license of such technology from Ultimatte Corporation and are subject to copyright
protection.

The following disclaimer is required by 3Prong.com Inc.:
Certain waveform and vector monitoring capabilities are provided under a license from 3Prong.com Inc.

The following disclaimer is required by Interplay Entertainment Corp.:
The “Interplay” name is used with the permission of Interplay Entertainment Corp., which bears no responsibility for Avid products.

This product includes portions of the Alloy Look & Feel software from Incors GmbH.

This product includes software developed by the Apache Software Foundation (http://www.apache.org/).

© DevelopMentor

This product may include the JCifs library, for which the following notice applies:
JCifs © Copyright 2004, The JCIFS Project, is licensed under LGPL (http://jcifs.samba.org/). See the LGPL.txt file in the Third Party Software
directory on the installation CD.

Avid Interplay contains components licensed from LavanTech. These components may only be used as part of and in connection with Avid Interplay.

This product includes the Warlib library, for which the following notice applies:
Copyright Jarle (jgaa) Aase 2000 - 2009

COPYRIGHT file which is included in the distribution:

warlib is copyright Jarle (jgaa) Aase 2000 - 2009

The warlib C++ Library is free software; you can redistribute it and/or modify it under the terms of the GNU Lesser General Public License as
published by the Free Software Foundation; either version 3.0 of the License, or (at your option) any later version.

The warlib C++ Library is distributed in the hope that it will be useful, but WITHOUT ANY WARRANTY; without even the implied warranty of
MERCHANTABILITY or FITNESS FOR A PARTICULAR PURPOSE. See the GNU Lesser General Public License for more details.

Portions copyright © 2012 Avid Technology, Inc.

                                                                            3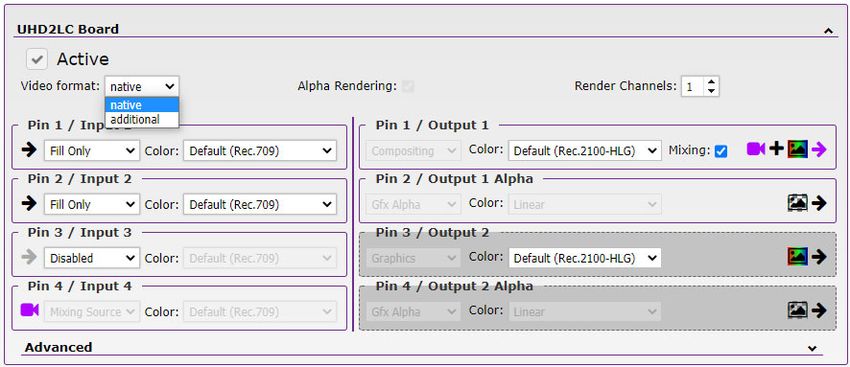
Attn. Government User(s). Restricted Rights Legend
U.S. GOVERNMENT RESTRICTED RIGHTS. This Software and its documentation are “commercial computer software” or “commercial computer
software documentation.” In the event that such Software or documentation is acquired by or on behalf of a unit or agency of the U.S. Government, all
rights with respect to this Software and documentation are subject to the terms of the License Agreement, pursuant to FAR §12.212(a) and/or DFARS
§227.7202-1(a), as applicable.

Trademarks
003, 192 Digital I/O, 192 I/O, 96 I/O, 96i I/O, Adrenaline, AirSpeed, ALEX, Alienbrain, AME, AniMatte, Archive, Archive II, Assistant Station,
AudioPages, AudioStation, AutoLoop, AutoSync, Avid, Avid Active, Avid Advanced Response, Avid DNA, Avid DNxcel, Avid DNxHD, Avid DS
Assist Station, Avid Ignite, Avid Liquid, Avid Media Engine, Avid Media Processor, Avid MEDIArray, Avid Mojo, Avid Remote Response, Avid Unity,
Avid Unity ISIS, Avid VideoRAID, AvidRAID, AvidShare, AVIDstripe, AVX, Beat Detective, Beauty Without The Bandwidth, Beyond Reality, BF
Essentials, Bomb Factory, Bruno, C|24, CaptureManager, ChromaCurve, ChromaWheel, Cineractive Engine, Cineractive Player, Cineractive Viewer,
Color Conductor, Command|24, Command|8, Control|24, Cosmonaut Voice, CountDown, d2, d3, DAE, D-Command, D-Control, Deko, DekoCast, D-
Fi, D-fx, Digi 002, Digi 003, DigiBase, Digidesign, Digidesign Audio Engine, Digidesign Development Partners, Digidesign Intelligent Noise
Reduction, Digidesign TDM Bus, DigiLink, DigiMeter, DigiPanner, DigiProNet, DigiRack, DigiSerial, DigiSnake, DigiSystem, Digital Choreography,
Digital Nonlinear Accelerator, DigiTest, DigiTranslator, DigiWear, DINR, DNxchange, Do More, DPP-1, D-Show, DSP Manager, DS-StorageCalc, DV
Toolkit, DVD Complete, D-Verb, Eleven, EM, Euphonix, EUCON, EveryPhase, Expander, ExpertRender, Fader Pack, Fairchild, FastBreak, Fast Track,
Film Cutter, FilmScribe, Flexevent, FluidMotion, Frame Chase, FXDeko, HD Core, HD Process, HDpack, Home-to-Hollywood, HYBRID,
HyperSPACE, HyperSPACE HDCAM, iKnowledge, Image Independence, Impact, Improv, iNEWS, iNEWS Assign, iNEWS ControlAir, InGame,
Instantwrite, Instinct, Intelligent Content Management, Intelligent Digital Actor Technology, IntelliRender, Intelli-Sat, Intelli-sat Broadcasting
Recording Manager, InterFX, Interplay, inTONE, Intraframe, iS Expander, iS9, iS18, iS23, iS36, ISIS, IsoSync, LaunchPad, LeaderPlus, LFX,
Lightning, Link & Sync, ListSync, LKT-200, Lo-Fi, MachineControl, Magic Mask, Make Anything Hollywood, make manage move | media, Marquee,
MassivePack, Massive Pack Pro, Maxim, Mbox, Media Composer, MediaFlow, MediaLog, MediaMix, Media Reader, Media Recorder, MEDIArray,
MediaServer, MediaShare, MetaFuze, MetaSync, MIDI I/O, Mix Rack, Moviestar, MultiShell, NaturalMatch, NewsCutter, NewsView, NewsVision,
Nitris, NL3D, NLP, NSDOS, NSWIN, OMF, OMF Interchange, OMM, OnDVD, Open Media Framework, Open Media Management, Painterly
Effects, Palladium, Personal Q, PET, Podcast Factory, PowerSwap, PRE, ProControl, ProEncode, Profiler, Pro Tools, Pro Tools|HD, Pro Tools LE, Pro
Tools M-Powered, Pro Transfer, QuickPunch, QuietDrive, Realtime Motion Synthesis, Recti-Fi, Reel Tape Delay, Reel Tape Flanger, Reel Tape
Saturation, Reprise, Res Rocket Surfer, Reso, RetroLoop, Reverb One, ReVibe, Revolution, rS9, rS18, RTAS, Salesview, Sci-Fi, Scorch, ScriptSync,
SecureProductionEnvironment, Serv|GT, Serv|LT, Shape-to-Shape, ShuttleCase, Sibelius, SimulPlay, SimulRecord, Slightly Rude Compressor,
Smack!, Soft SampleCell, Soft-Clip Limiter, SoundReplacer, SPACE, SPACEShift, SpectraGraph, SpectraMatte, SteadyGlide, Streamfactory,
Streamgenie, StreamRAID, SubCap, Sundance, Sundance Digital, SurroundScope, Symphony, SYNC HD, SYNC I/O, Synchronic, SynchroScope,
Syntax, TDM FlexCable, TechFlix, Tel-Ray, Thunder, TimeLiner, Titansync, Titan, TL Aggro, TL AutoPan, TL Drum Rehab, TL Everyphase, TL
Fauxlder, TL In Tune, TL MasterMeter, TL Metro, TL Space, TL Utilities, tools for storytellers, Transit, TransJammer, Trillium Lane Labs, TruTouch,
UnityRAID, Vari-Fi, Video the Web Way, VideoRAID, VideoSPACE, VTEM, Work-N-Play, Xdeck, X-Form, Xmon and XPAND! are either registered
trademarks or trademarks of Avid Technology, Inc. in the United States and/or other countries.

Avid Maestro | Engine 4K Administrator’s Guide v2021.3 • Created 4/2/21 • This document is distributed by Avid in online
(electronic) form only, and is not available for purchase in printed form.

                                                                        4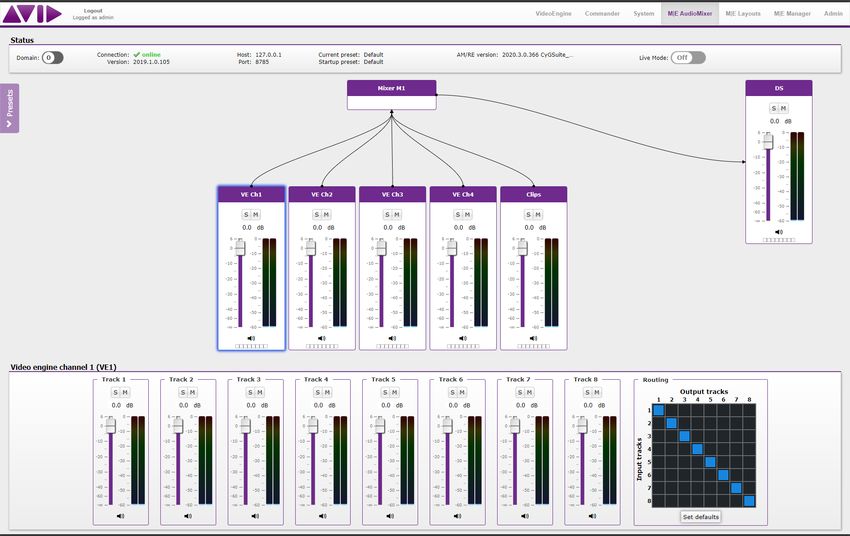
Contents

            Symbols and Conventions . . . . . . . . . . . . . . . . . . . . . . . . . . . . . . . . . . . . . . . . . . . . . . . . . . . . . . . . . . . . 7
Chapter 1   Introduction . . . . . . . . . . . . . . . . . . . . . . . . . . . . . . . . . . . . . . . . . . . . . . . . . . . . . . . . . . . . . . 8
            Technical Specifications . . . . . . . . . . . . . . . . . . . . . . . . . . . . . . . . . . . . . . . . . . . . . . . . . . . . . . . . . . . . . 9
Chapter 2   Working with Maestro | Engine Manager . . . . . . . . . . . . . . . . . . . . . . . . . . . . . . . . . . . . 11
            The Login Page . . . . . . . . . . . . . . . . . . . . . . . . . . . . . . . . . . . . . . . . . . . . . . . . . . . . . . . . . . . . . . . . . . . 11
                   Logging In . . . . . . . . . . . . . . . . . . . . . . . . . . . . . . . . . . . . . . . . . . . . . . . . . . . . . . . . . . . . . . . . . . . 11
            The M|E Manager Page . . . . . . . . . . . . . . . . . . . . . . . . . . . . . . . . . . . . . . . . . . . . . . . . . . . . . . . . . . . . . 12
                   The Status Section . . . . . . . . . . . . . . . . . . . . . . . . . . . . . . . . . . . . . . . . . . . . . . . . . . . . . . . . . . . . . 12
                   The Bottom Panel Buttons . . . . . . . . . . . . . . . . . . . . . . . . . . . . . . . . . . . . . . . . . . . . . . . . . . . . . . . 12
                   The Global Settings . . . . . . . . . . . . . . . . . . . . . . . . . . . . . . . . . . . . . . . . . . . . . . . . . . . . . . . . . . . . 13
                   The Boards Settings . . . . . . . . . . . . . . . . . . . . . . . . . . . . . . . . . . . . . . . . . . . . . . . . . . . . . . . . . . . . 15
                   The Controller Presets Settings . . . . . . . . . . . . . . . . . . . . . . . . . . . . . . . . . . . . . . . . . . . . . . . . . . . 18
                   The Frame Accuracy Settings. . . . . . . . . . . . . . . . . . . . . . . . . . . . . . . . . . . . . . . . . . . . . . . . . . . . . 18
                   The Clips Settings. . . . . . . . . . . . . . . . . . . . . . . . . . . . . . . . . . . . . . . . . . . . . . . . . . . . . . . . . . . . . . 18
                   The NDI Settings . . . . . . . . . . . . . . . . . . . . . . . . . . . . . . . . . . . . . . . . . . . . . . . . . . . . . . . . . . . . . . 19
            The Admin Page. . . . . . . . . . . . . . . . . . . . . . . . . . . . . . . . . . . . . . . . . . . . . . . . . . . . . . . . . . . . . . . . . . . 20
Chapter 3   Working with Layouts . . . . . . . . . . . . . . . . . . . . . . . . . . . . . . . . . . . . . . . . . . . . . . . . . . . . 21
            Overview . . . . . . . . . . . . . . . . . . . . . . . . . . . . . . . . . . . . . . . . . . . . . . . . . . . . . . . . . . . . . . . . . . . . . . . . 21
                   Logging In . . . . . . . . . . . . . . . . . . . . . . . . . . . . . . . . . . . . . . . . . . . . . . . . . . . . . . . . . . . . . . . . . . . 21
                   The Status Section . . . . . . . . . . . . . . . . . . . . . . . . . . . . . . . . . . . . . . . . . . . . . . . . . . . . . . . . . . . . . 22
                   The Domain Section . . . . . . . . . . . . . . . . . . . . . . . . . . . . . . . . . . . . . . . . . . . . . . . . . . . . . . . . . . . . 22
                   The Global Values Section . . . . . . . . . . . . . . . . . . . . . . . . . . . . . . . . . . . . . . . . . . . . . . . . . . . . . . . 23
                   The Layout Section. . . . . . . . . . . . . . . . . . . . . . . . . . . . . . . . . . . . . . . . . . . . . . . . . . . . . . . . . . . . . 23
                   The Import/Export Section . . . . . . . . . . . . . . . . . . . . . . . . . . . . . . . . . . . . . . . . . . . . . . . . . . . . . . . 24
                   The Overview Section . . . . . . . . . . . . . . . . . . . . . . . . . . . . . . . . . . . . . . . . . . . . . . . . . . . . . . . . . . 25
            Canvases. . . . . . . . . . . . . . . . . . . . . . . . . . . . . . . . . . . . . . . . . . . . . . . . . . . . . . . . . . . . . . . . . . . . . . . . . 27
                   Overview of Canvases . . . . . . . . . . . . . . . . . . . . . . . . . . . . . . . . . . . . . . . . . . . . . . . . . . . . . . . . . . 27
                   Canvas Editor . . . . . . . . . . . . . . . . . . . . . . . . . . . . . . . . . . . . . . . . . . . . . . . . . . . . . . . . . . . . . . . . . 28
            Routings . . . . . . . . . . . . . . . . . . . . . . . . . . . . . . . . . . . . . . . . . . . . . . . . . . . . . . . . . . . . . . . . . . . . . . . . . 30
                   Overview of Routings. . . . . . . . . . . . . . . . . . . . . . . . . . . . . . . . . . . . . . . . . . . . . . . . . . . . . . . . . . . 30
                   Routing Editor . . . . . . . . . . . . . . . . . . . . . . . . . . . . . . . . . . . . . . . . . . . . . . . . . . . . . . . . . . . . . . . . 31
            Outputs to Window . . . . . . . . . . . . . . . . . . . . . . . . . . . . . . . . . . . . . . . . . . . . . . . . . . . . . . . . . . . . . . . . 34
                   Overview of Outputs to Window . . . . . . . . . . . . . . . . . . . . . . . . . . . . . . . . . . . . . . . . . . . . . . . . . . 34
                   Output Editor . . . . . . . . . . . . . . . . . . . . . . . . . . . . . . . . . . . . . . . . . . . . . . . . . . . . . . . . . . . . . . . . . 35
            Outputs to VE. . . . . . . . . . . . . . . . . . . . . . . . . . . . . . . . . . . . . . . . . . . . . . . . . . . . . . . . . . . . . . . . . . . . . 36
                   Overview of Output Channels . . . . . . . . . . . . . . . . . . . . . . . . . . . . . . . . . . . . . . . . . . . . . . . . . . . . 36

                                                                                  5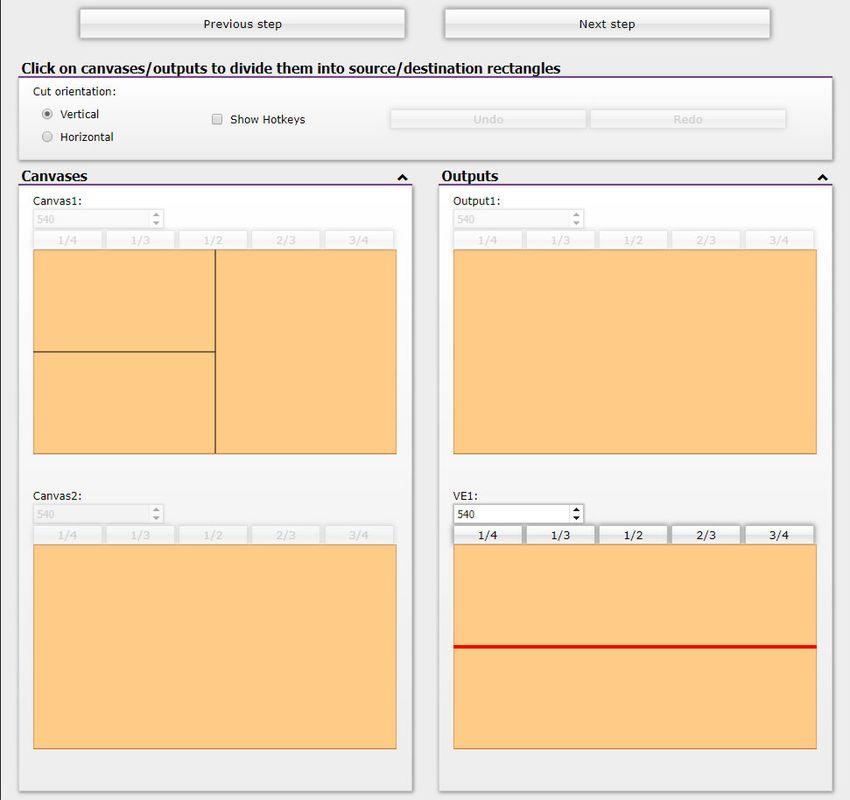
Channel Editor . . . . . . . . . . . . . . . . . . . . . . . . . . . . . . . . . . . . . . . . . . . . . . . . . . . . . . . . . . . . . . . . 36
             Outputs to NDI . . . . . . . . . . . . . . . . . . . . . . . . . . . . . . . . . . . . . . . . . . . . . . . . . . . . . . . . . . . . . . . . . . . . 37
                    Overview of Output Channels . . . . . . . . . . . . . . . . . . . . . . . . . . . . . . . . . . . . . . . . . . . . . . . . . . . . 37
             Group Edit . . . . . . . . . . . . . . . . . . . . . . . . . . . . . . . . . . . . . . . . . . . . . . . . . . . . . . . . . . . . . . . . . . . . . . . 38
             The Layout Wizard . . . . . . . . . . . . . . . . . . . . . . . . . . . . . . . . . . . . . . . . . . . . . . . . . . . . . . . . . . . . . . . . 39
             Saving Changes . . . . . . . . . . . . . . . . . . . . . . . . . . . . . . . . . . . . . . . . . . . . . . . . . . . . . . . . . . . . . . . . . . . 41
Chapter 4    Working with AudioMixer . . . . . . . . . . . . . . . . . . . . . . . . . . . . . . . . . . . . . . . . . . . . . . . . . 42
             Overview . . . . . . . . . . . . . . . . . . . . . . . . . . . . . . . . . . . . . . . . . . . . . . . . . . . . . . . . . . . . . . . . . . . . . . . . 42
                    Logging In . . . . . . . . . . . . . . . . . . . . . . . . . . . . . . . . . . . . . . . . . . . . . . . . . . . . . . . . . . . . . . . . . . . 42
             The Status Section . . . . . . . . . . . . . . . . . . . . . . . . . . . . . . . . . . . . . . . . . . . . . . . . . . . . . . . . . . . . . . . . . 43
             The Presets Section . . . . . . . . . . . . . . . . . . . . . . . . . . . . . . . . . . . . . . . . . . . . . . . . . . . . . . . . . . . . . . . . 44
             The Inputs / Mixers / Outputs Schema. . . . . . . . . . . . . . . . . . . . . . . . . . . . . . . . . . . . . . . . . . . . . . . . . . 45
             The Tracks Panel . . . . . . . . . . . . . . . . . . . . . . . . . . . . . . . . . . . . . . . . . . . . . . . . . . . . . . . . . . . . . . . . . . 47
Chapter 5    HDR and Linear Rendering Workflow . . . . . . . . . . . . . . . . . . . . . . . . . . . . . . . . . . . . . . . 49
             Color Spaces. . . . . . . . . . . . . . . . . . . . . . . . . . . . . . . . . . . . . . . . . . . . . . . . . . . . . . . . . . . . . . . . . . . . . . 49
             HDR Rendering Workflow Diagram . . . . . . . . . . . . . . . . . . . . . . . . . . . . . . . . . . . . . . . . . . . . . . . . . . . 50
             Linear Workflow Configuration . . . . . . . . . . . . . . . . . . . . . . . . . . . . . . . . . . . . . . . . . . . . . . . . . . . . . . 51
             Inputs Configuration . . . . . . . . . . . . . . . . . . . . . . . . . . . . . . . . . . . . . . . . . . . . . . . . . . . . . . . . . . . . . . . 52
             Outputs Configuration . . . . . . . . . . . . . . . . . . . . . . . . . . . . . . . . . . . . . . . . . . . . . . . . . . . . . . . . . . . . . . 53
                    Images. . . . . . . . . . . . . . . . . . . . . . . . . . . . . . . . . . . . . . . . . . . . . . . . . . . . . . . . . . . . . . . . . . . . . . . 53
                    Outputs (in Layout terminology) . . . . . . . . . . . . . . . . . . . . . . . . . . . . . . . . . . . . . . . . . . . . . . . . . . 53
                    Video Outputs. . . . . . . . . . . . . . . . . . . . . . . . . . . . . . . . . . . . . . . . . . . . . . . . . . . . . . . . . . . . . . . . . 53
             API Changes . . . . . . . . . . . . . . . . . . . . . . . . . . . . . . . . . . . . . . . . . . . . . . . . . . . . . . . . . . . . . . . . . . . . . 54
Chapter 6    RenderEngine’s Cores.xml File . . . . . . . . . . . . . . . . . . . . . . . . . . . . . . . . . . . . . . . . . . . . . 55
Chapter 7    Working with NDI® Video on RenderEngine. . . . . . . . . . . . . . . . . . . . . . . . . . . . . . . . . . 58
             Configuring NDI on RenderEngine (Linux) . . . . . . . . . . . . . . . . . . . . . . . . . . . . . . . . . . . . . . . . . . . . . 58
             Configuring NDI on RenderEngine (Windows) . . . . . . . . . . . . . . . . . . . . . . . . . . . . . . . . . . . . . . . . . . 60
Chapter 8    Configuring Audio Delay. . . . . . . . . . . . . . . . . . . . . . . . . . . . . . . . . . . . . . . . . . . . . . . . . . . 61
             Adjusting Audio Offset . . . . . . . . . . . . . . . . . . . . . . . . . . . . . . . . . . . . . . . . . . . . . . . . . . . . . . . . . . . . . 62
                    Configuring Video and Audio Delay for Video Insertions . . . . . . . . . . . . . . . . . . . . . . . . . . . . . . 62
                    Configuring Audio Delay for VideoEngine and ClipPlayer Clips . . . . . . . . . . . . . . . . . . . . . . . . . 63
Appendix A   Infuse Chroma Key Tool . . . . . . . . . . . . . . . . . . . . . . . . . . . . . . . . . . . . . . . . . . . . . . . . . . . 64
             Infuse Default Values. . . . . . . . . . . . . . . . . . . . . . . . . . . . . . . . . . . . . . . . . . . . . . . . . . . . . . . . . . . . . . . 64
             Infuse User Interface . . . . . . . . . . . . . . . . . . . . . . . . . . . . . . . . . . . . . . . . . . . . . . . . . . . . . . . . . . . . . . . 65

                                                                                   6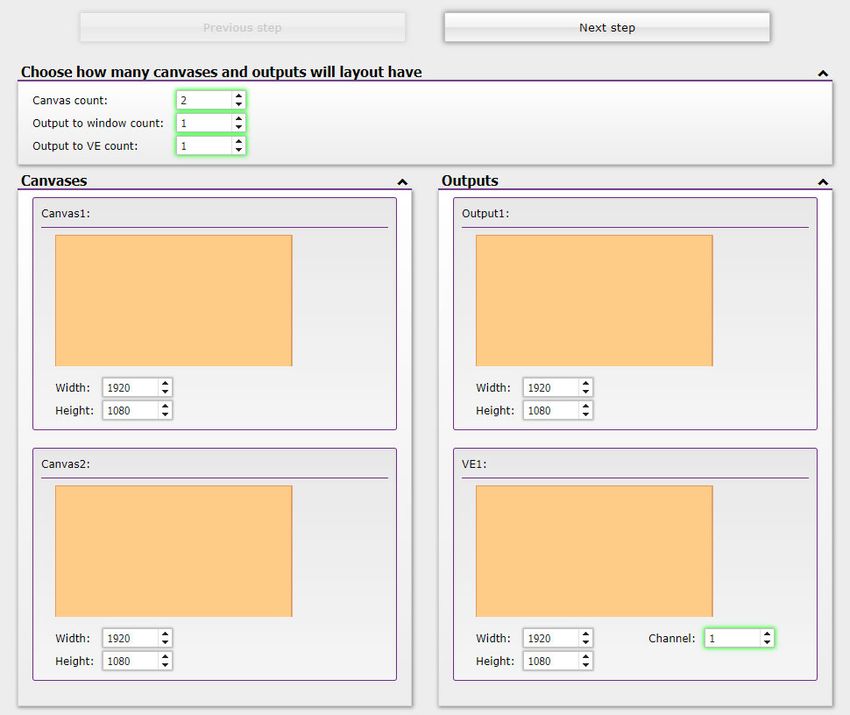
Using This Guide

Symbols and Conventions
     Avid documentation uses the following symbols and conventions:

     Symbol or Convention        Meaning or Action

     n                           A note provides important related information, reminders,
                                 recommendations, and strong suggestions.

     c                           A caution means that a specific action you take could cause harm to
                                 your computer or cause you to lose data.

     w                           A warning describes an action that could cause you physical harm.
                                 Follow the guidelines in this document or on the unit itself when
                                 handling electrical equipment.

     >                           This symbol indicates menu commands (and subcommands) in the
                                 order you select them. For example, File > Import means to open the
                                 File menu and then select the Import command.

                                 This symbol indicates a single-step procedure. Multiple arrows in a list
                                 indicate that you perform one of the actions listed.

     (Windows), (Windows       This text indicates that the information applies only to the specified
     only), (macOS), or (macOS operating system, either Windows or Macintosh OS X.
     only)

     Bold font                   Bold font is primarily used in task instructions to identify user interface
                                 items and keyboard sequences.

     Italic font                 Italic font is used to emphasize certain words and to indicate variables.

     Courier Bold font           Courier Bold font identifies text that you type.

     Ctrl+key or mouse action    Press and hold the first key while you press the last key or perform the
                                 mouse action. For example, Command+Option+C or Ctrl+drag.

     | (pipe character)          The pipe character is used in some Avid product names, such as
                                 Interplay | Production. In this document, the pipe is used in product
                                 names when they are in headings or at their first use in text.
1 Introduction

   Avid Maestro | Engine 4K is an all-in-one digital video rendering platform. It is designed to meet the
   real-time graphic rendering needs of the broadcast industry.

   Maestro | Engine works in concert with Maestro | RenderEngine software, providing advanced
   graphics rendering in the highest quality possible—whether displayed onscreen or in the studio.

   Maestro | Engine 4K is solidly built to withstand the demands of 24/7 operation. It features dual
   power supplies, dual network interfaces, and software and hardware watchdogs, so should a system
   go offline, your production will not be interrupted. And because all Maestro graphics suite
   applications can control multiple Maestro | Engines 4K, you can use additional engines as live
   backups to your on-air systems.

   No need to install additional client software or have a systems administrator tethered to your machine
   room to manage and configure settings. The engine uses a web-based interface for all systems
   management, enabling you to set up and make changes to user access rights, video formats, genlock
   sources, input and output mapping, and other settings from any computer or device on your
   network—from anywhere inside or outside your facility.

Technical Specifications
     The below table presents the current hardware specification of the Maestro | Engine 4K system.

     Motherboard                AIC Phoenix

     Graphic Card               2 x NVIDIA RTX 2080 or 2 x NVIDIA GTX 1080

     CPU                        2 x Intel E5-2640 v4

     Operating System           CentOS 7.4 w/customized kernel

     Memory                     64 GB DDR4

     Internal Storage           2 x 240 GB system disk (RAID 1)
                                Hard disks for clips storage
                                4 x 2 TB (RAID10)

     Ethernet                   2 x 1000 BASE-T (RJ-45)
                                2 x 10GB (SFP+, optical modules optional)

     Ports                      1 Serial
                                2 USB (front)
                                2 USB (rear)

     Control interfaces         1 x Serial
                                4 x USB
                                2 x Ethernet (1Gbit)
                                VGA
                                IPMI

     Supported Video Standard   3G: ST 425-1:2014 (Level A), ST 425-5:2019 (level A) Quad-link 3G
                                HD: ST 260:1999, ST 295:1997, ST 274:2008

     Video in (mixer)           Up to four (4) 3G

     Video in (insertion)       Up to 8 3G, up to 16 HD SDI inputs

     Video output               Up to 16 HD SDI Outputs
                                Up to 8 3G Fill and 8 3G Key Outputs
                                Up to 4 3G HDR and 4 3G HDR Key Outputs
                                (video key compositing configurable);
                                Internal linear keyer

     Video references           Bi / Tri level Sync

     Audio                      Embedded audio support 24-bit/48 kHz in HD/ 3G

     Clip Options               Video to texture mapping of AVI, QuickTime, DV, DVC25, and MPEG files
                                (optional)

     Video bypass               Up to 2 Mechanical bypasses, Watchdog on each DSK

                                                         9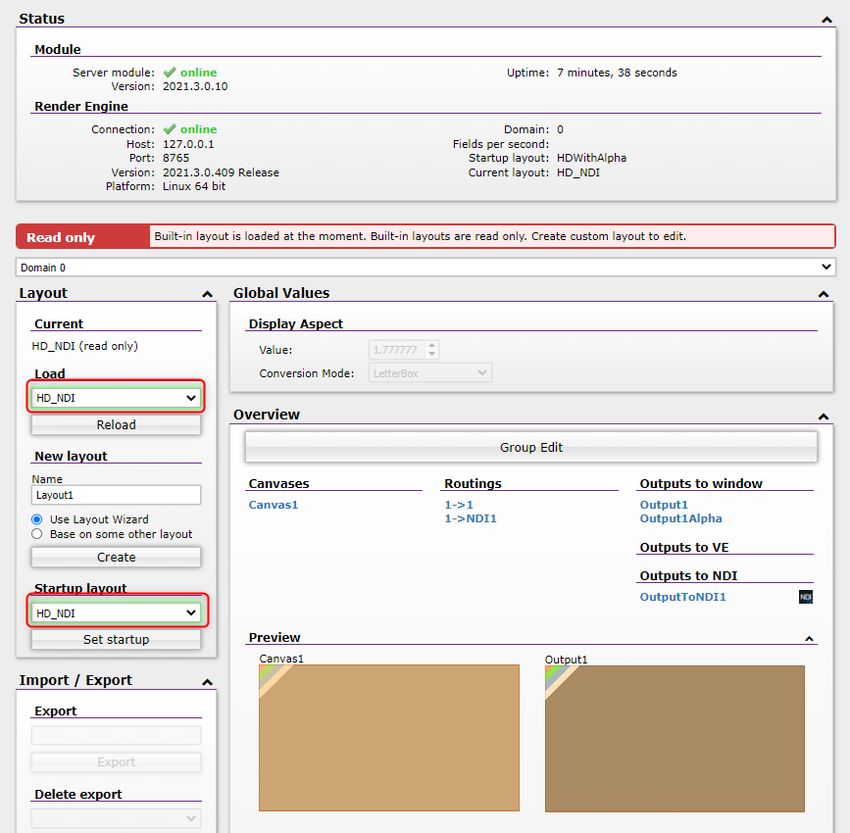
Size           Height: 5.25 in (133.4 mm)
               Width: 17.4 in (443 mm)
               Depth: 29.5 in (750 mm)
               Weight: 59.5 lbs (27 kg) approximate

Power supply   Redundant power supply: 100-240 V
               Frequency: 47-63 Hz
               2 x 1500W (max)

                                      10
2 Working with Maestro | Engine Manager
The Maestro | Engine Manager is a web-based interface that you will use to configure and maintain
your Maestro | Engine 4K server.
Prior to proceeding with configuration using the M|E Manager, please ensure that your Maestro |
Engine 4K server is installed and connected using the information in the Setup Guide.
If you have already configured your Maestro | Engine 4K server, then you can log in.
The following main topics describe how to use the Maestro | Engine Manager to setup and administer
your Maestro | Engine 4K system:
• The Login Page
• The M|E Manager Page
• The Admin Page
The Login Page
The Login page provides you with the controls you need to navigate to and log in to the Maestro |
Engine Manager.
Logging In
This topic contains information on how to log into the Maestro | Engine Manager.
To log into Maestro | Engine Manager:
1. Open a web browser and enter the Maestro | Engine 4K unit’s IP address as the URL, with the suffix
8080. For example, 192.0.2.0:8080.
The Log In Page opens.
2. Type your password in the Password field.
n The default user name for a standard user is “avid” and default password is “Avid123”. To login as
administrator, use the “admin” name and “Avid123” password.
3. (Option) If you want the login credentials to be saved, click the Remember me check box.
4. Click the Log In button and open the M|E Manager page.The M|E Manager Page
The M|E Manager page provides all necessary means to configure your Maestro | Engine 4K server.
The Status Section
The Status section provides you with basic information about the machine, the IN/OUT limitations
and the current configuration.
The Config in use field shows information about the render stream that is currently used by the
machine. There are 3 possible values:
• host (LINUX_MACHINE_NAME) - displayed if a render_stream named
LINUX_MACHINE_NAME is defined in the configuration file.
• default - this is a default configuration, that will be used by Maestro | Engine 4K if a definition
for the host (LINUX_MACHINE_NAME) does not exist and the configuration file contains
render_stream named “>defaultThe Global Settings
The Global settings provide you with means to change basic configuration details such as the
frequency, native and additional formats and Genlock type.
n Any change to the configuration is automatically synchronized with the RenderEngine configuration
file (data/RE/bin/RE.xml). All changes are applied after RenderEngine restart.
The following table describes the fields used on the Global settings section.
Field Description
Config file Information about the current configuration file. You can choose a
different configuration file by clicking on change.
The additional HAL file only stores the NDI configuration and you
cannot import different settings from other configurations here.
Render Stream You can switch between the available render streams:
• host (LINUX_MACHINE_NAME) - if this option is selected, then
the currently edited configuration will be saved as
LINUX_MACHINE_NAME and it will be available to use only by
the currently used Maestro | Engine 4K machine.
• default - if this option is selected, then the currently edited
configuration will be saved as “>defaultField Description
Genlock Select the Genlock sync type.
To access the color model settings required for HDR and linear workflows, expand the Advanced
section.
The Advanced panel gives you the option to select a color model and color space for Input and
Output. You can also enable or disable frame rendering here.
Field Description
Input Choose the Input Color Model between 8-bit and 10-bit.
Select the Default Color Space from the available options, which will be
adjusted to the selected Color Model.
Frame Rendering You can set the following options for Frame Rendering:
• Auto (On/Off) - this option will automatically activate Frame
Rendering based on the Native video format value.
• On - enable Frame Rendering.
• Off - disable Frame Rendering.
Outputs Choose the Output Color Model between Default (RGBA), Packed
Alpha, Deep Color.
Select the Default Color Space from the available options, which will be
adjusted to the selected Color Model.
14The Boards Settings
The Boards section allows you to configure DVG boards options.
n The Boards section is only available for administrators.
The following table describes the fields used on the Boards section.
Field Description
Active Select the Active check box to enable the board.
Video Format Toggle the video format between native and additional.
Alpha Rendering Enable or disable alpha rendering.
Render Channels Set the number of render channels.
15Field Description
Inputs Select the required type for each Input:
• Disabled
• Fill only
• Fill & Key
• Mixing source
Set the color space for each input. The following values are available:
Default (as selected in the Global section), Linear, sRGB, Rec.601,
Rec.709, Rec.2020, Rec.2100-PQ, Rec.2100-HLG.
n The Color spaces list will be adapted depending on the selected
input color model and input type.
- Outputs Set the signal output for each connector according to your system's
requirements.
• Graphics - Output displays graphics (fill) signal only.
• Gfx Alpha - Output displays alpha (key) signal only.
• Compositing - Output displays graphics, alpha, and mixer input
combined. Graphics and alpha is overlaid on mixer input signal.
• Input 1 to 6 - Output displays selected input signal from main board.
• Processed Fg - Output displays chromakeyed output with blue color
range, deblended from the video source.
• Chromakey Alpha - Output displays chromakey mask.
• Compound Alpha - Output displays combined mask.
• Mixing Source - Output displays input source for internal mixer.
Set the color space for each output. The following values are available:
Default (as selected in the Global section), Linear, sRGB, Rec.601,
Rec.709, Rec.2020, Rec.2100-PQ, Rec.2100-HLG.
n The Color spaces list will be adapted depending on the selected
output color model and output type.
You can also enable the Activate Mixing option to allow for mixing
graphic output with video signal for the specified number of Render
Channels.
The following Advanced options are available for each board:
16Field Description
Flicker filter strength Set the flicker filter strength to reduce flickering of lines and sharp edges
in images. As the flicker filter is increased, more flicker is eliminated, but
the image also becomes softer.
Auto output type Enable this option to automatically set output types based on the Alpha
Rendering value:
• Alpha Rendering is On - “Graphics”, “Gfx alpha", “Graphics”, “Gfx
alpha” for successive outputs.
• Alpha Rendering is Off - “Graphics” for every output.
• Compositing - used when mixing is activated.
Grabbing Scale X Set the scaling of the video insertion. Scale X / Y decreases the resolution
of the grabbed video insertion in half. This improves scene performance,
Grabbing Scale Y
but at the expense of video quality for those insertions.
Speed Link Enable or disable speed link (default: enabled).
Single Mixing Source Select this check box to enable dual channel systems to use one mixer
input for two separate channels.
Pipeline Select this check box if the video board supports a separate pipe for each
video insertion (default: enabled).
Do Not Pre-Multiply Gfx Leaving this check box unselected enables the DVG board to properly
represent half transparent pixels on the video background when working
with Linear key. Using Premultiplied requires the background to be set to
black.
VITC Source 1 Select the timecode sources.
VITC Source 2
LTC Source
GFX Optimized Select this check box to improve video insertions performance (default:
on).
Key Select the keying method: Linear or Chroma.
17The Controller Presets Settings
The Controller Presets section allows you to change the path to the .xml configuration file with
Controller Presets. In the Auto recall option select the number of the preset to be loaded
automatically.
The Frame Accuracy Settings
The Frame Accuracy section allows you to configure the settings used to compensate for time
synchronization differences between studio environment systems.
The following table describes the fields used on the Frame Accuracy section.
Field Description
Receive UDP Counter Select the Activate check box to enable Frame Accuracy. Define the
source of the UDP timecode. Enter the hostname and port of the interface
with the frame accuracy service.
Accept window Set the time frame (in milliseconds) for accepting frame accuracy
commands. Commands which arrive outside of the set time frame will be
ignored. Commands received with the execution time before the current
time are queued, and the ones with the timestamp after the current time
are carried out immediately.
The Clips Settings
The Clips section allows you to add and remove Clips caches. Select the width and height of your
clips according to your clip’s resolution. The number of frames to be buffered at the beginning of a
clip is set in the Buffers parameter (by default this parameter is set to 5 and it is not recommended to
change this setting). In the Count field, choose the number of caches to create with the specifications
made here.
18The NDI Settings
The NDI section allows you to add or remove NDI inputs and outputs.
To add an NDI input:
1. Use to define a new input (a maximum of 4 inputs is supported).
2. Set the required incoming stream size in the Profile drop-down list: SD, HD, Full HD, Ultra HD,
Custom.
To add an NDI output:
1. Use to define a new output.
2. Enter a name for the output, which needs to be unique per machine.
3. Select the required resolution from the Format list (720p, 1080i, 1080p, 2160p) and the pixel
format (UYVY, BGRA).
4. Currently, only one Color Space is supported: Rec.709.
n Use the button to link settings between outputs.
19The Admin Page
The Admin page is for configuring user access when using Maestro | Engine Manager. In the User
Authorization section, you can add a new user. You can also log out here.
203 Working with Layouts
A Maestro | Engine 4K Layout defines the setup of all canvases used for a production. You can use
a predefined Layout, or create your own. Before you begin to define your layout, familiarize
yourself with the technical specifications and requirements of your output and production.
The Layouts configurator is a part of the Maestro | Engine 4K WebSettings. Make sure your
Maestro | Engine 4K machine is correctly configured using the M|E Manager (see Working with
Maestro | Engine Manager) and the RenderEngine is running.
Overview
To access the Layouts configurator, you need to login to the WebSettings of your Maestro |
Engine 4K machine.
Logging In
To log into the Layouts configuration tool:
1. Open a web browser and enter the Maestro | Engine 4K unit’s IP address as the URL, with the suffix
8080. For example, 192.0.2.0:8080.
The Log In Page opens.
2. Type your password in the Password field.
n The default user name for a standard user is “avid” and default password is “Avid123”. To login as
Administrator, use the “admin” name and “Avid123” password.
3. (Option) If you want the login credentials to be saved, click the Remember me check box.
4. Click the Log In button and open the M|E Layouts page.
After starting RenderEngine the connection with M|E Layouts is automatically established and
all information about layouts is reloaded.The Status Section
The Status area contains information about the M|E Layouts module and about the RenderEngine
currently running on the system.
Field Description
Module The following information about the M|E Layouts module is
displayed:
• Server module - status of the M|E Layouts connection.
• Version - version of the installed software.
• Uptime - duration of uninterrupted system availability.
RenderEngine The following information about RenderEngine is displayed:
• Connection - status of the RenderEngine connection.
• Host - the IP address of the RenderEngine host machine.
• Port - the port number on which RenderEngine is working.
• Version - RenderEngine version number.
• Platform - the operating system on which RenderEngine is
running.
• Domain - which RenderEngine domain is currently connected
and edited.
• Fields per second - the value for number of fields per seconds
setup in RenderEngine.
• Startup layout - name of the layout, that will be automatically
used by RenderEngine on its startup.
• Current layout - the currently used and edited layout.
The Domain Section
The Domain area contains a list of RenderEngine domains and allows to switch between them. The
following domains are available:
• Domain 0 - RenderEngine is working without domains or in domain 0 mode (port 8765).
• Domain 1 - RenderEngine is working in domain 1 mode (port 8766).
After selecting one of the domains from the list, the Layouts module will try to connect to
RenderEngine every 3 seconds. After the connection is established, the editing of layouts will be
possible.
22The Global Values Section
The Global Values area allows to set global values for Display Aspect and the Conversion Mode
parameters.
n This section can only be edited when a custom layout is loaded.
The Layout Section
The Layout area provides the means to load an existing layout, create a new one and delete a custom
layout. Also, the startup layout can be chosen here.
To load an existing layout:
t Choose a layout from the list and click on the Load button.
t To refresh information about the currently loaded layout, press on Reload.
n Layouts shown on the list are read from the Layout.xml file and can be either predefined or custom.
Not every layout that is present in the Layout.xml file will be shown on the list, because some of them
can be unavailable to use on the current machine (e.g. not enough number of outputs is available).
To create a new layout:
1. Enter a Name for your new layout.
2. Select Use Layout Wizard if you wish to use a creator which will guide you step-by-step
through the process of defining a completely new custom layout (see The Layout Wizard).
- or -
233. Select the Base on some other layout option and choose a model for the new layout from the
list.
4. Click on Create.
To delete a custom layout:
t When a custom layout is loaded, you are given an option to delete it from the system. Select the
Permanently delete layout check box and click on Delete.
n Layout deletion is irreversible. You cannot restore a layout unless it had been exported before it was
deleted.
To set a startup layout:
t Choose a layout from the list and click on Set Startup.
This layout will be loaded automatically after establishing a RenderEngine connection.
The Import/Export Section
This Import/Export area is used when there is a need to export a layout (to save it for later use) or
import an existing one so it can be edited with the Layout configurator and then later saved to the
Layout.xml file. You can also delete an exported layout here if it is no longer required.
To export a custom layout:
t Enter a Name for your export and press on the Export button to create an XML file containing
the layout details.
The XML file will be placed in the following location: WebSettings/modules/MELayouts.
To delete an exported layout:
t Choose an export file from the list, select the Delete exported layout check box and press on
Delete.
24To import a custom layout:
t Choose an exported layout from the list, select the Import (potential overwrite) check box and
press on Import.
n Importing a layout will overwrite an unsaved layout.
The Overview Section
The Overview panel contains basic information about defined canvases, routings and outputs in the
currently loaded layout.
Field Description
Group Edit Open an additional window which allows to edit canvases, routings
and outputs at the same time.
25Field Description
Canvases, Routings, Outputs to This section displays a list of all defined canvases, routings and
Window, Outputs to VE, Outputs outputs.
to NDI
Clicking on the group header (Canvases, Routings, Outputs to
window, Outputs to VE, Outputs to NDI) opens a section containing
more detailed information about the selected group.
Clicking on any of the list elements, opens an editor for the selected
item.
Preview The Preview area visualizes what the canvases and outputs will look
like after creation.
However the mouse cursor over one of the rectangles to view the
resolution of the specified canvas and the output. The related
routing's name will be highlighted. If the preview rectangle is
clicked, the routing editor page will be opened.
If 2Si mapping is set for routing, it will be visualized in the preview
area.
26Canvases
A canvas is a rendering buffer. You can define the different parts to be routed to various outputs
there. A layout can use multiple canvases.
The Canvas page of the M|E Layouts configurator allows to view and set properties of canvases. It
can have two forms: it can be an overview of the whole set of canvases or an editor for a specified
canvas.
Overview of Canvases
All canvases are listed with information about their size and interlace mode. Each of them can be
deleted by checking the Confirm delete check box and clicking on the Delete button.
To open an editor of a specified canvas, click on the Canvas name (e.g. Canvas1).
To create a new canvas:
1. Under New canvas, type in the New canvas name.
2. You can select an existing canvas to use it as a template for the new canvas in the Based on field.
3. Click on Create.
A new canvas is created in the Layout.xml file as shown in the example below:
4. To further edit the newly created canvas, open its editor by clicking on the canvas name in the
overview.
27Canvas Editor
You can open the Canvas editor by clicking on a canvas name in the main page Overview or in the
Canvas overview window.
The Feeds Section
The feeds panel displays on which output the current canvas is displayed and which routing defines
this relation.
The Size Section
Here you can define the canvas width and height. You can also enable the Lock aspect option so that
changing the canvas size will not affect the current display aspect ratio.
It is also possible to choose one of the predefined sizes from the Set size to list. The following values
are available:
• NTSC
• PAL
• HD
• 4K
To save the newly selected size values, press on Apply size preset.
n Changing the canvas size is not allowed when the routing that feeds the selected canvas has a 2SI
mapping.
28The Interlace Section
This section is used to specify interlace property for canvas.
Select the interlace Mode:
• Off - no shift will be applied.
• Auto - a vertical shift by 1 line is applied (only when the canvas is detected to be interlaced).
• Vertical - a vertical shift (along Y axis) is applied.
• Horizontal - a horizontal shift (along X axis) is applied.
The Shift attribute defines the number of lines by which the projection matrix is shifted. This
attribute is used only when the Vertical or Horizontal mode is selected.
The Display Aspect Section
Use this section to change the display aspect of a canvas. When the Default check box is disabled,
you can set a custom display aspect in the Value text field. A new DisplayAspect attribute will
be added to the Layout.xml file.
The Areas Section
This section is used to divide canvas into multiple smaller areas. Each of the areas should have a
name, size and position on the canvas defined.
There is also a rectangle, which serves as a preview of real canvas. It shows the aspect ratio and areas
defined for the canvas.
29The Safe Area Section
By checking the Enabled check box, the safe area property for the current canvas will be set.
The Rename Section
It is possible to rename an already created canvas by entering a new name into the text field and
clicking on the Rename button.
Routings
The routing defines which part of the canvas is displayed on which output. A canvas can have
multiple routings.
The Routings page of the M|E Layouts configurator allows to view and set properties of routings. It
can have two forms: it can be an overview of the whole set of routings or an editor for a specified
routing.
Overview of Routings
In the overview area, all routings are listed. The Input region describes which part of the canvas is
displayed on the output defined by the Output region.
You can delete an existing routing by selecting the Confirm delete check box and clicking on the
Delete button.
To open an editor of a specified routing, click on the routing name (e.g. 1->1).
30To create a new routing:
1. Under New routing, type in the New routing’s name.
2. You can select an existing routing to use it as a template in the Based on field.
3. Click on Create.
A new routing is created in the Layout.xml file as shown in the example below:
4. To further edit the newly created routing, open its editor by clicking on the routing name in the
overview.
Routing Editor
You can open the Routing editor by clicking on a routing name in the main page Overview or in the
Routings overview window.
The Routes Section
In the Routes panel you can set which canvas (and decide whether the entire canvas or its part)
should be copied and to which output (select between the entire output or its part).
The Input Section
The Input section allows to choose which canvas this routing should use on input.
The Copy mode specifies how to output graphic components:
• “Color”: copy RGB (with depremultiplication or without)
• “Color & Alpha”: copy RGB with blending (with depremultiplication or without)
• “Alpha”: copy alpha (in green component)
• “Zones”: copy zones (in blue component)
31To use an entire canvas as the source, select Use entire canvas.
To use part of a canvas, clear Use entire canvas and under Source rectangle enter the Top and Left
alignment of the source, its Width and Height and select whether the display aspect should remain
unchanged.
If an UHD canvas is used and 4 HD outputs are available, you can set a 2Si mapping mode: 2Si-1,
2Si-2, 2Si-3, 2Si-4. If a different canvas size is used, the Src viewport -> Dst viewport mapping is
used by default.
The Output Section
The purpose of this panel is to define the output properties for the routing.
First, select the Output type. You can choose between Window, VE and Device.
After choosing the output type, decide which Output will be affected by the routing. The outputs on
the list are filtered to match the chosen output type.
The next option is to define which color channels of output should be affected by highlighting the
components in Copy Mask field.
Canvas can also be rotated during copying to output by choosing the angle from the Rotate list.
Texture filtration during routing can be defined by selecting the Use mipmaps check box.
To copy a customized part of the canvas to the output, disable the Fill whole screen option and set
the required dimensions in the Destination rectangle section. To maintain the current aspect ratio
while changing the size of the output, select the Lock aspect check box.
32The Color Correction Section
Color correction is a set of filters applied one after another in a specific order. If there is a need to set
all settings back to neutral, enable the Set all to neutral option.
The color correction filters are applied in the following order:
1. Levels - scaling the intensity of each 2. RGB Levels -scaling the intensity of 3. Gamma correction - adjusting
color based on the Light Value and each color component separately, based gamma for whole picture based on the
Dark Value. on Light Red, Green, Blue and Dark Mid Value.
Red, Green, Blue.
4. RGB Gamma Correction - adjusting 5. Contrast - adjusting the image 6. Brightness - adjusting the image
gamma separately for each color contrast based on the Contrast value. brightness based on the Brightness
component of picture based on Mid value.
Red, Green, Blue.
33The Filters Section
In the filters section you can enable the option to perform antiflicker filter on GPU. The Antiflicker
filter means that the canvas is rendered in frame dimension and output is interlaced.
After enabling the Antiflicker filter option, define the Strength of the filter. It can take values
between 0 - 1.
n It is not possible to activate the antiflicker filter if the output is not interlaced or the height of the
source rectangle is not equal to the value of 2 * height of the destination rectangle.
The Rename Section
It is possible to rename an already created routing by entering a new name into the text field and
clicking on the Rename button.
Outputs to Window
The output defines the display area of the input that is set for it. A routing can have multiple outputs.
The Outputs to window page of the M|E Layouts configurator allows to view and set properties of
outputs to window. It can have two forms: it can be an overview of the whole set of outputs or an
editor for a specified output.
Overview of Outputs to Window
In the overview area, all outputs to window are listed with information about their size, origin
position and type of scan. There is also information how many routings filled the output.
34You can delete an existing output by selecting the Confirm delete check box and clicking on the
Delete button.
To open an editor of a specified output, click on the output name (e.g. Output2).
Output Editor
You can open the Output editor by clicking on an output name in the main page Overview or in the
Outputs to Window overview.
The Filled With Section
This section displays which canvas and through which routing is copied to the output.
The Display Section
In the Display section, you can adjust the size and position of the display.
To maintain the current aspect ratio while changing the size of the output, activate the Lock aspect
option.
The Rename Section
To change the current name of the output, use the Rename button.
35Outputs to VE
The Outputs to VE page of the M|E Layouts configurator allows to view and set properties of
outputs to VE. It can have two forms: it can be an overview of the whole set of output channels or an
editor for a specified output channel.
Overview of Output Channels
In the overview area, all output channels are listed with information about their size, index of channel
and type of scan. There is also information how many routings filled the channel.
You can delete an existing output channel by selecting the Confirm delete check box and clicking on
the Delete button.
To open an editor of a specified output channel, click on the output channel name (e.g. VE1).
To create a new output channel:
1. Under New channel, type in the New channel name.
2. You can select an existing output channel to use it as a template in the Based on field.
3. Click on Create.
A new channel is created in the Layout.xml file as shown in the example below:
4. To further edit the newly created channel, open its editor by clicking on the channel name in the
overview.
Channel Editor
You can open the Channel editor by clicking on a channel name in the main page Overview or in the
Outputs to VE overview.
36The Filled With Section
This section displays which canvas and through which routing is copied to the output channel.
The Display Section
In the Display section, you can adjust the channel index and the size of the display.
To maintain the current aspect ratio while changing the size of the output, activate the Lock aspect
option.
The Rename Section
To change the current name of the channel, use the Rename button.
Outputs to NDI
The Outputs to NDI page of the M|E Layouts configurator allows to view NDI outputs. You cannot
delete any outputs or add new ones here, because they are only configured in the Maestro | Engine
Manager (as described in the The NDI Settings topic).
Overview of Output Channels
In the overview area, all output channels are listed with information about their size, and type of
scan. There is also information how many routings filled the channel.
37Group Edit
You can use the Group Edit option to edit canvases, routings and outputs simultaneously.
The To Edit panel shows the currently defined items for the layout. Click on an item to allow for
editing. The Canvases view below is shown as an example.
It is also possible to change properties of multiple items of the same category at once. For example,
you change the size of every canvas without the need of opening the editor for each of them
separately.
n When editing multiple items, only the options with the same values can be changed.
38The Layout Wizard
The Layout wizard will guide through creating a custom layout.
Number of Canvases and Outputs
On the first page of the wizard, define the number of input canvases, outputs to window, outputs to
VE and Outputs to NDI.
It is also possible to adjust the width and height for each new canvas and output.
Additionally, if the chosen output type is VE, you can set the index number of the channel.
n When working on Linux, outputs to window are detected automatically and cannot be created
manually.
Click on the Next Step button.
39Dividing Canvases and Outputs into Parts
In this step, each canvas and output can be divided into smaller areas.
In order to do so, either vertical or horizontal cut orientation should be chosen. After hovering the
mouse pointer over one of the rectangles, a cutting line will appear. After selecting the right spot,
press the mouse to make a cut.
The cut that can be adjusted in three ways:
• dragging the cutting line,
• passing the exact value into the field above rectangle,
• choosing one of the predefined positions by clicking on a proper button.
Every cut that has been made can be undone or redone by clicking the Undo or Redo buttons.
n You can use predefined hotkeys that will make the cutting process easier. To show available hotkeys,
activate the Show Hotkeys check box.
Click on the Next Step button.
40Defining Routings
In this step, you can define which part of the canvas is displayed on which output by creating a
routing.
To create the routing, click on the parts of canvas and on the output that you want to connect. After
this step is finished, click on Route w/ maintaining aspect or Route w/o maintaining aspect.
Click on the Finish button to exit the wizard.
Saving Changes
To save the applied changes in the Layout.xml file, click on the Save changes button.
c Changes made in the M|E Layouts module will be automatically applied to the RenderEngine.
After reloading the layout or restarting the RenderEngine, all unsaved changes will be lost.
41You can also read