End-to-end E-commerce web application, a modern approach using MERN stack - Hung Viet Nguyen - Core
←
→
Page content transcription
If your browser does not render page correctly, please read the page content below
Hung Viet Nguyen

End-to-end E-commerce web application, a
modern approach using MERN stack

Metropolia University of Applied Sciences
Bachelor of Engineering
Information Technology
Bachelor’s Thesis
21 May 2020
Abstract

                           Hung Viet Nguyen
Author
                           End-to-end E-commerce web application, a modern approach
Title
                           using MERN stack
Number of Pages
                           54 pages + 0 appendice
Date
                           21 May 2020

Degree                     Bachelor of Engineering

Degree Programme           Information Technology

Professional Major         Software Engineering

Instructors
                           Janne Salonen, Supervisor

Over the last decade, web development has gone through significant changes in every as-
pect. The rapid development of web technologies in general as well as front-end library and
framework have taken web development to a new level which facilitate developer job con-
siderably. One of the most widely used and modern full-stacks is the MERN stack, which
plays a leading role in web development nowadays. The four components included in MERN
stack are MongoDB database, Express as back-end web framework, React.js serves as
front-end library and Node.js as JavaScript environment.

The purpose of this thesis was to study the usability and functionality of each technology in
the MERN stack and as a consequence, to develop a fully functional E-commerce web ap-
plication by utilizing MERN as well as some other additional modules.

The thesis presented the development process of the application, with all the essential parts
noted and explained. The outcome of this project is an e-commerce web application with all
the necessary and fundamental features of an online bookstore. The product aimed to be
an essential part in the business strategy of the author’s parents startup. The application is
a beta version and focused mainly in development process, therefore deployment process
is not carried out in this thesis but will be concerned further in the future.

Keywords                      MERN stack, E-commerce, React, JavaScript, Node, Ex-
                              press, MongoDB, web development
Contents

List of Abbreviations

1   Introduction                                               1

2   Application Infrastructure – The MERN stack                2

    2.1   Node.js                                              3
          2.1.1    Node Module                                 4
          2.1.2    Node Package Manager                        5
          2.1.3    Node Event Loop                             7
    2.2   Express.js                                           8
          2.2.1    Basic Routing                               8
          2.2.2    Writing and Using Middleware                9
    2.3   MongoDB                                              10
          2.3.1    NoSQL Database                              11
          2.3.2    Data Models                                 12
                    2.3.2.1   Embedded Data Model              12
                    2.3.2.2   Normalized Data Model            13
          2.3.3    MongoDB Atlas                               14
          2.3.4    Mongoose                                    16
    2.4   React.js                                             17
          2.4.1    JSX                                         18
          2.4.2    Virtual DOM                                 19
          2.4.3    Component                                   20
                    2.4.3.1   Functional Components            21
                    2.4.3.2   Class Components                 22

3   Application Implementation                                 23

    3.1   Application requirements                             23
    3.2   Application development                              24
          3.2.1    Back-end development                        24
                    3.2.1.1   Basic Setup                      24
                    3.2.1.2   Mongoose Schema Creation         26
                    3.2.1.3   Authentication with JWT          28
                    3.2.1.4   Routing and API Documentations   30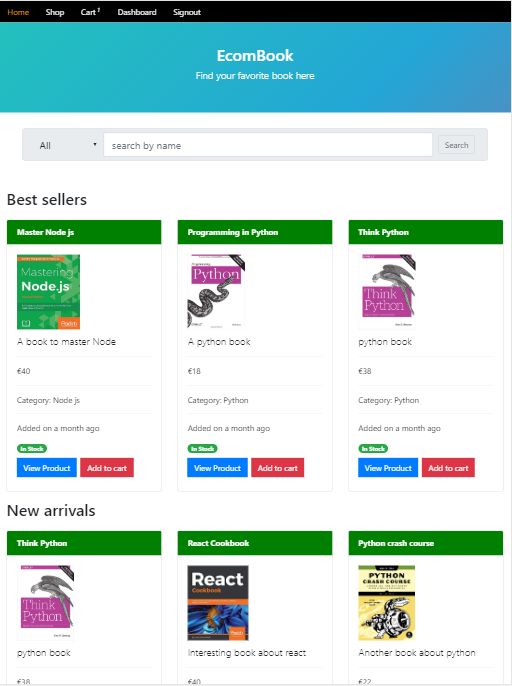
3.2.1.5   API Testing with Postman             33
          3.2.2   Front-end development                          34
                  3.2.2.1   Basic Setup and Routing              34
                  3.2.2.2   User Authentication                  35
                  3.2.2.3   Dashboard Component                  38
                  3.2.2.4   Home Component                       39
                  3.2.2.5   Shop Component                       42
                  3.2.2.6   Cart Component and Payment Gateway   44

4   Discussion                                                   47

    4.1   Application Evaluation                                 47
    4.2   Further Improvement                                    48

5   Conclusion                                                   50

References                                                       51
List of Abbreviations

ASP        Active Server Pages

JSON       JavaScript Object Notation

BSON       Binary JavaScript Object Notation

PHP         Hypertext Preprocessor

MERN        MongoDB, Express, React.js, Node.js

JSX         JavaScript Syntax Extension

HTTP        Hypertext Transfer Protocol

HTML        Hypertext Markup Language

CSS         Cascading Style Sheets

REST        Representational State Transfer

API         Application programming interface

URL          Uniform Resource Locator

NPM          Node Package Manager

NoSQL        Non-Structured Query Language

MVC          Model View Controller

UI            User Interface

ODM          Object Data Modeling

DOM          Document Object Model
JWT   JSON Web Token

B2C   Business to Customer
1

1   Introduction

Nowadays, technology is growing incredibly fast. The rapid innovation of hardware
devices makes software technologies to advance as well, automatically take place of old
technologies. Because of the significant expanding in the number of electronic devices
that use Internet and real-time feature, performance is key. By tradition, web
development has been carried out by technologies such as JAVA servlets, ASP.NET or
PHP. While those technologies are quite widespread and have good features with many
years of development and are supported by a large community, they still have some
limitations concerning about today’s need which is performance. The MERN stack
(MongoDB, Express, React and Node) with their simplicity and uniformity, has been
recently developed to become a better solution for this performance issue.

The objectives of this thesis were to illustrate and understand the fundamental concepts
and usage of each technology in the MERN stack, as well as their compatibilities and
advantages as a complete stack in web application development. The thesis achieved
that goal by utilizing these modern technologies and implementing a web application.
The idea of this web application was toward a startup running by the author’s parents as
they decided to open a book retail store. By researching, the author realized how e-
commerce – an enormous platform is emerging at an extraordinary speed over the last
decades all over the world and providing more advantages and conveniences as
compared to physical stores. Ecommerce has changed permanently the way business
and consumer interact, which allows users to connect with their favorite shops and
brands whenever and wherever they want and also helps stores to more actively
approach consumers. It is believed that the growth of e-commerce for the next incoming
years is increasing beyond measure rate with the release of modern technologies.
Understanding this need, the author’s solution was to create an e-commerce web
application as an online bookstore in order for the startup to develop its business
strategy.

This document structure was organized as follow. The first section brought in the goal of
the thesis and technologies used. Next, essential concepts and theoretical background
of each technology in the stack was introduced along with example, followed by the third
2

section which demonstrated carefully and thoroughly the application development
process, from back-end to front-end. In the end, this paper provided discussion of the
project with further improvements and gave conclusion about the final product.

2   Application Infrastructure – The MERN stack

The MERN stack is basically a JavaScript-based stack which is created to facilitate the
development process. MERN comprises of four open-source elements: MongoDB as the
database, Express as server framework, React.js serves as client library and Node.js is
an environment to run JavaScript on the server. These technologies introduce an end-
to-end web stack for developers to utilize in web development. [1.]

Figure 1.   MERN stack architecture

Figure 1 explains the architecture of MERN stack. Firstly, Express with Node.js create
API which is used for logic and to interact with MongoDB. When React client sends a
HTTP request to the back-end server. The server analyzes the request, retrieves data
from the database and responses with that data. React client is updated based on that
returned data.
3

2.1   Node.js

Node.js is JavaScript environment provider and the most essential core of the MERN
stack. Node.js is now the most widely used free open source web server environment
created by Ryan Dahl. It allowed to execute JavaScript code on the server. It is able to
run on multiple platforms like windows, Linux and mac OS. Node.js is dependent on
Google V8 engine which is the core of Chrome browser. C and C++ run both Node and
V8 which is better in performance speed and memory consumption. [2.]

A Node app runs in an individual process with event looping, without the need of a new
thread for each operation. This is opposed to traditional servers which make use of lim-
ited thread to handle requests. Node is a non-blocking, asynchronous and event-driven
engine aimed for scalable application development. Generally, Node libraries are cre-
ated using non-blocking pattern. Application calls a request and then move on to work
on next task rather than stalling while waiting for a response. When the request is com-
pleted, a callback function informs the application about the results. This allows multiple
connections or requests to a server to be executed simultaneously which is important
when scaling applications. MongoDB is also invented to be used asynchronously, there-
fore it is compatible with Node.js applications. [3.]
4

Table 1.   A popular web server task (reading a file on server and send the content as response
           to the client) handled by PHP and Node.js

Node terminate the waiting time between handling requests and move on to the next
request as table 1 illustrates [4].

2.1.1   Node Module

Node module is similar to JavaScript libraries which consists of a package of functions
to be included in application when needed [5]. Node has a variety of modules that offer
fundamental features for web applications implementation.
While developers can customize their own modules for personal project, Node has many
built in modules that can be used instantly without installation.
One of the most popular built in modules is http module, which can be used to create an
HTTP client for a server.
5
var http = require('http');
//create a server object:
http.createServer(function (req, res) {
res.write('This is shown in client'); //write a response to the client
res.end(); //end the response
}).listen(8080); //the server object listens on port 8080
Listing 1. A simple code in Node.js to create a server
Listing 1 demonstrates the usage of http module and ‘createServer’ function to initiate a
server running on port 8080. A text string is shown in the client as a response.
2.1.2 Node Package Manager
Node Package Manager (NPM) offers two essential functionalities:
• Command line for performing NPM commands such as package installa-
tion and version management of Node packages
• Downloadable repositories for Node package [6.]
In 2017, statistic showed that more than 350 000 packages are found in the npm registry,
make it the largest software repository on Earth [7]. Due to being an open source and
having a basic structure, the Node ecosystem has prospered dramatically, and currently
there are over 1 million open source free package, which facilitates development process
a lot. Beginning with being a method to download and manage Node dependencies, npm
has become a powerful means in front-end JavaScript.
There are two types of Node packages installation, globally or locally by the npm install
command. The package then is downloaded from the NPM registry and presented in a
folder named node_modules. The package is also added to the package.json file under
property dependencies. By using require function follow with the package name, it is
usable in the project as the example below in listing 2: [8]
$ npm install
var name = require('Module Name');
Listing 2. Installation and usage of Node package6 Package.json is an obligatory file in all JavaScript/Node project. It is a JSON format file which displays pair value of names and versions of all the packages that required to run the project as well as other commands. Sometimes when a package got outdated, it will show up by running the command ‘npm outdated’. If those updates are main releases, common ‘npm outdated’ do not work because a core release usually comes up with cru- cial changes which can cause the project trouble. In this case, Node package ‘npm- check-updates’ need to be installed globally and then running command ‘ncu-u’ will up- grade all the version noted in package.json. Now ‘npm update’ is ready to handle all the updates. [9.] Figure 2. A screenshot of package.json file in E-commerce application Figure 2 illustrates some Node package used in the application under dependencies property such as body-parser, Braintree, cookie-parser, etc.
7

2.1.3   Node Event Loop

Event Loop is one of the most essential concepts to master Node.js. Node.js takes ad-
vantage of events heavily and it is literally one of the reasons why Node has pretty high-
speed compared to other technologies. As this paper mentions above, Node.js code runs
on a single thread, there is only one thing occurring at a time. This seems like a drawback
but turns out to be helpful because developers do not have to worry about concurrency
problems but only have to care mainly if anything could block the thread such as infinite
loops or synchronous requests. The execution flow of JavaScript code will be blocked if
there is a piece of code that takes too long to return back to the event loop [10.]. The
event loop constantly looks for all the function calls in the call stack and execute one by
one respectively.

const hello = () => console.log('hello')
const hey = () => console.log('hey')
const run = () => {
    console.log('run')
    setTimeout(hello, 0)
    hey()
}
run()
//run
//hey
//hello

Listing 3. Example about function call in event loop

Listing 3 presents the surprising output. When this code executes, first run() is called.
Inside run(), setTimeout() is called first with hello as an argument. It is instructed to run
instantly as 0 is passed as timer and finally hey() is called.

This is happening because the callback function of setTimeout() which is hey() is put in
the Message Queue after the timer expire (immediately). Message queue is simply
where functions are queued before code can reach them. The loop process prioritizes
everything in the call stack and when there is nothing left, functions in the message
queue are selected to run. [10.]
8
2.2 Express.js
Express is a micro and flexible prebuilt framework based on Node that can provide faster
and smarter solution in creating server-side web applications. Express is made of Node
so it inherits all Node’s features like simplicity, flexibility, scalability and performance as
well. In brief, what Express does to Node is the same as Bootstrap does to HTML/CSS
and responsive design [11.]. It makes programming in Node a piece of cake and provides
developers some additional tools and features to improve their server-side coding. Ex-
press is literally the most famous Node framework so that whenever people mention
about Node, they usually imply Node combined with Express. TJ Holowaychuk released
Express the first time in 2010 and currently it is maintained by the Node foundation and
developers who contribute to the open source code.
Despite the fact that Express itself is completely minimalist, developers have pro-
grammed many compatible middleware packages to solve almost all issues in web de-
velopment [12]. Express offers a quick and straightforward way to create a robust API
with a set of helpful HTTP methods and middleware.
2.2.1 Basic Routing
Routing determine the way how an application’s endpoints (URIs) interact with client re-
quests. The basic syntax consists of an object as instance of Express and the corre-
spondent HTTP request method such as app.get(), app.post() to handle GET and POST
request respectively. [13.]
Routing methods take a callback function as parameter. The specified function is called
when the HTTP requests match the defined routes and methods.
var express = require('express')
var app = express()// create instance of express
//respond with 'hello' when a GET request is made to the route :/hello
app.get('/hello', function(req, res) {
res.send('hello') //response method
})9
var callback1 = function(req, res, next) {
//
next()
}
var callback2 = function(req, res, next) {
//
next()
}
app.get('/multiple', [callback1, callback2])
Listing 4. Example of Routing functions
As can be seen from listing 4, routing method in line 17 has more than 1 callback function
as parameters. In this case, it is crucial to add ‘next’ to each callback function arguments
and call it later in the body to switch control to the next callback. ‘next’ function will be
discussed more in the next section.
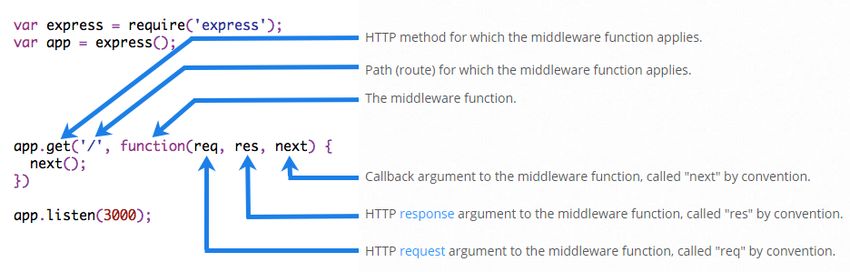
2.2.2 Writing and Using Middleware
Middleware functions have the ability to approach request object, response object and
the ‘next’ function in the application’s request-response phase. Middleware execution re-
turn an output which could be either the final outcome or could be passed as an argument
to the next middleware until the end of the cycle [14.]. The ’next’ function belongs to the
Express router which starts the following middleware right after the current middleware
finished. If a middleware does not finish the req-res cycle, next() must be called to pass
control to the next one. Otherwise, the request will be suspended.
Figure 3. Middleware function components10 Figure 3 illustrates middleware concepts in details. An Express application is basically a sequence of middleware calls. The call orders is based on the order which they are declared Figure 4. Diagram of middleware execution order Figure 4 explains that Express treats all middlewares in the same way so that the order in which your route handlers and other middleware functions are written is exactly the execution order [15]. 2.3 MongoDB MongoDB is a document-based NoSQL database used mainly for scalable high-volume data applications and data involved jobs which does not work well in a relational model. It is among the most popular non-relational database which emerged in the mid-2000s. MongoDB architecture comprises of collections and documents replacing the use of ta- bles and rows from traditional relational databases point of view. One of the most essen- tial functionalities of MongoDB is its ability to store dynamic data in flexible BSON docu- ments, which means documents sharing the same collection can have different fields and key-value pairs, while data structure can be changed without any restrictions at any time [16.]. Therefore, this removes the necessity of storing strictly structured data which is obligatory in other relational databases and improves database operation speed
11

significantly. Indexing and aggregation offer robust method to access and work with data
easily. Whatever field in a document can be indexed, leading to a much better search
performance. MongoDB also provides numerous operations on the documents such as
inserting, querying, updating as well as deleting. With the diversity of field value and
strong query languages, MongoDB is great for many use cases and can horizontally
scale-out to provide storage for larger data volumes, make it stably be the most popular
NoSQL database globally [17].

2.3.1   NoSQL Database

There are big differences between the mechanism NoSQL databases store data and
relational databases do. NoSQL databases are differentiated based on their data model.
There are 4 main types:

        •    Document databases
        •    Key-value databases
        •    Wide-column databases
        •    Graph databases

They share one common thing which is dynamic schema and can scale easily with large
data loads and high user volumes. A popular misunderstanding is that NoSQL databases
do not handle relationship data well. While in fact, many developers believed that data
modeling relationship is easier for NoSQL databases due to the nested individual data
structure.

During the late 2000s, as a result of the considerable decrement in storage price, there
is no need to create a complicated data model just to avoid data duplication. NoSQL
databases took a big step forward and became a good option for developers and large
data volume applications [18.].
12 Figure 5. Cost per MB of data overtime As price of storage critically decreased as figure 5 demonstrates, the number of applica- tions along with the data needed to store increased incredibly. Defining the schema be- forehand for all those data is almost impossible. Therefore, NoSQL databases provide developers flexibility to save a large amount of unstructured data. 2.3.2 Data Models Data model design is determined by the document’s structure and relationships between data. Related data can be embedded into a single document. 2.3.2.1 Embedded data model Embedded documents present the connection between data by attaching related data in a single structure. Related data then can be fetched and manipulated in a single opera- tion [19].
13

Figure 6.   A picture of an embedded document

Figure 6 illustrates how related information is stored in the same database record. As a
consequence, fewer queries are needed to handle operations leading to a better perfor-
mance, especially with read operation [20].

In conclusion, embedded data models should be used when there are relationships be-
tween entities or when one to many relationships exists, as long as the document size is
smaller than 16mb which is BSON largest size allowed.

2.3.2.2     Normalized data model

As its own name shows, this kind of data model is normal and common. Applications can
resolve these references to access the related data. References are added from one
document and linked to other to present the relationship between data. Related data then
can be accessed by resolving references [19.].
14

Figure 7.   References between related data

As can be seen from figure 7, both contact document and access document have refer-
ence linked to the user document.

Normalized data models should be used in these following cases:

    •   data duplication happens when embedding but performance advantages are not
        enough to outperform the duplication.
    •   complicated many-to-many relationships exist.
    •   big hierarchical data exist [20.].

2.3.3   MongoDB Atlas

MongoDB Atlas, which announced in 2016 by MongoDB creator team, is the cloud ser-
vice for storing data globally. It offers everything MongoDB provide without further re-
quirements when building applications, allowing developers to fully focus on what they
do best [21.]. With Atlas, developers do not have to worry about paying for unnecessary
things as they follow a pay-as-you-go standard.
15
MongoDB Atlas introduces a simple interface to get started and running. Basically, by
choosing instance size, region and any customized features needed, Atlas brings out the
suitable instance and includes it with the following:
• Built-in Replication: Atlas ensures constant data availability by providing
multiple servers, even when the primary server is down.
• Backups and Point-in-time Recovery: Atlas puts a lot of efforts to prevent
data corruption.
• Automated Update and One-Click Upgrade: users take advantage of the
latest and best features as soon as they are released due to Atlas auto-
mated patching.
• Various options for additional tools: users can freely decide on which re-
gions, cloud providers and billing options they prefer to use, making them
feel like customizing their own instances.
• Fine-Grained Monitoring: users are kept up with a diversity of organized
information, to let them know the right time to advance things to the next
level.
MongoDB Atlas is practical and reliable thanks to its integrated automation mechanisms.
With Atlas, it is unnecessary to concern about operational tasks as following:
• Supply and Configuration: Atlas gives clear instruction step by step to go
through the setup process, so developers do not have to think about what
aspect to choose even if they are beginners.
• Patching and Upgrades: Atlas is integrated with automatic upgrade and
patching, ensures user can reach latest features when they are released
as patching process takes just some minutes with no downtime.
• Monitoring and Alerts: database and hardware metrics are always visible
so users can foresee and prepare for any performance and user experi-
ence problems [22.].16 2.3.4 Mongoose Mongoose is an Object Data Modeling (ODM) JavaScript-based library used to connect MongoDB with Node.js. Mongoose provides a straight-forward, schema-based solution to create your application data template. It handles data relationships, provides methods to validate schema, and is used to render and represent between objects in MongoDB [23.]. Mongoose schema is covered inside a mongoose model, and a specific schema creates model. While schema and model are slightly equivalent, there is a primary differ- ence: schema determines the document formation, default values, validator, etc. while model is responsible for document-related operation like creating, querying, updat- ing and deleting. A schema definition is simple, and its structure is usually based on application requirements. Schemas are reusable and can include multiple child-sche- mas. Schema applies a standard structure to all the documents in a collection. Moreover, Mongoose provides additional features like query helper functions and business logic in the data. For example, Mongoose can help connect database with the server and per- form typical database operations for reading, writing, updating and deleting data. Mon- goose removes the need of writing complicated data validations by providing schema validation rules to allow only acceptable data to be saved in MongoDB [24.].
17

2.4   React.js

React is an open-source front-end JavaScript-based library that specializes in building
user interfaces. It was originally created by a Facebook software engineer and first im-
plemented in newsfeed feature of Facebook in 2011 and followed by Instagram a year
later. Due to the minimal understanding requirement of HTML and JavaScript, React is
easy to learn and thanks to the support by Facebook and strong community behind it,
React expands its popularity and becomes one of the most used JavaScript library [25.].

Figure 8.   Number of package downloads with NPM per year of React, Angular and Vue

Figure 8 compares the number of package downloads with NPM among React and two
other popular frameworks - Angular and Vue. As can be seen, the number of React has
increased dramatically in popularity in the past few years and definitely has proven its
preference [26.].

React works only on user interfaces of web and mobile applications. This equivalent to
the view layer of MVC template. ReactJS allows developers to create reusable UI com-
ponents as well as to create scalable web applications that can change data without
reloading the page. In addition to providing reusable component code, which means
18

reducing development time and lessening the risk of bugs and errors, React released
some key features that add to its appeal for developers [27.]:

        •     JSX (JavaScript Syntax extension)
        •     Virtual Dom
        •     Component

2.4.1   JSX

The beginning foundation of any basic website is made by HTML files. Web browsers
read and display them as web pages. During this process, browsers create a Document
Object Model which is a representational tree of the page structure. Dynamic content
can be added by modifying the DOM with JavaScript [28]. JSX is XML/HTML-like syntax
used to make it easier to modify the DOM by using simple HTML-like code [29]. Literally,
JSX makes it possible to write brief HTML-like structures in the same file with JavaScript
code, then transpiler such as Babel will convert these expressions to standard JavaScript
code. Contrary to the past when JavaScript is put into HTML, now JSX allows HTML to
be mixed in JavaScript.

React takes advantage of JSX to handle templating and writing React element. It is not
compulsory to use JSX, but following are some benefits that should be considered:

        •     Time efficiency due to performing optimization while compiling code to Ja-
              vaScript.
        •     Type-safe due to the ability to find out most of the errors during compilation.
        •     Faster in templating, if developers are familiar with HTML.
19 Figure 9. Some examples of JSX As can be seen in figure 9 line 4, variable ‘name’ is called inside JSX by wrapping it in curly braces. In general, all valid JavaScript expression need to be inside curly braces in order to be used in JSX. Line 7 and 10 indicate that in case of an attribute, either quotes or curly braces should be used properly depend on specific situations. 2.4.2 Virtual DOM Considered as the next important breakthrough in web development after AJAX, the vir- tual DOM (Document Object Model) is the main reason why React is able to create fast and scalable web application. Normally without react, the web application uses HTML to update its DOM. This works well for uncomplicated and static sites, but it can be a huge performance issue for dy- namic websites especially the one that involve high user interaction and view update because the whole DOM needs to reload every time the user triggers a page refresh [30]. Despite of JavaScript engines nowadays which are fast enough to carry out such complicated applications, DOM manipulations are still not that advanced. Another factor is that DOM is tree-structured so that even a change in a layer can cause extreme changes. Updating DOM is always the shortcoming when it comes to performance. Re- act optimized this by introducing Virtual DOM.
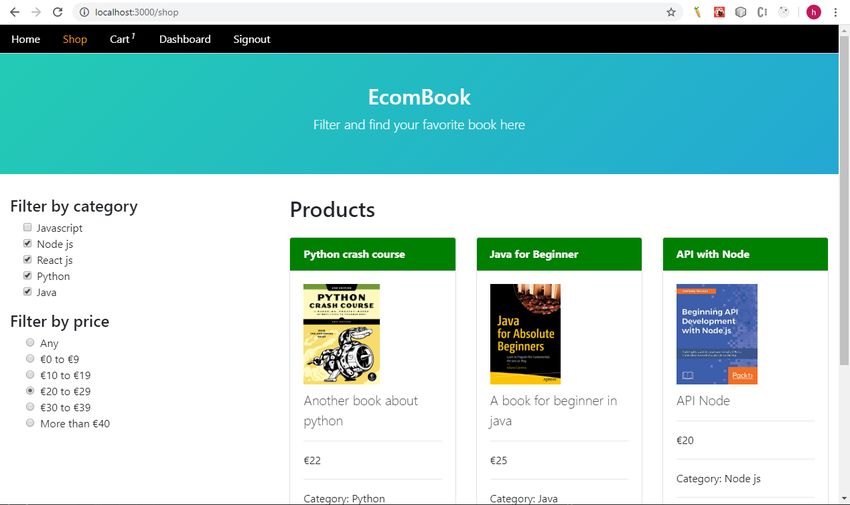
20

Virtual DOM is a representation of the DOM object, where it executes all updates re-
quired before rendering the final page to the browser. Whenever a user action happens
or by any means, there is a change to the DOM, React will generate a copy of the Virtual
DOM. At that point, a diff algorithm compares the previous and current states of the
Virtual DOM and figures out the optimal way with the least amounts of updates needed
to apply these changes. If there are any differences, React updates that single element
only rather than update a tons of elements, while if there is no change, React make
browser render nothing [31.]. As a result, this behavior spends less computing power
and less loading time, leading to better user experience and performance.

Figure 10. A picture of React Virtual DOM

Figure 10 indicates how Virtual DOM works, only the specific changes are updated and
re-rendered to the real DOM. This is the core reason behind React high performance.

2.4.3   Component

React is all about component, which reflects the primary unit of every application. React
allow developers to divide the user interface into simple, independent and reusable
21

components. A developer can start with common tiny components that can be used re-
peatedly on several pages like navigation bar, button, input form etc. This is what reus-
ability means, which is a perfect way to reduce development time, so that developers
can concentrate on more crucial features and business logic. Then comes the turn of
wrapper components that include children components with internal logic. Each compo-
nent determines its own way how it should be rendered. A component can also be com-
bined with other components or nested inside higher order components. The develop-
ment process keeps going on like that until it reaches the root component which is also
the application. As a result, this approach guarantees the application consistency and
uniformity which make it easier for maintenance as well as further codebase growth.

There are 2 types of components, functional component and class component.

2.4.3.1 Functional components

Functional components are completely presentational and basically are written under the
form of a JavaScript function that can receive some props (properties) as argument and
return a React element. Thanks to their predictability and straightforwardness, functional
components always make the same result given the same props. Therefore, developers
tend to pick functional components whenever possible. Stateless component or dumb
component is all functional component’s name as it comes from the natural fact that
functional components do not manage any state and their task is simply output user
interface elements [32.].

Function Hello (props) {
     Return Hello {props.name} ;
}

Listing 5. A functional component

Listing 5 illustrates an example of a functional component which takes ‘name’ as a props
and return a JSX.
22 2.4.3.2 Class components ECMAScript6 class syntax are utilized to write class-based components, the one which not only can return JSX but also can dispatch action, fetch data, handle events and have local state. Class components offer more functionalities by inheriting from React.Com- ponent class. They can access all additional lifecycle methods from their parent class and manipulate code at particularly moment during the process [33]. While functional components are dumb and stateless, class components are said to be smart and stateful thanks to being a container of the local state, internal logic and other children compo- nents. Therefore, a class component should be considered in case if there is a need for local state management or lifecycle method as well as some logic. Otherwise, a func- tional component is more suitable. Figure 11. A class component As figure 11 summarizes, all React.Component subclasses have to define render func- tion. A constructor function is implemented here because there is initial state and inside constructor, super(props) should be called first out of all statements. If not, this can lead to errors because of undefined props [34].
23
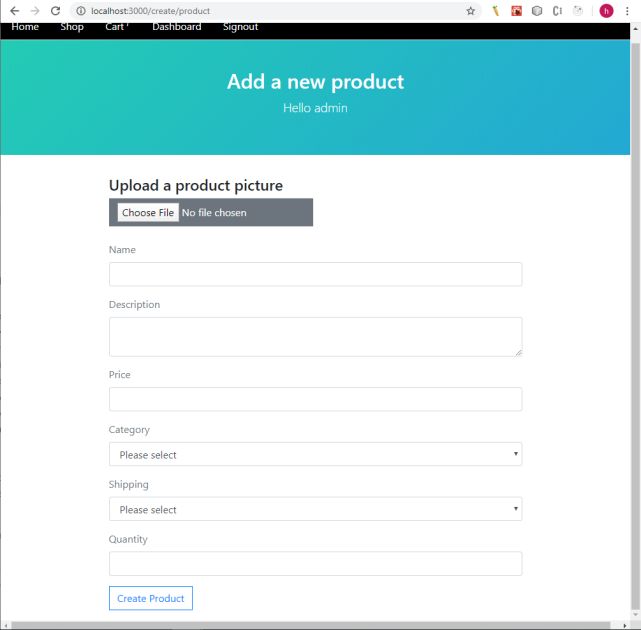
3 Application Implementation
A prototype version of the e-commerce application was created to apply the study of
MERN stack as well as to understand how they contribute to the whole entity in web
development.
3.1 Application requirements
Typically, a (business to customer) B2C e-commerce web application has two types of
users, which are admin and user. Admins are responsible for some specific management
tasks such as creating, updating and removing the products from the database as well
as managing user orders. A user is able to browse and read product’s information dis-
played in the application. He can also add the product to the shopping cart and perform
the payment for that product. While some resources and web routes are public, the oth-
ers can only be accessed by an admin or a signed in user.
By interviewing and researching some normal customers and business owners, the au-
thor figured out what different type of user want from the application, what features they
think are necessary for an e-commerce web application. Based on that, a list of user
stories is shown below to illustrate some of the required functionalities for this application:
• As a user, user want to create an account for himself
• As a user, user want to update his profile
• As a user, user want to surf through all the products
• As a user, user want to see product information such as category, price,
name, review, picture, etc.
• As a user, user want to add many products to the shopping cart and is able
to view the cart
• As a user, user want to delete products from the cart
• As a user, user want to modify the quantity of products inside the cart
• As a user, user want to pay for the products in the cart
• As an admin, admin want to add product to the database
• As an admin, admin want to remove product from the database
• As an admin, admin want to update product to the database24
• As an admin, admin want to add category to the database
• As an admin, admin want to manage user orders
3.2 Application development
This section is dedicated to demonstrate the functionalities development process from
back-end to front-end of the e-commerce application. Due to the limited scope of this
thesis, it is not able to mention all the files or describe every step in the project into
details, but it aims to discuss precisely about all fundamental and important parts that
needed to implement the MERN application. Basic concepts of any third-party libraries
or module are also explained along the way. The project structure is divided into 2 folder,
ecommerce and ecommerce-front which contain the source code of back-end and front-
end respectively.
3.2.1 Back-end development
3.2.1.1 Basic setup
The very first thing to do is to set up an Express application by creating an app.js file,
which is the entrance file of the project, where some of the necessary middlewares and
node packages are stored. Express instance is defined under app variable.
Figure 12. A screenshot of app.js file from the e-commerce application
The purpose of those middlewares in figure 12 are explained as below:25
• Mongoose is discussed in chapter 2.3.4
• Morgan logs the request details
• bodyParser unzips the whole body part of an incoming request and makes
it available on req.body object [35].
• cookieParser deconstructs cookie header and populates all the cookie in
req object under property named cookies.
• dotenv let developers use environment variable by accessing .env file
The following step is setting up database connection. MongoDB atlas is used due to
various advantages it brings in for the project as chapter 2.3.3 summarizes above. Since
Atlas is an online database service, no installation is required. By accessing MongoDB
Atlas official site and following instruction there, a cluster is created with the author’s
personal choice of cloud provider and region followed by a connection string which is
saved as MONGO_URI variable in the environment file. It is then used by mongoose to
connect to the database. When the connection is successful, ‘DB Connected’ is dis-
played in the terminal. Otherwise, a message telling the connection error is printed out
as Figure 13 below explains.
Figure 13. A code snippet of how to connect to the database.
The back-end folder is structured by 3 main sub-folders: models, routes and controllers.
While models contain all the mongoose schemas that are based on application require-
ments, routes define all the API routes and controllers comprise of the logic that needed
to be execute after each incoming request match with the corresponding route.26 3.2.1.2 Mongoose Schema Creation There is a total of 4 schemas in this application: category, order, product and user. Each mongoose schema represents for a document structure User schema is written first be- cause user model is needed to handle authentication and authorization. User schema As can be seen from figure 14 below, a user schema has 3 required properties called name, email and password. Role property is set to 0 by default as it means this is a normal user. By manually changing the role value to other (in this application: 1) the user becomes an admin. The user model only accepts defined properties in the schema to be added to the database. While history shows an array of purchases that user used to make, timestamps displays the time of creation and modification of a user object. Figure 14. A screenshot of User schema
27

For security reasons, real password is not saved in the database but an encrypted one,
therefore the author used Crypto, which is a Node module to hash the password while
combined with a tool called mongoose virtual.

A Mongoose Virtual is a property that is not stored in MongoDB. Mongoose Virtuals,
which has getter and setter methods are great option for computing properties.

Figure 15. Usage of Mongoose Virtual in the application

Figure 15 demonstrates how ‘hashed_password’ is created based on Mongoose Virtual.
Firstly, Virtual creates a property named password for user object. When a new user is
signed up, the value of ‘password’ property from the req.body is set to the virtual property
and is passed to setter function as an argument. Then ‘password’ is encrypted and set
to ‘hashed_password’ property. A function is also assigned to userSchema method ob-
ject to create an authenticate method which compare the encrypted input password with
the hashed one to verify the user.
28

Product schema

A product schema is structured as figure 16 below. It has all the properties that any e-
commerce product may need, like name, description, price, quantity, category, etc. Sold
field is set to 0 as default value and is incremented after each user purchase. One differ-
ent with the user schema above is that category field has a type of ObjectId while the
‘ref’ option indicates which model to refer to during population (in this case category
model). This illustrates the relationship between product model and category model and
by using populate method, category data is no longer its original _id but replaced with
mongoose document retrieved from the database.

Figure 16. ProductSchema structure

While user schema and product schema look complex, category schema is pretty simple
and straightforward with only name and timestamps field.

3.2.1.3 Authentication with JWT

JSON Web Token (JWT) is a standard that defines a compact and self-contained way to
transmit data securely between client and server as a JSON object. Tokens can be
29

transferred through an URL or a HTTP request header easily thanks to its compact size
while self-contained feature let JWT comprise all the necessary user information. Data
inside a JWT is verified and reliable because it is signed with a secret key or a public
private key pair. Moreover, the signature also confirms that only the party holding the
private key have signed it.

Figure 17. How JWT works in authorization

Authentication is the most popular use case of JWT. After a user signs in, the authoriza-
tion is granted and a JWT is created by the application and sent back to the user. By that
time, all following requests made by user will contain the token in the authorization
header with Bearer schema. The server will check for a valid token, and if it is available,
the user is allowed to access protected routes, services and resources that require that
token. As JWT is self-contained, all needed data stay there, leading to less works toward
the database [36.]. This whole process is analyzed in figure 17 above
30

Figure 18. Usage of JWT in E-commerce application to sign in user

Figure 18 demonstrates how JWT is implemented in the ‘signin’ controller method. This
method is executed when there is a POST request to the route ‘/api/signin’. Firstly, user
credentials are retrieved from the request body and set to the corresponding variable.
Then database looks for the user with that email and checks if the password is matched
with hashed password. If yes, a signed token is generated with user ID and a secret
random string which is saved in environment file. This secret string key is needed for
security reasons since tokens are user credentials. Then the token is attached in cookie
with an expiry time and is returned with user data as json format to the client.

3.2.1.4 Routing and API Documentations

Data distribution and sharing between two or more systems has always been an essen-
tial aspect of software development. Taking into account a case when a user search for
some books of a specific category, an API is called and the request is sent to the server.
The server analyzes that request, performs necessary actions and finally, user gets a list
of books as a response from the server. This is the way how REST API works. An API
stands for Application Programming Interface, which is a set of rules that allows two
applications or programs to interact with each other [37].
31

REST determines how the API looks like. It stands for “Representational State Transfer”
-an abstract definition of the most popular web service technology. REST is a way for
two computer systems to communicate over HTTP in a similar way to web browsers and
servers. It is a set of rules that developers follow when they create their API.

Table 2.   Product related API

  Method                 Route path                              Description

 GET           api/product/:productId            Return a product with the given ID un-
                                                 der json format

 POST          api/product/create/:userId        Create a new product and save it to da-
                                                 tabase, return a json object of that
                                                 product. Required to be admin and be
                                                 authenticated

 DELETE        api/product/:productId/:userId    Remove a product with the given ID
                                                 and return a json message object. Re-
                                                 quired to be admin and be authenti-
                                                 cated

 PUT           api/product/:productId/:userId    Update a product with the given ID and
                                                 return updated product under json ob-
                                                 ject. Required to be admin and be au-
                                                 thenticated
32
GET api/products Return a list of products under json for-
mat
GET api/products/search Return a list of products based on
search query under json format
GET api/products/related/:productId Return all the products with the same
category as the given ID product
Table 2 above illustrates all the product related API routes with corresponding method
and description in brief. As can be seen, only user with admin role can perform operation
like creating, deleting and updating to a product. Other public routes can be accessed
wherever and by whatever kind of user even without a signed account.
Figure 19. Usage of router.param method
The author also makes use of router.param method as most of the product API routes
above have a parameter (productid, userId) inside. Router.param finds the product with
that ID and populate its information to request object under product property as figure 1933 summarizes. This is also applied to other routes which have userId, categoryId and or- derId as well since it facilitates the logic implementation. 3.2.1.5 API Testing with Postman At this moment of the development process, the front-end is not available yet so a third- party tool called Postman is used to handle API testing. Figure 20. A screenshot of Testing with Postman As can be seen from figure 20, a GET request has been called to the route ‘api/catego- ries’ and been successfully handled. Since this is a public route and categories is not protected resource, no authorization token in the header is needed. As a result, an array of json object containing all the categories is returned. Each category object includes all the properties defined in Mongoose schema like name, timestamps and auto generated ID.
34

3.2.2   Front-end development

3.2.2.1 Basic setup and Routing

Unlike back-end is performed with multiple technologies, front-end development is han-
dled by only React.js. It is not impossible to set up a React application from scratch, but
this process includes of many intimidating and time-consuming steps, such as setting up
Babel to convert JSX to compatible JavaScript that old browser can understand and
configuring Webpack to bundle all the modules. Fortunately, Facebook has developed
Create React App node module for quickly scaffolding a React template, which saves
developers from all those complicated configurations. Create React App not only gener-
ates a boilerplate with core structure for a React application but also takes care of some
build script and development server.

After running command ‘npx create-react-app’ to generate a template, bootstrap – the
most popular CSS framework is added to minimize styling tasks from scratch since the
author want to focus on the development part using MERN stack.

Then Routes.js file is created with the sole purpose of including all the route paths with
their corresponding components by using a package called react-router-dom. Route
component is then rendered by ReactDom as the root component of the application.

Figure 21. A screenshot of Routes.js file, with BrowserRouter wraps around Switch and Route
35

Figure 21 summarizes all the route paths and the component to be render when that
route is accessed. For example, any kind of user can go to public route like ‘/shop’ to
access Shop component, but only authenticated user can see Dashboard or Profile com-
ponent as they are protected routes.

There is a total of three main types of components in React Router:

       •      routers, like  and
       •      route matchers, like  and
       •      navigation, like , , and

Router component is the wrapper of React Router application. BrowserRouter is mainly
used for web-based projects. Router component must be rendered as the root element.

Switch and Route are route matchers. When a  is rendered, it finds the
 element whose path is similar to the current URL. When a  is found, it
renders that  and ignores the rest. This means  with more specific (usu-
ally longer) paths should be written before less-specific ones [38.].

One essential thing to consider when setting up Route is that a Route path matches
the beginning of the URL, not the whole URL. Therefore a  will match
every URL. That is why  should be located last in the , otherwise
 can be used to match the whole URL.

3.2.2.2 User Authentication

Sign up Component

Although some main pages of this application like Home page, Shop page do not require
the user to sign up in order to enhance user experience, if users want to make a pur-
chase, they have to sign up and log in to their account first. Below is a simple user inter-
face to sign up new users.
36 Figure 22. A screenshot of the Signup page Figure 22 displays a web page with shared navigation bar and layout. Right below is the signup form which includes some inputs for name, email and password with a submit button. Bootstrap class ‘form-group’ is applied to facilitate these styling tasks. In this component, beside the state of each input field there are error and success state which determine if some alerts should be shown up when user fail or succeed to sign up. Given the user put in correct data and press submit, fetch method is used to send a POST request with user data under json format in the body to the back-end API ‘api/sig- nup’. After validation process, a new instance of user model is created based on req.body and is saved into the database. The server then returns a json file containing user data without hashed password back to the client. Finally, a success alert is shown up and is redirecting the user to the sign in page. Sign in Component The sign in component is quite similar to the sign up one except the data flow when the user press submit button. As summarized in chapter 3.2.1.3, after the server handled the POST request from the client, a token is signed and sent back to the client along with
37
user information. Those data then are passed to authenticate function and stored in the
local storage as jwt.
export const authenticate = (data, next) => {
//check if we have window obj
if (typeof window !== undefined) {
localStorage.setItem('jwt', JSON.stringify(data))
next();
}
};
export const isAuthenticated = () => {
if (typeof window == undefined) {
return false;
}
if (localStorage.getItem('jwt')) {
return JSON.parse(localStorage.getItem('jwt'));
} else {
return false;
}
};
Listing 6. A snippet code to store user information in local storage.
Figure 23. A screenshot of Local Storage
As shown in listing 6 and figure 23, user data can be saved in local storage and therefore
can be retrieved from there. By using JSON.parse(), user data is converted from json
string back to JavaScript object and can be used to find out the user role (user or admin).
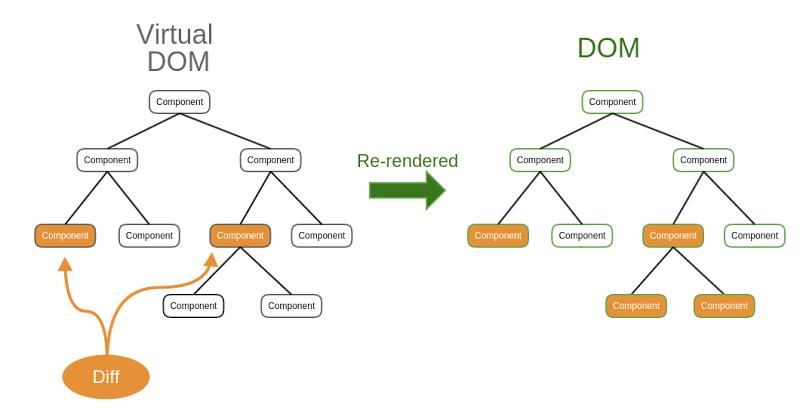
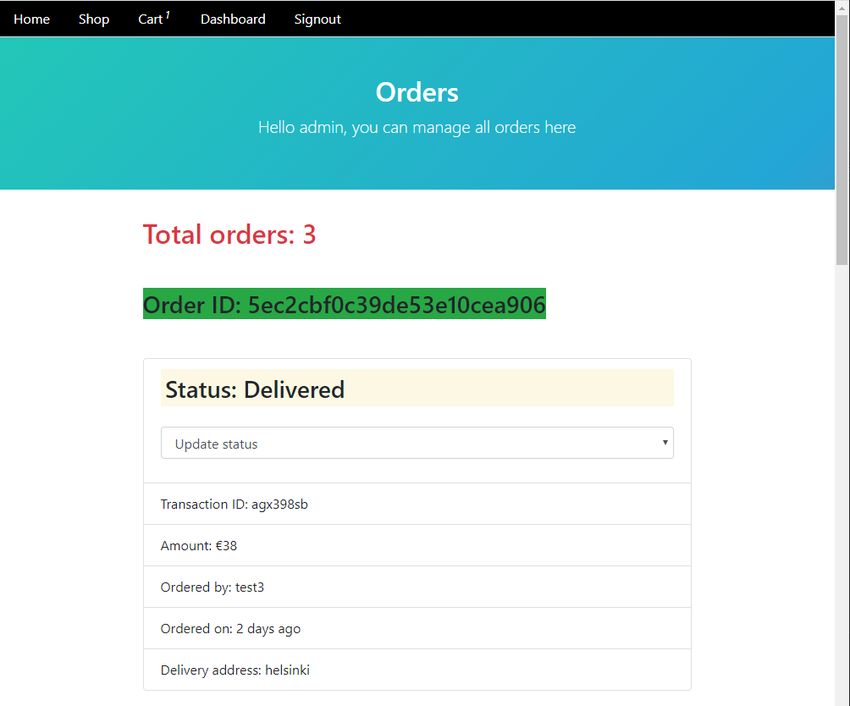
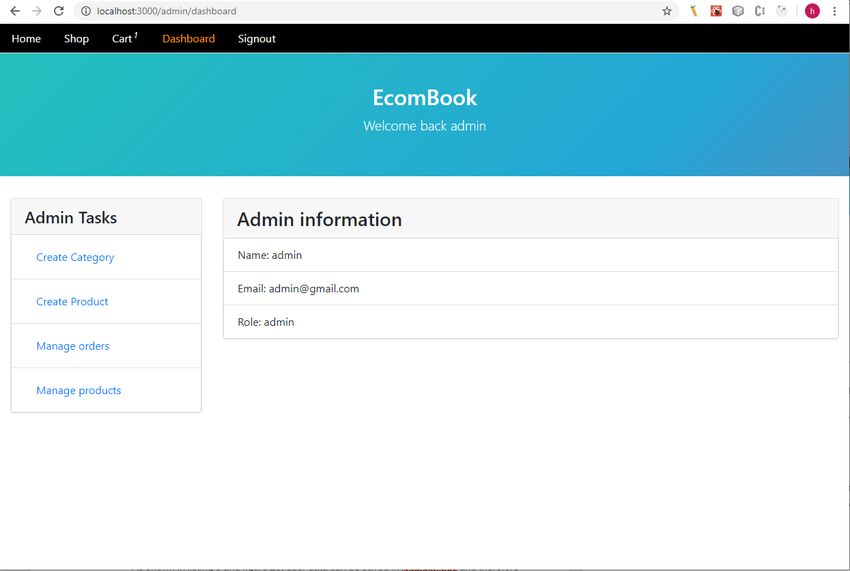
Based on that signing the user in to the corresponding dashboard.38 3.2.2.3 Dashboard Component Admin Dashboard Figure 24. User interface of Admin Dashboard Admin dashboard is accomplished with this component as can be seen in figure 24. It consists of 2 section elements which both applies Bootstrap class Card. All admin infor- mation is shown on the right side while some admin actions like creating category and product, viewing and managing order are on the left. By clicking on tasks link, admin will be navigated to the matching component where he/she can create a category or a prod- uct. The admin also has the ability to view orders and manage them, for example setting the order status from processing to shipped or delivered. Moreover, ManageProduct component enables the admin user to modify products or even delete them from the database. User Dashboard Generally, the user dashboard component is quite similar to the admin one. Since the user have less power than an admin, there is fewer actions for a user to perform.
39

Checking out in the Cart page or updating their profiles are the two only user’s tasks, as
visualized in figure 25.

Figure 25. User interface of User Dashboard

Unlike admin dashboard, user’s purchase history is presented under his/her personal
information. This list provides a precise look of order history, such as product name, price
and the time it was performed.

3.2.2.4 Home Component

UI Description

Home page, which is the main page of this application is demonstrated by Home com-
ponent. This component is accessible through a public empty URL. It plays an important
role in an e-commerce application.
40

Figure 26. User interface of Home component

An overview of the Home page is described in figure 26. Some of the most fundamental
functionalities of an e-commerce application are shown in this component. As can be
seen, there are 2 lists of products. One is for best sellers, which are those products with
highest sold property, the other is new arrivals, meaning that the createdAt property is
closest to the current time. Each product is presented by a Card component which ap-
plies a Bootstrap class called ‘card’. The card header shows the product name while
other information like product image, price, category, timestamps are set in the card
body. In stock feature depends on the quantity property of each product. In the end
comes 2 buttons for user to view each product in detail and to add to cart for payment
and purchase. There is also a search engine rendered by the Search component on top
41

of the page right below the shared layout. Here user can search product based on cate-
gory and by text in name.

Logic and Data Flow

const Home = () => {
    const [productsBySell, setProductsBySell] = useState([]);
    const [productsByArrival, setProductsByArrival] = useState([]);
    const [error, setError] = useState(false);

    const loadProductsBySell = () => {
        getProducts('sold').then(data => {
            if (data.error) {
                setError(data.error)
            } else {
                setProductsBySell(data)
            }
        })
    }

    const loadProductsByArrival = () => {
        getProducts('createdAt').then(data => {
            if (data.error) {
                setError(data.error)
            } else {
                setProductsByArrival(data)
            }
        })
    }

    useEffect(() => {
        loadProductsByArrival()
        loadProductsBySell()
    }, [])

Listing 7. A snippet code of Home component

As can be seen in listing 7, when Home component is mounted Effect Hook is called to
perform some side effects like fetching data, setting up a subscription or changing the
DOM, in this case is fetching product data by running 2 functions loadProductsByArrival
and loadProductsBySell. By default, Effect Hook runs after every render or update, even
the first one. An empty array is passed as the second argument to tell React that this
effect only needs to run once because it does not depend on any state or props. Then
getProducts is executed with 2 different sorting method as parameter to send a GET
request to the back-end API. Server returns all the best seller and new arrival products
as json object to the client. Component local state is set by setState function after that
and finally, array of products is looped through map function to render multiple Card
components. Each Card takes a product as its props as listing 8 describes below:
42
{productsBySell.map((product, index) => (
))}
Listing 8. A snippet of code to render an array of Card components
With the search engine, user is required to type in a text string, otherwise pressing search
button does not trigger anything. When user has provided valid input and clicked search
button, an object containing search criteria is passed to query-string Node module to
generate a text string query, followed by an API request with that query to the server.
Query string is then analyzed and passed to database query function to look for appro-
priate products. The rest of the data flow is similar to Home component as the server
response with those products and React render Card component based on them.
3.2.2.5 Shop Component
A shop page enables user to sort products based on category and price.
UI description
Figure 27. User interface of Shop component43
Figure 27 illustrates the Shop component with shared layout and a navigation bar like
other pages, followed by some filter features on the left side and filtered results on the
right side of the page. Card component is again utilized to render products. Category
filter is handled by checkbox component while price filter is presented by radio-box com-
ponent.
Logic and Data Flow
Firstly, when a user selects an input from the checkbox, handleToggle method is trig-
gered with an argument of that selected category ID. This function finds the index of that
selected category in the state array (checked state) and checks if it is already there. If
not, add that category to the array as the user is looking for that one. On the other hand,
remove that category from the array as the user does not want that type of products. This
Checked array which includes all selected category IDs is then updated and passed to
the parent component-Shop component. Here is where an API request is called to the
server with an object containing 2 array, category ID and price range values. Finally,
client updates the user interface immediately when it receives the response from back-
end server. Listing 9 in the following shows all steps before checked state is passed to
Shop component.
const Checkbox = (props) => {
const { categories, handleFilters } = props;
const [checked, setChecked] = useState([]);
const handleToggle = (catId) => () => {
const indexOfCheckedCate = checked.indexOf(catId);
//clone an array es6
const ArrayOfCateId = [...checked];
if (indexOfCheckedCate === -1) {
ArrayOfCateId.push(catId)
} else {
ArrayOfCateId.splice(indexOfCheckedCate, 1)
}
setChecked(ArrayOfCateId);
handleFilters(ArrayOfCateId);
}
return (
{categories.map((cat, index) => (You can also read