IBM Blockchain Platform Hands-On - Lab 3: Connecting to an Existing Network - GitHub Pages
←
→
Page content transcription
If your browser does not render page correctly, please read the page content below
IBM Blockchain

IBM Blockchain Platform Hands-On

Lab 3:
Connecting to an Existing Network
IBM Blockchain                                                                                                 An IBM Proof of Technology

Table of Contents

Disclaimer ...................................................................................................................................... 4
1     Overview of the lab environment and scenario .................................................................. 6
    1.1      Lab Scenario ..................................................................................................................... 7
2     Connecting to an Existing Network ...................................................................................... 8
    2.1      Setting up ......................................................................................................................... 9
    2.2      Working as MagnetoCorp. .............................................................................................. 14
    2.3      Running the Issue transaction as MagnetoCorp ........................................................... 18
    2.4      Working as DigiCorp ....................................................................................................... 29
    2.5      Running the Buy and Redeem transactions as DigiBank .............................................. 52
    2.6      Issuing another paper as MagnetoCorp ........................................................................ 56
    2.7      Buying another paper as DigiBank ................................................................................ 57
    2.8      Looking at Errors ............................................................................................................ 59
3     We Value Your Feedback! ................................................................................................... 62
4     Running the lab on your own machine: ............................................................................. 63
Appendix 1 The networkConnection.json file: ......................................................................... 63
Appendix 2 The getPaper.js file: ............................................................................................... 63
Appendix 3 The fabric-samples\basic-network\docker-compose.yml file .......................... 66

                                                                    Page 2
                                                                                                                                          Lab 3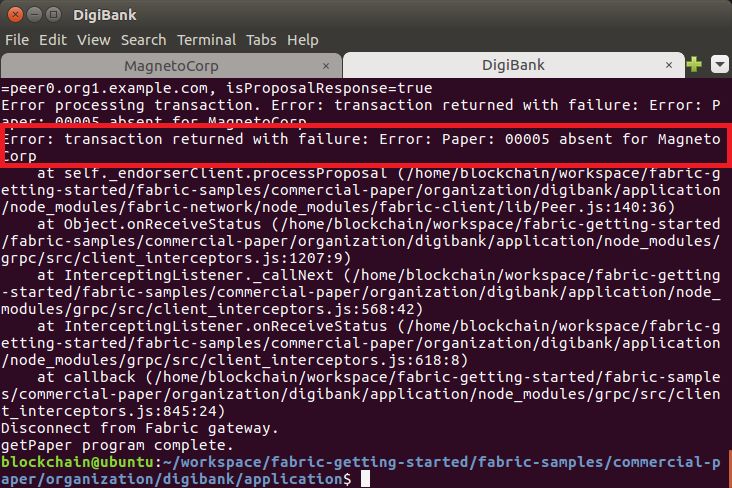
IBM Blockchain            An IBM Proof of Technology

                 Page 3
                                             Lab 3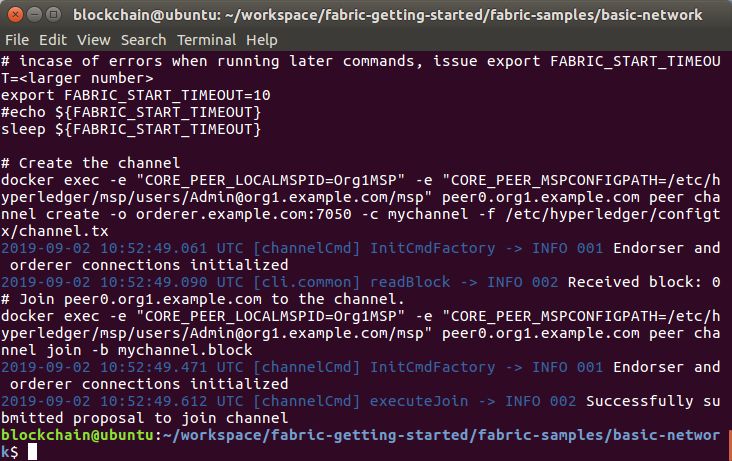
IBM Blockchain                                                            An IBM Proof of Technology

Disclaimer
IBM’s statements regarding its plans, directions, and intent are subject to change or
withdrawal without notice at IBM’s sole discretion. Information regarding potential future
products is intended to outline our general product direction and it should not be relied on in
making a purchasing decision.

The information mentioned regarding potential future products is not a commitment, promise,
or legal obligation to deliver any material, code or functionality. Information about potential
future products may not be incorporated into any contract.

The development, release, and timing of any future features or functionality described for our
products remains at our sole discretion I/O configuration, the storage configuration, and the
workload processed. Therefore, no assurance can be given that an individual user will achieve
results like those stated here.

Information in these presentations (including information relating to products that have not
yet been announced by IBM) has been reviewed for accuracy as of the date of
initial publication and could include unintentional technical or typographical errors. IBM shall
have no responsibility to update this information. This document is distributed “as is”
without any warranty, either express or implied. In no event, shall IBM be liable for any
damage arising from the use of this information, including but not limited to, loss of data,
business interruption, loss of profit or loss of opportunity. IBM products and services are
warranted per the terms and conditions of the agreements under which they are provided.

IBM products are manufactured from new parts or new and used parts.
In some cases, a product may not be new and may have been previously installed. Regardless,
our warranty terms apply.”

Any statements regarding IBM's future direction, intent or product plans are subject to
change or withdrawal without notice.

Performance data contained herein was generally obtained in controlled,
isolated environments. Customer examples are presented as illustrations of how those
customers have used IBM products and the results they may have achieved. Actual
performance, cost, savings or other results in other operating environments may vary.

References in this document to IBM products, programs, or services does not imply that IBM
intends to make such products, programs or services available in all countries in which
IBM operates or does business.

Workshops, sessions and associated materials may have been prepared by independent
session speakers, and do not necessarily reflect the views of IBM. All materials and
                                             Page 4
                                                                                             Lab 3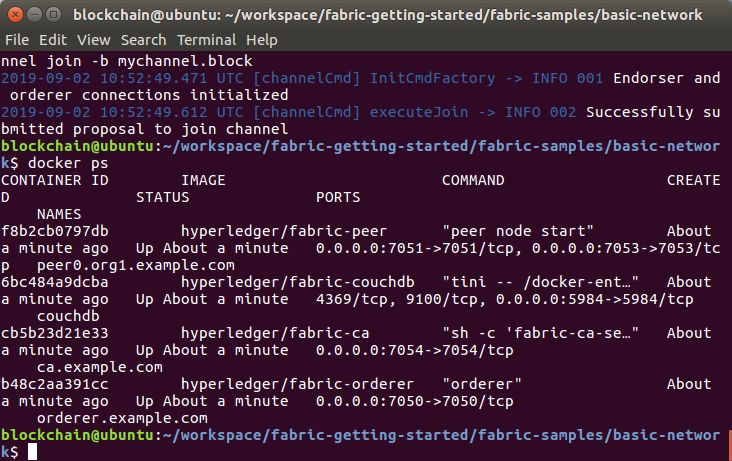
IBM Blockchain                                                           An IBM Proof of Technology

discussions are provided for informational purposes only, and are neither intended to, nor shall
constitute legal or other guidance or advice to any individual participant or their specific
situation.

It is the customer’s responsibility to insure its own compliance with legal requirements and to
obtain advice of competent legal counsel as to the identification and interpretation of any
relevant laws and regulatory requirements that may affect the customer’s business and any
actions the customer may need to take to comply with such laws. IBM does not provide legal
advice or represent or warrant that its services or products will ensure that the customer
follows any law.

Information concerning non-IBM products was obtained from the suppliers of those products,
their published announcements or other publicly available sources. IBM has not tested
those products about this publication and cannot confirm the accuracy of performance,
compatibility or any other claims related to non-IBM products. Questions on the capabilities of
non-IBM products should be addressed to the suppliers of those products. IBM does not
warrant the quality of any third-party products, or the ability of any such third-party products
to interoperate with IBM’s products. IBM expressly disclaims all warranties, expressed or
implied, including but not limited to, the implied warranties of merchantability and fitness
for a purpose.

The provision of the information contained herein is not intended to, and does not, grant any
right or license under any IBM patents, copyrights, trademarks or other intellectual
property right.

IBM, the IBM logo, ibm.com and [names of other referenced IBM products and services used in
the presentation] are trademarks of International Business Machines Corporation, registered in
many jurisdictions worldwide. Other product and service names might be trademarks of IBM or
other companies. A current list of IBM trademarks is available on the Web at "Copyright and
trademark information" at: www.ibm.com/legal/copytrade.shtml.

© 2019 International Business Machines Corporation. No part of this document may be
reproduced or transmitted in any form without written permission from IBM.

U.S. Government Users Restricted Rights — use, duplication or disclosure restricted by
GSA ADP Schedule Contract with IBM.

                                             Page 5
                                                                                            Lab 3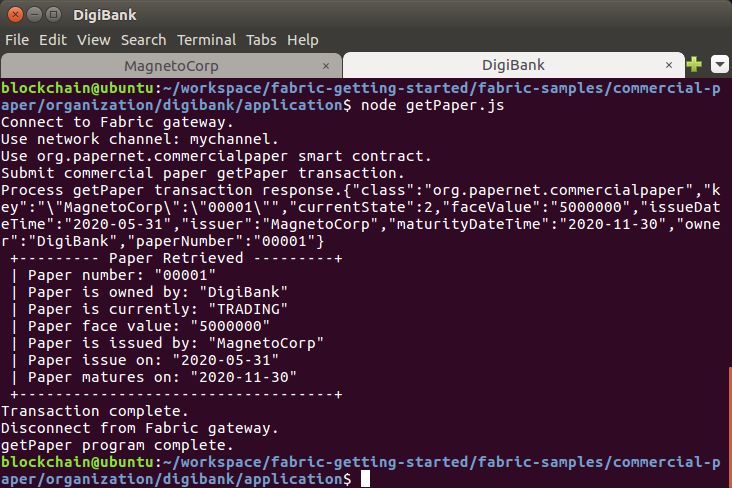
IBM Blockchain An IBM Proof of Technology
1 Overview of the lab environment and scenario
This lab is a technical introduction to blockchain, specifically smart contract development
using the latest developer enhancements in the Linux Foundation’s Hyperledger Fabric v1.4
and shows you how IBM’s Blockchain Platform’s developer experience can accelerate your
pace of development.
Note: The screenshots in this lab guide were taken using version 1.37.1 of VS Code, and version
1.0.9 of the IBM Blockchain Platform plugin. If you use different versions, you may see
differences to those shown in this guide.
Start here. Instructions are always shown on numbered lines like this one:
__ 1. If it is not already running, start the virtual machine for the lab. The instructor will tell
you how to do this if you are unsure.
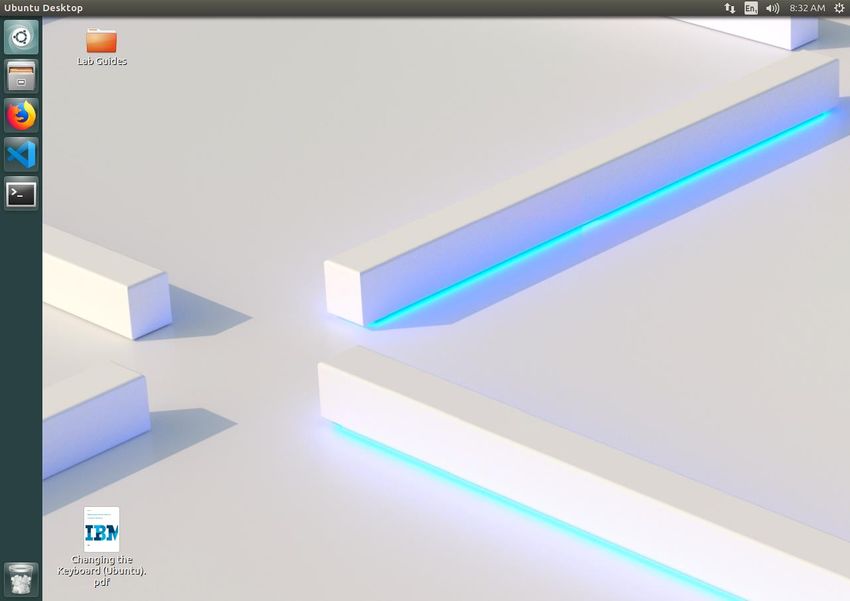
__ 2. Wait for the image to boot and for the associated services to start. This happens
automatically but might take several minutes. The image is ready to use when the
desktop is visible as per the screenshot below.
Note: If it asks you to login, the userid and password are both “blockchain”.
Page 6
Lab 3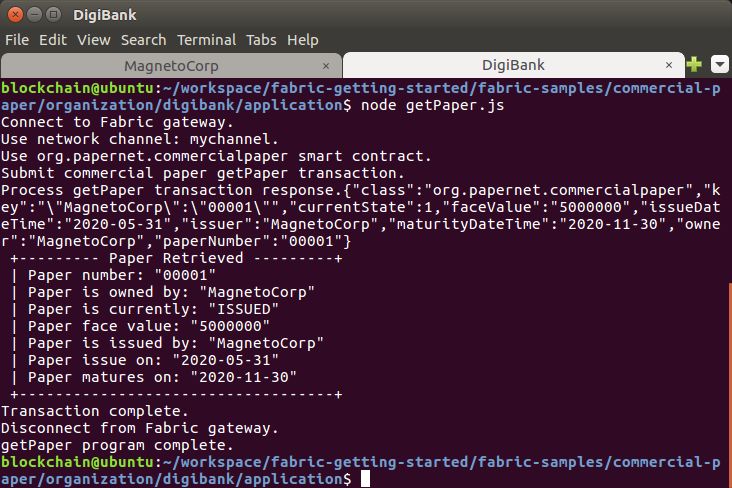
IBM Blockchain                                                          An IBM Proof of Technology

1.1   Lab Scenario
       In this lab, part three, we will take you through connecting to an existing network, one
       that is running outside of in Visual Studio Code (VS Code). The network we will be using
       is the ‘basic-network’ used by the “Commercial Paper” Hyperledger Fabric tutorial,
       and we will stand this network up, run through a simple version of the tutorial and then
       extend the network with a new smart contract transaction.

       Note that if you get an “Software Updater” pop-up at any point during the lab, please
       click “Remind Me Later”:

                                           Page 7
                                                                                           Lab 3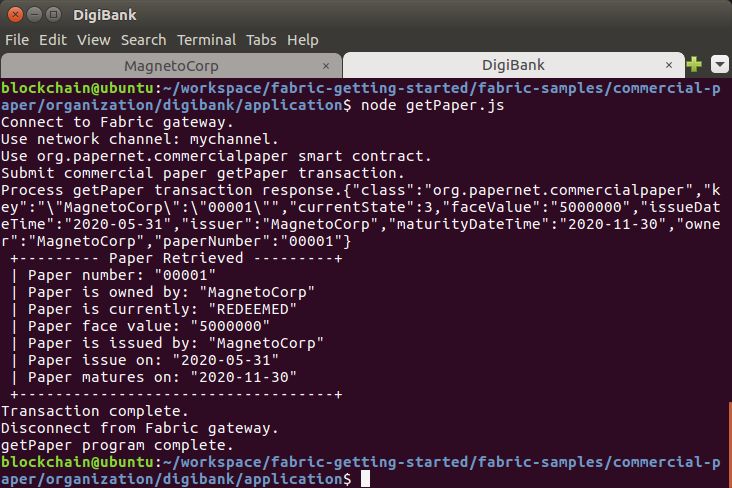
IBM Blockchain                                                             An IBM Proof of Technology

2     Connecting to an Existing Network
      As mentioned above, in this lab will be using the Hyperledger Fabric “Commercial
      Paper” tutorial. The full version of this tutorial is available online and we will be using a
      simplified version of it designed to work well in a lab environment.

      The scenario the tutorial follows is one of a commercial paper trading network called
      PaperNet. Commercial paper itself is a type of unsecured lending in the form of a
      “promissory note”. The papers are normally issued by large corporations to raise funds
      to meet short-term financial obligations at a fixed rate of interest. Once issued at a
      fixed price, for a fixed term, another company or bank will purchase them at a discount
      to the face value and when the term is up, they will be redeemed for their face value.

      As an example, if a paper was issued at a face value of 10 million USD for a 6-month
      term at 2% interest then it could be bought for 9.8 million USD (10M – 2%) by another
      company or bank who are happy to bear the risk that the issuer will not default. Once
      the term is up, then the paper could be redeemed or sold back to the issuer for their
      full face value of 10 million USD. Between buying and redemption, the paper can be
      bought or sold between different parties on a commercial paper market.

      These three key steps of issue, buy and redeem are the main transactions in a
      simplified commercial paper marketplace, which we will mirror in our lab. We will see a
      commercial paper issued by a company called MagnetoCorp, and once issued on the
      PaperNet blockchain network another company called DigiBank will first buy the paper
      and then redeem it.

      In diagram form it looks like this:

      So, let’s begin!

                                             Page 8
                                                                                              Lab 3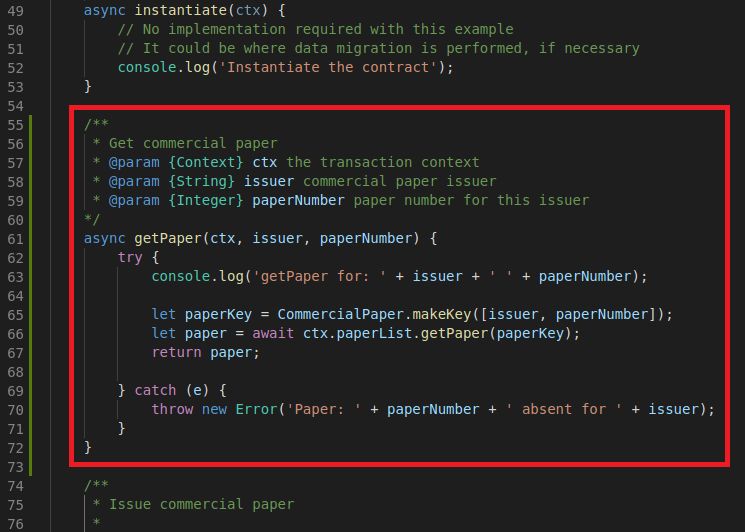
IBM Blockchain                                                           An IBM Proof of Technology

2.1      Setting up

      __ 3. Use the launcher to open a terminal:

      __ 4. Enter the following cd command to change directory to the basic network folder that
          we will use for this lab:

          cd workspace/fabric-getting-started/fabric-samples/basic-network

          If you are not familiar with the command line, you can just copy and paste the above
          or you can type it yourself if you prefer. Remember you can press the tab key after
          typing the first few characters of the folder name to auto-complete the full name and
          save some typing. When you have run the command, your console should look like
          this:

                                              Page 9
                                                                                            Lab 3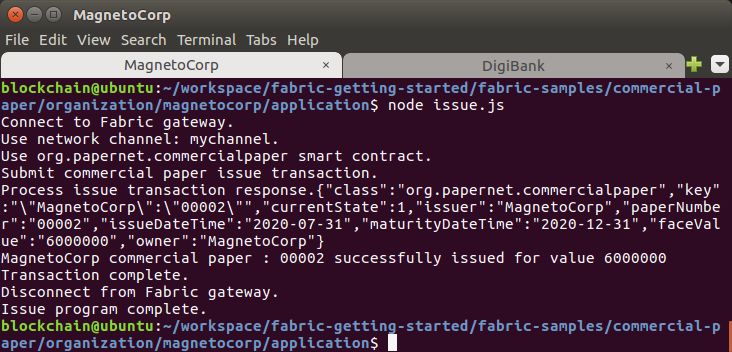
IBM Blockchain                                                           An IBM Proof of Technology

   __ 5. Type the ls command and press enter to see the files that make up the basic-
       network.

       These files contain the configuration for the basic-network along with a script to set it
       up. Feel free to have a look at their contents if you are curious. The main files of
       interest are start.sh and docker-compose.yml; you can open the files to view them
       with a command like “code start.sh” but make sure you do not change the
       contents of any of the files.

                                           Page 10
                                                                                            Lab 3
IBM Blockchain An IBM Proof of Technology
__ 6. To start the network running, run the following command in your terminal:
./start.sh
Note: make sure you enter the period ( . ) at the beginning of this command or the
command will not be found.
This command is a script that starts the docker containers that make up the basic
network and may take a minute or so to run. The command may output a warning
which you can ignore. When it has finished, your terminal should look something like
this:
Next we will look at the containers that were started.
Page 11
Lab 3IBM Blockchain An IBM Proof of Technology
__ 7. Run the command below in your terminal:
docker ps
This command lists the docker containers that are running. Although this output is a
little hard to read, you can make your terminal window wider to see the output better
if you wish. This command shows that we have started four containers, one for each of
the Hyperledger fabric-peer, fabric-ca, fabric-couchdb and fabric-orderer
components. Together these make up the simple basic-network that we will be
using. A more realistic setup would have multiple copies of the components to better
reflect the multiple parties in the network, but for a lab this simple network will
suffice. In a diagram form, the network looks like this:
Page 12
Lab 3IBM Blockchain An IBM Proof of Technology
__ 8. These containers are joined together into the same docker network called net_basic.
A docker network lets containers communicate with each other. Take a look at the
network by running this command to inspect it:
docker network inspect net_basic
You should see output similar to this:
Scroll back up and look at the output. You can see that each of the containers have
their own IP address inside the same network so they can communicate with each
other.
Next, we will begin working as if we were an administrator for MagnetoCorp who
would want to see combined logs from all these components. Although proper
dashboards could be created, we will use a simple log viewing tool in this lab.
Page 13
Lab 3IBM Blockchain An IBM Proof of Technology
2.2 Working as MagnetoCorp.
__ 9. From the terminal, change to the following folder:
cd ../commercial-paper/organization/magnetocorp/configuration/cli/
The full path should now be showing as:
~/workspace/fabric-getting-started/fabric-samples/commercial-
paper/organization/magnetocorp/configuration/cli
Page 14
Lab 3IBM Blockchain An IBM Proof of Technology
__ 10. As this terminal is going to spend the rest of this lab showing the logs, let’s give it a
title so we can easily see what it is doing:
set-title docker log output
As you can see, this changes the title of the terminal window to make it easily
identifiable:
Page 15
Lab 3IBM Blockchain An IBM Proof of Technology
__ 11. Now we will run the monitoring script to show the docker logs in this terminal:
./monitordocker.sh net_basic
This terminal is now waiting to display any logging output from the net_basic docker
network. Keep an eye on this terminal throughout the rest of this lab and you will see
logging messages appear as we run the different commands.
Page 16
Lab 3IBM Blockchain An IBM Proof of Technology
__ 12. Now we need a new terminal window as the current one is dedicated to logging
output. Make sure the current terminal window is selected by clicking in it, and from
the “File” menu at the top of the screen, choose “Open Terminal”
This should open a new terminal window, with the path set to the same location as the
logging terminal where we can enter new commands:
Next, we are going to act as a MagnetoCorp administrator again and interact with the
network. To do this we need to issue commands to the peer to install and instantiate
smart contracts (also known as chaincode). Unlike in the previous labs, we are going
to do this manually without VS Code for now so we can see the different experience.
Page 17
Lab 3IBM Blockchain An IBM Proof of Technology
2.3 Running the Issue transaction as MagnetoCorp
__ 13. First, let’s give our terminal a name so we know who we are running as by issuing
the command:
set-title MagnetoCorp
As before when we ran this for the logging window, you should see the terminal title
change to MagnetoCorp:
Page 18
Lab 3IBM Blockchain An IBM Proof of Technology
__ 14. The Fabric commands we need to use are in the fabric-tools docker image, so let’s
start it running by issuing this docker-compose command to start the container:
docker-compose -f docker-compose.yml up -d cliMagnetoCorp
Docker compose is a tool that allows you to define and run multi-container
applications. In this case it will start the fabric-tools container and join it to the
existing net_basic network. You should see output telling you that the container has
been created, with the cliMagnetoCorp name we gave it:
If we run the docker ps command again we should see that the new container is
running. You can also see the container we created above for logging is running as
well:
Both of these containers have also been added to the net_basic network as well and
you can run the docker network inspect net_basic command again if you want to see
this for yourself.
Next we will begin to deploy the PaperNet smart contract.
Page 19
Lab 3IBM Blockchain An IBM Proof of Technology
__ 15. Change directory to the magnetocorp/contract folder:
cd ../../contract/
The full path should now be showing as: ~/workspace/fabric-getting-
started/fabric-samples/commercial-paper/organization/magnetocorp/contract
__ 16. Let’s take a brief look at the contract in VS Code. Open the contract folder in VS
Code by running:
code .
Note: do not miss the period ( . ) after the word code.
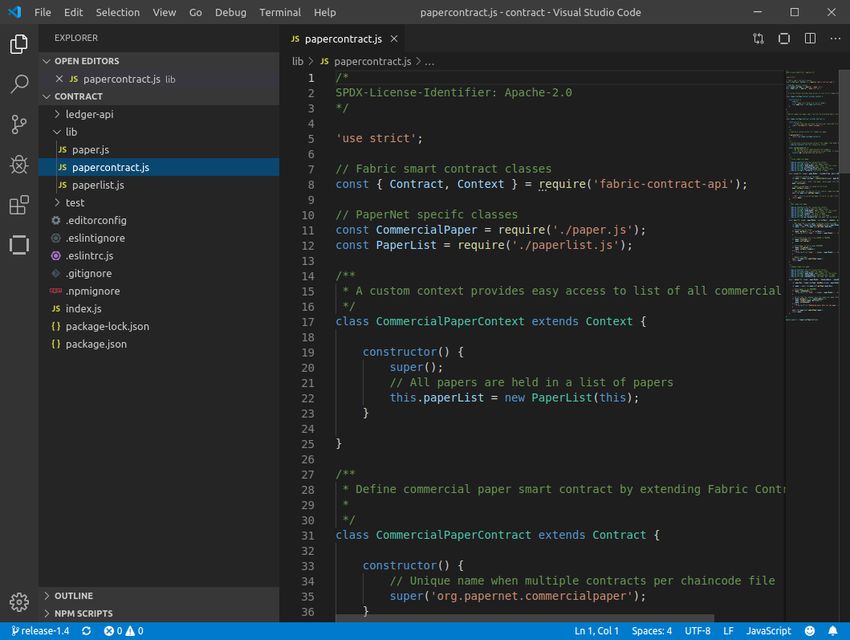
__ 17. When VS Code opens, expand the “lib” folder and double click on the
papercontract.js file to open it in the edit pane:
Page 20
Lab 3IBM Blockchain An IBM Proof of Technology
__ 18. The Commercial Paper contract is more sophisticated than the contracts we saw in
labs one and two, but it mostly works the same way. The main
CommercialPaperContract class starts on line 31, and if we use the “>” buttons
highlighted below in the VS Code editor to fold the methods of this class we can see
that the main transactions are instantiate, issue, buy and redeem.
Note: These “>” buttons only appear when you move your mouse over their location,
as shown above.
Page 21
Lab 3IBM Blockchain An IBM Proof of Technology
__ 19. Let’s expand the issue transaction and take a look so we can see what it will do.
Line 68 creates a new CommercialPaper object from the parameters passed in using
the static createInstance method on the CommercialPaper class. This class is
defined in the separate “paper.js” file which is also if the lib folder alongside
papercontract.js if you want to take a look at this method.
Line 71 then moves the newly created paper into the ISSUED state and on line 74 it
has its owner set from the parameters passed in.
Line 77 adds the paper to a “paperList” which is responsible for storing the state of
the paper in the world state. This is defined in the paperlist.js file if you want to take a
deeper look.
Line 80 then returns the paper to the client who called this transaction.
Feel free to have a look at the other files that make up the commercial paper smart
contract. If you want to delve even deeper into the design of the CommercialPaper
contract, there is much more information online if you have time to take a look.
Now we are going to install the papercontract onto a peer in the network.
Page 22
Lab 3IBM Blockchain An IBM Proof of Technology
__ 20. Switch back to the MagnetoCorp terminal window and issue the following
command:
docker exec cliMagnetoCorp peer chaincode install -n
papercontract -v 0.0.3 -p /opt/gopath/src/github.com/contract -l
node
Note: The above command must be entered as a single line. If you copy and paste it
from the pdf, be sure to enter it as a single line.
Note 2: In the above command, the flags are case-sensitive and the flag “-l” is a
letter “l” for language and not a number one.
This command uses the cliMagnetoCorp container which was configured to send
commands to peer0.org1.example.com in our basic network. Its main role is to copy
the papercontract source code and send it to the remote peer, ready for it to be
instantiated.
Page 23
Lab 3IBM Blockchain An IBM Proof of Technology
__ 21. To instantiate the contract on peer0, issue the following command at the
MagnetoCorp terminal:
docker exec cliMagnetoCorp peer chaincode instantiate -n
papercontract -v 0.0.3 -l node -c
'{"Args":["org.papernet.commercialpaper:instantiate"]}' -C
mychannel -P "AND ('Org1MSP.member')"
Note: As before, the above command must be entered as a single line. If you copy and
paste it from the pdf, be sure to enter it as a single line. Again, remember, the flags are
case-sensitive and the flag “-l” is a letter “l” for language and not a number one.
This command also uses the cliMagnetoCorp container to cause the contract to
become instantiated on the mychannel channel. In addition, it also invokes the
instantiate transaction as part of the command which allows any required
initialisation to take place. Finally, note the last option – the -P flag which specifies
which organisations in the network need to endorse the transactions issued by this
contract before they will be considered valid.
Note that this command may take a little time to run as it will cause the peer to create
a new docker container to be created to run the contract in.
Page 24
Lab 3IBM Blockchain An IBM Proof of Technology
If you wish to see this new container, run the docker ps command again – it should
have a name beginning with: dev-peer0.org1.example.com-papercontract-0.
Note 2: Log messages are written to the docker log output window as a result of
the instantiate transaction if you want to take a quick look.
Now the contract is up and running, it is time to start running transactions, and to start
things moving, MagnetoCorp is going to run an application to issue the first
commercial paper on the PaperNet network. To do this we are going to act as
Isabella, an employee of MagnetoCorp.
__ 22. Change to the folder that contains the issue application.
cd ../application/
The full path at this point should be: ~/workspace/fabric-getting-started/fabric-
samples/commercial-paper/organization/magnetocorp/application
__ 23. Run the ls command to see the files in this folder:
ls
We see that there are several files:
Next let’s take a look at the issue application.
__ 24. Run this command to open the issue application in the VS Code editor so we can
see the code:
code issue.js
Take a look at the code for the issue application. The main points are:
Page 25
Lab 3IBM Blockchain An IBM Proof of Technology
Lines 18 - 21: Import various dependencies
Line 25: Load the identity from the wallet on the file system
Line 31: Create a new gateway
Line 41: Load the connection profile from file system
Line 53: Connect to the gateway
Line 58: Get the mychannel channel from the gateway network
Line 63: Get the papercontract contract from the gateway
Line 68: Use the contract to submit the issue transaction, passing in the details of the
paper to be issued.
Line 71: Log the response
As we can see above on line 25, the issue application will need to load Isabella’s
identity before it can create the transaction, so we need to make sure her identity is in
the wallet that the issue application will use as shown in this diagram:
However, before we can run the application, we need to download the dependencies
listed in the package.json file from npm
Page 26
Lab 3IBM Blockchain An IBM Proof of Technology
__ 25. Switch back to the MagnetoCorp terminal and issue this command:
npm install
Note: This will take a while to download the dependencies and you may see a slightly
different output to that shown below.
When the download has finished, if you run ls again, you will see a new node_modules
folder has been created. It is the node_modules folder that contains the dependencies.
__ 26. Now we are almost ready to issue a new commercial paper, we just need to load
Isabella’s digital certificate into the wallet before we can use it. To do this we run the
following application:
node addToWallet.js
addToWallet simply copies an identity from the basic-network to our wallet location
for use by other applications.
Page 27
Lab 3IBM Blockchain An IBM Proof of Technology
__ 27. Run this command to see the contents of the newly created wallet:
ls ../identity/user/isabella/wallet/
Now you can see the User1@org1.example.com folder which is used by the issue
application. If we run another command, we can see the three files that make up the
identity itself:
ls ../identity/user/isabella/wallet/User1@org1.example.com
These files consist of a private key for signing transactions, a public key linked to the
private key and a file that contains both metadata and a certificate for our user.
Page 28
Lab 3IBM Blockchain An IBM Proof of Technology
__ 28. Now we can finally issue the commercial paper by running:
node issue.js
From the output you can see that we followed the steps outlined above to
successfully issue commercial paper 00001 for 5,000,000 USD. We have submitted
the transaction to the network and the contract has written these details to the world
state and the ledger. The transaction was also endorsed and validated before it was
committed.
2.4 Working as DigiCorp
__ 29. Now that we have issued paper 00001, we want to take on the persona of an
employee of DigiBank who is going to buy and redeem this paper. If we look at a
diagram, we can see how they will interact with the same network:
Page 29
Lab 3IBM Blockchain An IBM Proof of Technology
__ 30. Let’s open up a new tabbed terminal window so we can act as Balaji, an employee
of DigiBank. Make sure the MagnetoCorp terminal window has focus, then press:
ctrl + shift + t
This will open up a new tab alongside the MagnetoCorp one:
__ 31. For ease of use, let’s give this new terminal tab a name:
set-title DigiBank
Now we can easily switch between the different users as required by clicking on the
tab for the user we want.
__ 32. As DigiBank, let’s change to DigiBank’s application folder:
cd ../../digibank/application/
The full path should be ~/workspace/fabric-getting-started/fabric-
samples/commercial-paper/organization/digibank/application
Page 30
Lab 3IBM Blockchain An IBM Proof of Technology
__ 33. Let’s have a look at what files we have in this folder by running:
ls
We can see this is similar to MagnetoCorp’s application folder, but this time we have
three different applications, buy.js, redeem.js and getPaper.js instead of issue.js.
Note: getPaper.js is added as part of this lab, and it is not part of the original
Commercial Paper tutorial. The contents of this file are shown in the appendix to this
lab guide.
__ 34. As before, before we can run anything, we need to download the dependencies
from npm:
npm install
Note: remember this can take a while to complete.
Page 31
Lab 3IBM Blockchain An IBM Proof of Technology
__ 35. As we are going to be running as Balaji, we need to load the identity they are going
to use into DigiBank’s wallet, just like we did for Isabella earlier:
node addToWallet.js
__ 36. Let’s take a quick look again at the identity the application copied:
ls ../identity/user/balaji/wallet/
This time you can see the identity is Admin@org1.example.com, as Balaji is acting as
an admin for DigiBank.
Page 32
Lab 3IBM Blockchain An IBM Proof of Technology
Just like last time, we can also run another command, we can see the three files that
make up the identity itself:
ls ../identity/user/balaji/wallet/Admin@org1.example.com
Again, these files consist of a private key for signing transactions, a public key linked to
the private key and a file that contains both metadata and a certificate for our user.
Now Balaji from DigiBank would like to buy the commercial paper 00001. However, he
would like to take a look at this paper (00001) on the ledger before he submits the buy
transaction.
Page 33
Lab 3IBM Blockchain An IBM Proof of Technology
__ 37. As Balaji from the DigiBank terminal, run this command to take a look at the
commercial paper:
node getPaper.js
However, if we look at the output, we can see that running getPaper.js returns an
error because the “getPaper” transaction does not exist in the commercial paper
smart contract that is currently deployed into the PaperNet network.
So now, we are going to help Balaji implement the new transaction in the commercial
paper smart contract. Although Balaji could do this entirely from the command line,
we are going to use VS Code to help us simplify the process.
__ 38. Switch to the VS Code windows which should already be open, but we will open a
new window so we can start from a clean editor:
Choose the File / New Window menu option
Page 34
Lab 3IBM Blockchain An IBM Proof of Technology
__ 39. From the “Welcome” screen choose “Add workspace folder…”:
__ 40. Using the screen shot below as a guide, navigate to open a folder as follows:
Step 1: Click in the workspace folder on the bottom left of the dialogue.
Step 2: Navigate to the folder: fabric-getting-started/fabric-
samples/commercial-paper/organization/digibank/
Step 3: Select the folder contract
Step 4: Click the Add button on the bottom right.
Note: the full path to the contract folder you are importing for reference is:
/home/blockchain/workspace/fabric-getting-started/fabric-
samples/commercial-paper/organization/digibank/contract
Note 2: Make sure you choose the digibank folder and not the magnetocorp one.
Page 35
Lab 3IBM Blockchain An IBM Proof of Technology
__ 41. Once the folder is added to the workspace, expand the lib folder and double-click
on the papercontract.js smart contract to open it in the main editing view:
__ 42. We looked at the issue transaction in the papercontract earlier in this lab, but now
we are going to create a new transaction called getPaper. It is going to be a simple
transaction that just returns the paper that was requested as a parameter. We are
going to insert it between the existing instantiate and issue transactions starting on
line 55.
/**
* Get commercial paper
* @param {Context} ctx the transaction context
* @param {String} issuer commercial paper issuer
* @param {Integer} paperNumber paper number for this issuer
*/
async getPaper(ctx, issuer, paperNumber) {
try {
console.log('getPaper for: ' + issuer + ' ' + paperNumber);
let paperKey = CommercialPaper.makeKey([issuer, paperNumber]);
let paper = await ctx.paperList.getPaper(paperKey);
return paper;
} catch(e) {
throw new Error('Paper: ' + paperNumber + ' absent for ' + issuer);
}
}
You can either copy the code above or type it in yourself, but make sure it is correct
and in the right place as shown in the screenshot below:
Page 36
Lab 3IBM Blockchain An IBM Proof of Technology
Notice how the new getPaper code is placed after the instantiate transaction finishes,
and before the issue transaction begins.
__ 43. Make sure you save the changes, using the File / Save option or press ctrl + s
Note that when a file has changes pending it will have a filled in circle in its tab:
when it is saved this will change to an ‘X’:
Page 37
Lab 3IBM Blockchain An IBM Proof of Technology
__ 44. When the papercontract.js file is saved, click on the IBM Blockchain Platform icon
in the sidebar to switch to the IBM Blockchain Platform view so we can use IBM
Blockchain Platform to simplify the smart contract upgrade experience.
Now we need to connect VS Code to the running PaperNet network we set up earlier
in this lab. To do this we need to configure a Fabric Environment in VS Code with the
details of the nodes that make up the network.
__ 45. Click on the + in the Fabric Environments panel on the left:
Note: the + only appears when you move your mouse over the Fabric Environments
panel.
__ 46. In the “Enter a name for the environment…” pop up at the top of the screen, enter
PaperNet and press Enter
__ 47. In the “Select all the Fabric node (JSON) files you want to import” pop up at the
top of the screen, click Browse:
Page 38
Lab 3IBM Blockchain An IBM Proof of Technology
__ 48. Using the screen shot below as a guide, navigate to open the nodes configuration
file as follows:
Step 1: Click in the workspace folder on the bottom left of the dialogue.
Step 2: Navigate to the folder: fabric-getting-started/fabric-
samples/commercial-paper/organization/digibank/gateway/
Step 3: Select the file networkConnection.json
Step 4: Click the Select button on the bottom right.
Note: the full path to the networkConnection.json file you are importing for
reference is: /home/blockchain/workspace/fabric-getting-started/fabric-
samples/commercial-paper/organization/digibank/gateway/networkConnection
.json
Make sure you choose the digibank folder and not the magnetocorp one. And make
sure you choose the networkConnection.json file.
Note 2: networkConnection .json is added as part of this lab, and it is not part of the
original Commercial Paper tutorial. The contents of this file are shown in the
appendix to this lab guide.
Page 39
Lab 3IBM Blockchain An IBM Proof of Technology
__ 49. In the “Add more (JSON) node definitions” pop up at the top of the screen click
“Done adding nodes”
When it is complete you will see this information message
__ 50. Click on the newly created PaperNet Fabric Environment:
This will then change to show that PaperNet needs further setup for three nodes that
were listed in the networkConnection.json file:
There is also an information message with more explanation:
Page 40
Lab 3IBM Blockchain An IBM Proof of Technology
__ 51. First, click on peer0.org1.example.com
__ 52. In the pop up at the top of the screen with the message “An admin identity for
“Org1MSP” is required to perform installs.” click “Add new wallet”:
__ 53. As we already have a wallet that we created earlier in this lab, in the pop up choose
“Specify an existing file system wallet”:
__ 54. In the “Enter a file path to a wallet directory” pop up choose “Browse”:
Page 41
Lab 3IBM Blockchain An IBM Proof of Technology
__ 55. Using the screen shot below as a guide, navigate to open a wallet folder as follows:
Step 1: Click in the workspace folder on the bottom left of the dialogue.
Step 2: Navigate to the folder: fabric-getting-started/fabric-
samples/commercial-paper/organization/digibank/identity/user/balaji/
Step 3: Select the folder wallet
Step 4: Click the Select button on the bottom right.
Note: the full path to the wallet folder you are importing for reference is:
/home/blockchain/workspace/fabric-getting-started/fabric-
samples/commercial-paper/organization/digibank/identity/user/balaji/
Make sure you choose the digibank folder and not the magnetocorp one. Also make
sure you choose the wallet folder itself and not the Admin@org1.example.com
folder inside it. You should then see an information message saying that the wallet
was added successfully.
Page 42
Lab 3IBM Blockchain An IBM Proof of Technology
__ 56. In the “Select the admin identity for Org1MSP” pop up at the top of the screen
choose “Admin@org1.example.com”:
This will trigger an information message showing success:
__ 57. In the “Do you want to associate the same identity with another node?” pop up
at the top of the screen choose “Yes, orderer.example.com”:
This will trigger two information messages showing we have successfully associated
the identity and connected to the PaperNet network:
Finally, in the Fabric Environment view we can now see the papercontract@0.0.3
smart contract that we installed and instantiated earlier in this lab:
Page 43
Lab 3IBM Blockchain An IBM Proof of Technology
To change an instantiated contract, Hyperledger Fabric requires that we upgrade the
existing contract to the new version. To do this we must first increment the version
number of the contract and make sure the name of the package will match the contract
we are upgrading.
__ 58. Switch to the Explorer view in VS Code.
Note: If you are having problems and cannot see the Explorer view for any reason,
click on its icon in the activity bar ( ) or press “ctrl + shift + e” to show it.
__ 59. Double click on the package.json file in the contract folder to open it for editing:
Lines two and three of the package.json file define the name and version of the
contract package. Currently the name is papercontract and the version is 0.0.3:
Page 44
Lab 3IBM Blockchain An IBM Proof of Technology
__ 60. We can see that the name is correct and matches the contract we have deployed,
but we need to increment the version to 0.0.4:
__ 61. Make sure you save the changes, using the File / Save option or press ctrl + s
__ 62. Switch back to the IBM Blockchain Platform view:
__ 63. From the Smart Contracts pane, click the “More Actions” ‘…’ button to package
the contract:
Note: The ‘…’ only appears when you move your mouse over the Smart Contracts
bar.
Page 45
Lab 3IBM Blockchain An IBM Proof of Technology
__ 64. From the pop up menu choose “Package Open Project”:
When the packaging is complete, you will see an informational message:
Also the package will appear in the Smart Contracts pane:
Note: Make sure that your package has got the correct name and version. If it does
not, make sure you enter the correct details in the package.json file as instructed
above and repackage it.
__ 65. To upgrade the contract to the new version that contains our getPaper transaction,
right click on the instantiated papercontract@0.0.3 contract and choose the
Upgrade Smart Contract menu option:
__ 66. From the “Select the smart contract version to perform an upgrade with” pop up
at the top of the screen, choose the papercontract@0.0.4 Packaged option:
Page 46
Lab 3IBM Blockchain An IBM Proof of Technology
__ 67. As the instantiate method in our smart contract does not perform and necessary
task, we do not need to call it, so from the “optional: What function do you want to
call…” pop up menu, just press enter:
__ 68. As we are not using private data collections, from the “Do you want to provide a
private data collection configuration file pop up menu, just press enter:
Upgrading a smart contract can take several minutes as a new docker container is
built to contain the new contract. Whilst it is happening you should see this
information message
When it is complete you will see this information message
Once complete, the “Fabric Environments” view will change to show the new
contract papercontract@0.0.4 has been installed and instantiated as part of the
upgrade process:
Now we have upgraded the contract, we need create a new gateway to interact with it
as gateways are the way you connect to a Fabric network.
Page 47
Lab 3IBM Blockchain An IBM Proof of Technology
__ 69. Click on the + in the Fabric Gateways panel on the left to add a new gateway:
Note: the + only appears when you move your mouse over the Fabric Gateways
panel.
__ 70. In the “Choose a method to add a gateway” pop up at the top of the screen,
choose “Create a gateway from a Fabric environment”:
Note: We could have created a gateway from a connection profile instead, by using
the profile that comes with the commercial paper sample in the
“~/workspace/fabric-getting-started/fabric-samples/commercial-
paper/organization/digibank/gateway/networkConnection.yaml” folder,
but as we already have an environment we can simplify the process by using it.
__ 71. In the “Enter a name for the gateway…” pop up at the top of the screen, enter
“PaperNet_gw”:
When it has finished an information message will appear:
__ 72. Click on the new PaperNet_gw gateway to connect to the PaperNet network:
Page 48
Lab 3IBM Blockchain An IBM Proof of Technology
__ 73. Expand the Channels section and the “myChannel” channel to see the upgraded
contract papercontract@0.0.4. Expand the contract and you will see the new
getPaper transaction is now available:
Note: If you don’t see the getPaper transaction, make sure you edited the Digibank
copy of package.json and papercontract.js.
Let’s run the getPaper transaction from within VS Code
__ 74. Right click on the getPaper transaction and choose Evaluate Transaction:
__ 75. In the pop up at the top of the screen enter "MagnetoCorp,"00001" inside the
array square brackets [ ]. Make sure you include the "" marks around each parameter.
Page 49
Lab 3IBM Blockchain An IBM Proof of Technology
__ 76. In the next optional pop up, just press enter as we have no transient data:
If you have entered everything correctly you will see a success information message:
In addition in the output window you will see the paper 00001 data that has been
returned:
However, this data is not very well formatted, so now we will use the DigiBank
getPaper.js command line application which better formats the response.
Page 50
Lab 3IBM Blockchain An IBM Proof of Technology
__ 77. Now switch back to DigiBank’s terminal window and run the getPaper command
again as you did earlier in this lab:
node getPaper.js
This time we can see that the transaction was run successfully and we can see that
the paper 00001 was successfully retrieved and that its state is currently ISSUED.
Now Balaji is ready to buy the paper.
Page 51
Lab 3IBM Blockchain An IBM Proof of Technology
2.5 Running the Buy and Redeem transactions as DigiBank
__ 78. In the same DigiBank terminal, run the buy application:
node buy.js
As you can see the transaction went through successfully, and paper 0001 is now
owned by DigiBank.
Page 52
Lab 3IBM Blockchain An IBM Proof of Technology
__ 79. In the same terminal, let’s run getPaper again to see the current state of the paper
and observe the changes made:
node getPaper.js
Now we can see that the paper indeed owned by DigiBank and that the state of the
paper is currently TRADING. It is still clear that the paper was issued by
MagnetoCorp though.
Page 53
Lab 3IBM Blockchain An IBM Proof of Technology
__ 80. Next, let’s assume that the maturity date has been reached and DigiBank wants to
redeem the paper. Also in the DigiBank terminal, let’s run the redeem application as
Balaji:
node redeem.js
Again the transaction has run smoothly, and the paper was redeemed with
MagnetoCorp.
Page 54
Lab 3IBM Blockchain An IBM Proof of Technology
__ 81. Let’s run getPaper one more time to see the final state of the paper and observe
the changes made:
node getPaper.js
As you can see, the paper is now in REDEEMED state, and is now owned by
MagnetoCorp again.
Now we have most things working, let’s issue a new commercial paper, but this time
we will go through the steps a little faster.
Page 55
Lab 3IBM Blockchain An IBM Proof of Technology
2.6 Issuing another paper as MagnetoCorp
__ 82. Switch to the MagnetoCorp terminal tab and open the issue application in VS Code
so we can edit it for a new paper:
code issue.js
Edit the submitTransaction call on line 68 so we can see some differences from the
previous one. Use 00002 for the paper number to match the rest of this lab. A valid
set of options would be:
'issue','MagnetoCorp','00002','2020-07-31','2020-12-31','6000000'
These will issue paper 00002 at a face value of 6,000,000 USD.
__ 83. Make sure you save the changes, using the File / Save option or press ctrl + s
__ 84. Back in the MagnetoCorp terminal, run the issue command again:
node issue.js
If you edited the file correctly, the transaction will go through and you can see the new
paper was issued matching the new details:
Page 56
Lab 3IBM Blockchain An IBM Proof of Technology
2.7 Buying another paper as DigiBank
__ 85. Switch back to DigiBank’s terminal tab and open the getPaper application in VS
Code so we can edit it to retrieve the new paper:
code getPaper.js
Edit the evaluateTransaction call on line 67 so that it retrieves paper 00002.
__ 86. Make sure you save the changes to getPaper.js, using the File / Save option or
press ctrl + s
__ 87. Run the getPaper application so you can confirm that paper 00002 is correct
before we buy it:
node getPaper.js
__ 88. This time we will issue the buy transaction from VS Code for a change. Right click
on the buy transaction for the contract in the gateway and choose Submit
Transaction:
__ 89. In the pop up at the top of the screen enter the arguments:
"MagnetoCorp","00002","MagnetoCorp","DigiBank","5900000","2020-08-20"
and press “Enter”. Make sure you enter the quotes around the strings, but do not add
any extra spaces as otherwise they will be taken as part of the string itself which will
result in an error.
Page 57
Lab 3IBM Blockchain An IBM Proof of Technology
__ 90. In the next optional pop up, just press enter as we have no transient data:
When the transaction has finished , if you have entered everything correctly you will
see a success message in the OUTPUT window, along with the information message:
Note: If instead you get an error, you may have entered the string incorrectly. Please
check for an error and try this step again.
__ 91. Once the transaction has been successfully submitted, back in the DigiBank
terminal window, enter node getPaper.js again the see the resulting changes to the
paper. You should see that it is now owned by DigiBank as expected and the status is
TRADING rather than ISSUED.
__ 92. Lastly, repeat the above four steps, but this time call the redeem transaction,
passing the parameters instead:
"MagnetoCorp","00002","DigiBank","2022-12-31"
Once the redeem transaction has been submitted, check that the paper has been
updated correctly again by running node getpaper.js again.
Page 58
Lab 3IBM Blockchain An IBM Proof of Technology
2.8 Looking at Errors
__ 93. As a final part of this lab, we will look at how errors are reported back in VS Code.
Open the code for the getPaper transaction in the papercontract.js file. We can see
that if there is an error, such as a paper not being found, it throws an Error exception
back to the caller:
__ 94. Let’s give this a try. Right click on the getPaper transaction and choose Evaluate
Transaction:
__ 95. In the pop up at the top of the screen enter "MagnetoCorp,"00005" inside the
array square brackets [ ], which is a paper number that we have not created in this lab
and so should not exist. Make sure you include the "" marks around each parameter.
Page 59
Lab 3IBM Blockchain An IBM Proof of Technology
__ 96. In the next optional pop up, just press enter as we have no transient data:
If you have entered everything correctly, this time you will see the expected failure
information message reporting the error:
This shows that the contents of the exception thrown in the getPaper transaction has
been reported to the user in the information message. You can also see this message
in the blockchain Output Window as well:
The error message is also reported in a more raw form from the getPaper.js
application in the DigiBank terminal window. To see this, we need to edit the
getPaper.js file again.
__ 97. From the DigiBank terminal window, enter:
code getPaper.js
Edit the evaluateTransaction call on line 67 so that it retrieves paper 00005.
__ 98. Make sure you save the changes to getPaper.js, using the File / Save option or
press ctrl + s
Page 60
Lab 3IBM Blockchain An IBM Proof of Technology
__ 99. Run the getPaper application one more time so you can see the error generated:
node getPaper.js
Although we can see the error, we also see the more detailed stack trace leading up to
the error in the client.
__ 100. We have now completed part three of this lab – Connecting to an Existing
Network and we hope you enjoyed it. If you have any time remaining, please feel free
to experiment further on your own, maybe changing one of the command line
applications or even changing and upgrading the contract itself again.
Page 61
Lab 3IBM Blockchain An IBM Proof of Technology
3 We Value Your Feedback!
• Please ask your instructor for an evaluation form. Your feedback is very important to us as we
use it to continually improve the lab material.
• If no forms are available, or you want to give us extra information after the lab has finished,
please send your comments and feedback to “blockchain@uk.ibm.com”
Page 62
Lab 3IBM Blockchain An IBM Proof of Technology
4 Running the lab on your own machine:
The following Appendixes list the files and changes needed to run this lab outside of the VM
provided so you can try the exercises in your own environment.
Appendix 1 The networkConnection.json file:
This file should be placed into the following folder:
“fabric-samples/commercial-paper/organization/digibank/gateway”.
[
{
"name": "peer0.org1.example.com",
"api_url": "grpc://localhost:7051",
"type": "fabric-peer",
"msp_id": "Org1MSP"
},
{
"name": "orderer.example.com",
"api_url": "grpc://localhost:7050",
"type": "fabric-orderer",
"msp_id": "OrdererMSP"
}
]
Appendix 2 The getPaper.js file:
This file should be placed into the following folder:
“fabric-samples/commercial-paper/organization/digibank/application”.
/*
SPDX-License-Identifier: Apache-2.0
*/
/*
* This application has 6 basic steps:
* 1. Select an identity from a wallet
Page 63
Lab 3IBM Blockchain An IBM Proof of Technology
* 2. Connect to network gateway
* 3. Access PaperNet network
* 4. Construct request to query a commercial paper
* 5. Submit transaction
* 6. Process response
*/
'use strict';
// Bring key classes into scope, most importantly Fabric SDK network class
const fs = require('fs');
const yaml = require('js-yaml');
const { FileSystemWallet, Gateway } = require('fabric-network');
const CommercialPaper = require('../contract/lib/paper.js');
// A wallet stores a collection of identities for use
const wallet = new FileSystemWallet('../identity/user/balaji/wallet');
// Main program function
async function main() {
// A gateway defines the peers used to access Fabric networks
const gateway = new Gateway();
// Main try/catch block
try {
// Specify userName for network access
// const userName = 'isabella.issuer@magnetocorp.com';
const userName = 'Admin@org1.example.com';
// Load connection profile; will be used to locate a gateway
let connectionProfile =
yaml.safeLoad(fs.readFileSync('../gateway/networkConnection.yaml', 'utf8'));
// Set connection options; identity and wallet
let connectionOptions = {
identity: userName,
wallet: wallet,
discovery: { enabled:false, asLocalhost: true }
};
// Connect to gateway using application specified parameters
Page 64
Lab 3IBM Blockchain An IBM Proof of Technology
console.log('Connect to Fabric gateway.');
await gateway.connect(connectionProfile, connectionOptions);
// Access PaperNet network
console.log('Use network channel: mychannel.');
const network = await gateway.getNetwork('mychannel');
// Get addressability to commercial paper contract
console.log('Use org.papernet.commercialpaper smart contract.');
const contract = await network.getContract('papercontract',
'org.papernet.commercialpaper');
// get commercial paper
console.log('Submit commercial paper getPaper transaction.');
const getPaperResponse = await contract.evaluateTransaction('getPaper',
'MagnetoCorp', '00001');
// process response
console.log('Process getPaper transaction response.');
let paper = CommercialPaper.fromBuffer(getPaperResponse);
let paperState = "Unknown";
if(paper.isIssued()) {
paperState = "ISSUED";
} else if(paper.isTrading()){
paperState = "TRADING";
} else if(paper.isRedeemed()){
paperState = "REDEEMED";
}
console.log(` +--------- Paper Retrieved ---------+ `);
console.log(` | Paper number: "${paper.paperNumber}"`);
console.log(` | Paper is owned by: "${paper.owner}"`);
console.log(` | Paper is currently: "${paperState}"`);
console.log(` | Paper face value: "${paper.faceValue}"`);
console.log(` | Paper is issued by: "${paper.issuer}"`);
console.log(` | Paper issue on: "${paper.issueDateTime}"`);
console.log(` | Paper matures on: "${paper.maturityDateTime}"`);
console.log(` +-----------------------------------+ `);
Page 65
Lab 3IBM Blockchain An IBM Proof of Technology
console.log('Transaction complete.');
//console.log('Transaction complete.' + JSON.stringify(paper));
} catch (error) {
console.log(`Error processing transaction. ${error}`);
console.log(error.stack);
} finally {
// Disconnect from the gateway
console.log('Disconnect from Fabric gateway.')
gateway.disconnect();
}
}
main().then(() => {
console.log('getPaper program complete.');
}).catch((e) => {
console.log('getPaper program exception.');
console.log(e);
console.log(e.stack);
process.exit(-1);
});
Appendix 3 The fabric-samples\basic-network\docker-
compose.yml file
This file has been edited in this lab to enable discovery which is required for VS Code to
connect to a remote environment. The following line should be added to the environment
section for the peer0.org1.example.com:
CORE_PEER_GOSSIP_EXTERNALENDPOINT=peer0.org1.example.com:7051
Page 66
Lab 3You can also read