Janet Collins Designs Feathered Dreams Runner - Janet Collins Designed by - Sew Steady
←
→
Page content transcription
If your browser does not render page correctly, please read the page content below
Janet Collins Designs
‘From the First Stitch to the Last’

             Free Pattern Series

           Feathered
         Dreams Runner

                      Designed by
                    Janet Collins
              Accredited Westalee Teacher
Feathered Dreams Runner
This runner is what started me designing my Feathered Dreams
quilt. I wanted to create a simple project to showcase these
wonderful templates.
I had this striking japanese print in our shop and really wanted to
use it. Initially I was just going to use an Essex Linen fabric, but
when I saw a new bolt of Metalic Essex come in, I was a goner. It
just took on a whole new look. So I cut 10" strips from the bolts of
fabrics, cut some batting and got out my Feather templates.
Hmmm what to do. I initially was going to do a straight feather, but
that seemed a little boring, so I just drew a curved line down the
centre of the fabric. By then I had already decided to TempLeeQuilt
it, not realising at the time just how stunning it would be. (other
people’s words, not mine). I started to quilt all the feathers down the
spine, then realised I didn’t have a spine, just a drawn line.
So then I decided to use the new Decorative Thread Foot that
Leonie and Bill had sent me to try. Now what thread? We had just
had a delivery of sparkly silver thread that was just perfect.
So the spine was stitched and I got back and finished quilting the
feathers. It was whilst I was quilting that I realised that my base
thread was almost a match for the fabric. I wondered how it would
look like and if I had enough contrast. Too late, already started and
as I tell my students, just keep going and see what it looks like.
I was really pleased with the result when I started cutting out the
shapes. I sent a photo to Leonie to see what she thought of it.
Needless to say, she loved it, asked me to get a binding on it ASAP,
put it in an Express post bag and get it to her to take to England the
following Tuesday. I did as I was asked, and o ffit went. What a thrill
it was to see it on the TV programme that Leonie was doing in
England. It was right at the front of the display desk for the whole
programme. My other new quilt Feathered Roses was there as
well.
So this runner is the result of playing with the Feathered Leaf Set
from Westalee Design.
Since then I have taught this runner in Perth and Adelaide with
everyone loving the simplicity of it. It is quick, easy and looks great
in all colourways.
Please enjoy this free pattern as a gift from me.
I hope you enjoy making your own Feathered Dreams Runner.
Janet Collins Designs
© 2018 1Feathered Dreams Runner
Preparation for “TempLeeQuilting”
Prepare your 10" strips using the directions below..
Fusible Top Layer
Apply paper backed fusible web to the wrong side of all the TOP Adhesive
fabrics using the manufacturers instructions.
Making a sandwich
Lay the batting rectangle wrong side up, on your table.
Lightly spray the batting block with spray adhesive.
Back
Remember that we are BASTING NOT GLUEING.
If you spray the fabric instead of the batting you can create a Batting
‘drag’ effect when quilting.
I once had a student who did this quite unintentionally who
sprayed too much on the fabric side. No matter what we did,
we couldn’t get her fabric to move smoothly. After a few choice
Contrast
words, I finally figured out that there was glue on the bottom
fabric and that was the problem. So take care with the Spray
Top Layer
Top Layer
Baste...
With
Gently lay the backing rectangle on top of this and smooth it
out. Turn the block over so that the batting is now on top.
Fusible
Spray the top of the batting lightly, then lay the contrast Adhesive
square on top. Smooth it out.
Remove the paper backing from the top paper
backed rectangle.
Lay the top fusible backed fabric on top of the other fabrics.
Voila !!! “TempLeeQuilt” sandwiches
DO NOT IRON at this stage.
If you find that it moves a little, just put a pin in each corner.
We don't want this layer pressed down just yet.
Janet Collins Designs
© 2018 2Feathered Dreams Runner
Draw in a 42" x 6" box. Mark ½" outside to all sides.
Mark a curved line in the middle of each block.
Using the Decorative Thread Foot, couch a thread down the centre of the spine using a thread of
your choice. Tie in all the ends. Follow the directions that came with the foot or watch the video at
Westalee Design.
Quilt feathers along the spine using the 5" Feather Template. Be sure to keep inside the drawn box
and allow for ¼” seam allowances all round.
Trim out each feather, top layer only, 1/8" from the stitching line using sharp scissors. Take your time
with this. The neater you are the better the finished result.
PRESS the completed block to adhere the fusible web and seal the raw edges on the block.
Trim the block to 7" x 42".
Bind your runner.
Janet Collins Designs
© 2018 3Feathered Dreams Runner
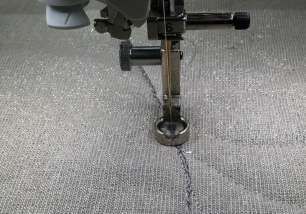
Using the Decorative Thread Foot
Westalee Design gave Quilters the first adjustable
height Domestic Sewing Machine Ruler Foot in
2015. Continuing their tradition of innovation for
quilting, they now bring you their Decorative
Threads Ruler Foot to let you couch with just one
Ruler Foot along with the guidance of templates
using a wide variety of decorative threads from
stranded silk to 12 ply metallics. All without
changing the Ruler Foot. I have decided to use a
decorative thread for all the spines in this quilt. I
used Wonderfil Dazzle in Silver. However you can
use any thread that suits your quilt.
Follow the Instructions that came with your Decorative Thread Ruler Foot or watch the
Westalee Design Video on their Youtube channel for visual directions.
The choice to use a decorative thread is yours. It is not essential, but I liked the look and definition it
gave my blocks.
Once all the threads have been couched tie all the ends in to secure them.
Janet Collins Designs
© 2018 4Feathered Dreams Runner
Other Layouts that you can create with these blocks
Janet Collins Designs
© 2018 5Feathered Dreams Runner
This is one of my Free pattern Series.
These patterns are available to enable you to try new templates. I hope
you enjoy this series. If there is a template you want me to add to the
series, just let me know.
Teachers who teach Westalee Design Templates are welcome to teach
this design so long as genuine templates are used.
Fabric Requirements
10" Top fabric x Width of fabric
10" Bottom Fabric x Width of fabric
10" Feature Fabric x Width of fabric
10" Piece Batting x Width of fabric
10" Paper backed fusible web x Width of fabric
Template Requirements
Westalee Design Ruler Foot
Westalee Design Decorative Thread Ruler Foot
Westalee Design 5" Feathered Leaf Template
Westalee Design Finial Template
For further information or assistance with this or any of our patterns or products please contact
us at
janetcollinsdesigns@iinet.net.au
or go to our website at fromthefirststitchtothelast.com.au or janetcollinsdesigns.com.au
“From the First Stitch to the Last”
is our shop in Perth, Western Australia. Pop on over to our website
and see what else we have been up to ‘Down Under’.
fromthefirststitchtothelast.com.au
All Quilts, Designs, Patterns, Books, Graphics and Text are protected by Copyright Laws 2018 and cannot be
reproduced by any means without the written consent of Janet Collins. By purchasing any Janet Collins product
you agree to abide by International Copyright Law.
Westalee Design graphics are used with the written consent of Westalee Design 2018 and are protected by
International Copyright Law.
All rights reserved 2018.
6You can also read