Lenovo XClarity Provisioning Manager Lite
User Guide
←
→
Page content transcription
If your browser does not render page correctly, please read the page content below
Lenovo XClarity Provisioning Manager Lite User Guide
Fifth Edition (March 2021)

© Copyright Lenovo 2018, 2021.
LIMITED AND RESTRICTED RIGHTS NOTICE: If data or software is delivered pursuant to a General Services
Administration (GSA) contract, use, reproduction, or disclosure is subject to restrictions set forth in Contract No. GS-35F-
05925.
Contents

Chapter 1. Overview . . . . . . . . . . . 1                                     Guided installation . . .    .   .   .   .   .   .   .   .   . . 9
Introduction . . . . . . . . . . . . . . .                      . . 1           Manual installation . . .    .   .   .   .   .   .   .   .   . 29
Creating the bootable USB storage drive . . . .                 . . 1       Firmware Update . . . . .        .   .   .   .   .   .   .   .   . 31
Launching Lenovo XClarity Provisioning Manager                              Cloning . . . . . . . . .        .   .   .   .   .   .   .   .   . 32
Lite. . . . . . . . . . . . . . . . . . .                       . . 2           Exporting response files.    .   .   .   .   .   .   .   .   . 32
Main interface . . . . . . . . . . . . . .                      . . 2           Importing response files .   .   .   .   .   .   .   .   .   . 33
Buttons on the Lenovo XClarity Provisioning                                 Diagnostics . . . . . . .        .   .   .   .   .   .   .   .   . 34
Manager Lite interfaces . . . . . . . . . . .                   . . 3
                                                                                Running memory test . .      .   .   .   .   .   .   .   .   . 34
Keyboard navigation . . . . . . . . . . . .                     . . 3
                                                                                Running disk drive test .    .   .   .   .   .   .   .   .   . 36
Chapter 2. Using Lenovo XClarity                                                Collecting RAID logs . .     .   .   .   .   .   .   .   .   . 37
Provisioning Manager Lite . . . . . . . . 5
                                                                            Chapter 3. Troubleshooting . . . . . . 41
Configuring network settings    .   .   .   .   .   .   .   .   .   .   5
System Summary . . . . .        .   .   .   .   .   .   .   .   .   .   6   Appendix A. Notices . . . . . . . . . . 43
RAID Setup . . . . . . .        .   .   .   .   .   .   .   .   .   .   7   Trademarks . . . . . . . . . . . . . . . .                         44
OS Installation . . . . . .     .   .   .   .   .   .   .   .   .   .   9

© Copyright Lenovo 2018, 2021                                                                                                                    i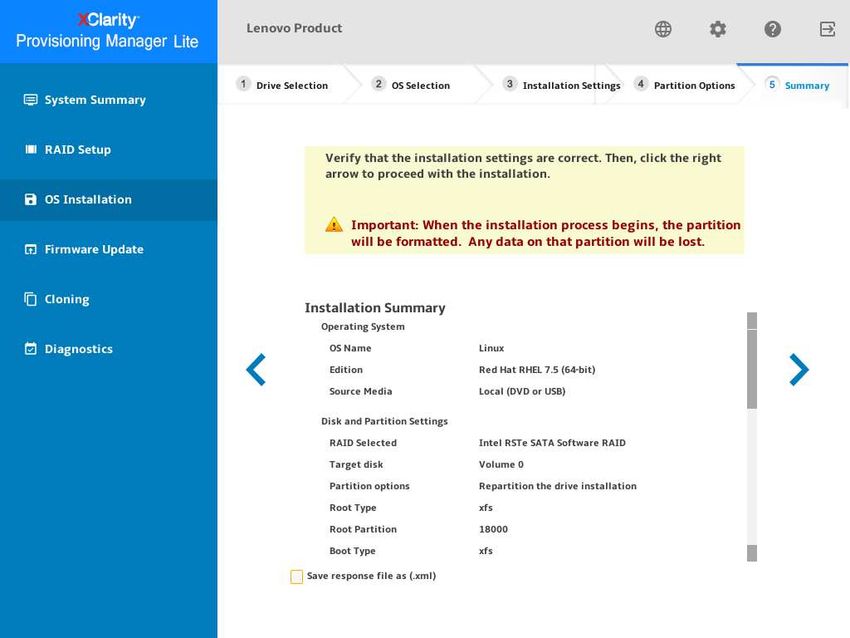
ii Lenovo XClarity Provisioning Manager Lite User Guide
Chapter 1. Overview
This chapter provides an overview of the Lenovo XClarity Provisioning Manager Lite (LXPM Lite) program,
including program introduction, program startup, main interface, buttons displayed on the program
interfaces, keyboard navigation, and how to download the useful information.

Notes:
 1. Before launching LXPM Lite, ensure that the boot mode of your server is set to UEFI.
 2. Some specific information might be different from what is displayed in the example interfaces.

Introduction
LXPM Lite enables you to configure Redundant Array of Independent Disks (RAID) , and updating firmware. It
also enables you to install the supported operating systems and associated device drivers, and run
diagnostics.

LXPM Lite has the following features:
• Easy-to-use, language-selectable interface
• Integrated help system
• Automatic hardware detection
• Ability to install an operating system and device drivers in an unattended mode or manually
• Ability to clone the settings in one server to other similarly configured Lenovo servers
• RAID setup support
• Firmware update support
• Diagnostics for memory test, disk drive test (HDD test), and RAID log collection

Creating the bootable USB storage drive
Before launching LXPM Lite, create a bootable USB storage drive first.

Notes:
• The USB storage drive must have a minimum of 500 MB of storage space.
• The USB storage drive will be formatted during the creation. Back up all data on it before the creation.

To create the bootable USB storage drive, do the following:
 1. Download the LXPM Lite package from http://datacentersupport.lenovo.com/ and save the package into a
    new folder on the computer. Unzip the package.
 2. Connect the USB storage drive to your computer.
 3. Download rufus-2.18.exe from http://rufus.ie/ and then double-click rufus-2.18.exe.
 4. In the Device drop-down list box, select the USB storage drive.
 5. In the Partition scheme and target system type drop-down list box, select MBR partition scheme for
    UEFI.
 6. In the New volume label text box, input LXPMLITE.
 7. In the Create a bootable disk using drop-down list box, select ISO Image.

© Copyright Lenovo 2018, 2021                                                                                1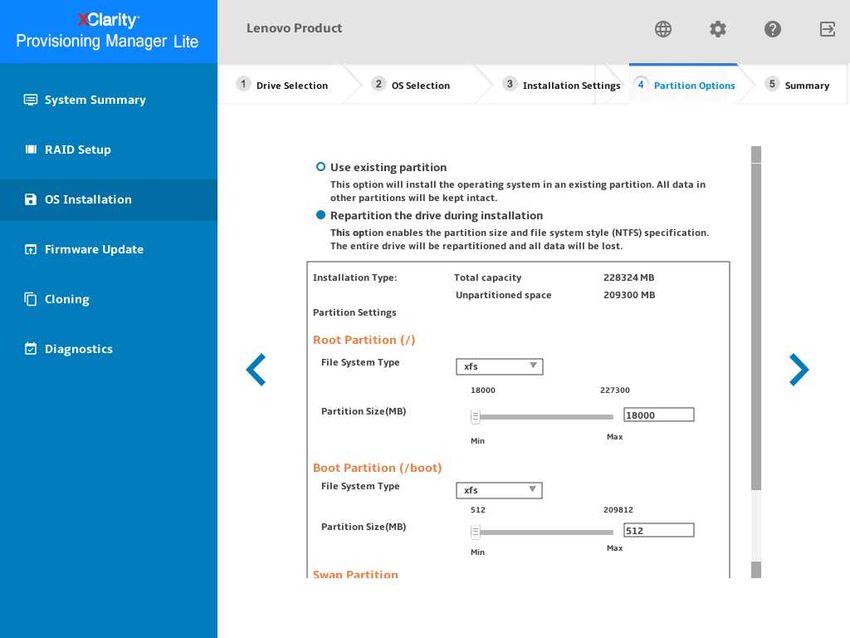
8. Click the browse button            and select the .iso file in the unzipped folder.
    9. Click Start. When prompted, click OK to continue.
10. After Copying ISO files finishes, click Close. The bootable USB storage drive for LXPM Lite is created.

Launching Lenovo XClarity Provisioning Manager Lite
Note: LXPM Lite only supports the UEFI mode. Ensure that the UEFI mode is enabled before launching the
program.

To launch LXPM Lite, do the following:
    1. Connect the LXPM Lite bootable USB storage drive to your server.
    2. Turn on the server. Press F12 to enter the boot menu.
    3. In the boot menu, select the bootable USB storage drive you created. Then, press Enter.
    4. Wait for several seconds. LXPM Lite will be launched.

Main interface
LXPM Lite main interface is divided into two panes. Click the tabs in the left pane to enter corresponding
interfaces in the right pane.

Figure 1. Lenovo XClarity Provisioning Manager Lite main interface

2     Lenovo XClarity Provisioning Manager Lite User Guide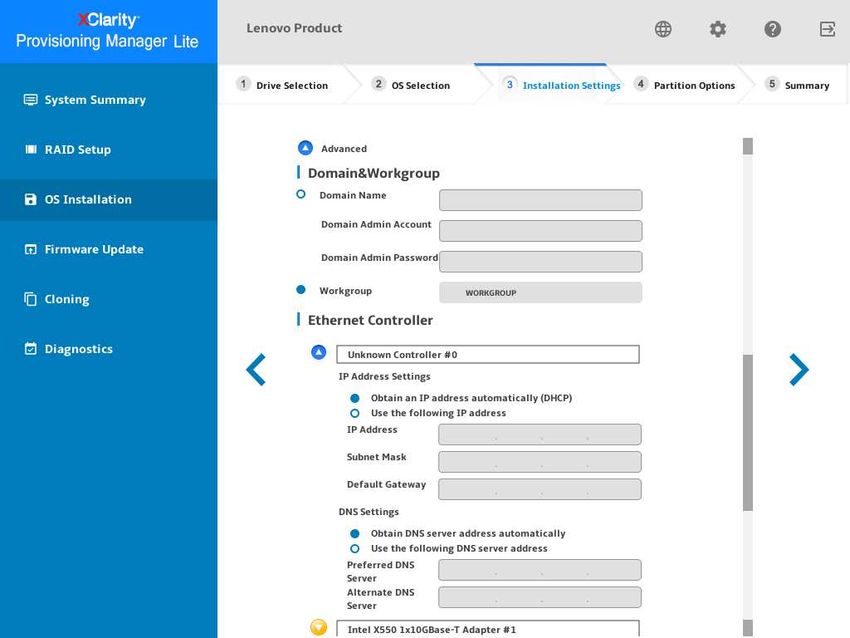
Tabs in the left pane of the main interface
The following list provides information about each tab in the left pane of the LXPM Lite main interface:
• System Summary: View basic information about your server, such as CPU, DIMM, and PCI devices.
• RAID Setup: Configure RAID and disk settings.
• OS Installation: Follow the wizard to install an operating system and associated device drivers.
• Firmware Update: Update UEFI firmware.
• Cloning: Export RAID settings to response files and import RAID and operating system installation
  settings from response files.
• Diagnostics: Diagnostics for memory test, disk drive test, and RAID log collection.

Buttons on the Lenovo XClarity Provisioning Manager Lite interfaces
The following table provides information about the buttons appear on the LXPM Lite interfaces.

 Button              Description

                     Select the language to be displayed. LXPM Lite supports 10 languages, including: Brazilian
                     Portuguese, English, French, German, Italian, Japanese, Korean, Simplified Chinese, Spanish,
                     and Traditional Chinese.
                     Display the Network Settings window. For details, refer to “Configuring network settings” on
                     page 5.

                     Click this button to display the following items:
                     • Help: View context-sensitive help information for each interface.
                     • HotKey: View keyboard navigation information.
                     • License Agreement: View Lenovo license agreement.
                     • Third-party Licenses: View the third-party licenses.
                     • About: View the LXPM Lite version, copyright, and trademark information.

                     Exit LXPM Lite

                     Return to the previous step.

                     Go to the next step.

Keyboard navigation
LXPM Lite supports navigation by using either mouse or keyboard. The following are the keys used for
keyboard navigation:
• Ctrl+Tab: Switch between the left pane and the right pane.
• Tab: Move forward to the next selectable item in the active pane.
• Shift+Tab: Move backward to the previous selectable item in the active pane.
• Space: Same as a click when a button is active.
• Up arrow: Scroll up.
• Down arrow: Scroll down.

                                                                                               Chapter 1. Overview   3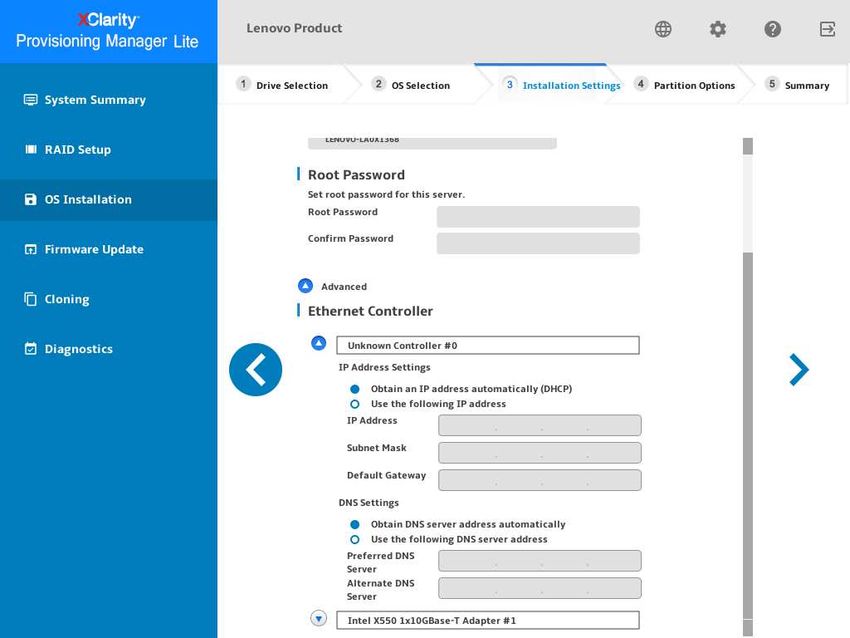
4 Lenovo XClarity Provisioning Manager Lite User Guide
Chapter 2. Using Lenovo XClarity Provisioning Manager Lite
This chapter provides information about using LXPM Lite.

Configuring network settings
To configure the network settings, do the following:

 1. Click     on the top right corner of the LXPM Lite main interface. The following Network Settings window
    is displayed.

     Figure 2. Network Settings window

 2. Follow the instructions on the screen to configure the network settings.
 3. After configuring the network settings, click one of the following buttons according to your needs:
     • Save and Connect: Save the settings and connect to the shared network. If the network cannot be
       connected, an error message will be displayed.
     • Save without Connect: Save the settings without connecting to the shared network. When you click
       the button, a confirmation window is displayed. Click Continue to save the settings without
       connecting, or click Cancel to go back to the Network Settings window.
     • Cancel: Discard the changes and exit the Network Settings window.

© Copyright Lenovo 2018, 2021                                                                              5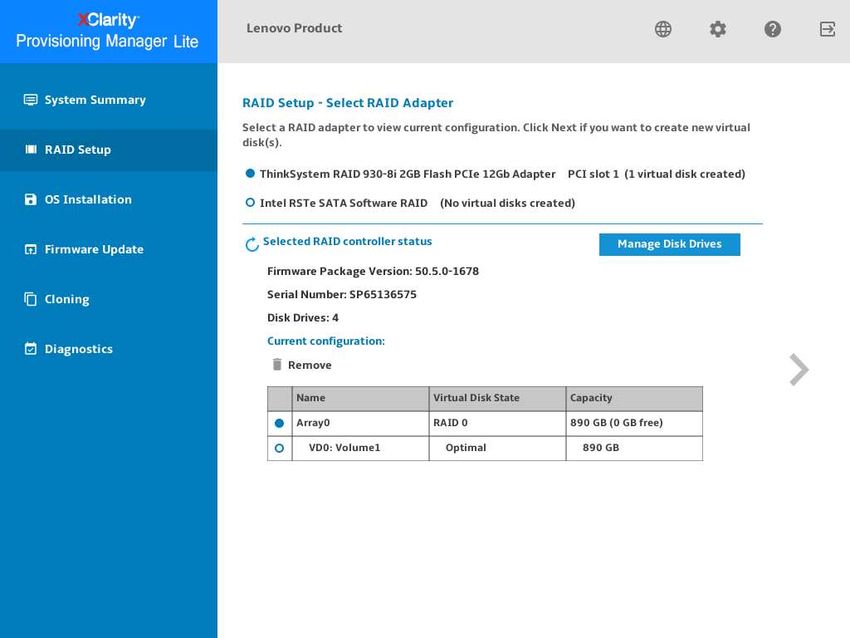
System Summary
Click the System Summary tab in the left pane to view the following system information in the right pane:
• Product name
• UEFI, and LXPM Lite version information
• Machine type and serial number
• Universally Unique Identifier (UUID)
• CPU information
• DIMM information
• PCI device information
• Disk drive information

Figure 3. System Summary interface

Notes:
• The Non-Volatile Memory express (NVMe) SSDs are recognized as PCIe devices and listed in the PCI
  device information section.
• If the Intel® Volume Management Device (VMD) feature for the PCI root port is enabled, the NVMe SSDs
  and NVMe switch adapters will not be displayed in the PCI device information section.
• For a running server, device changes will not be displayed in the System Summary interface in real time.
  To view the latest device information, you need to restart the server.

6   Lenovo XClarity Provisioning Manager Lite User Guide
• If the disk drive information cannot be displayed, go to UEFI Setup, disable CSM setting, and then restart
  the server.

RAID Setup
Click the RAID Setup tab in the left pane to enter the wizard for configuring RAID and disk settings for the
installed RAID adapters. The following is the first interface for the wizard.

Note: If there is no supported RAID adapter found on your server, a warning message is displayed. For
supported RAID adapters, go to:
http://www.lenovo.com/us/en/serverproven/index.shtml.

Figure 4. RAID Setup - Select RAID Adapter interface

To configure RAID and disk settings, follow the wizard to do the following:
 1. Select the RAID adapter you want to configure. The basic information and current configuration for the
    selected RAID adapter will be displayed.
 2. If you want to delete a disk array or a virtual disk for the selected RAID adapter, select the disk array or
    virtual disk you want to delete and click Remove. Then, follow the instructions on the screen to delete it.
 3. If you want to view or change the drive status for the selected RAID adapter, click Manage Disk Drives
    to enter the Manage Disk Drives interface. In this interface, all the drives connected to the selected RAID
    adapter are listed. You can change the drive status according to your needs. Then, click             and confirm
    to save changes and return to the “RAID Setup - Select RAID Adapter” interface or click              to discard
    changes and return to the “RAID Setup - Select RAID Adapter” interface.

                                                          Chapter 2. Using Lenovo XClarity Provisioning Manager Lite   7
Notes:
• If there is no disk drive connected to the selected RAID adapter or there is not enough space for the
disk drive connected to the RAID adapter, you cannot enter the “RAID Setup - Select RAID
configuration type” interface.
• If you are configuring the ThinkSystemTM M.2 RAID adapter, you cannot change the drive status, but
only can view the drive status in the Manage Disk Drives interface.
4. Click or click Start to enter the “RAID Setup - Select RAID configuration type” interface and do one
of the following:
• Select Simple configuration and go to step 5.
• Select Advanced configuration and select Create new disk array and virtual disk in the drop-
down list box. Then, go to step 6.
• Select Advanced configuration and select Use free capacity on the existing disk array in the
drop-down list box. Then, go to step 7.
5. Click to enter the “RAID Setup - Set RAID level and hot spare” interface. Select the RAID level and
choose to select or clear the Add Hot Spare Drive check box. If the check box is selected, one of the
drives is assigned for dedicated hot spare function. Then, go to step 9.
Notes:
• If you are configuring Intel RSTe RAID adapter or ThinkSystem M.2 RAID adapter, at least two disk
drives should be connected to the adapter.
• If you are configuring Intel RSTe RAID adapter or ThinkSystem M.2 RAID adapter, the Add Hot Spare
Drive check box will not be displayed.
• If you are selecting RAID 0 as the RAID level, the Add hot Spare Drive check box cannot be selected.
6. Click to enter the “RAID Setup - Select RAID Level and Select Drives” interface. Select the RAID level
and the drives for the new disk array, and set the role for each drive. Then, go to step 8.
7. Click to enter the “RAID Setup - Select Disk Array” interface. All the disk arrays that have free space
will be displayed. Select a disk array for the new virtual disk.
8. Click to enter the “RAID Setup - Create and Edit Virtual Disk” interface. You can create new virtual
disks. Then, you can edit or remove the new virtual disks. Follow the instructions on the screen to do the
configuration.
9. Click to enter the “RAID Setup - Verify settings” interface. Double check the settings and click .A
confirmation window is displayed.
10. Click Yes to enter the “RAID Setup - Creating Virtual Disk(s)” interface. The virtual disk creation result is
displayed.
11. Click to return to the first interface of the wizard and view the current configuration of the selected
RAID adapter.
8 Lenovo XClarity Provisioning Manager Lite User GuideOS Installation
Click the OS Installation tab in the left pane to enter the OS Installation interface. The OS Installation
interface provides a configuration wizard for installing an operating system.
Figure 5. OS Installation interface
There are two types of installation for your selection:
• Guided Install: Install an operating system and device drivers in an unattended mode.
• Manual Install: Install an operating system and device drivers manually.
Guided installation
Prerequisites
Before performing guided installation:
• Ensure that LXPM Lite bootable USB storage drive is writable, otherwise Guided Install cannot be
selected.
• If the operating system image file is stored on a USB storage drive, connect the USB storage drive to the
server.
Chapter 2. Using Lenovo XClarity Provisioning Manager Lite 9Performing guided installation In the OS Installation interface, select Guided Install and click . Refer to one of the following to install an operating system: • “Installing a Windows operating system” on page 11 • “Installing a Linux operating system” on page 18 • “Installing a VMware operating system” on page 24 Device drivers will be automatically installed during guided installation. It is recommended to reboot the OS after guided installation is completed to make all drivers take effect. You also can export the operating system installation settings to a response file. For more information, refer to “Exporting an operating-system- installation response file” on page 29. 10 Lenovo XClarity Provisioning Manager Lite User Guide
Installing a Windows operating system
The wizard provides a step by step guidance for installing an operating system. Follow the instructions on the
screen and the tips listed below to install a Windows operating system.
 1. Drive Selection

    Figure 6. Drive Selection step (for Windows)

    Attention: The selected drive will be formatted during the installation. Back up all data on it before the
    installation.

    Note: The drivers will be installed automatically after the OS installation. It is recommended to restart
    your server to ensure that all installed drivers take effect.

                                                        Chapter 2. Using Lenovo XClarity Provisioning Manager Lite   11
2. OS Selection
Figure 7. OS Selection step (for Windows)
12 Lenovo XClarity Provisioning Manager Lite User Guide3. Installation Settings
Figure 8. Installation Settings step – 1 (for Windows)
Administrator Password: You can change your administrator password later from the operating
system.
Chapter 2. Using Lenovo XClarity Provisioning Manager Lite 13If you want to do advanced configurations, expand the list by clicking the arrow icon next to Advanced.
Figure 9. Installation Settings step – 2 (for Windows)
Refer to the following table for the valid values when you type the required address information.
Address Part 1 Part 2 Part 3 Part 4
IP Address 1 – 126; 128 – 223 0 – 255 0 – 255 1 – 254
Subnet Mask 0 – 255 0 – 255 0 – 255 0 – 255
Default Gateway 0 – 255 0 – 255 0 – 255 0 – 255
Preferred DNS 1 – 126; 128 – 223 0 – 255 0 – 255 0 – 255
Server
Alternate DNS 1 – 126; 128 – 223 0 – 255 0 – 255 0 – 255
Server
14 Lenovo XClarity Provisioning Manager Lite User GuideFigure 10. Installation Settings step – 3 (for Windows)
Components: You can select one or more components for installation according to your requirements.
Include run-once commands: If you want to run specified commands at the end of the installation
process, select the check box. A command-type area is displayed. Type one command and click Add.
The command is added to the command list. You can add five commands at most. If you want to
remove a certain command, select it and click Remove. The commands in the command list will run one
time only and in the order you type them.
Chapter 2. Using Lenovo XClarity Provisioning Manager Lite 154. Partition Options
Figure 11. Partition Options step (for Windows)
If no existing partition is detected on the drive, select Repartition the drive during installation.
16 Lenovo XClarity Provisioning Manager Lite User Guide5. Summary
Figure 12. Summary step (for Windows)
If you want to change some settings, click until you return to the page where you can make the
changes.
If you want to export the operating system installation settings to a response file, refer to “Exporting an
operating-system-installation response file” on page 29.
Click . The license agreement page for the operating system is displayed. Read and accept the
license agreement. Click Next. The installation process starts. Wait until the installation finishes.
Chapter 2. Using Lenovo XClarity Provisioning Manager Lite 17Installing a Linux operating system
The wizard provides a step by step guidance for installing an operating system. Follow the instructions on the
screen and the tips listed below to install a Linux operating system.
1. Drive Selection
Figure 13. Drive Selection step (for Linux)
Attention: The selected drive will be formatted during the installation. Back up all data on it before the
installation.
Note: The drivers will be installed automatically after the OS installation. It is recommended to restart
your server to ensure that all installed drivers take effect.
18 Lenovo XClarity Provisioning Manager Lite User Guide2. OS Selection
Figure 14. OS Selection step (for Linux)
Chapter 2. Using Lenovo XClarity Provisioning Manager Lite 193. Installation Settings
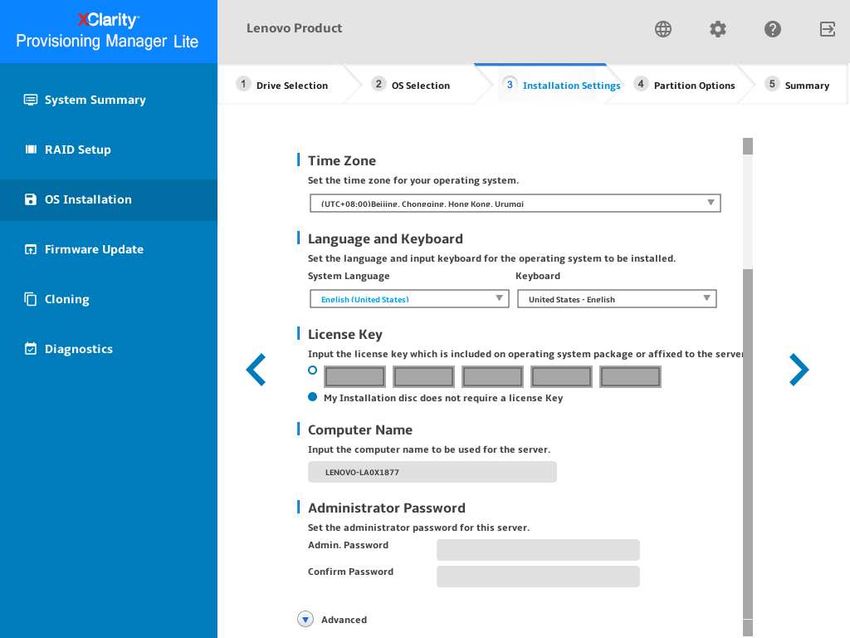
Figure 15. Installation Settings step – 1 (for Linux)
Root Password: You can change your root password later from the operating system.
20 Lenovo XClarity Provisioning Manager Lite User GuideIf you want to do advanced configurations, expand the list by clicking the arrow icon next to Advanced.
Figure 16. Installation Settings step – 2 (for Linux)
Refer to the following table for the valid values when you type the required address information.
Address Part 1 Part 2 Part 3 Part 4
IP Address 1 – 126; 128 – 223 0 – 255 0 – 255 1 – 254
Subnet Mask 0 – 255 0 – 255 0 – 255 0 – 255
Default Gateway 0 – 255 0 – 255 0 – 255 0 – 255
Preferred DNS 1 – 126; 128 – 223 0 – 255 0 – 255 0 – 255
Server
Alternate DNS 1 – 126; 128 – 223 0 – 255 0 – 255 0 – 255
Server
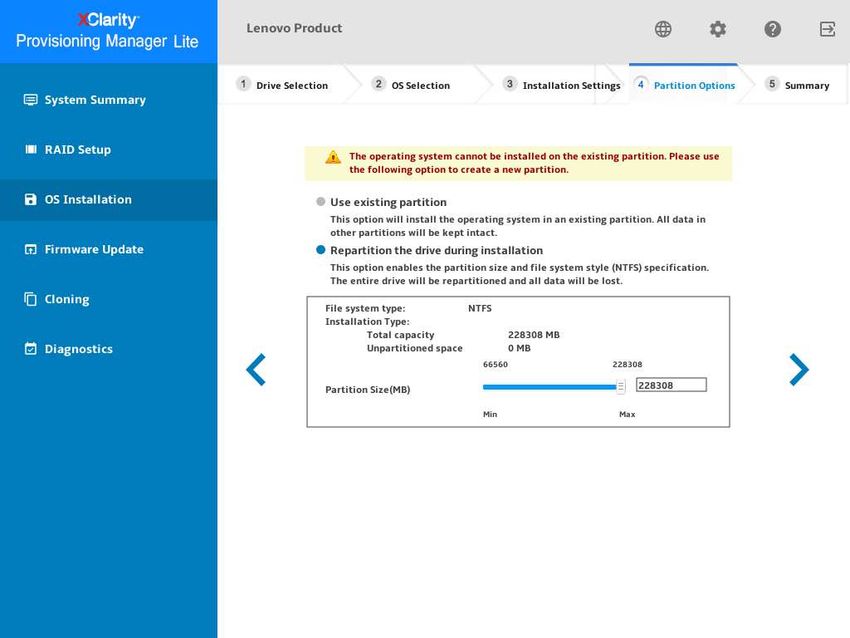
Chapter 2. Using Lenovo XClarity Provisioning Manager Lite 214. Partition Options
Figure 17. Partition Options step (for Linux)
If no existing partition is detected on the drive, select Repartition the drive during installation.
Root Partition: The root partition size depends on the space required for the operating system and
applications.
Boot Partition: This partition contains files required to start the operating system.
Swap Partition: Swap partition is the virtual memory in Linux. When the Random Access Memory (RAM)
is full, data will be stored on the swap partition temporarily. Although swap partition can be used to store
data, it should not be considered as a replacement for RAM. It is located on hard disk drives, and has
slower access speed than RAM.
22 Lenovo XClarity Provisioning Manager Lite User Guide5. Summary
Figure 18. Summary step (for Linux)
If you want to change some settings, click until you return to the page where you can make the
changes.
If you want to export the operating system installation settings to a response file, refer to “Exporting an
operating-system-installation response file” on page 29.
Click . The installation process starts. Wait until the installation finishes.
Chapter 2. Using Lenovo XClarity Provisioning Manager Lite 23Installing a VMware operating system
The wizard provides a step by step guidance for installing an operating system. Follow the instructions on the
screen and the tips listed below to install a VMware® operating system.
1. Drive Selection
Figure 19. Drive Selection step (for VMware)
Attention: The selected drive will be formatted during the installation. Back up all data on it before the
installation.
Note: The drivers will be installed automatically after the OS installation. It is recommended to restart
your server to ensure that all installed drivers take effect.
24 Lenovo XClarity Provisioning Manager Lite User Guide2. OS Selection
Figure 20. OS Selection step (for VMware)
Chapter 2. Using Lenovo XClarity Provisioning Manager Lite 253. Installation Settings
Figure 21. Installation Settings step – 1 (for VMware)
Root Password: You can change your root password later from the operating system.
26 Lenovo XClarity Provisioning Manager Lite User GuideIf you want to do advanced configurations, expand the list by clicking the arrow icon next to Advanced.
Figure 22. Installation Settings step – 2 (for VMware)
Refer to the following table for the valid values when you type the required address information.
Address Part 1 Part 2 Part 3 Part 4
IP Address 1 – 126; 128 – 223 0 – 255 0 – 255 1 – 254
Subnet Mask 0 – 255 0 – 255 0 – 255 0 – 255
Default Gateway 0 – 255 0 – 255 0 – 255 0 – 255
Preferred DNS 1 – 126; 128 – 223 0 – 255 0 – 255 0 – 255
Server
Alternate DNS 1 – 126; 128 – 223 0 – 255 0 – 255 0 – 255
Server
Chapter 2. Using Lenovo XClarity Provisioning Manager Lite 274. Summary
Figure 23. Summary step (for VMware)
If you want to change some settings, click until you return to the page where you can make the
changes.
If you want to export the operating system installation settings to a response file, refer to “Exporting an
operating-system-installation response file” on page 29.
Click . The installation process starts. Wait until the installation finishes.
28 Lenovo XClarity Provisioning Manager Lite User GuideExporting an operating-system-installation response file
You can export the operating system installation settings to a response file. Later, you can clone the settings
in this response file to other similarly configured Lenovo servers.
To export an operating-system-installation response file, do the following:
1. Attach a USB storage drive to the server or connect your server to a shared network. For instructions on
how to connect to a shared network, refer to “Configuring network settings” on page 5.
Note: The USB storage drive should include an FAT32 partition.
2. Follow the wizard to go through the Drive Selection, OS Selection, Installation Settings, Partition
Options, and Summary steps.
3. In the Summary step, select the Save response file as (.xml) check box, and click . The Save
Response File window is displayed.
4. Select the location to save the response file and input a file name.
5. Click Save. Wait for several minutes until the saving process is completed.
Manual installation
Prerequisites
Before installing an operating system manually, ensure that the operating system installation files are
prepared in one of the following forms:
• CD or DVD
Note: Ensure that the disc is clean and the version and architecture of the operating system are correct.
• USB storage drive
To create a USB installation medium, refer to the documentation at:
http://cn.download.lenovo.com/ibmdl/pub/pc/pccbbs/thinkservers/how_to_create_usb_os_installation
_media.pdf
Chapter 2. Using Lenovo XClarity Provisioning Manager Lite 29Installing an operating system manually
In the OS Installation interface, select Manual Install and click . The following interface is displayed.
Figure 24. Manual Install interface
Do the following to install an operating system manually:
1. Select the operating system you want to install, select a location to save the drivers, and click .
Note: If no USB storage drive is detected, the Save Drivers button is dimmed.
2. Select Begin the installation and click . The server will boot from the operating system medium and
the operating system installation process starts.
Note: You also can select Reboot system to restart the server if you want to do other configuration.
3. Install the operating system manually. To get instructions on how to install a specific operating system
manually, do the following:
a. Go to http://datacentersupport.lenovo.com and navigate to the support page for your server.
b. Click How-tos & Solutions.
c. Select an operating system and the installation instructions will be displayed.
4. After the operating system installation process is completed, install the drivers saved in step 1 by
yourself.
30 Lenovo XClarity Provisioning Manager Lite User GuideFirmware Update
Click the Firmware Update tab in the left pane to enter the Firmware Update interface. You can update the
UEFI firmware for your server in the Firmware Update interface. To download the update packages, go to:
http://datacentersupport.lenovo.com
Figure 25. Firmware Update interface
To update firmware, do the following:
1. Insert the USB storage drive into the server.
2. Click Browse Update Package.... The Select File window is displayed.
3. Select the UEFI firmware file and click OK. The check box will be enabled and the version information
will be displayed in the Available Version column.
Notes:
• If the available version is later than the current version, the check box will be selected automatically.
• Do not modify the UEFI firmware file name after downloading the file.
• Shared network is not supported to download the UEFI firmware file.
4. Select the UEFI firmware update check box.
5. Click Update. The update process takes several minutes. When the Status is shown as Success, the
update process is completed.
Note: After updating UEFI firmware, the server will be restarted automatically.
Chapter 2. Using Lenovo XClarity Provisioning Manager Lite 31Cloning
Click the Cloning tab in the left pane to enter the Cloning interface. In the Cloning interface, you can clone
settings in one server to other similarly configured Lenovo servers. The Cloning interface includes the
following two sections:
• Export: Used to export RAID settings of the current server to response file and save the response file to a
USB storage drive or a shared network folder.
• Import: Used to import RAID and operating system installation settings from response files.
Figure 26. Cloning interface
Exporting response files
To export RAID settings to response file, do the following:
1. Attach a USB storage drive to the server or connect your server to a shared network. For instructions on
how to connect to a shared network, refer to “Configuring network settings” on page 5.
Note: The USB storage drive should include an FAT32 partition.
2. In the Export section, click the Browse button. The Save Response File window is displayed.
3. Select the location to save the response file and input a file name.
4. Click Save to return to the Cloning interface. The check box for RAID export will be selected
automatically.
5. Click Start and wait for several minutes until the exporting process is completed.
32 Lenovo XClarity Provisioning Manager Lite User GuideTo export operating system installation settings to a response file, refer to “Exporting an operating-system-
installation response file” on page 29.
Importing response files
Prerequisites
• Before importing a RAID response file, ensure that the target server and the source server have same
RAID configuration.
• Before importing an operating-system-installation response file, ensure that the target server and the
source server have the same RAID adapter installed, and the capacity of the disk drive under the RAID
adapter for the target server is greater than the partition size in the response file.
To import RAID or operating system installation settings saved in response files to your server, do the
following:
1. If the response file is stored on a USB storage drive, insert the USB storage drive into the server. If the
response file is stored in a shared network folder, ensure that you have configured the network settings.
For instructions on how to configure the network settings, refer to “Configuring network settings” on
page 5.
2. In the Import section, click the Browse button. The Select File window is displayed.
3. Select the corresponding response file. The selected file name is displayed in the File Name field.
4. Click OK to return to the Cloning interface. The item you want to import will be selected automatically.
5. If you are importing a RAID response file, click Start. The importing process starts. Wait for several
minutes until the importing process is completed.
If you are importing an operating-system-installation response file, click Next, the Installation Summary
page appears. The settings in the operating-system-installation response file are listed in this page. You
can edit some settings according to your need. Then, click Start to start the operating system
installation process. Wait until the installation finishes.
Chapter 2. Using Lenovo XClarity Provisioning Manager Lite 33Diagnostics
Click the Diagnostics tab in the left pane to enter the Diagnostics interface. In the Diagnostics interface, you
can select actions for memory test, disk drive test, and RAID log collection. The Diagnostics interface
includes the following three sections:
• Memory Test: Run the memory test.
• HDD Test: Run the disk drive test.
• RAID Log: Collect the logs for the selected RAID adapters.
Figure 27. Diagnostics interface
Running memory test
To run memory test, do the following:
1. If you want to save the test result, attach a USB storage drive to the server, or connect your server to a
shared network. For instructions on how to connect to a shared network, refer to “Configuring network
settings” on page 5.
2. Click the Memory Test tab.
3. Select the test options according to your needs, and click Run Test to start testing.
Notes:
• You can select Test by cycles or Test by time according to your needs.
• Quick Test is selected as the default test type and it only runs the WriteRead test pattern.
34 Lenovo XClarity Provisioning Manager Lite User Guide• Full Test runs all test patterns and takes a long time to finish.
• The mouse pointer is not active during the test process.
• After the testing process is completed, the test result will be displayed to show you if the test is
passed or failed.
• You can press Esc to stop the test.
Figure 28. Memory test interface – 1
4. Click Save after the testing process is completed if you want to save the test result.
Note: The test result with more details will be saved in a memorylog.txt file in the USB storage drive or
the shared network folder. For example, if the memory test fails, you can see the specific number of the
fault devices, such as CPU and DIMM in the file.
Chapter 2. Using Lenovo XClarity Provisioning Manager Lite 35Figure 29. Memory test interface – 2
Running disk drive test
To run disk drive test, do the following:
1. If you want to save the test result, attach a USB storage drive to the server or connect your server to a
shared network. For instructions on how to connect to a shared network, refer to “Configuring network
settings” on page 5.
2. Click the Disk Drive Test tab.
3. Select the test options according to your need, and click Run to start testing.
Notes:
• You can select Short Self Test or Long Self Test according to your needs.
• Short Self Test is selected as the test type by default.
• The mouse pointer is not active during the testing process.
• You can press Esc to stop the test.
• If you are running test for NVMe SSDs, no matter you select Short Self Test or Long Self Test, the
test item only includes the Self-Monitoring, Analysis, and Reporting Technology (SMART) flag status.
• If there is no disk drive information displayed in System Summary page or Disk Test page, ensure that
the boot mode of your server is set to UEFI, and then restart your server.
4. Click Save after the testing process is completed if you want to save the test result.
Notes:
36 Lenovo XClarity Provisioning Manager Lite User Guide• The test result will be saved in a test_hdd.txt file in the USB storage drive or the shared network
folder. The file includes more details than the test result displayed on the interface.
• If two M.2 drives are configured as a RAID array, the drives are not supported in the disk drive test. If
you want to use disk drive test function to test the M.2 drives, do not configure them as a RAID array.
Figure 30. Disk drive test interface
Collecting RAID logs
To collect RAID logs, do the following:
1. If you want to save the logs, attach a USB storage drive to the server or connect your server to a shared
network. For instructions on how to connect to a shared network, refer to “Configuring network settings”
on page 5.
2. Click the RAID Log tab.
3. Select the RAID adapter that you want to collect the logs and click Collect RAID Log to start the
collection.
Note: The mouse pointer is not active during the collecting process.
Chapter 2. Using Lenovo XClarity Provisioning Manager Lite 37Figure 31. RAID logs collection interface – 1
4. After the collecting process is finished, the summary information for the RAID adapter will be displayed.
You can click View Recent Log to see the recent logs of the RAID adapter.
38 Lenovo XClarity Provisioning Manager Lite User GuideFigure 32. RAID logs collection interface – 2
5. If you want to save the detailed logs, click Save Detailed Log. The collected logs will be saved in three
TXT files in the USB storage drive or the shared network folder. The three TXT files include the following
information respectively:
• Basic information about the RAID adapter
• Firmware logs for troubleshooting
• Event logs for the RAID adapter
Chapter 2. Using Lenovo XClarity Provisioning Manager Lite 3940 Lenovo XClarity Provisioning Manager Lite User Guide
Chapter 3. Troubleshooting
This chapter provides information about basic troubleshooting methods to help you solve problems that
might occur while using LXPM Lite.

If you cannot diagnose and solve a problem by using the information in this chapter, go to http://
datacentersupport.lenovo.com for additional troubleshooting resources. You also can get help and
information by telephone through the Customer Support Center. The most up-to-date telephone list for
Lenovo Support is always available on the Web site at:
https://datacentersupport.lenovo.com/supportphonelist

The following table lists typical symptoms you might experience and the suggested actions.

 Symptom                                                   Action

 LXPM Lite cannot be launched successfully                 Do one of the following:
                                                           • Ensure that the LXPM Lite bootable USB storage drive
                                                             has created successfully.
                                                           • Ensure that bootable USB storage drive has no
                                                             problem. Use another USB storage drive and recreate
                                                             the bootable USB storage drive.

                                                           To create bootable USB storage drive, see “Creating the
                                                           bootable USB storage drive” on page 1.

 The process for installing an operating system            Make more space available on the hard disk drive.
 continuously loops.

 LXPM Lite cannot start the operating system medium.       Do one of the following:
                                                           • Ensure that the disc has no problem.
                                                           • Ensure that the USB installation medium is created
                                                             correctly. Refer to:
                                                             http://cn.download.lenovo.com/ibmdl/pub/pc/ pccbbs/
                                                             thinkservers/how_to_create_usb_os_ installation_
                                                             media.pdf

 No drive is found in OS Installation ➙ Guided Install ➙   Ensure that you have configured a RAID adapter for the
 Drive Selection.                                          server in the RAID Setup interface. For instructions on
                                                           how to configure a RAID adapter, refer to “RAID Setup”
                                                           on page 7.

© Copyright Lenovo 2018, 2021                                                                                        41
42 Lenovo XClarity Provisioning Manager Lite User Guide
Appendix A. Notices
Lenovo may not offer the products, services, or features discussed in this document in all countries. Consult
your local Lenovo representative for information on the products and services currently available in your
area.

Any reference to a Lenovo product, program, or service is not intended to state or imply that only that
Lenovo product, program, or service may be used. Any functionally equivalent product, program, or service
that does not infringe any Lenovo intellectual property right may be used instead. However, it is the user's
responsibility to evaluate and verify the operation of any other product, program, or service.

Lenovo may have patents or pending patent applications covering subject matter described in this
document. The furnishing of this document is not an offer and does not provide a license under any patents
or patent applications. You can send inquiries in writing to the following:
   Lenovo (United States), Inc.
   1009 Think Place
   Morrisville, NC 27560
   U.S.A.
   Attention: Lenovo VP of Intellectual Property

LENOVO PROVIDES THIS PUBLICATION “AS IS” WITHOUT WARRANTY OF ANY KIND, EITHER EXPRESS
OR IMPLIED, INCLUDING, BUT NOT LIMITED TO, THE IMPLIED WARRANTIES OF NON-INFRINGEMENT,
MERCHANTABILITY OR FITNESS FOR A PARTICULAR PURPOSE. Some jurisdictions do not allow
disclaimer of express or implied warranties in certain transactions, therefore, this statement may not apply to
you.

This information could include technical inaccuracies or typographical errors. Changes are periodically made
to the information herein; these changes will be incorporated in new editions of the publication. Lenovo may
make improvements and/or changes in the product(s) and/or the program(s) described in this publication at
any time without notice.

The products described in this document are not intended for use in implantation or other life support
applications where malfunction may result in injury or death to persons. The information contained in this
document does not affect or change Lenovo product specifications or warranties. Nothing in this document
shall operate as an express or implied license or indemnity under the intellectual property rights of Lenovo or
third parties. All information contained in this document was obtained in specific environments and is
presented as an illustration. The result obtained in other operating environments may vary.

Lenovo may use or distribute any of the information you supply in any way it believes appropriate without
incurring any obligation to you.

Any references in this publication to non-Lenovo Web sites are provided for convenience only and do not in
any manner serve as an endorsement of those Web sites. The materials at those Web sites are not part of the
materials for this Lenovo product, and use of those Web sites is at your own risk.

Any performance data contained herein was determined in a controlled environment. Therefore, the result
obtained in other operating environments may vary significantly. Some measurements may have been made
on development-level systems and there is no guarantee that these measurements will be the same on
generally available systems. Furthermore, some measurements may have been estimated through
extrapolation. Actual results may vary. Users of this document should verify the applicable data for their
specific environment.

© Copyright Lenovo 2018, 2021                                                                                43
Trademarks
LENOVO and LENOVO logo are trademarks of Lenovo.

Intel is a trademark of Intel Corporation or its subsidiaries in the U.S. and/or other countries.

Microsoft, Windows, and Windows Server are trademarks of the Microsoft group of companies.

Linux is a registered trademark of Linus Torvalds.

All other trademarks are the property of their respective owners. © 2021 Lenovo

44   Lenovo XClarity Provisioning Manager Lite User Guide
You can also read