Notes on OLEX2 - UW-Madison
←
→
Page content transcription
If your browser does not render page correctly, please read the page content below

Notes on OLEX2
                                    Updated on 25 March 2019,at 17:19.

                                    Olex2 v1.2 © OlexSys Ltd. 2004 – 2019
Compilation Info: 2018.05.29 svn.r3508 MSC:150030729 on WIN64, Python: 2.7.15, wxWidgets: 3.1.0 for OlexSys

                                            Ilia A. Guzei
2124 Chemistry Department, University of Wisconsin-Madison, 1101 University Ave, Madison, WI 53706 USA.

This is work in progress. You are encouraged to e-mail me (iguzei@chem.wisc.edu) your
comments, corrections, and suggestions. Many thanks to Nattamai Bhuvanesh, Brian Dolinar,
Oleg Dolomanov, Dean Johnston, Horst Puschmann, Amy Sarjeant, Charlotte Stern, for proof-
reading, suggestions, and comments. I have also borrowed from Martin Lutz, Len Barbour,
Richard Staples, Tony Linden, and Michael Roy.
OLEX2 Manual

Table of Content
Table of Content ........................................................................................................................... 2
How to install OLEX2 under Windows .......................................................................................... 3
How to install OLEX2 on a Mac .................................................................................................... 6
Installing and using PLATON on a Mac and getting OLEX2 to use it .......................................... 8
How to get OLEX2 to use PLATON ............................................................................................ 11
About program OLEX2 ................................................................................................................ 12
Keyboard shortcuts ...................................................................................................................... 12
Mouse traps .................................................................................................................................. 13
Alphabetical list of commands................................................................................................... 13
Space group selection/manipulation ........................................................................................... 43
Space group changes ..................................................................................................................... 46
Additional structure manipulations. ............................................................................................ 47
How to combine / concatenate two or more commands into a macro command: ........................ 49
Constraining the molecular geometry ........................................................................................ 51
When a solvent cannot be modeled ......................................................................................... 59
Working with molecular graphics .............................................................................................. 60
Structure matching ....................................................................................................................... 63
Working with hydrogen atoms................................................................................................... 67
Making the structure look professional..................................................................................... 68
Deriving metric data using GUI................................................................................................ 69
General useful commands ........................................................................................................... 70
How to include instrument specifications in the CIF file ............................................................. 72
Comments on the Report feature .................................................................................................. 76
Working with Solid Angles .......................................................................................................... 76
Some known issues ....................................................................................................................... 77

                                                                                                                                               2
OLEX2 Manual

How to install OLEX2 under Windows
A: The program is available as a free download from http://www.olexsys.org, just follow the
installation instructions from the web. OLEX2 must installed and launched at least once in the
administrator mode in order for all features to work for all computer users. You will also likely
need programs SHELXS and SHELXL (written by George Sheldrick) available free upon request
from http://shelx.uni-ac.gwdg.de/SHELX/. SHELXS and SHELXL are necessary for structural
solution and refinement, respectively. OLEX2 is smart and if you already SHELXS and SHELXL
(or the entire SHELX suite) installed, OLEX2 is likely to find the programs on your computer. If
it does not you ought to specify the path to the SHELXS and SHELXL files on your computer as
follows.
Suppose your SHELXL package is in folder C:\SAXI\.
Under Windows 7 open the properties panel: Launch→right-click on Computer→Properties.
Under Advanced System Settings click on Environment Variables. Under System Variables select
Path, and add to the (rather long) line the following:
;c:\saxi
Save and close. Now Olex will list the supported programs in its structure solution and structure
refinement drop-down menus.

Q: What other programs do I need and how do I install them?
A: OLEX2 can work seamlessly with other programs such as SHELXL, PLATON, XP, superflip,
and Pov-ray. The instructions below imply that you have licenses for the programs. The
instructions are for Windows 7 and 8.
0. Close OLEX2.
1. Download SHELXL from http://shelx.uni-ac.gwdg.de/SHELX/ and install it in
C:\SAXI\
You may have to register – it is free.

2. Put XP.exe and superflip.exe in the same folder, C:\SAXI\.

3. Download the PLATON for Windows Taskbar and PLATON executable and check.def from
http://www.chem.gla.ac.uk/~louis/software/platon/ and put them into
C:\PWT\
Make sure you put all PLATON-related files into this folder.

4. Some environment variables need to be set as follows. Go to Start→Control Panel→System
and Security→System→Advanced system settings
and in the System Properties window click on the “Environment Variables…” button. It may look
something like this:

                                                                                               3
OLEX2 Manual

Under “User variables for username” click on “New…” and in the “Variable Name” type
CHECKDEF and in the “Variable value” type c:\pwt\check.def as shown:

Click OK.

                                                                                 4
OLEX2 Manual

If there is no PATH variable in the “User variable for username” section - click on the “New…”
button again and in the “Variable name” type:
PATH
and for the “Variable value:” type
c:\saxi\;c:\pwt\
as shown below

Click OK and close the windows you opened while navigating to the Advanced System Settings.

5. Start OLEX2. Let’s check if the procedure worked. Open a structure. Go to Work→Refine
and expand the Refinement Program dropdown menu. If you installed the programs correctly, you
should see, at a minimum, SHELXL and olex2.refine there:

If you are not seeing SHELXL – go back to the Advanced System Settings and modify the PATH
System variable (rather than User variable) to include c:\saxi\. To do so, highlight the PATH
variable, click Edit, navigate to the end of this rather long line, and append ;c:\saxi\ to the
end of the line. Note the leading semicolon – it is needed to separate the values on the line:

Olex2 should be restarted for the changes to take effect. If this does not work – move the
c:\saxi\; part to the beginning of the “Variable value” line (note the semicolon). Olex2
should be restarted for the changes to take effect.

                                                                                             5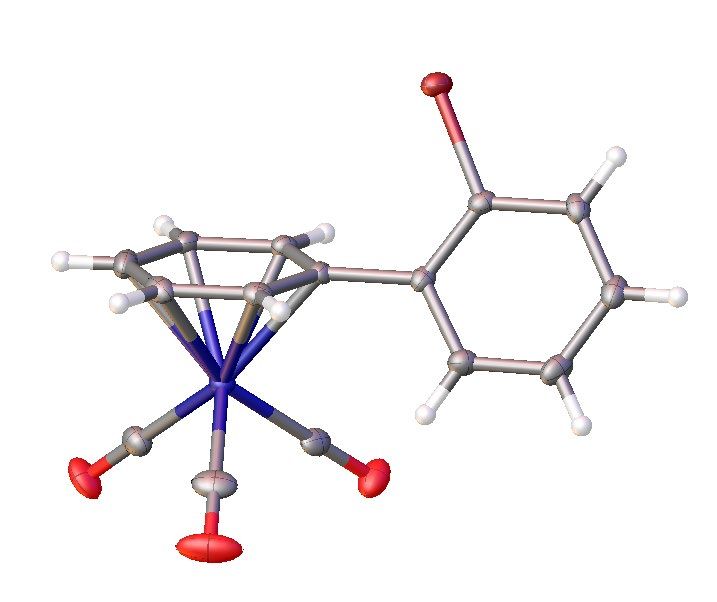
OLEX2 Manual

Once SHELXL is visible, select it in the dropdown menu, put a checkbox next to the “CONF,
MORE -1, Bond $h, Acta” line:                                     , and run a refinement.

Now click on the PLATON button            located in the very top row

                                   .
PLATON should launch and you should see PLATON’s interface with all the buttons.
If it does not work – modify the PATH environment variable for the System, similarly to the
suggestions for the c:\saxi above.

Important: if you launched PLATON successfully, you need to close the PLATON interface and
PLATON-generated windows before you can return to OLEX2, otherwise OLEX2 will hang and
PLATON will run in the background (in which case it must be killed as a process in the Task
Manager).

Optional: Another good structure solution program Superflip can be downloaded from
http://superflip.fzu.cz/ and it too should be placed in C:\SAXI folder.

A computer restart may be necessary at this point.

How to install OLEX2 on a Mac

OLEX2, SHELX, and XPREP Installation Instructions for Mac
by Brian Dolinar, and from http://www.xrayforum.co.uk/viewtopic.php?t=1838.

In general, it is helpful to refer to a list of commands for the OSX terminal such as the one found
here: http://ss64.com/osx/. The terminal will be used throughout the installation process.

OLEX2
  Download and install OLEX2 from http://www.olexsys.org/. You need OLEX2 version
  1.2.6 or later.

SHELX
1. Register (free) as a new SHELX users at http://shelx.uni-ac.gwdg.de/SHELX/.
2. Once you have registered, a password will be emailed to you. Navigate to the Downloads tab.
   Click the link provided at the bottom of the page that says, “download the programs”. When
   prompted, supply the username “shelx” and the password emailed to you.

                                                                                                  6
OLEX2 Manual

3. You should now be looking at a file page that says “Index of /~gsheldr/bin”. Click the Mac
   folder. Then download the .bz2 files you need. For Ilia’s class, you will at least need shelxl
   and shelxs.
4. Navigate to your Downloads folder and double click on the bz2 files you downloaded. This
   will extract your SHELX executable files to your Downloads folder.
5. Open the application folder for OLEX2, but do not run the program. To open the folder, right
   click on the installed OLEX2 application icon (in the Applications folder) and select "Show
   package contents". Then in the window that appears open the sub-folders Contents and
   MacOS.
6. Place all the the SHELX executables you plan to use, plus SHREDCIF in this folder.
7. Open an OSX Terminal window to make sure these files are executable:
   type: cd /Applications/olex2.app/Contents/MacOS [“cd” stands for change directory] this
   navigates to the place where you just put the SHELX executables

   type: chmod a+x shelx* shredcif
   If this fails because of permissions, repeat the instruction as
   sudo chmod a+x shelx* shredcif
   then give an administrator password

    this changes the permissions on all the SHELX programs and SHREDCIF to become
    executable files and gives all users permission to run them.
8. Run the OLEX2 application. Click the Work tab. Then click the drop down arrow for the
    Solve menu. Verify that both olex2.solve and SHELXS listed as solution programs.
9. Click the drop down arrow for the Refine menu. Verify that olex2.refine and SHELXL are
    listed as refinement programs.
10. If you have a structure loaded you can verify that SHELXS and SHELXL work by running
    them on that structure.

XPREP (This is for Chemical Crystallography at UW-Madison only. XPREP is not freeware)

1. Download XQuartz-2.7.7.dmg from http://xquartz.macosforge.org/landing/. This program
   contains certain libraries that allow XPREP to work correctly. Older computers may not need
   this, but newer ones do.
2. Open the .dmg file, then run the installer. The installation will take ~5 minutes. Be patient.
3. To obtain XPREP, download the program from the Box set up by Ilia. Select the mac
   version.
4. Once it is downloaded, rename xprepformac to xprep.
5. In the terminal, change the directory to your Downloads folder. Do this by typing the
   command “cd” and dragging the downloads folder into the terminal. Press enter. Your
   terminal should now be in the Downloads folder.
6. Type the following command into your terminal: “chmod +x xprep”. This changes the mode
   on xprep to allow it to be executed by your computer. The icon should also change from a
   blank white icon to one that shows a black and green computer terminal.

                                                                                                7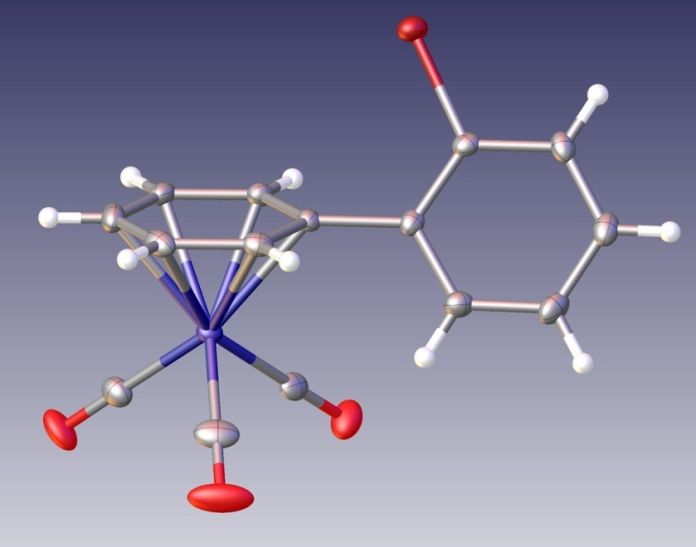
OLEX2 Manual

7. Your terminal’s directory should still be the folder that contains XPREP. Run XPREP by
   typing “./xprep” into your terminal. If it works, it will list some information about XPREP
   and prompt you for a reflection file.
8. To run XPREP on a structure, copy the executable into a folder with structurename.hkl and
   structurename.p4p files in it. Navigate the terminal to that folder. Type in the terminal
    ./xprep structurename
    It should load the .hkl and .p4p files into xprep and show statistics about lattice centering.

    However, XPREP can be installed in the /usr/local/bin folder and then be called for
    anywhere. This way, users never have to worry about moving the XPREP executable and can
    use it more easily.
    Once XPREP has been installed, it can easily be moved into the /usr/local/bin folder the same
    way that platon and check.def are moved, using the command:
    sudo mv xprep /usr/local/bin

Installing and using PLATON on a Mac
and getting OLEX2 to use it
By Anthony Linden, Department of Chemistry, University of Zurich, Switzerland,
anthony.linden@chem.uzh.ch. Updated February 19, 2019.

Here is how to get PLATON running on a Mac. PLATON uses X11 for its GUI, so you need the X11
libraries and tools and you then need a fortran compiler. Ton Spek does not create compiled versions of
PLATON with static libraries, hence you must compile it yourself and the need for all this.

The instructions below should work on OS 10.14 (Mojave), OS 10.13 (High Sierra), 10.12 (Sierra) and
10.11 (El Capitan). The procedure sometimes changes a little for each new Mac OS version, mainly
because X11 libraries sometimes change location and a PLATON executable compiled under one OS
does not always work under another. Once you get this set up for one OS, it works from then on at least
until the next OS is installed, so you usually only need to do the actual compile step when updating
PLATON. It is advisable to update and recompile PLATON at least once a month, because it is
constantly being improved.

If you are familiar with Unix/Linux, the following is probably clear to you. If not, please simply try to follow
the instructions below exactly. Please read and type carefully, as there are important spaces, dots and
dashes within some commands. All commands typed in the XQuartz window are case sensitive. Unix
commands usually do not give any feedback when they work correctly. Messages often mean something
might not have worked.

This looks long, but is quite quick if all goes well. Don’t be discouraged!

The following is based on Ton Spek’s readme at http://www.platonsoft.nl/xraysoft/Mac-OSX/platon, but I
have modified it a little to update the steps and remove the unnecessary installation of the full Xcode
developer kit. Everything below is case sensitive. Any other instructions or even a compiled version you
find on the PLATON web site might not be up to date.

                                                                                                               8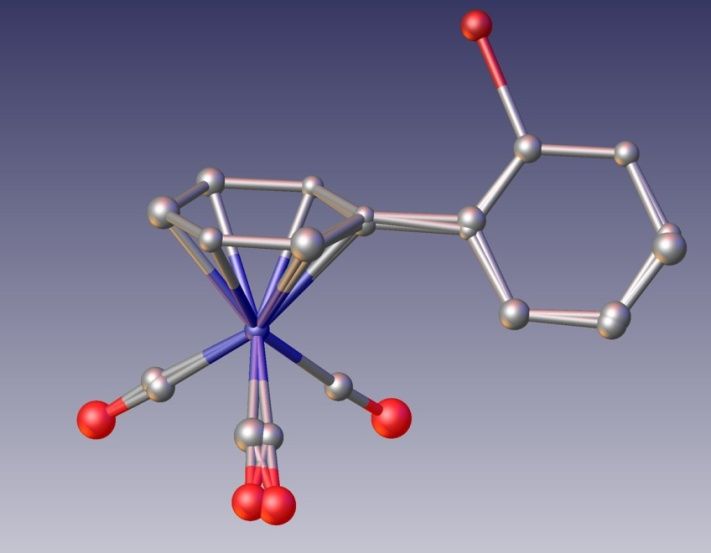
OLEX2 Manual

1 - Download the latest XQuartz (2.7.11 or later) from http://xquartz.macosforge.org

2 - Install it and start it (located in Applications/Utilities). When the window opens, you are in the top level
directory (folder) for your Mac user account. To return here at any time, type 'cd'. To find out which folder
you are in at any time, type 'pwd'.

3 - Install Apple Command Line Tools; type in the XQuartz window: xcode-select --install

3a - For OS 10.14 (Mojave) users only (to be more specific, users of Command Line Tools version 10),
one additional step is required; type in the XQuartz window the following two lines:
cd /Library/Developer/CommandLineTools/Packages
open macOS_SDK_headers_for_macOS_10.14.pkg
then follow the usual installer dialogue.

4 - Download gcc from http://hpc.sourceforge.net.
The binaries are near the top of the page; be sure to choose the version (X.Y) appropriate for your Mac
OS version: i.e. gcc-X.Y-bin.tar.gz (contains gcc and gfortran). It is recommended you use Safari for the
download to avoid the tar files being completely unpacked, after which the instructions below will not work
(Firefox unfortunately unpacks the downloads).

5 - Move these two files to your Desktop for convenience. Your Mac might automatically uncompress
them, so the .gz is removed, but you still must have the single files with the .tar ending for the next step.

6 - In the XQuartz window, type the following lines. Uppercase, spaces and dots are part of the
command and must be typed exactly as given (add .gz to the file names if they are still present with that
extension):
cd
cd Desktop
sudo tar -xvzf gcc-X.Y-bin.tar -C /
sudo asks for your login password the first time, assuming you have administrator rights. Otherwise the
password for the admin account on your Mac.

7 - Create a folder named 'platon' at a convenient location. I use Desktop for now. Note that if you use
uppercase letters for any part of the folder name, then you must type it exactly the same way from now
on.

8 - Download the files: platon.f.gz, xdrvr.c.gz, check.def, sucrose.spf from:
http://www.platonsoft.nl/xraysoft/unix/platon and move them into that folder.

9 - In XQuartz, go to that folder. If already at Desktop from the above, then just type 'cd platon'. If lost,
type:
cd
cd Desktop/platon

10 - gunzip the files platon.f.gz and xdrvr.c.gz (the Mac probably has done that automatically). If not:
gunzip platon.f.gz
gunzip xdrvr.c.gx

The file check.def might have acquired the .txt ending during the download, If so, type:
mv check.def.txt check.def

11 - Compile PLATON. This is the most critical and often troublesome step. Type carefully and exactly:
sudo gfortran -o platon platon.f xdrvr.c -I/opt/X11/include -L/opt/X11/lib -lX11

                                                                                                                9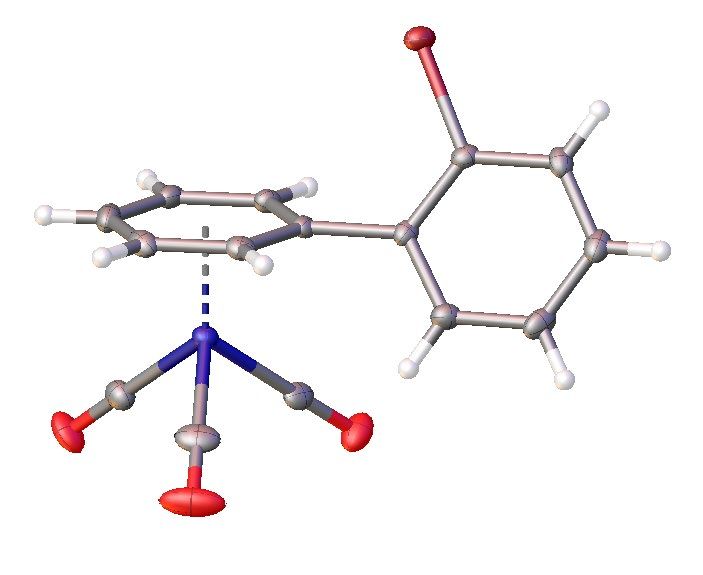
OLEX2 Manual

Note that in the above, the character after the dash in -I/opt is an uppercase i and the character after the
dash in -lX11 is a lowercase L.

If nothing appears to be happening, just wait. The compiler takes a minute or two. If the command
prompt reappears after a while without any messages, you have succeeded!

If this step fails with error messages after the long wait, either you did not type the above correctly, or the
X11 libraries are not where they are expected to be, which might be the case if you are using an older
Mac OS. There might also be a problem if a version of Command Line Tools higher than version 10 is
used. A solution to that has not been worked out yet.

If you have an earlier version of the Mac OS, e.g. Yosemite or Mavericks, one of the following might work
instead (these will certainly not work if you use El Capitan or later):
gfortran -o platon platon.f xdrvr.c -L/opt/X11/lib -lX11
gfortran -o platon platon.f xdrvr.c -L/usr/X11/lib -lX11

If this also fails, try to find the path to the /X11/lib folders and use that with the –L switch.

12 - Copy the newly created file 'platon' (the executable) and check.def to /usr/local/bin or any other
location you like your executables, such as shelxl, etc., to be. I recommend not putting these in the
/Applications folder. With El Capitan or later, if you do not already have the folder /usr/local/bin, you
might not be allowed to create it. Simply use any convenient folder within your user account and use the
path to it instead of /usr/local/bin in the following.

In the following, the dot at the end is important.
cp platon /usr/local/bin/.
cp check.def /usr/local/bin/.
chmod -R 755 /usr/local/bin/platon
chmod -R 755 /usr/local/bin/check.def

If these commands do not work, try prefixing them with 'sudo '.
sudo cp platon /usr/local/bin/.
sudo cp check.def /usr/local/bin/.
sudo chmod -R 755 /usr/local/bin/platon
sudo chmod -R 755 /usr/local/bin/check.def

Quit XQuartz and start it again so the system leans about the new program (or type 'hash -r' if in the
default bash shell, 'rehash' if in tsch or csh). Only needed the first ever time you install PLATON.

13 - Set up an environment variable for the location of the check.def file to be used as part of CheckCIF
validation. If this step is skipped, it is not important because PLATON will create a new check.def in your
current working folder each time if it cannot find check.def otherwise.

If you wish to define the environment variable, it has to be done each time you start XQuartz, so for
convenience it needs to be in the .bash file if you use the default bash shell in XQuartz, or in .cshrc if you
change to csh or tcsh.
For bash: export CHECKDEF=/check.def
For tcsh: setenv CHECKDEF /check.def
Where '/check.def' might be '/usr/local/bin/check.def' if you put check.def where I suggest above.

14 - Test: type 'platon sucrose.spf' in the XQuartz window (you have to be in the platon folder again if you
moved away), click on ORTEP in the main PLATON menu for an ORTEP plot.

If all is well, you have a working version of PLATON that you can now use quite independently of any
other program simply by using the command line in XQuartz, such as 'platon x.cif'. Similarly, if the shelx

                                                                                                             10
OLEX2 Manual
programs are on a known path, you can run them manually from there too. All you need to do is 'cd' to
the folder with your current structure files in them.
To update PLATON at any time, you need to repeat steps 7-12. The availability of a new version is
indicated on the PLATON opening window (red text starting with WEB:). The compilation and installation
steps can be simplified by creating a makefile with the relevant instructions. See hints at
http://www.cs.colby.edu/maxwell/courses/tutorials/maketutor/. A makefile for compiling PLATON is below.
Remove the # from the first two lines if your Mac does not automatically unzip the downloads.
means insert the tab character on those lines. Simply save this as a file called 'makefile' and run it in
XQuartz with the command 'make' initially to compile and then, if no errors, 'make install' to move things
to the right places.
platon:
# gunzip -f platon.f.gz
# gunzip -f xdrvr.c.gz
gfortran -o platon platon.f xdrvr.c -I/usr/X11/include -L/opt/X11/lib -lX11
install:
mv platon /usr/local/bin/.
cp check.def /usr/local/bin/.
chmod 755 /usr/local/bin/platon
chmod 755 /usr/local/bin/check.def
How to get OLEX2 to use PLATON
By Anthony Linden, Department of Chemistry, University of Zurich, Switzerland,
anthony.linden@chem.uzh.ch. Updated February 19, 2019.
On a Mac, to get Olex2 to know that PLATON exists, and thus show the 'Pton' button at the top of the
main GUI instruction panel, and to start PLATON, you need to do the steps below. This only works from
version 1.2.8 of Olex2 released in August 2016, or later versions. Earlier versions had bugs which made
getting PLATON to work more complicated, although it can be done. Therefore, please ensure you have
the latest version of Olex2 installed.
1 - Install PLATON as described above. Make a note of the full path to where you put the PLATON
executable. For example, /usr/local/bin if you put it there.
2 - Start Olex2. In the main GUI instruction panel, select the Home panel and then click on the Settings
tab. The second last item in the list that appears is "path:". Enter the full path to your PLATON
executable here and then click out of the path definition box. Quit Olex2 and restart it. Come back to the
path definition box and ensure the path you typed is shown. If the box is empty try again.
3 - You are done! Platon should work now, but you have to have a refined structure with a CIF or .res file
to test this, e.g. try the sucrose sample structure and refine it with SHELXL with the option ACTA
activated.
It is possible that PLATON still does not know where check.def is, but that is no longer a problem,
because if PLATON cannot find check.def, it creates one each time in the current working directory and
uses that.
Note that if the executables for all external programs like SHELXL, SHELXT, etc. are in the same location
as PLATON, Olex2 will have no trouble finding them and they do not then need to be placed in the Olex2
application folder itself.
11OLEX2 Manual
About program OLEX2
Q: How do I reference OLEX2?
A: O. V. Dolomanov, L. J. Bourhis, R. J. Gildea, J. A. K. Howard and H. Puschmann. "OLEX2:
a complete structure solution, refinement and analysis program". J. Appl. Cryst. 2009, 42, 339-
341.
Q: Do I have the latest version?
A: In the console type
echo GetCompilationInfo() [provides the compilation date]
Or check the About button.
Q: How do I get the latest release with the latest features?
A: Under Help→Update Options change the Repository URL to
http://dimas.dur.ac.uk/olex-distro-test/update/
Then restart OLEX2. Note that the new added functionality in the "test" version may not be very
well documented, but you will have a more powerful program.
Alternatively, type
update
in the command line and watch the progress in percent right below in the status bar. Once the
percentage reaches 100% restart OLEX2.
Keyboard shortcuts
F2 - toggles the solid background color.
F3 - toggles atom labels.
F4 - toggles the gradient background color.
F5 - activates the work tab.
F6 - activates the view tab.
F7 - activates the tools tab.
F8 - activates the info tab.
ESC - deselects selected atoms or quits the current MODE of operation (such as atom labeling).
ctrl-A - select everything.
ctrl-G - launch the grow mode.
ctrl-H - toggles the H atoms.
ctrl-I - inverts the selection. If nothing is selected works as ctrl-A.
ctrl-O – launches the Open File dialog.
ctrl-Q - cycles through "no Q peaks", "show isolated Q peaks", and "show connected Q peaks".
ctrl-R - runs a refinement.
ctrl-T - cycles through "hide molecule/show text", "hide text/show molecule", "show text and
molecule".
12OLEX2 Manual
ctrl-Z - undo the last action. It works whenever possible.
TAB - expands the command (when typing in OLEX's console).
mode off (not a shortcut, but a quick way to exit a current mode)
“↑” key brings the previously issued commands from the console.
Page Up and Page Down buttons will scroll the content of the command line window inside
OLEX2.
Mouse traps
Left click rotates the model
Right click and hold - zooms the view
left and right buttons down – translates the molecule
CTRL + left click – rotates the model around the axis perpendicular to the screen
left and right buttons down – translates the molecule
ALT + left click – zooms the view
CTRL + SHIFT + left button down – translates the molecule
Left click on an atom – selects the atom
Double click on an atom – selects the molecule
right click on the background – opens the scene menu
right click on an atom – open the atom property menu
Alphabetical list of commands
The list is not exhaustive yet. I am listing the commands I know how to use.
addbond atom1 atom2
addbond (GUI-selected atoms)
Adds a bond between atom1 and atom2 unless a CONN command prevents it.
Selecting two atoms (such as C1 and C2) in the GUI and typing addbond is equivalent to
typing
addbond C1 C2
Issuing an addbond command is equivalent to inserting the shelx BIND command in the
instruction file and the bond is added to the connectivity table.
addins [text]
Inserts text into the ins file. Great for including additional commands. Synonym: “/ “
(forward slash with a space. For example, to add an extinction card EXTI to the INS file one can
type either of the two:
13OLEX2 Manual
addins exti
/ exti
asr
(Absolute Structure Refinement). Adds TWIN and BASF instructions to the INS file in the case of
a non-centrosymmetric structure.
azoom percentage [atoms]
Scales the radii of the specified atoms according to the percentage. If no atoms are
specified the change is applied to all atoms. Note that azoom will change the size of the thermal
probability ellipsoids. The command also works for Q peaks, for example:
azoom 10 $q
will make all q peaks smaller.
basis
toggles the basis vectors.
brad [value] [parameters]
short for Bond RADius. Adjusts the width of the selected bonds.
value is a scale factor (default is 1) for all bond radii. Here 1 unit is 0.1 Å.
Syntax:
When any bonds in a molecule displayed in the GUI are selected
brad value
will adjust their radii by scaling the current radius by a factor of value.
brad [value] [parameters]
this notation allows one to set the bond radii without selecting the bonds in the GUI.
[parameters] are bonds (such as C-H, N-N) are case sensitive.
Examples:
Select a C–C bond in the GUI. Type
brad 0.8
All C–C bonds in the GUI have changed to a radius of 0.8. Of course, bonds of different types
can be selected simultaneously.
brad 0.5 C-H
changes all C–H bonds to have the radius of 1/2 of the default thickness. Note that the elements
in this notation are case sensitive.
brad 3 hbonds
sets all hydrogen bonding interactions displayed in the GUI to be three times as thick as their
default (note: the default for the hydrogen bonding interactions is unity, but this unity is 1/10 of
the value of a regular C–H bond). But at least one hbond should be selected.
14OLEX2 Manual
calcpatt
calculates the Patterson map. The map’s features can be adjusted in the typical manner with the
Level slider and Tools→Maps.
cell
toggles the view of the unit cell boundaries. There are two different modes in which you can
render the cell: lines and tubes. You can choose the type under Home->Settings->Unit cell style.
Or you can right-click on it and then use Draw style to change the drawing style (when using
cylinders make sure you choose the correct Primitive to which the style is applied). Same goes
for the labels - make sure also that the plane has 0 transparency if you do not want to display it.
center
centers the model in the GUI
chemdraw
inserts circles in six-membered rings:
The circles can be deleted by rotating the mouse wheel or typing undo or fuse.
close
Closes current structure.
compaq [switch]
Repositions atoms and/or fragments in the asymmetric unit as close to each other as possible.
possible switches: -a, -c, -m, -q.
compaq
All fragments are assembled around the largest one.
compaq -a
assembles together the incomplete fragments
compaq -c
similar to the default behavior, but takes into account the atom-to-atom distances and moves all
atoms into the closest possible positions to the largest fragment in the structure
compaq –m
assembles non-metallic parts of the structure first, then moves atoms to the closest metal.
compaq -q
moves the electron density peaks closer to existing atoms.
15OLEX2 Manual
The compaq -c button in GUI
conn value1 [value2] atoms
Adjusts the number of atoms bonded to a selected atom(s)
conn value1 value2 atoms
if both values are supplies value1 is the maximum number of bonds (default = 12), value2 is
bonding radius.
By default, two atoms are bonded when (the distance between the atoms is less than
R1+R2+delta).
conn value1 atoms
If value1 is an integer it specifies the number of bonds the atom(s) makes.
If value1 is floating it specifies the bonding radius of the atoms in the list.
atoms designates specific atoms, not atom types. Use the $ sign to change the bonding radius
for all atoms of a certain type.
To see the default bonding radius of your atom(s) type
info atomname
the R-bond column will list the radius.
Examples:
conn 3 2.4 Ti2
Atoms Ti2 will make no more than three (shortest) bonds with the Ti2's bonding radius set to
2.4.
conn 3 Ti2
Atom Ti2 will make three shortest bonds with the default radius
conn 2.4 Ti2
Atom Ti2's bonding radius is set to 2.4 Å and all possible bonds are shown.
conn 2.4 $ti
The bonding radii of all Ti atoms are set to 2.4 Å.
Also possible:
1. Select the atom(s) for which you want to set a new radius with the mouse in the GUI
2. type
conn value1
the value1 will be applied as a new radius to the selected atoms
16OLEX2 Manual
Important: if value1 is an integer it is interpreted as a number of bonds, if not – as a radius.
Thus if a radius of 3 Å is needed the value1 should be entered as 3.0.
Database for the CIF file
This is an advanced option as of August 14, 2014.
In OLEX2 under Report→Publicaton one can add authors and affiliations. However, I managed
to enter my affiliation incorrectly and had difficulty correcting the entry. To get ultimate control
over the database one should do the following (and it takes 3 minutes).
Download and install the SQliteBrowser database editor from
http://sourceforge.net/projects/sqlitebrowser/files/latest/download
Launch SQliteBrowser. Click on Open Database. Leave it as is for now.
Go to OLEX2 and type
shell datadir()/db
to see the database file. Copy the path to this folder. Go back to the Open Database dialog and
paste the path in there. Open the olex2.sqlite file and edit your heart out.
Restart OLEX2 for the changes to take effect.
Also, if you type
spy.editparam(user.report)
you will get a window in which the location of the database (db_location) is specified.
17OLEX2 Manual
The location can be opened with
shell datadir()
default
restores all program defaults.
degen
prints the list of atoms on special positions
delbond atom1 atom2
delbond (selected atoms)
Removes the bond between atom1 and atom2.
Selecting two atoms (such as C1 and C2) in the GUI and typing delbond is equivalent to
typing
delbond C1 C2
Issuing a delbond command is equivalent to inserting a shelx FREE command in the
instruction file.
deltai [value]
specifies the connectivity delta for forming hydrogen bonds (and short interactions). Value is
distance in Angstroms. For example, an undesirable hydrogen bonding interaction O-H…S
shown below
18OLEX2 Manual
can be eliminated with
deltai 1
which reduces the default delta of 1.2 Å to 1 Å.
Typing deltai with no parameters output the current value of the delta. Should you change
the delta it may be a good idea to change it back to the default value after you are done with
figures.
direction
Prints the current orientation (vector perpendicular to the screen) of the model in fractional
coordinates. If the selected direction is close to a principle direction the program also prints the
direction of the current projection.
Example:
select two atoms in the GUI and type
direction
produces the following output:
Direction: (-1.000*A, 7.846*B, 9.246*C)
View along 000-011 (normalised deviation: 0.045A)
View along 100-111 (normalised deviation: 0.045A)
The first line of the output prints the equation of the direction. The two “View” lines refer to the
direction (projection) perpendicular to the screen; in this case the viewer is “almost” looking
down the [011] direction. This is NOT the direction specified by the two selected atoms.
If you now type
matr 011
the view is adjusted to look down exactly along the [001] direction.
To determine what direction is specified by the two selected atoms do the following:
19OLEX2 Manual
with the two atoms selected (I know it’s a redundant statement but bear with me) type
line –n
direction
The program will print out the direction equation and, if it’s close to a primary direction, the
deviation from the primary direction.
Echoing
By default the successfully executed commands are not displayed on the console. To see the
issued commands on the console type
silent off
to enable echoing.
edit [file extension]
Typing edit by default opens the INS file for editing.
edit lst
opens the name.lst file for editing,
edit res
opens the name.res file. Also works with cif, ins, etc.
file filename.oxm
saves the current view with whatever is showing in Olex2. Loading this file should re-create the
exact same view you had when you saved it.
fit
see mode fit
fixhl
Re-labels the H atoms consistently with the atoms they are attached to.
fix occu [value]
fixes the occupancy of the selected atoms. To assign a 33% occupancy to the selected atoms
type
fix occu 0.33
fixunit [Z’]
updates the formula based on the content of the asymmetric unit. The Z’ value is unity by
default. If the symmetry independent unit contains a number of molecules different from unity
the Z’ should be specified. It will be updated on the ZERR line in the INS file.
The OK button works similarly.
20OLEX2 Manual
Example: the asymmetric unit contains one half of a molecule. To update the formula with the
correct Z on the ZERR line type
fixunit 0.5
fmol
Displays all fragments
fuse
Resets the view to the symmetry-independent unit and quits some of the MODEs.
fvar [variable] [value]
This is a convenient and powerful command. There are four ways to use it.
1. When typed by itself, fvar outputs the values of all free variables to the console.
2. To assign a value to a variable, for example, to assign free variable number 3 a value of 0.72,
one types
fvar 3 0.72
3. To assign several atoms to a free variable (let’s say free variable number 4) select the atoms
and type
fvar 4
If you you also want to specify the value of the free variable number 4 to be 0.2 type
fvar 4 .2
4. This option allows one to assign a positive and negative free variable (such as 5 and -5) to a
set of atoms. When an even number of atoms is selected and the command is issued simply as
fvar
the first half of the atoms is assigned the occupancy as the next free variable (as deduced from
the fvar line in the INS file; let’s say there are four entries on the fvar line already) multiplied by
one, in this case 51.000, and the second half of atoms is assigned an occupancy of -51.000.
The H atoms riding on these atoms follow suit.
Whereas option #4 is convenient, the part command may be a good alternative because
frequently part numbers should also be specified when free variables are used.
grad [switch]
allows customizing the GUI background.
switch: -p [removes or inserts a picture as the GUI background]
grad
invokes a menu in which you can select the four colors for the four corners of the GUI canvas
and the background will be colored with the proper gradient transitions.
To set a picture as your background use the switch -p with the full path to the picture file:
grad -p='c:\xray\mypicture.jpg'
21OLEX2 Manual
and now F4 will toggle this new background. If it does not - restart OLEX2 (I know, I know).
To remove the picture and return to the default gradient background type
grad -p
Graphics command for displaying the molecule:
telp [value] [atoms]– displays the thermal ellipsoids of the value probability for the
selected atoms. The atoms can be mentioned explicitly or selected in the GUI before this
command is executed.
Example:
telp 40 $c
will display all C atoms at the 40% probability level.
telph
works like telp, but also shows the H atoms with their proportional displacement coefficients
rather than small spheres of an arbitrary radius.
pers [atoms]
displays selected atoms as ball and stick. When no selection is made the change is applied to all
atoms.
proj [atoms]
changes the display of the selected atoms to a line drawing.
tubes
changes the display of the selected atoms to a thicker line drawing (called “pipes” in some other
programs)
Example:
tubes $n
will change the diplay of all N atoms and bond to the N atoms to the pipes display style.
poly [argument]
shows polyhedral for qualifying atoms. poly reguires an argument, thus its typical use would be
poly auto
grow [atoms] [switch]
generates symmetry-equivalent atoms in moieties residing on special positions.
switches:
-w: repeats the previous grow command on moieties in the asymmetric unit not bonded to the
atoms outside the asymmetric unit. This is convenient for solvents and other moieties.
-s: generates the first shell (generates only the symmetry equivalent atoms covalently bonded
to atoms in the asymmetric unit).
Example. A tetranuclear metal complex co-crystallizes with two solvent molecules of
dichloromethane. The complex resides on an inversion center, thus the asymmetric unit contains
a half of the complex and one solvent molecule (figure A). To see the entire complex one types
grow
to generate the second half of the complex (figure B). Note that the second solvent molecule is
not generated. To see the second solvent molecule in order to represent the composition
correctly you now type
grow -w
22OLEX2 Manual
to properly represent the stoichiometry of the complex (figure C). Note that to generate figure C
one must issue two grow commands, grow and grow -w, not just grow -w.
Alternatively, if you just want to show the full coordination sphere of the metal atom closest to
the special position, instead of the first grow command you would type
grow -s
to complete the coordination sphere of that metal (figure D).
A B C D
Also see mode grow.
hide [atom list] [switch]
hides atoms. Unfortunately, by design, if used without a switch it hides the selected atoms, not
the bonds formed by them.
To hide all N atoms:
sel $n
hide
To hide all N atoms and the bonds formed by them:
sel $n
hide -b
Alternatively the atoms to be hidden can be selected in the GUI followed by
hide -b
history
opens Notepad with 1000 last commands
htab [dist] [angle] [switch]
analyzes the atomic connectivity list and inserts HTAB (and/or RTAB) and EQIV cards in the SHELXL
instruction file in order to tabulate the hydrogen bonding interactions in the LST and CIF files with
proper standard uncertainties. (Note that if the H atoms are in the idealized positions there will be
no s.u.’s on the donor-H…acceptor angles.)
Defaults for the distance and angle are 2.9 Å and 150° and the default elements for the H-bond
detection are N,O,F,Cl,S.
23OLEX2 Manual
switches:
-t: adds extra elements that should be comma-separated
-g: if any of the detected H–bonds are generated by symmetry transformations, the structure is
grown using those symmetry operations
If the htab command is issued multiple times only unique results will be added to the INS file.
Examples:
htab
will insert HTAB cards (and the necessary EQIV cards) for the detected hydrogen bonds in the INS
file.
To survey more interactions one may use
htab 3.2 120
where 3.2 is the donor…acceptor distance in Angstroms, 120 is the donor-H…acceptor angle
in degrees.
switch -t allow the use of additional elements in the hydrogen bond searches:
htab 3.2 -t=Br,I
will ensure that in addition to the default donor/acceptor atoms all Br and I atoms will also be
considered and all H-bonding interactions shorter than 3.2 Å will be listed.
htab -g
produces an expanded structure if any hydrogen bonds are generated with a symmetry operation.
If too many bonds are generated and inserted into the instruction file and a removal of some of
them is desirable, the HTAB commands should be edited out manually from the INS file.
Sometimes hydrogen bonds are not displayed in the OLEX2 interface, for example when the
donor–donor distance is too long, e.g. 3.08 Å. This can be resolved in at least two ways.
1. Execute
htab 3.1 140
fuse
The fuse command forces OLEX2 to recalculate the bonds. In general, all H-bonds listed in the
RES file with HTAB commands should be displayed.
2. Alternative you can adjust the delta for interactions:
deltai 1.3
info
provides information about the selected molecule, such as formula, electron count, and mass.
Especially useful to troubleshoot uncooperative match procedure to detect the differences
between would-be identical molecules.
kill [object]
removes the specified atoms from the model.
24OLEX2 Manual
To delete atoms C1 and C2 either type
kill C1 C2
or select C1 and C2 in the GUI and type
kill
or type
sel C1 and C1
kill
To kill all atoms of a certain type use $:
kill $n
removes all N atoms from the model.
If atom labels have been placed for diagrams, as in Tools→Images→Label selected atoms
kill labels
will remove them. The labels can also be removed as described in Working with Molecular
Graphics.
label [atoms]
generates moveable atom labels for diagrams.
Examples:
label o1 o2 [will create movable labels for atoms o1 and o2].
label $o [will create movable labels for all oxygen atoms].
labels [switches]
displays non-printable labels for the atoms according to the switch. These options are also
available under Work→Toolbox Work→Labels.
To display all non-H labels (equivalent to F3) either would work:
labels
labels -l
To display all H atoms labels as well:
labels -l -h
The Q peaks are treated as atoms as far as labeling is concerned except for one unique command
labels –qi
which displays the Q peak heights in e/Å3.
The labels can be hidden by another
labels
command.
To display the afix code for the non-H atoms :
labels –a
25OLEX2 Manual
To display the afix code for H atoms:
labels –h –a
To display the actual occupancy of the non-H atoms:
labels –ao
As an example this value might be 21 or -21 for disordered atoms or 10.5 if an atom lies on a
special position.
To display the actual occupancy for H atoms:
labels –h –ao
To display the chemical occupancy for the non-H atoms:
labels –co
This would be the actual value of the free variable for disordered atoms.
To display the chemical occupancy for H atoms:
labels –h –co
To display the PART number for the non-H atoms:
labels –p
To display the PART number for H atoms:
labels –h –p
To display the Uiso multiplier for non-H atoms:
labels –r
To display the Uiso multiplier for H atoms:
labels –h –r
To display the Uiso for non-H atoms:
labels -u
To display the Uiso for H atoms:
labels –h –u
To display the free variable number for the occupancy of non-H atoms:
labels –v
To display the free variable number for the occupancy of H atoms:
labels –h –v
legend
displays an insert showing atom types. Typing legend toggles the display of the insert. The
insert can be moved within GUI by holding down the SHIFT key and dragging the left mouse
button. If typing legend does not work, type legend –r (to reset it) and then do the
following twice: type legend and press ENTER.
Example of a legend in the main window:
26OLEX2 Manual
line [-n] [atoms] (note the command is singular)
Draws a least-squares fitted line for the atoms specified by the atoms and its length is
displayed. If only two atoms are specified a line is drawn between the atoms. The label can be
hidden by right-clicking. In the case of more than two atoms the line length is determined by the
atomic coordinates - a projection is taken and the max/min values are derived from the atomic
coordinates.
If the –n switch is enabled no line is drawn and the molecular projection is reoriented to be
viewed along the line determined by the atoms.
Atoms can be typed on the line or selected in the GUI.
Examples:
1. Select two atoms in the GUI and type
line
The atoms are connected with a line and its length is displayed.
2. Do not select atoms but type
line C1 C2
Atoms C1 and C2 will be connected with a line.
3. Select two atoms in the GUI, type
line –n
The molecular projection is shown along the line determined as described above, but the line
itself is not drawn.
4. Do not select atoms but type
line –n C1 C2 C3
The molecular projection is now shown along the best-fitting line determined for atoms C1-C3.
Also see direction.
lines [value] (note the command is plural)
Displays the specified number of lines in the GUI. To display 40 lines type
lines 40
27OLEX2 Manual
Note that you can cycle through the structure and text with CTRL-T that has three settings.
lines -1
displays all lines.
log
displays the content of the log file that contains all information about the OLEX2 run.
match [switch] [selection]
allows superposition of two or more molecule. The molecules must have the same composition
and connectivity. By default, the program matches all atoms, thus if you do not want to see the
H atoms they should be killed explicitly. A typical procedure involves three commands:
kill $h $q [to kill all the h and q peaks]
fuse [ensures the correct connectivity after atom elimination – very important command!]
match [will superimpose the molecules with all atoms used for matching].
or
match –i [will try to superimpose the molecules with and without inverting one of the
molecules first]
To see how well the molecules fit on the right-hand panel select Tools→Overlay to see the RMS
table. The table will refer to individual molecules as A, B, C…, which do not reflect the way
your molecules are labeled.
To un-match the molecules type
fuse
A fragment can be inverted individually, by typing
inv
It is possible to match only selected atoms in two or more molecules. Select four or more atoms
in one molecule, then four or more atoms (in the matching sequence) in another molecule (and
other molecules if necessary) and type
match sel
Or
match –i sel
A convenient way to show the superimposed molecules is with the “stick” drawing style
(achieved by typing tubes in the console) and different colors.
To color one of the superimposed molecules
right-click on the molecule→Fragment→Show this only [to display the molecules by itself]
ctrl-a [to select the molecule, both atoms and bonds]
right-click on the molecule→Selection→Group [to group atoms and bonds]
right-click on the molecule→Draw style [to display the Material Parameters palette]
In the Material Parameters palette double click on the color rectangle corresponding to Ambient
Front and select the color of your choice followed by OK.
28OLEX2 Manual
fmol [to bring back all the molecules on the screen]
Repeat as necessary for other molecules.
Example of two superimposed S8 molecules, one red and one yellow.
For an additional example see section Structure Matching.
29OLEX2 Manual
matr [parameters]
Orients the molecular projection according to the parameters.
Parameters can be supplied as
1. a [uvw] lattice line from the origin
2. a lattice line from lattice point u1v1w1 to lattice point u2v2w2
3. a full Cartesian matrix
the uvw values should be either space-separated or have the same number of digits.
Examples:
1. To orient the view along the crystallographic a axis any of the following will work:
matr 1
matr 100
matr 1 0 0
To orient the view along [5,12,1] the following would work (note that if the values have different
numbers of digits either spaces or preceding zeros are necessary to ensure that each value has the
same number of characters):
matr 5121 / would not work
matr 5 12 1
matr 051201
To orient the view along [0-12] it is necessary to either use spaces or supply the signs for each
value or or supply preceding zeros to ensure that each index has the same number of characters.
Either of the following three would work.
matr 0 -1 2
matr 00-1+2
matr 00-102
2. To orient the view along the vector from 010 to 12,2,4 use two numbers without spaces
between indices (note the use of preceding zeros):
matr 010 120204
matr 010 12 2 4 /would not work
The current projection can be saved with a save view command:
save view filename
and loaded later with
load view filename
30OLEX2 Manual
mode fit [switch]
allows one to (1) move an atom or a group of atoms, (2) rotate a group of atoms, (3) split a group
of atoms.
switch can be –s followed by the number of atoms to not be displaced as in
mode fit –s=1 (see part (3) of this section).
1) If you want to move an atom to a new position in the GUI follow these steps.
a) Select an atom.
b) type mode fit on the console. The selected atom will acquire a greenish tint.
c) Press the SHIFT button and use the left mouse button to move the atom in question to a
new position. While you are dragging the atom the old atom position is also displayed
and both the old and the new positions are connected with a bond.
d) When you are satisfied with a new location for the atom press the ESC key. The atom will
remain situated at the new position, the old one will disappear, and you will have quit the
fit mode.
Example: The program incorrectly assigns one of the water molecule’s H atoms to atom
O10, diagram below. Atom H10B is placed correctly, whereas atom H10A needs to be
moved to coincide with Q1. The four steps are outlined in the diagram.
The four stages of atom fitting. From left to right: original situation; atom H10A
selected; atom H10A moved to a new position coincident with Q1; the operation
completed.
31OLEX2 Manual
(2) A group of atoms can be rotated about a bond. This is handy, for example, for –CF3
groups and H atoms.
Example with a water molecule. A refinement program was asked to
assign water molecule H atoms to atom O4 (see figure on the left), but a
subsequent refinement revealed that one of the H atoms was not placed
correctly, as demonstrated by the electron density peak Q1.
The goal is to rotate the water molecule about the Zn1–O4 bond to bring
the H atoms into correct positions. Importantly, this rotation operation
will not destroy any AFIX commands imposed on the geometry of the
water molecule.
The first step is to decide which of the H atoms is in a wrong location. To figure it out display
the Fourier difference map by Work→Toolbox Work→Electron density map:
The green color shows areas with excess of electron density (it overlaps
with Q1) whereas the brown-purple meshwork indicates holes. Atom
H4a is in an incorrect position.
We will rotate the water molecule about the Mn1–O4 vector so that H4a
will move to the position of H4b, and H4b will take the position of Q1.
Hide the map by clicking on Work→Toolbox Work→Electron density
map.
Select atoms O4, H4a, H4b in that order. The first selected atom will be on the axis of rotation.
In the console type mode fit.
Alernatively, select “fit” from the
dropdown menu under Work→Toolbox
Work→Select group of atom(s) and then
32OLEX2 Manual
The selection will change the colors. Note that the Mn1–O4 bond is also
highlighted. This is the axis of rotation and this is why it was important
to select atom O4 first.
Right-click on the Mn1–O4 bond. Then left-click and drag on the Mn1–
O4 bond. The water molecule will rotate about the Mn1–O4 axis. The
final position may look like the diagram on the left. It is a little crowded
because both the starting and final positions of the H atoms are shown.
Type mode off in the console to exit the fit mode and produce the
desired outcome:
(3) Splitting a group of atoms into two for the refinement of
positional disorder is illustrated with a –CF3 group.
This is seriously cool. The idea is to split atoms F1,F2,F3 into
two sets by rotating the CF3 group about the C1-C2 axis.
Select atoms C2 F1 F2 F3 by clicking on them in this order. In general, a
selection can be made by drawing a box around the atoms of interest (by
holding down the SHIFT key and dragging the mouse with the left button
depressed), but in this case the order in which the atoms are selected is
important.
In the GUI type
33OLEX2 Manual
mode fit -s=1
to indicate that we will be fitting the whole group to a new location, but one atom (the first atom
of the selection) will not be split.
The colors change somewhat, but importantly, the C1–C2 bond is highlighted:
Right click on the C1–C2 bond once.
Press the left mouse button and drag on the C1–C2 bond to rotate the F
atoms about the C1–C2 axis.
When you find good positions for the new F atoms, press ESC. The
anisotropic F atoms have been split into two sets of isotropic atoms:
FVAR 0.20168 0.75
PART 1
F1 5 0.27260 0.87054 0.57380 21.00000 0.07766
F2 5 0.31045 0.91385 0.76109 21.00000 0.10564
F3 5 0.22327 0.78921 0.69629 21.00000 0.11074
PART 2
F2a 5 0.32353 0.93217 0.71783 -21.00000 0.05000
F3a 5 0.24159 0.81252 0.75254 -21.00000 0.05000
F1a 5 0.24608 0.83512 0.57664 -21.00000 0.05000
Note that the F atoms are assigned to two parts with occupancies 21 and -21 and that the
second free variable with a value of 0.75 has been added to the FVAR line.
mode grow [switch]
Displays clickable bonds to generate symmetry-related molecules.
To display clickable bonds to covalently bonded atoms:
mode grow
mode grow –a
Allows to conveniently reposition atoms to symmetry-related sites within the same molecule. It
is exceptionally handy when a molecule occupies a special position. [but try
compaq -m
compaq
first. It may do what you wish to achieve.
To display clickable bonds to generate symmetry related atom that can be used in the refinement
with PART -1:
mode grow –p
34OLEX2 Manual
The new atoms generated thereby behave as independent atoms and can be used in FRAG
commands, but the occupancy of these atoms and their source atoms should be adjusted.
To display clickable bonds to atoms within short contacts:
mode grow -s
mode grow -v
Example: mode grow -v=3
The mode will be used with the user-provided delta for connectivity analysis; the default is 2 Å.
mode off
exits the current mode and return the cursor to the default “arrow”.
mode pack
displays clickable pyramids that allow generation of additional asymmetric units:
move (for moving atoms see mode fit)
places all entities inside the unit cell, as close to the cell center as possible.
mpln [atoms] [switch]
short for Mean PLaNe. Computes the best LS plane through the selected atoms.
[switch] values are -n or -r.
1. mpln
computes the best-fitting LS plane through the atoms selected in the GUI or through all visible
atoms if no atoms are selected. The atoms are in the "corners" of the plane
2. mpln -n
computes the best least-squares plane and orients the molecule so that the normal to this plane is
perpendicular to the screen. Convenient for showing the best molecular orientation.
3. mpln -r
similar to mpln -n, but the created plane is rectangular and the atoms are no longer in the
"apices" of the plane.
Example:
1. mpln C1 C2 C3
computes the LS plane through atoms C1, C2, and C3
2. mpln C1 C2 C3 -r
computes a rectangular plane through C1, C2, and C3
35You can also read


