Online Judging Portal Instructions
←
→
Page content transcription
If your browser does not render page correctly, please read the page content below
Online Judging Portal Instructions
Step 1: Create Your Judge Account
   • Go to the link to your contest registration page.
   • Select Create Account from the top menu bar and select Judge from the dropdown menu.

   •   Enter your name and email address and click Next.

   •   Confirm your email works: Go to your email inbox and look for the Confirm Email Address
       message from NoReply@zfairs.com (it may be in your spam folder). Click on the link inside
       the email and follow prompts.
   •   Return to the Verify Email Address page and continue your registration.
   •   Complete the Personal Information section.
Online Judging Portal Instructions

    •   Write down your username and password and keep them in a safe place. Click Save and
        Continue.
    •   Agree to the Conflict of Interest statement and click Next.

    •   Agree to the Permissions and Waivers and click Continue.

2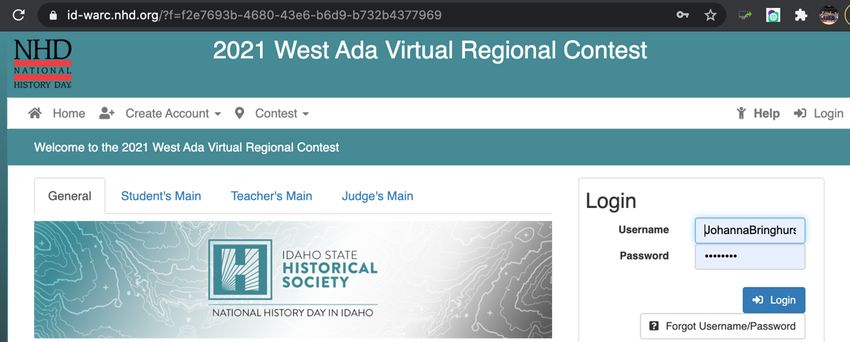
Online Judging Portal Instructions

    •   Registration complete!

    Step 2: Log In to Judge
    • When it is time to begin judging, log in to your contest. Go to the link to your contest page.

    •   Click Judging in the top toolbar, then select Judge Portal from the drop-down menu to
        access your judge assignments.

    •   Your home screen will show:
           Ø Judge Group: Your team name (i.e. Senior Group Exhibit - Group A) as well as team
               members’ names, email addresses, and phone numbers. There is also a button next to
               your team name (rectangle icon with three people) which gives your team the option
               to open a video conference on this page.
                   § Note: If you have multiple judging assignments in this contest, there will be
                       multiple Judge Group listings, each on its own tab.

3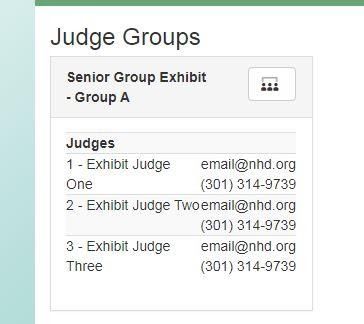
Online Judging Portal Instructions
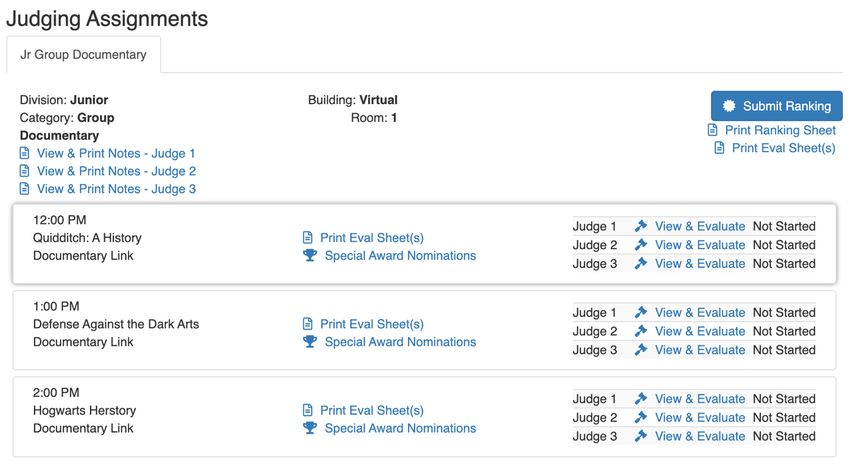
Ø Judging Assignments: The entries you are judging.
Step 3: View Student Projects
• Click the blue View & Evaluate button next to the project’s title to start evaluating. This will
open a new browser tab. This tab will show the project title and links to the project and/or
project’s written materials at the top left of the page.
4Online Judging Portal Instructions
Ø Paper category – Click View Paper, which opens the paper, including the required
written materials (title page, process paper, and annotated bibliography), in a new
browser tab.
Ø Website category – Click View Website, which opens the website in another
browser tab. Process papers and annotated bibliographies are incorporated into the
websites.
Ø Exhibit category – Click View Written Materials, which opens the title page,
process paper, annotated bibliography, and exhibit as a single PDF, in a new browser
tab.
Ø Documentary category – Click View Written Materials, which opens the title page,
process paper, and annotated bibliography as a single PDF, in a new browser tab.
Then, click on the Documentary Link to view the documentary.
Ø Performance category – Click View Written Materials, which opens the title page,
script, process paper, and annotated bibliography as a single PDF, in a new browser
tab. Then, click on the Performance Link to view the performance.
Step 4: Evaluating Student Projects
• Underneath the title and links, you will find the digital evaluation sheet.
• Select a circle for each of the evaluation criteria.
Ø Note: If a section of the evaluation has two evaluative items (i.e. Historical
Argument), you can select one circle under one column and another under a
different column, if desired.
5Online Judging Portal Instructions
• Under the Rules Compliance section, select Yes or No for each of the category rules. If you
select No, you will be asked to provide an explanation. Please discuss all rules compliance
violations with your team. If you all agree on a violation, each of you must mark the violation.
Students will receive this section of the form.
• Under the Feedback and Notes section, write your evaluative comments. There is a required
minimum of 300 characters for each of the comments sections. There is not a character
maximum. Students will receive these comments.
6Online Judging Portal Instructions
• Under the Personal Notes section, you have the option to write your own comments here
(i.e. notes on the project). Students will not see these notes.
• To save an in-progress evaluation, click the blue Save button. This will save your progress, but
not share it with your team or submit it to the contest admin.
• After you have completed an evaluation, click the light blue Save & Submit button to save
the evaluation and allow your team members and your contest admin to view it. You may still
make changes to the evaluation after clicking Save & Submit; just be sure to click it again to
update your evaluation.
• After saving, close out of the tab.
• Repeat this process with each of your projects. When you are finished with all of the
evaluations, be sure to Save & Submit your evaluation for each entry.
• As you complete evaluations, the judge system will update your progress status. You will also
be able to view your team members’ progress status for each project. For each project, you
will see three different statuses: Not Started, In Progress, and Finished.
• Not Started: This evaluation has not been started.
• In Progress: This evaluation has some progress, but the evaluation is not completed.
• Finished: This evaluation is completed and have been submitted to the NHD contest admin.
7Online Judging Portal Instructions
Step 5: Virtual Team Meeting
• Your Judge Captain will set up an online meeting. Your team may use any online meeting
platform of your choosing. If your team chooses to use the built-in online meeting platform,
click on the icon (rectangle with three people) at the top of your Judge Portal to join the
meeting at your agreed-upon
time.
• During the meeting, discuss the projects, review any rules compliance issues, and develop a
consensus ranking for the entries in your group. It is important that all of you agree on rules
violations (and mark them as such) so that students receive a consistent message.
• After your meeting, please return to the Judge Portal to complete or revise your evaluations
as needed, adding or removing rules compliance flags in accordance with your consensus
discussion. When you are finished with all of the evaluations, remember to click the light blue
Save & Submit button for each entry’s evaluation. All of your progress statuses should now
show as Finished.
• Notify your captain that you are finished with your evaluations. Once your Judge Captain
submits the rankings and evaluations, your team’s access to the evaluations will be locked.
8Online Judging Portal Instructions
• For Judge Captains: to rank projects, go to your Judge Portal and select the blue Submit
Rankings button. A pop-up menu will appear to insert the rankings. Click
Save.
a) To submit the rankings and evaluations to the contest admin, click the blue
Submit to NHD button. A pop-up message will ask you to confirm the
submissions and lock the room (from further judging). Click the blue Okay
button.
b) Note: If a change needs to be made following this point, contact your contest
admin.
9You can also read