Oracle MICROS Tablet 700 Series - Setup Guide
←
→
Page content transcription
If your browser does not render page correctly, please read the page content below
Oracle® MICROS Tablet 700 Series
Setup Guide

   E91732-09
   January 2022
Oracle MICROS Tablet 700 Series Setup Guide,

E91732-09

Copyright © 2017, 2022, Oracle and/or its affiliates.

This software and related documentation are provided under a license agreement containing restrictions on
use and disclosure and are protected by intellectual property laws. Except as expressly permitted in your
license agreement or allowed by law, you may not use, copy, reproduce, translate, broadcast, modify, license,
transmit, distribute, exhibit, perform, publish, or display any part, in any form, or by any means. Reverse
engineering, disassembly, or decompilation of this software, unless required by law for interoperability, is
prohibited.

The information contained herein is subject to change without notice and is not warranted to be error-free. If
you find any errors, please report them to us in writing.

If this is software or related documentation that is delivered to the U.S. Government or anyone licensing it on
behalf of the U.S. Government, then the following notice is applicable:

U.S. GOVERNMENT END USERS: Oracle programs (including any operating system, integrated software,
any programs embedded, installed or activated on delivered hardware, and modifications of such programs)
and Oracle computer documentation or other Oracle data delivered to or accessed by U.S. Government end
users are "commercial computer software" or "commercial computer software documentation" pursuant to the
applicable Federal Acquisition Regulation and agency-specific supplemental regulations. As such, the use,
reproduction, duplication, release, display, disclosure, modification, preparation of derivative works, and/or
adaptation of i) Oracle programs (including any operating system, integrated software, any programs
embedded, installed or activated on delivered hardware, and modifications of such programs), ii) Oracle
computer documentation and/or iii) other Oracle data, is subject to the rights and limitations specified in the
license contained in the applicable contract. The terms governing the U.S. Government’s use of Oracle cloud
services are defined by the applicable contract for such services. No other rights are granted to the U.S.
Government.

This software or hardware is developed for general use in a variety of information management applications.
It is not developed or intended for use in any inherently dangerous applications, including applications that
may create a risk of personal injury. If you use this software or hardware in dangerous applications, then you
shall be responsible to take all appropriate fail-safe, backup, redundancy, and other measures to ensure its
safe use. Oracle Corporation and its affiliates disclaim any liability for any damages caused by use of this
software or hardware in dangerous applications.

Oracle, Java, and MySQL are registered trademarks of Oracle and/or its affiliates. Other names may be
trademarks of their respective owners.

Intel and Intel Inside are trademarks or registered trademarks of Intel Corporation. All SPARC trademarks are
used under license and are trademarks or registered trademarks of SPARC International, Inc. AMD, Epyc,
and the AMD logo are trademarks or registered trademarks of Advanced Micro Devices. UNIX is a registered
trademark of The Open Group.

This software or hardware and documentation may provide access to or information about content, products,
and services from third parties. Oracle Corporation and its affiliates are not responsible for and expressly
disclaim all warranties of any kind with respect to third-party content, products, and services unless otherwise
set forth in an applicable agreement between you and Oracle. Oracle Corporation and its affiliates will not be
responsible for any loss, costs, or damages incurred due to your access to or use of third-party content,
products, or services, except as set forth in an applicable agreement between you and Oracle.
Contents
    Preface

1   The Oracle MICROS Tablet 700 Series
    Tablet 721P Features                                                              1-2
    Tablet 721 Features                                                               1-4
    Tablet 720 Features                                                               1-6
    Technical Specifications                                                          1-7
    Software Components                                                               1-9
    Tablet Accessories                                                               1-10

2   Setup and Configuration
    Performing an Initial Setup                                                       2-1
    Inserting and Removing the Battery                                                2-1
    Charging the Tablet and Battery                                                   2-1
    Powering the Tablet On and Off                                                    2-2
    Barcode Scanner Configuration                                                     2-3
    Using the Barcode Scanner                                                         2-3
    Configuring the Barcode Scanner for Use With Oracle Retail Xstore Applications    2-4

3   Battery Performance
    LED Status and Behavior                                                           3-1
    Battery Life and Charging Times                                                   3-2
    Backup Battery                                                                    3-2

4   Wireless Networking
    Connecting the Oracle MICROS Tablet 721/721P to a Wireless Network                4-1
    Connecting the Oracle MICROS Tablet 720 to a Wireless Network                     4-1
    Wireless Signal Performance and Settings                                          4-2

                                                                                       iii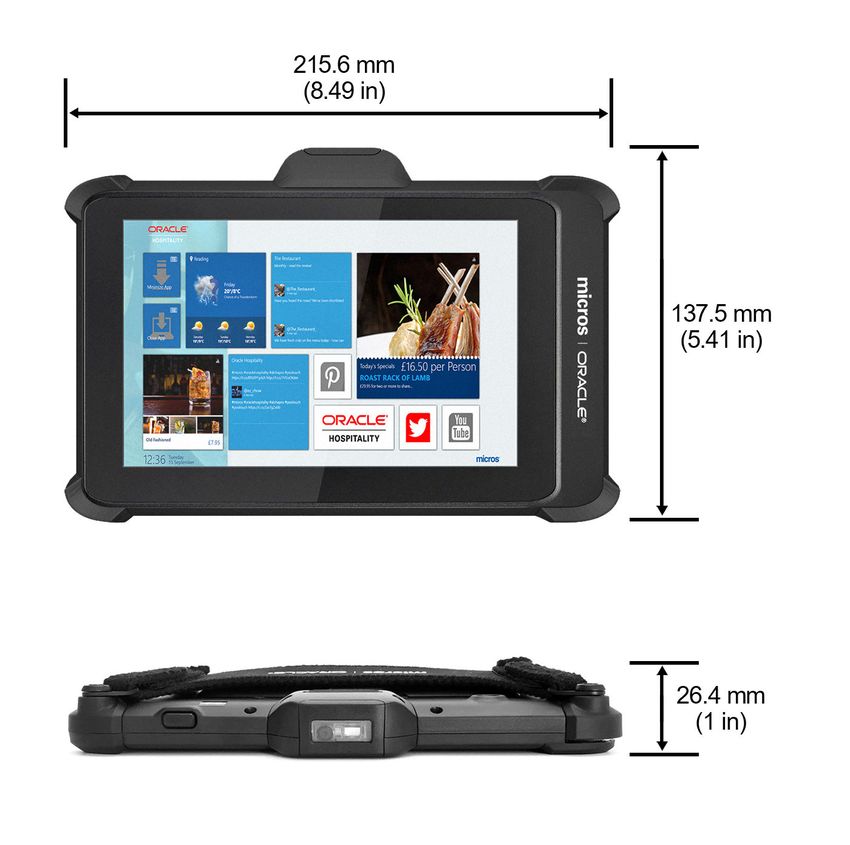
Configuring Bluetooth                                                       4-3

5   Tablet 721/721P BIOS Configuration
    Starting the Tablet 721/721P BIOS System Configuration Utility              5-1
    Configuring Tablet 721/721P System Security Settings                        5-1
    Setting the Tablet 721/721P BIOS Supervisor Password                        5-2
    Configuring the Tablet 721/721P Boot Priority for Devices                   5-2
    Exiting the Tablet 721/721P BIOS Configuration Utility                      5-2

6   Equipment Dimensions
    Tablet 721P Dimensions                                                      6-1
    Tablet 721 Dimensions                                                       6-2
    Tablet 720 Dimensions                                                       6-3
    4-Bay Tablet Charger Dimensions                                             6-4
    4-Bay Battery Charger Dimensions                                            6-5

7   Troubleshooting
    Basic Troubleshooting                                                       7-1
    Troubleshooting the Barcode Scanner                                         7-1
    Troubleshooting the MSR                                                     7-2
    Tablet 720 System Recovery                                                  7-2
    Tablet 721/721P System Recovery                                             7-3
    Tablet 721/721P - Restore OS After Power Loss During System Recovery        7-4
    Replacing the Bridge Battery in the MICROS Tablet 720                       7-4

8   Care and Handling

9   Regulatory and Compliance
    FCC Compliance                                                              9-1
    FCC Interference                                                            9-1

                                                                           iv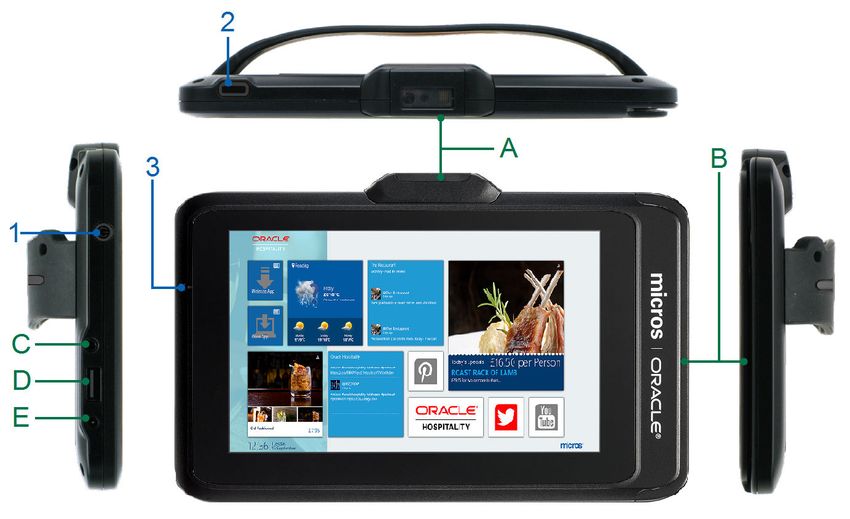
Preface
      The Oracle MICROS Tablet 700 Series tablets are designed for the hospitality market.

      Audience
      This document is intended for those who will be setting up, installing, and operating the
      Oracle MICROS Tablet 720, Oracle MICROS Tablet 721, or Oracle MICROS Tablet 721P. It is
      not specific to a particular software application.

      Customer Support
      To contact Oracle Customer Support, access My Oracle Support at the following URL:
      https://support.oracle.com
      When contacting Customer Support, please provide the following:
      •   Product version and program/module name
      •   Functional and technical description of the problem (include business impact)
      •   Detailed step-by-step instructions to recreate
      •   Exact error message received
      •   Screenshots of each step you take

      Documentation
      Oracle Hospitality product documentation is available on the Oracle Help Center at http://
      docs.oracle.com/en/industries/food-beverage/.

      Revision History

      Date                  Description of Change
      December 2017         Initial Publication
      February 2018         Updated the battery information in the Accessories section
      April 2019            Miscellaneous improvements
      June 2020             Added Tablet 721P
      November 2021         Miscellaneous improvements
      January 2022          Updated tablet accessories information.

                                                                                                   v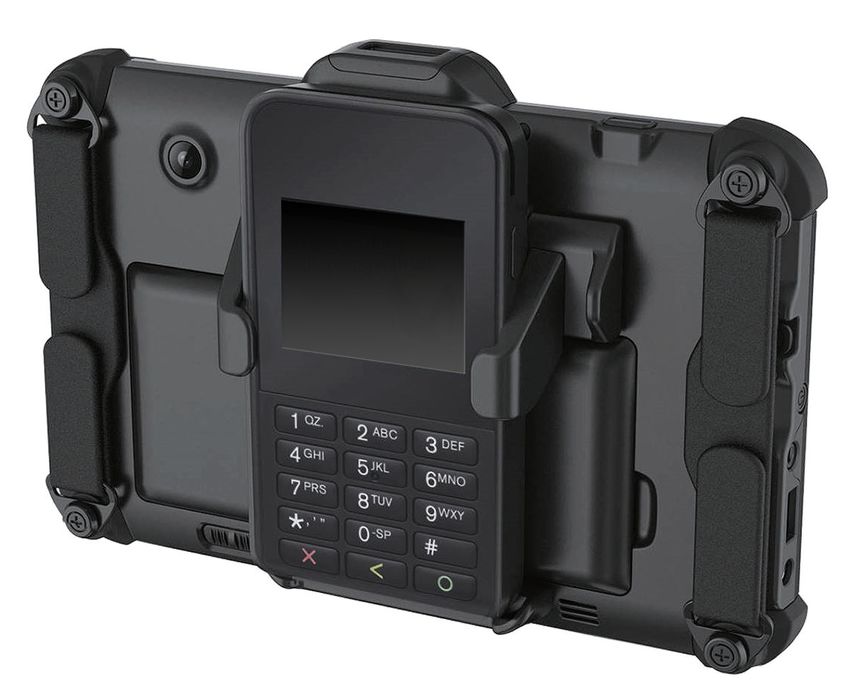
1
The Oracle MICROS Tablet 700 Series
      The Oracle MICROS Tablet 700 Series (Tablet 720, Tablet 721, and Tablet 721P) features
      slim yet rugged enclosures, a 7–inch TFT display powered by the Intel Atom quad-core
      processor, and offers an optimal combination of performance and power savings. It provides
      integrated Wi-Fi and Bluetooth connectivity, a magnetic stripe reader, an optional barcode
      scanner, an optional camera (Tablet 721/721P only), and an optional RFID reader. The Tablet
      721P features an ulta-ruggedized enclosure for added protection.

                                                                                             1-1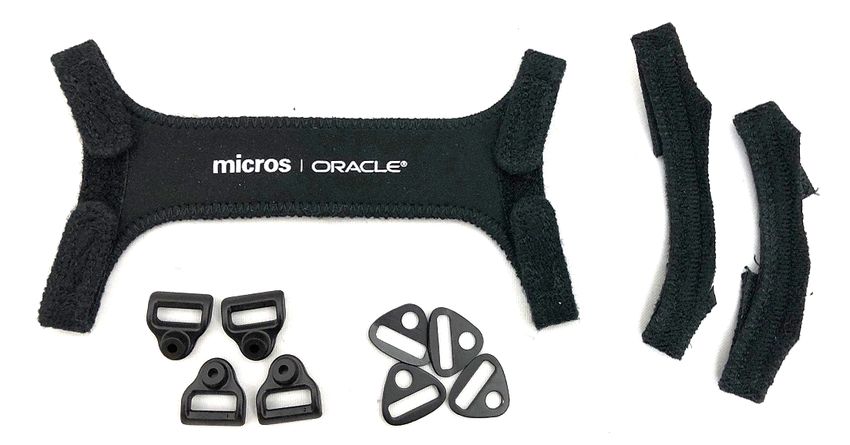
Chapter 1
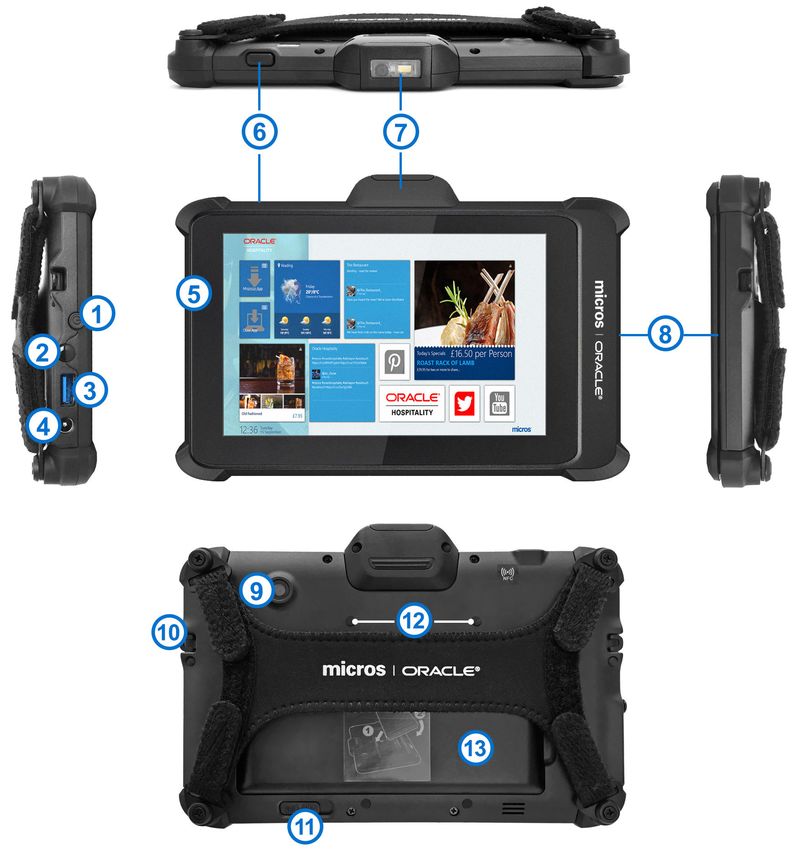
Tablet 721P Features
Tablet 721P Features
Figure 1-1 The Features of the Oracle MICROS Tablet 721P
Table 1-1 Oracle MICROS Tablet 721P Features
Feature Description
1. Power button Turns the tablet on or off.
2. Headphone port Use to connect a headphone, a microphone,
or a headset.
3. High speed USB port Use to connect peripherals such as storage
devices, printers, and displays.
1-2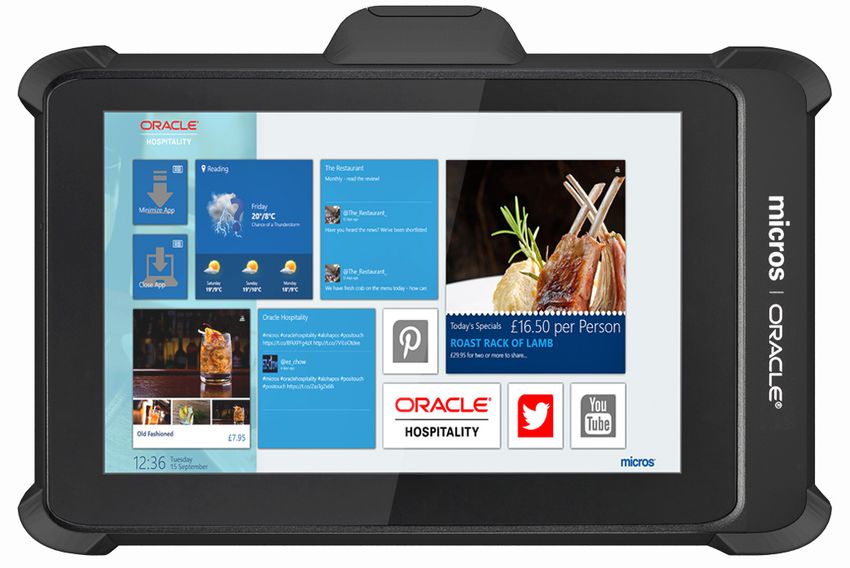
Chapter 1
                                                                                Tablet 721P Features

Table 1-1   (Cont.) Oracle MICROS Tablet 721P Features

Feature                                       Description
4. 12V DC power input                         Use to connect a power supply to provide
                                              power to your tablet and charge the
                                              battery.
5. Battery charge indicator                   Use to connect a power supply to provide
                                              power to your tablet and charge the
                                              battery.
6. Barcode scanner button                     Use to activate the barcode scanner.
7. Barcode scanner (optional)                 Captures and reads information contained
                                              in a bar code.
8. Magnetic Stripe Reader (MSR)               Reads the information encoded in the
                                              magnetic stripe of payment cards.
9. Camera (optional)                          Use to take photographs.
10. Anchor (2x) for safety tether or third-   Use to attach a safety tether or shoulder
party shoulder strap                          strap.
11. Battery latch                             Use to unlock and remove the battery.
12. Mounting points (4x) for PIN entry        Use to attach PIN entry device.
device, mobile payment location
13. Battery sensor (located under battery).   Senses the presence of a battery. Located in
Note: Pressing the battery sensor when the    the battery compartment under the
battery is removed disables the hot swap      battery. Inadvertently pressing this when
capability and causes the tablet to shut      the battery is removed disables the “hot
down.                                         swap” capability and causes the tablet to
                                              power off.

                                                                                                 1-3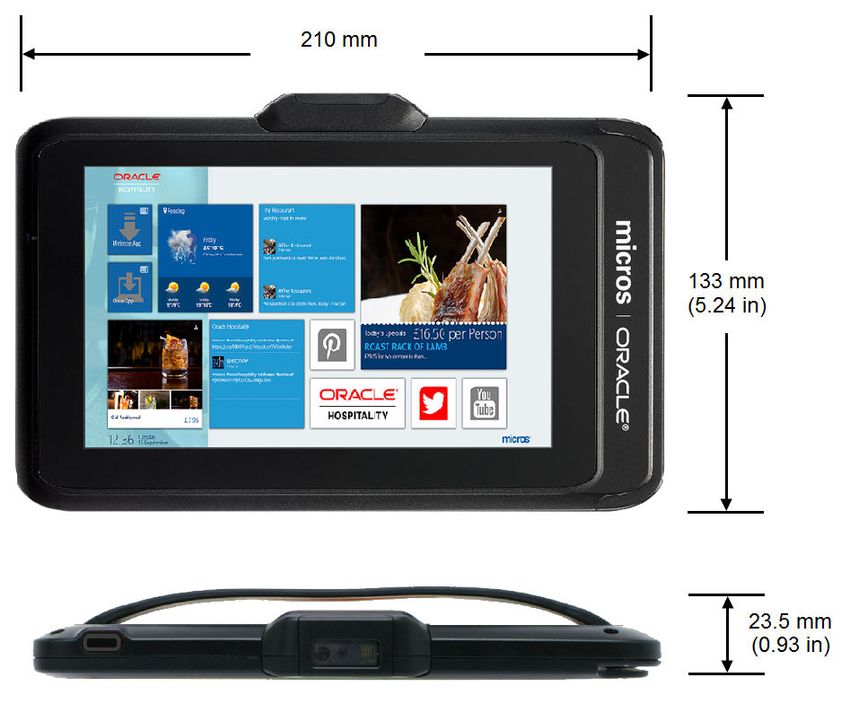
Chapter 1
                                                                           Tablet 721 Features

Tablet 721 Features
         Figure 1-2    The Features of the Oracle MICROS Tablet 721 — Front and Side
         View

         Figure 1-3    The Features of the Oracle MICROS Tablet 721 — Back View

         Table 1-2    Input/Output Port on the Oracle MICROS Tablet 721

          Feature                                 Description
          A. Barcode Scanner (Optional)           Captures and reads information contained
                                                  in a bar code.

                                                                                         1-4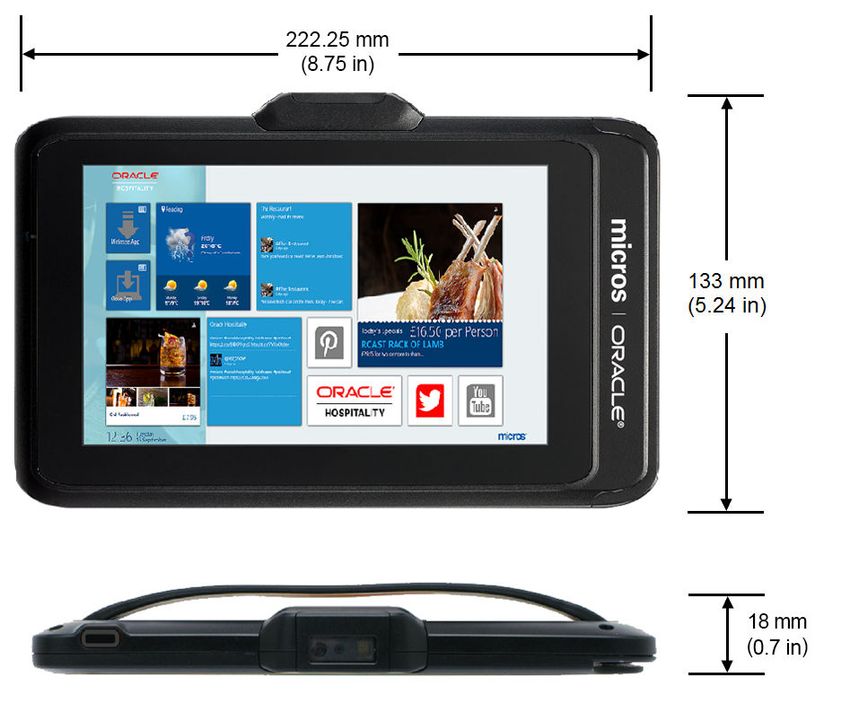
Chapter 1
                                                                             Tablet 721 Features

Table 1-2     (Cont.) Input/Output Port on the Oracle MICROS Tablet 721

Feature                                   Description
B. Magnetic Stripe Reader (MSR)           Reads the information encoded in the
                                          magnetic stripe of payment cards.
C. Headphone Jack                         Use to connect a headphone, a microphone,
                                          or a headset.
D. USB Port                               Use to connect peripherals such as storage
                                          devices, printers, and displays.
E. 12V DC Power Input                     Use to connect a power supply to provide
                                          power to your tablet and charge the
                                          battery.
F. Camera                                 Use to take photographs.

Table 1-3     Button Functions on the Oracle MICROS Tablet 721

Feature                                       Description
1. Power Button                               Turns the tablet on or off.
2. Scanner Trigger                            Use to activate the barcode scanner.
3. Battery/Power LED                          Indicates the power and battery status.
                                              Battery LED Status has more information on
                                              the behavior of the LED.
4. Battery Latch                              Use to unlock and remove the battery.
5. Battery Sensor                             Senses the presence of a battery. Located in the
                                              battery compartment under the battery.
                                              Inadvertently pressing this when the battery is
                                              removed disables the “hot swap” capability
                                              and causes the tablet to power off.

                                                                                            1-5
Chapter 1
Tablet 720 Features
Tablet 720 Features
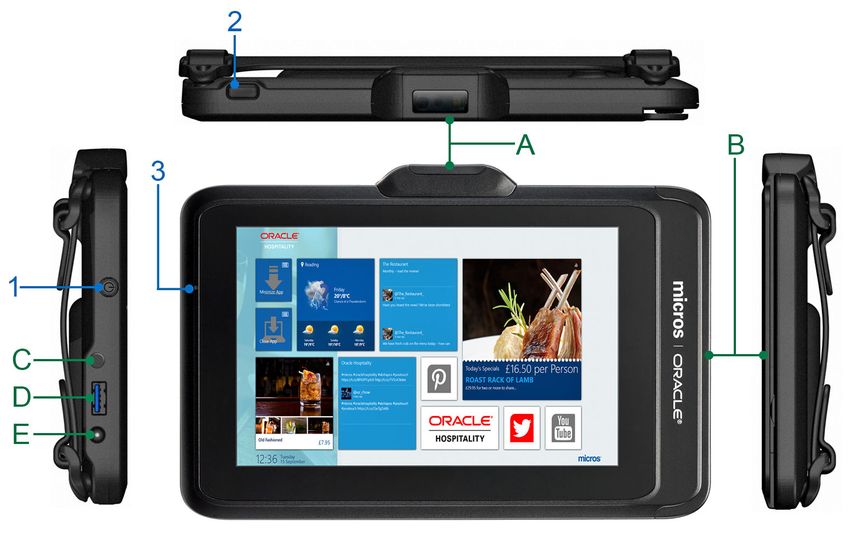
Figure 1-4 The Features of the Oracle MICROS Tablet 720 — Front and Side
View
Figure 1-5 The Features of the Oracle MICROS Tablet 720 — Back View
1-6Chapter 1
Technical Specifications
Table 1-4 Input/Output Port on the Oracle MICROS Tablet 720
Feature Description
A. Barcode Scanner (Optional) Captures and reads information contained in a
bar code.
B. Magnetic Stripe Reader (MSR) Reads the information encoded in the
magnetic stripe of payment cards.
C. Headphone Jack Use to connect a headphone, a microphone, or
a headset.
D. USB 2.0 Port Use to connect peripherals such as storage
devices, printers, and displays.
E. 5V DC Power Input Use to connect a power adapter to provide
power to your tablet and charge the battery.
Table 1-5 Button Functions on the Oracle MICROS Tablet 720
Feature Description
1. Power Button Turns the tablet on or off.
2. Scanner Trigger Use to activate the barcode scanner.
3. Battery/Power LED Indicates the power and battery status.
Battery LED Status has more information on
the behavior of the LED.
4. Battery Latch Use to unlock and remove the battery.
5. Battery Sensor Senses the presence of a battery. Located in the
battery compartment under the battery.
Inadvertently pressing this when the battery is
removed disables the “hot swap” capability
and causes the tablet to power off.
Technical Specifications
The following tables contains the technical specifications for the Oracle MICROS Tablet 720,
Oracle MICROS Tablet 721, and Oracle MICROS Tablet 721P.
Table 1-6 Technical Specifications for the Oracle MICROS Tablet 720
Feature MICROS Tablet 720
Processor Intel Atom Quad Core, 1.33GHz
RAM 2GB
Storage 64GB Flash
Operating System Microsoft Windows Embedded 8.1 Industry
Pro
Microsoft Windows 10 IoT Enterprise 2016
LTSB
Display 7-inch LED-Backlight Screen with Capacitive
Touch
1-7Chapter 1
Technical Specifications
Table 1-6 (Cont.) Technical Specifications for the Oracle MICROS Tablet 720
Feature MICROS Tablet 720
Display Resolution 1280 x 800
WLAN Wi-Fi 802.11a/b/g/n
Bluetooth Bluetooth 4.0 LE
USB Port USB 2.0 x 1
Headset Jack 1
DC In 1
AC/DC Adapter Input: 100 – 240V AC; Output: 5V DC, 3A
Battery Pack Replaceable rechargeable Li-ion battery, 3.6V,
8800mAh
Backup/Bridge Battery: 240mAh
Enclosure ABS + PC plastics
Dimensions (H x W x D) 5.24in x 8.26in x 0.93in
133mm x 210mm x 23.5mm
Temperature Operation: 0 °C (32 °F) to 40 °C (104 °F)
Storage: -20 °C (-4 °F) to 60 °C (140 °F)
Humidity 0% to 90% Non-Condensing
Weight 1.31 lbs (0.59 kg)
Magnetic Stripe Reader (MSR) Triple Track Readers (ISO TK1, 2 & 3), JIS &
AAMVA Compliant
Barcode Scanner Optional; 1D/2D Barcode Scanner
NFC/RFID Optional; Supports ISO/IEC 14443 A Reader/
Writer Mode @ 13.56MHz
Table 1-7 Technical Specifications for the Oracle MICROS Tablet 721 and 721P
Feature MICROS Tablet 721/721P
Processor Intel Atom Quad Core, 1.44GHz
RAM 4GB
Storage 64GB Flash
Operating System Microsoft Windows 10 IoT Enterprise 2016
LTSB
Display 7-inch LED-Backlight Screen with
Capacitive Touch
Display Resolution 1280 x 800
WLAN Wi-Fi 802.11a/b/g/n/ac
Bluetooth Dual Mode Bluetooth 4.2, BLE
USB Port USB x 1
Headset Jack 1
DC In 1
AC/DC Adapter Input: 100 – 240V AC; Output: 12V DC, 5A
1-8Chapter 1
Software Components
Table 1-7 (Cont.) Technical Specifications for the Oracle MICROS Tablet 721
and 721P
Feature MICROS Tablet 721/721P
Battery Pack Replaceable rechargeable Li-ion battery,
3.6V, 8800mAh
Backup/Bridge Battery: 240mAh
Enclosure ABS + PC plastics
Dimensions (H x W x D) Tablet 721:
• 5.24in x 8.75in x 0.7in (133mm x
210mm x 18mm)
Tablet 721P (without accessories):
• 5.41in x 8.49in x 1in (137.5mm x
215.6mm x 26.4mm)
Temperature Operation: 0 °C (32 °F) to 40 °C (104 °F)
Storage: -20 °C (-4 °F) to 60 °C (140 °F)
Humidity 0% to 90% Non-Condensing
Weight Tablet 720/721: 1.31 lbs (0.59 kg)
Tablet 721P: Up to 2 lbs (0.91 kg)
Magnetic Stripe Reader (MSR) Triple Track Readers (ISO TK1, 2 & 3), JIS &
AAMVA Compliant
Barcode Scanner Optional; 1D/2D Barcode Scanner
Camera Optional; Resolution up to 2592x1944px,
68° FOV, 3.94in minimum focus distance,
F2.8±5%
NFC/RFID Optional; Supports ISO 14443A/B, ISO
15693, MIFARE Ultralight, and FeliCa A
Reader/Writer Mode @ 13.56MHz
Software Components
The Oracle MICROS Tablet 720 comes pre-installed with the Microsoft Windows Embedded
8.1 Industry Pro or Microsoft Windows 10 IoT Enterprise operating system. The Oracle
MICROS Tablet 721 and Oracle MICROS 721P are pre-installed with the Microsoft Windows
10 IoT Enterprise operating system.
The Microsoft Windows Embedded 8.1 Industry Pro operating system offers the latest
Windows 8.1 innovations in security, management, and user experience, as well as the
flexibility and enhanced lockdown capabilities needed to power and secure POS-industry
devices. Features include:
• Enhanced security technologies protect your device, data, and network.
• Lockdown features help control the device configuration for a consistent and secure user
experience.
• BitLocker and Trusted Boot technologies ensure data protection, hard drive encryption,
and protect against malware.
• Improved multi-touch capabilities and responsive controls create a more natural user
experience.
1-9Chapter 1
Tablet Accessories
• New power management and wireless technologies improve mobility and access.
The Microsoft Windows 10 IoT Enterprise operating system offers the latest Windows
10 Enterprise innovations to the POS industry as well as enterprise-grade security and
reliability to ensure your devices and data are protected against modern security
threats. Features include:
• Comprehensive infrastructure and management features provide flexibility,
consistency, and advanced security.
• Built-in defenses, such as Secure Boot, BitLocker, Device Guard, and Credential
Guard, protect your information from leaks or theft.
• Advanced lockdown capabilities, such as AppLocker, help create a dedicated
device experience for business applications.
• Support for Universal Windows apps and Classic Windows applications create a
flexible and all-inclusive workspace.
• Native-device interoperability provides manageability and a connected
organization.
Tablet Accessories
Table 1-8 Oracle MICROS Tablet 700 Series Accessories
Accessory Description
High Capacity Battery Allows for long use and quick swap
Part Number: 7117485 without requiring the tablet to be docked.
Can be charged separately using the 4-Bay
Battery Charger or with the tablet using the
Desktop Charging Cradle, 4-Bay Tablet
Charger, External Power Adapter (Tablet
720), or the Power Supply (Tablet 721).
High Capacity Li-Ion Polymer Battery Note: The Tablet 720 requires BIOS
Part Number 7601701 v0.01.25ORC or greater to support the new
Lithium-Ion Polymer battery. Download
the BIOS update (patch number 28178739)
from https://support.oracle.com.
The High Capacity Li-Ion Polymer Battery
allows for long use and quick swap without
requiring the tablet to be docked. The
battery can be charged separately using the
4-Bay Battery Charger or with the Oracle
MICROS Tablet 700 Series tablets using the
Desktop Charging Cradle, 4-Bay Tablet
Charger, or external power adapter.
1-10Chapter 1
Tablet Accessories
Table 1-8 (Cont.) Oracle MICROS Tablet 700 Series Accessories
Accessory Description
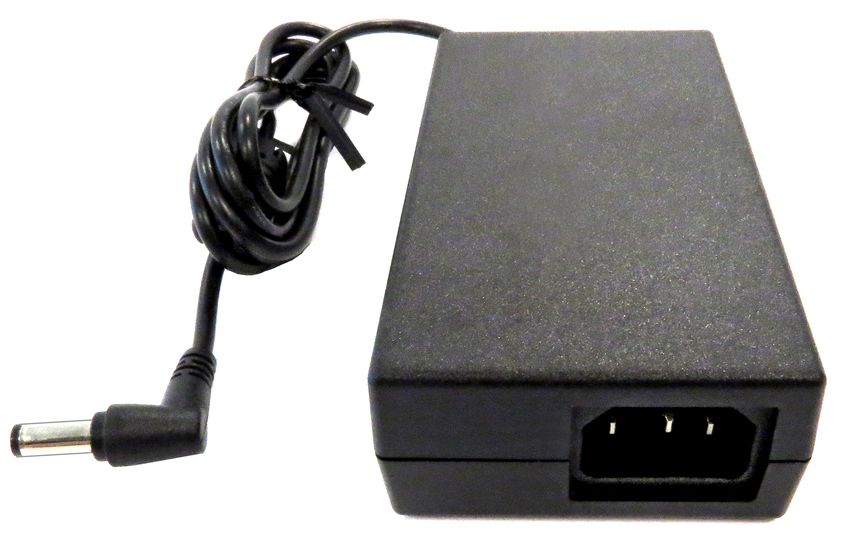
Power Supply The Power Supply (12V) is used to charge a
Part Number: 7118431 with C13 power single Tablet 721/721P with the battery
cord connection. attached. Not for use with the Tablet 720.
External Power Adapter The External Power Adapter (5V) charges a
Part Number: 7117487 single Tablet 720 with battery attached. Not
for use with the Tablet 721/721P.
4–Bay Battery Charger Charges up to 4 batteries at a time.
Part Number: 7118826 with C13 power
cord connection
1-11Chapter 1
Tablet Accessories
Table 1-8 (Cont.) Oracle MICROS Tablet 700 Series Accessories
Accessory Description
4–Bay Tablet Charger Charges up to 4 tablets with batteries
Part Number: 7118827 with C13 power attached at the same time.
cord connection
Desktop Charging Cradle Charges one tablet with battery attached
Part Number: 7118828 with C13 power and one spare battery at the same time.
cord connection
Payment Device Mount and hand straps for The Payment Device Mount lets you mount
Oracle MICROS Tablet 721P a PIN entry device on the Tablet 721P.
Part Number: 7601705
1-12Chapter 1
Tablet Accessories
Table 1-8 (Cont.) Oracle MICROS Tablet 700 Series Accessories
Accessory Description
Replacement hand straps and mounting Includes “x-style” and “PED-style” hand
brackets for Oracle MICROS Tablet 721 and straps, plus brackets, screws, and washers
Oracle MICROS Tablet 721P for replacing the hand straps on a Tablet
Part Number: 7601707 721/721P.
LCD screen protectors for Oracle MICROS The LCD screen protector helps defend
Tablet 700 Series, pack of 5 your Tablet 700 Series screen against
Part Number: 7602035 scratches and scuffs.
1-132
Setup and Configuration
This section contains instructions for setting up and configuring the Oracle MICROS Tablet
720 and the Oracle MICROS Tablet 721/721P.
Performing an Initial Setup
1. Place the tablet face down on a smooth, flat surface.
2. Tablet 721P only: Remove the battery cover, and then remove the plastic tab from the
interior bridge battery compartment.
3. Insert the battery into the battery compartment and gently press down until it clicks into
place.
4. Connect the tablet to its power supply and fully charge.
5. Power on the tablet by pushing and quickly releasing the Power button. The display
powers on in a few seconds.
6. Complete the Microsoft Windows setup by following the prompts. Consult your network
administrator to properly complete the tablet’s network and system configurations.
7. Ensure the tablet is connected to a secure wireless network.
8. Install the Client Application Loader (CAL) by double-tapping the CALClient Install icon
and following the prompts. Upon successful completion, the tablet is connected to your
application’s CAL server.
Inserting and Removing the Battery
1. To insert the battery, slide the battery into the battery compartment with the terminal slots
aligned with the battery terminals, and then gently push into place.
2. To remove the battery, use the Battery Latch on the back of the tablet to unlock and
release the battery.
Charging the Tablet and Battery
The Tablet 720 and its battery can be charged using the following chargers:
• External Power Adapter
• Desktop Charging Cradle
• 4-Bay Tablet Charger
• 4-Bay Battery Charger
The Tablet 721/721P and its battery can be charged using the following chargers:
2-1Chapter 2
Powering the Tablet On and Off
• Power Supply
• Desktop Charging Cradle
• 4-Bay Tablet Charger
• 4-Bay Battery Charger
1. Charge the tablet using the External Power Adapter (Tablet 720 only):
a. Plug the charger into an electrical outlet.
b. Ensure the tablet battery is properly inserted into the Tablet 720.
c. Plug the charger into the DC Power Input port on the tablet.
2. Charge the tablet using the Power Supply (Tablet 721/721P only):
a. Connect the C13 cable to the Power Supply, and then plug the Power Supply
into an electrical outlet.
b. Ensure the tablet battery is properly inserted into the Tablet 721/721P.
c. Plug the Power Supply into the DC Power Input port on the tablet.
3. Charge the tablet using the Desktop Charging Cradle or the 4-Bay Tablet
Charger:
a. Connect the external power supply to the DC Input port on the Desktop
Charging Cradle or the 4-Bay Tablet Charger.
b. Plug the external power supply into an electrical outlet.
c. Ensure the tablet battery is properly inserted into the Tablet 720 or Tablet
721/721P.
d. Place the tablet into the charging cradle.
e. If using the Desktop Charging Cradle and charging a spare battery, place the
battery into the spare charging bay.
4. Charge the battery using the 4-Bay Battery Charger:
a. Connect the external power supply to the DC Input port on the 4-Bay Battery
Charger.
b. Plug the external power supply into an electrical outlet.
c. Remove the tablet battery from the Tablet 720 or Tablet 721/721P.
d. Place the battery into the charging bay.
Note:
Tablet 721P: The orange LED appears when the tablet is trickle charging.
The white blinking LED indicates normal charging.
Powering the Tablet On and Off
1. To power on, push and quickly release the Power button.
The display powers on in a few seconds.
2-2Chapter 2
Barcode Scanner Configuration
2. To place in standby mode and conserve power, push and quickly release the Power
button.
The display is turned off, but the tablet remains on.
3. To take the tablet out of standby mode, quickly push the Power button.
The display powers on in a few seconds. The wireless connection may take several
seconds to re-establish.
4. To power off for extended storage, use the Shut Down function provided in the operating
system software.
5. To perform a hardware shutdown as means of recovery from tablet lockups, hold the
Power button for four to six seconds.
Use precaution. This type of shutdown is only advisable for troubleshooting and not as
normal operation.
Barcode Scanner Configuration
The Barcode Scanner is an optional configuration of the Oracle MICROS Tablet 700 Series
tablets. It comes pre-installed and is programmed for the most common terminal and
communications settings.
If you need to change these settings, programming is accomplished by scanning the
barcodes provided by Honeywell International Inc., the manufacturer of the barcode scanner
engine. The N36XX Decoded Engine User Guide by Honeywell International Inc. provides
these scan codes. It can be found on the Honeywell International Inc. website.
Using the Barcode Scanner
The Barcode Scanner has a view finder that projects a bright red aiming beam corresponding
to the scanner’s field of view. It can read both 1D linear barcodes and 2D matrix symbols.
To scan single or multiple barcodes/symbols:
1. Hold the Barcode Scanner at an appropriate distance from the barcode/symbol.
2. Pull the Scanner Trigger, and then center the aiming beam on the barcode/symbol.
Tips for using the Barcode Scanner:
• For the best read, position the aiming beam centered over the barcode/symbol.
• For a good read, position the beam in any direction, such as horizontal, vertical, or
diagonal.
• The aiming beam is smaller when the scanner is closer to the barcode/symbol and
larger when it is farther from the barcode/scanner.
• If the barcode/symbol is laminated or highly reflective, it may be necessary to tilt the
barcode/symbol to prevent unwanted reflection.
2-3Chapter 2
Configuring the Barcode Scanner for Use With Oracle Retail Xstore Applications
Figure 2-1 Barcode Scanner Field of View
Configuring the Barcode Scanner for Use With Oracle Retail
Xstore Applications
Oracle MICROS Tablet 700 Series tablets require additional configuration for use with
Oracle Retail Xstore applications. Follow the steps below to configure your Oracle
MICROS Tablet 700 Series device.
1. Set the scanner to USB HID mode by scanning the following code:
2. Open a Command Prompt with Admin rights, type cd \Program
Files\Honeywell\UPOS Suite\OPOS Suite\NULL_Driver
nulldriverinstall /uninstall, and then press Enter.
3. Open Windows Device Manager and verify the existence of POS HID Barcode
scanner under POS Barcode Scanner.
2-43
Battery Performance
This section contains details regarding the batteries for the Oracle MICROS Tablet 700
Series.
LED Status and Behavior
The following table describes the behavior and status of the tablet’s LED when connected
and disconnected from the power supply.
Table 3-1 LED Status and Behavior of the Oracle MICROS Tablet Battery
LED Power Supply Status
Off Disconnected Battery is not charging.
Off Connected Battery is not charging; check
power supply connection.
On Connected Battery is fully charged.
Tablet 721P: On (orange color) Connected Battery is trickle charging.
Blinking, Slow Connected Battery is charging.
(1 blink/second)
Blinking, Fast Connected Charging error. The
(4 blinks/second) Troubleshooting sections
contains a list of possible
causes.
Blinking, Fast Disconnected Battery is removed for hot
(4 blinks/second) swap. Install a new battery
within 3 minutes to avoid
power off.
Inadvertently pressing the
Battery Sensor when the
battery is removed disables
the hot swap capability and
causes the tablet to power off.
The following table describes the behavior and status of the 4-Bay Battery Charger LED
when charging the tablet’s battery.
Table 3-2 LED Status and Behavior of the Oracle MICROS Tablet 4-Bay Battery
Charger
LED Status
Off Battery is not charging.
Yellow Battery is charging.
Green Battery is fully charged.
3-1Chapter 3
Battery Life and Charging Times
Battery Life and Charging Times
The following table lists the charging and discharging data for the Oracle MICROS
Tablet 700 Series. The charging data pertains to all power supplies and chargers
designed for the tablet.
Table 3-3 Battery Charge and Discharge Data
State Charge Status
Charging Approximately 4 hours to reach 95%
battery charge.
Approximately 6 hours to reach 100%
battery charge.
Discharging Approximately 8 hours to fully discharge
battery.
Backup Battery
The Backup or Bridge Battery is a small 240mAh battery located underneath the main
battery compartment. This battery provides enough power to perform a hot swap of the
main battery without having to reboot the Tablet.
Run Time Charge Time
Approximately 4 minutes from fully Approximately 2 hours to full
charged state Assumption: Tablet is charging or the main
Assumption: Tablet running a nominal battery is powering up the tablet.
background task.
3-24
Wireless Networking
The Oracle MICROS Tablet 700 Series features the following networking technology:
Oracle MICROS Tablet 721/721P: Embedded 802.11a/b/g/n/ac WLAN adapter and Dual
Mode Bluetooth 4.2 BLE network technology.
Oracle MICROS Tablet 720: Embedded 802.11a/b/g/n WLAN adapter and Bluetooth 4.0 low
energy (LE) network technology.
Connecting the Oracle MICROS Tablet 721/721P to a Wireless
Network
If WEP/WPA/WPA2 is enabled, the SSID and WEP/WPA/WPA2 parameters and the access
points must match. Consult your network administrator for proper configuration.
The Oracle MICROS Hardware Wireless Networking Best Practices Guide has additional
information for configuring your wireless network.
To connect the Tablet 721/721P to a wireless network:
1. Tap the Wireless Networks icon in the System Tray.
2. Select the wireless access point from the list of available networks.
3. If you want the device to automatically connect to this wireless network, select Connect
automatically.
4. If required, enter the network’s password.
5. Tap Connect.
Connecting the Oracle MICROS Tablet 720 to a Wireless
Network
If WEP/WPA/WPA2 is enabled, the SSID and WEP/WPA/WPA2 parameters and the access
points must match. Consult your network administrator for proper configuration.
The Oracle MICROS Hardware Wireless Networking Best Practices Guide has additional
information for configuring your wireless network.
To connect the Tablet 720 to a wireless network:
1. Tap the Wireless Networks icon in the System Tray.
2. Select the wireless access point from the list of available networks.
3. If you want the device to automatically connect to this wireless network, select Connect
automatically.
4. If required, enter the network’s password.
4-1Chapter 4
Wireless Signal Performance and Settings
5. Tap Connect.
Wireless Signal Performance and Settings
Ideal signal strength for optimum performance varies based on many factors, such as
background noise in the environment, what applications are being run, and the amount
of clients on the network.
Table 4–1 contains details on the optimal roaming performance for the Oracle
MICROS Tablet 720. The optimal signal performance varies based on the network.
The Oracle MICROS Tablet 721/721P features an updated Intel wireless adapter that
includes additional advanced settings. Table 4–2 lists information about the Oracle
MICROS Tablet 721 advanced wireless settings.
Table 4-1 Wireless Signal Performance for the Oracle MICROS Tablet 720
Optimal Bandwith Optimal Distance
Roaming Tendency Default (-75dBm)
(-65dBm) (-85dBm)
Aggressive Maximum Minimum Minimum
(AP + 10dBm) performance for performance for performance for
highest achievable basic connectivity. reliable connectivity.
connectivity.
Auto Minimum
(AP + 15) performance for
basic connectivity.
Conservative Minimum
(AP + 30dBm) performance for
basic connectivity.
Moderate Minimum
(AP + 20dBm) performance for
basic connectivity.
Table 4-2 Advanced Wireless Settings for the Oracle MICROS Tablet 721/721P
Property Default Parameters Feature Affected
802.11 n Channel Width for Auto Throughput/channel width
2.4GHz
802.11 n Channel Width for Auto Throughput/channel width
5.2GHz
ARP offload for WoWLAN Enabled Wake-On-WLAN
Fat Channel Intolerant Disabled Channel width
GTK Rekeying for WoWLAN Enabled Wake-On-WLAN
HT Mode VHT Mode Throughput/data rate
MIMO Power Save Mode Auto SMPS Power usage
Mixed Mode Protection RTS/CTS Enabled Throughput/data rate
NS offload for WoWLAN Enabled Wake-On-WLAN
Packet Coalescing Enabled Power usage
Preferred Band No pref. Band selection
4-2Chapter 4
Configuring Bluetooth
Table 4-2 (Cont.) Advanced Wireless Settings for the Oracle MICROS Tablet
721/721P
Property Default Parameters Feature Affected
Roaming Aggressiveness Medium Connectivity/roaming
Sleep on WoWLAN Disabled Wake-on-Wireless LAN
disconnect
Throughput Booster Disabled Throughput/data rate
Transmit Power Highest Connectivity
U-APSD Support Disabled Connectivity
Wake on Magic Packet Enabled Wake-On-WLAN
Wake on Pattern Match Enabled Wake-On-WLAN
Wireless Mode 802.11a/b/g Band selection
Refer to the Intel website for detailed technical information about the AC-8265 wireless
adapter.
Configuring Bluetooth
To configure Bluetooth on the Tablet 720 and Tablet 721/721P:
1. From the Start Menu, tap Settings.
2. Tap Devices, and then tap Bluetooth.
3. Tap On/Off and ensure Bluetooth is turned on. The Bluetooth icon is shown in the
System Tray when Bluetooth is turned on.
4. Select the Bluetooth device from the list of available devices.
4-35
Tablet 721/721P BIOS Configuration
This section describes how to enter the Tablet 721/721P BIOS System Configuration Utility
and how to configure the system BIOS on the Tablet 721/721P.
Starting the Tablet 721/721P BIOS System Configuration Utility
To configure the BIOS on the Tablet 721/721P, start the BIOS System Configuration Utility
using the following steps:
1. Connect a USB keyboard to the tablet.
2. Power on or restart the tablet.
3. Press Esc immediately after pressing the power button and before the BIOS splash
screen. You can press Esc repeatedly until the Configuration Utility starts.
If the tablet boots into the operating system without starting the utility, restart the tablet
and try again.
Configuring Tablet 721/721P System Security Settings
On the Security tab, configure the settings as described in the following table:
Table 5-1 BIOS Security Settings
Setting Description of Option
Secure Boot Configuration Disabled by default. To enable, set the
Supervisor Password.
Enforce Secure Boot Enable or Disable the UEFI secure boot
firmware validation process.
Restore Secure Boot to Factory Settings Reset secure boot variables to the factory
default.
Erase all Secure Boot Settings Delete the protection key, change the platform
to setup mode, and disable secure boot.
Set Supervisor Password Set or clear the supervisor password. After
setting a supervisor password, the option to set
user passwords will appear. Setting user
passwords allows the creation of users with
limited access.
TPM Availability Enable or Disable Trusted Platform Module
support.
TPM is disabled by default.
5-1Chapter 5
Setting the Tablet 721/721P BIOS Supervisor Password
Setting the Tablet 721/721P BIOS Supervisor Password
Setting the supervisor password is an important step to secure the Tablet 721/721P.
After setting a supervisor password, the option to set user passwords will appear.
Setting user passwords allows the creation of users with limited access.
1. Connect a USB keyboard to the tablet, and then power on or restart the tablet.
2. Press Esc immediately after pressing the power button and before the BIOS
splash screen. You can press Esc repeatedly until the Configuration Utility starts.
3. On the BIOS main screen, use the keyboard arrow keys to select the SCU icon,
and then press Enter.
4. Navigate to the Security tab, select Set Supervisor Password, and then press
Enter.
5. On the Set Supervisor Password dialog, enter and confirm a password.
6. Exit and save the changes.
Configuring the Tablet 721/721P Boot Priority for Devices
On the Boot Manager screen, use the arrow keys to reorder the priority list for boot
devices. The BIOS reads the devices from top to bottom in determining the method for
booting into the operating system.
For example, if you want the tablet to boot from a DVD whenever a user inserts a disc
and the HDD installation when there is no operating system disc, make sure to place
the DVD device, such as USB DVD, higher on the list than the HDD with the operating
system installation, such as ATA HDD0.
Exiting the Tablet 721/721P BIOS Configuration Utility
On the Exit tab, select one of the following options:
• Exit Saving Changes: Save the current configuration settings, exit the
configuration utility, and boot into the operating system.
• Save Change Without Exit: Save changes without exiting BIOS.
• Exit Discarding Changes: Discard the current configuration settings, exit the
configuration utility, and boot into the operating system.
• Load Optimal Defaults: Load the optimal default settings.
• Load Custom Defaults: Load the custom default settings.
• Save Custom Defaults: Save the current configuration as a custom default
setting.
• Discard Changes: Discard the current configuration settings without exiting the
configuration utility. This resets the configurations to the last saved state.
5-26
Equipment Dimensions
This section contains dimensions for the Oracle MICROS Tablet 700 Series tablets and
accessories.
Tablet 721P Dimensions
Figure 6-1 Oracle MICROS Tablet 721P Dimensions
6-1Chapter 6
Tablet 721 Dimensions
Tablet 721 Dimensions
Figure 6-2 Oracle MICROS Tablet 721 Dimensions
6-2Chapter 6
Tablet 720 Dimensions
Tablet 720 Dimensions
Figure 6-3 Oracle MICROS Tablet 720 Dimensions
6-3Chapter 6
4-Bay Tablet Charger Dimensions
4-Bay Tablet Charger Dimensions
Figure 6-4 Oracle MICROS Tablet 720 4-Bay Tablet Charger Dimensions
6-4Chapter 6
4-Bay Battery Charger Dimensions
4-Bay Battery Charger Dimensions
Figure 6-5 Oracle MICROS Tablet 720 4-Bay Battery Charger Dimensions
6-57
Troubleshooting
This section contains general troubleshooting tasks related to the Oracle MICROS Tablet 700
Series.
Basic Troubleshooting
The following table contains descriptions and solutions for common problems encountered
with the Oracle MICROS Tablet 700 Series.
Table 7-1 Oracle MICROS Tablet 700 Series Basic Troubleshooting
Problem Possible Causes Solution
Tablet will not power up. Battery is fully discharged. Charge the battery.
Battery is in a state of failure. Replace battery with a fully
Tablet is in a state of failure. charged and operational
battery.
If this does not work, order a
replacement tablet.
The back of the tablet gets Applications running while Ensure the power settings
warm when charging. charging. allow the tablet to sleep while
Tablet not in sleep mode while charging. This prevents warm
charging. casework and reduces the
time required to fully charge
the battery.
Battery will not charge. Battery failure. Order a replacement battery.
Troubleshooting the Barcode Scanner
Use the OPOS Validation Utility to ensure the Barcode Scanner is working correctly.
1. For the Tablet 720 running Microsoft Windows 8.1, go to the Apps list on the Start Menu,
and then tap OPOS Validation Utility.
For the Tablet 720 and the Tablet 721/721P running Microsoft Windows 10, go to the
Apps list on the Start Menu, tap Honeywell, and then tap OPOS Validation Utility.
2. In the Scanner section, select Honeywell from the Device Name drop-down list.
3. Tap the Begin Test button.
4. Scan a barcode.
5. If data is observed and collected, then the Barcode Scanner is working correctly.
6. Tap the End Test button, and then exit the utility.
7-1Chapter 7
Troubleshooting the MSR
Troubleshooting the MSR
Use the MSR OPOS Test Program utility to ensure the MSR is working correctly. Note:
By default, this procedure tests the first two MSR tracks. To test the third track, refer to
Step 5 below.
1. (Tablet 720 only) For Microsoft Windows 8.1, go to the Apps list from the Start
Menu, and then tap MSR OPOS Test Program.exe.
(Tablet 720 and Tablet 721/721P) For Microsoft Windows 10, go to the Apps list on
the Start Menu, tap MSROPOSDEMO, and then tap MSR OPOS Test
Program.exe.
2. For MSR Properties, select IDTECH_SECUREMAG_USBHID - USB HID from
the drop-down list.
3. Tap the Open button.
4. Tap the Claim button.
5. By default, the MSR test utility tests only tracks 1 and 2. To include track 3 in the
test procedure, select the Track Control tab, and then change the default
TracksToRead to MSR_TR_1_2_3.
6. Select the Control tab, and then select DeviceEnabled.
7. Select the Track Data tab.
8. Swipe a test card through the MSR.
9. If data is observed and collected, then the MSR is working correctly.
10. Exit the utility.
Tablet 720 System Recovery
Performing a system recovery removes all data and the current operating system, and
then restores the tablet to its out-of-box state.
Tablet 720 System Recovery Process
Before starting the system recovery process for the Tablet 720, you’ll need the
following:
• USB Flash Drive with 8GB or more capacity
• USB Hub with at least 2 USB ports
• USB Keyboard
• Computer with Internet access
To perform a system recovery:
1. Ensure your tablet is fully charged or plugged into an outlet.
2. Login to My Oracle Support, download the system recovery file, and then create
the recovery media:
a. Click the Patches & Updates tab, and then search for the Oracle MICROS
Tablet 720 product and applicable operating system.
7-2Chapter 7
Tablet 721/721P System Recovery
b. From the list of results, select and download the system recovery (.iso) file to the
computer.
c. Create a bootable USB flash drive using a third party utility that supports .iso files and
helps format and create bootable USB flash drives.
3. Connect the USB Hub to the Tablet 720.
4. Connect a keyboard to the USB Hub.
5. Insert the bootable USB flash drive into the USB Hub.
6. Power on the tablet, and then immediately press the ESC button on the keyboard to enter
the BIOS.
7. Use the arrow keys on the keyboard to navigate the BIOS, select Boot Manager, and
then select the bootable USB flash drive.
The system recovery process begins.
8. When complete, select Y to power off or N to reboot.
The tablet automatically shuts down after 3 minutes.
Figure 7-1 Oracle MICROS Tablet 720 Series System Recovery Process
Tablet 721/721P System Recovery
Performing a system recovery removes all data and the current operating system, and then
restores the tablet to its out-of-box state. The Tablet 721/721P recovery process can take up
to 15 minutes.
Do not power off the tablet during the recovery process. If the tablet loses power during
the recovery process, the operating system will become corrupt and you must perform the
7-3Chapter 7
Tablet 721/721P - Restore OS After Power Loss During System Recovery
following procedure: Tablet 721/721P - Restore OS After Power Loss During System
Recovery
To perform a system recovery on the Tablet 721/721P:
1. Ensure the tablet is fully charged or plugged into a power outlet.
2. Restart the tablet.
3. On the Boot Options dialog box, tap OS Restore.
4. On the OS Restore dialog box, tap Yes or allow the process to automatically
continue. The recovery process begins.
5. On the OS Restore Finished dialog box, tap Reboot or allow the OS to
automatically reboot to its out-of-box state.
6. Configure the OS as needed, and then install any required Windows updates.
Tablet 721/721P - Restore OS After Power Loss During
System Recovery
If the tablet loses power during the recovery process, the operating system will
become corrupt and you must perform a series of steps to restore the operating
system and tablet.
Before starting the OS restore process for the Tablet 721/721P, you’ll need the
following:
• USB Keyboard
To perform an OS restore:
1. Ensure your tablet is fully charged or plugged into a power outlet.
2. Plug a USB keyboard into the tablet, and then power on the tablet.
3. When the Recovery screen appears, press the Windows key on the USB keyboard
to begin the recovery process.
4. On the OS Restore dialog box, tap Yes or allow the process to automatically
continue. The recovery process begins.
5. On the OS Restore Finished dialog box, tap Reboot or allow the OS to
automatically reboot to its out-of-box state.
6. Configure the OS as needed, and then install any required Windows updates.
Replacing the Bridge Battery in the MICROS Tablet 720
Follow the steps below to replace the bridge battery in the MICROS Tablet 720.
Prerequisites
• #1 Phillips head screwdriver
• Tweezer or needle nose pliers
Procedure
1. Place the tablet face down on a rubberized or cloth surface to prevent scratches.
7-4Chapter 7
Replacing the Bridge Battery in the MICROS Tablet 720
2. Slide the battery release latch until the main battery detaches from the tablet body. Set
the main battery aside.
Figure 7-2 Removing the MICROS Tablet 720 Main Battery
3. Remove the bridge battery cover using a #1 Phillips screwdriver. For some tablets, you
may need to peel back the license decal first.
7-5Chapter 7
Replacing the Bridge Battery in the MICROS Tablet 720
Figure 7-3 Removing the Bridge Battery Cover
4. Carefully remove the battery from the compartment until you can access the
connector cable. Use your fingers or a gripping tool to carefully separate the
connector. Make sure you hold and pull the plastic connectors and not the wires.
After disconnecting the battery, set it aside.
Figure 7-4 Battery Connector Cable
5. Connect the replacement battery. Tuck the excess battery wire into the casework
and place the battery in the battery compartment.
7-6Chapter 7
Replacing the Bridge Battery in the MICROS Tablet 720
Figure 7-5 The Bridge Battery in the Battery Compartment
6. Reinstall the battery cover and hand-tighten the screw.
7. (Optional) Attach the CBR sticker inside the battery bay. The CBR sticker helps identify
tablets whose bridge batteries have been replaced.
8. Reinstall the main battery.
7-78
Care and Handling
Use the following precautions when operating the Oracle MICROS Tablet 700 Series tablets:
• Always exercise care when operating and handling the tablet.
• Use a cleaner and cloth intended for use on LCD screens (ammonia free) to clean the
display screen.
• Do not apply excessive pressure to the display screen.
• Avoid prolonged exposure of the display panel to any strong heat source.
• Wherever possible, the tablet should face away from direct light to reduce glare.
• Do not use any power supply other than the one recommended for use with each tablet.
• Never attempt to disassemble the tablet, as this will void any warranty.
The Oracle MICROS Hardware Site Preparation Guide contains additional environmental and
placement considerations.
8-19
Regulatory and Compliance
This section contains regulatory and compliance information specific to the Federal
Communication Commission (FCC).
FCC Compliance
FCC Caution: Any changes or modifications not expressly approved by the party responsible
for compliance could void the user’s authority to operate this equipment.
This device complies with Part 15 of the FCC Rules.
Operation is subject to the following two conditions: (1) This device may not cause harmful
interference, and (2) this device must accept any interference received, including interference
that may cause undesired operation.
This device and its antenna(s) must not be co-located or operating in conjunction with any
other antenna or transmitter.
This Class [B] digital apparatus complies with Canadian ICES-003.
Cet appareil numérique de la classe [B] est conforme à la norme NMB-003 du Canada.
FCC Interference
This equipment has been tested and found to comply with the limits for a Class B digital
device, pursuant to Part 15 of the FCC Rules. These limits are designed to provide
reasonable protection against harmful interference in a residential installation. This
equipment generates, uses and can radiate radio frequency energy and, if not installed and
used in accordance with the instructions, may cause harmful interference to radio
communications. However, there is no guarantee that interference will not occur in a
particular installation. If this equipment does cause harmful interference to radio or television
reception, which can be determined by turning the equipment off and on, the user is
encouraged to try to correct the interference by one of the following measures:
• Reorient or relocate the receiving antenna.
• Increase the separation between the equipment and receiver.
• Connect the equipment into an outlet on a circuit different from that to which the receiver
is connected.
• Consult with an Oracle MICROS consultant or experienced technician for assistance.
9-1You can also read