SBCUSD IT Applications Training & Support Smartsheet - Project Development, Management, & Collaboration for Licensed Project Managers
←
→
Page content transcription
If your browser does not render page correctly, please read the page content below

Smartsheet - Project Management & Collaboration

              SBCUSD
 IT Applications Training & Support

                             Smartsheet
             Project Development, Management,
                        & Collaboration
                for Licensed Project Managers

                                     Revised – 7/7/2021

SBCUSD – IT Training
Smartsheet - Project Management & Collaboration

SBCUSD – IT Training
Smartsheet - Project Management & Collaboration

                                                                             CONTENTS
SMARTSHEET ACCOUNTS – WHO’S WHO..................................................................................................................... 1
   Paid for Licensed Account – Project Managers and Project Developers .................................................................. 1
   Free Account – Project Team Members/Responders............................................................................................... 1
LOGGING IN .................................................................................................................................................................. 2
GETTING STARTED ........................................................................................................................................................ 3
   Create Sheet/Project from Template ....................................................................................................................... 3
   Create Blank Sheet/Project....................................................................................................................................... 3
SHEET COLUMN TYPES.................................................................................................................................................. 4
   Default System Columns ........................................................................................................................................... 4
    Project Column Types and Definitions ..................................................................................................................... 4
CREATING COMMON CORE SHEET COLUMNS ............................................................................................................. 5
   Column Types ........................................................................................................................................................... 5
   Core Task Project Columns in Order ......................................................................................................................... 5
   Rename Columns ...................................................................................................................................................... 5
   Add Columns ............................................................................................................................................................. 5
   Move Columns .......................................................................................................................................................... 5
BUILDING SHEETS - ROWS ............................................................................................................................................ 6
   Indenting Rows ......................................................................................................................................................... 6
   Save and Refresh ...................................................................................................................................................... 6
COLUMN AND ROW MENUS......................................................................................................................................... 7
   Column Menu ........................................................................................................................................................... 7
   Notable Column Menu Features .............................................................................................................................. 7
   Row Menu ................................................................................................................................................................. 7
   Notable Row Menu Features .................................................................................................................................... 7
SHARING SHEETS........................................................................................................................................................... 8
   Invite Collaborators .................................................................................................................................................. 8
   Sharing Permissions .................................................................................................................................................. 8
FILE SHARING ................................................................................................................................................................ 9
   Row Attachments ..................................................................................................................................................... 9
   Sheet Attachments ................................................................................................................................................... 9
CONVERSATIONS/COMMENTS ................................................................................................................................... 10
   Row Comments ....................................................................................................................................................... 10
    Sheet Comments.................................................................................................................................................... 10

SBCUSD – IT Training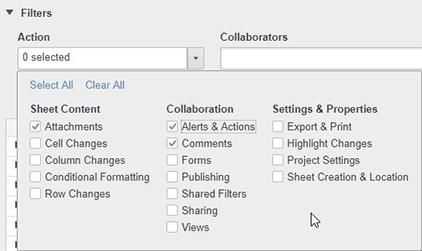
Smartsheet - Project Management & Collaboration
   Comment Attachments........................................................................................................................................... 10
TRACK SHEET ACTIVITY ............................................................................................................................................... 11
   Highlight Cells Changes ........................................................................................................................................... 11
   Cell History .............................................................................................................................................................. 11
   View Activity Log ..................................................................................................................................................... 11
CONDITIONAL FORMATTING ...................................................................................................................................... 12
   Conditional Formatting ........................................................................................................................................... 12
AUTOMATED WORKFLOW – TASK REMINDERS ......................................................................................................... 13
   Workflow Result ..................................................................................................................................................... 13
AUTOMATED WORKFLOW – ALERT SOMEONE .......................................................................................................... 14
EXAMPLE ALERT WORKFLOW ..................................................................................................................................... 15
AUTOMATED WORKFLOW - AUTOMATED UPDATE REQUESTS ................................................................................. 16
EXAMPLE UPDATE REQUEST WORKFLOW .................................................................................................................. 17
AUTOMATED WORKFLOW - APPROVAL REQUESTS ................................................................................................... 18
EXAMPLE APPROVAL REQUEST WORKFLOW ............................................................................................................. 19
EXAMPLE ALERTS AND ACTIONS AND EXAMPLE WORFLOWS SETUP ........................................................................ 20
SEND THIS TO FIRST TIME ASSIGNEES AND OR SHEET INVITEES ................................................................................ 21
WELCOME TO SMARTSHEET ....................................................................................................................................... 21

SmartSheet Support
 SMARTSHEET RESOURCE CENTER - SMARTSHEET VIDEOS

 Information Technology Training Team - TECHTRAINING@SBSCUSD.COM

SBCUSD – IT Training
Smartsheet - Project Management & Collaboration

                                SMARTSHEET ACCOUNTS – WHO’S WHO

PAID FOR LICENSED ACCOUNT – PROJECT MANAGERS AND PROJECT DEVELOPERS
 District Directors, Assistant Directors, Managers, Supervisors and the like, can purchase a Smartsheet license in
 order to create, develop, build, and manage Smartsheets/Smartsheet Projects. This would also allow them to
 invite free Smartsheet account holders to edit basic content in a sheet/project.

FREE ACCOUNT – PROJECT TEAM MEMBERS/RESPONDERS
 Any District team member can create a free Smartsheet account at Smartsheet.com. This would make them
 available to respond to licensed Smartsheet project manager sheets. They could be shared to a sheet in order to
 login to the sheet and make basic changes and or respond to Smartsheet Update Requests.

      NOTE: Smartsheet licensed accounts are acquired by the District in packs of 3. The Purchasing Department
      will open a purchase requisition and follow up on your acquiring of an account.

SBCUSD – IT Training                                                                                        Page 1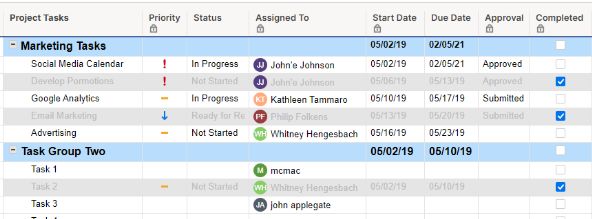
Smartsheet - Project Management & Collaboration

                                                  LOGGING IN

   1. Point a web browser to WWW.SMARTSHEET.COM

   2. Click on the Log In button

   3. Enter your username

   4. Example: FIRSTNAME.LASTNAME@SBCUSD.COM

   5. Enter your password

      NOTE – Licenses ($300 annual), are procured by the purchasing department. Once you are licensed with
      Smartsheet, you will receive an email in your District inbox instructing you to log in with a temporary
      password. At that time, you can set your password as you wish.

      NOTE – Licensed users/project managers can create project sheets, and maintain full administrative
      permissions to those projects. Colleagues who are given edit permissions through the sheet sharing
      feature do not need to purchase a license. Project editors will be invited to edit projects sheets and can
      create a Smartsheet account for free.

SBCUSD – IT Training                                                                                           Page 2
Smartsheet - Project Management & Collaboration
GETTING STARTED
The primary project development feature in Smartsheet are the columns you develop in the sheet. Together
adding needed columns and defining their type is what creates the project type and the project management
approach. With this, Smartsheet is heavily loaded with templates that cover a wide variety in project types and
project management approaches.
CREATE SHEET/PROJECT FROM TEMPLATE RELATED VIDEOS
1. Click on the Folder button in the left navigation bar
HOW TO SET UP A SHEET
2. Click on the Create button in the upper right
3. Click on Browse Templates
4. Click on Browse All Solutions at the left
5. Click on the Template Category
6. Select from a number of Templates
7. Click on the Use button
8. In the list of sheets, click on the sheet/template you created
9. Edit the sheet as need be
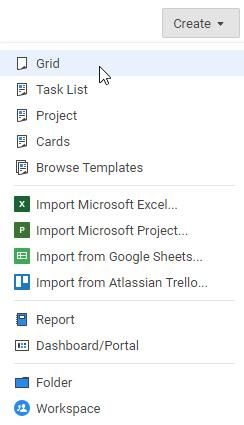
CREATE BLANK SHEET/PROJECT
1. Click on the Folder button in the left navigation bar
2. Click on the Create button in the upper right, and Click on Grid
3. Name your sheet and click on OK
NOTE: You may create your own template by clicking on the File Menu from within your sheet selecting
Save As Template…
SBCUSD – IT Training Page 3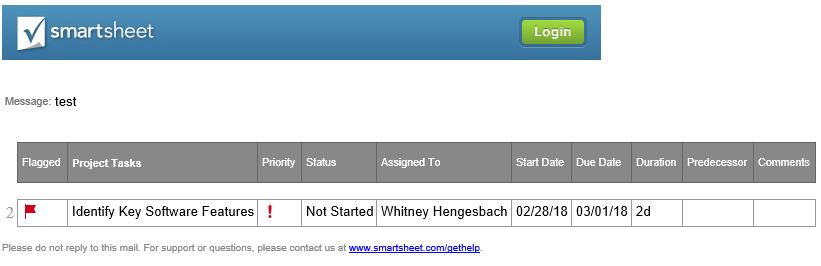
Smartsheet - Project Management & Collaboration

                                            SHEET COLUMN TYPES
Building your project is much like building a spreadsheet. The rows will become the project tasks you track. The
columns will become the criteria you track and measure for each task, as well as criteria that can be utilized to
trigger automated work flow.
                                                                                   RELATED VIDEOS

                                                                             CREATING AND DEFINING COLUMNS

DEFAULT SYSTEM COLUMNS
      Attachments                     Make files available which are related to this task/row

      Comments                        Create and manage comment threads related to this task/row

      Proofs                          Review and approve attached file images, videos, PDFs, and Microsoft
                                      Office documents, get feedback, and get approvals from stakeholders
      Row Action Indicators           Set reminders to trigger which are related to this task/row, create update
                                      requests
      Primary Column                  Contains Key/Unique project information, its type cannot be changed or
                                      removed

PROJECT COLUMN TYPES AND DEFINITIONS
      Text/Number                     Default column type, general text,
                                      or numbers
      Contact List…                   Dropdown List, specifically user
                                      contact information
      Date                            Date content

      Dropdown                        List of multiple choices you define,
                                      single select or multiple select
      Check Box                       Yes/No

      Symbols…                        Predefined set of symbols to create
                                      status or progress information
      Auto-Number/System              Auto generate a unique ID or item
                                      number

SBCUSD – IT Training                                                                                         Page 4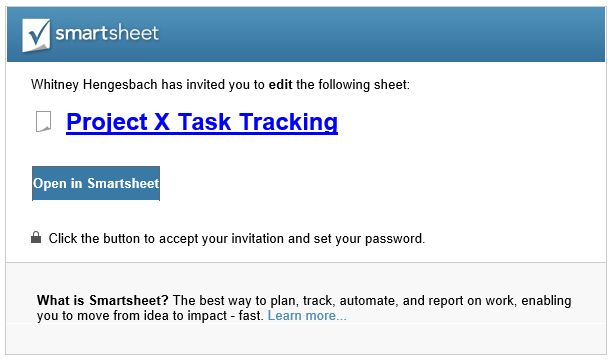
Smartsheet - Project Management & Collaboration

                            CREATING COMMON CORE SHEET COLUMNS

COLUMN TYPES                                                                       RELATED VIDEO
   1. Double-click on the column headings and choose Edit Column
      Properties                                                            CREATING AND DEFINING COLUMNS

CORE TASK PROJECT COLUMNS IN ORDER
     Column Name                   Column Type and Use

     Project Tasks                 Primary Column – Key Task Title/Information being tracked
     Priority                      Dropdown List - Low, Medium, High
     Status                        Dropdown List - Not Started, At Risk, In Progress, Ready for Review
     Assigned To                   Contact List – Assign task to this person(s)/contact(s)
     Start Date                    Date – Create start dates for tasks
     Due Date                      Date – Create due dates for the tasks
     Approval                      Dropdown List - Submitted, Approved, Declined
     Completed                     Check Box – Yes, No checkmark

RENAME COLUMNS
   1. Right-click on the column heading and choose rename

ADD COLUMNS
   1. Right-click on a column heading next to where you wish to place a new column

   2. Choose Insert Column Left or Insert Column Right

MOVE COLUMNS
   1. Click and Drag columns headings horizontally across the sheet and drop them in the desired location

SBCUSD – IT Training                                                                                     Page 5
Smartsheet - Project Management & Collaboration
BUILDING SHEETS - ROWS
Rows are a key element in your sheet and can contain project criteria, like project task names, order information,
due dates, task status and much more. Rows can also include additional project information, like file attachments
and comments.
1. Enter task names/phrases in Task Name column for each task you need to track in the project
Grouping related tasks together in contiguous rows will help you work with them and track them later.
2. Right-click in a task row which is the first row per a related group of task and choose Insert Row
3. Enter a task group name above the related task groups
4. Repeat these steps until you have entered all projects tasks and task group rows
5. Enter and set data in each cell along each row
NOTE – You can use AutoFill Down in Smartsheet as you would in Excel.
INDENTING ROWS
Rather than facing hundreds of rows in one project, you easily condense your data so you can focus on a related
set or group of tasks.
1. Highlight a related set of task rows (hold shift and click on the first row and the last row in the range)
2. Click on the Indent button in the toolbar above
Parent rows can be collapsed or expanded, helping you to concentrate on certain parts or your
projects at one time.
NOTE – You can create as many child relationships as you wish by further indenting rows.
SAVE AND REFRESH
1. To save your sheet, click on the Save button in the toolbar above
2. To refresh your sheet, click on the File menu and choose Refresh
SBCUSD – IT Training Page 6Smartsheet - Project Management & Collaboration
COLUMN AND ROW MENUS
COLUMN MENU
All columns maintain a number of features which are available in the Column Menu in
the column heading.
1. Point to a column heading, and click on the Column Menu (triple dot icon)
2. Select from a number of common column functions and
features
NOTABLE COLUMN MENU FEATURES
Insert Column Insert columns left or right as needed
Lock Column Lock a column so other sheet users may
not change data in that column
Freeze Column Freeze the column and any left of it, in
order to keep columns visible at left of
sheet
Column Properties Change column names, or change the
column type
ROW MENU
All rows maintain a number of features which are available in the Row Menu
immediately right of the row number.
1. Point to a row number, and click on
the Row Menu (triple Dot) icon
2. Select from a number of common row functions and features
NOTABLE ROW MENU FEATURES
Insert Row Inset a row above or below as needed
Edit Produces a form view allowing you to
edit any cell’s contents in that row
Lock Row Lock a row so other sheet users may not
change data in that row
Send Update Request Send an update request per this row to
any team member or assigned to
member
SBCUSD – IT Training Page 7Smartsheet - Project Management & Collaboration
SHARING SHEETS
Invite others to collaborate or edit and change sheet content.
Sharing a sheet with someone enables them to log in to Smartsheet RELATED VIDEO
and access the sheet based on the permission level you assign them.
SHARING SHEETS
INVITE COLLABORATORS
1. Click on the Share button in the upper right of your sheet
2. In the Invite Collaborators field type the email addresses of organization members,
and or outside peoples or vendors, and or group names (if groups have been created by the group
administrator)
OR
3. Click on the Select Contacts button to select organization members and any other contacts or
contact groups which you have added to your account
NOTE – You can create a contacts list from within your account menu in the lower left.
4. Use the Permissions Dropdown List to assign appropriate sheet permissions to the invitees
NOTE – You can return to this share window anytime to remove members or edit their permission levels.
SHARING PERMISSIONS
Viewer No license needed, can view all information in sheet, cannot modify any
sheet data
Editor – cannot share No license needed, can edit sheet data, enter and edit comments, add files,
they cannot modify the column layout, cannot add shares
Editor – can share No license needed, can edit sheet data, enter and edit comments, add files,
can share the sheet, they cannot modify the column layout
Admin Must be licensed user, can edit sheet data, enter and edit comments, add
files, modify columns, add/manage shares and permissions
5. Click on Invite Details and enter a subject line explaining what’s being shared
6. Click on the Share Sheet button
NOTE – The recipient of the sharing invite will receive an email with a link to the sheet. If they have an
account, they can view it immediately. If the recipient does not have an account, the will be prompted to
create an account at no charge. See this document’s final page, Send This to First Time Assignees and or
Sheet Invitees in order to properly inform first time Smartsheet users of basic Smartsheet use.
NOTE – Your Assigned To team member(s) would most probably maintain share permissions at edit level.
Remember the Lock Columns and or Rows feature once you have shared your sheet with others.
SBCUSD – IT Training Page 8Smartsheet - Project Management & Collaboration
FILE SHARING
ROW ATTACHMENTS
You can attach a file that is directly related to a row by using the
RELATED VIDEO
row attachment feature.
1. Click on the Attachments icon in the row you wish to attach ATTACHMENTS AND FILE SHARING
a file to
2. In the Attachments window click on the Attach Files button
3. Select from the various web file sharing platforms or choose to upload a file via your computer
4. Browse to the file on your computer and click on Open
OR
5. Log into the selected web file sharing platform, click on Allow, select the file and, click on the Select
button
SHEET ATTACHMENTS
1. Click on the Attachments button at the right of the sheet
2. In the Attachments window click on the Attach Files button
3. Select from the various web file sharing platforms or choose to upload a file via your computer
4. Browse to the file on your computer and click on Open
OR
5. Log into the selected web file sharing platform, click on Allow, select the file and, click on the Select
button
NOTE – Uploaded files from the supported web file sharing platforms will always maintain the latest
version of the file when it is edited within the supported platform.
SBCUSD – IT Training Page 9Smartsheet - Project Management & Collaboration
CONVERSATIONS/COMMENTS
Using comments in your sheet, creates an archive of relevant notes,
links, and files that collaborators can access, modify, and reply to at RELATED VIDEO
any time. Comments with their links and attachments is an excellent
way to coordinate efforts. USING COMMENTS
ROW COMMENTS
1. Click on the Comments button in the row you wish to create a comment for
2. In the Comments window enter a comment
3. Click on the Add attachment button to add an attachment or web link to this comment or comment
thread (optional)
SHEET COMMENTS
1. Click on the Comments button at the right of your sheet
2. In the Comments window enter a comment
3. Click on the Add attachment button to add an attachment or web link to this comment or comment
thread (optional)
NOTE – You can Tag People in Comments with an @, this will notify them of the comment. If they're
shared to the sheet, they'll receive a notification that includes a link to the comment so they can quickly
find it and respond.
COMMENT ATTACHMENTS
You can attach a file that is directly related to a comment by using the comment attachment feature.
1. Click on the Comments button in the row you wish attach a file to
2. In the Comments window click on the Attach icon
3. Select from the various web file sharing platforms or choose to upload a file via your computer
4. Browse to the file on your computer and click on Open
OR
5. Log into the selected web file sharing platform, click on Allow, select the file and, click on the Select
button
NOTE – All team members this sheet has been shared will receive a notification (upper left notification
feature) of sheet or row comments. If they maintain edit level share permissions, they can then reply,
attach supporting files, and add web links to the comment thread.
SBCUSD – IT Training Page 10Smartsheet - Project Management & Collaboration
TRACK SHEET ACTIVITY
HIGHLIGHT CELLS CHANGES
1. Click on the Highlight Changes button in the button bar above
2. In the Highlight Cells window click the ON/OFF toggle to turn the feature
on
3. In the Highlight changes in the last: Dropdown List, choose a time frame
for which cells have changed
CELL HISTORY
1. Right-click on any cell and choose View Cell History
You can view who changed the cell, when the cell was change and
what was changed.
VIEW ACTIVITY LOG
The Activity Log gives sheet owners, admins, and editors one place to see who has viewed a sheet, what changes
were made, and when those activities occurred.
1. Click on the Activity Log button at the right of the sheet
2. Click on the Filters Dropdown arrow, and select sheet actions to filter the activities by action types
3. Select a date range for your filters in order to narrow you filter down to a known time frame
RELATED VIDEOS
TRACK AND VIEW SHEET ACTIVITY
NOTE – Sheet Owners see all sheet activities since the sheet was created. Admins and Editors see all sheet
activity since they were shared to the sheet.
SBCUSD – IT Training Page 11Smartsheet - Project Management & Collaboration
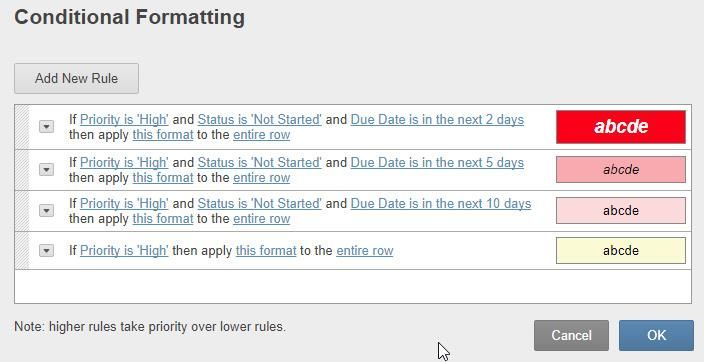
CONDITIONAL FORMATTING
Conditional formatting can change the look of cells in your sheet
when they meet certain conditions. RELATED VIDEO
1. To create conditional formatting rules, click CONDITIONAL FORMATTING
on the Conditional Formatting button in the
toolbar above
2. In the Conditional Formatting window, click on the Add New Rule button
3. A new rule will appear in the window below.
CONDITIONAL FORMATTING
Select a column you wish track value changes in, excellent for looking after the
Priority column in combination with the Due Date Column
this format Select from various font schemas, colors, as well as row color to visually alert you
to condition change that are met
entire row Leave at entire row or select which columns cells in the row will receive the
formats when the condition is met
NOTE: Per the formatting, use Taskbar to apply formats to Calendar View and Card View. In order for this
to work, you will need to apply the format to the entire row.
NOTE – You can set as many conditions as you wish when creating a rule. To do so, click on the dropdown
arrow at the left of the rule and choose Add Condition (AND).
SBCUSD – IT Training Page 12Smartsheet - Project Management & Collaboration
AUTOMATED WORKFLOW – TASK REMINDERS
The Set a Reminder feature will automatically send a reminder in regards to task dates.
1. Point to a row number, and click on the Row Menu (triple Dot)
RELATED VIDEO
icon for the row you wish to set a reminder for
REMINDERS
2. Choose Set Reminder…
3. Select who will receive the reminder
4. Select a date the reminder will arrive
5. Click on OK
WORKFLOW RESULT
SBCUSD – IT Training Page 13Smartsheet - Project Management & Collaboration
AUTOMATED WORKFLOW – ALERT SOMEONE
The Alert Someone feature will automatically alert you or a team member when particular sheet conditions
exist.
1. Click on the Automation menu above the sheet
RELATED VIDEO
and choose Alert Someone…
ALERTS
2. In the top of the window, enter a unique Workflow
Name for this new workflow
3. In the Trigger Dropdown List, choose a trigger condition
4. Select when the workflow will be triggered
5. Select who will be alerted
6. Click on Save
SBCUSD – IT Training Page 14Smartsheet - Project Management & Collaboration
EXAMPLE ALERT WORKFLOW
Alert Someone Worflow
The task assignee will
receive an email alert.
Assignee can login and further review
task information and make updates
as they wish.
SBCUSD – IT Training Page 15Smartsheet - Project Management & Collaboration
AUTOMATED WORKFLOW - AUTOMATED UPDATE REQUESTS
The Send an Update Request feature will automatically request updates on specific rows.
1. Click on the Automation menu above the sheet and RELATED VIDEO
choose Request and Update…
AUTOMATED UPDATE REQUEST
2. In the top of the window, enter a unique Workflow Name for this new workflow
3. In the Trigger Dropdown List, and choose a When a
date is reached
4. For the When field, choose Run once
5. Choose 5 days before
6. Choose Date field, and select Due Date
7. Select when the request will be sent
8. Click on Add a condition to add column field conditions
(optional)
9. Select who will be alerted when the above conditions are
met
10. Click on Customize message, and Specific fields to select
which column data will be editable from within the update
request
11. Click on Save
SBCUSD – IT Training Page 16Smartsheet - Project Management & Collaboration
EXAMPLE UPDATE REQUEST WORKFLOW
Update Request Alert Rule
The task assignee will
receive an update
request email with a link
to a form which contains
these columns’ editable
data displayed.
The assigned team member responds
and changes field values in the form
and hits submit.
The sheet is updated with the changes.
SBCUSD – IT Training Page 17Smartsheet - Project Management & Collaboration
AUTOMATED WORKFLOW - APPROVAL REQUESTS
The Send Approval Request feature will automatically initiate a request for approval on tasks in the sheet.
1. Click on the Automation menu above the sheet
RELATED VIDEO
and choose Set up an Approval Workflow…
APPROVAL REQUEST
2. In the top of the window, enter a unique Workflow Name for this new workflow
3. In the Trigger Dropdown List, choose a When rows are changed
4. For the When field, choose Status
5. Select changes to Ready for Review
6. Select when the request will be sent
7. Select who will be alerted when the above conditions are met
8. Under Save response in, choose Approval
9. Click on Customize message, and Specific fields to select which
column data will be editable from within the approval request
10. Click on Save
SBCUSD – IT Training Page 18Smartsheet - Project Management & Collaboration
EXAMPLE APPROVAL REQUEST WORKFLOW
Approval Request Alert Rule
Whitney will receive a
request approval email
with a link to a form
which contains these
columns editable data
displayed.
Whitney responds and changes field
values, as well as approving the task or
not in the form and hits submit.
The sheet is updated with the changes.
SBCUSD – IT Training Page 19Smartsheet - Project Management & Collaboration
EXAMPLE ALERTS AND ACTIONS AND EXAMPLE WORFLOWS SETUP
SBCUSD – IT Training Page 20Smartsheet - Project Management & Collaboration
SEND THIS TO FIRST TIME ASSIGNEES AND OR SHEET INVITEES
NOTE - SHARE THIS DOCUMENT with Task Assignees and or Sheet Invitees before inviting or requesting an
update if they have never been prompted to do any Smartsheet work previously.
WELCOME TO SMARTSHEET
Smartsheet is an application for project management and collaboration. It is used to assign tasks, track project
progress, share documents, and manage other work. Even though you are not a Smartsheet Project Manager or
Smartsheet account holder, you may be prompted by a Smartsheet Project Manager in the District to update
information within a project sheet or be invited to edit the project sheet.
When a Smartsheet Project Admin invites you to edit a Smartsheet project sheet or they prompt you to update a
project, you'll receive an email to either udpate the project (Update Request), or edit the project sheet (Invite to
Edit Sheet).
Receiving an Update Request Looks Like This Receiving an Invite to Edit a Project Sheet Looks Like
This
Have you received a Smartsheet Update Request Have you been invited to edit and or share a project
from a project manager? Simply click on the Open sheet in Smartsheet for the first time? Just click the link
Update Form button in the email. You will see the contained in the sharing notification you received to
Update Request form and can edit any of the fields quickly create a Smartsheet account. You'll then be
it contains. The idea is that without having to see directed right to the sheet where you can edit various
or access the acutal project sheet, you can edit the sheet information.
available form fields in the Update Request and
submit this information to the project sheet
automatically. That’s it, your done.
LEARM MORE AND GET STARTED WITH SMARTSHEET
SBCUSD – IT Training Page 21You can also read