Smart Siren User Guide - Thermo Fisher Scientific
←
→
Page content transcription
If your browser does not render page correctly, please read the page content below
Smart Siren

User Guide
331676H04 • Revision B • 04/16/2021
IMPORTANT Read this user guide. Failure to follow the instructions in this user guide can result in damage to
the unit, injury to operating personnel and poor equipment performance.

CAUTION All internal adjustments and maintenance must be performed by qualified service personnel.

Material in this manual is for informational purposes only. The contents and the product it describes are
subject to change without notice. Thermo Fisher Scientific makes no representations or warranties with
respect to this manual. In no event shall Thermo be held liable for any damages, direct or incidental, arising
from or related to the use of this manual.

© 2021 Thermo Scientific. All rights reserved. Thermo Scientific, the Thermo Scientific logo, Smart-Vue Pro
Duo and Smart-Vue Pro Quatro are the exclusive property of Thermo Scientific. All other brands mentioned
are the property of their respective owners. This is a non-contractual document. Features and specifications
mentioned here are subject to change.
Contents
Safety Instructions ....................................................... 1
  Device Maintenance ................................................. 1

Regulatory Information ................................................. 3
  IC Statements .......................................................... 3
  CE - Conformity with European Regulations ............ 3

Introduction ................................................................. 5
   Package Contents.................................................... 5
   Key Features ............................................................ 6
   Requirements and Recommendations...................... 6
   What is a Smart Siren?............................................. 7
   Where to Find More Information ............................... 8

Using the Smart Siren .................................................. 9
  Placement for Best Wireless Performance ................ 9
  Mounting Kit............................................................. 9
  AC Adapter .............................................................. 9
  Battery ..................................................................... 10
  Adjusting Siren Volume ............................................ 10

Device Maintenance..................................................... 11
  Non-replaceable Battery........................................... 11
  Cleaning Instructions ................................................ 11

Appendix 1 - Troubleshooting ...................................... 12

Smart-Vue Pro Installation Procedure........................... 13

WEEE Compliance ...................................................... 25

Contact Information .................................................... 26
Safety Instructions
                                                                           When the battery is low, or in case the battery-
          IMPORTANT NOTE: Do not use this product for                      operated device in question remains unused for a
          protection or as part of an automated emergency                  lengthy period of time, remove the battery from
          system or as for any other application that                      the device in order to avoid any risk of battery
          involves protecting people and/or property. This                 liquid leakage. Never leave batteries within the
          product is designed for use in environments                      reach of children. In case of a battery leak, avoid
          where children are not likely to be present.                     all contact with the liquid present on the batteries.
          Customers and users of Thermo Scientific                         Rinse with clear water immediately in case the
          products are responsible for making sure that the                battery liquid comes into contact with the eyes,
          product is fit for the intended usage. Do not open               mouth or skin. Contact a doctor or emergency
          the product casing and do not disassemble or                     service immediately. Battery liquid is corrosive
          modify internal components in any manner.                        and can damage vision or cause blindness or
          Thermo Scientific products do not contain any                    chemical burns.
          internal components that require user
          intervention or repair. If the device shows signs of
          improper operation, disconnect it immediately
          from its power source or remove the battery and        Device Maintenance
          contact Thermo Scientific technical services.
          CAUTION: TO REDUCE THE RISK OF                         When maintaining your device:
          ELECTRIC SHOCK, DO NOT OPEN OR
          REMOVE THE PRODUCT CASING. NO USER-                              CAUTION: : Do not attempt to disassemble the
          SERVICEABLE PARTS INSIDE. PLEASE REFER                           device. There are no user serviceable parts
          SERVICING TO QUALIFIED SERVICE                                   inside.
          PERSONNEL.                                                       CAUTION: Do not misuse the device. Follow
          The lightning flash with arrowhead symbol is                     instructions on proper operation and only use as
          intended to alert the user to the presence of                    intended. Misuse could make the device
          uninsulated “dangerous voltage” within the                       inoperable, damage the device and/or other
          product’s enclosure that may be of sufficient                    equipment, or harm users.
          magnitude to constitute a risk of electric shock to              CAUTION: Do not apply excessive pressure or
          persons.                                                         place unnecessary weight on the device. This
          BATTERY WARNING: This product contains one                       could result in damage to the device or harm to
          nonrechargeable 3.6V battery. THE BATTERY IS                     users.
          NOT REPLACEABLE. Any attempt to change the                       CAUTION: Do not use this device in explosive or
          battery or opening the product casing will void                  hazardous environments unless the model is
          the manufacturer warranty. REFER SERVICING                       specifically approved for such use. The device
          TO QUALIFIED SERVICE PERSONNEL                                   may cause sparks. Sparks in explosive areas
          Use only batteries recommended by Thermo                         could cause explosion or fire and may result in
          Scientific. Do not use a different type of battery,              property damage, severe injury, and/or death.
          such as rechargeable, alkaline and magnesium,
          or use batteries of different brands, or even                    CAUTION: Do not expose your device to any
          different types of batteries of the same brand.                  extreme environment where the temperature or
          Incorrect batteries may cause the device to heat                 humidity is high. Such exposure could result in
          up and may result in fire or battery liquid leakage.             damage to the device or fire.
          Never dispose of batteries in fire. Do not charge                CAUTION: Do not expose the device to water,
          regular batteries that are not specifically                      rain, or spilled beverages. It is not waterproof.
          rechargeable.                                                    Exposure to liquids could result in damage to the
                                                                           device.

Smart Siren User Guide                                                                                Safety Instructions |        1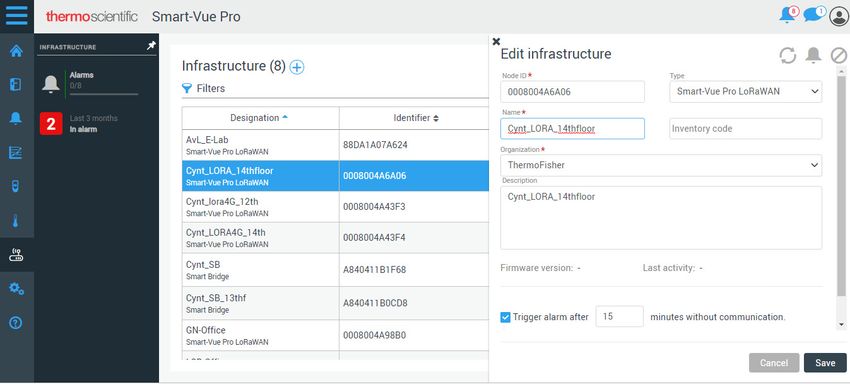
CAUTION: Do not place the device alongside
          computer discs, credit or travel cards or other
          magnetic media. The information contained on
          discs or cards may be affected by the device.
          CAUTION: Using accessories, such as
          antennas, that Thermofisher has not authorized
          or that are not compliant with Thermofisher
          accessory specifications may invalidate the
          warranty.

2 |   Safety Instructions                                   Smart Siren User Guide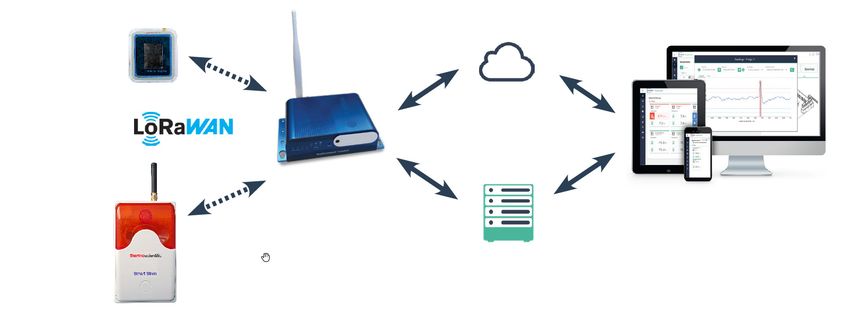
Regulatory Information
             FCC Certification
             FCC part 15 modular qualification
                                                                   CE - Conformity with
             FCC IDs:                                              European Regulations
      -   Contains Bluetooth component 2AA9B04
                                                                              This paragraph pertains to 868 MHz Smart-Vue
      -   Contains LoRaWAN™ component XTLCMABZ                                Pro™ wireless devices. The Thermo Scientific
This paragraph pertains to 915 MHz Smart-Vue Pro™                             product (contains Bluetooth component BMD-
wireless devices. This device complies with part 15 of the                    300, LoRaWAN component CMWX1ZZABZ) is
FCC rules. Operation is subject to the following two               compliant with the essential requirements and other relevant
conditions:                                                        requirements of the following standards and/or normative
                                                                   documents.
1. This device may not cause harmful interference.
                                                                   •   Directives:
2. This device must accept any interference received,
   including interference that may cause undesired                     •   2014/53/EU Radio Equipment Directive (RED)
   operation.                                                          •   2014/30/EU EMC Directive
FCC RF Radiation Exposure Statement:                                   •   2014/35/EU Low Voltage Directive
This equipment complies with FCC radiation exposure limits             •   2011/65/EU and the amendment of (EU) 2015/863
set forth for an uncontrolled environment. In order to avoid the           Restriction of Hazardous Substances Directive
possibility of exceeding the FCC radio frequency exposure          •   In application of the following standards
limits, human proximity to the antenna should not be less than
20 cm (8 inches) during normal operation. End users must               •   ETSI EN 300 220-2 V3.1.1
follow the specific operating instructions for satisfying RF           •   EN 301 489-1 V2.2.1
exposure compliance. This transmitter must not be co
                                                                       •   EN 301 489-3: V2.1.1
located or operating in conjunction with any other antenna or
transmitter.                                                           •   EN 301 489-17 V3.2.1
                                                                       •   EN 300 328 V2.2.2
                                                                       •   UL/CSA 61010-1: 2012 3rd edition and IEC/EN
IC Statements                                                              61010-1: 2010 3rd edition

Industry Canada RSS-210 modular qualification                                 CAUTION: Any changes or modifications not
IC:                                                                           expressly approved by Thermo Scientific could
      -   Contains Bluetooth component 12208A-04                              void the user's authority to operate the
                                                                              equipment.
      -   Contains LoRaWAN™ component 9337A-CMABZ
This paragraph pertains to 915 MHz Smart-Vue Pro™                             RoHS Compliance
wireless devices. This device complies with Industry Canada                   The wireless device is in compliance with the EU
license-exempt RSS standard(s). Operation is subject to the                   Directive 2011/65/EU (Restriction of the Use of
following two conditions: (1) this device may not cause                       Certain Hazardous Substances in Electronic and
interference, and (2) this device must accept any interference,               Electrical Equipment) and the amendment of (EU)
including interference that may cause undesired operation of                  2015/863. Do not dispose of this product with
the device.                                                                   household trash. Thermo Scientific recycles this
Under Industry Canada regulations, this radio transmitter may                 product under certain conditions. Contact us for
only operate using an antenna of a type and maximum (or                       more information.
lesser) gain approved for the transmitter by Industry Canada.
To reduce potential radio interference to other users, the
antenna type and its gain should be so chosen that the
equivalent isotropically radiated power (e.i.r.p.) is not more
than that necessary for successful communication.

Smart Siren User Guide                                                                              Regulatory Information |     3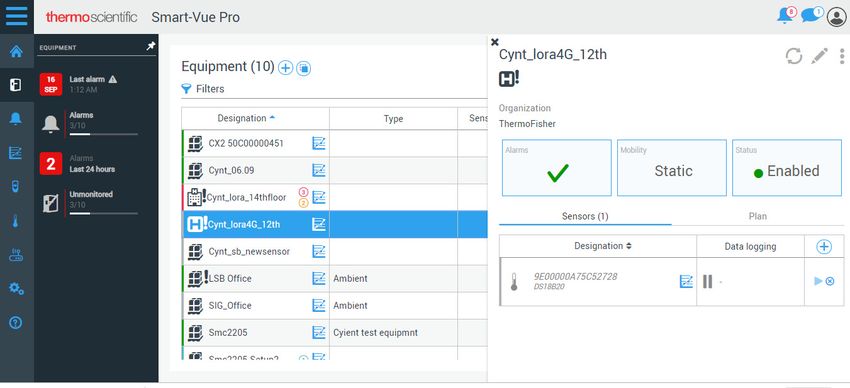
Introduction
This guide describes how to prepare your siren up for use
with the Smart-Vue Pro wireless monitoring system.
The Thermo Fisher Scientific Smart Siren is the perfect
addition to your lab or storage facility’s monitoring solution.
As part of your Smart-Vue Pro monitoring system, this
LoRaWAN enabled device alerts you in case of alarms, such
as sensor readings that exceed programmed limits as well as
other types of technical alarms.
Just place the Smart Siren in a convenient location and use
the Smart-Vue Pro web application to create an alert strategy
that includes the device. The siren can be used in addition to
other alert mechanisms, such as e-mail, voice notification,
and text message sent to your phone.
The Smart-Vue Pro system activates the siren wirelessly if one
of your data loggers, network devices, or even the siren itself,
encounters an alarm.
The siren even has a backup battery that maintains the
LoRaWAN wireless connection in order to be able to notify the
system in case of a power outage.
With its flashing red light and (adjustable) siren sound, you’ll
never miss an alarm.
Note: Detailed configuration instructions and software
settings are provided in the Smart-Vue Pro Web Application
User Guide available in the Help section of the web
application.
Package Contents
• Smart Siren and antenna
• AC power adapter with 1.5 meter (about 5 ft.) cable and
4 international plug sizes;
100-240 V (50/60 Hz) AC12 V DC – 1.0 A
• Mounting kit with magnet and 2-sided Velcro® tape.
4 | Introduction Smart Siren User Guide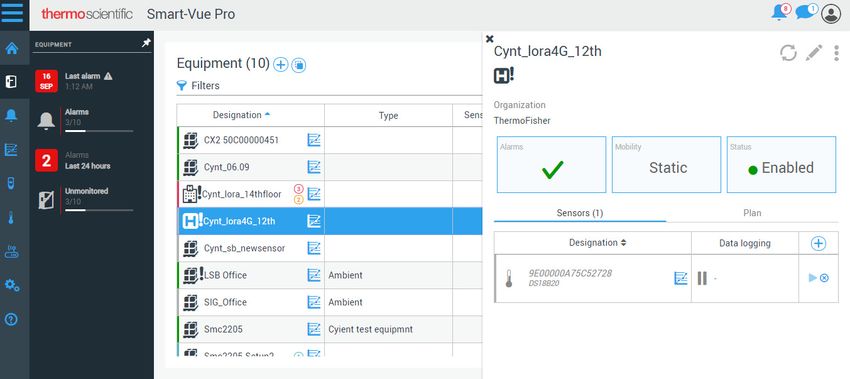
Key Features
Applications                   • Audiovisual notification in case alarms are detected by your Smart-Vue Pro system
Compatibility                  • For use with Smart-Vue Pro LoRaWAN-based monitoring solutions
                               • LoRaWAN™ long-range wireless technology (range up to 16 km/10 miles line-of-
Connectivity                   sight(1))
                               • Bluetooth® Low Energy for wireless firmware upgrade
                               • A long press (> 3 seconds) on the button tests the network connectivity with Smart Vue
                               Pro web server. The LED flashes GREEN if the test is passed. If the test fails, it is indicated
Push-Button                    in RED.
                               • Snooze
                               • 110-240 V input auto-switching power adapter and international plugs (included)
                               • 1.5 m (about 5 feet) cable
Power Supply
                               • 12 V 1.0 A output
                               • Auto-switch to backup battery (with alert in case of power outage)
                               • 3.6 V backup battery
Battery                        • Non-rechargeable, non-replaceable
                               • Maintains LoRaWAN™ connectivity to notify system in case of power outage
Sound                          • Adjustable siren volume from 60 dBA to 100 dBA (± 10%)
LED                            • Green/red status indicator
                               • 0°C to +50°C (32°F to 122°F)
Operating Conditions
                               • 0 to 90% RH (non-condensing)
                               • -10°C to +60°C (14°F to 140°F)
Storage Conditions
                               • 0 to 99.99% RH (non-condensing)
                               • Mounting kit for use with provided Velcro® or magnet
Mounting and Installation
                               • Maximum mounting height < 2 meters
                               • For indoor use only
Casing
                               • ABS and polycarbonate plastic
Dimensions                     • 160 x 80 x 83 mm (6.3 x 3.2 x 3.3 in.)
Weight                         • 400 g (14.1 oz.) including battery
Certifications                 • CE, FCC, IC

Requirements and
Recommendations
For the purposes of this installation guide we assume that:
•   Your access to the Smart-Vue Pro web platform and
    application is configured and you have appropriate
    access rights to configure devices in the system.
•   LoRaWAN wireless coverage is available at the location
    where you will be using the siren.

Smart Siren User Guide                                                                                        Introduction |     5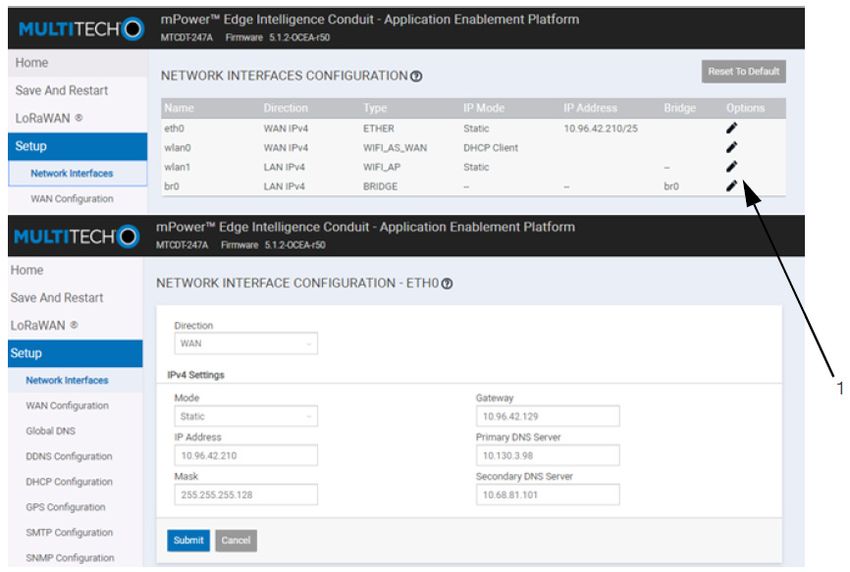
What is a Smart Siren?
Smart Sirens are used to raise visual and audio alerts if alarm
conditions are detected in your
Smart -Vue Pro wireless monitoring system. Alarms can be
configured in the Smart-Vue Pro web application for any or all
of your end-point modules and/groups.
For example, you can configure a data logger to trigger an
alarm if the temperature exceeds or drops below a specified
limit. The alarm limits and values depend on the type of data
logger you are using. The siren is triggered when an alarm is
detected by the web platform.
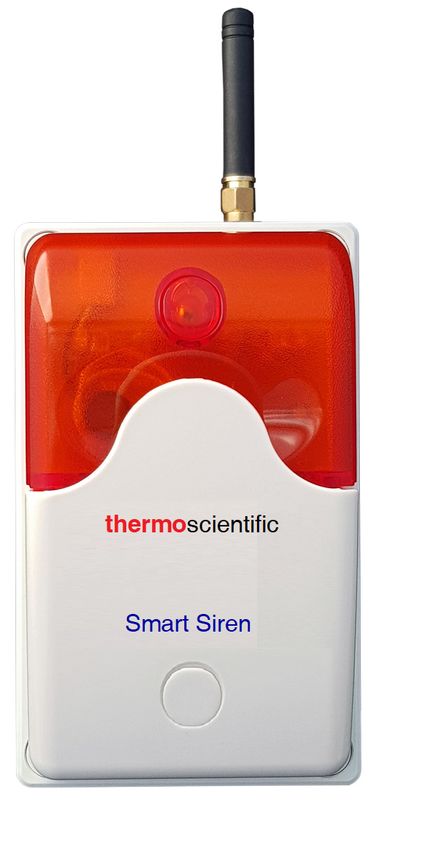
Smart Siren
Volume AC Adapter Plug
Control
Figure 1. Smart Siren
6 | Introduction Smart Siren User Guide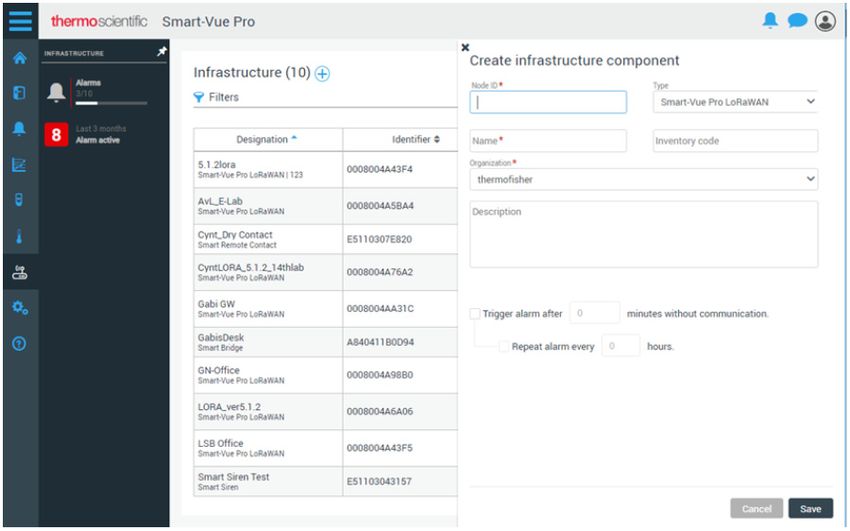
Architecture Overview
Thermo Fisher Scientific sirens connect wirelessly to your LoRaWAN receiver, just as the other wireless modules in your
network:

Smart-Vue Pro
LoRaWAN
enabled
dataloggers

                                                                    Smart-Vue
                                                                    Pro Cloud

                                        Smart-Vue Pro
                                                                                                     Smart-Vue Pro
                                        LoRaWAN
                                                                                                     web application
                                        gateway
    Smart                                                             Customer
    Siren                                                             Service

Figure 2. Smart Siren as part of your Smart-Vue Pro monitoring solution

The Smart-Vue Pro web monitoring platform triggers the siren wirelessly when it detects an alarm condition on an end-module
or repeater.

General Requirements and                                        Where to Find More
Recommendations                                                 Information
•   For safety reasons, the siren should be mounted less
    than 2 meters (about 6.5 feet) from the floor.              The use and operation of your Smart Siren is described in the
                                                                Smart-Vue Pro web application user guide. You may click on
•   The AC adapter used for your Smart Siren should be          Help       Online Help          User guides to open directly
    plugged into an uninterruptible power supply (UPS).         from the web application interface.
•   Weekly manual system testing should be performed as
    defined in your Standard Operating Procedure (SOP).
•   Thermo Fisher Scientific recommends Installation and
    Operational Qualifications (IQ/OQ) be performed before
    initial use.

Smart Siren User Guide                                                                                     Introduction |   7
Using the Smart Siren
This section assumes that your access to the Smart-Vue Pro
web platform and application is configured and you have Mounting Kit
appropriate access rights to configure devices in the system.
You will need application manager role to access certain CAUTION: For safety reasons, the siren should
configuration options. be mounted less than 2 meters (about 6.5 feet)
from the floor.
Placement for Best 1. For strong adhesion, wipe and dry the back of the siren
and the mounting surface on which you intend to place
Wireless Performance the unit.
2. Velcro: Attach one side of the Velcro tape to the back of
For optimal operation, follow these recommendations when the siren and the other on the wall where you intend to
physically placing your device: place the unit.
• Do not place the siren within 40 cm (16 in.) of another Magnet: Remove the adhesive backing and attach the
module or wireless device. magnet to the siren.
• Place the LoRaWAN gateway and the Smart Siren device 3. Place the siren on mounting surface.
at least 1 meter away from each other for a good radio
frequency (RF) communication between them.
• Make sure the wireless module is not placed on an
electrical conduit or cable tray (such as for computer
AC Adapter
network cables).
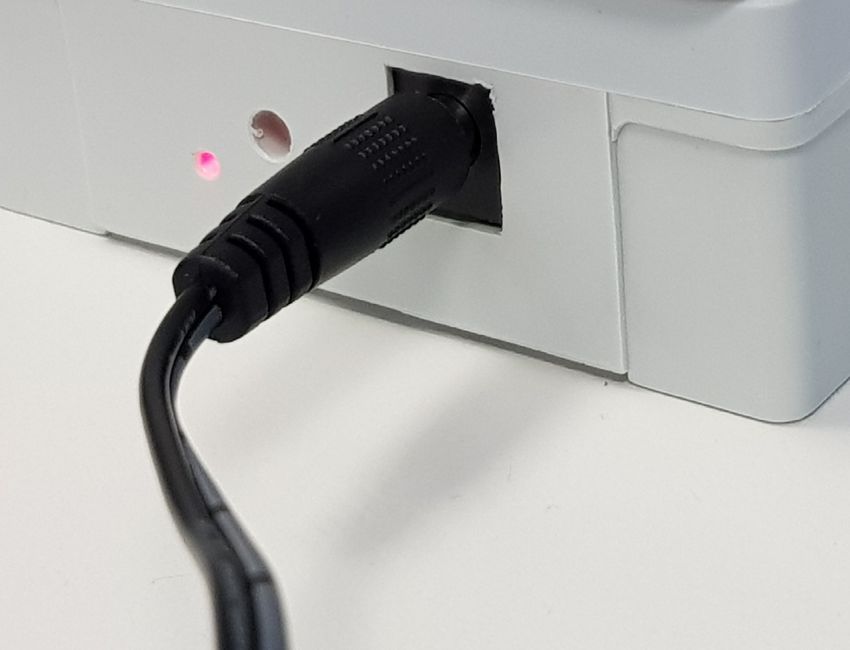
1. Plug the AC adapter into the siren as shown below. The
• For best results, place the module so that it faces the plug should slide firmly into the socket on the siren.
general direction of the receiver antenna if possible.
• The respective position of the antennas of the LoRaWAN
gateway and the Smart Siren device should be parallel
(not perpendicular) to establish a good radio frequency
(RF) communication between them.
• The LoRaWAN gateway and the Smart Siren device
should not be put on top of each other.
• Keep about 20 cm (8 in.) of clear space around the
module. For example, a module that is “stuck” between
two refrigerators may not communicate effectively.
• Place your siren where people will not bump into it or
unplug it (no more than 2 meters (6.5 ft.) from the floor).
• To ensure that the AC adapter does not get unplugged
accidentally, use a power socket that is also elevated
from the floor and/or shield the cord in a protective
conduit that is fixed to the wall (or within the wall).
The siren is a critical device in your wireless monitoring
WARNING: Do not open the Smart Siren casing.
system. Therefore, we recommend that you keep it plugged it
There are no user-serviceable parts inside.
into an Uninterruptible Power Supply or safety plug.
Opening the casing voids the manufacturer
warranty.
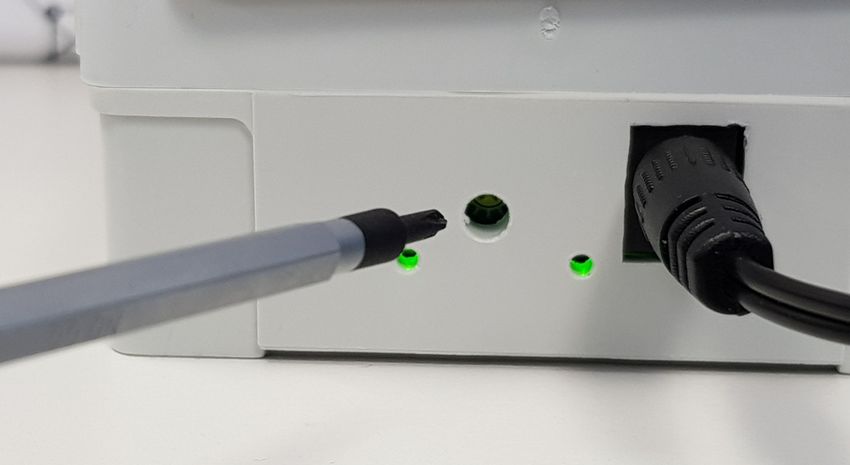
8 | Using the Smart Siren Smart Siren User Guide2. Plug the AC adapter into an uninterruptible power supply Smart-Vue Pro webapp sends a new alarm or rings for an on
or wall outlet, a LED next to plug shall be turned ON in going alarm after 12 hours.
GREEN.
Buzzer shall be muted for 12 hours or till a new alarm is
3. When operating on battery, the LED turns to RED. detected on the datalogger or Webapp.
4. After 1 minute operation on battery, device shall turn
OFF, by emitting a notification to webapp.
Battery
The battery in the Smart Siren is used to send an “AC
unplugged” event to the Smart-Vue Pro Web Application.
Once the device sends the unplug event to the Smart-Vue
Pro Web application, the device will go into sleep mode until it
is connected to AC power.
A communication failure alarm will be triggered if data from
the Smart Siren is not received by the Smart-Vue Pro Cloud
server after a defined time interval as configured in the Smart-
Vue Pro Application, with or without the AC adapter
connected to the Smart Siren.
In case of a low battery, the “low battery” event is generated
by the Smart Siren and is sent to the Smart-Vue Pro Web
application. In normal use, when the device is plugged into
AC power, the battery will not discharge. Battery life is
extended as long as the device is plugged into AC power.
Adjusting Siren Volume
The siren volume is adjustable from 60 dBA to 100 dBA
(± 10%). Adjust the volume to meet your needs by turning the
screw-knob inside the cavity on the bottom of the unit as
shown here:
Volume: Clockwise tuning shall increase the volume and anti
clock wise tuning shall decrease the volume.
Note: Use a appropriate star screw driver for adjusting the
volume.
Snooze: A short press on the push button snoozes the buzzer
locally i.e. the sound is muted and LED is turned OFF until
Smart Siren User Guide Using the Smart Siren | 9Device Maintenance
Non-replaceable Battery
The Smart Siren runs on AC power (via the provided 12 V
adapter). The battery is only used to maintain the wireless
connection to send alert to webapp in case of an outage on
mains power. The battery is installed in the unit prior to
delivery.
WARNING: Do not open the Smart Siren casing.
There are no user-serviceable parts inside.
Opening the casing voids the manufacturer
warranty.
Cleaning Instructions
You may occasionally need to clean your siren modules,
depending on conditions at your site. Here are some
recommendations and guidelines for cleaning your siren:
1. Always unplug the device from its AC power source
when cleaning with any type of liquid.
2. Clean the module using a soft cloth lightly moistened with
water, a detergent or isopropanol alcohol.
3. Do not use any aggressive cleaning agents or scratching
cleansers that might damage your Smart Siren.
4. Do not submerse the siren in any liquid, as the casing is
not waterproof.
10 | Device Maintenance Smart Siren User GuideAppendix 1 - Troubleshooting What is Strobe LED? Strobe LED is the RED alarm LED used for alarm indication. How do we perform snooze operation? A short press on the push button snoozes the buzzer locally i.e. the sound is muted and LED is turned OFF until Smart- Vue Pro webapp sends a new alarm or after 12 hours it shall ring back for an ongoing alarm. How much time will buzzer gets snoozed if we select snooze button? Buzzer shall be muted for 12 hours or till a new alarm is detected on the datalogger. Ho do we configure the Smart Siren? Smart Siren shall be added in the Smart-Vue Pro webapp. Refer Smart-Vue Pro webapp user guide for configuration details. From where do we get the input commands to smart siren, so that they generates siren or buzzer? When Smart-Vue Pro webapp detects a new alarm, then webapp sends the information to Smart Siren via Lorawan gateway. Smart Siren User Guide Appendix 1 - Troubleshooting | 11
Smart-Vue Pro Installation Procedure
1. Ensure Smart-Vue Pro Quatro is connected with Sensors
   and sensor value is shown in Show sensors screen.
   Example: Smart Sensor value displayed in Show sensors
   screen.

                                                                Figure 4. LoRaWAN Network Options

                                                                4. Select your country from the drop-down and Save.
Figure 3. Sensor Screen                                         5. To communicate with the cloud in Multitech LoRaWAN
                                                                   web browser page, configure the Network in Smart-Vue
2. Ensure LoRaWAN is ON in Smart-Vue Pro Quatro.                   Pro LoRaWAN settings. Refer to the Settings in the
   In Smart Vue Pro Quatro device, Click Menu                      Smart Vue Pro LoRaWAN user guide to know more
                                                                   about setting up of different networks like WiFi and
   Advanced            give the code which is set in Web app
                                                                   Ethernet.
   which is added by User during configuring the user
   setting i.e., Pin code set in web app by the user or by         a.   Ethernet Configuration:
   default it is 000000. Then in Advanced, once a valid code
                                                                        •   Click on Setup         Network
   is entered, select the LoRaWAN            select ON option
   from ON/OFF to enable LoRaWAN connectivity.                              Interfaces       Options (Edit) for “eth0” (1).
                                                                            Click on the edit icon (1) for the network interface
    Note: The code is the Pin code set in webapp by the                     you want to edit as shown.
    user. Default it is 000000.
    •   After giving a valid code in Advanced, select
        LoRaWAN and select ON option. Now, LoRaWAN
        Connectivity is enabled.
3. Select Menu and select Advanced and then click on
   LoRaWAN and select Network. Select the Thermo
   Scientific option (or) for Onpremise installation, select
   “custom” as shown below.

12 |    Smart-Vue Pro Installation Procedure                                                           Smart Siren User Guide
Figure 5. Ethernet Configuration page
b. WiFi Configuration:
• Click Wireless in Setup section and select WiFi as WAN and add the desired Network. Select enabled option
and click Submit to save the settings, select Save and Restart.
Figure 6. Wi-Fi Configuration page
Smart Siren User Guide Smart-Vue Pro Installation Procedure | 13c. In Smart-Vue Pro LoRaWAN page, after infrastructure is added in webapp, click on “Test LoRaWAN Server” (This
works when you configure your network as described in the Setting section of Smart-Vue Pro LoRaWAN user Guide).
Figure 7. LoRaWAN connectivity page
6. Configuration in web app
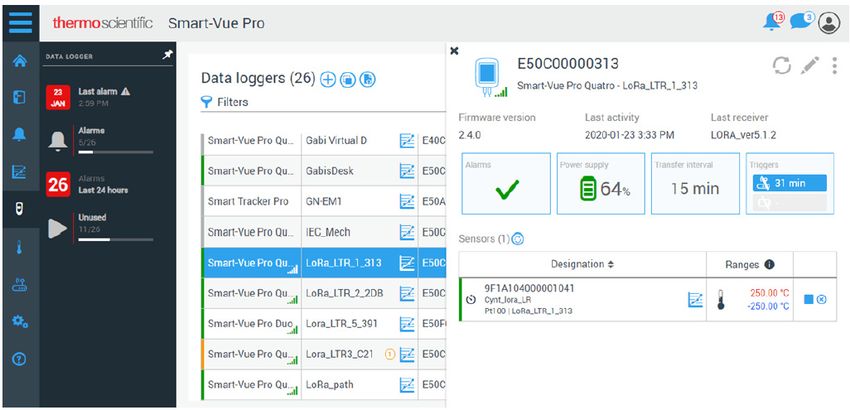
a. In Data loggers page, add the Data logger name (Smart-Vue Pro Quatro) which is under test.
Figure 8. Create Data logger page
14 | Smart-Vue Pro Installation Procedure Smart Siren User Guide7. Ensure data logger is added. Figure 9. Sensor serial number display 8. In Sensor page, verify the associated sensor serial number shown. 9. In Infrastructure, add the details of LoRaWAN. Figure 10. Create Infrastructure Smart Siren User Guide Smart-Vue Pro Installation Procedure | 15
10. To add a gateway, in serial number field, enter the node id mentioned on the Gateway label.

Figure 11. Enter Node ID

Figure 12. Filling the details

16 |   Smart-Vue Pro Installation Procedure                                                       Smart Siren User Guide
11. Link the device and its sensors to an equipment which are under test.

Figure 13. Create Equipment

12. To add sensor to an equipment, open the equipment created and click on ‘+’ in equipment details page in sensor section.
13.

14.

Figure 14. Associating Sensor

15. After successfully adding the equipment, device and testing the Lora coverage on SVP Quatro, start the data logging from
    either Equipment page or Data logger page by clicking on the play icon.

Smart Siren User Guide                                                          Smart-Vue Pro Installation Procedure |    17
16. In Equipment page, click start data logging. Figure 15. Starting Data logging from the Equipment page 17. You can also start from Data logger page 18. You can see the equipment thumbnail in Watchmode when data logging is in progress. Note: For more details refer the user guide of the module. 18 | Smart-Vue Pro Installation Procedure Smart Siren User Guide
19. Set up procedure for Smart Siren in Web app:
     a. In Web app, click Menu        Infrastructure       Create Infrastructure.

Figure 16. Create Infrastructure

b. Enter your Smart Siren Serial number which is present on
   the Smart Siren device. Select the type as “Smart Siren”.

c.   Enter a valid Name and Description and select your
     Organization and Time zone from the drop down.

d. For Technical and Limit alarms, select your desired output
   type from Smart Siren.

e.   To Snooze off the buzzer of Smart Siren, select the check
     box of Allow snooze when Smart Siren is snoozed.
     A small press on the push button snoozes the buzzer
     locally i.e., the sound is muted and LED is turned OFF
     until Smart- Vue Pro web app sends a new alarm or after
     12 hours it shall chime back for an ongoing alarm.

f.   Select the check box of Trigger/ Repeat alarm and enter
     number of minutes/hours based on your requirement
     (alarm after communication lost and battery mode) and
     click on Save.

Smart Siren User Guide                                                         Smart-Vue Pro Installation Procedure |   19
Alert Configuration for Smart Siren in Web app
In the Web app, Alerts can be configured as required. Based a. Navigate to Menu Configuration Alerts
on the type of alerts configured, the user will receive emails/ Add Alert rule.
sms/voice calls when smart siren is in alarm configuration.
b. Enter Alert rule name and Description.
c. Select the Alarm Types, Item in Organization, Alert for and
Criticality.
Note: The selected Item in Organization should be same as
Organization of the Smart Siren, LoRaWAN and the
Equipment to which the LoRaWAN is communicating to.
Note: When Alert for is selected as “Mobile equipment”,
“Shipments” or “Static equipment”, dropdown field
“Criticality” is displayed.
Note: Options selected in Alert for and Criticality fields
should be in accordance with the Equipment type to which
the LoRaWAN is communicating to, in order to successfully
receive the Alerts.
d. Select the check box of If the alarm persists.... Enter
number of minutes in the text box to receive repeated
voice call alerts, till the alarm condition is not
acknowledged or ended.
e. Click on Next and select Time slot and Day off from the
drop down.
f. To configure Time slot: Navigate to Menu
Configuration Time slots Add Time slot.
20 | Smart-Vue Pro Installation Procedure Smart Siren User GuideFigure 17. Time slots configuration g. To configure Days off: Navigate to Menu Configuration Days off Add Day off. Smart Siren User Guide Smart-Vue Pro Installation Procedure | 21
Figure 18. Days off Configuration

h. In Create Alert rule page, select the users from the Available list and move them to Alerted users list, under each Time slot
   tab. Selected Users will receive alerts based on the time slot.

Note: User can choose not to receive any alerts by configuring Days off. Users that are selected from the Available users list
under particular Day off tab while creating Alert rule would only receive the alert during the Day off period.

Figure 19. Available Users List

22 |   Smart-Vue Pro Installation Procedure                                                             Smart Siren User Guide
20. Click on the Smart Sirens and Smart Remote Contacts to select the Smart Siren for alert configuration.
21. User should provide a valid email id and contact number for SMS and Voice call alerts.
22. Click on the Profile picture of the user on the top right corner of the page and go to Profile    Options       Edit
    contact information.

Figure 20. Contact information

Smart Siren User Guide                                                           Smart-Vue Pro Installation Procedure |    23
WEEE Compliance WEEE Compliance. This product is required to comply with the European Union’s Waste Electrical & Great Britain Electronic Equipment (WEEE) Directive 2012/19/EU. It is marked with the following symbol. Thermo Fisher Scientific has contracted with one or more recycling/disposal companies in each EU Member State, and this product should be disposed of or recycled through them. Further information on our compliance with these Directives, the recyclers in your country, and information on Thermo Scientific products which may assist the detection of substances subject to the RoHS Directive are available at www.thermofisher.com under Services & Support. WEEE Konformittät. Dieses Produkt muss die EU Waste Electrical & Electronic Equipment (WEEE) Deutschland Richtlinie 2012/19/EU erfüllen. Das Produkt ist durch folgendes Symbol gekennzeichnet. Thermo Fisher Scientific hat Vereinbarungen getroffen mit Verwertungs-/Entsorgungsanlagen in allen EU- Mitgliederstaaten und dieses Produkt muss durch diese Firmen widerverwetet oder entsorgt werden. Mehr Informationen über die Einhaltung dieser Anweisungen durch Thermo Scientific, dieVerwerter und Hinweise die Ihnen nützlich sein können, die Thermo Fisher Scientific Produkte zu identizfizieren, die unter diese RoHS. Anweisungfallen, finden Sie unter www.thermofisher.com unter Services & Support. Conformità WEEE. Questo prodotto deve rispondere alla direttiva dell’ Unione Europea 2012/19/EU Italia in merito ai Rifiuti degli Apparecchi Elettrici ed Elettronici (WEEE). È marcato col seguente simbolo. Thermo Fischer Scientific ha stipulato contratti con una o diverse società di riciclaggio/smaltimento in ognuno degli Stati Membri Europei. Questo prodotto verrà smaltito o riciclato tramite queste medesime. Ulteriori informazioni sulla conformità di Thermo Fisher Scientific con queste Direttive, l’elenco delle ditte di riciclaggio nel Vostro paese e informazioni sui prodotti Thermo Scientific che possono essere utili alla rilevazione di sostanze soggette alla Direttiva RoHS sono disponibili sul sito www.thermofisher.com in Servizi e Supporto. Conformité WEEE. Ce produit doit être conforme à la directive euro-péenne (2012/19/EU) des France Déchets d’Equipements Electriques et Electroniques (DEEE). Il est marqué par le symbole suivant. Thermo Fisher Scientific s’est associé avec une ou plusieurs compagnies de recyclage dans chaque état membre de l’union européenne et ce produit devraitêtre collecté ou recyclé par celles-ci. Davantage d’informations sur laconformité de Thermo Fisher Scientific à ces directives, les recycleurs dans votre pays et les informations sur les produits Thermo Fisher Scientific qui peuvent aider le détection des substances sujettes à la directive RoHS sont disponibles sur www.thermofisher.com sous Services et Assistance.
Contact Information
Thermo Fisher Scientific products are backed by a global technical support team ready to support your applications. We offer
cold storage accessories, including remote alarms, temperature recorders, and validation services.
Visit www.thermofisher.com or call:

 Countries                    Sales                                             Services

 North America                +1 866 984 3766                                   (800) 438-4851

 India                        1800 22 8374, +91 22 6716 2200                    +91 22 6716 2200

 China                        +800 810 5118, +400 650 5118                      +8621 68654588

 Japan                        +81 3 5826 1616                                   +81 3 3816 3355

 Australia                    +61 39757 4300                                    1 300 735 292

 Austria                      +43 1 801 40 0                                    +43 1 801 40 0

 Belgium                      +32 53 73 42 41                                   +32 2 482 30 30

 France                       +33 2 2803 2180                                   +33 2 2803 2180

 Germany                      0800 1 536 376, +49 6184 90 6000                  0800 1 536 376

 Italy                        +32 02 95059 552                                  +39 02 95059 552, 432 254 375

 Netherlands                  +31 76 579 55 55                                  +31 76 571 4440

 Nordic/Baltic/CIS            +358 9 329 10200                                  +358 9 329 100

 Russia                       +7 812 703 4215                                   +7 812 703 4215

 Spain/Portugal               +34 93 223 09 18                                  +34 93 223 09 18

 Switzerland                  +41 44 454 12 22                                  +41 44 454 12 12

 UK/Ireland                   +44 870 609 9203                                  +44 870 609 9203

 New Zealand                  +64 9 980 6700                                    +64 9 980 6700

 Other Asian Countries        +852 2885 4613                                    +852 2885 4613

 Countries not listed         +49 6184 90 6000                                  +49 6184 90 6000

Thermo Fisher Scientific Inc.
275 Aiken Road
Asheville, NC 28804
United States

Find out more at thermofisher.com/cold
© 2021 Thermo Fisher Scientific Inc. All rights reserved. All trademarks are the property of
Thermo Fisher Scientific and its subsidiaries unless otherwise specified.
331676H04 04/21
You can also read