SMARTVOICE AUTO-ATTENDANT USER GUIDE
←
→
Page content transcription
If your browser does not render page correctly, please read the page content below

.

 SmartVoice

                .
                .

Auto-Attendant
  User Guide

    Last Updated: April 2019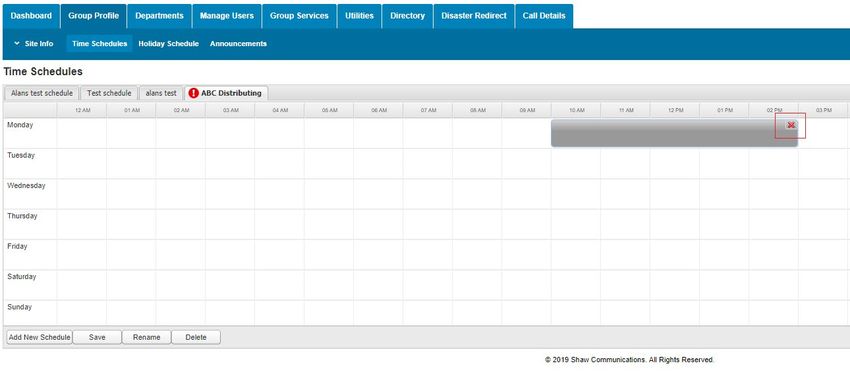
Table of Contents

Table of Contents
Steps to setup an Auto-Attendant...................................................................................................................................... 1
  Steps.......................................................................................................................................................................... 1
Plan your Auto-Attendant................................................................................................................................................. 1
   Map out the structure ............................................................................................................................................... 1
Prepare Custom Greetings................................................................................................................................................ 2
  Customer Greeting examples..................................................................................................................................... 2
   Define custom greeting contents ................................................................................................................................... 3
   After Hours Menu Greeting........................................................................................................................................... 3
   Holiday Menu Greeting................................................................................................................................................. 3
   Administration Department Submenu Greeting................................................................................................................ 3
   Customer Service Submenu Greeting.............................................................................................................................. 3
   Hours of Operation Submenu Greeting ........................................................................................................................... 3
Uploading and Recording Greetings ................................................................................................................................... 4
  Greetings for Menus and Submenus using the End User Portal ........................................................................................... 4
   Greetings for Menus and Submenus using the voice portal ................................................................................................ 4
Announcement Repository ............................................................................................................................................... 5
  Upload a Pre-recorded Greeting .................................................................................................................................... 5
   Recording A Greeting ................................................................................................................................................... 6
Voice Portal.................................................................................................................................................................... 8
  How to record custom announcements ..................................................................................................................... 8
Configure Time and Holiday Schedules for your Organization................................................................................................. 9
  Add Time Schedule ...................................................................................................................................................... 9
Creating Holiday Schedules ............................................................................................................................................. 11
  How to add Holidays Schedules ............................................................................................................................... 11
Configure Auto-Attendant Profile Options......................................................................................................................... 12
  Configure the Auto-Attendant profile options ................................................................................................................ 12
Configure Business Hours, Greetings and Dialing Menus ..................................................................................................... 13
  Configure business hours ............................................................................................................................................ 13
   Configure after hours ................................................................................................................................................. 16
   Configure holiday hours .............................................................................................................................................. 16
Configure the Sub-Menus ............................................................................................................................................... 16
Steps to setup an Auto-Attendant

The Auto-Attendan t serves as an automated receptionist that answers the phone call and provides a personalized
message to callers. It can be configured to provide callers with the option to connect to the operator, dial by name or
extension, leave a message, listen to a greeting, or connect to configurable destinations.

Note: VoIP phone emergency 9-1-1 features differ from traditional 9-1-1 services.

Visit https://busin ess.shaw.ca/smar tvoic e911 for more information.

Steps
•   Plan your Auto-Attendant structure
•   Prepare Custom Greetings for each Menu and Sub-menu
•   Configure Time and Holiday Schedules for your organization
•   Set up the Menus and Submenus
•   Call the Auto Attendant numbers to test your design

Plan your Auto-Attendant

Map out the structure

Map out the structure of the Menus (Business Hours, After Hours and Holiday) and Submenus.

Here is a sample Auto-Attendant structure:

                                                                                                                      1
Business Hours Menu
          0: Operator
                                             1: Extension dialing
          1: Extension dialing
          2: Name dialing
          3: Administration
          4: Customer Service
          5: Hours

          After Hours Menu
          0: Operator                        1: Extension dialing
          1: Extension dialing
          2: Name dialing                    3: Orders
          3: Hours

          Holiday Menu
          0: Operator
          1: Extension dialing
          3: Hours

Notes
• Extension dialing can be enabled in each Menu and Submenu to allow the user to dial an extension without
  having to select an option first.
• There are controls for the scope of extension and name dialing to determine whether calls can be directed
  to users in the same group, department, or enterprise.

Prepare Custom Greetings

Customer Greeting examples

Custom greetings that include each key defined in the menu are needed to be voiced to the caller. They can be
recorded using the End User Portal web interface or pre-recorded in an audio file.

Note:
• If Custom greetings are not defined for each Menu and Submenu, the system will play default greetings

                                                                                                                2
that may not be related to the options in the Auto-attendant menus and submenus.
Tips:
• List Menu options in a predictable order.
• List menu options that transfer to the operator last (To reach the operator, press 0 or stay on the line).
Define custom greeting contents
For the sample menu the following custom greetings will be required:
• Welcome to ABC Distributing.
• If you know the extension of the party you are trying to reach, dial it now.
• To use our automated name directory, press 2.
• To reach the Administration department, press 3.
• To reach Customer Service, press 4.
• For our regular Business Hours, press 5.
• To reach the operator, press 0, or stay on the line.
After Hours Menu Greeting
• “Welcome to ABC Distributing. Our offices are now closed.
• To reach an extension, dial 1.
• To use our automated name directory, press 2.
• For our regular business hours, press 3.
• Thank you for calling”.
Holiday Menu Greeting
• “Welcome to ABC Distributing. Our offices are closed for holidays.
• To reach an extension, dial 1.
• For our regular business hours, press 3.
• Thank you for calling”.
Administration Department Submenu Greeting
• “You have reached the administration department of ABC Distributing.
• If you know the extension of the party you are trying to reach, dial it now.
• To use our automated name directory, press 2.
• To reach Jean Smith, press 3.
• To repeat this menu, press the pound key.
• To go back to the previous menu, press the star key.
• To reach the operator, press 0 or stay on the line”.
Customer Service Submenu Greeting
• “You have reached the customer service department of ABC Distributing.
• To dial an extension, press 1.
• To use our automated name directory, press 2
• To place an Order, press 3.
• To repeat this menu, press the pound key.
• To go back to the previous menu, press the star key.
• To reach an operator, press 0 or stay on the line.”
Hours of Operation Submenu Greeting
• “Our hours of operations are Monday to Friday from 9 AM to 4 PM
• To repeat this menu, press the pound key.
• To go back to the previous menu, press the star key.
3Uploading and Recording Greetings
There are multiple ways to manage greetings in the Auto-atten dan t.
• The End user portal is an on-line interface that allows customers to record or upload pre-recorded greetings
• The Voice portal is accessed through a phone and allows customers to record custom greetings
Greetings for Menus and Submenus using the End User Portal
It is possible to record or upload pre-recorded greetings for the Business Hours, After Hours and Holiday menus by
logging into the End User portal using Group Administrator credentials.
• Note: About Pre-recorded audio files:
• Most common audio file extensions supported (wav, mp3, etc)
• Audio recorded for less than 10 min 40 sec
• Total amount of all pre-recorded greetings cannot exceed 1GB
• Recording announcements is done using you PC microphone
Steps to Upload or Record the Custom greetings can be found in the announcement repository section
To access the SmartVoice Call Queuing settings, login to the SmartVoice Portal found at
smartvoice.shawbusin ess.ca
Figure 1
Greetings for Menus and Submenus using the voice portal
It is possible to record custom greetings for the Business Hours, After Hours and Holiday menus by calling the
Voice Portal and logging in as the Group Voice Portal extension with the Voice Portal Administrator password.
Steps to record the Menu greeting using the Voice Portal can be found in the Voice Portal Section
Tips:
• When messages are recorded through the Voice portal, they will show up in the Announcemen t
repository and will be named with a time stamp (date/Time of the recording)
• Shaw recommends logging into the End user Portal and changing the name to something that is
more manageable
4Announcement Repository
The announcemen t repository is a new feature in the End User Portal available to Group Administrator s that
provides a convent central location to manage all announcemen ts. From this section customers can easily upload,
record, delete or edit announcements and quickly see what announcements are assigned to what
features/serv ic es.
Steps for applying Announcemen t to features can be found in the section SET UP THE MENUS AND
SUBMENUS.
Note: As of April 2019, Shaw recommends customer use the Announcemen t Repository for management of
all announcements
Existing announcements made or uploaded prior to April 2019 can be found and managed in the Service
Announcemen t repository
Group Services > Site Service > Auto Attendant > Announcements
*Announcemen t recorded or uploaded here will not show up in the Group Announcemen t repository and will
remain local to the Auto Attendant.
Shaw recommends re-recording all announcements into the Group Announcement Repository - Group
Profile > Announcements
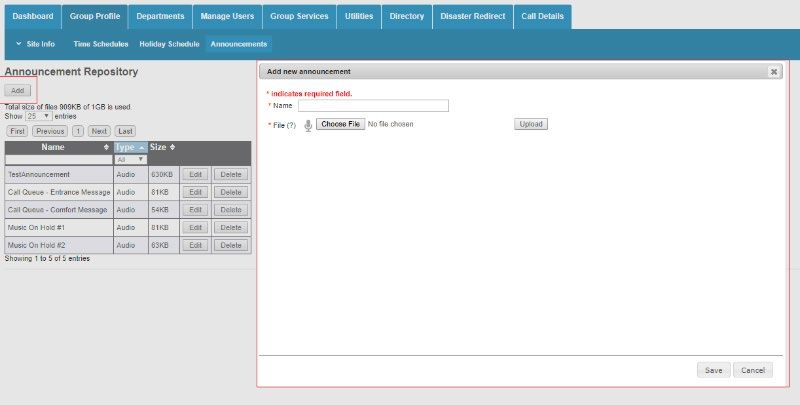
Upload a Pre-recorded Greeting
The Group administrator user can perform this task in the End User Portal web interface:
Group Profile -> Announcements
Figure 2
1. Click Add
A new window will open
5Figure 3
1. Name your new Announcement
2. Select “Choose File” and select the wav file you wish to use
3. Click upload – a message will confirm the upload was successful
Figure 4
4. Click save
Your announcement will now show up in the Announcement repository
Figure 5
Recording A Greeting
The Group administrator user can perform this task in the End User Portal web interface:
Group Profile -> Announcements
6Figure 6
1. Click Add
A new window will open
2. Name your new Announcement
3. Select the microphone
4. Select the Record icon to start recording and again to stop recording
5. Recording will be done through your PC microphone or auxiliary device if available
Figure 7
6. Click upload – a message will confirm the upload was successful
Figure 8
7. Click save
8. Your announcement will now show up in the Announcement repository
7Figure 9
Voice Portal
How to record custom announcements
Follow these steps to record custom announcements for the Business Hours, After Hours and Holiday menus of any
Auto Attendant in your group by calling the Voice Portal:
Note:
• To use this method the Group Voice Portal extension and the Group Voice Portal Administrator password
are needed
1. Log in to the Voice Portal as the administrator from any phone that does not have Voice Messaging Auto login
enabled:
Press *99 and then press the pound key (#)
Press star key (*)
Enter the Group Voice Portal extension which is always 9999 followed by the pound key (#).
Enter the Voice Portal Administrator password followed by the pound key (#). By default, the passcode is the
main number of your business without the area code.
Note:
Passcode can be changed in the group admin portal or as indicated below
To change the administrator Voice portal password in the portal:
Group Services>Site Services>Voice Portal>Change Administrator Passcode
2. The Group voice portal announces the Administrator main menu:
To change an Auto Attendant’s greetings, press 1.
To go to the Branding Configuration menu, press 2.
To record a new Announcement, press 5.
To change your passcode, press 8. (Administrator password)
8To exit the voice portal, press 9.
To repeat this menu, press the pound key (#)
3. Press 1 to change an Auto Attendant’s greetings
4. Enter the extension for the auto attendant, followed by the pound key (#). Only if there is more than one
Auto-attendant in the group
5. Follow the prompts to change any of the Business Hours, After Hours or Holiday greetings:
To change the business hours greeting, press 1
To change the afterhours greeting, press 2
To change the holiday hours greeting, press 3
To go back to the previous menu, press (*)
To repeat this menu, press the pound key (#)
Note:
Greetings recorded through the phone will be recorded in the Announcement Repository as a Date Stamp.
The group admin can change the name to something unique to help identify multiple recordings.
Configure Time and Holiday Schedules
for your Organization
Configure a Time Schedule for your organization’s Business Hours and a Holiday Schedule for your organization’s
holidays.
Note:
• The Group administrator can manage the Group Schedules in the End User Portal web interface. If you
do not have a Group administrator this section will be completed by Shaw on your behalf.
Add Time Schedule
The Group administrator user can perform this task in the End User Portal web interface:
Group Profile -> Time Schedules -> Add New Schedule
9Figure 10
1. Enter a name for the schedule in the text box of the Name window that appears:
Figure 11
2. Click OK. This creates a schedule with no events
3. Select the tab of the created (or existing) schedule to display the week calendar:
Note:
• An empty schedule, that is, a schedule with no events, is considered by the system as always
applicable.
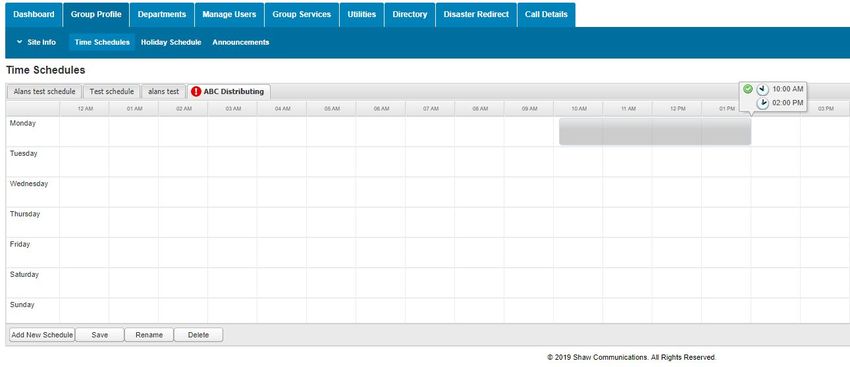
• To add an event, click and drag the mouse from the start time until the end time of the Business day
for each weekday:
Figure 2
To remove an event, click on the red X at the top right corner of the event box:
Figure 13
104. Click on Save to save the changes in the Time schedule
Creating Holiday Schedules
How to add Holidays Schedules
The Group administrator user can perform this task in the End User Portal web interface:
Group Profile -> Holiday Schedule -> Add Holiday Schedule
Figure 3
1. Click Add Holiday Schedule. The Add Holiday Schedule window appears
2. Enter the name for the Holiday schedule, the list of non-business days and click on Save:
Figure 45
11Configure Auto-Attendant Profile Options
Note:
• The Group administrator can manage the Menus and Submenus in the End User Portal web interface. If
you do not have a Group administrator this section will be completed by Shaw on your behalf.
The menus are configured in the End User Portal web Interface by the Group administrator user.
Group Services -> Site Services -> Auto Attendant -> Select: -> Profile
Configure the Auto-Attendant profile options
Select the options for the Auto-Attendant:
Field Description
Scope of Extension Specify whether extension dialing
Dialing applies across the Enterprise, Group
or Departmen t of the Auto
Attendant.
Scope of Name Specify whether name dialing
Dialing applies across the Enterprise, Group
or Department of the Auto
Attendant.
Name Dialing Entries Define how a caller should say the
name of the person they want to
reach.
LastName + FirstName: The caller
must first enter the last name of
the person and then enter the
first name.
LastName + FirstName and
FirstName + LastName: The caller
can enter either the last name and
then the first name of the person,
or the first name and then the last
name.
Business Hours Use the Business Hours tab to
specify the business hour schedule ,
Greetings and dialing Menu
After Hours Use the After Hours tab to specify
the Afterhours schedule, Greetings and
dialing Menu
Holiday Hours Use the Holiday Tab to specify the
Holiday hour , , Greetings and dialing
Menu
Call Policies Use this menu to set specific
policies for the auto attendant
12Figure 16
Figure 17
Configure Business Hours, Greetings and
Dialing Menus
Configure business hours
Use the Business Hours tab to specify the dialing menu of prompts and actions to be used during business hours
in the End User Portal
Group Services -> Site Services -> Auto Attendant -> Select: -> Profile -> Business Hours Tab
1. Specify the Business Hours schedule. Select a Time Schedule for the Business Hours from the drop-down list.
This value applies for both "Business Hours" and "After Hours" menus.
Refer back to the “Configure time and holiday schedules section for details on how to set a time schedule.
Figure 18
2. In the Business Hours Greeting section, select Default greeting for the standard system generated greeting or
13select Personal Greeting to apply a greeting from the Announcement Repository.
Figure 19
3. Check or uncheck Enable first-level extension dialing. This feature allows the caller to interrupt the greeting
and dial an extension without having to select an option first. This feature is more convenient for callers who
know the extension of the person they want to reach.
Figure 20
4. Specify menu options for callers (see below table for details)
Field Description
Key A key on a telephone keypad to which you can assign
an action.
Description Description of the menu option.
Action Select an action to be performed when the key is
pressed by the caller.
Details Appears for actions that require additional data, such as
a phone number or submenu name
The Action control offers the following choices for Menu and Submenus:
Action Explanation
Transfer With This informs the caller that is being transferred and
Prompt transfers the call to the phone number or extension
provided in the Details column.
Transfer This transfers the call to the phone number or
14Without extension provided in the Details column without
Prompt playing any prompt to the caller.
Transfer To The caller is played a message informing them that
Operator they are being transferred to the operator and the
call is transferred to the number in the Details
column. All operator functions of the auto attendant
will use this transfer path once this operator phone
number is set.
Transfer To The caller is transferred to the indicated submenu and
Submenu played the greeting defined for that submenu.
Name Dialing The caller is provided with access to name dialing and
asked to enter the name of the party they are trying to
reach using the phone keypad. The caller is played th e
name of the called party and is then transferred.
Extensi The caller is provided with access to extension dialing
on and asked to provide an extension. The caller is played
Dialing the name of the called party provided and then is
transferred.
Repeat Menu The Menu or Submenu greeting is played to the caller.
Return to The caller is transferred to the previous menu and the
Previous greeting for the previous menu is played. This option is
Menu only available in the Submenu selection.
Exit The caller is thanked for calling and the call is released.
-- Indicates that no action has been selected. Menu
greeting is played to the caller after an error message.
Figure 21
5. Click Save:
Note:
• If an action that requires a phone number is selected, Phone numbers can include the Feature Access Code
prefix to activate Direct Voice Mail Transfer (*55) to transfer calls directly to the mailbox of a phone
number or extension in the same group. For example *55*4035551234
• Callers who do not press any key in a Menu will be transferred to the operator. If no operator is
configured, the call will be terminated.
Callers who do not press any key in a Submenu after the greeting has been played three times will be forwarded to
the operator. If no operator is configured, the call will be terminated.
15Configure after hours
Use the After-Hours tab to specify the dialing menu of prompts and actions to be used after business hours in
the End User Portal:
Group Services -> Site Services -> Auto Attendant -> Select: -> Profile -> After Hours Tab
1. Specify the Business Hours schedule. Select a Time Schedule for the After Hours from the drop-down list. This
value applies for both "Business Hours" and "After Hours" menus.
Refer back to the “Configure time and holiday schedules section for details on how to set a time schedule.
Figure 22
2. Repeat steps 2-5 from the Configure Business Hours, Greetings and Dialing Menus Section to set the Greetings
and Menus
Configure holiday hours
Use the Holiday tab to specify the dialing menu of prompts and actions to be used for holiday hours In the
End User Portal:
Group Services -> Site Services -> Auto Attendant -> Select: -> Profile -> Holiday Hours
Tab
1. Specify the Holiday Hours schedule. Select a Time Schedule for the Holiday Hours from the drop-down list.
Refer back to the “Configure time and holiday schedules section for details on how to set a time
schedule.
Figure 23
2. Repeat steps 2-5 from the Configure Business Hours, Greetings and Dialing Menus Section to set the Greetings
and Menus
Configure the Sub-Menus
The Submenus are used to build multilevel menus. In the End User Portal:
Group Services -> Site Services -> Auto Attendant -> Select: -> Submenus
Follow these steps to Add every Submenu needed for the Auto-Attendant.
(The Edit submenu screen has the same options available as the Add submenu and the same steps can be
16used to manage the submenu).
1. On the Auto-Attendant Submenu page, click Add:
Figure 24
2. The Auto-Attendant Submenu Add page appears
3. In the Submenu ID text box, enter a name for the Submenu.
Figure 25
4. In the Submenu Greeting section, select Default greeting for the standard system generated greeting or select
Personal Greeting to apply a greeting from the Announcement Repository.
Figure 5
5. Check or uncheck Enable extension dialing at any time. This feature allows the caller to interrupt the greeting
and dial an extension without having to select an option first.
17Figure 27
6. Specify menu options for callers. The required data applies for Submenus and Menus. For each option, provide
the following data:
Field Description
Key A key on a telephone keypad to which you can assign
an action.
Description Description of the menu option.
Action Select an action to be performed when the key is
pressed by the caller.
Details Appears for actions that require additional data, such as
a phone number or submenu name
18The Action control offers the following choices for Menu and Submenus:
Action Explanation
Transfer With This informs the caller that is being transferred and
Prompt transfers the call to the phone number or extension
provided in the Details column.
Transfer This transfers the call to the phone number or
Without extension provided in the Details column without
Prompt playing any prompt to the caller.
Transfer To The caller is played a message informing them that
Operator they are being transferred to the operator and the
call is transferred to the number in the Details
column. All operator functions of the auto attendant
will use this transfer path once this operator phone
number is set.
Transfer To The caller is transferred to the indicated submenu and
Submenu played the greeting defined for that submenu.
Name Dialing The caller is provided with access to name dialing and
asked to enter the name of the party they are trying to
reach using the phone keypad. The caller is played th e
name of the called party and is then transferred.
Extensi The caller is provided with access to extension dialing
on and asked to provide an extension. The caller is played
Dialing the name of the called party provided and then is
transferred.
Repeat Menu The Menu or Submenu greeting is played to the caller.
Return to The caller is transferred to the previous menu and the
Previous greeting for the previous menu is played. This option is
Menu only available in the Submenu selection.
Exit The caller is thanked for calling and the call is released.
-- Indicates that no action has been selected. Menu
greeting is played to the caller after an error message.
19Figure 28
7. Click Save:
• If an action that requires a phone number is selected, Phone numbers can include the Feature Access
Code prefix to activate Direct Voice Mail Transfer (*55) to transfer calls directly to the mailbox of a
phone number or extension in the same group. For example, *55*4035551234
• Callers who do not press any key in a Menu will be transferred to the operator. If no operator is
configured, the call will be terminated.
• Callers who do not press any key in a Submenu after the greeting has been played three times will be
forwarded to the operator. If no operator is configured, the call will be terminated.
20For customer care and technical support Call 1-877-742-9249 Email inquiries@shawbusiness.ca Follow us on LinkedIn: linkedin.com/company/shaw-business
You can also read