TECHNICAL MANUAL 2018 - Neolith
←
→
Page content transcription
If your browser does not render page correctly, please read the page content below
TECHNICAL MANUAL
            2018

                                                    1
                                                    TECHNICAL MANUAL
                                         www.neolith.com
                                         info@thesize.es

    DESIGN, HANDLING AND MECHANIZATION

INDEX

                                                                           01. Product       05

                                                           02. Handling and Storage          12

                                                                        03. Inspection       22

                                                      04. Mechanization Parameters           24

                                                      05. Cutting Recommendations            28

                               06. Design and Production of a Neolith Countertop             36

                                                                    07. Extreme Heat         50

                                                                               08. Glue      54

                                                                09. Tiling and Paving        56

                                                                           10. Repairs       59

                                                                              11. Tools      63

                                                               12. Cleaning Products         79

                                                                                                                3
                                                                                                             TECHNICAL MANUAL

            Due to the uniqueness of the materials used in North America to produce kitchen countertops,
a specific countertop manual was created for this market which is only applicable in the USA and Canada.
             The “Technical Kitchen Countertop Manual” should be used in all other countries of the world.

       Each marble producer must follow the manual that corresponds to their market in order to ensure
                                             proper production pursuant to the typical local materials.
4
TECHNICAL MANUAL
01. PRODUCT01. PRODUCT
1.1 Product Range
Arctic White Barro Nero Zimbabwe
Avorio Basalt Beige Phedra
Humo Basalt Black Pierre Bleue
Nero Basalt Grey Pietra di Luna
Nieve Beton Pietra di Osso
Perla Cement Pietra di Piombo
Arena Concrete Taupe Zaha’s Stone
5
TECHNICAL MANUAL
Aspen Grey Lava01. PRODUCT
1.1 Product Range
Iron Ash Blanco Carrara Onyx translucent
Iron Copper Calacatta Onyx 001/001-R
Iron Corten Calacatta Gold Pulpis
Iron Frost Estatuario E01/E01R Strata Argentum
Iron Grey Estatuario E04/E04R Travertino Navona
Iron Moss Estatuario E05/E05R Steel Marengo
Textil White Marfil
6
TECHNICAL MANUAL
La Bohème Nero Marquina01. PRODUCT
1.2 Finishes
SATIN
Completely matte finish. Highly resistant and ideal for
commercial uses.
SILK
A matte finish with a light layer of enamel for subtle shine
and a pleasant soft touch. Surface finish which is easy to
clean.
RIVERWASHED
Finish with a rugged texture and high relief for surfaces that
evoke feelings upon touch.
NATURAL HONED
A honed texture which is typical of natural stones: smooth, soft,
shine-free and completely matte.
DÉCOR POLISHED
Décor Polished offers a perfectly linear reflection of the
Classtone Collection colors, which gain depth and elegance.
NANOTECH POLISHED
With a high shine level, Nanotech Polished offers the Colorfeel
Collection a more sophisticated image.
7
TECHNICAL MANUAL01. PRODUCT
1.3 Formats
New
* Only in 3 and 6 mm
3.600x1.200 mm / 142”x48” 3.200x1.600 mm / 125”x64” 3.200x1.500 mm / 125”x60”
* Only in 3 and 6 mm (1/8” and 1/4”) * Only in 12 and 20 mm (1/2” and 3/4”) * Only in 6 and 12 mm (1/4” and 1/2”)
8
TECHNICAL MANUAL01. PRODUCT
1.4 Thicknesses
3 mm - 1/8”
6 mm - 1/4”
12 mm - 1/2”
20 mm - 3/4” New
3 3+ 6 6+ 12 20
(1/8”) (1/8”) (1/4”) (1/4”) (1/2”) (3/4”)
Indoor paneling 9
Indoor paving
TECHNICAL MANUAL
Outdoor natural stone facade
Outdoor paving
Ventilated facade with exposed anchor
Ventilated facade with hidden anchor
Countertops
High-traffic paving
Indoor paneling over the material
Indoor paving over the material
Furniture01. PRODUCT
1.5 Product Technical Characteristics
Product characteristics as per the finishes:
TEST STANDARD DETERMINATION Unit FINISH
SATIN SILK POLISHED RIVERWASHED
Determination of ISO 10545-2 Thickness* mm ± 0,2 ± 0,2 ± 0,2 ± 0,2
Dimensions and
Tolerance Flatness mm ± 2 (0,1%) ± 2 (0,1%) ±2 ± 2 (0,1%)
Surface Appearance
Slab width (0,1%)
Tolerance Flatness mm ± 4 (0,1%) ± 4 (0,1%) ±4 ± 4 (0,1%)
Slab length (0,1%)
Tolerance mm ± 1 (0,2%) ± 1 (0,2%) ± 1 (0,2%) ± 1 (0,2%)
Dimensions**
Water Absorption ISO-10545-3 Boiling Absorption % ≤ 0,1 ≤ 0,1 ≤ 0,1 ≤ 0,1
Apparent Density gr/cm3 2,4 2,4 2,4 2,4
Impact Resistance ISO 10545-5 Coefficient of - 0,8 0,8 0,6 0,8
restitution
Deep Abrasion ISO-10545-6 Lost Volume mm3 130 - - -
Resistance
Surface Abrasion ISO 10545-7 Visual Appearance Clase PEI III PEI II PEI I PEI II
Resistance
Linear Thermal ISO 10545-8 Expansion 25 - 10-6· oC 5,7 5,7 5,7 5,7
Expansion 100oC (Average)
Resistance to Sudden ISO 10545-9 Damage - No Damage No No No
Temperature Change Damage Damage Damage
Moisture Expansion ISO 10545-10 Coefficient of mm/m < 0,1 < 0,1 < 0,1 < 0,1
Expansion
Freeze Resistance ISO 10545-12 Damage - No Damage No No No
Damage Damage Damage
Chemical Resistance ISO 10545-13 Cleaning Products Clase UA GA GA GA
Pool Salts Clase UA GA GA GA
Weak Clase ULA GLA GLB GLA
Concentrations
High Clase UHA GHA GHB GHA
Concentrations
Stain Resistance ISO 10545-14 Visual Appearance Clase 5 5 5 5
Release of Lead and ISO 10545-15 Lead Concentration mg/dm201. PRODUCT
1.5 Product Technical Characteristics
Bending Resistance as per the slab thickness:
TEST STAN- DETERMI- Unit 3600 x 1200 3200 x 1500
DARD NATION
3 mm 3+ 6 mm 6+ 3+3 6+3 6+6 6+ 12 mm 20 mm
Weight - Grammage Kg/ 7 8 14 15 16 23 30 15 29
m2
Mass 34 38 67 72 76 110 143 77 148
Bending ISO Breaking N 353 430 1449 1807 1337 2735 3149 1807 5451 15748
Resistance 10545-4 Force
Modulus of N/ 48 54 48 53 47 57 47 53 51 55
Rupture mm2
11
TECHNICAL MANUAL02. HANDLING AND STORAGE 12 TECHNICAL MANUAL
02. HANDLING AND STORAGE

Neolith slabs must be loaded, unloaded and transported by means of a forklift, bridge
crane or other hoisting device.
Whenever handling and transporting, the slabs must be balanced taking their center of
gravity into account.

The following table summarizes the weight per slab and per square meter:

 Format                                3600 x 1200 mm, 144” x 48”               3200 x 1500 mm, 125” x 60”

 Thicknesses (mm)      3     3+          6       6+       3+3       6+3   6+6   6+      12       20

 Weight (kg/m2)        7     8           14      15       16        23    30    14      29       48

 Weight of full slab   34    38          67      72       76        110   143   77      148      245
 (Kg)

Table 1: Formats and weights per thickness.

2.1 Transporting with a clamp

Always pay attention to the movement and handling of the slabs to prevent splintering
or breakage.
TheSize recommends using the following type of clamp for lifting and moving individual
slabs:

                                                                                                             13
                                                                                                             TECHNICAL MANUAL

   Neolith Slab handled with a clamp
The additional width of this clamp will prevent the slab from bending during handling
to, thus, prevent undesirable breakage.
This clamp is available through TheSize.
Contact TheSize for more details.
Recommendations:
Clamping more than 2 slabs at the same time is not recommended.
Before lifting polished slabs with the clamp, remove the protective plastic.
Make sure to cover all metal surfaces that may come into contact with the slab with
adhesive foam tape.
Make sure to cover all metal surfaces that may come into contact with the slab with
adhesive foam tape.
If this type of clamp is not available, use a 2 cm thick plank of approximately 3 m x
20 cm so the clamp can catch 12 mm slabs.
14 Fixing the ends of the slab with jacks to the plank so the slab doesn’t sag during
handling is recommended.
TECHNICAL MANUAL
Position the plank to the rear of the slab to be lifted.
1) Place the clamp on the slab and the plank.
2) Fix the clamp and lift the slab and plank with care.
3) Avoid sudden changes in direction.1. Plank at the back of the slab
2. Clamping
15
TECHNICAL MANUAL
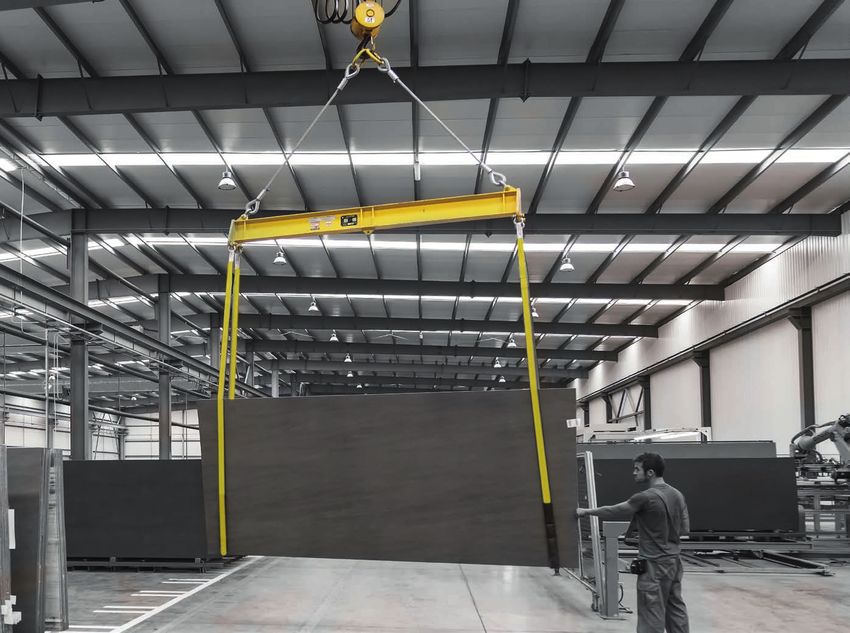
3. Handling the slab with the clamp2.2 Transporting with slings
Using canvas slings to move several slabs at the same time is recommended.
Metal slings must not be used to handle Neolith slabs.
Canvas slings
16
TECHNICAL MANUAL2.3 Manually transporting a Neolith slab
Moving a Neolith countertop
INCORRECT CORRECT
Raising a Neolith countertop onto a bench
17
TECHNICAL MANUAL
INCORRECT CORRECT2.4 Suction frame
For easier handling of slabs and finished parts, using a suction frame is recommended
(only for 3 and 6 mm slabs).
The suction cups can move easily along the frame which helps adapt the frame to any
size slab needed.
This frame can be purchased from TheSize.
*Contact TheSize for more details.
18
TECHNICAL MANUAL
Handling and installing a piece with a suction frameIf this type of frame is not available, an aluminum rod or similar element, secured
with several jacks, can also be used.
This will prevent the part from bending too much during handling.
Fixing thin, long parts (skirting, for example) with jacks to an aluminum rod for
transport is also recommended.
This will prevent the part from bending too much during handling.
19
TECHNICAL MANUAL
Handling a part with a rod secured with jacks2.5 Slab storage
Place the slabs length-wise on wooden beams to prevent the slabs from splintering.
supports for slab storage
3 mm and 6 mm slabs need at least three support points, distributed evenly along the
back of the slab; a full support is recommended - an unused granite or marble slab with
sufficient width, for example. The best way to maintain the integrity of the slabs is to
keep them in their original packaging or use a full support on the back of the slab such
as an unused granite or marble slab which is wide enough.
Avoid positioning large slabs against smaller slabs:
CORRECT INCORRECT
20
TECHNICAL MANUALThe supports must be able to hold the entire surface of the part during transport.
Supports that are too small may cause the part to break:
CORRECT INCORRECT
Storage of Neolith slabs in the shop
21
2.6 Transport by road
TECHNICAL MANUAL
When in a truck, the slabs must be completely supported and securing the slabs
mechanically (with jacks or belts) is recommended as they could become loose with
strong wind and break.
Lightweight slabs and tiles may easily fall from a truck or to the ground so always
secure the slabs to a sawhorse while unloading.
Pay special attention in the shop if the slabs are stored outdoors; secure the slabs to
sawhorses to protect them from gusts of wind.03. INSPECTION
Before beginning production, TheSize recommends deep-cleaning the slab and doing a
meticulous visual inspection of the slab to check whether the slab complies with the
quality requirements. Check these items when visually inspecting a slab:
Fissures Thickness Pollution
Stains Shine variations Pricks
The tones of the different slabs Flatness Imperfections
This should be the first step prior to starting production. Doing the inspection against
the light to identify possible imperfections not seen when flat is recommended.
*No claims will be accepted for installed or manufactured material when defects were
already present upon delivery of the material. Marble workers are responsible for
determining whether the slabs are adequate for use. If they are not adequate, they
should be exchanged before the slabs are cut or modified in any way.
3.1 Slab characteristics
3.1.1 Flatness
To check the flatness of a slab, it should be positioned horizontally on a completely
flat base.
The flatness is measured by placing an aluminum rod or similar object on the surface of
the slab, covering the entire width or length of the slab.
ROD TOLERANCE BASE
22
TECHNICAL MANUAL
Image 9: Set-up for correct measurement of the warp.
MAXIMUM TOLERANCE IN THE SLAB WIDTH: 2 mm
MAXIMUM TOLERANCE IN THE SLAB LENGTH: 4 mm3.1.2 Tone
TheSize is constantly working so the tone of the current batches matches the tone
of previous batches. Despite our efforts, slight variations in tone may occur between
different batches of the same model due to the use of natural raw materials.
Deviations in tone are more noticeable among the various thicknesses of a single model
given the way in which each thickness is produced.
Before cutting, visually inspect the slabs to ensure the tone of the different slabs is
acceptable. Do this inspection under lighting conditions that are similar to what would
be found at the place of installation. We recommend not combining slabs from different
batches.
3.2 Slab identification
Each slab has a label with important information related to each slab. The labels must
be recorded for future reference.
Thickness Tone
Batch Number
Finish
Production plant
Item
23
TECHNICAL MANUAL
Year of manufacture Consecutive number04. MECHANIZATION PARAMETERS 24 TECHNICAL MANUAL
04. MECHANIZATION PARAMETERS
Before producing a 12 mm or 20 mm slab, it is important to remove 2 cm of each side
from the slab:

                                                   1

  3                                                                                            4

                                                                                                   2 cm

                                                   2

Cuts to loosen a 12 mm or 20 mm slab.

When cutting 12 mm or 20 mm slabs with a disc, it is important to reduce the speed to
half at the beginning and end of the cutting process.

        Half speed                        Normal speed                            Half speed

         200 mm                                                                    200 mm
                                                                                                          25
                                                                                                          TECHNICAL MANUAL

These recommendations only apply to 12 mm and 20 mm slabs.
Any other thickness can be cut without having to take these steps into account.
4.1 Parameters for the Ultra-compact Neolith disc
Thickness Straight Cut 45º Angle Ø Disc (mm) RPM Surface Speed
Speed (m/min) Speed (m/min) (m/s)
3+ 3,5 1,7
300 2400 - 2600
6 mm 1,5 0,7
350 2300 - 2500
6+ and 3+3 mm 3,0 1,5
35 – 40
6+3 mm 2,5 1,4
12 mm /12+ 1,5 0,7 400 2000 - 2150
20 mm 1,0 0,5
Table 3: Disc parameters.
26
TECHNICAL MANUAL4.2 Waterjet parameters
Thickness Speed (m/min) Pressure (Bars) Abrasive flow rate (kg/min)
3 mm | 3+ 2
6 and 3+3 mm, 6+ 2
2800 0,4
6+3 mm 2
12 mm 1
20 mm 0.7
Table 4: Waterjet parameters.
The values indicated are suggestions. The cutting speeds and abrasive flow rates can be
adjusted for a cleaner finish.
4.3 Parameters for CNC tools.
Tool RPM Speed (mm/min)
Crown bit 4500 – 5500 10
Cutting bit 12 mm 4500 – 5500 150
20 mm 4500 – 5500 125
Router bit 8000- 10000 250
Table 5: CNC parameters.
27
TECHNICAL MANUAL05. CUTTING RECOMMENDATIONS 28 TECHNICAL MANUAL
05. CUTTING RECOMMENDATIONS

5.1 Bridge disc or similar

Before beginning

Check that the bench is straight, level and free of any debris. Check that there is
enough support for the slab.

While cutting, it’s important to use the maximum water flow to cool the disc. Be
sure the water flow is aimed at the cutting area.

                                                                                      1

                                                          3

                             2

CUTTING SEQUENCE:

Steps:

1. Perimeter cut, minimum 2 cm. (only for 12 mm and 20 mm).

2. Prepare the holes on all inner corners, minimum 3 mm bit diameter.
                                                                                          29
We recommend bits larger than 3mm when the kitchen design allows, as it will make
the countertop firmer.
                                                                                          TECHNICAL MANUAL

3. Prepare the remaining cuts.
RECOMMENDATIONS:
Make sure the disc rotation coincides with the cutting direction.
The cutting disc should be at least 1.5 mm more than the slab thickness to guarantee a
clean cut.
To release stress, the perimeter cut of the slab may be used as a final cut for the part to
be made.
In the exceptional case that the disc is lowered directly onto the slab, do it in automatic
mode at the slowest possible speed.
Periodically check the support plates and don’t use the disc if it does not easily fit into
the support plate.
Cutting 45º angles in Neolith requires a slower cutting speed. It also helps to have
something at the head and tail of the cut to keep the disc aligned.
When using a new disc, do a few cuts so the disc segments can adapt and the diamonds
open.
Use something made of limestone at the head and tail of the cut to enhance the segments
if the segments become blunt faster than normal during straight cuts.
All cutouts must have previously drilled holes:
- A minimum radius of 3 mm.
- Never lower the disc directly on the slab before drilling the corners.
30
TECHNICAL MANUALNo squared inner corner means:
No “L”-shaped countertop with 45º angled edges.
No squared cutout for a sink.
No inner 45º angled edge for the sink.
Absolutely NO 90º CORNER.
The clearest models (Arctic White, Estatuario, Calacatta) are harder for tools given the
specific raw materials used.
TheSize recommends lowering the cutting speeds to 75% for these models to prevent the
disc from overheating.
Bridge disc 31
TECHNICAL MANUAL5.2 Waterjet
Before beginning:
Check that the bench is straight, level and free of any debris. Check that there is enough
support for the slab.
If using the waterjet to remove the 3/4” perimeters from 1/2” and 3/4” slabs, the cut
should begin and go off the slab.
STEPS:
1 Perimeter cut, minimum 2 cm. (only for 12 mm and 20 mm)
2 Cutting.
3 Preparing the cutouts.
All inner corners require a minimum radius of 3 mm.
We recommend radiuses of more than 3 mm when the kitchen design allows as it will
make the countertop firmer.
32
TECHNICAL MANUALRemember that the perimeter cut of the slab to release stress may be used as a final cut
for the part to be made.
Lower pressure is recommended for drilling holes.
To do the cutouts, beginning the cut at an internal point in the cutout and then getting
closer to the cut perimeter is recommended:
To do large cutouts or large parts, you must remember the following cutting sequence:
OK NOT
OK
NO OK
NOT 33
OK OK
TECHNICAL MANUAL
First cutting towards the edge of the slab from the hole or in parallel to the edge of the
slab and following this direction to finish the part is recommended.
Making the first cut towards the center of the slab is not recommended.5.3 Digital control bit
Before beginning:
Check that the bench is straight and level and that the suction cups are free of any
debris. Check that there is enough support for the slab.
Make sure there are suction cups below the entire slab, especially below the part to be
cut.
Use plenty of water to cool the tool during production in the inside and outside of the
tool.
STEPS:
1. Perimeter cut, minimum 2 cm. (only for 12 mm and 20 mm)
2. Drilling with a crown bit.
3. Preparing the cutouts. All inner corners require a minimum bit of 3 mm.
We recommend bits larger than 3 mm when the kitchen design allows, as it will make
the countertop firmer
34
TECHNICAL MANUALFirst drill a hole inside the cutout, using the crown bit. Afterwards, use the router bit to
get closer to the cutting line.
As you get closer to the cutting line, curve a bit; do not use a perpendicular approach as
this could create a notch.
At the end of the cut, reduce the speed to 50% as you complete the cutout.
Tips for digital control bits.
Crown bit:
Drill the slab with the lowest downward speed possible, especially at the end of drilling.
Before completing the drilling, raise the crown a bit to remove the pressure from the
inside of the crown.
Router bit:
Always begin from a hole previously made with a crown bit.
Never lower the router bit directly onto the surface.
The first two times, eliminate only 0.5 mm; then 2 mm per pass.
Removing more than 6 mm on a 12 mm slab or 10 mm on a 20 mm slab is not recommended.
Cutting bit:
Do not use the oscillation option during cutting; this could cause splintering.
The clearest models (Arctic White, Estatuario, Calacatta) are harder for tools given the
specific raw materials used;
TheSize recommends lowering cutting speeds for these models to prevent tool overheating.
35
TECHNICAL MANUAL06. DESIGN AND PRODUCTION OF A NEOLITH
COUNTERTOP
36
TECHNICAL MANUALTheSize Surfaces recommends the following end uses for the various Neolith thicknes-
ses:
Paneling: 3mm, 3+, 6 mm and 6+
Paving: 6 mm, 6+, 12 mm and 20 mm
Countertops: 3+3, 6+3, 6+6, 12 and 20 mm.
6.1 Gaps
The minimum distance between a cutout and the edge of the slab must be at least 5 cm.
TheSize recommends distances greater than 5 cm when the kitchen design allows as it
makes the countertop firmer.
5 cm
5 cm
5 cm 5 cm
IMPORTANT
All cutout corners must have a minimum radius of 3 mm.
Never leave 90º angles.
We recommend radiuses of more than 3 mm when the kitchen design allows as it will
make the countertop firmer.
37
CORRECT
TECHNICAL MANUAL
INCORRECT INCORRECT INCORRECT
The correct way to create a cutout, except with waterjet and digital control bits, is to first
drill the corners and then the rest of the cuts.Guidelines for cutouts:
Two straight cuts must never be joined.
No squared inner corners.
All inner corners must have a minimum radius of 3 mm.
If the countertop design so allows, avoid Neolith countertops with unbalanced weights:
INCORRECT CORRECT
Irregular cuts are also not recommended such as for a “farmhouse sink”; in these cases,
add joints to the countertop design:
38
CORRECT
TECHNICAL MANUALOther types of designs to be avoided:
INCORRECT INCORRECT
Sockets and switches:
Gaps made to insert accessories (sockets, switches, etc.) should be done using circular
drills; they may overlap.
CORRECT
39
TECHNICAL MANUAL6.2 Countertop reinforcement
Countertops with 45º edges:
Reinforcements for 45º edges must be made with Neolith strips or dense granite; be
careful when using other materials for reinforcement. The difference in the thermal
expansion can cause the countertop to curve or the 45º edges may open over time.
NEVER USE QUARTZ REINFORCEMENT.
For countertops with 45º edges, reinforcements must be installed for greater countertop
firmness, especially with 3+3, 6+3 and 6+6 thicknesses. These reinforcements must be
distributed around the perimeter in such way that they find direct support on the sides
of the kitchen furniture.
Moreover, it is important to reinforce the perimeter of the cutouts for greater strength
and firmness in the area:
40
TECHNICAL MANUALCountertops with a straight edge:
For straight edge countertops, where no inner structure can be hidden, a continuous
surface like a wooden plank, Kerdi-Board or similar element should be placed over
kitchen furniture.
3+3, 6+3 and 6+6 Neolith countertops
Besides the aforementioned written recommendations, inserting a reinforcement
piece (wood or similar) in the faucet gaps is recommended to reinforce this area. This
reinforcement will distribute the forces generated during installation and daily use.
NEVER USE QUARTZ REINFORCEMENT.
41
TECHNICAL MANUAL6.3 Draining racks
With a Neolith countertop, the only solution is creating sloped channels and combining them
with an undermount sink.
The grooves can be made in the size and shape that best adapts to the kitchen design.
For example:
Wavy Straight Fanned
The following considerations must be observed when making the channels:
• This part of the countertop will require additional cross-reinforcement.
• The maximum depth of the channels is 3 mm for 12 mm thicknesses and 5 mm
for 20 mm thicknesses.
• Sloped channels are not recommended for 3+3 and 5+3 mm countertops.
• The minimum distance between channels should be 1 cm.
• NANOTOP by LITHOFIN or a similar product should be used to seal the grooves.
Please remember that the base color of the slab will be visible upon creating the grooves and
it may contrast with the surface design in some models. Depending on the model, the grooves
may change color and be void of the design.
Manufacturing
Recess
42 Use a router bit and always begin at the sink gap. Never lower the router bit directly onto the
surface.
TECHNICAL MANUAL
The first two times, eliminate only 0.5 mm; then a maximum of 2 mm per pass.
Finish
Sand the grooves by hand to remove any marks made by the router bit. Use fine sandpaper
until all marks have been removed.
Round the upper edges of the grooves and seal using NANOTOP by LITHOFIN or a similar
product.6.4 Sinks
Flush sinks
TheSize only recommends the installation of flush sinks in 12 mm and 20 mm.
Removing more than 6 mm on a 12 mm slab or 10 mm on a 20 mm slab is not
recommended.
Undermount sinks
To reduce the risk of splintering to a minimum, a round edge with a radius of at least 2
mm is recommended.
For large-size sinks, place a rod support structure under the sink so the weight is on
the rods and not the countertop.
1
43
TECHNICAL MANUAL
2
1.Furniture
2. Support rod6.5 Edges and Joints
Edges
TheSize recommends using the following edge for Neolith countertops.
It is the perfect compromise between esthetics and functionality.
R 0,5 mm
2 mm Bevel
0,5 mm
The edge is formed by a 2 mm bevel and by two rounded edges with a radius of 0.5 mm.
The radius is barely visible but increases the edge impact resistance.
In high impact risk areas (sinks and dishwashers, for example), the edges could be as
follows:
R 2 mm
The greater the radius, the better it will bear any impacts. Remember that the greater the
bevel, the more base color in the slab.
The edges can be wet or dry polished using standard granite or marble discs.
Recommended edges for Neolith:
R 2 mm R 0,5 mm
R 0,5 mm
R 2 mm
44
TECHNICAL MANUAL
Round edge, R 2 mm 45º edge with a bevel, 2 mm Inverted fluted peak
IMPORTANT
Polished edges must be treated with water repellant to permanently seal the edge.
TheSize recommends using NANOTOP by LITHOFIN or a similar product.Joints
Given the texture of Neolith slabs, a micro-bevel for all joints is recommended. Even if
the straight edges are perfect, they may seem “splintered” due to the texture of Neolith
slabs.
Each joint requires additional support (any technique will work).
The oven finish may not be “touched-up”; once the Neolith surface is polished or ground,
there is no way back.
Producing samples so your customer can approve the edges and joints is highly
recommended. (joint with a micro-bevel, 45º edge with a 2 mm bevel or a round 2 mm
edge).
45
TECHNICAL MANUAL6.6 Glass-ceramic / induction stovetops
The minimum distance between the countertop and a stovetop must be 2 mm.
countertop stovetop
2 mm 2 mm
Use the right heat-resistant silicone or the joints supplied by the stovetop manufacturer.
Removing more than 6 mm on a 12 mm slab or 10 mm on a 20 mm slab is not recom-
mended.
6.7 Countertop Installation
Furniture:
Furniture must be in perfect conditions and level before installing the countertop.
Cabinets must be secured to each other and then secured to the wall.
INCORRECT CORRECT
Expansion joints:
Given the irregularities in the wall and possible structural movements in the building,
leaving a 3 mm perimeter expansion joint on the countertop is recommended. The point
where the crown and countertop meet shall be sealed with a line of silicone:
46
TECHNICAL MANUAL
Flexible adhesive should be used such as 100% transparent adhesive to fill these joints
and secure the countertops to the furniture and the floor or to secure the Neolith
crowns to the wall. This will enable adequate thermal expansion.
Using flexible adhesives such as epoxy or liquid nails to secure the countertop is not
recommended.6.8 Overhang
Sizing the parts that will overhang must be taken into consideration during countertop
designing, pursuant to the parameters indicated in the following table:
Thicknesses
12 mm 20 mm
1. Full side overhang
A) Without cut-out
A
A
A≤350 mm A ≤ 500 mm
B) With cut-out
X A X
X X
A
------------- --------------
X≥100 mm X≥100 mm
2. Partial overhang
A) Without cut-out B) With cut-out
X
A≤500 mm A≤1000 mm
X
B≤200 mm B≤400 mm
B B
47
-------------- --------------
TECHNICAL MANUAL
X≥100 mm X≥100mm
A A
Occasional maximum static load = 100kg
It is recommendable to reinforce the X sections with additional reinforcements of expanded polyurethane.More examples of countertops with overhangs
A A
A
A
A
A A
A
6.9 Outdoor countertops
Installing the countertop over a brick/stone or similar base or structure using C2 cement
glue is recommended.
If there is no such structure available, covering the top of the existing structure with
reinforced cement panels is recommended.
When installing outside, avoid the use of wood or agglomerate planks due to their
tendency to expand and contract as the weather changes.
Using flexible adhesives such as epoxy, liquid nails or construction adhesives to secure
a Neolith countertop is not recommended.
To glue the 45º angles, use an adhesive that is suitable for outdoor use and resistant to
UV rays such as Integra Ultra.
48
TECHNICAL MANUAL
1
1 Neolith Slab.
2 C2 cement glue, silicone or polyurethane.
2
3 5 3 Reinforced cement plank such as Kerdi-Board or
similar.
4
4 Brick / stone / concrete base
5 Neolith or dense granite reinforcement
5 mm space minimum6.10 Observations
L-shaped countertops
Dividing L-shaped countertops into several parts is recommended to avoid 90º corners
in one part.
45º 45º
L-shaped countertops made of a single piece without a 45º angle must have a minimum
radius of 2”.
R 20 mm
Make sure the furniture is in perfect conditions and level before installing this type of
countertop.
49
TECHNICAL MANUAL07. EXTREME HEAT 50 TECHNICAL MANUAL
07. EXTREME HEAT

Neolith parameters that are essentially relevant for this use:

  Maximum temperature: 300º C
  Linear thermal expansion: between 5.3º and 6.7º. 10-6 xºC-1

If grills and/or barbecue grills are to be placed in a Neolith countertop, keep the following
in mind:

· Always remember that all material expands when subject to temperature changes (i.e.
the metal structure of a barbecue grill) to prevent stress due to a lack of space for such
expansion.

· Metal materials expand much more than Neolith; therefore, prevent direct contact
by leaving enough space (which will depend on the dimensions of the barbecue grill,
maximum temperature it may reach, etc.).

· Polishing the edges of the cutout is recommended to eliminate any micro-fissures
created when cutting. The more intense this treatment is, the less risk there will be in
the future.

· Inner corners must have minimum radiuses of 10 mm. We recommend diameters of
more than 10 mm or producing the countertop in several parts, when the design so
allows:

                                                                                                51
                                                                                                TECHNICAL MANUAL

 View of the top of the grill/barbecue grill built into a Neolith countertop

· Leaving a minimum space of 5 mm between the grill/barbecue grill and filling with
thermal insulation such as fiberglass thermal insulation tape is recommended.

           Neolith is not recommended for inner paneling for a fireplace.
Possible uses for Neolith with built-in barbecue grills:
back
countertop
front
natural stone
support fur-
niture
Possible uses for Neolith with fireplaces:
Front outer paneling: separated from the heat by an inner refractory wall (fire
resistant).
Side outer paneling: separated from the heat by an inner refractory wall.
Countertop furniture
side front
paneling
fireplace
shell
52
TECHNICAL MANUAL
Neolith is not recommended for inner paneling for a fireplace.Ethanol fireplace design
Front outer paneling: separated from the heat by an inner refractory wall.
Side outer paneling: separated from the heat by an inner refractory wall.
fireplace shell front - side paneling
53
TECHNICAL MANUALTECHNICAL MANUAL
54
08. GLUE08. GLUE
Look at the side of the Neolith slab when preparing the glue color as the color of the surface is not
exactly the same as the color of the slab base; this is important as polishing the edges will expose
the slab base color.
Recommended glue: Integra or similar.
INTEGRA COLOR CATALOG:
Sheet name Integra Match Sheet name Integra Match
Arctic White Perfect - 720-314 Pietra Di Piombo Medium - 720-315
Arena Marfil - 720-310 Pulpis Clay Brown - 720-308
Aspen Grey Quarry - 720-423 Strata Argentum White Linen - 720-427
Avorio Marfil - 720-310 Textil Black Cement - 720-313
Barro Meteor Grey - 720-311 Timber Ash Cement - 720-313
Basalt Beige Barley - 720-307 Timber Ice Perfect - 720-314
Basalt Black Nacreto - 720-312 Timber Night Meteor Grey - 720-311
Basalt Grey Meteor Grey - 720-311 Timber Oak Cement - 720-313
Belgian Blue Nacreto - 720-312 Travertino Classico Marfil - 720-310
Beton Light Grey - 720-310 Travertino Navona Marfil - 720-310
Calacatta Perfect - 720-314 Zaha Stone Dove - 720-422
Cement Cement - 720-313
Concrete Taupe Diana Pearl - 720-424
Estatuario Perfect - 720-314
Iron Copper Nacreto 720-312
Iron Corten Nacreto 720-312
Iron Grey Nacreto 720-312
Iron Moss Nacreto - 720-312
Limestone Lava Cement - 720-313
Marfil Marfil - 720-310 55
Nero Nacreto - 720-312
TECHNICAL MANUAL
Nero Assoluto Nacreto - 720-312
Nero Marquina River Rock - 720-425
Nero Zimbabwe Iron Grey - 720-426
Nieve Perfect - 720-314
Onyx Perfect - 720-314
Phedra Light Grey - 720-309
Pietra Di Luna Silk Grey - 720-316
Pietra Di Osso Barley - 720-307TECHNICAL MANUAL
56
09. TILING AND PAVING
TECHNICAL MANUAL
5609. TILING AND PAVING
9.1 Indoor installation.
Leave a 2-3 mm space between tiles.
Create movement joints every 25 m2 or as dictated by applicable national law.
The adhesive must be applied with a notched trowel using the double-glue technique; in
other words, the adhesive must be applied to the back of the tile and the sublayer.
Neolith must be installed with class C2 adhesive pursuant to standard EN 12004 and
class “highly flexible S2”.
9.2 Outdoor installation.
Create flexible movement joints of around 1 cm wide in the corners. Create movement
joints every 9-12 m2 or as dictated by applicable national law.
The building structural joints must be absolutely respected.
The tiles must be installed with a large joint between them. The width of the joint must
be determined pursuant to the local climate conditions, the size of the tiles and flexibility
of the sublayer.
In warm climates and during poor weather (strong winds, for example), using class E ad-
hesives (with open time) is recommended pursuant to standard EN 12004.
In cold climates and during the winter, it is best to use class F adhesives (quick fixing) as
per EN 12004.
9.3 Tiling over other Tiles.
Check that the old tiling is well-fixed. Otherwise, remove any loose tiles and fill the gaps
57
with mortar that is compatible with the support.
TECHNICAL MANUAL
Wash the old tiling with water and soap to eliminate any grease or dust, rinse well and
let dry.
Apply bonding resin before tiling above the old tiles, following the recommendations for
installation indoors or outdoors.9.4 Manual Cutting
Manual ceramic cutter:
Neolith can be cut without any problems using traditional machines. Thicknesses of 3 and
6 mm can be cut using manual cutters. Cutting with a grinder is recommended for 12 mm.
If the part has reinforcement mesh, the mesh must be cut with a cutter after splitting.
Grinder:
Tiles may be cut with no problems using a diamond disc available from TheSize.
Irregular cut:
Use crown bits, available from TheSize, for round holes. Gaps made to insert accessories
(sockets, switches, etc.) should be done using circular drills; they may overlap.
A radius of at least 3 mm must be left on any inner corner of a gap. Never leave a 90
degree angle.
9.5 Tile Rejointing
Recommended Products:
High-performance, anti-fluorescence, quick fix and dry, water-repellant, anti-mold, class
CG2 as per EN 13888.
High-performance, polymer modified, water-resistant technology for filling joints of up to
6 mm wide, class CG2 as per EN 13888.
Deep clean the surface after re-jointing with the right soap, wash the surface and absorb
any excess water using the right equipment and do any other necessary operations to
complete the work as per the specifications.
For more information, read our “Tiling and Paving Guide”, available in the download area
on our website: www.neolith.com.
58
TECHNICAL MANUALTECHNICAL MANUAL
59
10. REPAIRS
TECHNICAL MANUAL
5910. REPAIRS
10.1 Chip repair
Ceramic surfaces can be damaged for many reasons. Most of the time it is due to a defect
caused by a plate that falls down or a heavy object.
Keep in mind that no repair is perfect; it’s very difficult to duplicate the tone and texture
of a surface with resins.
Step 1:
Mix the bi-component epoxy resin, adding the color to color the epoxy so it matches the
Neolith countertop.
Tip:
Repair all defects at the same time as the bi-component epoxy will cure quickly. And only
mix enough to fill the defects with a little left over: epoxy resin cannot be stored once
mixed.
60 60
TECHNICAL MANUAL
TECHNICAL MANUAL
Step 1Step 2:
Use a Neolith fragment to imitate the surface finish and fill the defect with the mixed
resin.
Step 2
Step 3:
Use an acetone-soaked cloth to add additional texture to the resin to imitate the
adjacent surface even better.
Make sure the level of resin does not exceed the surface.
Clean the excess resin from the surface before it hardens with an acetone-soaked cloth.
Step 4:
Once the resin hardens, remove the excess resin in the edge mechanically. For surface
repairs, it’s best to work manually to prevent damage to the surface.
61
TECHNICAL MANUAL
Step 410.2 Repairing surface scratches in Neolith Polished.
Necessary materials:
- Cerium oxide powder (90% purity, optical quality)
- Rubber gloves
- Smooth cloth
- Water
- Electric drill / Grinder
- Polishing pad (lamb wool, felt or leather pads)
- Spray bottle
- Gggles
Determine the depth of the scratches before polishing the scratches on the surface. If you
can feel the scratches with your fingernail, they’re too deep to be polished with cerium
oxide. You must first sand the entire surface.
Only then can you polish the surface with cerium oxide.
Instructions:
1. Mix a little cerium oxide with the water to form a fine paste (creamy consistency) -
mixing in a small bowl is recommended so the paste can be applied easily to the polishing
pad.
2. Deep clean the surface to eliminate all dirt and grease residue.
3. Apply the polishing paste to the pad.
4. Place the pad on the drill and work the area.
5. Move the pad up and down, left and right in the area.
6. Keep the surface damp to prevent overheating - if there’s enough paste, just spray a
little water on to keep the area damp.
7. Clean any residue and inspect the repair - keep working until you get a satisfactory
result.
8. Clean the pad for later use.
62
TECHNICAL MANUALTECHNICAL MANUAL
63
11. TOOLS
TECHNICAL MANUAL
6311. TOOLS
DISCS
Dented disc for porcelain
Ø 300 Ref. 411-053
Ø 350 Ref. 411-055
Ø 400 Ref. 411-056
SILICON CARBIDE DISC
A flexible silicon carbide disc with Velcro for dry work. 60, 120, 220, 400 Grain
Ø 125 Ø 180
60: 720-041 60: 720-018
120: 720-042 120: 720-019
220: 720-043 220: 720-020
400: 720-044 320: 720-021
400: 720-023
600: 720-022
800: 720-183
SMOOTHING PLATE WITH ELECTRO-DEPOSITED DIAMOND
To refine and smooth edges
Fine grain G40, Ref.720-008
Thick grain G100, Ref. 720-009
64 64
FELT DISC
TECHNICAL MANUAL
TECHNICAL MANUAL
Ø 125 Ref. 720-181
Ø 180 Ref. 720-064SMOOTHING CUP
Preliminary edge beveling and polishing
medium, 60 grain: Ref. 720-061
SILICON CARBIDE DISCS
Discs for wet work
Ø 100
30: 720-291
100: 720-292
200: 720-293
400: 720-294
800: 720-295
1500: 720-296
3000:720-297
20-35 MM CROWN BITS
Electro-deposited diamond bits
Ø 35: 411-018
65
ROUTER BIT
TECHNICAL MANUAL
Ref. 720-1076-12 MM BITS
Electro-deposited diamond bit. Use a drill without the hammer action. Use
water to cool.
Ø 6 Ref. 853-099
Ø 8 Ref. 853-098
Ø 10 Ref. 853-097
CROWN BIT (CNC)
Ref. 720-165
10 CM DIAMOND DISC
Dented disc for porcelain. Recommended speed 11.00 R.P.M.
Ref. 411-051
66
ROUTER BIT
TECHNICAL MANUAL
Ref. 720-210NEOLITH COLORED FILLER
Check availability and references.
ULTRA-COMPACT DISC
Segmented disc for porcelain
Ø 300 Ref. 411-066
Ø 350 Ref. 411-067
Ø 400 Ref. 411-068
67
TECHNICAL MANUALMANUAL TILE CUTTER
Sales Contact:
Brevetti Montolit SpA
Reference: 300-70 (SUPERSTICK)
Company headquarters: Machinery: Manual tile cutter.
Largo Cav. Montoli – 21050 Cantello (VA) Italy Features, Diameters, Observations:
Via Varese, 4/A – 21050 Cantello (VA) Italy
• A complete system for cutting porcelain
Legal head office: stoneware tiles and slabs from 0 to 340
Via Turconi, 25 – 21050 Cantello (VA) Italy (o” to 134”) cm
Tel. +1 604 353 99 64 • Non-slip system;
Tel. +39 0332 419 206 • Quick connection;
Tel. +39 0332 419 230 • Integrated lubrication;
e-mail: export@montolit.com • Quick cutting wheel change;
web: www.montolit.com • International patent;
• 100% MADE IN ITALY
68
TECHNICAL MANUALELECTRICAL TILE CUTTER
Sales Contact:
Brevetti Montolit SpA Reference: MOTO-300-FL (MOTO-FLASH-LINE)
Machinery: Electrical Tile Cutter
Company headquarters: Features, Diameters, Observations:
Largo Cav. Montoli – 21050 Cantello (VA) Italy
Via Varese, 4/A – 21050 Cantello (VA) Italy • Motorized dry cutting system for slabs and
porcelain tiles, granite marble from 0 to 340
Legal head office: cm (134”).
Via Turconi, 25 – 21050 Cantello (VA) Italy
Tel. +1 604 353 99 64 • This is the motor-powered evolution of the
Tel. +39 0332 419 206 Flash Line manual cutting system. With this
Tel. +39 0332 419 230 system you can cut porcelain tile and slabs
e-mail: export@montolit.com up to 20mm (approximately ¾ inch) thick.
web: www.montolit.com The machine itself has all the advantages of
manual flash line (easy to transport, light,
precision, patented locking system without
the use of suction cups), with the addition
of a motorized head with a professional
diamond blade for ceramic and porcelain
tile. In short, it is a system for dry cutting
porcelain slabs up to 20 mm (approximately
3/4 inch) thick.
69
TECHNICAL MANUALHANDLING SYSTEM FOR LARGE FORMAT TILES
Sales Contact:
Brevetti Montolit SpA Reference: 300-70 (SUPERSTICK)
Machinery: Handling System for Large Format
Company headquarters: Tiles.
Largo Cav. Montoli – 21050 Cantello (VA) Italy Features, Diameters, Observations:
Via Varese, 4/A – 21050 Cantello (VA) Italy
• It is designed to handle and position next-
Legal head office: generation large format (320x160 cm)
Via Turconi, 25 – 21050 Cantello (VA) Italy (128”x64”) porcelain stoneware slabs.
Tel. +1 604 353 99 64
Tel. +39 0332 419 206 • The overall dimensions of the complete
Tel. +39 0332 419 230 frame are also specifically designed so the
e-mail: export@montolit.com tile slabs can be removed from the special
web: www.montolit.com packaging they come in.
• The telescopic handles provide for a more
ergonomic grip.
• The ‘Superstick’ carrying frame allows the
tile slabs to move in both horizontal and
vertical directions and is equipped with
telescopic legs for support on the ground so
the tile remains in the frame without being
damaged.
• The special suction cups are equipped with
a vacuum safety gauge to indicate the force
of adhesion to the tile slab.
• Made of galvanized steel to resist wear and
corrosion.
• Max. load 80 Kg (160 pounds)
70
TECHNICAL MANUALPLASTIC CORNER PROTECTOR FOR SINTERED STONE SLABS
Sales Contact:
Brevetti Montolit SpA Reference: 300-95-04 (3/4mm)
300-95-06 (5/6mm)
Company headquarters: 300-95-10 (8/10mm)
Largo Cav. Montoli – 21050 Cantello (VA) Italy 300-95-12 (11/12mm)
Via Varese, 4/A – 21050 Cantello (VA) Italy
Machinery: Plastic corner protector for Sintered
Legal head office: Stone slabs
Via Turconi, 25 – 21050 Cantello (VA) Italy Features, Diameters, Observations:
Tel. +1 604 353 99 64 • A set of large plastic tiles for Sintered Stone
Tel. +39 0332 419 206 slabs and ceramic tiles.
Tel. +39 0332 419 230 • A patented system that absorbs shocks
e-mail: export@montolit.com which could damage or chip the material.
web: www.montolit.com • Made of plastic material that can be re-used
again and again.
71
TECHNICAL MANUALBOGIE FOR LARGE TILES
Reference: 300-85 (GOAL)
Machinery: Bogie for Large Tiles.
Features, Diameters, Observations:
• The ideal solution for moving large slabs
of porcelain stoneware in warehouses or at
installation sites.
Sales Contact:
Brevetti Montolit SpA • Easily folds to use less space during trans-
port and storage.
Company headquarters:
Largo Cav. Montoli – 21050 Cantello (VA) Italy • The 4 soft rubber castors on each corner
Via Varese, 4/A – 21050 Cantello (VA) Italy offer superb movement and direction con-
trol as well as extreme stability.
Legal head office:
Via Turconi, 25 – 21050 Cantello (VA) Italy • Two of the wheels have brakes which can
Tel. +1 604 353 99 64 be locked to keep the carriage in the desired
Tel. +39 0332 419 206 position.
Tel. +39 0332 419 230
e-mail: export@montolit.com • Slabs up to a maximum weight of 150 kg
web: www.montolit.com (300 pounds) can be carried completely
safely and materials such as wood and foam
can be secured to avoid chipping and slip-
ping in areas of contact with the cart.
• Two hooks in the upper part of the cart
support the Superstick frame to more easily
coat tiles with adhesive glue and create mo-
vement continuity between the plate lifting
phase and installation.
72
TECHNICAL MANUALDIAMOND BLADE
Sales Contact:
Brevetti Montolit SpA
Company headquarters: Reference: CGX115 (4.5”) (FRECCIA ORO)
Largo Cav. Montoli – 21050 Cantello (VA) Italy
Via Varese, 4/A – 21050 Cantello (VA) Italy Machinery: Diamond blade
Features, Diameters, Observations:
Legal head office:
Via Turconi, 25 – 21050 Cantello (VA) Italy • Use: dry and wet
Tel. +1 604 353 99 64 • Height band diamond: 11 mm
Tel. +39 0332 419 206 • Material: porcelain stoneware, hard stone
Tel. +39 0332 419 230 • Application: laying tiles
e-mail: export@montolit.com • Performance
web: www.montolit.com • Speed: Very high
• Finish: Very high
• Life span: Very high
• Use: angle/flexible grinder
• Renewable blades with abrasive stone
art. 395B.
73
TECHNICAL MANUALDIAMOND CORE-BITS FOR DRY DRILLING
Sales Contact:
Brevetti Montolit SpA
Company headquarters: Reference: FS (MONDRILLO)
Largo Cav. Montoli – 21050 Cantello (VA) Italy
Via Varese, 4/A – 21050 Cantello (VA) Italy Machinery: Diamond Core-Bits for dry drilling
Features, Diameters, Observations:
Legal head office:
Via Turconi, 25 – 21050 Cantello (VA) Italy • Use: dry and wet
Tel. +1 604 353 99 64 • Diameter: 6-8-10-12-14-16-18-20-25-27-
Tel. +39 0332 419 206 30-35-40-45-50-55-60-65-68-70-75-100-
Tel. +39 0332 419 230 120 mm (1/4”, 5/16”, 3/8”, ½”, 9/16”, 5/8”,
e-mail: export@montolit.com 11/16”, ¾”, 1”, 1-1/16”, 1-3/16”, 1-3/8”,
web: www.montolit.com 1-1/2”, 1-3/4”, 2”, 2-3/16”, 2-3/8”,2-1/2”,
2-11/16”, 2-3/4”, 3”, 4”, 4-3/4”)
• Material: For all types of ceramics, gres
porcelain, terracotta tiles, granite and
marble.
• Application: For furniture and bathroom
fittings and electric and plumbing systems.
• Perfect for drilling: porcelain stoneware,
hard ceramic, granite, marble
• Speed: Very High
• Finish: Good
• Lifespan: Good
• Use: Flexible angle grinder.
74
TECHNICAL MANUALDIAMOND CORE-BITS FOR DRY DRILLING
Sales Contact:
Brevetti Montolit SpA
Company headquarters: Reference: FAJ (MONDRILLO JR)
Largo Cav. Montoli – 21050 Cantello (VA) Italy
Via Varese, 4/A – 21050 Cantello (VA) Italy Machinery: Diamond Core-Bits for dry drilling
Features, Diameters, Observations:
Legal head office:
Via Turconi, 25 – 21050 Cantello (VA) Italy • Use: dry and wet
Tel. +1 604 353 99 64 • Diameter: 5-6-8-10-12 mm (3/16”, ¼”,
Tel. +39 0332 419 206 5/16”, 3/8”, ½”)
Tel. +39 0332 419 230 • Material: All types of ceramics, gres porce-
e-mail: export@montolit.com lain, terracotta tiles, granite, marble, glass.
web: www.montolit.com • Application: For furniture and bathroom
fittings, electric and plumbing systems.
• Speed: High
• Finish: Good
• Lifespan: Good
• Use: Universal drill and cordless drill
(recommended minimum rpm 800).
75
TECHNICAL MANUALCOOLING FLUID
Sales Contact:
Brevetti Montolit SpA
Company headquarters: Reference: M-Performer
Largo Cav. Montoli – 21050 Cantello (VA) Italy
Via Varese, 4/A – 21050 Cantello (VA) Italy Machinery: Cooling fluid
Features, Diameters, Observations:
Legal head office:
Via Turconi, 25 – 21050 Cantello (VA) Italy • Cooling fluid for optimal performance of
Tel. +1 604 353 99 64 diamond core bits (diameters up to 12 mm)
Tel. +39 0332 419 206 (1/2”). When drilling, switch the machine off
Tel. +39 0332 419 230 and sink the drill bits into fluid for a couple
e-mail: export@montolit.com of seconds.
web: www.montolit.com
76
TECHNICAL MANUALDIAMOND HAND PADS
Sales Contact:
Brevetti Montolit SpA
Company headquarters: Reference: DT262
Largo Cav. Montoli – 21050 Cantello (VA) Italy
Via Varese, 4/A – 21050 Cantello (VA) Italy Machinery: Diamond hand pads
Features, Diameters, Observations:
Legal head office:
Via Turconi, 25 – 21050 Cantello (VA) Italy • Main purpose: Ideal for smoothing and
Tel. +1 604 353 99 64 finishing ceramic, glass and porcelain tile
Tel. +39 0332 419 206 corners and edges and marble and granite
Tel. +39 0332 419 230 coverings. Excellent for smoothing and
e-mail: export@montolit.com rounding sharp edges were tiles are cut to
web: www.montolit.com increase their mechanical strength.
• Instructions for use: Rub the pad on the sur-
face to be treated, using the entire diamond
surface so as to maximize service life.
• Characteristics: Made using a special dia-
mond deposition technology, the pads come
in two different diamond grain sizes to suit
the material to be worked: – medium (art.
DT060), in blue, for hard tile, porcelain tile,
klinker and granite – fine (art. DT200), in
red, for single-fired tiles, double-fired tiles,
terracotta, marble and glass.
77
TECHNICAL MANUALGRESCUT
®
Type Diameter Segment thickness Segment height Bore Steel Core
Grescut 360 3 10 60/50 NRM/SIL
Porcelain Tile Thickness RPM FOR Ø360 Feed speed ML/min
3 mm/3+ 2150 - 2500 1,5 - 1,8
6 mm/6+ 2150 - 2500 1,2 - 1,5
12 mm/12+ 2150 - 2500 1,0 - 1,2
20 mm 2150 - 2500 0,8 - 1,0
Our suggestions:
- While entering and exiting the cut, reduce the speed feed by 40 - 50%
- While cutting at 45º, reduce the speed feed by 40%
78
TECHNICAL MANUAL12. CLEANING PRODUCTS
79
TECHNICAL MANUALACRYCLEAN
An absolutely pure solvent to clean different surfa-
ces without leaving any residue.
Field of application:
• to clean and degrease before gluing and coating
• removes grease, oil and silicone residue, wax, tea
incrustations, tree resin remains, sealants and glue
• removes stickers, laminas and adhesive tape
• to smooth and remove sealant
Container Units Ref. number
500ml sprayer 12 Neolith - 720-511 | AKEMI - 87603
1l bottle 12 AKEMI - 87600
ANTI-MOSS AND ALGAE POWER
Fast-action and highly-effective, low-alkaline and
solvent-free cleaning product.
Field of application:
Immediately removes deep incrustations and natural
decoloring caused by flowers, leaves, bird excrements
and other stubborn soiling.
80
TECHNICAL MANUAL
Container Units Ref. number
500ml sprayer 12 Neolith - 720-508 | AKEMI - 10825
1l bottle 6 AKEMI - 10832
5l jug 2 AKEMI - 10833EPOXY REMOVAL
A highly effective solvent-based cleaning product that
is free of acids, bleach and chlorinated hydrocarbons.
No penetrating odor.
Field of application:
To remove mortar remains from epoxy resin-based
joints, resin residue, sealant, adhesive remains and
similar soiling from indoor and outdoor Sintered
Stone.
Due to the liquid and gel-like consistency, it works
quite well on vertical surfaces.
Container Units Ref. number
1l bottle 6 Neolith - 720-506 | AKEMI - 11983
GRAFFITI CLEANING
A very effective, gel-like blend of solvents.
Field of application:
Removes graffiti paint and drawings made with
markers from unprotected, solvent-resistant surfaces.
81
TECHNICAL MANUAL
Container Units Ref. number
1l bottle 6 AKEMI - 10880DEOXYGENATION
A concentrated, acidic cleaning product that is free
of hydrochloric acid and is biodegradable.
Field of application:
To effortlessly remove oxide stains from Sintered
Stone acid-resistant surfaces.
Container Units Ref. number
1l bottle 6 AKEMI - 10814
5l jug 2 AKEMI - 10815
1l can (paste) 6 AKEMI - 10824
ELIMINATES URINE AND LIME INCRUSTATIONS
An inorganic acid-based cleaning product (hydrochloric
acid-free) with biodegradable surfactants. pH < 1.
Field of application:
Removes stubborn urine and lime incrustations,
soap remains and similar soiling from acid-resistant
surfaces. The product is suitable for effectively and
completely cleaning floors, walls and other sanitation
82 surfaces such as faucets, toilets, wall urinals and
bidets.
TECHNICAL MANUAL
Container Units Ref. number
750ml sprayer (ready for use) 12 AKEMI - 11979
1l bottle 6 AKEMI - 11982
5l jug 2 AKEMI - 11980SOLVENT
A product made of highly-effective solvents,
surfactants and emulsifiers that is free of chlorinated
hydrocarbons and is biodegradable.
Field of application:
To effortlessly remove tar and polish. It even dissolves
layers of wax that are very difficult to remove as well
as polish from Sintered Stone.
Container Units Ref. number
1l bottle 6 AKEMI - 10816
BASIC CLEANING
A highly-concentrated low-alkaline cleaning product
that is free of phosphates and bleach and which is
biodegradable, inoffensive to human health in the
food sector (confirmed by an external German testing
institute).
Field of application:
For deep cleaning, to remove soiling from construction
work, the wax and protective layers of the stone, 83
cement stains, oil and grease, soot and tar, acrylic
paint remains as well as plaster from Sintered Stone.
TECHNICAL MANUAL
Container Units Ref. number
250ml bottle (ready for use) 20 Neolith - 720-512 | AKEMI - 10808
1l bottle 6 AKEMI - 10812
5l jug 2 AKEMI - 10813Products for countertops, sinks and shower trays
TECHNO CERAMIC INTENSIVE CLEANER
A ready-to-use cleaning product to remove heavy
soiling and/or incrustations on Sintered Stone
surfaces. This product can also be used to clean
kitchen sinks. Can be supplied in a practical sprayer.
Field of application:
Intensive cleaning of food remains, light oil and
grease stains and fine layers of treatment products,
rubber and protective products.
1. Evenly apply to the surface to be treated.
2. Spread with a damp cloth or sponge and leave
for only a little bit of time. Do not let it dry!
3. Then, clean the dirt with a damp cloth and rinse
with water. Rube with a clean, hair-free cloth
until there are no stripes or streaks.
Container Units Ref. number
500ml sprayer 12 Neolith - 720-510 | AKEMI - 12026
84
TECHNICAL MANUALTECHNO CERAMIC DAILY CLEANER
A ready-to-use spray cleaning product, which is
free of surfactant-based acids and bleach, auxiliary
substances, aromas and alcohol and free of substances
containing phosphates, which is biodegradable,
inoffensive to human health in the food sector
(confirmed by an external German testing institute).
Field of application:
For daily cleaning of light soiling (i.e. fine layers of
oil and grease, dried beverages) on high-tech large-
size ceramic surfaces, especially from countertops,
display counters and sinks.
Also removes light lime stains. For this reason, it’s
also excellent for cleaning ceramic shower trays and
faucets. The quick-dry formula ensures a streak-free
surface.
1. Shake before using, then open the valve.
2. Evenly apply to the surface to be treated.
3. Clean the surface with a clean, dry cloth.
Container Units Ref. number
500ml sprayer 12 AKEMI - 12027
TECHNO CERAMIC SET (transparent plastic box)
85
Content:
500ml Intensive Cleaner
TECHNICAL MANUAL
500ml Daily Cleaner
1 microfiber cloth
Field of application:
For daily, intensive cleaning of high-tech large-size
ceramic surfaces.
Container Units Ref. number
Set in a plastic box 6 AKEMI - 12025You can also read