The Actiheart Guide to Getting Started - Covering Actiheart & Actiheart Software - CamNtech
←
→
Page content transcription
If your browser does not render page correctly, please read the page content below

The Actiheart
                         Guide to Getting Started
                         Covering Actiheart & Actiheart Software

                          Document Reference:           30209
                          Issue Version:                5.1.11a
                          Issue Date:                   29/01/2021

                         This equipment must be configured and operated
                         in accordance with these instructions and in
                         conjunction with: ‘The Actiheart 5 User Manual’

Actiheart Guide to Getting Started 5.1.11a (Jan 2021)                      1
Regulatory Information
European Union
                       The Actiheart is NOT a Medical Device and is intended for the measurement of
                       Energy Expenditure only. The Actiheart may be used for applications relating to
                       Energy Expenditure and research related to HRV and is NOT indicated for use in
                       clinical applications. Please contact CamNtech UK for advice on application if
                       further clarification is required.
                       The CE mark is applied to the Actiheart to indicate conformity with the following
                       Directives:

                          Electromagnetic Compatibility Directive 2014/30/EU.
                          RoHS2 Directive 2011/65/EU.
                          WEEE Directive 2012/19/EU.

Manufacturer:
                       For assistance with set-up, use or maintenance of the Actiheart or to report any
                       unexpected operation or events, please contact CamNtech using the details
                       below or contact your local representative.

                       CamNtech Ltd
                       Manor Farm                                               Tel: 01480 831223
                       Fenstanton                                               Fax: 01480 831733
                       Cambridgeshire                             Email: technical@camntech.co.uk
                       PE28 9JD, UK                                      Web: www.camntech.com

US FDA status

                       The Actiheart is FDA cleared for prescription use only with FDA 510(k) number
                       K052489. USA designated agent:

                       CamNtech Inc.
                       630 Boerne Stage Airfield,
                       Boerne,                                            Phone: +1 830-755-8036
                       Texas 78006,                                           Fax: +1 830-755-8085
                       USA                                           Email: inquiry@camntech.com

Actiheart Guide to Getting Started 5.1.11a (Jan 2021)                                                  2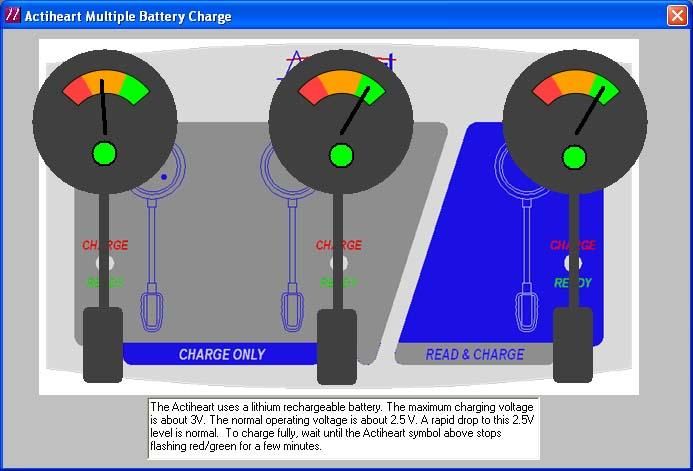
IMPORTANT SAFETY INFORMATION
WARNINGS
                • Contains Lithium Battery – DO NOT ATTEMPT TO DISSASEMBLE: No user serviceable parts,
                  danger of chemical hazard if battery is damaged.
                • Not Defibrillation proof.
                • Not indicated for use on areas of broken, damaged or irritated skin.
                • Remove ECG pads from skin if there is significant discomfort from skin irritation or reaction.
                • Devices removed from subjects must be considered to be contaminated – see Appendix 1.

Safety Classification
Information:
                • The Actiheart is INTERNALLY POWERED EQUIPMENT.
                • The Actiheart mode of operation is CONTINUOUS OPERATION.

Device and Packaging Symbols and Markings:

          MEANING                   SYMBOL                                 DESCRIPTION

             General Warning                      Potential hazard -refer to the warnings in the instructions
                                                  for use (i.e. this user guide).

 Consult Instructions for Use                     This symbol indicates that important operational
                                                  information is contained in the user instructions (i.e. this
                                                  user guide).

                                                  The Actiheart is suitable for temporary immersion in water
   Ingress Protection Rating        IPX7          (up to 30 minutes at 1m).

               Serial Number                      This number provides a unique identification for a particular
                                                  device. Always quote this number when seeking technical
                                                  assistance.

           Catalogue Number                       This number identifies this particular variant of the product
                                                  range.

    Manufacturer and Date of                      This symbol is accompanied by a date in the format yyyy-
               Manufacture                        mm which indicates when the device was manufactured.
                                                  The symbol is also accompanied by the address and
                                                  contact details of the manufacturer

             Electrical Safety                    The Actiheart is a TYPE B APPLIED PART.
                Classification

 FOR FURTHER HANDLING & ENVIRONMENTAL INFORMATION PLEASE REFER TO APPENDIX 1

Actiheart Guide to Getting Started 5.1.11a (Jan 2021)                                                              3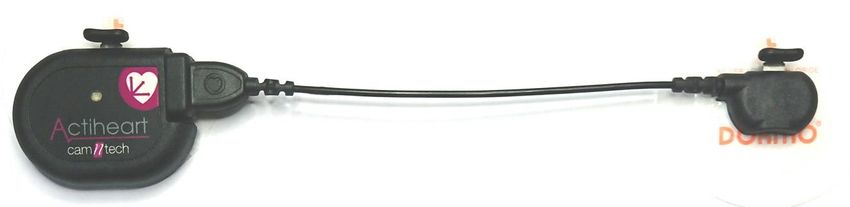
Contents

Regulatory Information ................................................................................................................................... 2
   European Union .................................................................................................................................................................. 2
   Manufacturer: ...................................................................................................................................................................... 2
IMPORTANT SAFETY INFORMATION ............................................................................................................ 3
   WARNINGS......................................................................................................................................................................... 3
   Safety Classification Information: ........................................................................................................................................ 3
   Device and Packaging Symbols and Markings: .................................................................................................................. 3
1. Introduction to the Actiheart System ......................................................................................................... 6
   1.1 Overview ....................................................................................................................................................................... 6
   1.2 Contraindications .......................................................................................................................................................... 6
   1.3 Required Skills, Training & Knowledge of Intended Users. .......................................................................................... 6
   1.4 General Description of Use ........................................................................................................................................... 6
2. Installing the Actiheart Software ................................................................................................................ 7
   2.1 System Requirements ................................................................................................................................................... 7
   2.2 Software Installation Menu ............................................................................................................................................ 7
   2.4 Installing the USB Drivers ............................................................................................................................................. 8
   2.5 Users upgrading from an earlier version of Actiheart Software .................................................................................... 8
   2.7 Using the Software for the first time .............................................................................................................................. 8
3.0 Charging the Actiheart ............................................................................................................................ 10
   3.1 Charging Actiheart 4 from the PC ............................................................................................................................... 10
   3.3 Charging the Actiheart using the Mains Power Supply ............................................................................................... 11
4.0 Setting up a Database ............................................................................................................................. 12
5.0 Preparing for a Recording....................................................................................................................... 13
   5.1 Selection of appropriate ECG Pads and Preparation of the Skin ............................................................................... 13
   5.2 Skin Preparation .......................................................................................................................................................... 13
   5.3 Multi-Day Wear of ECG Pads ..................................................................................................................................... 14
   5.3 Electrode Positioning .................................................................................................................................................. 14
   5.4 Positioning of the Actiheart ......................................................................................................................................... 15
   5.5 Use of the Actiheart in Water ...................................................................................................................................... 16
6.0 Setting up a User in the Database .......................................................................................................... 17
   6.1 Selecting an existing User from the Database ............................................................................................................ 17
   6.2 Setting up a new User ................................................................................................................................................. 18
7.0 Checking Signal Integrity and Performing a Test Recording ............................................................... 20
   7.1 How to set up a Signal Test ........................................................................................................................................ 20
   7.2 Downloading Recorded Data from the Actiheart......................................................................................................... 21
   7.3 Storing Comments with the Data ................................................................................................................................ 22
   7.5 Analysing the Signal Quality ....................................................................................................................................... 22
8.0 Viewing Live Actiheart 5 Data ................................................................................................................. 24
   8.1 Set up for Live Display ................................................................................................................................................ 24
   8.2 Pairing (for first use) .................................................................................................................................................... 25
   8.3 Live Display on the PC ................................................................................................................................................ 25
   8.4 Capabilities & Requirements ....................................................................................................................................... 26
9.0 Summary of Recording, Reading and Analysis Options ...................................................................... 27
   9.1 Actiheart 5 Recording Modes ...................................................................................................................................... 27
   9.2 Other Device Recording Modes .................................................................................................................................. 27
   9.3 Setup and Analysis Functions Summary .................................................................................................................... 28
Appendix 1 - Handling & Environmental Information ................................................................................. 30
   A1.1 Decontamination ....................................................................................................................................................... 30
   A1.2 Battery Care .............................................................................................................................................................. 30
   A1.3 Disposal .................................................................................................................................................................... 30
   A1.4 EMC Guidance & Declaration ................................................................................................................................... 31
Appendix 2 – Troubleshooting ..................................................................................................................... 32

Actiheart Guide to Getting Started 5.1.11a (Jan 2021)                                                                                                                          4
IMPORTANT BATTERY CARE INFORMATION!

The Actiheart device contains a miniature rechargeable battery which must be cared for correctly to
maximise service life. Following any long recording, always ensure the battery is at least partly re-charged -
do not leave it completely flat before storage. However, it need not be completely recharged. If the device is
to be stored for an extended period then it should ideally be part-charged rather than left either completely
full or empty.

Actiheart Guide to Getting Started 5.1.11a (Jan 2021)                                                      5

1. Introduction to the Actiheart System
1.1 Overview
                       The Actiheart 5 and is a compact lightweight device that records the
                       electrocardiogram (ECG) between two ECG pads on the chest, simultaneously
                       with three-axis acceleration waveforms within the same unit.

                       Alternatively, the Actiheart 5 can record ECG peak information for continuous
                       Inter-Beat-Interval (IBI) monitoring for up to two weeks, in addition to three-axis
                       acceleration waveforms.

                       This allows detailed study of movement patterns on both a short and long term
                       basis, in addition to heart rate variability and energy expenditure in everyday
                       daily living and more intense sessions of exercise.

                       An Actiheart system consists of two components:

                       •   The Actiheart device with detachable electrode connection
                       •   Actiheart Analysis Software

                       Additionally, a standard micro-USB lead is used to connect the Actiheart to a PC
                       for setup, download & charging of the device.

1.2
Contraindications
                       The Actiheart is indicated for use on healthy, undamaged areas of skin. Where
                       the subject has a history of skin irritation, a sample ECG electrode should be
                       tested for skin irritation prior to commencing any recording.

1.3 Required
Skills, Training &
Knowledge of
Intended Users.
                       It is intended that the device be administered only by duly qualified health care
                       professionals, researchers and or trained nursing staff.

1.4 General
Description of Use
                       The Actiheart is intended for the monitoring of physical movement and activities,
                       measurement of Energy Expenditure and analysis of HRV in research
                       applications.

                       The Actiheart is typically worn by the subject during their normal daily activities
                       over a period of up to one week thus providing a benefit over lab based ECG
                       tests which only provide a short ‘snapshot’ of heart activity.

                       The Actiheart has an LED indicator on the front which flashes to indicate ongoing
                       recording.

Actiheart Guide to Getting Started 5.1.11a (Jan 2021)                                                        6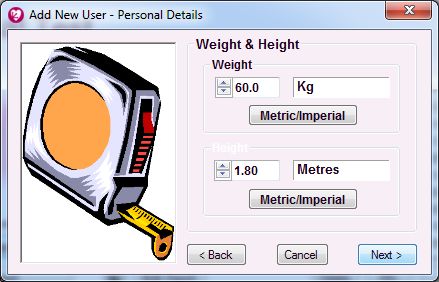
2. Installing the Actiheart Software

2.1 System
Requirements
                       The Actiheart system is supplied with a CD-ROM containing all of the
                       components of the software package ordered. The following are the minimum
                       requirements of a host PC for installing the Actiheart software:

                          •   Windows 8 or 10 operating system
                          •   1 GB hard disk space
                          •   USB port
                          •   A CD-ROM drive or equivalent
                          •   Printer (if hard copy output is required)

                       In addition, if you wish to use the optional Live Display feature with an ‘Actiheart
                       5 BT’ which has the Bluetooth module fitted, your PC must also meet these
                       requirements:

                          •   Windows 10
                          •   Bluetooth capable hardware

2.2 Software
Installation Menu
                       Place the CD-ROM into the drive; the operating system should automatically
                       offer to install the Actiheart 5 software. You will then see the installation wizard
                       below:

                       To install the software, click “Next” and follow the installation process prompts. If
                       you are using a 32 bit version of Windows, you must install the 32 bit software
                       instead, but we strongly recommend that you use a 64 bit machine instead with
                       the appropriate software. The software may be limited in its ability to open large

Actiheart Guide to Getting Started 5.1.11a (Jan 2021)                                                         7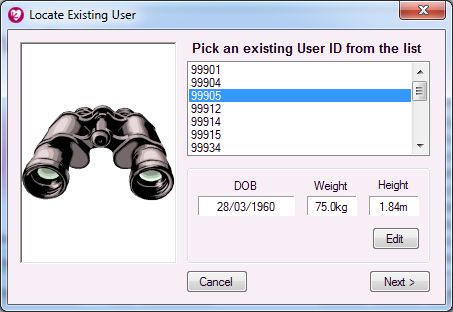
recordings due to technical issues in the .NET 32 bit environment, which occur
                       well before physical memory becomes a limitation.

                       If the above installer is not displayed, browse the CD and double-click the file
                       named “Actiheart_5_Setup” or similar.

2.4 Installing the
USB Drivers
                       Plug the Actiheart into a USB Port using the supplied micro-USB lead.
                       Depending upon the operating system in use and the current driver status, the
                       computer will display a message saying ‘Found New Hardware’ and will then
                       load the drivers with no user intervention. This requires the computer to have a
                       working internet connection, and for Windows to be configured to allow driver
                       download from Windows Update.

                       If any problems are encountered, please see the web page below for latest
                       guidance:

                       https://www.camntech.com/support/drivers

2.5 Users upgrading
from an earlier
version of Actiheart
Software
                       The Actiheart 4 software may be installed and used alongside the Actiheart 5
                       software. The use of Actiheart 4 devices is fully supported in the newer version,
                       and we would recommend upgrading to it whenever possible. It also better
                       supports installation for non-admin users than the older software. However, we
                       would not recommend switching software version in the middle of a data
                       collection process without careful testing.

                       For installation of device drivers for Actiheart 4 and Actiwave Cardio docks, we
                       recommend in the first instance allowing Windows to download drivers
                       automatically from the internet. In case of problems, check the link above to the
                       CamNtech website for the latest advice. Only in the case of docks several years
                       old will any other procedure be required – in this case please contact technical
                       support.

2.7 Using the
Software for the
first time
                       Double clicking on the Actiheart icon on the desktop will produce the following
                       screen asking the user to input a serial number for the software:

Actiheart Guide to Getting Started 5.1.11a (Jan 2021)                                                     8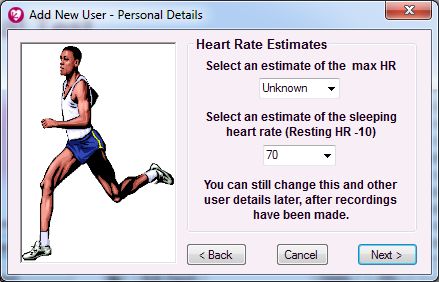
When you register your Actiheart system with CamNtech, you will be supplied
                       with an 8 digit serial number along with the software. This serial number is
                       unique to the user and will enable the user to obtain software support from
                       CamNtech. Once this is done, the software is ready to use.

Actiheart Guide to Getting Started 5.1.11a (Jan 2021)                                           9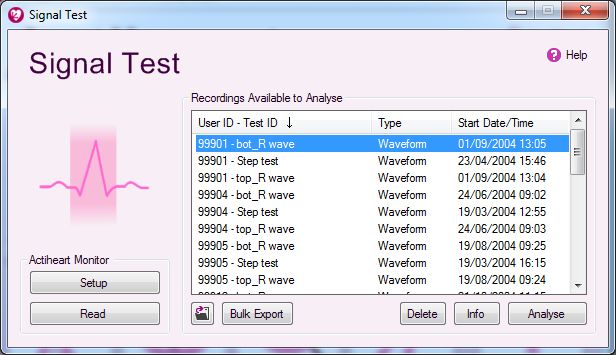
3.0 Charging the Actiheart
                       Before the Actiheart can be used, the user must ensure that it is charged. This is
                       performed simply by plugging the device into an available USB port of a PC
                       which is running, or by connecting it to a mains powered USB supply such as a
                       phone or tablet charger.

                       It is also possible to check the current battery level by beginning any setup
                       process and connecting the Actiheart. A small graphic will indicate battery level
                       and a specific warning will be given if the charge is considered low for the mode
                       chosen. Care should still be taken to charge fully for any particularly long
                       recording, but the automatic check will be sufficient for short ones.

                       Furthermore, full battery charge information can be checked using the Utilities ->
                       Actiheart 5 -> Test Window function and then the “Battery” button. If charged, this
                       will show a result similar to:

                       If you experiencing any battery charge issues, leave the Actiheart connected to a
                       mains powered USB supply for at least three hours. Then connect to a PC and
                       perform the check described above, noting the result values for CamNtech
                       technical support.

                       It is very important that you DO NOT attempt to charge any Actiheart 4, 5 or
                       Cardio after setting up the device. You must charge before setup, or after the end
                       of a recording. Attempting to charge after setting up a device will result in a
                       shutdown of the device instead of a recording.

3.1 Charging
Actiheart 4 from
the PC
                       When Actiheart 4 are to be charged from the PC, select ‘Utilities’ from the main
                       screen then select the ‘Recharge Actiheart’ button. A screen similar to that
                       shown below will be displayed:

                       If no Actiheart 4 are placed on the Reader/charger the display will show –
                       ‘Searching for Actihearts’. As an Actiheart 4 is placed in each location, it will be
Actiheart Guide to Getting Started 5.1.11a (Jan 2021)                                                  10
detected and the battery status will be displayed. The battery gauge provides an
estimated indication of battery charge level/remaining charge time. The coloured
bands in the gauge represent the voltage level in the Actiheart 4and correspond
to the very approximate voltages and estimated charging times as follows:
Voltage Colour Expected charging time4.0 Setting up a Database
All data used in the Actiheart system is stored in SQLite databases. For full
details of the databases used by the system, please see the chapter in the main
manual on databases. For now, note that when the software is first run, the
window below will be displayed. Note the highlighted warning about a “demo
database”.
This highlighted warning indicates that the software has installed a database of
demonstration data in your own Documents directory. This will allow you to
quickly try out parts of the software to view data before needing to make a
‘proper’ recording. Note however that we strongly recommend creating a new
(empty) database before beginning any significant data collection, as it will make
it easier to organise the data and distinguish real results from test recordings.
When you wish to create a new recording database, use the Utilities button, and
then the Database section and “New”. This is not necessary for quick test
purposes and trying out the software – you can continue with the demo
database.
You are now is a position to begin using the Actiheart and software.
Actiheart Guide to Getting Started 5.1.11a (Jan 2021) 125.0 Preparing for a Recording
5.1 Selection of
appropriate ECG
Pads and Preparation
of the Skin
Range of Pads
Before the Actiheart can be used, the subject has to be fitted with ECG pads to
clip the Actiheart to. Selection of appropriate pads is difficult because there are
many different types of skin and different skin types react differently to different
pads. Users may experience some redness and itchiness from pads in normal
use. However, if there is any significant discomfort from skin irritation or reaction
then they must remove the ECG pads.
There are a huge variety of electrode pads available. CamNtech has tried many
but suggest as a starting point the following (NOTE: information is intended for
general guidance only and does not constitute clinical advice or endorsement of
any particular product – the user is responsible for the suitability of the
electrodes). We advise you to experiment with your local supplier and population
group.
Short Term Recording Pads
These tend to be foam backed pads with high adhesion.
• 3M Red Dot 2560. These are extremely adhesive pads that provide very good
adhesion for short term use. The downside of this is that on removal, CamNtech
has noticed some gel residue left on the skin. They are not really suitable for long
term use.
Long Term Recording Pads
These tend to be micro porous cloth backed pads which allow the skin to breathe
during longer term recordings.
• DORMO Solid Gel SP-50. These pads are usually supplied by CamNtech for
initial testing, suitable for most purposes but we recommend testing yourself with
the specific target group before committing to any pad.
• Unomedical Unilect Long Term 4620M. These are cloth backed pads and are
small in size. These pads would be the most suitable type for paediatric use.
• Unomedical Unilect Long Term 4060M. These are similar to the 4620M but larger
in size. They have a raised section of the backing plastic that is designed for use
in skin preparation.
• Bio Protech ECG electrode E5 Tele815. These are very similar in construction to
the Unilect Long Term 4060M pads. They also appear to be good value
financially.
5.2 Skin
Preparation
In all cases, adequate skin preparation is vital to the success of any recording.
The R wave signal that the Actiheart requires is usually low and adequate skin
Actiheart Guide to Getting Started 5.1.11a (Jan 2021) 13preparation is required to ensure that the levels captured by the device are high
enough and consequently that noise levels are low enough for a good quality
recording.
The purpose of skin preparation is to remove the top layer of the skin, the
Stratum Corneum and to scratch the surface of the next layer of skin down, the
Stratum Granulosum. The recommended skin preparation procedure is as
follows:
Procedure for Skin Preparation
Clean the skin to ensure that it is clean and oil free. This can easily be achieved
by using warm water and soap or other detergent. Alcohol should not be used as
this can potentially cause skin irritation which needs to be avoided.
Use an abrasive material to remove the top layer of skin. The ideal preparation
material is a Cardio prep which is similar to very fine emery paper. One that
CamNtech has tried with success is the Cardio Prep from Unomedical, stock
code 2121M. These are low cost adhesive backed skin preparation pads which
are supplied in packs of 50. In the absence of an abrasive material a suitable
alternative is to rub the skin with a towel or other cloth. If this is done it should be
vigorous enough to remove the top layer of skin. Some redness will be seen and
this is normal and should not be cause for concern.
Apply the chosen pads to the chest. This is best achieved by placing the pad in
the centre of the chest and locating the Actiheart on it. Attach the second pad to
the other clip on the Actiheart and use the wire to position the second electrode.
Further details on positioning of the Actiheart are shown below:
5.3 Multi-Day Wear
of ECG Pads
Although many of the ECG pads from manufacturers are labelled as “Long
Term”, this typically does not refer to use spanning a week from a single
application. For recordings of this length, it is recommended to change pads
regularly every few days. Note that it is particularly important to clean all residue
off the skin after removing previous pads in order to avoid further irritation.
Subsequent applications of ECG pads may be applied in slightly varying location
in order to avoid irritating exactly the same regions of skin. As described below,
there is some latitude in positioning while still capturing good ECG data in order
to facilitate this.
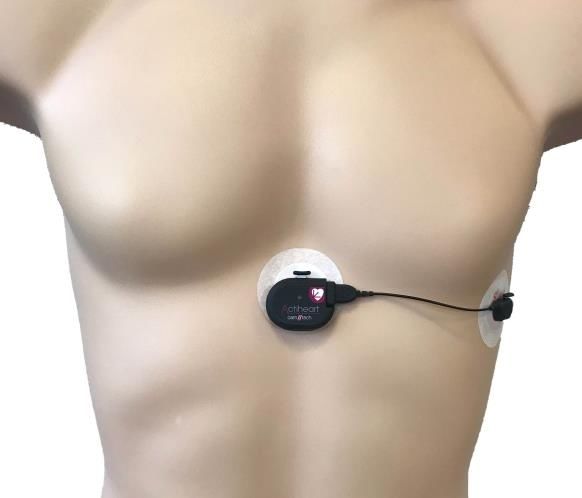
5.3 Electrode
Positioning
The best ECG signals can usually be picked up by placing the large end of the
Actiheart unit in a position midway between and below V1 and V2. The other
electrode can be placed at V4 or V5. This is illustrated on the chest in the
diagram below. A position on the upper chest around 10cm higher than that
shown in the diagram can also be used – this may be either more or less
acceptable for female users depending on their breast size. According to
Actiheart Guide to Getting Started 5.1.11a (Jan 2021) 14Rauharju et al.1 breast tissue appears to have a practically negligible effect on
ECG amplitudes, and in women, the placement of chest electrodes on the breast
rather than under the breast is recommended in order to facilitate the precision of
electrode placement at the correct horizontal level and at the correct lateral
positions.
1. Rautaharju PM, Park L, Rautaharju FS, Crow R. A standardized procedure for locating and documenting
ECG chest electrode positions: consideration of the effect of breast tissue on ECG amplitudes in women. J
Electrocardiol. 1998 Jan; 31(1):17-29.
5.4 Positioning of
the Actiheart
For good accurate measurement of activity the Actiheart needs to be placed with
the top edge of the device body as near to horizontal as possible. A 10 degree tilt
(Fig. B) gives a theoretical activity reading error of 3% for vertical movement.
However, a 45 degree tilt would mean that the detected magnitude is 30% less
than the actual for vertical movement. The electrodes should be positioned so
that the cable is nearly stretched to its full length (Fig. A). This will avoid
unnecessary rotation of the sensor in situ. The diagram below shows an
illustration of this:
Accelerometer
Orientation
Fig A
Direction of
Vertical Motion
Fig B Tilt Angle
Measured a = v cos(tilt)
(vertical only)
Actiheart Guide to Getting Started 5.1.11a (Jan 2021) 155.5 Use of the
Actiheart in Water
Although the Actiheart is waterproof, use in the water, for example when
swimming, can result in movement of water and the Actiheart, which will result in
noise on the ECG signal. This can be avoided by covering the Actiheart unit
completely with a swimsuit which will isolate movement over that area, or large
waterproof plaster or equivalent whilst swimming.
Actiheart Guide to Getting Started 5.1.11a (Jan 2021) 166.0 Setting up a User in the Database
Once the subject has been fitted with ECG pads and before a recording is started
it is necessary to set up the user in the selected database. A user can be set up
in any of the recording modes but prior to commencing any important recording it
is recommended that the level of signal being picked up by the unit is checked by
recording a short signal test, so this is usually the most appropriate place to set
up a new user.
After opening the main menu of the Actiheart software, click on the “Signal Test”
button. This brings up the screen shown below:
Clicking the "Setup" button then produces the following screen:
Clicking ‘Find’ allows the settings for an existing user to be retrieved.
Clicking ‘Add New’ allows the details for a new user to be added.
6.1 Selecting an
existing User from
the Database
If the user is already present in the selected database, selecting ‘Find’ will
produce the following screen:
Actiheart Guide to Getting Started 5.1.11a (Jan 2021) 17The required user can now be selected from the list and the recording can
be set up as detailed in Section 7.
6.2 Setting up a
new User
If a new user is being set up, selecting ‘Add New’ produces the following screen:
The user ID, date of birth and sex are entered here. Selecting ‘Next’ produces
the following:
The weight and height of the user are selected from here. It is possible to input
the user details either in Metric or Imperial units. The increments are 1cm and 0.1
Kg. Accurate measurements are necessary for calculations of energy
expenditure, but do not affect the recording process.
Actiheart Guide to Getting Started 5.1.11a (Jan 2021) 18Once entered, selecting ‘Next’ produces the final user details window:
This screen allows an estimate of the maximum heart rate and sleeping heart
rate to be entered. Neither of these are essential at this point. In general, all user
details can be modified after initial entry in order to facilitate more accurate
analysis at a later date.
The Maximum heart will only be used for an estimate of VO2Max to be made. It
will not affect energy expenditure estimates, HRV, or any other measurements
made using the software.
Sleeping heart rate is critical to accurate energy expenditure calculations during
daily living. The easiest way to collect accurate sleeping data is to wear the
Actiheart for at least one overnight recording, then use the “Set sleeping heart
rate” function in the Long Term analysis window to extract the measure from the
overnight Actiheart recording. However, it need not be set accurately in this
window right now, and will not affect the recording process – only later analysis.
Once details are entered, clicking ‘Next’ shows the message “Do you want to
save this user data?”. Selecting ‘Yes’ produces a confirmation message that the
new user has been saved correctly into the database.
Actiheart Guide to Getting Started 5.1.11a (Jan 2021) 197.0 Checking Signal Integrity and Performing a Test Recording
Before starting any multi-day recording it is recommended that a short signal test
be carried out. This is to check that the level of R wave signal being picked up by
the Actiheart is adequate and helps to avoid serious recordings being marred by
artefacts due to either high noise or a low R wave signal.
The test involves making a short recording and analysing the signal using a built
in utility called Signal Test which provides a Pass/Fail indication of whether each
part of the recorded signal is acceptable. For full details on analysing a signal
test recording please see the main Actiheart User Manual.
Since artefacts are often aggravated by poor adhesion of the pads with the skin
and movement of the pads relative to the skin during exercise it is important
that:
a. The pads are worn for at least 30 minutes before conducting the test.
b. The subject moves around and even jogs on the spot for a few minutes
during the test.
It is only necessary to record for a few minutes for this test – it is not designed to
view longer recordings, and 10 minutes will be more than sufficient.
The method described below for making a recording and downloading the data to
the PC for analysis applies equally to the various other recording modes
described in the User Manual and summarised in Section 8 of this guide.
7.1 How to set up a
Signal Test
Connect the Actiheart to its micro-USB lead and to the PC. Look carefully before
inserting the connector. The internal “D” orientation can be observed, or you can
note that the USB connector icon should be visible upwards on the lead when
connected to the Actiheart 5 with its label upwards.
The signal test can also be performed with an Actiheart 4. In general, when using
any setup function in the software, you may attempt to connect an Actiheart 5,
Actiheart 4 & dock, or Actiwave Cardio & dock and the software will attempt to
offer you the most suitable modes in all cases. Note however that not all
capabilities are equal, and that only ONE of these devices should be connected
to the PC at once. If the relevant selection does not appear, check that all other
CamNtech devices are disconnected from USB.
From the main menu, click the ‘Signal Test’ button. Selecting ‘Setup’ then brings
up a window where you may add a new user by clicking ‘Add New’ (see section
6.2 for details) or find an existing user by clicking ‘Find’.
After the user is selected or created, the following screen will then be displayed:
Actiheart Guide to Getting Started 5.1.11a (Jan 2021) 20You may enter an additional ‘Test ID’ (i.e. to identify this particular test for this
user). Note that the exact modes displayed in this window will depend on the
device connected. Click the ‘Send’ button to write the setup information into the
Actiheart. You will see a confirmation message when this is complete.
WARNING
The Actiheart MUST be removed IMMEDIATELY from the PC. Failure to do
so may lead to the Actiheart being unable to record in which case the setup
procedure would need to be repeated. It must not be reconnected to
charge until after the recording is complete.
Once the Actiheart is disconnected, it can be placed onto the user by clipping
onto the previously attached pads. To do this, you will first need to attach the
other electrode lead to the Actiheart main body’s USB socket. The orientation for
this can be seen by ensuring that the “heart” symbol on the connector is facing
upwards when the Actiheart logo is also upwards.
After switching to the ECG connector lead, connect both clips to the ECG pads
attached to the chest. This is performed for each connector separately. First,
depress the small “button” to release the connector. While holding this
depressed, move it onto the ECG pad metal nipple. Once onto the nipple,
release the “button” and the Actiheart will grip the ECG pad. Note that no
physical “push” is required to connect the ECG pad – simply depress the button
first, then move it over the pad and release afterwards.
To remove the Actiheart from ECG pads, simply squeeze the small “button”
above the clip again. While holding it squeezed, lift the device clear of the ECG
pad. Then release the button. You can perform this for the main body of the
device and the lead connector one by one.
7.2 Downloading
Recorded Data
from the Actiheart
Once the subject has worn the Actiheart for the required length of time (making
sure that the subject has moved around to fully test pad contact), the data can
then be downloaded to the PC.
Disconnect the Actiheart from the ECG pads as described above by depressing
the button and gently lifting it off. Then reconnect the Actiheart to the PC using
Actiheart Guide to Getting Started 5.1.11a (Jan 2021) 21the micro-USB lead with connector logo facing upwards as for the main Actiheart
logo.
After connecting the Actiheart back to the PC there are two options for reading
the data. The data can either be read from the recording mode / application that
the unit was set up in using the “Read” button, or from the general Read function
which can be selected after clicking the ‘Utilities’ button from the main screen.
The data recorded on the Actiheart is then downloaded to the PC via the
Reader/USB interface. Download progress is indicated by means of the yellow
progress bar. Once this is finished, the following screen is shown:
7.3 Storing
Comments with
the Data
This allows the user to add comments on the recording which will be stored along
with the data. This could be, for example, that the wearer has described when
they did or did not wear the Actiheart during the period, or the type of ECG pads
that were used for the recording. Once any comment required is entered into this
screen, “Finish” saves the data into the selected database.
7.5 Analysing the
Signal Quality
Once the recording has been downloaded into the current database, it can be
analysed for the quality of the signal. Select the recording requiring analysis from
the list of available recordings and click ‘Scan all’. This will examine the recording
in detail and the message shown below will then be displayed:
Actiheart Guide to Getting Started 5.1.11a (Jan 2021) 22Any areas of the recording that have failed the test are displayed in red on the
scan as shown in the screen below. You may click on the scroll bar just above
the red / green bar to move the main data display to that point. This will allow you
to examine each 10 second region which may have been problematic.
Scan results
It should normally be obvious from the recording why an area of the recording
has failed, for example due to movement artefacts. If it is not obvious, ensure
that the “Activity” box is selected to show the activity trace recorded with the R
wave. This may help the user identify if the problems have been caused by
movement. If a recording has failed for the 10 second period currently displayed,
as indicated by the graphics to the right of the window, this usually means that
either the noise level is too high or the R wave is too low. The following tests are
applied to determine this:
▪ 16-[signal/noise x 2] 4.75
▪ signal > 9.6 but this is normally true anyway.
In either case, it is necessary to check the position and impedance of the ECG
pads. For further details on the selection of ECG pads and skin preparation,
please see Section 5 of the Guide to Getting Started.
Note that you will always expect that the beginning and end of the signal test will
be marked as red since these regions will not show a stable ECG pad
connection. This is not a concern – only those periods of recording where you
know a good signal should have been present.
Actiheart Guide to Getting Started 5.1.11a (Jan 2021) 238.0 Viewing Live Actiheart 5 Data
The Actiheart 5 can be ordered with an optional Bluetooth module, for live display
of ECG and accelerometry data during an activity. This will allow monitoring of
the wearer’s ECG, heart rate and movement during a step test or other physical
activity. Data is displayed “Live” on the PC via the link, but can also be
downloaded in full via the USB connection after the end of a recording for further
analysis.
The ‘Actiheart 5 BT’ model is fitted with the Bluetooth module; the front label
design of the device will indicate this. In addition, when you try to set up the
device for the Step Test or Waveform functionality, a “Live Display” option will
appear in the available mode list as shown below.
Note that the Actiheart 5 is not designed to provide alarms or warning of
any kind against high heart rate, arrhythmia, or any other heart condition. It
is presenting live data and estimated heart rate as additional information
for the researcher or clinician, not diagnostic purposes or as a preventative
alarm for a life-threatening condition.
8.1 Set up for Live
Display
To view live data from an Actiheart 5 BT, you must choose the Live Display mode
when setting up the device. This can be done from the Waveform or Step Test
setup window. As an example, the Step Test Setup is shown below.
Note that the choice of two modes will only appear here if your Actiheart 5 is
fitted with the optional Bluetooth Module. You may still use it with or without the
module enabled by choosing either one of the two modes. Begin the recording
as described in previous sections.
Actiheart Guide to Getting Started 5.1.11a (Jan 2021) 248.2 Pairing (for first
use)
The first time you use each Actiheart with your Windows PC, you must ensure
that you enable Bluetooth and then pair with the device (after it is recording and
broadcasting data).
First, use the Windows start menu to open the settings window, and then select
the “Devices” section, and specifically “Bluetooth & other devices”.
Next, ensure that the Bluetooth function is set to “On”.
Then, click “Add Bluetooth or other device”, and choose to add a “Bluetooth”
device.
The computer will then display any nearby devices. Your Actiheart 5 must be
broadcasting in order to appear in this list. If you have set it up as described
previously, you will still need to wait for it to begin recording before it will appear
in the list as shown below:
Click on the Actiheart 5 BT in order to pair with it, and close the window.
8.3 Live Display on
the PC
Immediately after you have started an Actiheart with the Live Display mode, a
corresponding data window will appear showing when data is expected:
Actiheart Guide to Getting Started 5.1.11a (Jan 2021) 25Once the start time of the set up is reached, the Actiheart will begin recording,
broadcasting its data, and flashing the red light on its front at the same time. The
Live Display window should then recognise incoming data within a few seconds.
Note that you must have paired your Windows computer with the device on first
use, as described in the previous section.
The data shown includes ECG as a red trace, and three axes of acceleration
data. The horizontal scale may be varied from 10 seconds up to one minute
using the Time Scale options in the window. A shorter scale will allow more
detailed view of the ECG and acceleration waveforms, while the longer options
make it easier to observe changes during an ongoing activity. Once a steady
heart rate has been detected, it will be shown in the BPM box and will update
continuously.
If you need to open the Live Display window without first setting up an Actiheart,
for example if it was set up on another computer, you can do so from the main
menu via Utilities -> Actiheart 5.
Several Actiheart 5 BT live streams can be shown simultaneously. The windows
may be opened automatically as each is set up, or through the Utilities window
as described above.
8.4 Capabilities &
Requirements
The Live Display feature requires Windows 10 and Bluetooth functionality in your
PC in order to function.
Range of the live data is at least 5m in normal use, but may vary greatly
depending on other nearby electronics and signal obstructions. If you are
experiencing difficulties then try to arrange a clear line-of-sight between your
computer and the Actiheart 5 unit and minimise the distance.
In typical use, the battery of the Actiheart will last for around 24 hours of live
data. However, this will vary with range and the presence of signal obstructions.
If you have followed the instructions above (including pairing for first use) and are
still experiencing difficulties with your data link, please test with at least one
additional computer to confirm the Bluetooth functionality, and then contact
CamNtech support with details of your devices and exactly what steps you have
attempted.
Actiheart Guide to Getting Started 5.1.11a (Jan 2021) 269.0 Summary of Recording, Reading and Analysis Options
Once a Signal Test has been successfully completed the collection of data can
then commence. It is important to choose the recording mode taking into account
what the data will be used for, both immediately and for any potential future
analysis. This section summarises both the physical recording capabilities of the
Actiheart 5, and the focus of the main operating modes of the software both for
configuration and analysis.
9.1 Actiheart 5
Recording Modes
The Actiheart 5 offers two internal recording modes:
Full Waveform: This mode records the ECG waveform between the two ECG
pads on the chest, simultaneously with three-axis acceleration waveforms.
Recordings made with this mode are marked as “Ah5 Wave” in the list of
recordings.
IBI Mode: This mode records the amplitudes and timings of each peak captured
in the ECG waveform, along with three-axis acceleration waveforms. The ECG
peak recording allows a visual representation of the ECG waveform to be given
and also produces more robust IBI results than simple device-beat-detection
algorithms. Recordings made with this mode are marked as “Ah5 IBI” in the list of
recordings.
In both of these cases, the acceleration waveforms will consist of X, Y & Z axes
and may be recorded with sample rates of 25Hz, 50Hz or 100Hz. Note that the
exact acceleration sampling frequency will vary internally, but it is timestamped
alongside the ECG signal capture and interpolated as necessary for each
analysis window. The raw data exported as text from the Recording Details
window will show the timing for each raw sample rather than any interpolated
results.
For the Full Waveform mode, the ECG may be captured at 128Hz, 256Hz, 512Hz
or 1024Hz. In all cases, the analogue bandwidth is limited to ~55Hz, and the
analysis software will interpolate each IBI to 1ms resolution. For this reason, we
do not recommend the highest rate modes (particularly 1024Hz), unless you
have a specific need to interface to legacy software which cannot interpolate
waveforms.
In IBI mode, the ECG will be sampled at 256Hz. Peaks are detected in this data
and both their timing and amplitude recorded for processing later in the PC
software. Again, the timing of each IBI is interpolated to 1ms resolution.
9.2 Other Device
Recording Modes
The Actiheart 5 PC software can also be used to configure and record with
legacy Actiheart 4 devices and Actiwave Cardios. Both of those offer a range of
different recording capabilities. For more details consult the original
documentation delivered with your recording hardware.
The Actiheart 5 software will attempt to offer recording modes for each device
which are suited to the function you have selected from the main menu. In some
cases no suitable mode will be available for that device. For example, this will be
Actiheart Guide to Getting Started 5.1.11a (Jan 2021) 27the case if you attempt to start a full waveform recording using an Actiheart 4,
because it is not capable of recording all three acceleration axes.
9.3 Setup and
Analysis
Functions
Summary
From the main menu of the Actiheart software, specialist windows are available
for recording and analysing for a specific purpose. Note that there is not a
separate hardware recording mode specific to each one, more that the purpose
is to offer one or more appropriate recording modes together with the right
visualisation and measurement tools for that purpose.
Signal Test: Designed for a simple short recording in order to check ECG pads
before a longer test. Requires waveform ECG and at least a single axis of
acceleration recording. Using an Actiheart 5, Full Waveform Mode.
IBI Monitoring: Designed for capturing and measuring heart rate variability for
up to two weeks. Requires IBI recording, and activity data quantifying the amount
of movement each 15 seconds. Using an Actiheart 5, IBI Mode.
Long Term: Designed for robustly capturing heart rate and movement data for
up to two weeks, without emphasis on individual IBIs. Requires heart rate
recording and activity data quantifying movement each 15 seconds. Using an
Actiheart 5, IBI Mode.
Full Waveform: Designed for recording and visualising detailed movement
waveforms with three-axis acceleration, alongside ECG waveform view. With fast
zooming and scrolling from full recording length down to seconds of display at
once. Also supports display of Ah5 IBI mode data with reduced ECG
functionality. Requires three axes of acceleration recording. Using an Actiheart
5, Full Waveform Mode.
Sleep Analysis: Alternative focus of the IBI Monitoring window, with specific
functions intended for sleep analysis. Note that these are published algorithms,
Actiheart Guide to Getting Started 5.1.11a (Jan 2021) 28but we do not consider them sensitive or specific enough for any diagnostic use.
Using an Actiheart 5, IBI Mode.
Step Test: Designed for individual calibration of Energy Expenditure using any
Actiheart, by leading the Actiheart wearer through an 8 minute step test of
steadily increasing intensity while capturing movement and heart rate. Using an
Actiheart 5, Full Waveform Mode.
Daily EE: Designed for a simple measurement of Energy Expenditure during
daily living without too many complex options. Makes use of heart rate and
activity data. Using an Actiheart 5, IBI Mode.
Advanced EE: Designed for more flexible measurement of Energy Expenditure
and including many more options for individual calibration adjustment and
breakdown of the branched model. Makes use of heart rate and activity data.
Using an Actiheart 5, IBI Mode.
Exercise Test: Designed as a more flexible variant of the step test, this analysis
window allows specific periods to be marked on a short higher resolution
recording and tabulated measurements made of those periods for comparison
and ultimately manual calculation of EE calibrations. Due to the lack of rigid
specific intent, this cannot be done automatically. Using an Actiheart 5, Full
Waveform Mode.
Actiheart Guide to Getting Started 5.1.11a (Jan 2021) 29Appendix 1 - Handling & Environmental Information
A1.1
Decontamination
• All used devices must be considered to be contaminated with surface borne
bacteria and must hence be de-contaminated before re-use using a suitable
disinfection and cleaning procedure.
• The operator must use gloves to handle such devices before and during de-
contamination.
• Care must be taken to use the correct de-contamination procedure and cleaning
materials because long term exposure to certain cleaning materials is known to
attack plastics which can lead to premature failure of the mechanical integrity of
the device casing or labelling.
• CamNtech recommend the use of aqua based disinfection products and our
recommended products are Clinell® Universal Wipes or Spray. These products
do not contain chemicals known to cause deterioration of plastics.
• Do not use products containing Glutaraldehyde, Glucoprotamin, Isopropyl,
ethyl, or methyl alcohols, hydrogen peroxide, or bleach products. Do not use
plasma sterilization or ethylene oxide sterilization procedures, Do not autoclave.
• Do not apply self-adhesive labels or tapes to the casing.
• Begin by spraying and/or wiping all visible surfaces of the Actiheart body, clips,
and cable with the cleaning agent. Ensure that all surfaces are dried before
proceeding.
• Take care not to place excessive stress on the cable assembly during cleaning.
• Do not clean the metal plug or socket where the cable attaches to the body.
A1.2 Battery Care
• The device is INTERNALLY POWERED and operates at voltages below 5VDC;
there is hence no risk from electric shock (equipment Type B).
• The battery is NOT user replaceable – no attempt should be made to open the
device casing.
• The battery is re-chargeable; to maximise the service life of the battery, ensure
it is not left for long periods completely flat or completely charged. It is
recommended to charge after use, and only avoid fully recharging if the device
will be left stored for a long period, when it should be left part-charged.
A1.3 Disposal
Waste Electrical & Electronic Equipment (WEEE) The EU requires, under the Waste
Electrical and Electronic Equipment Directive 2012/19/EU, that manufacturers and/or
distributors of Electronic and/or Electrical Equipment manage and pay for the collection
and further handling of WEEE products, as well as provide WEEE-related information to
their customers.
CamNtech has taken the following approach to complying with this Directive:
• CamNtech has registered with an approved producer compliance scheme (PCS)
in accordance with the requirements of the WEEE Directive.
• CamNtech will provide free recycling for all of its WEEE products when returned
to them.
• CamNtech WEEE products will be designed with recycling, reuse and waste
management as a consideration.
• CamNtech WEEE products will be labelled or stamped with the WEEE marking in
accordance with European Standard EN 50419
Actiheart Guide to Getting Started 5.1.11a (Jan 2021) 30A1.4 EMC Guidance & Declaration
Please consult the Actiheart User Manual for details of Electromagnetic
environment and compliance.
Actiheart Guide to Getting Started 5.1.11a (Jan 2021) 31Appendix 2 – Troubleshooting
The Actiheart did not start recording – Following set-up, the Actiheart must be
removed from the USB lead immediately. If the Actiheart is left connected, the set-up
will be cancelled and the device will not start recording.
The Actiheart recorded nothing – After set-up, the Actiheart must be removed from
the USB lead immediately. Furthermore, it must not be reconnected to USB for charging
until after the recording is complete. Charging should be done before set-up.
The Actiheart stopped recording early – Ensure that the Actiheart battery is fully
charged. It is recommended that prior to any long term recording that the Actiheart is
fully charged overnight. It is advisable to use the mains power adaptor to supply the
charger as the PC may shut-down or sleep hence interrupting the charging.
My data is very noisy – The Actiheart requires a good, low impedance connection to
the skin of the subject. Carefully follow the advice provided in section 5 and allow the
ECG electrodes time to ‘settle’ (at least 30 minutes) before attempting a recording.
Perform a signal test to determine the quality of the ECG. If the signal quality is poor, try
moving the position of the ECG electrodes slightly, or try the alternative mounting
location (see section 5).
The Actiheart is not recognised by the PC – Ensure the Actiheart battery is fully
charged. If the Actiheart is not detected at all, contact CamNtech or your local agent for
support.
I received read errors during download – Ensure that the Actiheart battery is fully
charged; a low battery can affect communications and result in errors during download.
The device can be re-charged following a recording without loss of data, then try to
download again.
I get a warning message with my data – The Actiheart software attempts to verify
that the data is correct with respect to the set-up. Inspect the data to ensure that the
required period is valid. It may also be advisable to charge the Actiheart and re-
download to remove the possibility of read errors.
Actiheart Guide to Getting Started 5.1.11a (Jan 2021) 32Document Revision History
From iss. To iss. Date Description Rev By
0.0.0 5.0.6 21/12/2018 First Issue: Pre-production TE
5.0.6 5.0.6a 01/02/2019 Corrected doc ref, corrected page no. position, minor layout HS
corrections.
5.0.6a 5.0.28 01/12/2019 Inclusion of live Actiheart 5 data display TE
5.0.28 5.0.29 31/12/2019 Updated CamNtech address details HS
5.0.29 5.1.11 24/02/2020 Updated for longer IBI recordings up to two weeks TE
5.1.11 5.1.11a 29/01/2021 Updated de-contamination section A1.1 HS
Actiheart Guide to Getting Started 5.1.11a (Jan 2021) 33You can also read