UCD-100 CD/USB MP3 PLAYER - Operating Instructions American Audio 6122 S. Eastern Ave. Los Angeles, CA 90040
←
→
Page content transcription
If your browser does not render page correctly, please read the page content below
UCD-100
CD/USB MP3 PLAYER

Operating Instructions

                          American Audio®
                       6122 S. Eastern Ave.
                    Los Angeles, CA 90040
                                       9/10
CONTENTS
safety precautions........................................................................................................................3
Electrical safety precautions.................................................................................................4
PRODUCT INFORMATION.....................................................................................................................5
CUSTOMER SUPPORT..........................................................................................................................6
SET-UP................................................................................................................................................7
FUNCTIONS AND CONTROLS..............................................................................................................8
BASIC OPERATION
LOADING/EJECTING DISC/USB DEVICE..................................................................................14
SELECTING TRACKS................................................................................................................15
STARTING/STOPPING PLAYBACK..........................................................................................16
FRAME SEARCH.......................................................................................................................17
CHANGE time display............................................................................................................18
PITCH ADJUSTMENT................................................................................................................19
CREATING Seamless LOOPS................................................................................................21
internal menu.................................................................................................................................22
databse builder..............................................................................................................................23
troubleshooting..........................................................................................................................26
POWER down procedures...........................................................................................................27
HANDLING COMPACT DISC...............................................................................................................27
Warranty.......................................................................................................................................28
SPECIFICATIONS............................................................................................................................29
CHECK THE AMERICAN AUDIO WEBSITE FOR DOWNLOADABLE USER SOFTWARE UPDATES.
FOR BEST CD-R DISC PLAYBACK RESULTS IN THIS CD PLAYER PLEASE FOLLOW THESE
GUIDELINES:
1. High quality CD-R Audio discs (should conform to the standards of the Orange Book 2).
2. Use a high quality bit rate when recording discs. (At least 160kbps)
3. Record discs in the slowest speed possible. (i.e. 2x or 4x speed)
Main features
• 8 times over sampling 1 bit D/A converter
• Auto cue
• Front Loading CD System
• Pitch Control and Bend (+/-4%, +/-8%, +/-16%, or +/-100% [+/-100 CD Only])
• Single Rackmount unit
• 1/75th second frame search
• Jog Wheel for frame search in Pause Mode and Pitch Bend in Play Mode
• 8 different speed scan (4 Forward/4 Reverse)
• RCA Output & Balanced XLR Output (Use only one of the outputs at a time. The UCD-100 is not designed for dual
output.)
• Large bright Digital Screen
• Seamless Loop
• Pitch Percentage Display
• Instant Start within 10 ms (sound is produced immediately when the PLAY button is pressed)
©American Audio® - www.americanaudio.com - UCD-100 Instruction Manual Page 2SAFETY PRECAUTIONS
NOTE: This CD player uses a semiconductor CAUTION: TO PREVENT ELECTRIC SHOCK
laser. It is recommended for use in a room at DO NOT USE THIS (POLARIZED) PLUG WITH
the following temperature: 41˚F - 95˚F / 5˚C - AN EXTENSION CORD, RECEPTACLE, OR
35˚C OTHER OUTLET UNLESS THE BLADES CAN
BE CAREFULLY INSERTED TO PREVENT
BLADE EXPOSURE
CAUTION:
1. Handle the power supply cord carefully. Do
not damage or deform; it may cause electric ATTENTION: POUR PREVENIR LES CHOCS
shock or malfunction when used. Hold plug ELECTRIQUES NE PAS UTILISER CETTE
attachment when removing from wall outlet. FICHE POLARISEE AVEC UN PROLON-
Do not pull on the cord. GATEUR, UNE PRISE DE COURANT OU
2. To avoid electric shock, do not open the UNE AUTRE SORTIE DE COURANT, SAUF
top cover when the unit is plugged in. If SI LES LAMES PEUVENT ETRE INSEREES A
problems occur with the unit, call your local FOND SANS EN LAISSER AUCUNE PARTIE A
American Audio® dealer. DECOUVERT.
3. Do not place metal objects or spill liquid
inside the CD player. Electric shock or mal- WARNING: TO PREVENT FIRE OR SHOCK
function may occur. HAZARD, DO NOT EXPOSE THIS UNIT TO
The serial and model number for this unit is WATER OR MOISTURE
located on the rear panel. Please write down
This equipment has been tested and found
the numbers here and retain for future refer-
to comply with the limits for a Class B digital
ence.
device, pursuant to Part 15 of the FCC Rules.
These limits are designed to provide reason-
Model No._____________________________
able protection against harmful interference
in a residential installation. This equipment
Serial No._____________________________
generates, uses, and can radiate radio fre-
NOTE: This product satisfies FCC regulations quency energy and, if not installed and used
when shielded cables and connectors are in accordance with the instructions, may cause
used to connect the unit to other equipment. harmful interference to radio communications.
To prevent electromagnetic interference with However, there is no guarantee that interfer-
electrical appliances such as radios and tele- ence will not occur in a particular installation.
visions, use shielded cables and connectors If this equipment does cause harmful interfer-
for connections. ence to radio or television reception, which can
be determined by turning the equipment off
and on, the user is encouraged to try to correct
CAUTION: the interference by one or more of the following
USE OF CONTROLS OR ADJUSTMENTS measures:
OTHER THAN THOSE SPECIFIED HEREIN – Reorient or relocate the receiving antenna.
MAY RESULT IN HAZARDOUS RADIATION – Increase the separation between the equip-
EXPOSURE ment and receiver.
THE COMPACT DISC PLAYER SHOULD NOT – Connect the unit into an electrical outlet on
BE ADJUSTED OR REPAIRED BY ANYONE a circuit different from that to which the
EXCEPT PROPERLY QUALIFIED SERVICE receiver is connected.
PERSONNEL. – Consult the dealer or an experienced radio/
TV technician for help.
©American Audio® - www.americanaudio.com - UCD-100 Instruction Manual Page 3ELECTRICAL SAFETY PRECAUTIONS
ELECTRICAL PRECAUTIONS
CAUTION
RISK OF ELECTRIC SHOCK
DO NOT OPEN
The lightning flash with arrowhead symbol, within an CAUTION: TO REDUCE THE RISK OF ELECTRIC The exclamation point within an equilateral triangle is
equilateral triangle, is intended to alert the user to the SHOCK, DO NOT REMOVE THE COVER (OR BACK). intended to alert the user to the presence of important
presence of uninsulated "dangerous voltage" within the THERE ARE NO USER SERVICEABLE PARTS operating and maintenance (servicing) instructions in
product's enclosure that may be of sufficient magnitude INSIDE REFER SERVICE TO YOUR AUTHORIZED the literature accompanying the appliance.
to constitute a risk of electric shock to persons. AMERICAN AUDIO® SERVICE TECHNICIAN.
IMPORTANT SAFETY INSTRUCTIONS
REAd INsTRUCTIONs — All the safety and operating gROUNdINg OR POlARIZATION ObJECT ANd lIQUId ENTRy - Never push objects of
instructions should be read before the product is • If this product is equipped with a polarized alternating any kind into this product through openings as they
operated. current line plug (a plug having one blade wider than may touch dangerous voltage points or short-out
RETAIN INsTRUCTIONs — The safety and operating the other), it will fit into the outlet only one way. This parts that could result in a fire or electric shock.
instructions should be retained for future reference. is a safety feature. If you are unable to insert the plug Never spill liquid of any kind on the product.
hEEd WARNINgs — All warnings on the product and fully into the outlet, try reversing the plug. If the plug sERVICINg — Do not attempt to service this product
in the operating instructions should be adhered to. should still fail to fit, contact your electrician to yourself as opening or removing covers may expose
FOllOW INsTRUCTIONs — All operating and use replace your obsolete outlet. Do not defeat the you to dangerous voltage or other hazards. Refer all
instructions should be followed. safety purpose of the polarized plug. servicing to qualified service personnel.
ClEANINg — The product should be cleaned only with • If this product is equipped with a three-wire dAMAgE REQUIRINg sERVICE - Unplug this product
a polishing cloth or a soft dry cloth. Never clean with grounding type plug, a plug having a third (grounding) from the wall outlet and refer servicing to qualified
furniture wax, benzine, insecticides or other volatile pin, it will only fit into a grounding type power outlet. service personnel under the following conditions:
liquids since they may corrode the cabinet. This is a safety feature. If you are unable to insert the • When the power-supply cord or plug is damaged.
ATTAChMENTs — Do not use attachments not plug into the outlet, contact your electrician to • If liquid has been spilled, or objects have fallen into
recommended by the product manufacturer as they replace your obsolete outlet. Do not defeat the the product.
may cause hazards. safety purpose of the grounding type plug. • If the product has been exposed to rain or water.
WATER ANd MOIsTURE — Do not use this product POWER-CORd PROTECTION - Power-supply cords • If the product does not operate normally by following
near water — for example, near a bathtub, wash should be routed so that they are not likely to be the operating instructions. Adjust only those controls
bowl, kitchen sink, or laundry tub; in a wet basement; walked on or pinched by items placed upon or that are covered by the operating instructions as an
or near a swimming pool; and the like. against them, paying particular attention to cords at improper adjustment of other controls may result in
ACCEssORIEs — Do not place this product on an plugs, convenience receptacles, and the point where damage and will often require extensive work by a
unstable cart, stand, tripod, bracket, or table. The they exit from the product. qualified technician to restore the product to its
product may fall, causing serious injury to a child or OUTdOOR ANTENNA gROUNdINg — If an outside normal operation.
adult, and serious damage to the product. Use only antenna or cable system is connected to the product, • If the product has been dropped or damaged in any
with a cart, stand, tripod, bracket, or table be sure the antenna or cable system is grounded so way.
recommended by the manufacturer, or sold with as to provide some protection against voltage surges • When the product exhibits a distinct change in
the product. Any mounting of the product should and built-up static charges. Article 810 of the National performance — this indicates a need for service.
follow the manufacturer’s instructions, and should Electrical Code, ANSI/NFPA 70, provides information REPlACEMENT PARTs -- W hen replacement parts
use a mounting accessory recommended by the with regard to proper grounding of the mast and are required, be sure the service technician has used
manufacturer. supporting structure, grounding of the lead-in wire replacement parts specified by the manufacturer or
CART — A product and cart combination should be to an antenna discharge unit, size of grounding have the same characteristics as the original part.
moved with care. Quick stops, excessive force, and conductors, location of antenna-discharge unit, Unauthorized substitutions may result in fire, electric
uneven surfaces may cause the product and cart connection to grounding electrodes, and shock, or other hazards.
combination to overturn. requirements for the grounding electrode. See Figure sAFETy ChECK - Upon completion of any service or
A. repairs to this product, ask the service technician to
lIghTNINg — For added protection for this product perform safety checks to determine that the product
during a lightning storm, or when it is left unattended is in proper operating condition.
and unused for long periods of time, unplug it from WAll OR CEIlINg MOUNTINg — The product should
the wall outlet and disconnect the antenna or cable not be mounted to a wall or ceiling.
system. This will prevent damage to the product hEAT — The product should be situated away from heat
due to lightning and power-line surges. sources such as radiators, heat registers, stoves, or
POWER lINEs — An outside antenna system should other products (including amplifiers) that produce
not be located in the vicinity of overhead power lines heat.
or other electric light or power circuits, or where it
VENTIlATION — Slots and openings in the cabinet are can fall into such power lines or circuits. When
provided for ventilation and to ensure reliable installing an outside antenna system, extreme care
operation of the product and to protect it from should be taken to keep from touching such power
overheating, and these openings must not be lines or circuits as contact with them might be fatal.
blocked or covered. The openings should never be OVERlOAdINg — Do not overload wall outlets,
blocked by placing the product on a bed, sofa, rug, extension cords, or integral convenience receptacles
or other similar surface. This product should not be as this can result in a risk of fire or electric shock.
placed in a built-in installation such as a bookcase or ANTENNA
rack unless proper ventilation is provided or the LEAD IN
manufacturer’s instructions have been adhered to. WIRE
POWER sOURCEs —This product should be operated
only from the type of power source indicated on the GROUND
marking label. If you are not sure of the type of CLAMP
power supply to your home, consult your product ANTENNA
dealer or local power company. DISCHARGE UNIT
lOCATION – The appliance should be installed in a (NEC SECTION 810-20)
stable location.
NONUsE PERIOds – The power cord of the appliance
should be unplugged from the outlet when left un- ELECTRIC GROUNDING CONDUCTORS
used for a long period of time. SERVICE (NEC SECTION 810-21)
EQUIPMENT
GROUND CLAMPS
POWER SERVICE GROUNDING
Fig. A ELECTRODE SYSTEM
(NEC ART 250, PART H)
NEC — NATIONAL ELECTRICAL CODE
©American Audio® - www.americanaudio.com - UCD-100 Instruction Manual Page 4PRODUCT INFORMATION
I. Read Instructions - All the safety and operat-
ing instructions should be read before the CD WARRANTY INFORMATION
Player is operated. The safety and operating The UCD-100 carries a ONE year (365 days)
instructions should be saved for future limited warranty. This warranty covers parts
reference. and labor. Please fill out the enclosed warranty
2. Heed Warnings - All warnings on the card to validate your purchase. All returned
Player and in the operating instructions service items whether under warranty or not,
should be adhered to. must be freight pre-paid and accompany a
return authorization (R.A.) number. The R.A.
3. Water and Moisture - The player should not number must be clearly written on the outside
be used near water - for example, near a of the return package. A brief description of
bath tub, kitchen sink, laundry tub, in a the problem as well as the R.A. number must
wet basement or near a swimming pool, etc. also be written down on a piece of paper and
4. Ventilation - The Player should be situated included in the shipping container. If the unit
so that its location or position does not inter- is under warranty, you must provide a copy of
fere with its proper ventilation. For example, your proof of purchase invoice. You may obtain
the player should not be situated on a R.A. number by contacting customer support
a bed, sofa, rug, or similar surface that may at (800) 322-6337.
block the ventilation openings; or, placed in
a built-in installation, such as a bookcase
or cabinet that may impede the flow of
air through the ventilation openings.
5. Heat - The player should be situated
away from heat sources such as radiators,
heat registers, stoves, or other appliances
(including amplifiers) that produce heat.
6. Power Sources - The player should be
connected to a power supply only of the
type described in the operating instructions
or as marked on the Player.
7. Servicing - The user should not attempt
to service the Player beyond that
described in the operating instructions. All
other servicing should be referred to quali-
fied service personnel. The Player should be
serviced by qualified service personnel when:
A. The power-supply cord or the plug has
been damaged.
B. Objects have fallen, or liquid has been
spilled into the Player.
C. The Player has been exposed to rain
or water.
D. The Player does not appear to operate
normally or exhibits a marked change
in performance.
©American Audio® - www.americanaudio.com - UCD-100 Instruction Manual Page 5Unpacking
Every UCD-100 has been thoroughly tested and has been shipped in perfect operating condition.
Carefully check the shipping carton for damage that may have occurred during shipping. If the car-
ton appears to be damaged, carefully inspect your player for any damage and be sure all equipment
necessary to operate the player has arrived intact. In the event damage has been found or parts are
missing, please contact our toll free customer support number for further instructions. Please do not
return the player to your dealer without first contacting customer support.
Introduction
Introduction:
Congratulations and thank you for purchasing the American Audio® UCD-100. This player is a repre-
sentation of American Audio’s continuing commitment to produce the best and highest quality audio
products possible at an affordable price. Please read and understand this manual completely before
attempting to operate your new player. This booklet contains important information concerning the
proper and safe operation of your new player.
Customer Support:
American Audio® provides a toll free customer support line, to provide set up help and answer any
question should you encounter problems during your initial set up or operation. You may also visit us
on the web at www.americanaudio.com for any comments or suggestions. Service Hours are Monday
through Friday 9:00 a.m. to 5:30 p.m. Pacific Standard Time.
Voice: (800) 322-6337
Fax: (323) 582-2610
E-mail: support@americandj.com
To purchase parts online visit http://parts.americandj.com
Caution! There are no user serviceable parts inside this player. Do not attempt any repairs yourself,
without being instructed to do so by an authorized American Audio service technician. Doing so will
void your manufactures warranty. In the unlikely event your player may require service, please contact
American Audio® customer support.
Do not discard the packing carton in the trash. Please recycle when ever possible.
Set-Up Precautions
Please be sure to make any connections before plugging the player into an electrical outlet. All fader
and volume controls should be set to zero or minimum position, before the player is switched on. If the
player has been exposed to drastic temperature fluctuation (e.g. after transportation), do not switch
on the player immediately. The arising condensation of water might damage your device. Leave the
device switched off until it has reached room temperature.
Operating Determinations:
• When installing this player, please make sure that the device is not exposed or will not be
exposed to extreme heat, moisture or dust!
• Do not operate the player in extremely hot (more than 30°/100°F) or extremely cold (less than
5°C/40°F) surroundings.
• Keep the unit out of direct sunlight and away from heaters.
• Operate the player only after becoming familiar with its' functions. Do not permit operation by
persons not qualified for operating the unit. Most damages are the result of unprofessional operation.
©American Audio® - www.americanaudio.com - UCD-100 Instruction Manual Page 6Set-UP
USB INFORMATION:
• Make sure your USB device has only MP3 files on it. There cannot be any other type of files
on your USB device, NO photo files, etc...
• If you are using a SD Card via USB SD Card reader, you must remove the USB SD Card
reader first to change SD Card's. Please do not remove the SD Card from the USB SD Card
reader while the USB card reader is still connected to the unit.
• Only supports FAT/FAT32 formatted devices.
SD CARD INFORMATION:
• Make sure your SD Card only has MP3 files on it
• Do Not have any other file type on your SD Card; no photo files, etc...
• American Audio SD Players can read SD HC (High Capacity) Cards up to 32GB
Please note:
For higher quality MP3 files (more than 128 kbps) American Audio recommends “High Speed”
SD Cards. Using high speed cards will ensure the best performance with your American Audio
SD Player.
1. Checking the Contents
Be sure your UCD-100 package was shipped with the following:
1) UCD-100 Professional Rackmount Single CD/USB Player
2) User Manual (this booklet)
3) RCA Cables Stereo Cables
4) Warranty Card
2. Installing the Units
1) The UCD-100 is designed to placed on a flat level surface or installed into a standard 19”
rack mount case or enclosure. When mounting the UCD-100 in a 19” rack be sure to support the unit
by all four screw slots on the face of the unit.
2) Be sure the player is mounted in a well ventilated area where it will not be exposed to direct sunlight,
high temperatures, or high humidity.
3) Try to place the unit as far as possible from TV’s and tuners, as the unit may cause undesirable inter-
ference with such devices.
3. Connections
1) Be sure the power is disconnected.
2) Connect the included RCA cable from your UCD-100 outputs to the inputs on your mixer.
3) Use the Digital Output to connect to MiniDisc, DAT machines, or other device that accepts digital
inputs.
CAUTION:
To avoid severe damage to the unit, be sure the power is off when making connections to the unit.
CAUTION:
• The player will work normally when the main unit is mounted with the front panel within 15 degrees of the
vertical plane If the unit is tilted excessively, disks may not be loaded or unloaded properly.
©American Audio® - www.americanaudio.com - UCD-100 Instruction Manual Page 7Functions and Controls
1 2 3 4 5 6 7 8
9
10
19 18 17 16 15 14 13 12 11
23 22 21 20
24 25 26 27 28
38
37 29
30
36 31
32
35 34 33
A. Front panel controls
1. Transport Tray - This tray is used to load and unload a compact disc into the drive mechanism. The
tray is opened and closed by pressing the OPEN/CLOSE button (3). Never attempt to force the transport
tray open or closed when the power is turned off.
2. USB PORT 1 - This is USB port 1 is where you can insert a USB stick, USB SD Card reader, or compatiable
external hard drive for playback. Very Important: Please see page 7 for details regarding/
using USB devices.
3. OPEN/CLOSE (Transport Tray Open/Close) - This button is used to open and close the transport tray.
NOTE: When a disc is already loaded in the transport tray, the tray will not open unless the unit is in pause or
cue mode.
4. SOURCE SELECTOR - Press this button to select your desired playback source. Select either CD Player,
USB 1, or USB 2. The source indicator LED will light when the selected source is activate.
5. TIME - The TIME button is used to changed the displayed time values and enter the internal menu. Time
can be displayed as elapsed track time, remaining track time, and total disc remaining time. Press this button
©American Audio® - www.americanaudio.com - UCD-100 Instruction Manual Page 8Functions and Controls
for at least 2 seconds to enter the internal menu. Use the FOLDER/TRACK KNOB (14) to scroll through the
internal menu.
6. SGL/CTN - This button allows the unit’s play mode to change between Single and Continuous. In single
mode the unit will play a single track and return to cue mode. In continuous mode the unit continues to play
track by track.
7. Liquid Crystal Display (LCD) - This high quality LCD Indicates all the unit functions (play, pause, cue,
etc..,), as they occur as well as displaying the time and track values. This display is viewable at several com-
fortable angles as described on page 11.
8. PITCH SLIDER - This slider is used to adjust the playback pitch percentage when the pitch (10) function
is activated. The slider is a set adjustment and will remain set until the pitch slider is moved or the pitch (10)
function has been turned off. This adjustment can be made with or without a CD in the drive. The pitch adjust-
ment will remain even if a disc has been remove, and will reflect on any other disc loaded into the unit. That is
to say, if you set a +2% pitch on one disc, remove that disc and insert another, that disc too will have a +2%
pitch. The amount of pitch being applied will be displayed in the LCD (7). Use this slider to match the BPM’s
of this unit to that of another music source. By changing the pitch of one disc with respect to the other in this
way, the beats can be matched.
9. TAP/BPM BUTTON - Press this button to switch between manual BPM and Auto BPM. When in manual
BPM mode, tap this button to the beat of the current track.
10. Pitch Button/ PITCH PERCENTAGE SELECTOR - This button is used to turn the pitch function on
and off and choose the pitch percentage. The pitch percentages to choose from are 4%, 8%, 16%, and 100%.
To activate the pitch slider press the button for at least 3 seconds. The pitch functions of the Pitch slider
(8), Pitch Bend Buttons (11), and JOG WHEEL (18) will not function without this function being activated.
See page 19 for more details. The pitch slider and “+” and “-” pitch bend buttons have a maximum range
of +/-100%.
11. Pitch bend buttons -
(-) PITCH BEND/volume control - The (-) pitch bend function creates a momentary “Slow Down” in
the CD’s pitch speed (Beats per minute - BPM) when the pitch (10) function is activated. This function allows
the beats between two CD’s or any other music source to match. This is a momentary function. When the
button is depressed the pitch speed will automatically return to Pitch slider’s (8) selected pitch. Holding
down this button will give a maximum of -16% pitch. Be sure to remember that this function is a momentary
pitch adjustment, for a more precise adjustment use the Pitch slider’s (8) to match the BPM’s with another
playing music source. This button can also lower the output volume level, please see page 18.
(+) PITCH BEND/volume control - The (+) pitch bend function creates a momentary “BUMP” in the
CD’s pitch speed (Beats per minute - BPM) when the pitch (10) function is activated. This function allows the
beats between two CD’s or any other music source to match. This is a momentary function. When the button
is depressed the pitch speed will automatically return to Pitch slider’s (8) selected pitch. Holding down
this button will give a maximum of +16% pitch. Be sure to remember that this function is a momentary pitch
adjustment, for a more precise adjustment use the Pitch slider’s (8) to match the BPM’s with another play-
ing music source. This button can also raise the output volume level, please see page 18.
12. TEMPO LOCK FUNCTION - This button activates the TEMPO LOCK function. This function allows you
to use the PITCH SLIDER (8) to speed up or slow down playback speed without altering the tonal pitch of
the track. When this function is not engaged the original tonal pitch of the track will be altered giving you the
“chipmunk” effect when a track is played at a high rate of speed, or the “James Earl Jones” effect when a
track is slowed to much.
13. SEARCH BUTTONS -
This search button allows you to quickly scan backwards through a track.
This search button allows you to quickly scan forwards through a track.
©American Audio® - www.americanaudio.com - UCD-100 Instruction Manual Page 9Functions and Controls
14. FOLDER/TRACK BUTTON & FOLDER/TRACK KNOB - This button is used to toggle the FOLDER/TRACK
KNOB between folder and track search. When the LED of the FOLDER BUTTON is lit, the player is in FOLDER
search mode. When the unit is in track search mode, turn the knob clockwise to search forward, and counter-
clockwise to search backwards. If you press the knob in and turn it while in track mode, you can skip ahead 10
tracks. Example: if you are at Track #1, pressing the knob and turning it clockwise will skip you to Track #11. If
you press the knob and turn it clockwise again, it will skip to Track #21. If there are not that many tracks, it will
go back to Track #1.
Hold the button down for at least 2 seconds to activate and deactivate the REPEAT function.
REPEAT ON: All the track in the current folder will play track by track until the repeat function is deactivated.
REPEAT OFF: All the tracks in the device will play in the normal mode.
SINGLE REPEAT: The current playing track will play continuously.
15. PLAY/PAUSE Button - Each press of the PLAY/PAUSE Button causes the operation to change from play
to pause or from pause to play. While in play mode the green play button LED will glow, and while in pause
mode the green play LED will flash.
16. CUE - Pressing the CUE button during playback immediately pauses playback and returns the track to the
last set cue point (see setting a CUE POINT, page 17).
17. IN, OUT, & RELOOP -
IN BUTTON - “cue ON THE FLY” - This function allows you to set a CUE POINT (see CUE POINT page 17)
without music interruption (“on the fly”). This button also sets the starting point of a loop (see LOOP).
Out Button - This button is used to set the ending point of a loop. A loop is started by pressing the IN
BUTTON, pressing the OUT BUTTON set the loop ending point. The loop will continue to play until the OUT
BUTTON is pressed once again.
RELOOP BUTTON - If a LOOP has been made (see setting a LOOP on page 21), but the CD Player is not
actively in LOOP mode (a loop is not playing), pressing the RELOOP button will instantly reactivate the LOOP
mode. To exit the loop, press the LOOP OUT BUTTON.
18. JOG WHEEL - The jog wheel serves two functions depending on the current operating mode:
A. The jog wheel will act as a slow frame search control when the unit is in pause or cue mode allowing you
to set a specific cue point or find a particular starting point.
B. The wheel also works as a momentary pitch bend during playback. Turning the wheel clockwise will
increase the pitch percentage up to 16%, and turning the wheel in the counter-clockwise direction will
decrease the pitch percentage up to -16%. The pitch bend will be determined on how fast you turn the
wheel.
19. POWER SWITCH - This switch is used to turn ON/OFF the unit's main power.
b. Rear panel -
20. AUDIO OUT R & L - These jacks are used to send a left and right output signal. Use these jacks to send
an audio signal to a mixer or receiver. The red colored jack represents the right channel output and white jack
represents the left channels output.
21. Balanced XLR MASTER Output jacks - The Master Output includes a pair of XLR Balanced
jacks as well as a pair of audio out rca Jacks (20). The 3-pin XLR jacks send a high current balanced
output signal. These jacks should be used when you will be driving an amp or other audio equipment with
a balanced input, or whenever you will be running a signal line greater than 15 feet. Always, use these jacks
whenever possible.
22. USB PORT 2 - This is USB port 2 where you can insert your USB device to play Mp3 files.
23. POWER CONNECTION - This is the main power connection. Only use the supplied polarized power cord.
Use of any power cord may result in severe damage to the unit. Be sure the local power source matches the
units’ required power.
©American Audio® - www.americanaudio.com - UCD-100 Instruction Manual Page 10Functions and Controls
C. LCD Display -
24. CUE Indicator - This indicator will glow when the unit is in CUE mode and will flash every time a new
CUE POINT is set.
25. FOLDER Display - This indicates which folder you are in.
26. TIME METER - These indicators will detail the current Minutes, Seconds, and Frames. The meter will dis-
play either the elapse, total, or remaining time of a track or the entire disc. The display time will depend on the
selected time function. The selected time function will be displayed above the TIME METER as either TOTAL
REMAINING, Remaining track time, or Elapsed track name.
27. Time bar indicator - This bar visually details the time defined in the time meter (26). As with the
time meter (26), this bar is also dependent on the selected time function Remain, elapsed, or Total
remain. This bar will begin to flash when 15 seconds of a track remain and will begin to rapidly flash when
three seconds of a track remain. The flashing bar is a great visual reminder a track is about to end. The flashing
bar will function regardless of which time mode the unit is in.
28. BPM meter - This meter will display the BPM’s of the current track.
BPM29. Pitch meter - This meter displays the pitch percentage being applied to playback by the pitch slider
(8). If the meter read zero regardless of the pitch slider’s (8) position, the pitch (10) function is not acti-
vated.
PITCH
30. TEMPO LOCK - This will indicate the Tempo Lock function is active.
31. LOOP/reloop indicator - The LOOP indicator will appear when a loop is ready to be engaged. The
RELOOP indicator will flash when a loop is engaged.
32. Auto cue - This will indicate if the Auto Cue is on or off. Press and hold the SGL/CTN (6) for 1 sec. to
turn the Auto Cue function on and off. The unit’s Auto Cue function will automatically set the cue point at the
beginninh of each track.
33. Character display - This will display the name of the track and/or folder when either a CD with text
information or an Mp3 disc with compatiable ID3 tags is loaded into the unit.
34. total/remain/Elapsed indicator - When total remain is indicated in the LCD Display (7) the
time meter will show the total disc remaining time. When REMAIN is indicated the time meter will show the
current track’s remaining time. When ELAPSED is indicated the time meter will show the current track’s elapsed
time.
35. REPEAT INDICATOR - This indicates the unit is in repeat play mode, the unit will continue to play
all tracks in a selected folder until the mode is deactivated. To activate REPEAT mode, press the FOLDER
BUTTON (14) for at least 2 seconds to activate and deactivate.
36. Single indicator - This indicates the unit is in single play mode, the unit will play a single track and
return to CUE mode. If the SINGLE indicator is not displayed the unit is in continuous mode.
37. Track indicator - This double digit indicator details a current track. The number displayed in the
track indicator is a direct reference to a track being selected for programming or a track in play, pause, or cue
mode.
38. PLAY INDICATOR - The “PLAY” indicator will glow when the unit is in play mode.
©American Audio® - www.americanaudio.com - UCD-100 Instruction Manual Page 11Functions and Controls - Remote
52 39
40
51 41
50 42
49
48 43
47
46 44
45
The Max. Range of the remote is 20ft. The beam can be affected by the angle, always aim the re-
mote directly to the IR receiver.
39. SOURCE SELECTOR - Press this button to select your desired playback source. Select either
CD Player, USB 1, or USB 2. The source indicator LED will light when the selected source is activate.
You can also use this button to record a demo from the current playing track.
40. IN, OUT, & RELOOP -
IN BUTTON - “cue ON THE FLY” - This function allows you to set a CUE POINT (see CUE POINT
page 17) without music interruption (“on the fly”). This button also sets the starting point of a loop
(see LOOP).
Out Button - This button is used to set the ending point of a loop. A loop is started by pressing
the IN BUTTON, pressing the OUT BUTTON set the loop ending point. The loop will continue to play
until the OUT BUTTON is pressed once again.
RELOOP BUTTON - If a LOOP has been made (see setting a LOOP on page 21), but the CD Player
is not actively in LOOP mode (a loop is not playing), pressing the RELOOP button will instantly
reactivate the LOOP mode. To exit the loop, press the LOOP OUT BUTTON.
41. PLAY/PAUSE Button - Each press of the PLAY/PAUSE Button causes the operation to change
from play to pause or from pause to play. While in play mode the green play button LED will glow, and
while in pause mode the green play LED will flash.
42. Stop Button - This button is used to stop playback.
43. Pitch percentage & Pitch bend buttons -
(-) PITCH BEND - The (-) pitch bend function creates a momentary “Slow Down” in the pitch
speed (Beats per minute - BPM) when the pitch (10) function is activated.
0% button - This button is used to change the pitch percentage to 0%.
(+) PITCH BEND - The (+) pitch bend function creates a momentary “BUMP” in the pitch speed
(Beats per minute - BPM) when the pitch (10) function is activated.
©American Audio® - www.americanaudio.com - UCD-100 Instruction Manual Page 12Functions and Controls - Remote
44. key lock - This button is used to toggle the Master Tempo function on and off.
45. mute button - This button is used to mute playback.
46. volume control buttons - These buttons are used to adjust the volume of internal attenu-
ator.
47. folder search buttons - These buttons are used to scroll through the different folders on
your MP3 disc or USB device.
48. track search buttons - These buttons are used to scroll either forwards or backwards
through a track.
49. SEARCH BUTTONS - These buttons are used to scroll through the different tracks.
50. SGL/CTN - This button allows the unit’s play mode to change between Single and Continuous.
In single mode the unit will play a single track and return to cue mode. In continuous mode the unit
continues to play track by track.
51. CUE - Pressing the CUE button during playback immediately pauses playback and returns the
track to the last set cue point (see setting a CUE POINT, page 17).
52. OPEN/CLOSE (Transport Tray Open/Close) - This button is used to open and close the trans-
port tray. NOTE: When a disc is already loaded in the transport tray, the tray will not open unless the
unit is in pause or cue mode.
©American Audio® - www.americanaudio.com - UCD-100 Instruction Manual Page 13Basic Operation
1. Opening and Closing the Disc Tray
This is an electronic operation and can only work when the power is on. Press the OPEN/CLOSE button (3)
to open or close the disc tray. Pressing the PLAY/PAUSE button (15), will also automatically close the tray if
it is open and immediately cue any CD that is in it. If the transport tray is left open for more than 60 seconds it
will close automatically to prevent accidental damage to the transport. Again if a CD is left in the transport tray
it will immediately cue to the first song. The disc tray cannot be opened during playback to prevent playback
from being interrupted if the OPEN/CLOSE button (3) is pressed accidentally. Stop playback, then press the
OPEN/CLOSE button (3).
Figure 1
2. Loading discs
The UCD-100 can play both 3 inch (8 cm) and 5 inch (12 cm) compact discs (CD’s). Odd shaped and oval CD’s
are not compatible. When loading a CD into the unit always hold the disc by its' edges and place it in the disc
tray. Never touch the signal surface (the glossy side). When using 5 inch/12 cm discs, place the disc in the outer
tray guides (figure 2), and when using 3 inch/8 cm discs, place them securely in the inner guides (figure 3).
CAUTION:
• Never insert any foreign objects in the disc tray.
• NEVER attempt to insert more than one disc in the disc tray at a time. Doing so may result in severe
damage to the unit.
• NEVER force the transport tray open or closed when the power is off, as this may result in malfunction
and damage the transport system.
Figure 2 - 5 in. / 12cm disc Figure 3 - 3 in. / 8cm disc
©American Audio® - www.americanaudio.com - UCD-100 Instruction Manual Page 14Basic Operation
3. Loading USB DEVICE
The UCD-100 can only read SDHC (High Capacity) Cards up to 32GB. The file format is Mp3 only. When
connecting a USB stick, USB card reader, or external hard drive make sure you are correctly lined up with the
USB port and gently insert the USB connection. To disconnect a USB drive, stop playback and “pull out” the
USB connection. Please see page 7 for USB information.
CAUTION:
• NEVER remove a USB device while in PLAY mode.
Figure 4
4. Selecting your audio source
Select your desired audio source using the SOURCE SELECTOR BUTTON (2). This button lets you toggle
between either the CD player, USB port 1 and USB port 2. The LED's will verify which source is active. The
different sources can only be selected while in PAUSE mode.
Figure 5
5. Selecting Tracks
Select a desired track by using the FOLDER/TRACK KNOB (14). Press the FOLDER/TRACK BUTTON (14) so
that the FOLDER LED is NOT lit. Rotate the FOLDER/TRACK KNOB (14) clockwise to select the next track, or
rotate the knob counter-clockwise to select the previous track. When you are using the knob to select a new
track during playback (a track already playing) the new track you selected will immediately begin playback as
soon as the search operation is completed.
Figure 6
©American Audio® - www.americanaudio.com - UCD-100 Instruction Manual Page 15Basic Operation
6. STARTING PLAYBACK
Insert an audio CD as describe on the previous page (loading discs). Pressing the PLAY/PAUSE button
(15) with an audio CD inserted will immediately start playback. The point at which playback starts (cue point)
will automatically be stored in the memory as the cue point. The unit will return to this cue point (the point at
which playback started) when the CUE button (16) is pressed.
Figure 7
7. Stopping Playback
Stopping playback will not stop the drive mechanism, but merely pause or cue the track. There are two ways
to stop playback:
8. Pausing
Pausing temporarily stops playback. Pressing the PLAY/PAUSE button (15) changes the operating mode
between play and pause. The PLAY/PAUSE Button LED will flash repeatedly when pause mode is activated
or when a track is in cue mode.
1) Press the PLAY/PAUSE button (15)
during playback to pause at that point.
Figure 8
2) Press the CUE button (16) during
playback to return the track to it’s last
cue point.
Figure 9
©American Audio® - www.americanaudio.com - UCD-100 Instruction Manual Page 16Basic Operation
9. Auto cue
”Cueing” is the action of preparing for playback. The unit is designed to automatically cue at the first audible
signal on the first of a disc when a disc is inserted. If a track is selected before a disc is inserted, the unit will
automatically cue to the first audible signal for the selected track.
10. Setting Cue Points
A cue point is the exact point playback will begin when the PLAY/PAUSE BUTTON (15) is pressed. A cue point
may be created anywhere on a disc or in a track.
Use the JOG wheel (18) to set a cue point by
frame. While the disc is in pause or cue mode,
use the JOG wheel (18) to scroll through a
track to find your desired starting point. Once
you have found your desired cue point press the
Play button (15) to enter this point in to the
unit's memory. At this point when ever the CUE
Button (16) is pressed it will return the track
to this exact point.
Figure 10
11. Frame search
This feature allows you to scroll through a track to
set a cue, or loop point. To use the scroll function
you must first be in Pause Mode or Cue Mode.
Once you are in Pause or Cue mode, use your
finger tip or hand to turn the JOG wheel (18)
to scroll through the track (figure 11). Turning the
wheel in a clockwise direction will advance the
frame search and turning the wheel in a counter-
clockwise direction rewinds the frame search.
When you use the JOG wheel (18) the moni-
tor (headphone level) of a mixer allows you to
here what you are scrolling through. Once you
reach your desired starting point you can set a Figure 11
cue (starting) point by pressing the PLAY/PAUSE
BUTTON (15) as in figure 11. Pressing the CUE
Button (16) will return the disc to the cue point
just set.
10. Frame search (forward /
reverse)
This function lets you a frame search through a
track. To do this press either the forward or reverse
search buttons (13).
Figure 12
©American Audio® - www.americanaudio.com - UCD-100 Instruction Manual Page 17Basic Operation
11. Setting output volume level
This function lets you set the output volume level.
Press the track knob (14) and press either the
(-) PItch bend button or the (+) pitch but-
ton (11) depending on if you want to raise or lower
the volume.
Figure 13
12. Changing the time display (26)/Time bar (27):
The time may be displayed in three different modes; Total Remain, Remain, and Elapsed. During normal play-
back, pressing the TIME button (5) as in figure 14, will change the time display information (26) in the LCD.
The following is a break down of the time settings and their definitions:
1) Total remain (34) - This details the time in the LCD as the current CDs’ total remaining
time.
2) Remain (34) - This details the time in the LCD as the current tracks’ remaining running time.
3) ELAPSED - This details the time in the LCD as the current tracks’ elapsed running time.
The unit will indicate the elapsed time when neither the TOTAL REMAIN OR REMAIN indica-
tors are showing. Note: When playing a Mp3 disc the TOTAL REMAIN time of a disc cannot be
shown. Only the REMAIN time and ELAPSED time of the track.
Time bar indicator - The time bar in the LCD visually details the time defined in the time meter (26). This
bar is also dependent on the selected time function; Remain (34) or total REMAIN (34). This bar will begin
to flash when 15 seconds of a track remain and will begin to rapidly flash when three seconds of a
track remain. The flashing bar is a great visual reminder a track is about to end. The flashing bar will
function regardless of which time mode the unit is in.
Figure 14
©American Audio® - www.americanaudio.com - UCD-100 Instruction Manual Page 18Basic Operation
13. Pitch adjustments
This function will increase or decrease the playback speed or "PITCH," of a track. The maximum pitch bend
percentage allowed is +/-16%. The pitch SLIDER (8) is used to decrease or increase the playback pitch. If
the slider is move up (towards the top of the unit) the pitch will decrease, if the slider is moved down (towards
the bottom of the unit) the pitch will increase.
Activating the Pitch Slider (8):
To activate the pitch slider (8), you must turn the
pitch function on. Press the PITCH BUTTON (10)
for at least 2 seconds to turn on the pitch function,
when the pitch function is activated the PITCH LED
(9) will begin to glow. If the pitch function is not acti-
vated the pitch slider (8) will not function.
Figure 15
Using the Pitch Slider (8): To use the pitch
slider (8) slide the slider up and down. Down will
increase the pitch and up will decrease the pitch.
When the slider is in the center position, there is
zero pitch being applied to a track.
Figure 16
Using the Pitch Slider Percentage Selector
(10): You may choose a pitch operating range at
any time. To change the operating range be sure the
pitch function is turned on, see figure 17. The pitch
percentage can be changed between +/-4%, +/-8%,
+/-16%, and 100%. 4% will allow the least amount
of pitch manipulation and 100% will allow the most
amount of pitch manipulation. To adjust the different
values, press the Pitch ON/Off Button (10) and
Tap on the % Button (10) until your desired value is
Figure 17 reached. The L.E.D. of the % Button (10); glowing
yellow for 4%, glowing green for 8%, or glowing red
for 16%, and all LEDs glowing for 100%.
©American Audio® - www.americanaudio.com - UCD-100 Instruction Manual Page 19Basic Operation
14. Pitch BEND
This function will momentarily increase or decrease a tracks playback speed using the (-) & (+) pitch but-
tons (11). The maximum pitch bend percentage allowed is +/-16%. The pitch bend function will work in con-
junction with the Pitch slider 118) pitch setting. For example, if the pitch slider (11) is set to a 2% pitch
gain the pitch bending process will begin at 0% and will continue to the maximum of -/+16%.
Pitch bend buttons (11)
The (+) PITCH BEND button (11) will provide a speed bump and the (-) PITCH BEND button (11) will pro-
vide a slow down. The extent to which the speed changes is proportionate to the amount of time the button
is pressed. For example, if the (+) PITCH BEND button (11) is held down continuously, the disc speed will
increases and will continue to increase until it reaches a maximum of 16% speed gain. When you release the
(+) Pitch bend button (11) the disc speed will automati ally return to it’s previous speed.
c
Holding down or tapping on the (+) PITCH
BEND button (11) will provide a speed
bump in the playback pitch.
Figure 18
Holding down or tapping on the (-) PITCH BEND
button (11) will provide a slow down in the
playback pitch.
Figure 19
JOG wheel (18)
The JOG wheel (18) will temporarily bend
the pitch if a track is in play mode. Turning
the wheel in a clockwise direction will increase
your track pitch and turning the wheel in a
counter-clockwise direction will slow your
track pitch. The speed you rotate the JOG
Figure 20 wheel (18) will determine pitch bend percent-
age, to a maximum of +/-100%.
©American Audio® - www.americanaudio.com - UCD-100 Instruction Manual Page 20Basic Operation
15. Creating and playing a Seamless Loop
A seamless loop is a sound loop that plays continuously without sound interruption. You can use this loop to
create dramatic effect in your mixing. This loop has no time limit and you could actually loop the entire length
of disc.
1) Press PLAY/PAUSE BUTTON (15) to activate
playback mode.
Figure 21
2) Press the in Button (17). This will set the
starting point of the SEAMLESS LOOP (figure
22). The IN Button (17) will blink.
Figure 22
3) Press the out Button (17) to set the end-
ing point for your SEAMLESS LOOP (Figure 23).
The out and IN ButtonS will stay lit indicating
a SEAMLESS LOOP is playing. Press the out
Button again to stop the Loop.
Figure 23
4) Press the RELoop Button (17) to reactivate
the SEAMLESS LOOP. Press the OUT BUTTON
(17) to deactivate the loop.
Figure 24
©American Audio® - www.americanaudio.com - UCD-100 Instruction Manual Page 21Internal Menu
Hold TIME BUTTON for 3 seconds to enter the internal menu. Turn TRACK KNOB to scroll through the differ-
ent menus and press the TRACK KNOB to enter the corresponding submenu. Turn TRACK KNOB to change
the submenus and press TIME BUTTON to memorize your settings in any operating mode and exit the menu.
1. Playlist – Normal / Title/ Artist / Album/ Genre
Normally the unit will read your USB devices in order of folder name and file names in folders. Title, Artist,
Album and Genre will use your last built database file when scrolling through the selected database in alpha-
betical order. When new files are added it is necessary to build a new database for the MP3 files to read in
any mode described.
2. Sleep Time – No sleep, 5~120 min
Set the time the player takes to enter sleep mode. When in sleep mode, the player will either read sleep or
ZZZZZ on the LCD screen.
3. Line Setup – MODE= 1~3(Line mode)
Dis=0.5~12.0 sec. (LINE NAME start/stop time adjustment)
Run=50~2000 msec. (LINE NAME move time adjustment)
4. Bit rate – Display ON/OFF
Display the bit rate off MP3 files.
5. Version – CON:XX (Control version)
DSP:XX (DSP version)
SER:XX (Servo version)
Displays the firmware version.
6. Load Default – Press TRACK Knob to enter load defaults. (LCD displays “Load OK”.)
Will reset all settings to factory default except for Firmware version.
7. Exit & Save – Exit & Save setting to next power on (LCD displays “Saving”.)
This will save all changes if changes are not saved the unit will revert to last saved changes on power off.
Press the TRACK knob to fast exit & save in any operating mode.
NOTE:
SLEEP TIME: The CD player automatically shuts off the transport and laser after about 15 minutes when in
pause or cue mode). This extends the life of your motor drive and laser. During sleep mode the display
shows the word “SLEEP”. To wake up the player, just press the cue or play button, the display turns to
normal and is ready to receive instructions. You can enter the Sleep Time menu to adjust sleep time, range
is 5~120 minutes.
SAVE: PITCH ON/OFF, PITCH RANGE, SGL/CTN, AUTO CUE, TIME MODE, KEY LOCK, DISPLAY/SCROLL,
TIME/JOG MODE.
DEFAULTS: PITCH (ON), PITCH RANGE (8%), PLAY MODE(CTN), AUTO CUE(ON), TIME MODE
(REMAIN), KEY LOCK(OFF), BIT RATE(Disp. ON), REPEAT MODE (OFF), PLAYLIST
(NORMAL), SLEEP TIME (15 min), LINE SETUP(model 1), DISPLAY(1 sec),RUN TIME(150msec)
©American Audio® - www.americanaudio.com - UCD-100 Instruction Manual Page 22database builder
Minimum Hardware Requirements:
CPU: Intel Pentium 4 1GHz processor or above, Intel Centrino Mobile Technology 1.6GHz
RAM: 512MB RAM
DISC SPACE: 100MB of free disc space needed
OS: Microsoft Windows XP SP3, Vista SP2
The device includes a database management software that enables you to search for your files by
Title, Artist, Album, and Genre.
Installation:
Refer to the following figures for installing database management software on your computer.
Step 1: Click Next > Step 2: Click Next >
Step 3: Click Install Step 4: Processing
The database builder will scan your USB
hard drive and create database files so
that you may locate the files in your music
library to your liking.
Step 4: Click Finish
©American Audio® - www.americanaudio.com - UCD-100 Instruction Manual Page 23database builder (PC Only)
To open the database builder, “click” on your start menu, then programs, then American Audio, Da-
tabase Builder. To build a database your hard drive must FAT formatted.
Build database file Drive Selector: Select
on memory device. your desired drive to for-
mat or build a database
Format the selected file.
source. Note: Make sure
that all files are backed
up prior to formatting
your device.
How to format your memory device.
1. Select your desired device in the drop down
menu.
2. Click Format, on the modes in the left
column.
3. Click Format. For best results set the cluster
size to Auto.
How to create a database file.
1. Select your desired device.
2. Select Build Database in the left column.
3. Click Build.
©American Audio® - www.americanaudio.com - UCD-100 Instruction Manual Page 24database builder
Errors:
1. Failed to Open Device: Your drive is a non
supported format.
2. File Error: This is due to MP3 file not have a
identified ID3 tag.
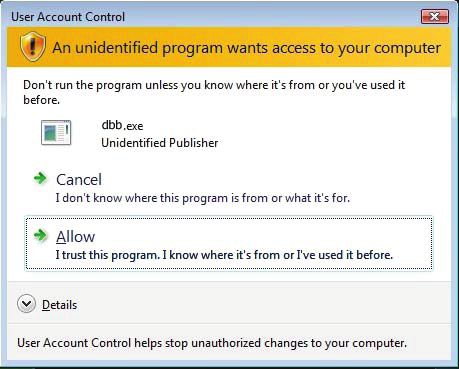
Windows 7/Vista may warn you accord-
ing to your security settings. Select Allow
if you wish to install the database builder
program.
©American Audio® - www.americanaudio.com - UCD-100 Instruction Manual Page 25troublshooting
Disc Read Error The disc is unable to read in the CD drive, make sure that the
disc is clean and not scratched. If the problem continues try a
different CD, make sure that the CD is CDA or MP3 format.
If the disk takes over 20 second or more to read the CD lens will
stop reading, this means the disc TOC was unreadable. Try
another disk or clean the troubled disc.
If problems continue with CD drives call American Dj service.
USB device not reading When using Hard Drives it is recommended that you use a hard
drive with an external power supply or one that does not exceed
5 volt power consumption. If your hard drive resets itself when
plugged into the USB ports on the UCD-100/200 you may need
an external power supply. Contact your device manufacturer for
accessory information.
If thedrive doesn’t read the device, make sure that your device is
formatted to a compatible FAT format. WARNING—DO NOT
FORMAT YOUR DEVICE WITH OUT BACKING UP YOUR
FILES.
Music files not found in -Make sure that the file is an MP3 file.
USB device or Data - If it does not show up on the database modes ( album;artist;
base etc) use the database builder to update you library.
File Error when building Remove the file that cause the database builder to stop and try
dB file again, if problem continues remove the folder and try again.
©American Audio® - www.americanaudio.com - UCD-100 Instruction Manual Page 26You can also read