USE + CARE MANUAL UTILISATION + ENTRETIEN MANUEL USO + MANTENIMIENTO MANUAL - RANGE TOP
←
→
Page content transcription
If your browser does not render page correctly, please read the page content below
P. 3   USE + CARE
        MANUAL

P. 31   UTILISATION + ENTRETIEN
        MANUEL

P.59    USO + MANTENIMIENTO
        MANUAL

              RANGE TOP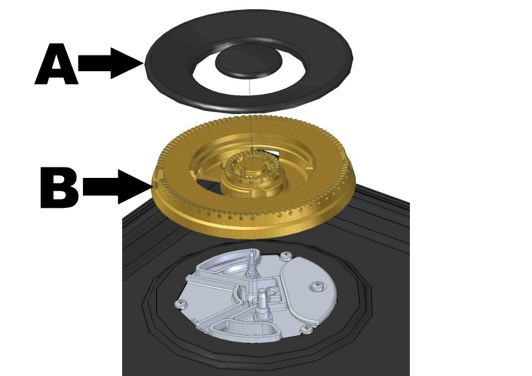
USE + CARE
      MANUAL

     RANGE TOP MODELS
              FRT304GN
              FRT366GN

3
Congratulations on your recent Forza purchase! Before you begin using your new Forza product, please take a moment
to review the Use + Care Manual. You will find the answers to all of your questions as well as some very important safety
information. Your Forza product is ready and waiting to be used for your next gourmet creation!

Table of Contents
05 General Warnings

13 Your Product

14   Use

17   Accessories

17   DIY Maintenance & Cleaning

20 Cleaning Chart

22 Troubleshooting

24 Service Information
25 Warranty

This Forza appliance is proudly made in Modena, Italy
by GlemGas S.p.A, a family owned company.
www.forzacucina.com

                                                              4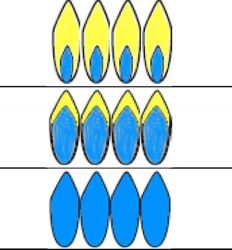
General Warnings
We have provided many important safety messages in this manual and on your appliance. Always read and obey all safety
messages.

                This is the safety alert symbol.
                This symbol alerts you to potential hazards that can kill or hurt you and others.
                All safety messages will follow the safety alert symbol and either the word “DANGER” or “WARNING.”

                                                            You can be killed or seriously injured if you don’t immediately
                                                            follow instructions.

                                                            You can be killed or seriously injured if you don’t follow
                                                            instructions.

All safety messages will tell you what the potential hazard is, tell you how to reduce the chance of injury, and tell you
what can happen if the instructions are not followed.

WARNING: If the information in this manual is not followed exactly, a fire or explosion
may result causing property damage, personal injury or death.
Do not store or use gasoline or other flammable vapors and liquids in the vicinity of this or any other appliance.

What to do if you smell gas:
• Do not try to light any appliance.
• Do not touch any electrical switch.
• Do not use any phone in your building.
• Immediately call your gas supplier from a neighbor’s phone. Follow the gas supplier’s instructions.
• If you cannot reach your gas supplier, call the fire department.

Installation and service must be performed by a qualified installer, service agency or the gas supplier.

IMPORTANT: Do not install a ventilation system that blows air downward toward this gas cooking appliance. This type of
ventilation system may cause ignition and combustion problems with this gas cooking appliance resulting in personal injury
or unintended operation.

IMPORTANT: Save these instructions for the local electrical inspector use.

INSTALLER: Please leave this manual with owner for future reference.

OWNER: Please keep this manual for future reference.

                                                                5                                                             EN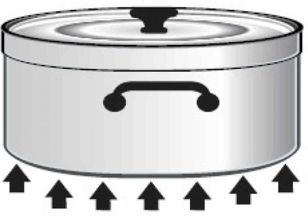
Poisoning Hazard
Never cover any slots, holes, or passages in the oven bottom, cover
an entire rack or the oven floor with materials such as aluminum foil.
Doing so blocks airflow through the oven and may cause carbon
monoxide poisoning. Aluminum foil linings may also trap heat, causing
a fire hazard.

Clean the appliance with caution. If a wet sponge or cloth is used
to wipe spills on a hot cooking area, be careful to avoid steam burn.
Some cleaners can produce noxious fumes if applied to a hot
surface. Follow the directions of the cleaner manufacturer.

Never use this appliance as a space heater to heat or warm the room.
Doing so may result in carbon monoxide poisoning and overheating
of the appliance.

Failure to follow this advice may result in poisoning or death.

Hot Surface Hazard
Accessible parts may become hot during use.

Do not touch burners, areas near burners. These may be hot enough
to cause burns even though they are dark in color. During and after
use, do not touch or let clothing or other flammable materials contact
these parts and surfaces until they have had sufficient time to cool.
Other parts and surfaces of the appliance may become hot enough
to cause burns–among these areas are the grates, back trim and
oven vents at the back of the cooktop, front edge, surfaces adjacent
to the cooktop.

Use only dry potholders–moist or damp potholders on hot surfaces
may result in burns from steam. Do not let the potholder touch hot
heating elements. Do not use a towel or other bulky cloth.

Let hot grease cool before attempting to handle it.

Failure to follow this advice could result in burns and scalds.

                  6
Please read all instructions before using this appliance.
Read this instruction booklet before installing and using the appliance.
The manufacturer will not be responsible for any damage to property or to persons caused by incorrect
installation or improper use of the appliance.
The manufacturer reserves the right to make changes to its products when considered necessary and
useful, without affecting the essential safety and operating characteristics.
This appliance has been designed for non-professional, domestic use only.
Do not use this appliance to heat a room.
Do not place any pot or pan on the open oven door. The door is made of glass and it can break if loaded with
a weight.
Before beginning installation, please read these instructions completely and carefully.
Do not remove permanently affixed labels, warnings, or plates from the product. This may void the warranty.
Please observe all local and national codes and ordinances.
Please ensure the range is properly grounded.
The installer should leave these instructions with the consumer who should retain for local inspector's use
and for future reference.
The plug should always be accessible.
Installation must conform with local codes or in the absence of codes, the National Fuel Gas Code
NSIZ223.1 latest edition. Electrical installation must be in accordance with the National Electrical Code,
ANIS/NFPA70–latest edition and/or local codes.
Installation of any gas fired equipment should be made by a licensed plumber. A manual gas shut off valve
must be installed in the gas supply line ahead of the oven in the gas flow for safety and ease of service.
This appliance should be serviced only by a qualified service technician. Contact the nearest authorized
service center for examination, repair or adjustment.
Do not repair or replace any part of the appliance unless specifically recommended. Refer service to an
authorized servicer.
Do not operate this appliance if it is not working properly or if it has been damaged, until an authorized servicer
has examined it.
Install or locate this appliance only in accordance with the Installation Instructions.
7 ENUse this range only as intended by the manufacturer. If you have any questions, contact the manufacturer.
Do not cover or block any openings on this appliance.
Use this appliance only for its intended use as described in this manual. Do not use corrosive chemicals,
vapors, or non-food products in this appliance. This type of oven is specifically designed to heat or cook.
It is not designed for industrial or laboratory use. The use of corrosive chemicals in heating or cleaning will
damage the appliance.
In the event that personal clothing or hair catches fire, DROP AND ROLL IMMEDIATELY to extinguish
flames.
In the event of a grease fire SMOTHER FLAMES with a close-fitting lid, cookie sheet, or other metal tray,
then turn off the gas burner.
BE CAREFUL TO PREVENT BURNS. If the flames do not go out immediately, EVACUATE AND CALL THE
FIRE DEPARTMENT.
Do not use water, including wet dishcloths or towels on grease fires. A violent steam explosion may result.
NEVER PICK UP A FLAMING PAN. You may be burned.
ALWAYS have a working SMOKE DETECTOR near the kitchen.
LEAVE THE HOOD VENTILATOR ON when flambéing food.
Do not obstruct the flow of combustion air at the oven vent nor around the base or beneath the lower front
panel of the range.
Avoid touching the vent openings or nearby surfaces as they may become hot while the oven is in operation.
This range requires fresh air for proper burner combustion.
NEVER cover any slots, holes or passages in the oven or cover an entire rack with aluminum foil. Doing so
blocks air flow through the oven and may cause carbon monoxide poisoning. Aluminum foil linings may also
trap heat, causing a fire hazard.
NEVER use this appliance as a space heater to heat or warm the room. Doing so may result in carbon
monoxide poisoning.
Do not allow alluminium foil, plastic, paper or cloth to come in contact with hot burners or grates.
Do not allow pans to boil dry.
Do not store items of interest to children above the appliance. If children should climb onto the appliance to
reach these items, they could be seriously injured.
8IN CASE OF AN ELECTRICAL FAILURE
To light the burners manually, carefully hold a lit match to the burner ports and turn the gas control knob to high.
During a power failure, you can use the standard cooktop burners, but each must be lit with a match.
The use of gas cooking appliances results in the production of heat and moisture.
It is the personal responsibility and obligation of you, the user, to have this appliance connected to the electrical power supply
by a qualified electrician, in accordance with the National Electrical Code and/or applicable local codes and ordinances.
Read this Use and Care Guide carefully before using your new range, to reduce the risk of fire, electrical shock, or injury to
persons.
Ensure proper installation and servicing. Follow the installation instructions provided with this product. Have the range
installed and electrically grounded by a qualified technician.
Have the installer show you where the electric circuit breaker and the gas supply shut off valve are located so you know how
and where to turn off the gas and electricity to the range.
In the event a burner goes out and gas escapes, open a window or a door. DO NOT attempt to use the range until the gas has
had time to dissipate. Wait at least 5 minutes before using the range.
When using the Flush Island Trim, recommends a minimum 12’’ (305 mm) rear clearance to a combustible surface.
Clearances from non-combustible materials are not part of the ANSI Z21.1 scope. Clearances of less than 12’’ (305 mm) must
be approved by the local codes and/or by the local authority having jurisdiction.
TO REDUCE THE RISK OF A GREASE FIRE:
Never leave surface units unattended at high settings.
Boilovers cause smoking and greasy spillovers that may ignite. Heat oils slowly on low or medium settings.
Always turn hood ON when cooking at high heat or when flambéing food (i.e. Crepes Suzette, Cherries Jubilee,
Peppercorn Beef Flambé).
Clean hood filters frequently. Grease should not be allowed to accumulate on fan or filter.
Use proper pan size. Always use cookware appropriate for the size of the cooktop burner.
9 ENWhen children become old enough to use the appliance, it is the responsibility of the parents or legal guardians to ensure that
they are instructed in safe operation of the appliance by qualified person.
DO NOT store items of interest to children above or at the back of the range. If
children should climb onto the appliance to reach these items, they could be
seriously injured.
DO NOT allow anyone to climb, stand, lean, sit, or hang on any part of an appliance, especially a door. This can damage the
appliance, and the unit may tip over, potentially causing severe injury.
DO NOT allow children to use this appliance unless closely supervised by an adult.
Children and pets should not be left alone or unattended in the area where the appliance is in use. They should never be
allowed to play in its vicinity, whether or not the appliance is in use.
NEVER use any part of the range or ovens for storage. Flammable materials can catch fire and plastic items may melt or
ignite.
DO NOT hang articles from any part of the appliance or place anything against the ovens. Some fabrics are quite flammable
and may catch on fire.
Use only dry potholders: moist or damp potholders on hot surfaces may cause burns from steam. DO NOT use a towel or
other bulky cloth in place of potholders. DO NOT let potholders touch hot elements, hot burners, or burner grates.
TO REDUCE THE RISK OF INJURY TO PERSONS, IN THE EVENT OF A RANGE
TOP GREASE FIRE, OBSERVE THE FOLLOWING:
Smother flames with a close-fitting lid, cookie sheet, or other metal tray, then turn off the gas burner or the
electric element. Be careful to prevent burns. If the flames do not go out immediately, evacuate and call the
fire department.
Never pick up a flaming pan - You may be burned.
DO NOT USE WATER, including wet dish cloths or towels - a violent steam explosion will result.
Use an extinguisher only if:
You know you have a class ABC extinguisher and you already know how to operate it.
The fire is small and contained in the area where it started.
The fire department is being called.
You can fight the fire with your back to an exit.
10When using the cooktop: DO NOT TOUCH THE BURNER GRATES OR THE IMMEDIATE SURROUNDING AREA. Areas
adjacent to the burners may become hot enough to cause burns.
Never leave the range unattended when using high flame settings. Boil overs cause smoking and greasy spillovers that may
ignite. Also, if the burner flames and igniter are smothered with spillage, unburned gas will escape into the room.
DO NOT heat or warm unopened food containers. Build-up of pressure may cause the container to burst and cause injury.
Only certain types of glass, heatproof glass-ceramic, ceramic, earthenware, or other glazed cookware are suitable for
cooking on the range burners. This type of cookware may break with sudden temperature changes.
Use only on low or medium heat settings according to the utensil manufacturer’s directions.
During cooking, set the burner control so that the flame heats only the bottom of the pan and does not extend beyond the
bottom of the pan.
Always use pots and pans that have flat bottoms large enough to cover the burner. The use of undersized pots and pans
could expose a portion of the flame and may result in ignition of clothing.
To minimize the risk of burns, ignition of flammable materials and unintentional spillage, position handles of pots and pans
inward so they do not extend over adjacent work areas, cooking areas, or the edge of the range’s cooktop.
DO NOT use flammable cleaners to clean the range.
Hold the handle of the pan to prevent movement when stirring or turning food.
WARNING: After a spill or boil over, turn off the burner and using caution due to possible hot surfaces,
clean around the burner and burner ports. After cleaning, check for proper operation.
Ensure all cooktop controls are turned off and the cooktop is cool before using any type of aerosol cleaner on or around
the cooktop. The chemical that produces the spraying action could, in the presence of heat, ignite or cause metal parts to
corrode.
Place oven racks in desired position while oven is cool. If a rack must be moved while the oven is hot, do not let the potholders
contact the broiler element.
When using the oven do not touch the broiler element, the interior surfaces of the oven or the exterior area immediately
surrounding the door. Interior oven surfaces become hot enough to cause burns.
Use care when opening the oven door; let hot air or steam escape before removing or replacing foods.
DO NOT clean, rub, damage, move or remove the door gasket. It is essential for a good seal during baking. If the gasket
becomes worn or excessively soiled with food particles, replace gasket to assure a tight seal.
11 ENTo reduce the risk of burn injuries during cook top use, observe the following:
• Children or pets should not be left alone or unattended in an area where appliances are in use.
• Children should never be allowed to sit or stand on any part of the appliance.
• Do not store flammable materials on or near the cooktop.
• When using the cooktop: DO NOT TOUCH THE BURNER GRATES OR THE IMMEDIATE SURROUNDING AREA. Use
only dry potholders; moist or damp potholders on hot surfaces may cause burns from steam.
• Never leave the cooktop unattended when in use.
• Boilovers cause smoking, and greasy spillovers may ignite. A spill on a burner can smother all or part of the flame or hinder
spark ignition. If a boilover occurs, turn off burner and check operation. If burner is operating normally, turn it back on.
• During cooking, set the burner control so that the flame heats only the bottom of the pan and does not extend beyond the
bottom of the pan.
• Take care that drafts like those from fans or forced air vents do not blow flammable material toward the flames or push the
flames so that they extend beyond the edges of the pan.
• Always position handles of utensils inward so they do not extend over adjacent work areas, burners, or the edge of the
cooktop.
• Wear proper apparel. Loose fitting garments or hanging sleeves should never be worn while cooking.
• Never let clothing, potholders, or other flammable materials come in contact with hot burners or hot burner grates.
• Use only certain types of glass, heatproof glass ceramic, ceramic, earthenware, or other glazed utensils that are suitable
for cooktop use.
• Do not clean the cooktop while it is still hot. Some cleaners produce noxious fumes when applied to a hot surface.
For proper lighting and performance of the burners, keep the igniters clean and dry.
In the event that a burner goes out and gas escapes, open a window or a door.
Wait at least 5 minutes before using the cooktop.
Do not obstruct the flow of combustion and ventilation air.
Do not use aluminum foil to line any part of the cooktop.
If the range cookers is near a window, be certain blow over or near the burners;
they could catch on fire.
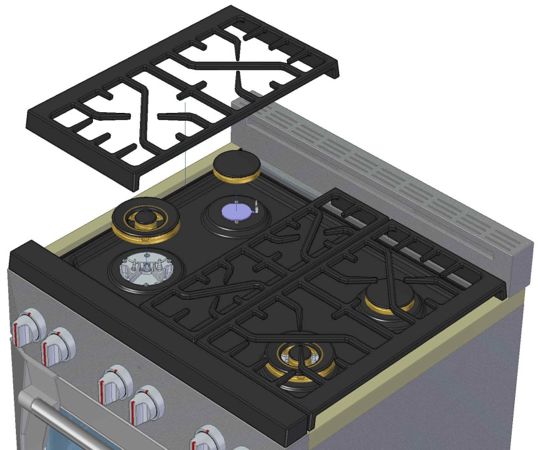
12Your Product
Rangetop 30”
KNOB COOKTOP BURNER BURNER OUTPUT RATINGS: BURNER OUTPUT RATINGS:
30” Model BTU/HR BTU/HR
NG (Natural) Gas, 5” W.C.P LP (Propane) Gas, 10” W.C.P.
1 Burner rear left 12,000 btu/h 12,000 btu/h
2 Dual Flame Burner front left 20,000 btu/h 20,000 btu/h
3 Dual Flame Burner front right 20,000 btu/h 20,000 btu/h
4 Burner rear right 12,000 btu/h 12,000 btu/h
Rangetop 36”
KNOB COOKTOP BURNER BURNER OUTPUT RATINGS: BURNER OUTPUT RATINGS:
36” Model BTU/HR BTU/HR
NG (Natural) Gas, 5” W.C.P LP (Propane) Gas, 10” W.C.P.
1 Burner Rear Left 12,000 btu/h 12,000 btu/h
2 Dual Flame Burner Front Left 20,000 btu/h 20,000 btu/h
3 Dual Flame Burner Front Right 20,000 btu/h 20,000 btu/h
4 Burner Central Rear 12,000 btu/h 12,000 btu/h
5 Dual Flame Burner Front Right 20,000 btu/h 20,000 btu/h
6 Burner Rear Right 12,000 btu/h 12,000 btu/h
13 ENUse
Cooktop
Turning on the Gas Burner
Press and turn the corresponding knob counter-clockwise to the MAX position.
When it is lit, hold the knob down for approximately 10 seconds, then release it and adjust flame intensity, being careful to
position the knob in the area between maximum and minimum (included) and never between maximum and zero to prevent
turning it off unexpectedly.
The burner may go out when you release the knob: this means that the thermocouple is not hot enough. If it does not ignite
within 15 seconds, wait 1 minute before trying again.
Dual Flame Burner
The dual flame burner has two separate flame rings to provide a complete heat regulation from the high power to simmering.
To set:
1) Push and turn the knob counter clockwise within the main high and low range, when the burner is turned on, the Simmer
flame ring ignite and remain on.
2) Set desired temperature within the high and low simmering range;
3) Continue turning the knob counter-clockwise to ignite both the flame rings and set the burner at its high power range.
Do not operate a burner using empty cookware or without cookware on the grate.
Do not touch the burner when the igniters are clicking
Do not let the burner flame extend beyond the edge of the pan.
Turn off all controls when not cooking.
14IMPORTANT:
Never leave empty cookware on a hot surface cooking area, element or surface burner.
Ideal cookware should have a flat bottom, straight sides, a well-fitting lid and the material should be of medium-to-heavy
thickness. Rough finishes may scratch the cooktop.
Aluminum and copper may be used as a core or base in cookware. However, when used as a base it can leave permanent
marks on the cooktop or grates. Cookware material is a factor in how quickly and evenly heat is transferred, which affects
cooking results. A nonstick finish has the same characteristics as its base material. For example, aluminum cookware with a
non-stick finish will take on the properties of aluminum. Use the following chart as a guide for cookware material
characteristics.
FLAME DESCRIPTION: Yellow Flames
Further adjustment is required
Yellow Tips on Outer Cones
Normal for LP Gas
Soft Blue Flames
Normal for Natural Gas
If the flame is completely or mostly yellow, verify that the regulator is set for the correct fuel. After adjustment, retest.
Some orange-colored streaking is normal during the initial start-up.
Allow unit to operate 4-5 minutes and re-evaluate before making adjustment.
Cookware Recommendations
WARNING: To avoid risk of serious injury, damage to appliance or cookware, please observe the following:
Bakeware, such as large casserole, pans, cookie sheet, etc. should never be used on the cooktop.
Placement of large stock pots should be staggered when used on the cooktop.
Select the base diameter to match the diameter of the flame. The diameter of the flame should be the same size as the pan
base or slightly smaller. Oversize or under size pans sacrifice cooking performance. A 5½’’ (140mm) base size is generally the
smallest recommended.
Avoid using high flame setting with a pan larger than the grate or with one that spans more than one burner, such as a griddle,
for prolonged periods of time. This can result in poor combustion that generates harmful by-products.
Balance is important for stability and even cooking. The handle must not be heavier than the pan and tilt in unevenly. A pan
must sit level on the grate without rocking or wobbling.
15 ENFood packaged in aluminum foil should not be placed directly on the burner grate. Aluminum foil can melt during cooking.
Do not let plastic, paper or cloth come in contact with a hot burner grate. They may melt or catch fire.
Never let a pan boil dry. This can damage your pan and the cooking surface.
Professional quality pans with metal handles are recommended because plastic handles can melt or blister if the flame
extends up the side of the pan. Professional quality pans are found at restaurant supply stores and gourmet specialty shops.
All cookware should have these characteristics: good heat conductivity, good balance, correctly sized base diameter, a
heavy, flat base, and a proper fitting lid.
For best cooking results, the flame should be contained under the bottom of the pan.
Aluminum and copper are pan materials that conduct the heat quickly and evenly. These metals are sometimes attached to
the base or in the core between stainless steel.
A heavy, flat base is more apt to remain flat when heated. Pan bases that are warped, dented, ridged or too lightweight will
heat unevenly. Heat and cool pans gradually to avoid sudden temperature changes which tend to distort cookware.
DO NOT add cold water to a hot pan.
A properly fitting lid will shorten cooking time and make it possible to use lower heat setting.
Specialty Cookware
Woks
Either flat-based or round-bottom woks with the accessory ring can be used on all models. Round bottom woks must be
used with a support ring. The Wok pan and the porcelain-coated cast iron wok support ring must be purchased separately.
16Canning Tips
• Use a cover when bringing the contents to a boil.
• Once the contents have reached a boil on high, use the lowest flame possible to maintain the boil or pressure.
Match Pan Diameter to Flame Size
The flame should be the same size as the bottom of the pan or smaller. Do not use small pans with high flame settings as the
flames can lick up the sides of the pan. Oversize pans that span two burners are placed front to rear, not side to side. Use
balanced pans. Pans must sit level on the cooktop grate without rocking. Center pan over burner. Use a lid that fits properly; a
well-fitting lid helps shorten the cooking time. Flat, heavy bottom pans provide even heat and stability.
Accessories
Some models are not provided with accessories.
Wok Ring
Useful when using a wok, use this accessory with high BTU burners
Slow Cooking / Moka
The cast-iron SlowCooking/Moka plate provides a steady temperature, evenly distributed
across a stable heating surface.
DIY Maintentance & Cleaning
It is necessary to periodically clean the oven thoroughly to avoid the formation of grease, which over time can produce smoke,
unpleasant odor and malfunctions. Below is a list of our tips concerning the various parts of your cooker.
WARNING:
• Do not use jets of steam to clean the appliance.
• Steam could reach the electrical parts, damaging them and causing short circuits.
• Do not use cleaning products that contain chlorine, ammonia or bleach on parts made of steel or superficially
treated with metal finishes (for example anodizing, nickel-plating, chrome-plating).
Food Stains or Residues
Do not use metallic sponges or sharp scrapers as they will damage the surfaces. Use ordinary non-abrasive products with the
aid of wooden or plastic utensils if necessary. Rinse thoroughly and dry with a soft cloth or a microfiber cloth.
17 ENCleaning the Cooktop
It is advisable to clean the hob daily after every use, once it has cooled down, using specific products for steel, or a normal
degreaser for colored cookers. Be careful to remove all cooking residues. We strictly advise you against using abrasive or
chlorine-based products.
Before cleaning, make sure all controls are off and the cooktop is cool.
Always use the mildest cleaner that will do the job. Use clean, soft cloths, sponges or paper towels.
Rub stainless steel finishes in the direction of the grain. Wipe area dry to avoid water marks.
Do not clean removable cooktop parts in any self-cleaning oven.
After cleaning, place all parts in their proper positions before using cooktop.
Cleaning the Pan Support
The pan supports must be cleaned on a regular basis with warm water and non-abrasive detergent, being careful to remove all
incrustations.
Cleaning the Burner Cap And Gas Spreader
Always keep the burner cap and gas spreader in place when using a surface burner. A clean burner cap and spreader will help
prevent poor ignition and uneven flames. Always clean the parts after a spillover and routinely remove and clean.
Burner Base and Injector
Gas must flow freely throughout the injector orifice to light properly. Keep this area free of soil and do not allow spills, food,
cleaning agents or any other material to enter the injector orifice opening. Protect it during cleaning.
Cleaning the Spark Plugs and Thermocouples
The burner caps and flame spreaders can be taken off to make it easier to clean the hob. Wash them with hot water and
non-abrasive detergent, making sure they are thoroughly dry before being re-installed.
A = Burner Cap
B = Burner Gas Spreader
18Following there is a procedure:
1) Remove the burner cap from the burner base and clean according to cleaning section.
2) Remove the burner spreader. Clean the gas tube opening and burner port according to cleaning section.
3) Clean the burner base with a damp cloth (keep the gas injector area free of cleaning agents and any other material
from entering the injector orifice).
4) Replace the burner spreader and cap, making sure the alignment pins are properly aligned with the slots.
5) Turn on the burner.
If the burner does not light, check cap and spreader alignment. If the burner still does not light, do not service the gas burner
yourself. Contact a trained repair specialist.
Be sure when lighting the burner:
• Gas spreader is seated correctly and pin is properly aligned with burner base slot.
• Cap is seated correctly and pin is properly aligned with gas spreader slot.
Burner Ports
Check burner flames occasionally. A good flame is blue in color, not yellow. Keep this area free of soil and do not allow spills,
food, cleaning agents or any other material to enter the burner ports.
19 ENCleaning Chart
The cleaners listed below indicate types of products to use and are not being endorsed. Use all products according to
package directions.
Part Cleaning Method
A. Chrome Plated Wash with hot sudsy water. Rinse thoroughly and dry. Or, gently rub with Soft Scrub®
Bon-Ami®, Comet®, Ajax®, Brillo® or S.O.S.® pads as directed. Easy Off® or Dow®
OvenCleaners (cold oven formula) can be used, but may cause darkening and
discoloration.Racks may be cleaned in the oven during the self-clean mode. However,
chromed racks will lose their shiny finish and permanently change to a metallic gray.
B. Painted Clean with hot sudsy water or apply Fantastik® or Formula 409® first to a clean sponge
or paper towel and wipe clean. Avoid using powdered cleansers and steel wool pads.
C. Enameled Immediately wipe up acidic spills like fruit juice, milk and tomatoes with a dry towel. Do
not use a moistened sponge/towel on hot porcelain. When cool, clean with hot sudsy
water or apply Bon- Ami® or Soft Scrub® to a damp sponge. Rinse and dry. For stubborn
stains, gently use Brillo® or S.O.S. ® pads. It is normal for porcelain to craze (fine lines)
with age due to exposure from heat and food soil.
D. Reflective Clean with hot sudsy water and sponge or plastic scrubber. Rub stubborn stains with
vinegar, Windex®, ammonia or Bon-Ami®. DO NOT USE HARSH ABRASIVES.
E. Stainless Steel / Zama Always wipe or rub with grain. Clean with a soapy sponge then rinse and dry. Or, wipe
with Fantastik® or Formula 409® sprayed onto a paper towel. Protect and polish with
Stainless Steel Magic® and a soft cloth. Remove water spots with a cloth dampened
with white vinegar. Use Zud®, Cameo®, Bar Keeper’s Friend® or RevereWare Stainless
Steel Cleaner®, to remove heat discoloration.
The entire Cooktop can be safely cleaned by wiping with a soapy sponge, then rinsing and drying. If stubborn soil remains,
follow the recommended cleaning methods below.
ATTENTION
• Before cleaning, be certain the burners are turned off and the grates are cool.
• Always use the mildest cleaner that will do the job. Use clean, soft cloths, sponges or paper towels.
• Rub stainless steel finishes in the direction of the grain. Wipe area dry to avoid water marks.
• Do not clean removable cooktop parts in any self-cleaning oven.
• After cleaning, place all parts in their proper positions before using cooktop.
20Parts and Materials Suggested Cleaners Suggestions/Reminders
Burner Base Damp cloth. Keep the gas injector area free of cleaning
(Cast aluminum) agents and any other material from
entering the injector orifice.
Gas Spreader Detergent and hot water; rinse and dry. Rub lightly, in a circular motion.
(Brass) Stiff nylon bristle-toothbrush to clean port Aluminium cleaners may dull the surface.
openings. To clean port opening, use a tooth brush
Abrasive cleansers: Revere ware® metal or straightened paper clip. Take care not
polish. Following package direction Use to damage / augment the shape of the
Brillo® or S.O.S.® pads. ports.
Rinse and dry.
Burner Cap and Grate Non abrasive cleaners: Hot water and The grates are heavy; use care when
(Porcelain enamel detergent, Fantastic, Formula 409. Rinse lifting. Place on a protected surface.
on cast iron) and dry immediately. Blisters/crazing/chips are common due
to the extreme temperatures on grate
Mild abrasive cleaners: Bon Ami® and Soft
fingers and rapid temperature changes.
Scrub®.
Acidic and sugar-laden spills deteriorate
Abrasive cleaners for stubborn stains:
the enamel. Remove soil immediately.
soap- filled steel wool pad.
Abrasive cleaners, used too vigorously or
too often, can eventually mar the enamel.
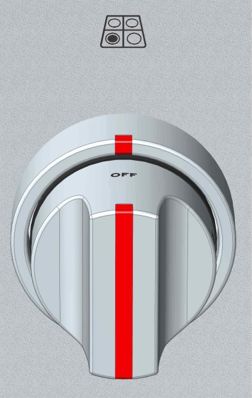
Control Knobs Hot sudsy water: rinse and dry immediately. Do not soak knobs.
(Zama) If necessary, remove knobs (lift straight Do not use abrasive scrubbers/cleaners.
up). Do not force knobs onto valve shaft.
Pull knobs straight away from control
panel to remove.
When replacing knobs, make sure knobs
are in the OFF position.
Do not remove seats under knobs.
Igniters Carefully wipe with a cotton swab Avoid excess water on the igniter. A damp
(Ceramic) dampened with water, ammonia or igniter will prevent burner from lighting.
Formula 409®. Gently scrape soil off with Remove any lint that may remain after
a toothpick. cleaning.
21 ENTroubleshooting
Before contacting service, check the following to avoid unnecessary service charges.
Problem Problem Solving Steps
Ignition will not operate Is the power supply cord unplugged?
Plug into a grounded 3 prong outlet.
Has a household fuse been blown or has the circuit
breaker been tripped?
Replace the fuse or reset the circuit.
Surface burners will not operate Is the power supply cord unplugged?
Plug into a grounded 3 prong outlet.
Has a household fuse been blown or has the circuit
breaker been tripped?
Replace the fuse or reset the circuit.
Is this the first time the surface burners have been
used?
Turn on any one of the surface burner knobs to release air
from the gas lines.
Is the control knob set correctly?
Push in knob before turning to a setting.
Are the burner ports clogged?
See “Cleaning the burner cap and gas spreader” section.
Surface burners flames are uneven yellow and/or noisy Are the burner ports clogged?
See “Cleaning gas burners” section.
Are the burner caps positioned properly?
See “Cleaning the burner cap and gas spreader” section.
Is propane gas being used?
The appliance may have been converted improperly.
Contact a service technician.
22Problem Problem Solving Steps
Surface burners makes popping noise Is the burner wet?
Let it dry.
Is the cap and gas spreader positioned correctly?
Make sure the alignment pins are properly aligned see
“Cleaning the burner cap and gas spreader” section.
Excessive heat around cookware on cooktop Is the cookware the proper size?
Use cookware about the same size as the surface cooking
area, element or surface burner. Cookware should not
extend more than 1 in (2.5 cm) outside the cooking area.
Cooktop cooking result not what expected Is the proper cookware being used?
See “Cookware” section.
Is the control knob set to the proper heat level?
See “Setting the Control Knobs” section.
23 ENService Information
If service is required, call your dealer or authorized service agency.
The name of the authorized service agency can be obtained:
• from the dealer or distributor in your area
• contacting the following telephone number 480.282.6406
• writing an email to service@forzacucina.com
Have the following information readily available:
• Model number
• Serial number
• Date purchased
• Name of dealer from whom purchased
• Clearly describe the problem that you are having
Record the information indicated below.
You will need it if service is ever required.
The model and serial number can be found under or behind the product .
Model no.
Serial no.
Date of purchase
Date installed
Dealer’s name
Address
If service requires installation of parts, use only authorized parts to insure protection under warranty.
Keep this manual for future reference.
24FORZA WARRANTY U.S.A.
FREESTANDNG GAS RANGES – WALL OVENS – RANGE TOPS – DISHWASHERS – RANGE HOODS
The warranties provided by Forza in this statement apply exclusively to Forza appliances and accessories sold as new
products to the original owner by a Forza authorized distributor, retailer, dealer or service center and installed in the United
States.
The warranties provided in this statement are not transferable and have validity from the date of original purchase.
Duration of warranty:
For twenty-four (24) months from the original date of purchase, the Forza warranty covers all parts and labor to repair or
replace, under normal residential use, any part of the product proving to be defective in material or workmanship as a result of
the original manufacturing process. Repair service must be performed by a Forza Authorized Service Center during normal
working hours.
Responsibilities of the buyer:
When writing or calling about a service problem, please include the following information:
• Your name, address and telephone number;
• Appliance model and serial number;
• Name of your dealer;
• A clear description of the problem you are having;
• Proof of purchase (sales receipt).
Cosmetic warranty:
Forza will cover parts showing cosmetic defects (doors, handles, glass, product frames, racking and interior, exterior surfaces)
in material and workmanship for a period of seven (7) days after the delivery of the unit. This coverage will include scratches,
stains, surface imperfections on stainless steel, paint and porcelain, with the exclusion of slight differences in color due to
materials and painting/enameling technologies. However, slight color variation may be noticed because of the inherent
differences in painted parts and porcelain parts as well as differences in kitchen lighting, product locations, and other factors.
Therefore, this warranty does not apply to color variation attributable to such factors.
WHAT IS NOT COVERED:
1) The product used in any commercial application.
2) Service trips to your home, during which no fault is found.
3) Repair service provided by any service agency that is not Forza authorized.
4) Damage or repair service to correct any service provided by an unauthorized agency.
5) Damage or repair service to correct the use, addition or substitution of any orginal part with an unauthorized part.
6) Installation not in accordance with local electrical codes or plumbing codes.
7) Defects or damage due to improper storage of the product.
8) Damages due to failure in following the manufacturer’s recommended care, cleaning and maintenance instructions;
in particular, damages to the oven and/or the cooktop if they have not been cared and cleaned according to these
instructions.
9) Defects, damages or missing parts on products sold out of the original factory packaging or from displays.
10) Service calls or repairs to correct the installation of the product and/or related accessories, calibrations and normal
adjustments after installation and setup, including burner adjustments.
25 EN11) Service calls to connect, convert or otherwise repair the electrical wiring and/or gas line to properly use the product.
12) Service calls to provide instructions on the use of a Forza product.
13) Repair or failure of the product if it is abused, misused, used improperly, used for other than the intended purpose or if
used commercially/industrially.
14) Damage or repairs caused by the use of harsh chemicals or cleaning products improperly applied.
15) Replacement of wear and tear parts.
16) Replacement of house fuses or resetting of circuit breakers.
17) Damages to anything situated next to the product, including, but not limited to, ceiling, floor or cabinetry.
18) Defects and damages arising from accidents, alterations, misuse, abuse, improper installation, or installation that does
not conform to instructions given by Forza.
19) Damages occurred during transit, handling and/or installation of the product.
20) Defects and damage arising from external forces beyond the control of Forza such as fire, flood, earthquakes and other
acts of God.
21) Forza cannot guarantee the availability of service in areas more than 30 miles from an authorized retailer. In such cases
where travel charges are levied, those will be borne by the consumer.
22) This warranty only covers service performed at the location of product installation and will not cover costs associated
with repairing off-site unless expressly authorized by Forza nor does it cover the travel costs associated with providing
service to remote locations.
23) Replacement filters for ventilation hood recirculating kits are not covered by the product warranty.
24) Products with original serial numbers that have been removed.
25) Replacement light bulbs are not covered by the product warranty.
26) Damages to people or property caused by the product or through its usage.
In the case that the product is will be installed in a remote area, where certified trained technicians are not reasonably available,
the customer will be responsible for the transportation costs for the delivery of the product to the nearest authorized service
center or for the travel costs of a certified trained technician.
Remote locations/area: are defined as being outside of a 30 miles from any service provider.
Forza reserves the right to revise this warranty at any time.
Forza does not assume any responsibility for incidental or consequential damages. Some states do not allow the
exclusion or limitation of incidental or consequential damages, so the above limitation or exclusion may not apply
to you. This warranty gives you specific legal rights and you may also have other rights which may vary from state to
state.
26FORZA WARRANTY U.S.A.
B-STOCK/ DISPLAY MODEL
FREESTANDNG GAS RANGES – WALL OVENS – RANGE TOPS – DISHWASHERS – RANGE HOODS
The warranties provided by Forza in this statement apply exclusively to Forza appliances and accessories sold to the original
owner by a Forza authorized distributor, retailer, dealer or service center and installed in the United States.
The warranties provided in this statement are not transferable and have validity from the date of original purchase.
B-Stock (refurbished product, product returns, ‘scratch and dent’ products, old stock (defined as more than one year’s difference
between production date and date of sale to end user, discounted product etc.) and display models (trade shows, dealer,
project or distributor showroom display models, etc.) are not considered ‘new’, in-the- box product and are thus not covered by
FORZA standard warranty.
For any functional or cosmetic issue not disclosed by the seller realized at initial inspection / commission of the product:
please contact the seller.
Duration of warranty:
FULL NINETY DAY TOTAL PRODUCT WARRANTY
For ninety days from the original date of purchase, the FORZA product warranty covers all parts and labor to repair or replace,
under normal residential use, any part of the product proving to be defective in material or workmanship as a result of the original
manufacturing process. There is no service or cosmetic warranty of any kind of B-Stock model.
Responsibilities of the buyer: When writing or calling about a service problem, please include the following
information:
• Your name, address and telephone number;
• Appliance model and serial number;
• Name of your dealer;
• A clear description of the problem you are having;
• Proof of purchase (sales receipt).
WHAT IS NOT COVERED:
1) The product used in any commercial application.
2) Service trips to your home, during which no fault is found.
3) Repair service provided by any service agency that is not Forza authorized.
4) Damage or repair service to correct any service provided by an unauthorized agency.
5) Damage or repair service to correct the use, addition or substitution of any orginal part with an unauthorized part.
6) Installation not in accordance with local electrical codes or plumbing codes.
7) Defects or damage due to improper storage of the product.
8) Damages due to failure in following the manufacturer’s recommended care, cleaning and maintenance instructions;
in particular, damages to the oven and/or the cooktop if they have not been cared and cleaned according to these
instructions.
9) Defects, damages or missing parts on products sold out of the original factory packaging or from displays.
10) Service calls or repairs to correct the installation of the product and/or related accessories, calibrations and normal
adjustments after installation and setup, including burner adjustments.
11) Service calls to connect, convert or otherwise repair the electrical wiring and/or gas line to properly use the product.
12) Service calls to provide instructions on the use of a Forza product.
27 EN13) Repair or failure of the product if it is abused, misused, used improperly, used for other than the intended purpose or if
used commercially/industrially.
14) Damage or repairs caused by the use of harsh chemicals or cleaning products improperly applied.
15) Replacement of wear and tear parts.
16) Replacement of house fuses or resetting of circuit breakers.
17) Damages to anything situated next to the product, including, but not limited to, ceiling, floor or cabinetry.
18) Defects and damages arising from accidents, alterations, misuse, abuse, improper installation, or installation that does
not conform to instructions given by Forza.
19) Damages occurred during transit, handling and/or installation of the product.
20) Defects and damage arising from external forces beyond the control of Forza such as fire, flood, earthquakes and other
acts of God.
21) Forza cannot guarantee the availability of service in areas more than 30 miles from an authorized retailer. In such cases
where travel charges are levied, those will be borne by the consumer.
22) This warranty only covers service performed at the location of product installation and will not cover costs associated
with repairing off-site unless expressly authorized by Forza nor does it cover the travel costs associated with providing
service to remote locations.
23) Replacement filters for ventilation hood recirculating kits are not covered by the product warranty.
24) Products with original serial numbers that have been removed.
25) Replacement light bulbs are not covered by the product warranty.
26) Damages to people or property caused by the product or through its usage.
In the case that the product is will be installed in a remote area, where certified trained technicians are not reasonably available,
the customer will be responsible for the transportation costs for the delivery of the product to the nearest authorized service
center or for the travel costs of a certified trained technician.
Remote locations/area: are defined as being outside of a 30 miles from any service provider.
Forza reserves the right to revise this warranty at any time.
Forza does not assume any responsibility for incidental or consequential damages. Some states do not allow the
exclusion or limitation of incidental or consequential damages, so the above limitation or exclusion may not apply
to you. This warranty gives you specific legal rights and you may also have other rights which may vary from state to
state.
Forza is a brand of Glem Gas S.P.A
Via Modenese 4266, 41018 San Cesario S.P. (Modena), Italy
Web: www.forzacucina.com – Email: service@forzacucina.com
28Note
UTILISATION + ENTRETIEN
                MANUEL

         MODÈLES DE TABLE DE CUISSON

                            FRT304GN
                            FRT366GN

            31
Félicitations pour votre achat récent chez Forza! Avant de commencer à utiliser votre nouveau produit Forza, veuillez pren-
dre quelques instants pour examiner le Manuel d’Utilisation et Soin. Vous trouverez les réponses à toutes vos questions ainsi
que des informations très importantes sur la sécurité. Votre produit Forza est prêt et attend d’être utilisé pour votre prochaine
création gastronomique!
Sommaire
33 Avertissements Généraux
41 Votre Produit
42 Utilisation
45 Accessories
45 Maintenance et Nettoyage DIY
48 Diagramme de Nettoyage
50 Dépannage
52 Informations de Service
53 Garantie
Cet appareil Forza est fièrement fabriquée en Modena, Italie
par GlemGas S.p.A, une entreprise familiale.
www.forzacucina.com
32Avertissements Généraux
Nous avons fourni de nombreux messages de sécurité importants dans ce manuel et sur votre appareil. Toujours lire et obéir
à tous les messages de sécurité.
C’est le symbole d’alerte de sécurité.
Ce symbole vous avertit des dangers potentiels pouvant vous tuer ou vous blesser, ainsi que d’autres personnes.
Tous les messages de sécurité suivront le symbole d’alerte de sécurité et le mot «DANGER» ou «AVERTISSEMENT».
Vous pouvez être tué ou sérieusement blessé si vous ne pas
immédiatement suivez les instructions.
Vous pouvez être tués ou sérieusement blessés si vous ne pas
suivez les instructions.
Tous les messages de sécurité vous indiqueront le danger potentiel, vous indiqueront comment réduire les risques
de blessure et vous indiqueront ce qui peut se produire si les instructions ne sont pas suivies.
AVERTISSEMENT: Si les informations contenues dans ce manuel ne sont pas suivies
à la lettre, un incendie ou une explosion peut entraîner des dommages matériels, des
blessures ou la mort.
Ne pas stocker ni utiliser d’essence ou d’autres vapeurs et liquides inflammables à proximité de cet appareil ou tout autre
appareil.
Que faire si vous sentez une odeur de gaz:
• N’essayez d’allumer aucun appareil.
• Ne touchez aucun interrupteur électrique.
• N’utilisez aucun téléphone dans votre immeuble.
• Appelez immédiatement votre fournisseur de gaz en utilisant le téléphone d’un voisin. Suivez les instructions du fournisseur
de gaz.
• Si vous ne pouvez pas joindre votre fournisseur de gaz, appelez les pompiers.
L’installation et l’entretien doivent être effectués par un installateur qualifié, une agence de service ou le fournisseur de
gaz.
IMPORTANT: N’installez pas de système de ventilation qui souffle de l’air vers cet appareil de cuisson à gaz. Ce type de
système de ventilation peut causer des problèmes d’inflammation et de combustion de cet appareil de cuisson au gaz, en-
traînant des blessures corporelles ou un fonctionnement inattendu.
IMPORTANT: Mémorise ces instructions pour la consultation par l’inspecteur électrique local.
INSTALLATEUR: S’il vous plaît laissez ce manuel avec le propriétaire pour référence future.
PROPRIÉTAIRE: S’il vous plaît gardez ce manuel pour référence future.
33 FRRisque d’empoisonnement
Ne couvrez jamais les fentes, trous ou passages au fond du four, ne recou-
vrez jamais une grille ou le fond du four avec du papier aluminium par exem-
ple. Cela bloquerait la circulation d’air dans le four et pourrait provoquer une
intoxication au monoxyde de carbone. Les doublures en papier d’aluminium
peuvent également piéger la chaleur, ce qui présente un risque d’incendie.
Nettoyez l’appareil avec prudence. Si vous utilisez une éponge ou un chiffon
humide pour essuyer les renversements sur une zone de cuisson chaude,
veillez à ne pas vous brûler à la vapeur. Certains nettoyants peuvent produire
des vapeurs nocives s’ils sont appliqués sur une surface chaude. Suivez les
instructions du fabricant du nettoyant.
N’utilisez jamais cet appareil comme appareil de chauffage pour chauffer ou
réchauffer la pièce. Cela pourrait entraîner une intoxication au monoxyde de
carbone et une surchauffe de l’appareil.
Ne pas suivre ces conseils peut entraîner une intoxication ou la mort.
Risque de Surface Chaude
Les composants accessibles peuvent atteindre des températures élevées
pendant l’utilisation.
Ne touchez pas les brûleurs, les zones proches des brûleurs. Celles ci peu-
vent être suffisamment chaudes pour causer des brûlures, même si leur cou-
leur est foncée. Pendant et après l’utilisation, ne touchez pas et ne laissez pas
les vêtements ou autres matériaux inflammables entrer en contact avec ces
pièces et surfaces jusqu’à ce qu’elles aient eu le temps de refroidir.
Autres parties et surfaces de l’appareil peuvent devenir suffisamment
chaudes pour causer des brûlures - parmi ces zones se trouvent les grilles, la
garniture arrière et les bouches d’aération à l’arrière de la table de cuisson, le
bord avant, les surfaces adjacentes à la table de cuisson.
Utilisez uniquement des maniques sèches - des maniques humides ou
mouillées sur des surfaces chaudes peuvent provoquer des brûlures par la
vapeur. Ne laissez pas le manique toucher des éléments chauffants chauds.
N’utilisez pas de serviette ni d’autre chiffon épais.
Laissez la graisse chaude refroidir avant d’essayer de la manipuler.
Ne pas suivre ces conseils peut entraîner des brûlures et des brûlures.
34Veuillez lire toutes les instructions avant d’utiliser cet appareil.
Lisez ce livret d’instruction avant d’installer et d’utiliser l’appareil.
Le fabricant ne sera pas responsable des dommages matériels ou corporels causés par une installation
incorrecte ou une utilisation inappropriée de l’appareil.
Le fabricant se réserve le droit d’apporter des modifications à ses produits lorsque cela est jugé nécessaire
et utile, sans affecter les caractéristiques de sécurité et de fonctionnement essentielles.
Cet appareil a été conçu pour un usage domestique non professionnel uniquement.
N’utilisez pas cet appareil pour chauffer une pièce.
Ne placez pas de casserole sur la porte du four ouverte. La porte est en verre et peut se briser si elle est
chargée d’un poids.
Avant de commencer l’installation, veuillez lire attentivement ces instructions.
Ne retirez pas les étiquettes, les avertissements ou les plaques apposés de manière permanentedu
produit. Cela peut annuler la garantie.
Veuillez respecter tous les codes et ordonnances locaux et nationaux.
Veuillez-vous assurer que la cuisinière est correctement mise à la terre.
L’installateur doit laisser ces instructions au consommateur, qui doit le conserver pour l’usage de
l’inspecteur local et pour pouvoir le consulter ultérieurement.
La prise doit toujours être accessible.
L’installation doit être conforme aux codes locaux ou, en l’absence de codes, à la dernière édition du
National Fuel Gas Code NSIZ223.1. L’installation électrique doit être conforme au National Electrical Code,
ANSI / NFPA 70 - dernière édition et / ou aux codes locaux.
L’installation de tout équipement à gaz doit être effectuée par un plombier autorisé. Une vanne d’arrêt
manuel du gaz doit être installé dans la conduite d’alimentation en gaz devant le four dans le flux de gaz pour
des raisons de sécurité et de facilité de maintenance.
Cet appareil ne doit être réparé que par un technicien qualifié. Contactez le centre de service autorisé le
plus proche pour un examen, une réparation ou un réglage.
Ne pas réparer ou remplacer toute pièce de l’appareil à moins qu’il ne soit spécifiquement recommandé
dans ce manuel. Confiez le service à un réparateur autorisé.
Ne pas utiliser cet appareil s’il ne fonctionne pas correctement ou s’il a été endommagé, jusqu’à ce qu’un
réparateur agréé l’ait vérifié.
Installer et placer impérativement cet appareil seulement en conformité aux instructions d’installation.
35 FRUtilisez cette cuisinière uniquement comme prévu par le fabricant. Si vous avez des questions, contactez le
fabricant.
Ne couvrez ni ne bloquez aucune ouverture de cet appareil.
Utiliser cet appareil uniquement pour l’utilisation pour laquelle il a été conçu comme décrit dans ce manuel.
N’utilisez pas de produits chimiques corrosifs, de vapeurs ou de produits non alimentaires dans cet appa-
reil. Ce type de four est spécialement conçu pour chauffer ou cuire.Il n’est pas conçu pour une utilisation
industrielle ou de laboratoire. L’utilisation de produits chimiques corrosifs lors du chauffage ou du nettoy-
age endommagera l’appareil.
Dans le cas où des vêtements ou des cheveux personnels prendraient feu, LES LAISSER TOMBER ET LES
ENROULER IMMÉDIATEMENT pour éteindre les flammes.
En cas d’incendie de graisse, ÉTEINDRE LES FLAMMES avec un couvercle bien ajusté, une tôle à biscuits ou
un autre plateau en métal, puis éteignez le brûleur à gaz.
SOYEZ PRUDENT POUR EMPÊCHER LES BRÛLURES. Si les flammes ne s’éteignent pas immédiatement,
évacuez et appelez le service d’incendie.
N’utilisez pas d’eau, y compris des torchons ou des serviettes humides, lors de feux de graisse. Une violente
explosion de vapeur peut en résulter.
NE JAMAIS PRENDRE UNE POÊLE FLAMBOYANTE. Vous pourriez vous brûler.
TOUJOURS tenir un DÉTECTEUR DE FUMÉE fonctionnant près de la cuisine.
LAISSEZ EN MARCHE LE VENTILATEUR DE LA HOTTE lorsque vous flambez des aliments.
Ne pas obstruer le flux d’air de combustion au niveau de la ventilation du four, ni autour de la base ni sous le
panneau avant inférieur de la cuisinière.
Évitez de toucher les ouvertures de ventilation ou les surfaces voisines car elles peuvent devenir chaudes
pendant le fonctionnement du four.
Cette cuisinière nécessite de l’air frais pour une combustion correcte du brûleur.
NE JAMAIS couvrir les fentes, trous ou passages du four, ni recouvrir une grille entière de papier aluminium.
Cela bloquerait la circulation d’air dans le four et pourrait provoquer une intoxication au monoxyde de car-
bone. Les doublures en papier d’aluminium peuvent également piéger la chaleur, ce qui présente un risque
d’incendie.
N’utilisez JAMAIS cet appareil comme appareil de chauffage pour chauffer ou réchauffer la pièce. Cela
pourrait entraîner une intoxication au monoxyde de carbone.
Ne laissez pas du papier d’aluminium, du plastique, du papier ou un chiffon entrer en contact avec les
brûleurs et les grilles chauds.
Ne pas laisser les poêles bouillir à sec.
Ne rangez pas d’objets présentant un intérêt pour les enfants au-dessus de l’appareil. Si des enfants de-
vaient grimper sur l’appareil pour atteindre ces objets, ils pourraient être grièvement blessés.
36You can also read