3-BURNER LIQUID PROPANE GAS GRILL - MODEL: RT2417S-1
←
→
Page content transcription
If your browser does not render page correctly, please read the page content below
3-BURNER LIQUID
                                                                 PROPANE GAS GRILL
                                                                                        MODEL: RT2417S-1

                                                                                           Français p.28
     WARNING                                                                                Español p.54
Improper installation,
adjustment, alteration, service or
maintenance can cause injury or
property damage.
Read this instruction manual
thoroughly before installing or
servicing this equipment.

     WARNING
1. Do not store or use gasoline or
   other flammable vapors and
   liquids in the vicinity of this or
   any other appliance,
2. An LP tank not connected for use
   should not be stored in the
   vicinity of this or any other
   appliance.

     DANGER
If you smell gas:
1. Shut off gas to the appliance.
2. Extinguish any open flames.
3. Open the lid.
4. If the odor continues, keep away
    from the appliance and
    immediately call your gas supplier
    or fire department.

     WARNING
  For Outdoor Use Only

ATTACH YOUR RECEIPT HERE
Serial Number                                Purchase Date

       Questions, problems, missing parts? Before returning to your retailer, call our customer service
       department at 1-888-804-7455, 8 a.m. - 6 p.m., EST, Monday - Thursday, 8 a.m. - 5 p.m., EST, Friday.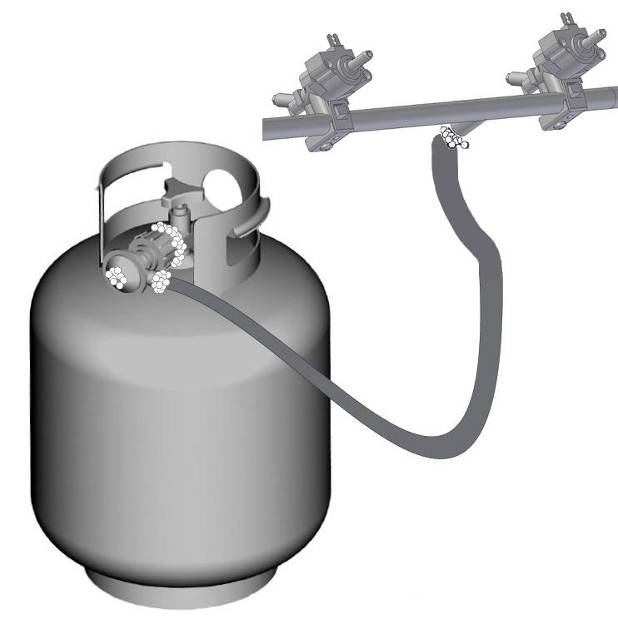
Installation Safety Precautions
                                                                • Use grill, as purchased, only with LP (propane) gas and the
                                                                  regulator/valve assembly supplied. A conversion kit must
   If you smell gas:                                              be purchased for use with natural gas.
                                                                • Grill installation must conform with local codes, or in their
   1. Shut off gas to the appliance.                              absence of local codes, with either the National Fuel Gas
   2. Extinguish any open flame.                                  Code, ANSI Z223.1/ NFPA 54, Natural Gas and Propane
                                                                  Installation Code, CSA B149.1, or Propane Storage and
   3. Open lid.
                                                                  Handling Code, B149.2, or the Standard for Recreational
   4. If odor continues, keep away from the                       Vehicles, ANSI A 119.2/NFPA 1192, and CSA Z240 RV
      appliance and immediately call your gas                     Series, Recreational Vehicle Code, as applicable.
      supplier or your fire department.                         • All electrical accessories (such as rotisserie) must be
                                                                  electrically grounded in accordance with local codes, or
                                                                  National Electrical Code, ANSI / NFPA 70 or Canadian
                                                                  Electrical Code, CSA C22.1. Keep any electrical cords
                                                                  and/or fuel supply hoses away from any hot surfaces.
                                                                • This grill is safety certified for use in the United States
   1. Do not store or use gasoline or other                       and/or Canada only. Do not modify for use in any other
                                                                  location. Modification will result in a safety hazard.
      flammable liquids or vapors in the vicinity
      of this or any other appliance.
   2. An LP cylinder not connected for use shall
      not be stored in the vicinity of this or any
      other appliance.

Call Grill Service Center For Help And Parts
If you have questions or need assistance during assembly,       Safety Symbols
please call 1-888-804-7455. You will be speaking to a           The symbols and boxes shown below explain what each
representative of the grill manufacturer.                       heading means. Read and follow all of the messages found
                                                                throughout the manual.

Product Record
IMPORTANT: Fill out the product record information
below.
                                                                   DANGER: Indicates an imminently hazardous
                                                                   situation which, if not avoided, will result in death or
    Model Number                                                   serious injury.

    Serial Number
         See rating label on grill for serial number.
                                                                   WARNING: Indicates an potentially hazardous
    Date Purchased                                                 situation which, if not avoided, could result in death
                                                                   or serious injury.

    For residential use only. Do not use for
    commercial cooking.                                            CAUTION: Indicates a potentially hazardous
                                                                   situation or unsafe practice which, if not avoided,
                                                                   may result in minor or moderate injury.

                                                            2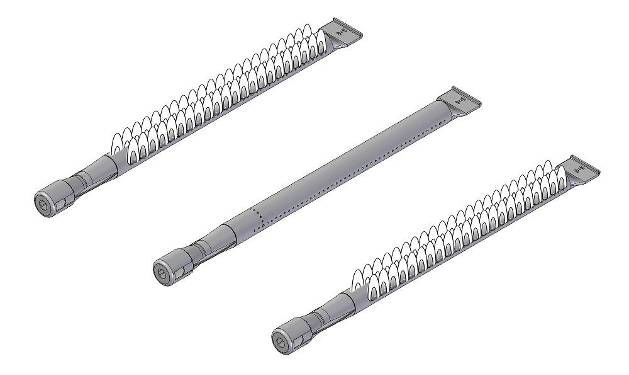
TABLE OF CONTENTS
                                                                                                                 WARNING
For Your Safety................................................................. 2                CALIFORNIA PROPOSITION 65
Grill Service Center.......................................................... 2                  1. Combustion by-products produced when using
                                                                                                     this product contain chemicals known to the
Product Record Information............................................. 2
                                                                                                     State of California to cause cancer, birth
Safety Symbols................................................................2                      defects, and other reproductive harm.
Installation Safety Precautions..........................................2                        2. This product contains chemicals, including lead
                                                                                                     and lead compounds, known to the State of
Grill Warranty...................................................................4                   California to cause cancer, birth defects or
Use and Care...............................................................5-13                      other reproductive harm.
                                                                                                     Wash your hands after handling this product.
Natural Gas Conversion Kit............................................14
Parts List.........................................................................15
Parts Diagram.................................................................16
Assembly....................................................................17-23                                WARNING
Natural Gas Conversion Instructions.........................24-25
                                                                                                  GREASE FIRE HAZARD
Troubleshooting.........................................................26-28                     z Putting out grease fires by closing the grill lid is
                                                                                                    not possible. Grills are well ventilated for safety
                                                                                                    reasons.
                                                                                                  z Do not use water on a grease fire. Serious
                                                                                                    personal injury may result. If a grease fire
                                                                                                    develops, wear gloves to protect hands and
                                                                                                    turn knobs and LP cylinder off.
                                                                                                  z Do not leave grill unattended while preheating
                                                                                                    or burning off food residue on HI. If grill has not
                                                                                                    been regularly cleaned, a grease fire can occur
                                                                                                    that may damage the product.

                                                                                            NOTICE: Using a water spray bottle to extinguish flame
                                                                                            flare-ups can cause thermal shock to firebox porcelain
                                                                                            surfaces, and create “feathering” cracks in the porcelain.
                                                                                            Water can seep through the cracks and cause the
                                                                                            underlying metal to rust.

                                                                                        3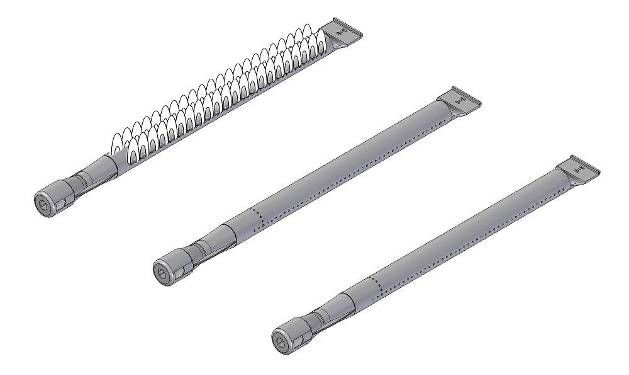
WARRANTY

CHEF’S GRILL LIMITED WARRANTY
WITH PROOF OF SALE, the following warranty coverage applies when this appliance is correctly installed,
operated and maintained according to all supplied instructions.
ONE YEAR Overall Warranty: From the date of sale this appliance is warranted against defects in material or
workmanship. A defective appliance will receive free repair or replacement at option of seller.
FIVE YEARS Burner Warranty: From the date of sale, any stainless steel burner that rusts through or burns
through will be replaced free of charge. A new burner will be supplied at no charge. You are responsible for the
labor cost of burner installation.
All warranty coverage excludes igniter batteries and grill part paint loss, discoloration or surface rusting, which are
either expendable parts that can wear out from normal use within the warranty period, or are conditions that can
be the result of normal use, accident or improper maintenance.
All warranty coverage applies is void if this appliance is ever used for other than private household purposes.
This warranty covers ONLY defects in material and workmanship, and will NOT pay for:
1. Expendable items that can wear out from normal use within the warranty period, including but not
    limited to batteries, screw-in base light bulbs and surface coatings or finishes.
2. A service technician to clean or maintain this appliance, or to instruct the user in correct appliance installation,
    operation and maintenance.
3. Service calls to correct appliance installation not performed by authorized service agents, or to repair
    problems with house fuses, circuit breakers, house wiring, and plumbing or gas supply systems resulting from
    such installation.
4. Damage to or failure of this appliance resulting from installation not performed by authorized service agents,
    including installation that was not in accord with electrical, gas or plumbing codes.
5. Damage to or failure of this appliance, including discoloration or surface rust, if it is not correctly operated and
    maintained according to all supplied instructions.
6. Damage to or failure of this appliance, including discoloration or surface rust, resulting from accident,
    alteration, abuse, misuse or use for other than its intended purpose.
7. Damage to or failure of this appliance, including discoloration or surface rust, caused by the use of
    detergents, cleaners, chemicals or utensils other than those recommended in all instructions supplied with the
    product.
8.   Damage to or failure of this appliance resulting from natural or other catastrophe, such as flood, fire or storm.
9. Damage to or failure of parts or systems resulting from unauthorized modifications made to this appliance.
10. Service to an appliance if the model and serial plate is missing, altered, or cannot easily be determined to
    have the appropriate certification logo.
Disclaimer of implied warranties; limitation of remedies
Customer’s sole and exclusive remedy under this limited warranty shall be product repair or replacement as
provided herein. Implied warranties, including warranties of merchantability or fitness for a particular purpose, are
limited to one year on the appliance and five years on the burners, or the shortest period allowed by law. Seller
shall not be liable for incidental or consequential damages. Some states and provinces do not allow the exclusion
or limitation of incidental or consequential damages, or limitation on the duration of implied warranties of
merchantability or fitness, so these exclusions or limitations may not apply to you.
This warranty applies only while this appliance is used in the United States.
This warranty gives you specific legal rights, and you may also have other rights which vary from state to state.

                                                                    4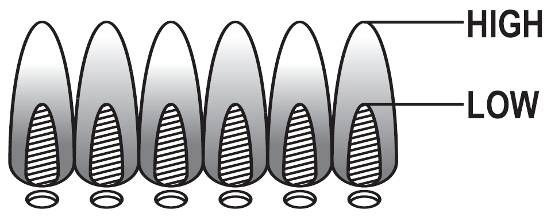
USE AND CARE                                                           • Do not store an LP tank in an area where children play.
                                                                         LP Cylinder
                                                                         • The LP cylinder used with your grill must meet the
                                                                           following requirements:
                                                                         • Use LP cylinders only with these required measurements: 12"
                                                                           (30.5cm) (diameter) x 18" (45.7 cm) (tall) with 20 lb. (9 kg.)
                                                                           capacity maximum.
 • NEVER store a spare LP cylinder under or near
                                                                         • LP cylinders must be constructed and marked in accordance
   the grill appliance or in an enclosed area.                             with specifications for LP cylinders of the U.S. Department of
                                                                           Transportation (DOT) or for Canada, CAN/CSA-B339,
                                                                           cylinders, spheres and tubes for transportation of dangerous
                                                                           goods. Transport Canada (TC). See LP cylinder collar for
                                                                           marking.
                                                                         • LP cylinder valve must have:
                                                                         • Type 1 outlet compatible with
                                                                           regulator or grill.
                                                                         • Safety relief valve.
                                                                         • UL listed Overfill Protection               OPD Hand Wheel
                                                                           Device (OPD). This OPD safety
                                                                           feature is identified by a unique triangular hand wheel. Use
                                                                           only LP cylinders equipped with this type of valve.
 • Never fill a cylinder beyond 80% full.                                • LP cylinder must be arranged for vapor withdrawal and
 • If the information in the two points above is not                       include collar to protect LP cylinder valve. Always keep LP
   followed exactly, a fire causing death or serious                       cylinders in upright position during use, transit or storage.
   injury may occur.
 • An over filled or improperly stored cylinder is a
   hazard due to possible gas release from the
   safety relief valve. This could cause an intense
   fire with risk of property damage, serious injury
   or death.
 • If you see, smell or hear gas escaping,
   immediately get away from the LP cylinder and
   grill appliance and call your fire department.

LP Tank Removal, Transport and Storage                                         LP cylinder in upright position for vapor withdrawal
• Turn OFF all control knobs and LP tank valve. Turn coupling
  nut counterclockwise by hand only - do not use tools to                LP (Liquefied Petroleum Gas)
  disconnect. Lift LP tank wire upward off of LP tank collar, then       • LP gas is nontoxic, odorless and colorless when produced.
  lift LP tank up and off of support bracket. Install safety cap         For Your Safety, LP gas has been given an odor (similar to
  onto LP tank valve. Always use cap and strap supplied with             rotten cabbage) so that it can be smelled.
  valve.                                                                 • LP gas is highly flammable and may ignite unexpectedly
  Failure to use safety cap as directed may result in                    when mixed with air.
  serious personal injury and/or property damage.
                                                                         LP Cylinder Filling
    LP Tank Valve
                                                                         • Use only licensed and experienced dealers.
                                                                         • LP dealer must purge new cylinder before filling.
                                                                         • Dealer should NEVER fill LP cylinder more than 80% of LP
                                                                           cylinder volume. Volume of propane in cylinder will vary by
                                                                           temperature.
                                       Safety Cap
                                                                         • A frosty regulator indicates gas overfill. Immediately close LP
                                                                           cylinder valve and call local LP gas dealer for assistance.
                                  Retainer Strap
                                                                         • Do not release liquid propane (LP) gas into the atmosphere.
• A disconnected LP tank in storage or being transported must              This is a hazardous practice.
  have a safety cap installed (as shown). Do not store an LP             • To remove gas from LP cylinder, contact an LP dealer or call
  tank in enclosed spaces such as a carport, garage, porch,                a local fire department for assistance. Check the telephone
  covered patio or other building. Never leave an LP tank inside           directory under “Gas Companies” for nearest certified LP
  a vehicle which may become overheated by the sun.                        dealers.

                                                                     5
LP Tank Exchange                                                         Connecting Regulator To The LP Tank
•Many retailers that sell grills offer you the option of replacing       1. LP tank must be properly secured onto grill. (Refer to
 your empty LP tank through an exchange service. Use only                   assembly section.)
 those reputable exchange companies that inspect, precision              2. Turn all control knobs to the OFF position.
 fill, test and certify their cylinders. Exchange your tank only         3. Turn LP tank OFF by turning OPD hand wheel clockwise to
 for an OPD safety feature-equipped tank as described in                    a full stop.
 the "LP Tank" section of this manual.                                   4. Remove the protective cap from LP tank valve. Always use
                                                                            cap and strap supplied with valve.
•Always keep new and exchanged LP tanks in upright position
 during use, transit or storage.

•Leak test new and exchanged LP tanks BEFORE
connecting to grill.

                                                                                                                            OPD Hand Wheel

LP Tank Leak Test                                                                                                           Type 1 outlet with
For your safety                                                                                                             thread on outside

•Leak test must be repeated each time LP tank is exchanged
 or refilled.                                                              Safety Relief Valve
•Do not smoke during leak test.
•Do not use an open flame to check for gas leaks.
•Grill must be leak tested outdoors in a well-ventilated area,
 away from ignition sources such as gas fired or electrical
 appliances. During leak test, keep grill away from open
 flames or sparks.
•Use a clean paintbrush and a 50/50 mild soap and water                                                Strap and Cap
 solution. Brush soapy solution onto areas indicated by arrows
 in figure below. Leaks are indicated by growing bubbles.

                                                                                                       Do not insert a POL transport plug
                                                                                                       (plastic part with external threads)
                                                                                                       into the Type 1 tank valve outlet . It
  If “growing” bubbles appear do not use or move the LP                                                will defeat the Safety Relief Valve
  tank. Contact an LP gas supplier or your fire department!                                            feature.

   Do not use household cleaning agents. Damage to gas
train components (valve/hose/regulator) can result.                      5. Hold regulator and insert nipple into LP tank valve.
                                                                            Hand-tighten the coupling nut, holding regulator in a straight
                                                                            line with LP tank valve so as not to crossthread the
                                                                            connection.

                                                                           Nipple has to be centered
                                                                           into the LP tank valve.

                                                                     6
Leak Testing Valves, Hose and Regulator

                                                                        1. Turn all grill control knobs to OFF.

                                                                        2. Be sure regulator is tightly connected to LP tank.

                                                                        3. Completely open LP tank valve by turning OPD hand wheel
                                                                           counterclockwise. If you hear a rushing sound, turn gas off
                                                                           immediately. There is a major leak at the connection.
                                Hold coupling nut and regulator            Correct before proceeding by calling 1-888-804-7455.
                                as shown for proper connection
                                to LP tank valve.
                                                                        4. Brush soapy solution onto areas where bubbles are shown
                                                                           in picture below:

                                                                             Never remove threaded
                                                                             orifice at end of valve.
6. Turn the coupling nut clockwise and tighten to a full stop.
   The regulator will seal on the back-check feature in the LP
   tank valve, resulting in some resistance. An additional
   one-half to three-quarters turn is required to complete
   the connection. Tighten by hand only – do not use tools.

NOTE:
If you cannot complete the connection, disconnect regulator
and repeat steps 5 and 6. If you are still unable to complete the
connection, do not use this regulator! Call 1-888-804-7455
for assistance.

 • Do not insert any tool or foreign object into the valve
 outlet or safety relief valve. You may damage the valve                5. If “growing” bubbles appear, there is a leak. Close LP tank
                                                                           valve immediately and retighten connections. If leaks
 and cause a leak. Leaking propane may result in
                                                                           cannot be stopped do not try to repair. Call
 explosion, fire, severe personal injury, or death.
                                                                           1-888-804-7455.

                                                                        6. Always close LP tank valve after performing leak test by
                                                                           turning hand wheel clockwise.

 • Outdoor gas appliance is not intended to be installed
   in or on a boat.
 • Outdoor gas appliance is not intended to be installed
   in or on an RV.
 • Never attempt to attach this grill to the self-contained
   LP gas system of a camper trailer or motor home.
 • Do not use grill until leak-tested.
 • If a leak is detected at any time, STOP and call the
   fire department.
 • If you cannot stop a gas leak, immediately close
   LPcylinder valve and call LP gas supplier or your fire
   department!

                                                                    7
Safety Tips
Before opening LP cylinder valve, check the coupling nut
for tightness.
When grill is not in use, turn off all control knobs and LP
For Safe Use of Your Grill and to Avoid Serious cylinder valve.
Injury: Never move grill while in operation or still hot.
• Do not let children operate or play near grill. Use long-handled barbecue utensils and oven mitts to
• Keep grill area clear and free from materials that avoid burns and splatters.
burn. Maximum load for sideburner and side shelf is 10 lbs.
• Do not block holes in sides or back of grill. The grease tray must be inserted into grill and emptied
• Check burner flames regularly. after each use. Do not remove grease tray until grill has
• Use grill only in well-ventilated space. NEVER use in completely cooled.
Clean grill often, preferably after each cookout. If a bristle
enclosed space such as carport, garage, porch,
brush is used to clean any of the grill cooking surfaces,
covered patio, or under an overhead structure of any ensure no loose bristles remain on cooking surfaces prior
kind. to grilling. It is not recommended to clean cooking surfaces
• Do not use charcoal or ceramic briquets in a gas grill. while grill is hot.
(Unless briquets are supplied with your grill.) If you notice grease or other hot material dripping from grill
• Use grill at least 3 ft. from any wall or surface. onto valve, hose or regulator, turn off gas supply at once.
Maintain 10 ft. clearance to objects that can catch Determine the cause, correct it, then clean and inspect
fire, or to sources of ignition such as pilot lights on valve, hose and regulator before continuing. Perform a
water heaters, live electrical appliances, etc. leak test.
Keep ventilation openings in cylinder enclosure (grill cart)
free and clear of debris.
Do not store objects or materials inside the grill cart
enclosure that would block the flow of combustion air to the
underside of either the control panel or the firebox bowl.
The regulator may make a humming or whistling noise
during operation. This will not affect safety or use of grill.
If you have a grill problem see the "Troubleshooting
Section".
If the regulator frosts, turn off grill and LP cylinder valve
immediately. This indicates a problem with the cylinder and
it should not be used on any product. Return to supplier!
WARNING
GREASE FIRE HAZARD
z Putting out grease fires by closing the grill lid is
not possible. Grills are well ventilated for safety
• Apartment Dwellers:
reasons.
Check with management to learn the requirements
Do not use water on a grease fire. Serious
and fire codes for using an LP gas grill in your
z
personal injury may result. If a grease fire
apartment complex. If allowed, use outside on the
develops, wear gloves to protect hands and
ground floor with a three (3) foot clearance from walls
turn knobs and LP cylinder off.
or rails. Do not use on or under balconies.
Do not leave grill unattended while preheating
• NEVER attempt to light burner with lid closed. A
z
or burning off food residue on HI. If grill has not
buildup of non-ignited gas inside a closed grill is
been regularly cleaned, a grease fire can occur
hazardous.
that may damage the product.
• Never operate grill with LP cylinder out of correct
position specified in assembly instructions.
• Always close LP cylinder valve and remove
coupling nut before moving LP cylinder from
specified operation position.
8NOTICE: Using a water spray bottle to extinguish flame Main Burner Match Lighting
flare-ups can cause thermal shock to firebox porcelain Do not lean over grill while lighting.
surfaces, and create “feathering” cracks in the porcelain. 1. Open lid during lighting.
Water can seep through the cracks and cause the 2. Place match into match holder (hanging from side of cart).
underlying metal to rust. Light match, place into the firebox.
3. Push in and turn right knob to HIGH position. Be sure burner
lights and stays lit.
4. Light other burners by pushing knob in and turning to HI
position.
Ignitor Lighting the Grill
1. Read instructions before lighting your grill.
2. Open lid during lighting.
3. Open LP cylinder or natural gas valve.
4. Push any burner control knob in and turn the knob to the left
to “HI” position. You will hear a clicking sound from all
burners. Keep pressing the knob until the burner is lit.
5. If ignition does not occur in 5 seconds, turn the burner
control off, wait 5 minutes for gas to clear away, and repeat
the lighting procedure.
6. To light other burners, repeat step 4.
NOTE: If ignitor does not work, follow Match Lighting
instructions.
Turn off controls and tank or gas supply when not
in use.
Please make sure the drip tray and drip cup are
properly installed before turning burners on.
Drip tray is hot when burner is on and after grilling.
Do not touch the drip tray when it is hot.
If ignition does not occur in 5 seconds, turn the burner
control off, wait 5 minutes, and repeat the lighting
procedure. If the burner does not ignite with
the valve open, gas will continue to flow out of the
burner and could accidently ignite with risk of Burner Flame Check
injury. •Remove cooking grates and heat diffusers. Light burners,
rotate knobs from HIGH to LOW. You should see a smaller
flame in LOW position than seen on HIGH. Perform burner
flame check on sideburner, also. Always check flame prior to
each use.
9Turning Grill Off
•Turn all knobs to position. Turn LP cylinder off by turning
hand-wheel clockwise to a full stop.
Ignitor Check
•Turn gas off at LP cylinder. Push the control knob in and
turn the knob to the left to “HI” position."Clicking" should be SPIDER ALERT!
heard and spark seen each time between collector box or
burner and electrode. See "Troubleshooting" if no click or
spark. SPIDER AND WEBS
Valve Check INSIDE BURNER TUBE
•Important: Make sure gas is off at LP cylinder before
checking valves. Knobs lock in OFF position. To check
valves, first push in knobs and release, knobs should spring
back. If knobs do not spring back, replace valve assembly
before using grill. Turn knobs to LOW position then turn back
to OFF position. Valves should turn smoothly.
Hose Check
•Before each use, check to see if hoses are cut or worn.
If you notice that your grill is getting hard to light or
Replace damaged hoses before using grill. Use only identical
that the flame isn’t as strong as it should be, take the
replacement part valve/hose/regulator as specified in the
time to check and clean the burner tubes.
Parts List of this Use and Care Guide.
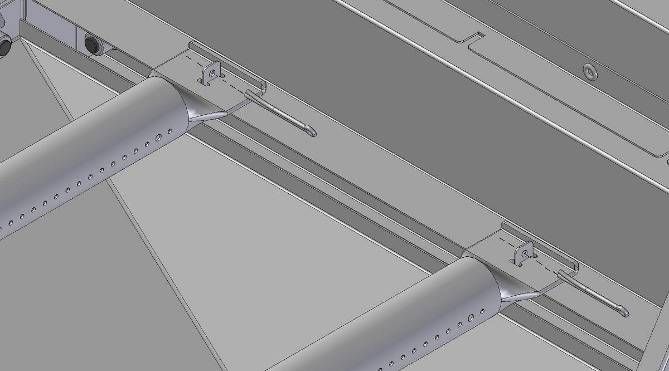
General Grill Cleaning Spiders or small insects have been known to create
“flashback” problems. The spiders spin webs, build nests
•Do not mistake brown or black accumulation of grease and
and lay eggs in the grill’s burner tubes obstructing the flow
smoke for paint. Interiors of gas grills are not painted at the
of gas to the burner. The backed-up gas can ignite in the
factory (and should never be painted). Apply a strong
burner tube behind the control panel. This is known as a
solution of detergent and water or use a grill cleaner with
flashback and it can damage your grill and even cause
scrub brush on insides of grill lid and bottom. Rinse and allow
injury.
to completely air dry. Do not apply a caustic grill/oven
cleaner to painted surfaces.
To prevent flashbacks and ensure good performance the
• Plastic parts: Wash with warm soapy water and wipe dry.
burner and burner tube assembly should be removed from
Do not use citrisol, abrasive cleaners, degreasers or a
the grill and cleaned before use whenever the grill has been
concentrated grill cleaner on plastic parts. Damage to and
idle for an extended period.
failure of parts can result.
•Porcelain surfaces: Because of glass-like composition, most
residue can be wiped away with baking soda/water solution or
specially formulated cleaner. Use nonabrasive scouring
powder for stubborn stains.
•Painted surfaces: Wash with mild detergent or nonabrasive
cleaner and warm soapy water. Wipe dry with a soft
nonabrasive cloth.
•Stainless steel surfaces: To maintain your grill’s high quality
appearance, wash with mild detergent and warm soapy water
and wipe dry with a soft cloth after each use. Baked-on
grease deposits may require the use of an abrasive plastic
cleaning pad. Use only in direction of brushed finish to avoid
damage. Do not use abrasive pad on areas with graphics.
• Cooking surfaces: If a bristle brush is used to clean any of
the grill cooking surfaces, ensure no loose bristles remain on
cooking surfaces prior to grilling. It is not recommended to
clean cooking surfaces while grill is hot.
10Storing Your Grill VERY IMPORTANT: Burner tubes must reengage valve
•Clean cooking grates. openings.
•Store in dry location.
•When LP cylinder is connected to grill, store outdoors in a
well-ventilated space and out of reach of children.
•Cover grill if stored outdoors. Choose from a variety of grill
covers offered by manufacturer.
•Store grill indoors ONLY if LP cylinder is turned off and
disconnected, removed from grill and stored outdoors.
•When removing grill from storage, follow “Cleaning the Burner Correct burner-to-valve engagement
Assembly” instructions before starting grill.
Indirect Cooking
Cleaning the Burner Assembly Poultry and large cuts of meat cook slowly to perfection on the
Follow these instructions to clean and/or replace parts of
grill by indirect heat. Place food over unlit burner(s); the heat
burner assembly or if you have trouble igniting grill.
from lit burners circulates gently throughout the grill, cooking
1. Turn gas off at control knobs and LP cylinder.
meat or poultry without the touch of a direct flame.
2. Remove cooking grates and heat diffusers.
This method greatly reduces flare-ups when cooking extra fatty
3. Remove R pins from rear of burners.
cuts because there is no direct flame to ignite the fats and
4. Carefully lift each burner up and away from valve openings.
juices that drip during cooking.
R pin ON
OFF
OFF
1 Burner Cooking
We suggest three ways to clean the burner tubes. Use the one Cook with direct or indirect heat.
easiest for you. Best for smaller meals or foods.
(A) Bend a stiff wire (a light weight coat hanger works well) Consumes less fuel.
into a small hook. Run the hook through each burner
tube several times. Indirect Cooking Instructions
• Always cook with the lid closed.
• Due to weather conditions, cooking times may vary.
(B) Use a narrow bottle brush with a flexible handle (do not During cold and windy conditions the temperature setting
use a brass wire brush), run the brush through each may need to be increased to insure sufficient cooking
burner tube several times. temperatures.
• Place food over unlit burner(s)
(C) Wear eye protection: Use an air hose to force air into
the burner tube and out the burner ports. Check each
port to make sure air comes out each hole.
5. Wire brush entire outer surface of burner to remove food ON
residue and dirt.
6. Clean any blocked ports with a stiff wire such as an open OFF
paper clip.
7. Check burner for damage, due to normal wear and corrosion
ON
some holes may become enlarged. If any large cracks or
holes are found replace burner.
2 Burner Cooking
Great indirect cooking on low.
Produces slow, even heating.
Ideal for slow roasting and baking.
11Food Safety
Food safety is a very important part of enjoying the outdoor
cooking experience. To keep food safe from harmful bacteria,
follow these four basic steps:
Clean: Wash hands, utensils, and surfaces with hot soapy
water before and after handling raw meat and poultry.
Separate: Separate raw meats and poultry from ready-to-eat
foods to avoid cross contamination. Use a clean platter and
utensils when removing cooked foods.
Cook: Cook meat and poultry thoroughly to kill bacteria. Use a
thermometer to ensure proper internal food temperatures.
Chill: Refrigerate prepared foods and leftovers promptly.
How To Tell If Meat Is Grilled Thoroughly
• Meat and poultry cooked on a grill often browns very fast on
the outside. Use a meat thermometer to be sure food has
reached a safe internal temperature, and cut into food to
check for visual signs of doneness.
• Whole poultry should reach 180° F; breasts, 170° F. Juices
should run clear and flesh should not be pink.
• Hamburgers made of any ground meat or poultry should
reach 160° F, and be brown in the middle with no pink juices.
Beef, veal and lamb steaks, roasts and chops can be cooked
to 145°F. All cuts of pork should reach 160° F.
• NEVER partially grill meat or poultry and finish cooking later.
Cook food completely to destroy harmful bacteria.
• When reheating takeout foods or fully cooked meats like hot
dogs, grill to 165° F, or until steaming hot.
WARNING: To ensure that it is safe to eat, food must be
cooked to the minimum internal temperatures listed in the table
below.
USDA* Recommended Safe Minimum Internal Temperatures
Beef, Veal, Lamb and Pork – Whole Cuts** 145° F
Fish 145° F
Beef, Veal, Lamb and Pork – Ground 160° F
Egg Dishes 160° F
Turkey, Chicken & Duck – Whole, Pieces & Ground 165° F
* United States Department of Agriculture
**Allow meat to rest three minutes before carving or consuming.
12Gas Requirements Care and Maintenance Time Table Chart
LP Gas
If your grill is for LP Gas, the regulator supplied is set for Frequency Based
Grill Item Cleaning Method
on Normal Use
an 11-in. water column (WC) and is for use with LP gas
Painted surface Twice yearly Car wax
only. The factory-supplied regulator and hose must be
used with a 20-lb. LP gas tank. Stainless surface Twice yearly Stainless cleaner
All grates After each use Burn off and wipe
Wire brush/
Stainless grates 15 days
Dishwasher safe
Excess Flow Control and Low Heat
Scrub pad soapy water
The propane regulator assembly incorporates an excess Porcelain grates 15 days
/Dishwasher safe
flow device designed to supply the grill with sufficient gas
flow under normal conditions yet control excess gas flow. Burner heat tents 30 days Wire brush
Rapid changes in pressure can trigger the excess flow Burners 90 days Wire brush
device providing a low flame and low temperature. If the Burner box Interior grill cleaning
tank valve is turned open to allow gas flow while a burner 120 days
interior products
valve is open, the surge of pressure will cause the device
to activate. The device will remain closed until the
pressure is equalized. This should occur within 5
seconds.
To ensure this does not cause difficulty in lighting the grill,
follow these instructions:
1. Make sure all burner valves are “OFF”.
2. Open the tank valve and wait 5 seconds.
3. Light the burners one at a time following the lighting
instructions.
Helpful Care and Maintenance Hints
Before grilling, pre-heat grill for 15 minutes on "HI" with
hood down. To avoid uncontrolled flare-ups or grease
fires, grill meats with hood open. Close hood if meats are
thick or weather is cold, or if you are using a rotisserie or
indirect cooking.
Always protect your hand with a pot holder or cooking
glove when coming into contact with a hot surface.
Hood up when grilling meats, especially chicken. Hood
down when indirect or rotisserie cooking.
NEVER leave your grill unattended while cooking.
After use, close hood, turn burners to HI for 15 min. for
self-cleaning, grease burn off.
13Operating Instructions:
Natural Gas Conversion Kit
1. To connect, push back socket sleeve.
Socket Sleeve Plug
Your grill can be converted to natural gas. The
conversion must be performed by a qualified gas
technician. The following listed Natural Gas Conversion
Kit (sold separately) are required for the conversion.
Natural gas conversion kit
Model # NGKIT-01
(Manufacturer Part No.: RT2417S-1-KIT)
2. Insert plug and release sleeve.
3. Push plug until sleeve snaps forward. (Gas will flow
automatically. Failure to connect plug properly to
socket will inhibit gas flow to the appliance.)
Natural Gas Connection Preparation: Socket Sleeve
1. Turn off gas supply, and then remove cap on gas
supply side.
2. Recommended: Install a shut-off valve on
gas supply side before installing the socket.
3. Socket should be installed by an authorized
technician in accordance with the national fuel gas
code (NFPA 54/ANSI223.1). To disconnect
4. Before inserting plug, turn on gas supply and leak 1. Pull Sleeve back. Pull plug out of socket. (Gas is
test all connections including the stem of the shut-off automatically shut off.)
valve and the opening of the socket. For best results, 2. Close shut-off valve or turn off gas supply, and replace
use an ammonia-free soap & water solution. dust caps on socket and plug.
Natural Gas
Now that your grill is converted to Natural Gas use, it is
set for 7-inch water column (WC) pressure, and cannot
be used with Propane Gas. Gas pressure is affected by
gas line size and the length of gas line run from the
house. Follow the recommendations in the chart below.
From House to Grill
Distance Tubing Size
Up to 25 ft. 3/8 in. diameter
26-50 ft. 1/2 in. diameter
2/3 of the run: 3/4 in. diameter
51-100 ft.
1/3 of the run :1/2 in. diameter
Over 101 ft. 3/4 in. diameter
14PARTS LIST
Manufacturer Manufacturer
Key Qty Description Key Qty Description
Part # Part #
1 3 HEAT TENT 2518SL-2003-N S7 3 R PIN R PIN
2 2 COOKING GRID RT2417S-00-2010 RT2417S-1-
1 HARDWARE PACK
HARDWARE
3 1 WARMING RACK RT2417S-00-2020 RT2417S-1-
1 PRODUCT MANUAL
4 1 TEMPERATURE GAUGE 2518-4C-8012 MANUAL
5 1 TEMPERATURE GAUGE BEZEL 3218LTN-00-4001
6 4 TEMPERATURE GAUGE SLEEVE 3218LT-00-4009
7 1 HOOD RT2417S-1-4000
If you are missing hardware or have
8 2 RUBBER PLUG 3219B-8083
9 1 HOOD HANDLE RT2417S-00-4300
damaged parts after unpacking grill, call
10 1 SIDE SHELF (LEFT) RT2417S-00-6000 1-888-804-7455 for replacement.
11 2 SIDE SHELF BRACKET (LEFT) RT2417S-00-2050
12 2 HOOD SLEEVE 2818-2T-0001
13 1 BURNER BOX RT2417S-00-2000
14 2 SIDE SHELF BRACKET (RIGHT) RT2417S-00-2040
To order replacement parts after using grill,
15 1 SIDE SHELF (RIGHT) RT2417S-00-5000 call 1-888-804-7455.
16 1 IGNITION WIRE RT2417S-00-8001
17 1 LPG REGULATOR L3218-00-8006
18 1 CONTROL BOX RT2417S-00-3101
19 3 KNOB BEZEL RT2417S-00-3321
20 3 KNOB RT2417S-00-3301
21 3 MAIN BURNER RT2417S-00-8020
22 1 IGNITION PIN (MAIN BURNER) RT2417S-00-8007
23 1 IGNITION PIN (MAIN BURNER) RT2417S-00-8008
24 1 IGNITION PIN (MAIN BURNER) RT2417S-00-8009
25 1 MANIFOLD RT2417S-00-3200
26 1 LEFT PANEL RT2417S-00-1700
27 1 SAFETY TANK RING P3018-00-1203
28 1 TANK RING BRACKET P3018-00-1202
29 1 REAR PANEL RT2417S-1-1200
30 1 IGNITER RT2417S-00-8004
31 1 RIGHT PANEL RT2417S-00-1800
32 1 BOTTOM PANEL RT2417S-00-1100
33 2 LOCKING CASTER RT2417S-00-8005
34 2 CASTER RT2417S-00-8006
35 1 MATCH HOLDER 3019L-1710
36 1 DOOR RT2417S-1-1600
37 1 DOOR HANDLE RT2417S-00-1610
38 1 BEAM RT2417S-1-1500
39 1 DRIP TRAY SUPPORT RT2417S-1-1900
40 1 DRIP TRAY P3018-00-1002
S1 4 SCREW 1/4-20 x 5/8"
S2 2 SCREW 5/16-18UNC x 3/4"
S3 2 NUT 5/16-18UNC
S4 6 SCREW M4 × 8
S5 30 SCREW 3/16-24UNC x 1/2"
S6 1 SCREW 5/32-32UNC x 3/8"
NOTE: Some grill parts shown in the assembly steps may differ slightly in appearance from
those on your particular grill model. However, the method of assembly remains the same.
15PARTS DIAGRAM
2 3 4 5 6 7
1 9 S1 8
10 11 S2 12 S3 13
14 15
S7
25
24 23 22 21
S4
20 19 18 17 16
26 S1 29 31
27 28 30
38 39
40 S5
S5
S6
37 36 35 34 33 32
16UNPACKING
After removing all parts and hardware pack from the top of the shipping box, and when the only part showing is
the grill head, use a box cutting knife to slice down the sides of the box. Be careful of staples along shipping box
edges.
Remove the steel and cardboard corner supports from the box and the styrofoam side pieces from the grill head.
Open grill lid and remove all packaged parts and packing material. Allow grill head to rest on cardboard until
placing grill head on cart in Step 9.
WARNING: Assemble the grill on a flat level surface. Compare the parts and hardware with the list and
diagrams. Do not attempt assembly if any part is missing or damaged.
1. Attach the locking casters (Q) and the 1
casters (R) to the bottom panel (P) using
12 screws (AA). When this process is AA
completed, turn the bottom panel over. Q
The two locking casters (Q) should be at
the back of the grill.
Hardware Used
AA 3/16-24 x 1/2 in. X 12
Screw
R
P
2. Align the holes in the rear panel (L) with the 2
holes in the bottom panel (P) and insert
screws (AA) into the aligned holes.
AA
Hardware Used
L
AA 3/16-24 x 1/2 in. X3
Screw
Note: Do not tighten the screws completely. Leave
at least one full turn on each. After all the screws
have been installed, go back and tighten them
fully. P
173. Attach the left panel (T) and right panel (N) to the
3
bottom panel (P). For both the left and right
panels, there are three screws for the rear panel AA
(L) and four for the bottom panel. Insert the four
bottom panel screws first.
T L
Hardware Used
AA 3/16-24 x 1/2 in. X 14
Screw N
P
4. Attach the front beam (U) to the left panel (T) and 4
the right panel (N) with 2 screws (AA) on each AA
side as shown.
Hardware Used
AA 3/16-24 x 1/2 in. X4
Screw
U
185. Slide the tank ring bracket (K) onto the end of the
5
safety tank ring (J) as shown. Attach the tank ring
K BB
bracket to the rear panel (L) with 2 screws (BB)
as shown.
Hardware Used
BB 1/4-20 x 5/8 in. X2
Screw J
6. Attach the drip tray support (I) to the front beam 6
(U) and rear panel (L) with 4 screws (AA) as AA
shown. U I
Hardware Used
AA 3/16-24 x 1/2 in. X4
Screw
7
7. Remove the cap and the nut from the igniter (M).
Secure the igniter to the right panel (N) with the
nut. Then, reassemble the cap to the igniter.
M
Nut Cap
198. For the door (S), insert bottom hinge pin into hole
on bottom panel (P). Push top hinge pin in the
corner of the door to insert into hole in top corner
of the right panel (N). Then, put the drip tray (O)
onto the drip tray support (I).
9. Take the pressure regulator out from under the
burner box (A). Lift the burner box (A) onto the
cabinet, making sure that the gas pressure
regulator is in the cabinet, then position burner
box on the cabinet by aligning the four tabs on
top of the cabinet with the holes in the burner box.
Fasten the burner box to the cabinet with 4
screws (AA).
Hardware Used
AA 3/16-24 x 1/2 in. X4
Screw
2010. Attach the left side shelf bracket (H) to the left of
the burner box (A) and the right side shelf bracket
(E) to the right of the burner box with 2 screws
(AA) on each bracket.
Hardware Used
AA 3/16-24 x 1/2 in. X8
Screw
Follow steps 11 - 13 for installing or removing the
side shelves (G and F).
11. To install the shelves:
Hold the shelf at its fold-down position (vertical).
Align the large holes on the shelf to the mounting
screw on the side shelf bracket. Move the side
shelf from front to back, making sure the screws
fit inside the holes on the side shelf, then slide
into the slot.
2112. To fold up the shelves:
Make sure the screws are in the slot as shown,
then slowly rotate the side shelf up.
When folding up to level position, press down the
hinge area to lock the shelf. Adjust the side
shelves to align it with the control box.
13. To remove the shelves:
Lift up the shelf, position the shelf at its folddown
position (vertical).
Align the screws with the holes on the shelf,
move the shelf from back to front until the side
shelf disconnect from the screw on the bracket.
2214. Plug the main burner igniter wires into the 14
sockets in the igniter.
Igniter wires
15. Place the heat tents (B), main grids(C) and 15
warming rack (D) into the burner box (A).
Remove the battery cap on the igniter (M) and
insert a AA battery (CC) with the positive end D
facing outward. Replace the cap.
C
B
Insert
AA battery
ASSEMBLED GRILL DIMENSION (INCHES):
46 (HEIGHT) x 51.2 (WIDTH) x 22.3 (DEPTH) (SIDE SHELF FOLDED OUT)
46 (HEIGHT) x 32 (WIDTH) x 22.3 (DEPTH) (SIDE SHELF FOLDED DOWN)
WARMING RACK AREA (SQUARE INCHES): 142
THE UL LABEL IS ON THE BACK OF THE DOOR.
23Natural Gas Conversion Instructions
The NGKIT-01 contains orifices for various grill models. Model Main burner
Please select the orifices as listed and discard the rest. 1.37mm
Follow the conversion instruction provided with the kit.
RT2417S-1 3 pc
Main Burner Conversion 16
R-pin Main burner
16. Pull off the R-pins and take the main burners out.
Adjust main burners’ air shutters by loosening the
air shutter screws.
17. The settings are: 17
1/4 in. open for LP gas.
1/16 in. - 1/8 in. open for NG gas.
You need to adjust the openings before you put
the burners back in the burner box.
Air shutter
2418. Remove the LP orifices first with the orifice
18
removal tool, then install the NG orifice. Make
sure you are using the correct orifice, marked
“1.37”.
When this step completed, install the main
burners back to the firebox and secure to the 1.37
bracket with the R-pins.
Make sure the orifices are aligned with the
burners and the ignition pins are installed in their
original positions. Check the sparks before
operating the grill.
Change to 10 ft. NG hose
19
19. Take the regulator off from the manifold and
replace it with 10-ft. natural gas hose. Please
make sure the hose is securely fastened.
Adjust valve control screw
20. Pull all the knobs off of valve stems. Adjust the 20
screw in the valve hole using the flathead
screwdriver. Turn screws two complete turns
counterclockwise.
21. To complete conversion, re-install all knobs,
return heat diffusers to firebox, followed by the Valve hole
grates and warming rack.
25Troubleshooting
Problem Possible Cause Corrective Action
1. The ignition wire came off the 1. Reconnect the ignition wire to the electrical
electrical igniter. igniter.
2. The distance between the ignition 2. Loosen the ignition pin and adjust the
pin and the burner is greater than distance, then fasten it again.
0.1-0.2 inch(side burner).
3. The ignition wire is broken. 3. Call customer service for a replacement
ignition wire.
Grill or side burner 4. The battery has died. 4. Install a new AA battery.
will not light 5. The battery is in the wrong 5. Change the battery polarity.
polarity.
6. The electrode tip does not 6. Reinstall the electrode.
produce sparks at the burner
port.
7. No gas supplied. 7. Turn on the regulator valve.
8. Air shutter opening is too big. 8. Loosen the air shutter and adjust the opening
to a smaller size.
1. The air shutter opening is 1. Loosen the air shutter and adjust the opening
Burner flame is
not properly set. to have blue flames.
yellow and gas
2. Spiders or insects block the air 1/4 in. opening for LPG.
odor can be
shutter. 1/8 in. or less opening for NG.
smelled
3. Gas leaks 2. Clean blockages.
3. Check for the source of gas leaks.
1. Grilling fatty meats while knobs 1. Grill fatty meats when the grids are cold while
on “HIGH”. the knobs are on the “LOW” setting. Move the
meats to the warming rack if flare up
Excessive flare-up continues until flame settles down.
2. Spray water on gas flames. 2. Never spray water on gas flames.
3. Hood closed when grilling. 3. Hood up when grilling.
26Problem Possible Cause Corrective Action
1. LP tank is empty. 1. Refill the LP Tank.
2. Burner is not aligned with the 2. Install the burner correctly.
Burner blows out control valve.
3. Gas supply is not sufficient. 3. Check the gas supply hose and make
sure there are no leaks and no knots.
1. Low heat is found in natural gas 1. This model is set for 7 in. natural gas usage.
models. Please check your natural gas supply system
Low heat with the to have correct gas pressure.
knob in “HI” Regulator is not needed for NG model.
position Check the orifice if you installed NG nozzles.
2. Ports are blocked. 2. Clear ports of any obstructions.
3. LP tank has run out. 3. Refill the LP tank.
Check your gas line and make corrections by
following the chart below.
From House to Grill
Gas pressure is significantly
Low heat, natural gas Distance Tubing Size
affected by gas line and length of
gas line from house gas line.
Up to 25 ft. 3/8 in. diameter
26 -50 ft. 1/2 in. diameter
2/3 in. of run 3/4 in.
51 -100 ft.
1/3 in. of run 1/2 in.
The propane regulator assembly Please follow these instructions:
incorporates an excess flow device 1. Make sure all burners are “OFF”.
designed to supply the grill with 2. Open the tank valve and wait 5
Low heat, sufficient gas flow. Rapid changes in minutes.
LP gas pressure can trigger the excess flow 3. Light the burner one at a time
device, providing a low flame and following the lighting instructions
low temperature. listed on the door liner
1. Out of gas. 1. Check for gas in LP cylinder.
2. Excess flow valve tripped. 2. Turn off knobs, wait 30 seconds and light
grill. If flames are still low, turn off knobs and
LP cylinder valve. Disconnect regulator.
Reconnect regulator and leak test. Turn on
Sudden drop in gas LP cylinder valve, wait 30 seconds and then
flow or low flame light grill.
3. Vapor lock at coupling nut/LP 3. Turn off knobs and LP cylinder valve.
cylinder connection. Disconnect coupling nut from cylinder.
Reconnect and retry.
Sagittarius Sporting Goods
c/o JDS
108 Leventis Drive.
Columbia, SC 29209, USA
27BARBECUE A GAZ PROPANE
LIQUIDE - 3 BRÛLEURS
MODÈLE: RT2417S-1
AVERTISSEMENT
Une installation, un ajustement, une
modification, une utilisation ou un entretien
inadéquat peut causer des blessures ou
des dommages matériels.
Lisez attentivement le manuel
d’instructions avant d’installer ou
d’entretenir cet appareil.
AVERTISSEMENT
1. Ne stockez pas ni n’utilisez pas
d’essence ou toute autre vapeur ou tout
autre liquide inflammable à proximité de
cet appareil ou de tout autre appareil.
2. Tout réservoir de gaz non branché ne
doit pas être entreposé à proximité de
cet appareil ou de tout autre appareil.
DANGER
Si vous sentez une odeur de gaz :
1. Coupez l’alimentation en gaz de
l’appareil.
2. Éteignez toute flamme nue.
3. Ouvrez le couvercle.
4. Si l’odeur persiste, tenez-vous à distance
de l’appareil et appelez immédiatement
le fournisseur de gaz ou le service
d’incendie.
AVERTISSEMENT
Pour usage à l’extérieur seulement
JOIGNEZ VOTRE REÇU ICI
Numéro de série Date d’achat
Des questions, des problèmes, des pièces manquantes? Avant de retourner l’article au détaillant,
appelez notre service à la clientèle au 1-888-804-7455, entre 8 h et 20 h (HNE), du lundi au vendredi.
28Mesures de sécurité pour l’installation
• Utilisez le barbecue, tel qu’il a été acheté, seulement avec
du gaz propane liquide et l’ensemble régulateur/soupape
fourni. Vous devez vous procurer un nécessaire de
Si vous sentez une odeur de gaz : conversion afin que le barbecue puisse fonctionner au gaz
naturel.
1. Coupez l’alimentation en gaz de l’appareil. • L’installation du barbecue doit être conforme aux codes
2. Éteignez toute flamme nue. locaux ou, en l’absence de codes locaux, soit à la norme
3. Ouvrez le couvercle. nationale des États-Unis sur les gaz
4. Si l’odeur persiste, éloignez-vous de combustibles ANSI Z223.1/NFPA 54 (National Fuel Gas
l’appareil et appelez immédiatement le Code) et au Code d’installation du gaz naturel et du
fournisseur de gaz ou le service propane CSA B149.1, soit au Code sur le stockage et la
d’incendie. manipulation du propane CSA B149.2, ou encore à la norme
relative aux véhicules récréatifs ANSI A 119.2/NFPA 1192
(Standard for Recreational Vehicles) ainsi qu’aux normes
AVERTISSEMENT CSA Z240 RV, Code pour véhicules récréatifs, selon le cas.
• Tous les accessoires électriques (par exemple le
tournebroche) doivent être mis à la terre conformément aux
1. Ne rangez pas ou n'utilisez pas d'essence codes locaux, ou en l’absence de tels codes, au Code
ou d’autres liquides ou vapeurs national de l’électricité, ANSI/NFPA 70, ou au Code
inflammables à proximité de cet appareil canadien de l'électricité, CSA C22.1. Gardez les cordons
ou de tout autre appareil. électriques et les tuyaux d’alimentation en gaz à distance
2. Ne rangez aucune bouteille de propane des surfaces chaudes.
liquide non raccordée (au barbecue) à • Ce barbecue est homologué uniquement pour une
proximité de cet appareil ou de tout autre utilisation aux États-Unis et au Canada. Ne le modifiez pas
pour l’utiliser dans un autre lieu. Une telle modification
appareil.
représenterait un risque pour la sécurité.
Pour obtenir de l'aide et des pièces, communiquez
avec le centre de service pour barbecues. Symboles relatifs à la sécurité
Si vous avez des questions ou si vous avez besoin d’aide Vous trouverez ci-dessous une explication du sens de
pendant l’assemblage de ce produit, veuillez composer le chacun des symboles. Lisez et suivez toutes les consignes
1-888-804-7455. qui apparaissent dans le présent guide.
DANGER : Indique une situation dangereuse
Fiche du produit imminente qui, si elle n'est pas évitée. entraînera la
mort ou des blessures graves.
IMPORTANT : Veuillez noter les renseignements
ci-dessous concernant votre produit :
AVERTISSEMENT
Numéro de modèle
AVERTISSEMENT : Indique une situation
Numéro de série potentiellement dangereuse qui, si elle n'est pas
évitée. entraînera la mort ou des blessures graves.
Le numéro de série figure sur l’étiquette du
barbecue.
Date d’achat
MISE EN GARDE
MISE EN GARDE MISE EN GARDE : Indique une situation
Pour un usage résidentiel seulement. potentiellement dangereuse ou une pratique non
N'utilisez pas ce barbecue pour la cuisson à sécuritaire qui, si elle n'est pas évitée, pourrait
causer des blessures mineures ou modérément
des fins commerciales.
graves.
29TABLE DES MATIÈRES AVERTISSEMENT
Pour votre sécurité..............................................................29 PROPOSITION 65 DE L’ÉTAT DE CALIFORNIE
Centre de services pour barbecues....................................29 1. Les produits dérives de la combustion produits
Renseignements relatifs à la garantie.................................29 lors de l’utilisation du présent produit
contiennent des produits chimiques reconnus
Symboles de sécurité..........................................................29
par l’État de Californie comme étant
Mesures de sécurité pendant l'installation..........................29 cancérigènes, pouvant causer des
Garantie sur les barbecues Kenmore.................................31 malformations congénitales et autres
Utilisation et entretien....................................................32-39 problèmes de reproduction.
2. Le présent produit contient des substances
Nécessaire de conversion au gaz naturel .........................40 chimiques, dont le plomb et des composés de
Liste des pièces..................................................................41 plomb, reconnus par l'État de Californie comme
Schéma des pièces.............................................................42 étant cancérigènes, pouvant causer des
malformations congénitales et autres
Assemblage...................................................................43-49
problèmes de reproduction.
Instructions pour la conversion......................................50-51 Veuillez vous laver les mains après manipulation
Dépannage....................................................................52-53 dudit produit.
AVERTISSEMENT
DANGER D'INCENDIE DE GRAISSE
z La fermeture du couvercle du gril ne pourra pas
éteindre l’incendie de graisse. Pour des raisons
de sécurité, les barbecues sont bien ventilés
z Veuillez ne pas utiliser de l’eau sur un feu de
graisse. Cela peut occasionner des blessures
graves. En cas de feu de graisse, veuillez
porter des gants pour protéger les mains et
fermer les perilla de contrôle et le détendeur
PL.
Veuillez toujours surveiller le barbecue pendant le
préchauffage ou pendant que vous brûlez les
résidus alimentaires sur HI. Si le barbecue n’est
pas nettoyé de façon régulière, Il peut causer un
feu de graisse susceptible d’endommager le
produit.
N.B: L'utilisation de l’eau en bouteille pour éteindre la
flamme pourra provoquer un choc thermique sur les
surfaces en porcelaine du barbecue, puis fissurer la
porcelaine. Cette eau peut suinter à travers ces fissures
et provoquer la roue du métal sous-jacent.
30GARANTIE LIMITÉE
Avec PREUVE DE VENTE à l’appui, la garantie suivante s’applique lorsque cet appareil est correctement installé, utilisé et
entretenu conformément à toutes les instructions fournies.
VALIDE POUR UN AN à compter de la date de vente de cet appareil, cette garantie couvre les défauts de matériaux ou de
fabrication. Un appareil défectueux sera réparé ou le remplacement gratuitement, selon le choix du vendeur.
VALIDE POUR CINQ ANS à compter de la date de vente, tout brûleur en acier inoxydable rouillé ou brûle en entier sera remplacé
gratuitement. Si cette rouille ou brûlure apparaît dans la première année suivant l’achat, un nouveau brûleur vous sera installé
gratuitement. Si cette rouille ou brûlure apparaît après la première année, un nouveau brûleur vous sera mis à votre disposition.
Mais son installation sera à vos frais. Vous êtes responsable du coût du travail d'installation du brûleur après la première année
de la vente.
Les piles de l’allumeur, l’écaillement de la peinture, la décoloration et la formation de rouille à la surface des pièces du gril,
dans la mesure où ces pièces sont des pièces consommables s’usant normalement pendant la période de garantie ou dans
des conditions pouvant résulter d'un usage normal, d'un accident ou d'un mauvais entretien, sont exclus de la garantie.
L’ensemble des garanties appliquées sera nul si cet appareil est utilisé à des fins autres que l’utilisation domestique privée.
Cette garantie couvre UNIQUEMENT les défauts de matériel et de fabrication, et NE S’APPLIQUE PAS pour:
1. Des articles consomptibles pouvant s’user par une utilisation normale au cours de la période de garantie, y compris, mais
non limité aux piles, vissage, ampoules de base et des revêtements de surface ou de finitions.
2. Un technicien pour nettoyer ou entretenir cet appareil, ou de guider l'utilisateur sur la bonne installation de l'appareil, le
fonctionnement et son entretien.
3. Les appels de service visant à corriger l'installation de l'appareil effectué par des agents de service autorisés, ou pour la
réparation des problèmes lies aux fusibles, disjoncteurs, câblage de la maison, et les systèmes de plomberie ou de fourniture
de gaz résultant d'une telle installation.
4. Dégât sur ou défaillance de cet appareil résultant d'une installation effectuée par des techniciens non autorisés, y compris
l'installation qui ne respecte pas les codes électriques, de gaz ou de plomberie.
5. Dégât sur ou défaillance de cet appareil, y compris la décoloration ou la rouille de surface, résultante d’une utilisation et d’un
entretenu non conforme à toutes les instructions fournies.
6. Dégât sur ou défaillance de cet appareil, y compris la décoloration ou la rouille de surface, résultant d'un accident, une
modification, un abus, une mauvaise utilisation ou une utilisation autre que celle autorisée.
7. Dégât sur ou défaillance de cet appareil, y compris la décoloration ou la surface de la rouille, causée par l'utilisation de
détergents, nettoyants, produits chimiques ou ustensiles autres que ceux recommandés dans toutes les instructions fournies
avec le produit.
8. Dégât sur ou défaillance de cet appareil suite à une force majeur ou d'autres catastrophes, telles que les inondations, les
incendies ou la tempête.
9. Dégât sur ou défaillance des pièces ou systèmes résultant des modifications non autorisées apportées à cet appareil.
10. Les entretiens sur un appareil n’ayant pas de plaque et de modèle et série, ou celles-ci ayant été altérées, ou encore avec de
logo de certification méconnaissable.
Clause d'exonération de responsabilité au titre des garanties implicites; limitation des recours
Le seul et unique recours du client dans le cadre de cette garantie limitée est la réparation du produit ou son remplacement
comme susmentionné. Les garanties implicites, y compris les garanties de qualité marchande ou d'adéquation à un usage
particulier, sont limitées à un an sur l'appareil et cinq ans sur dommages les brûleurs ou sur la période la plus courte autorisée par
la loi. Le vendeur ne sera pas tenu pour responsable des directs ou indirect. Certaines provinces interdisent l'exclusion ou la
limitation de dommages directs et indirects, ou la limitation de la durée des garanties de qualité marchant ou d'adéquation à
un usage particulier, ainsi les limitations ou exclusions susmentionnées peuvent ne pas s'appliquer dans votre cas.
Cette garantie ne s'applique que lorsque cet appareil est utilisé aux États-Unis.
Cette garantie vous accorde des droits légaux précis auxquels peuvent s'ajouter d'autres droits pouvant varier d'une
juridiction à l'autre.
31You can also read