User Guide - Version 1.0.2 - English Model: nOb 001 www.nobcontrol.com - DIONYSIOS MARINOS - NOB CONTROL SOLUTIONS - Louki ...
←
→
Page content transcription
If your browser does not render page correctly, please read the page content below
User Guide

Version 1.0.2 - English
Model: nOb 001
www.nobcontrol.com - info@nobcontrol.com
DIONYSIOS MARINOS – NOB CONTROL SOLUTIONS – Louki Akrita 11, 15126 Marousi, Greece

Copyright © 2015-2019 NOB CONTROL SOLUTIONS                                          1
Table of Contents
Introduction..........................................................................................................................................3
Requirements.......................................................................................................................................4
Getting started......................................................................................................................................5
Operation Modes..................................................................................................................................6
   Drag Mode.......................................................................................................................................6
   Stationary Mode..............................................................................................................................6
   Horizontal Drag................................................................................................................................6
   Vertical Drag.....................................................................................................................................6
Advanced Features...............................................................................................................................8
   Direction Change..............................................................................................................................8
   Undo.................................................................................................................................................8
   Moving the Cursor & Switching Between Two Parameters.............................................................8
   Radial & Diagonal Mode..................................................................................................................9
Serial Interface....................................................................................................................................11
Adjusting the knob's rotation resistance............................................................................................13
Technical Specifications......................................................................................................................14
SAFETY INSTRUCTIONS & WARRANTY INFORMATION.......................................................................15
   Safety Instructions.........................................................................................................................15
   Notice Concerning EU Regulations................................................................................................15
   Notice Concerning FCC Regulations...............................................................................................15
   Notice Concerning Canadian Regulations......................................................................................15
   Notice Concerning Australian & New Zealand Regulations...........................................................15
   Correct Disposal of this Product....................................................................................................16
   Limited Warranty...........................................................................................................................16

Copyright © 2015-2019 NOB CONTROL SOLUTIONS                                                                                                           2
Introduction
Welcome to nOb's User Guide. nOb is a precise, generic, endless knob controller. It was designed
with the author in mind, who wants to adjust any type of on-screen parameter during demanding
media production.
By taking control of your mouse cursor position and click behavior, nOb is able to control any
parameter you would normally adjust with your mouse, delivering out-of-the-box compatibility
with any operating system and software package. You simply have to hover your mouse cursor over
the on-screen parameter you want to control and use nOb's big knob to fine-tune it to taste. Based
on the current mode of operation, any draggable user interface element found in modern media
production software can be controlled, including sliders, scroll bars, knobs, value indicators and so
on.

DISCLAIMER
By default, nOb works by taking control of your mouse cursor. DIONYSIOS MARINOS - NOB
CONTROL SOLUTIONS assumes no liability for any damages or data loss of any kind that might
arise by the improper use of the device. The user is advised to use nOb to control on-screen
parameters in media authoring software. Any use of nOb outside a media authoring environment
might take place only at the user's own risk.

Copyright © 2015-2019 NOB CONTROL SOLUTIONS                                                        3
Requirements
nOb requires a USB 2.0 (or above) port and has been tested with the following systems:
•   Microsoft® Windows® XP (and later)
•   Apple® MacOSX® v10.1 (and above)
•   Linux (Kernel v2.4.0 and above)

Copyright © 2015-2019 NOB CONTROL SOLUTIONS                                              4
Getting started
nOb implements a class complaint HID device (standard USB mouse or keyboard interface) utilizing
an Arduino Leonardo microcontroller. This means that setting up the device is as easy as plugging a
common USB mouse to your computer.

However, if you experience any difficulties please follow the steps bellow:
1. Connect the USB cable to a USB port (v2.0 or above) on your PC or Mac.
   •   Make sure that you do not touch any of the toggle switches or the big knob, directly after or
       while you connect the device. nOb takes a second to calibrate itself upon connecting.
       Touching the device may disrupt the calibration and lead to touch instabilities.
   •   If you decide, you need a USB extension cable, please use a cable no longer than 1.5m.
       Using a longer USB extension cable will not be harmful, but may lead to instabilities.
   •   If you connect nOb to a USB hub make sure it is USB 2.0+ compatible and externally
       powered.
2. After connecting, and depending on your operating system, some configuration dialogs may
   appear. Those dialogs will either concern the automatic installation of drivers for the Arduino
   Leonardo microcontroller or the configuration of a new keyboard, mouse or network device.
   Just let any automatic driver installation finish and close any configuration windows that might
   have appeared. Do not worry, if any automatic driver installations fails. Just close the windows
   and move to the next step.
3. Now, you may touch and turn the big knob. You will notice your mouse cursor moving on the
   screen. If for any reason, this is not the case, unplug nOb and repeat steps 1 to 3 using another
   USB port.

The next time you connect nOb to your computer, it will work right away, without having to go
over the above steps again.

                                             That's it!
  Move on the next chapters to learn all about controlling on-screen parameters
                                   with nOb.

Copyright © 2015-2019 NOB CONTROL SOLUTIONS                                                        5
Operation Modes
nOb features two toggle switches: one on the left and one on the right. You can use those toggle
switches to set the operation mode of nOb, depending on the type of the on-screen element you
want to adjust. By choosing the right mode, you can control virtually any on-screen element you
like.
Drag Mode
Drag Mode is activated by flipping down the left toggle switch. This mode is useful for
controlling elements that move along with the mouse cursor when dragged, like e.g.
faders, sliders and scroll bars.
Turning the knob will automatically result into clicking and dragging the element that your mouse
cursor is hovering over. After you finish an adjustment and you let go of nOb, the mouse cursor will
still be over the UI element. You can then just use your nOb again, to readjust the parameter.
Stationary Mode
Stationary Mode is activated by flipping up the left toggle switch. This mode is useful for
controlling elements that do not move along with the mouse cursor when clicked and
dragged, like e.g. most knobs, pitch wheels or value indicators.
Touching and turning the knob will result into clicking and dragging the element, like it happens in
drag mode. However, there is an important difference in this mode: once you finish an adjustment
and you let go of the big knob, the mouse cursor will snap back to the position it was when you
started adjusting. This way, the mouse cursor will lie over the element you have just adjusted,
allowing for further consequent readjustments. If you are experiencing any trouble with this mode,
please reduce or disable mouse acceleration in your operating system settings. More on mouse
acceleration in the section Advanced Features of this guide.
IMPORTANT TIP: There are certain knobs or other on-screen elements, that hide the mouse cursor,
while you make adjustments. In this case, those elements take care of the correct positioning of
the mouse cursor after making an adjustment, thus rendering the snap back functionality of the
Stationary Mode redundant. Those elements can be safely controlled in Drag Mode.
Horizontal Drag
Horizontal Drag is activated by flipping down the right toggle switch. When activated,
turning the knob will result into clicking and dragging along the horizontal screen axis.
Turning the knob clockwise will result into dragging the element to the right. Turning the knob
counter-clockwise will drag the element to the left.
Vertical Drag
Vertical Drag is activated by flipping up the right toggle switch. When activated, turning the
knob will result into clicking and dragging along the vertical screen axis. Turning the knob
clockwise will result into dragging the element upwards. Turning the knob counter-
Copyright © 2015-2019 NOB CONTROL SOLUTIONS 6clockwise will drag the element downwards. Copyright © 2015-2019 NOB CONTROL SOLUTIONS 7
Advanced Features
nOb utilizes the touch sensitivity of both its knob and toggle switches to implement a series of
advanced features, to help you be more productive.
For most of these features to work reliably, changing the acceleration settings of the mouse device
associated with nOb may be necessary. nOb was designed to compensate for the acceleration
applied to the mouse cursor by the operating system. However, this compensation can work
reliably only if the mouse acceleration is kept relatively small. If you are experiencing any trouble
with the advanced features, please consider one of the following solutions:
•   Go to https://www.nobcontrol.com/nac and download the latest nOb Assignment center, a.k.a
    nAc. This piece of software eliminates any acceleration issues and adds many new exciting
    features to your nOb.
•   For Windows, go the Control Panel and open up the Mouse settings. Go to the Pointer Options
    tab and uncheck the Enhance pointer precision option.
•   Alternatively, use a free Windows utility, like e.g. EitherMouse (http://www.eithermouse.com/)
    to disable the Enhance pointer precision option and set the mouse speed individually for nOb.
•   For Mac, there are a series of utilities that you can use to disable mouse acceleration, like e.g.
    SmoothMouse (http://smoothmouse.com/), USB Overdrive (http://www.usboverdrive.com/),
    CursorSense (http://plentycom.jp/en/cursorsense/), SmoothCursor
    (https://smoothcursor.com/).
•   Advanced Mac and Linux users can change the mouse acceleration settings in the Terminal.
    Please refer to your OS manual for more information.

Direction Change
The drag axis can be temporarily changed, while you touch the right toggle switch. For example, if
Vertical Drag is activated and you turn the knob while touching the right toggle switch, the
dragging will take place along the horizontal axis. Likewise, if Horizontal Drag is activated and you
turn the knob while touching the right toggle switch, a vertical drag will occur.

Undo
You are able to undo the last adjustment you have made by double tapping the big knob. Double
tapping again will redo the adjustment.
NOTICE: There may be on-screen elements that do not behave in a linear manner in relation to mouse cursor
movements. Undo and redo functionality will not be 100% reliable with such elements. Please reduce or deactivate
mouse acceleration for nOb to get better undo/redo results.

Moving the Cursor & Switching Between Two Parameters
You can move the mouse cursor with nOb without inducing a drag (or rather without causing a
mouse click), by touching the left toggle switch when you start turning the knob. This way you can
move the mouse cursor from one element to another without changing any parameter values.

Copyright © 2015-2019 NOB CONTROL SOLUTIONS                                                                        8
nOb notices this type of movement and is able to make the mouse cursor jump from the second
element back to the first and vice versa by double-tapping the left toggle switch.
It is important that you perform this kind of movement in the right mode:
• In Stationary Mode for knobs, pitch wheels or other elements that stay at the same place when
dragged.
• In Drag Mode for faders, sliders, scroll bars or other elements that move along with the mouse
cursor when dragged.
NOTICE: You can reliably switch between two on-screen elements using the method above, if the elements behave in
the same way (like e.g. both being sliders or both being knobs) and if your mouse acceleration is kept small or is turned
off.
Radial & Diagonal Mode
This mode is the most advanced feature of nOb and is slightly of an experimental nature and
certainly not for every nOb user. To use this feature reliably, mouse acceleration for nOb has to be
completely turned off.
This mode was designed to allow users to control on-screen elements that react to a circular or a
diagonal movement of the mouse cursor. To activate this mode, simply double-tap the right toggle
switch just before turning the knob. You have 2 seconds time before nOb gets back to its default
functionality, if you do not turn the knob after the double tap. Once you release the knob, this
mode is deactivated. You will have to double-tap the right toggle switch again and turn the knob to
activate it again.
Depending on the current mode of operation, this mode behaves differently:
1. Drag Mode & Vertical Drag: The mouse cursor will move on the perimeter of a circle.
2. Stationary Mode & Vertical Drag: The mouse cursor will move from its current position to the
perimeter of the circle. It will then move along the circle, while turning the knob. Once the
knob gets released, the mouse cursor will move back to the start position.
3. Drag Mode & Horizontal Drag: The mouse cursor will move diagonally.
4. Stationary Mode & Horizontal Drag: The mouse cursor will move diagonally and get back to its
start position, once the knob gets release.
There are two ways to define the radius of the desired circle:
• Perform a simple vertical drag with the length of the desired radius and without releasing the
knob, double-tap the right toggle switch.
• Just perform a diagonal drag like in 3. and 4. with the length of the desired radius.
If you are turning the knob while being in this mode and you touch the right toggle switch, you can
flip between moving along the perimeter of a circle or moving diagonally. Notice, that any diagonal
movement will set the radius of the circle and any circular movement will set the angle of the
diagonal drags.
Copyright © 2015-2019 NOB CONTROL SOLUTIONS 9We advise the user to experiment inside a drawing/painting software to get used to all the possibilites that this mode opens up - starting with drawing simple circles, moving on to drawing diagonal lines and learning how to set radius and angle with confidence. TIP: This mode can be useful not only for drawing purposes, but also for performing automation in surround panning situations by draggind an audio source around (circurlarly or diagonally). Other circular UI elements may also be controllable using this mode. Copyright © 2015-2019 NOB CONTROL SOLUTIONS 10
Serial Interface
nOb is able to send data and receive commands over a simple serial interface. To be able to access
this serial interface in Windows, you may have to install the Arduino Leonardo drivers. Follow the
official instructions here https://www.arduino.cc/en/Guide/ArduinoLeonardoMicro#toc10 and you
are ready to go. A serial device (COM port) will then appear in Windows Device Manager.
In Linux and MacOSX, there is no need to install any extra drivers. The serial interface is available
as a ttyUSB device in /dev.
The serial connection operates at a baud rate of 9600 bps. nOb repeatedly sends two bytes,
describing its current state:
1. State Byte
This byte describes the general state, which nOb is currently in. The most significant bit is always a
zero. The State Byte is encoded as follows:
  MSB        D7 = 0      D6         D5        D4         D3         D2        D1         D0     LSB

   •    D6 = 1, if the big knob is being touched, 0, otherwise.
   •    D5 = 1, if the left toggle switch is being touched, 0, otherwise.
   •    D4 = 1, if the right toggle switch is being touched, 0, otherwise.
   •    D3 = 1, if the left toggle switch is flipped upwards, 0, if it is flipped downwards.
   •    D2 = 1, if the right toggle switch is flipped upwards, 0, if it is flipped downwards.
   •    D1 D0 =
        ◦ 00, if everything works normally.
        ◦ 11, if there is a general error (sent repeatedly) or if the last command failed to execute
          (transmitted only once).
        ◦ 01, if the last command has just been successfully executed (transmitted only once).
        ◦ 10, if the last command was unknown (transmitted only once).

2. Encoder Byte
This byte describes how much and in which direction the knob has been turned since the last
transmission. The most significant bit is always a one. The Encoder Byte is encoded as follows:
  MSB        D7 = 1      D6         D5        D4         D3         D2        D1         D0     LSB

   •    D6 = 0, if the knob has been turned clockwise, 1, if it has been turned counter-clockwise.
   •    D5D4D3D2D1D0 = Ranging from 000000 (decimal 0) to 111111 (decimal 63), describing the
        number of ticks the rotary encoder counted since the last transmission. If you sum the
        number of ticks during a full knob turn, this should add up to 2400 ticks.

Copyright © 2015-2019 NOB CONTROL SOLUTIONS                                                           11
nOb is able to receive simple commands for setting up the way it operates. These commands are
encoded as simple ASCII bytes. The following commands are currently (nOb Firmware v1.0)
supported:
• ASCII character '0', encoded as 00110000: This command will bring nOb back to its default
way of operation.
• ASCII character '1', encoded as 00110001: This command will disable any HID functionality.
nOb will then be unable to control any on-screen elements by dragging them. If the
command is received, while nOb is controlling an on-screen element, the element will be
released. This command only affects the mouse cursor controlling capabilities of nOb. The
serial interface will keep functioning.
nOb will not buffer the commands it receives. So, make sure you always wait for a response by
parsing the State Byte, before sending the next command.
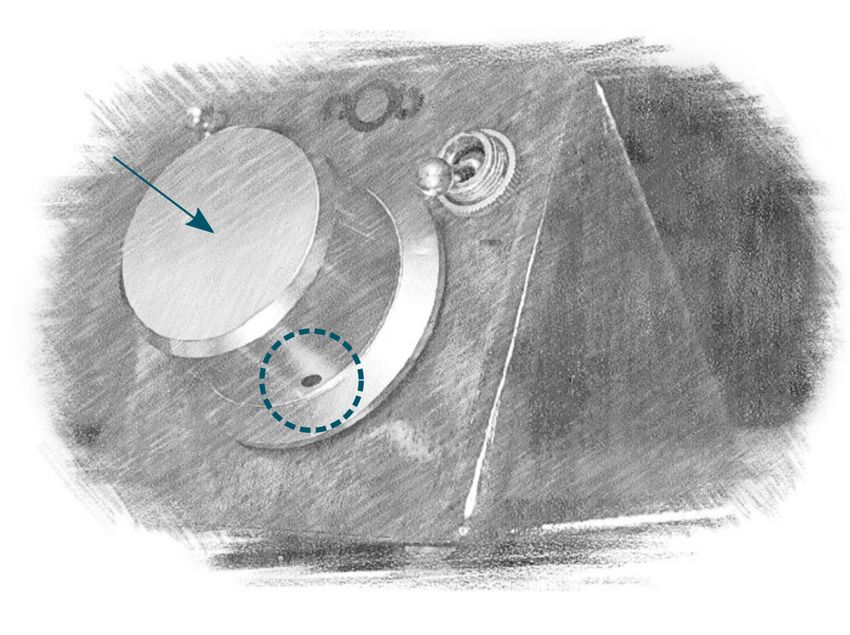
Copyright © 2015-2019 NOB CONTROL SOLUTIONS 12Adjusting the knob's rotation resistance The knob's rotation resistance is a result of the friction induced by a combination of a polyamide and a felt washer, located between the knob and the encoder's face. The harder the knob pushes against the encoder's face (towards the wooden enclosure), the bigger will be the rotation resistance. You can readjust the amount the knob pushes against the encoder by loosening the screw, located at the side of the big knob. You will need a 2 mm Allen key (hexagon socket screw key) to be able to do so. Once you have loosened up the screw, hold the knob pushed against the enclosure and tighten the screw, in order to lock the knob in place. Pushing lightly will result in less resistance, while pushing harder will make the rotation stiffer. Notice that with time, the rotation of the knob will ever become smoother. This is a result of the washers getting worked in, as you keep using nOb. Copyright © 2015-2019 NOB CONTROL SOLUTIONS 13
Technical Specifications
Product Name:                           nOb

Model:                                  n0b 001

Dimensions (Length x Width x Height):   115 mm x 80 mm x 75mm

Weight:                                 ca. 350 grams

Knob Dimensions:                        Height 27mm, Diameter 40mm (50mm at base)

Encoder Type:                           Double phased optical rotary encoder (up to
                                        2400 ticks/rev)

Microcontroller:                        Pro Micro (5V @ 16Mhz)

Touch Controller:                       Adafruit MPR121 Sensor

Maximum Current:                        500mA

Operating Temperature:                  0 °C – 50 °C (non condensing)

Compatibility:                          USB 2.0 (Complies fully with Universal
                                        Serial Bus Specification Rev 2.0)

USB Cable Length:                       1.5m

USB Cable Extension Length:             max. 1.5m

Copyright © 2015-2019 NOB CONTROL SOLUTIONS                                           14
SAFETY INSTRUCTIONS & WARRANTY INFORMATION
Safety Instructions
1. Read these instructions.
2. Keep these instructions.
3. Follow all instructions.
4. Do not use this apparatus near water.
5. Clean only with dry cloth.
6. Do not install near any heat sources such as radiators, heat registers, stoves, or other apparatus (including amplifiers) that produce heat.
7. Unplug the apparatus during lightning storms.
8. This product should be kept away from direct contact with liquids.
Notice Concerning EU Regulations
This apparatus has been tested and found to comply with all applicable EU Directives.
Notice Concerning FCC Regulations
You are cautioned that changes or modifications not expressly approved by the part responsible for compliance could void the
user’s authority to operate the equipment. This device complies with Part 15 of the FCC Rules.
Operation is subject to the following two conditions: (1) this device may not cause harmful interference, and (2) this device
must accept any interference received, including interference that may cause undesired operation of the device.
Note: This equipment has been tested and found to comply with the limits for a Class B digital device, pursuant to part 15 of the FCC rules. These
limits are designed to provide reasonable protection against harmful interference in a residential installation.
This equipment generates, uses and can radiate radio frequency energy and, if not installed and used in accordance with the instructions, may cause
harmful interference to radio communications. However, there is no guarantee that interference will not occur in a particular installation. If this
equipment does cause harmful interference to radio or television reception, which can be determined by turning the equipment off and on, the user
is encouraged to try to correct the interference by one or more of the following measures:
• Reorient or relocate the receiving antenna.
• Increase the separation between the equipment and receiver.
• Connect the equipment on a circuit different from that to which the receiver is connected.
• Be sure that all cables are properly shielded, using a choke or ferrite where appropriate.
• Consult the dealer or an experienced radio/TV technician for help.
Notice Concerning Canadian Regulations
This Class B digital apparatus complies with Canadian ICES-003
Cet appareil numérique de la classe B est conforme à la norme NMB-003 du Canada.
Notice Concerning Australian & New Zealand Regulations
This apparatus complies with all applicable ACMA regulations. NOB CONTROL SOLUTIONS is represented by:
EMC Technologies Pty Ltd
176 Harrick Road, Keilor Park, Victoria Australia 3042
Telephone: + 613 9365 1000
Copyright © 2015-2019 NOB CONTROL SOLUTIONS 15Correct Disposal of this Product
This marking indicates that this product should not be disposed with other household wastes throughout the EU. To prevent possible
harm to the environment or human health from uncontrolled waste disposal, recycle it responsibly to promote the sustainable reuse of
material resources. To return your used device, please use the return and collection systems or contact the retailer where the pro
product was purchased. They can take this product for environmentally safe recycling.
Limited Warranty
This DIONYSIOS MARINOS - NOB CONTROL SOLUTIONS brand Product, as supplied and distributed by DIONYSIOS MARINOS - NOB CONTROL
SOLUTIONS and delivered new to the original purchaser is warranted by DIONYSIOS MARINOS - NOB CONTROL SOLUTIONS against malfunction
resulting from defects in materials and workmanship for a limited warranty period of two (2) years for EU and one (1) year for non-EU countries.
However, there will be only a 90 days limited warranty for commercial use.
Proof of purchase in the form of an Invoice is evidence that the Product is within the limited warranty period. The Receipted Invoice must be
presented to obtain limited warranty service. To receive warranty service, the purchaser must contact DIONYSIOS MARINOS - NOB CONTROL
SOLUTIONS for problem determination and service procedures. The original dated invoice must be presented upon request as proof of purchase to
DIONYSIOS MARINOS - NOB CONTROL SOLUTIONS.
DIONYSIOS MARINOS - NOB CONTROL SOLUTIONS will repair or if repairs cannot be made, DIONYSIOS MARINOS - NOB CONTROL SOLUTIONS will
replace this Product, and at no charge if the Product is defective as specified in this limited warranty during the limited warranty period. DIONYSIOS
MARINOS - NOB CONTROL SOLUTIONS may use new or remanufactured parts to repair the Product at its sole discretion.
Product freight needs to be prepaid by original purchaser and shipped in either its original packaging or packaging affording an equal degree of
protection.
This limited warranty does not cover cosmetic damage or damage due to acts of God, accident, misuse, abuse, negligence, commercial use or
modification of, or to any part of this Product.
This limited warranty does not cover damage due to improper operation or maintenance, connection to improper voltage supply or attempted repair
by anyone other than a facility authorized by DIONYSIOS MARINOS - NOB CONTROL SOLUTIONS to service the Product.
THERE ARE NO EXPRESS WARRANTIES OTHER THAN THOSE LISTED AND DESCRIBED ABOVE, AND NO WARRANTIES WHETHER EXPRESS OR IMPLIED,
INCLUDING, BUT NOT LIMITED TO, ANY IMPLIED WARRANTIES OF MERCHANTABILITY OR FITNESS FOR A PARTICULAR PURPOSE, SHALL APPLY AFTER
THE EXPRESS WARRANTY PERIODS STATED ABOVE, AND NO OTHER EXPRESS WARRANTY OR GUARANTY GIVEN BY ANY PERSON, FIRM OR
CORPORATION WITH RESPECT TO THIS PRODUCT SHALL BE BINDING ON DIONYSIOS MARINOS - NOB CONTROL SOLUTIONS. REPAIR OR
REPLACEMENT AS PROVIDED UNDER THIS LIMITED WARRANTY IS THE EXCLUSIVE REMEDY OF THE CONSUMER. DIONYSIOS MARINOS - NOB
CONTROL SOLUTIONS SHALL NOT BE LIABLE FOR ANY INCIDENTAL, OR CONSEQUENTIAL DAMAGES FOR BREACH OF ANY EXPRESS OR IMPLIED
WARRANTY ON THIS PRODUCT; EXCEPT TO THE EXTENT PROHIBITED BY APPLICABLE LAW, ANY IMPLIED WARRANTY OF MERCHANTIBILITY OR
FITNESS FOR A PARTICULAR PURPOSE ON THIS PRODUCT IS LIMITED IN DURATION TO THE DURATION OF THIS LIMITED WARRANTY. THIS LIMITED
WARRANTY SHALL NOT EXTEND TO ANYONE OTHER THAN THE ORIGINAL PURCHASER OF THIS PRODUCT, IS NONTRANSFERABLE AND STATES YOUR
EXCLUSIVE REMEDY.
To obtain warranty service, please contact DIONYSIOS MARINOS - NOB CONTROL SOLUTIONS at:
www.nobcontrol.com - info@nobcontrol.com
DIONYSIOS MARINOS - NOB CONTROL SOLUTIONS – Louki Akrita 11, 15126, Marousi, Greece
Copyright © 2015-2019 NOB CONTROL SOLUTIONS 16You can also read