USER INSTRUCTIONS - I-BRAAI BLUETOOTH THERMOMETER - Cadac
←
→
Page content transcription
If your browser does not render page correctly, please read the page content below
LIVE THE BRAAI LIFE
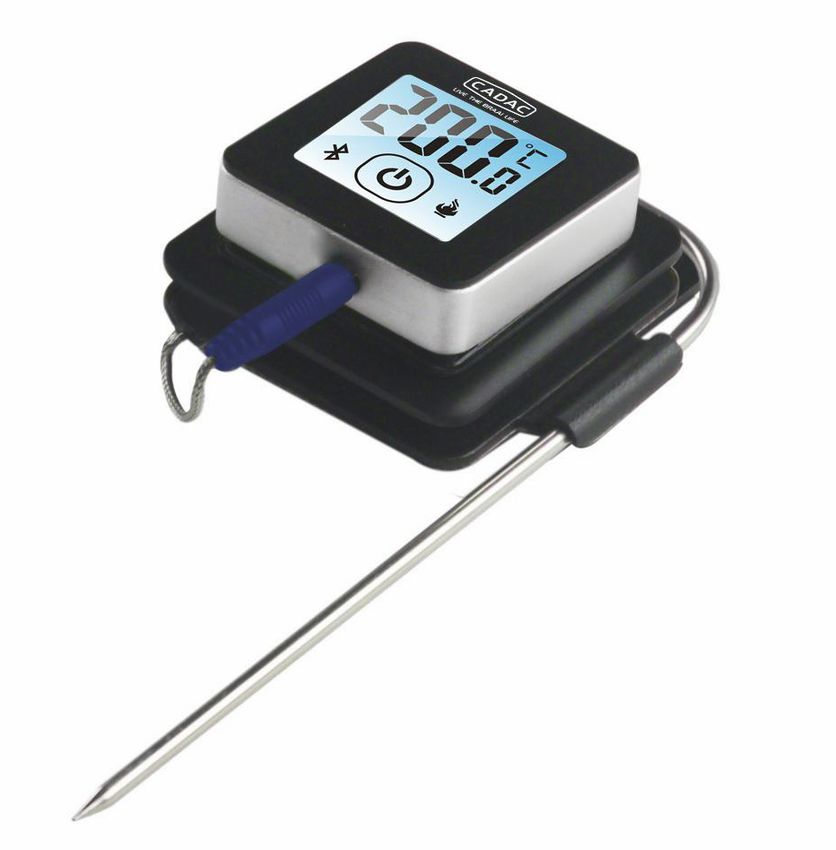
I-BRAAI
BLUETOOTH THERMOMETER
MODEL No 2017001
USER INSTRUCTIONS
GB DE DK ES FR IT NL NO PL SE
NOTE! PRODUCT MAY VARY FROM ILLUSTRATIONS 503-0715 LEV1
CAUTION                                                               GB
                               This product gets used with products in connection with hot surfaces.
                                                          IMPORTANT
                          Read these instructions carefully so as to familiarise yourself with the product.
                                          Retain these instructions for future reference.

1. General
Thank you for purchasing the i-Braai thermometer.
To get started, simply follow the below steps to help guide you on how to set up and how to operate the app and its functions.

2. In the box
•   1x   i-Braai thermometer
•   1x   Coin cell battery (installed)
•   1x   Meat probe
•   1x   Magnetic base

3. Quick start instructions
Download the CADAC i-Braai app from the App Store® or Google PlayTM store by typing in “i-
Braai” as the keyword in the search bar (See Fig. 1 for app icon).

The CADAC i-Braai is compatible with the following devices:
• iPhone® (4S and later)
• iPad® (3rd generation and later)
• iPad mini™ (all generations)
• iPod touch® (5th generation and later)                                                                                    Fig. 1
• Android™ devices equipped with
• Bluetooth® 4.0 and running Android™ software version 4.3 or later

Separate the i-Braai from its base by firmly holding the base with one hand and gently pulling the
i-Braai top upwards with the other hand. On the underside of the i-Braai, turn and open the battery
cover by twisting it counter-clockwise, remove the plastic lint and replace the cover. (Fig.2)

Place the i-Braai top back onto its base.
Plug the probe into the probe port of the i-Braai.
Enable Location and then Bluetooth® on your smart device under ‘Settings’.
Tap the power button located at the bottom of the faceplate.
Open the CADAC i-Braai App on your smart device.
Press on search in the centre of the app and it will automatically pair with your i-Braai                                    Fig. 2
thermometer (Fig. 3 and 4).

You are now connected and
ready to use your i-Braai.
(Fig. 5)

                                 Fig. 3                           Fig. 4                            Fig. 5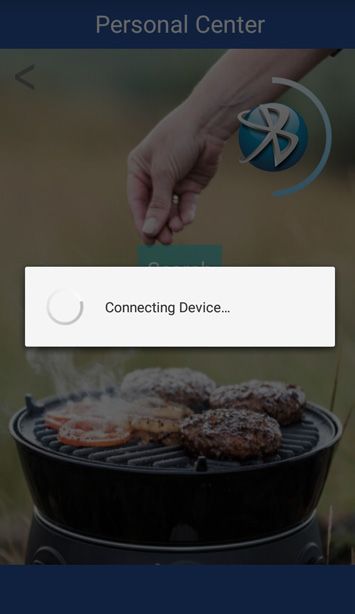
4. Powering On & Off
To   turn on the i-Braai follow these steps:
•     Make sure the probe is installed
•     Press the power button located at the centre of the faceplate once.
•     Press the power button again quickly to change between Celsius and Fahrenheit.

To turn off the i-Braai follow these steps:
• Press and hold down the power button located in the centre of the faceplate for several seconds.

5. Connecting
To   connect your i-Braai to your iPhone®, iPad®, iPod touch® or Android™ device follow these steps:
•    Open Settings.
•    Set Location to On.
•    Tap Bluetooth®.
•    Set Bluetooth® to On.
•    While turned on, place your i-Braai thermometer next to your smart device and open the i-Braai App.
•    Select “Search” in the centre of the screen.

6. Disconnecting
To   disconnect your i-Braai device from your iPhone®, iPad®, iPod Touch® or Android™ device, follow these steps:
•    While turned on, place your i-Braai next to your smart device and select the home screen.
•    Tap “Pair” in the top left corner of the screen.
•    Tap “Disconnect” in the centre of the screen.

7. Positioning of magnetic base
•    The base of the i-Braai is magnetic for convenient positioning on a cool portion of your grill, smoker or other magnetic
     surfaces.
•    The magnetic base is not designed to withstand high heat and it must be placed on a cool surface.

8. Probe
•    Meat probes should always be inserted into the centre of the item being cooked for an accurate temperature reading.
•    When using the standard meat probe, be sure to route the probe wire where it will not be exposed to flames or temperatures
     exceeding 572°F / 300°C).
•    The probe should be cleaned by hand with a damp towel or sanitary wipe. The probe is not dishwasher safe. Take precaution
     not to get the wiring of the probe wet.
•    Be sure to avoid water exposure to the wiring of the probes as well as the area where the wiring and crimp meet the probe.
•    The probe is not waterproof and damage may result from water exposure.
•    The probe should never be submersed in water.
9. APP functions
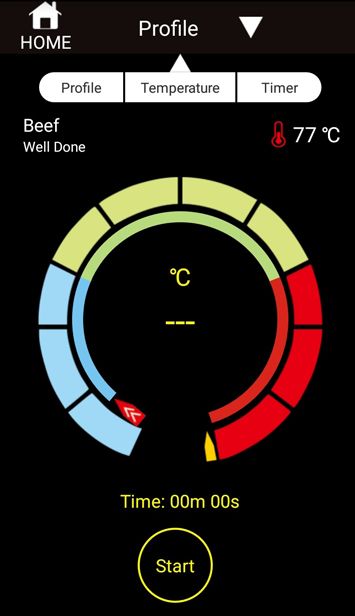
BBQ (Fig. 6)
• The i-Braai App offers pre-set alarms for many types of meats and cooking temperatures.
Tapping profile and then meat type will take you to the pre-set alarms.
• Change between type of meats by tapping the meat type or temperature mark.
• Once the meat is selected, you can ‘Select Your Doneness.’
• Tap “Back” and then “Start” to commence.
• You can also create your own custom pre-set alarm for any desired temperature by tapping
profile and then type of meats or temperature mark.
• You can choose to bypass the pre-set alarms by choosing “Temperature” or “Timer”.
• For “Temperature” choose the desired doneness and then start.
• For “Timer” choose the time and then start for the countdown to commence.
CAMERA (Fig. 7)
• Upload photos of your meals whilst they are still cooking and
share it with others.
• Tap the camera icon and choose the platform to share it.
Fig. 6
SETTINGS (Fig. 8)
• Choose your alarm tone by doing the following:
• Select profile to view the sound options.
• Tap on each tone to hear and select the desired ton sound.
SUPPORT
• Instruction manual
VERSION
• Version of the installed APP
10. Warranty
Fig. 7
CADAC (Pty) Ltd hereby warrants to the ORIGINAL PURCHASER of this CADAC product, that
it will be free of defects in material and workmanship from the date of purchase for 2 years.
The warranty will only apply if the unit is assembled and operated in accordance with the
printed instructions.
CADAC may require reasonable proof of your date of purchase. THEREFORE, YOU SHOULD
RETAIN YOUR SALES SLIP OR INVOICE.
This Limited Warranty shall be limited to the repair or replacement of parts that prove
defective under normal use and service and which on examination shall indicate, to CADAC’s
satisfaction, they are defective. Before returning any parts, contact the customer service
representative in your region. If CADAC confirms the defect and approves the claim, CADAC
will elect to replace such parts.
This Limited Warranty does not cover any failures or operating difficulties due to accident,
abuse, misuse, alteration, misapplication, vandalism, improper installation or improper
maintenance or service, or failure to perform normal and routine maintenance.
Deterioration or damage due to severe weather conditions such as hail, hurricanes,
earthquakes or tornadoes, discoloration due to exposure to chemicals either directly or in the
atmosphere, is not cover by this Limited Warranty. Fig. 8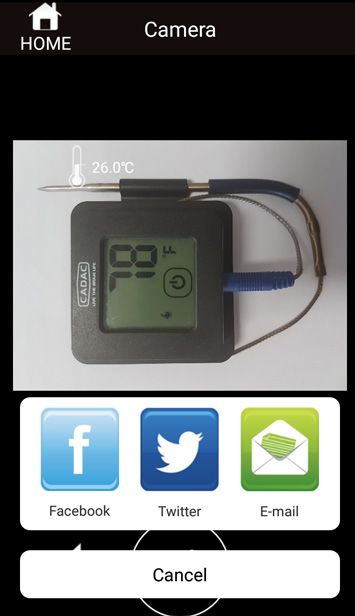
There are no other express warrants except as set forth herein and any applicable implied warranties of merchantability and
fitness are limited in duration to the period of coverage of this express written limited warranty. Some regions do not allow
limitation on how long an implied warranty lasts, so this limitation may not apply to you.

CADAC is not liable for any special, indirect or consequential damages. Some regions do not allow the exclusion or limitation
of incidental or consequential damages, to this limitation or exclusion may not apply to you.

CADAC does not authorize any person or company to assume for it any obligation or liability in connection with the sale,
installation, use, removal, return, or replacement of its equipment; and no such representations are binding on CADAC.

This Warranty applies only to products sold at retail.
VORSICHT                                                             DE
                       Dieses Produkt wird mit Produkten in Verbindung mit heißen Oberflächen verwendet.
                                                         WICHTIG
                  Lesen Sie diese Anweisungen sorgfältig durch, um sich mit dem Produkt vertraut zu machen.
                               Bewahren Sie diese Anweisungen zum späteren Nachschlagen auf.

1. Allgemeines
Vielen Dank, dass Sie sich für das i-Braai-Thermometer entschieden haben.
Befolgen Sie zunächst einfach die folgenden Schritte, um zu erfahren, wie Sie die App und ihre Funktionen einrichten und
bedienen.

2. In der Box
•   1x   i-Braai Thermometer
•   1x   Knopfzellenbatterie (installiert)
•   1x   Fleischsonde
•   1x   Magnetfuß

3. Schnellstartanweisungen
Laden Sie die CADAC i-Braai-App aus dem App Store® oder dem Google PlayTM-Store herunter,
indem Sie in der Suchleiste „i-Braai“ als Schlüsselwort eingeben (App-Symbol siehe Abb. 1).

Der CADAC i-Braai ist mit folgenden Geräten kompatibel:
• iPhone® (4S und höher)
• iPad® (3. Generation und höher)
• iPad mini ™ (alle Generationen)
                                                                                                                           Abb. 1
• iPod touch® (5. Generation und höher)
• Android ™ -Geräte mit
• Bluetooth® 4.0 und Android ™ Software Version 4.3 oder höher

Trennen Sie den i-Braai von seiner Basis, indem Sie die Basis mit einer Hand festhalten und mit
der anderen Hand das i-Braai-Oberteil vorsichtig nach oben ziehen. Drehen Sie die Batterieab-
deckung an der Unterseite des i-Braai und öffnen Sie sie, indem Sie sie gegen den Uhrzeigersinn
drehen. Entfernen Sie die Plastikflusen und setzen Sie die Abdeckung wieder auf. (Abb.2)

Setzen Sie das i-Braai-Oberteil wieder auf die Basis.
Stecken Sie die Sonde in den Sondenanschluss des i-Braai.
Aktivieren Sie den Standort und dann Bluetooth® auf Ihrem Smart-Gerät unter “Einstellungen”.
Tippen Sie auf den Netzschalter unten auf der Frontplatte.                                                                 Abb. 2
Öffnen Sie die CADAC i-Braai App auf Ihrem Smart-Gerät.
Drücken Sie auf Suchen in
der Mitte der App und es
wird automatisch mit Ihrem
i-Braai gekoppelt
Thermometer (Abb. 3
und 4).

Sie sind jetzt verbunden
und bereit, Ihren i-Braai zu
verwenden. (Abb. 5)

                                 Abb. 3                        Abb. 4                             Abb. 5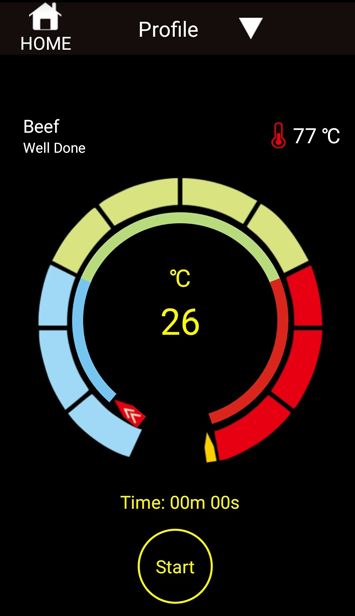
4. Ein- und Ausschalten
Gehen Sie folgendermaßen vor, um den i-Braai einzuschalten:
• Stellen Sie sicher, dass die Sonde installiert ist
• Drücken Sie einmal den Netzschalter in der Mitte der Frontplatte.
• Drücken Sie den Netzschalter erneut schnell, um zwischen Celsius und Fahrenheit zu wechseln.

Gehen Sie folgendermaßen vor, um den i-Braai auszuschalten:
• Halten Sie den Netzschalter in der Mitte der Frontplatte einige Sekunden lang gedrückt.

5. Anschließen
Gehen Sie folgendermaßen vor, um Ihren i-Braai mit Ihrem iPhone®, iPad®, iPod touch® oder Android ™ zu verbinden:
• Einstellungen öffnen.
• Setzen Sie den Standort auf Ein.
• Tippen Sie auf Bluetooth®.
• Stellen Sie Bluetooth® auf Ein.
• Stellen Sie Ihr i-Braai-Thermometer im eingeschalteten Zustand neben Ihr Smart-Gerät und öffnen Sie die i-Braai-App.
• Wählen Sie in der Mitte des Bildschirms „Suchen“.

6. Trennen
Gehen Sie folgendermaßen vor, um Ihr i-Braai-Gerät von Ihrem iPhone®, iPad®, iPod Touch® oder Android ™ zu trennen:
• Stellen Sie Ihren i-Braai im eingeschalteten Zustand neben Ihr Smart-Gerät und wählen Sie den Startbildschirm aus.
• Tippen Sie oben links auf dem Bildschirm auf „Pair“.
• Tippen Sie in der Mitte des Bildschirms auf „Trennen“.

7. Positionierung der Magnetbasis
•   Die Basis des i-Braai ist magnetisch, um eine bequeme Positionierung auf einem kühlen Teil Ihres Grills, Rauchers oder eines
    anderen Magneten zu ermöglichen Oberflächen.
•   Der Magnetfuß ist nicht für hohe Hitze ausgelegt und muss auf eine kühle Oberfläche gestellt werden.

8. Sonde
•   Fleischsonden sollten immer in die Mitte des zu kochenden Gegenstands eingeführt werden, um eine genaue
    Temperaturmessung zu gewährleisten.
•   Wenn Sie die Standard-Fleischsonde verwenden, verlegen Sie den Sondendraht so, dass er keinen Flammen oder
    Temperaturen ausgesetzt ist über 572 ° F / 300 ° C).
•   Die Sonde sollte von Hand mit einem feuchten Handtuch oder einem Hygienetuch gereinigt werden. Die Sonde ist nicht
    spülmaschinenfest. Seien Sie vorsichtig die Verkabelung der Sonde nicht nass machen.
•   Achten Sie darauf, dass das Produkt keinem Wasser ausgesetzt ist.
•   Die Sonde ist nicht wasserdicht und kann durch Wassereinwirkung beschädigt werden.
•   Die Sonde darf niemals in Wasser getaucht werden.
9. APP-Funktionen
BBQ (Abb. 6)
• Die i-Braai App bietet voreingestellte Alarme für viele Fleischsorten und Kochtemperaturen.
Wenn Sie auf Profil und dann auf Fleischart tippen, gelangen Sie zu den voreingestellten
Alarmen.
• Wechseln Sie zwischen den Fleischsorten, indem Sie auf die Fleischsorte oder die
Temperaturmarke tippen.
• Sobald das Fleisch ausgewählt ist, können Sie Ihren Gargrad auswählen.
• Tippen Sie auf „Zurück“ und dann auf „Start“, um zu beginnen.
• Sie können auch Ihren eigenen voreingestellten Alarm für jede gewünschte Temperatur
erstellen, indem Sie auf tippen Profil und dann Art des Fleisches oder Temperaturmarke.
• Sie können die voreingestellten Alarme umgehen, indem Sie „Temperatur“ oder „Timer“
wählen.
• Wählen Sie unter „Temperatur“ den gewünschten Gargrad und beginnen Sie dann.
• Wählen Sie für „Timer“ die Uhrzeit und starten Sie dann, damit der Countdown beginnt.
KAMERA (Abb. 7)
• Laden Sie Fotos Ihrer Mahlzeiten hoch, während diese noch kochen und Teile es mit anderen.
• Tippen Sie auf das Kamerasymbol und wählen Sie die Plattform aus, auf der Sie es freigeben
möchten.
Abb. 6
EINSTELLUNGEN (Abb. 8)
• Wählen Sie Ihren Alarmton wie folgt aus:
• Wählen Sie ein Profil, um die Soundoptionen anzuzeigen.
• Tippen Sie auf jeden Ton, um den gewünschten Ton zu hören und auszuwählen.
UNTERSTÜTZUNG
• Bedienungsanleitung
AUSFÜHRUNG
• Version der installierten APP
10. Garantie
CADAC (Pty) Ltd garantiert dem URSPRÜNGLICHEN KÄUFER dieses CADAC-Produkts, dass
es ab Kaufdatum 2 Jahre lang frei von Material- und Verarbeitungsfehlern ist.
Die Garantie gilt nur, wenn das Gerät gemäß den gedruckten Anweisungen zusammengebaut
und betrieben wird.
Abb. 7
CADAC kann einen angemessenen Nachweis Ihres Kaufdatums verlangen. Daher sollten Sie
Ihren Verkaufsbeleg oder Ihre Rechnung behalten.
Diese beschränkte Garantie beschränkt sich auf die Reparatur oder den Austausch von Teilen,
die sich bei normalem Gebrauch und Service als fehlerhaft erweisen und bei Prüfung zur
Zufriedenheit von CADAC als fehlerhaft erweisen. Wenden Sie sich vor der Rücksendung
von Teilen an den Kundendienst in Ihrer Region. Wenn CADAC den Defekt bestätigt und den
Anspruch genehmigt, wird CADAC diese Teile ersetzen.
Diese eingeschränkte Garantie deckt keine Fehler oder Betriebsschwierigkeiten ab, die
auf Unfälle, Missbrauch, Missbrauch, Änderungen, fehlerhafte Anwendung, Vandalismus,
unsachgemäße Installation oder unsachgemäße Wartung oder Instandhaltung oder die
Nichtdurchführung normaler und routinemäßiger Wartungsarbeiten zurückzuführen sind.
Eine Verschlechterung oder Beschädigung aufgrund von Unwettern wie Hagel, Hurrikanen,
Erdbeben oder Tornados sowie Verfärbungen aufgrund der direkten oder chemischen
Einwirkung von Chemikalien wird von dieser beschränkten Garantie nicht abgedeckt.
Abb. 8Es gibt keine anderen ausdrücklichen Garantien, außer wie hierin dargelegt, und alle anwendbaren impliziten Garantien für die Marktgängigkeit und Eignung sind in ihrer Dauer auf den Zeitraum der Deckung dieser ausdrücklichen schriftlichen beschränkten Garantie beschränkt. In einigen Regionen ist die Dauer einer impliziten Garantie nicht beschränkt. Daher gilt diese Einschränkung möglicherweise nicht für Sie. CADAC haftet nicht für besondere, indirekte oder Folgeschäden. In einigen Regionen ist der Ausschluss oder die Einschränkung von Neben- oder Folgeschäden nicht zulässig. Diese Einschränkung oder der Ausschluss gilt möglicherweise nicht für Sie. CADAC ermächtigt keine Person oder Firma, für sie eine Verpflichtung oder Haftung im Zusammenhang mit dem Verkauf, der Installation, Verwendung, Entfernung, Rückgabe oder dem Austausch ihrer Ausrüstung zu übernehmen. und solche Darstellungen sind für CADAC nicht bindend. Diese Garantie gilt nur für Produkte, die im Einzelhandel verkauft werden.
VOORZICHTIG                                            NL
                                 Dit product wordt gebruikt in combinatie met hete oppervlakken!
                                                       BELANGRIJK
                          Lees deze instructies aandachtig door om vertrouwd te raken met het product.
                                        Bewaar deze instructies voor toekomstig gebruik.

1. Algemeen
Bedankt voor het aanschaffen van de i-Braai-thermometer.
Volg eenvoudig onderstaande stappen bij het instellen en bedienen van de app en zijn functies.

2. In de doos
•   1x   i-Braai thermometer
•   1x   knoopcelbatterij (geïnstalleerd)
•   1x   vleesthermometer
•   1x   magnetische voet

3. Snelstartinstructies
Download de CADAC i-Braai-app uit de App Store® of Google PlayTM store door “i-Braai” in te
typen als het trefwoord in de zoekbalk (zie Fig. 1 voor het app-pictogram).

De CADAC i-Braai is compatibel met de volgende apparaten:
• iPhone® (4S en hoger)
• iPad® (3e generatie en later)
• iPad mini ™ (alle generaties)
• iPod touch® (5e generatie en later)                                                                        Fig. 1
• Android ™ -apparaten uitgerust met
• Bluetooth® 4.0 en Android ™ -softwareversie 4.3 of hoger

Scheid de i-Braai van de basis door de basis stevig met één hand vast te houden en de i-Braai-
bovenkant voorzichtig met de andere hand naar boven te trekken. Draai en open het batterijklepje
aan de onderkant van de i-Braai door het klepje tegen de klok in te draaien, verwijder de plastic
pluisjes en plaats het klepje terug. (Fig. 2)

Plaats de i-Braai-bovenkant terug op zijn basis.
Sluit de sonde aan op de sondepoort van de i-Braai.
Schakel Locatie en vervolgens Bluetooth® in op uw smarttoestel onder ‘Instellingen’.
Tik op de aan / uit-knop aan de onderkant van het voorpaneel.
Open de CADAC i-Braai-app op uw smarttoestel.                                                                Fig. 2
Druk op zoeken in het mid-
den van de app en hij zal
automatisch koppelen met
uw i-Braai
thermometer (Fig. 3 en 4).

U bent nu verbonden en uw
i-Braai is klaar voor gebruik.
(Fig.5)

                                 Fig. 3                         Fig. 4                              Fig. 5
4. In- en uitschakelen
Volg deze stappen om de i-Braai in te schakelen:
• Zorg ervoor dat de sonde is geïnstalleerd.
• Druk eenmaal op de aan / uit-knop in het midden van het voorpaneel.
• Druk nogmaals snel op de aan / uit-knop om te wisselen tussen Celsius en Fahrenheit.
Volg deze stappen om de i-Braai uit te schakelen:
• Houd de aan / uit-knop in het midden van het voorpaneel enkele seconden ingedrukt.
5. Verbinden
Volg deze stappen om uw i-Braai met uw iPhone®, iPad®, iPod touch® of Android ™ -apparaat te verbinden:
• Open instellingen.
• Zet Locatie op Aan.
• Tik op Bluetooth®.
• Zet Bluetooth® op Aan.
• Terwijl ingeschakeld, plaatst u uw i-Braai-thermometer naast uw smartapparaat en opent u de i-Braai-app.
• Selecteer “Zoeken” in het midden van het scherm.
6. Verbinding verbreken
Volg deze stappen om uw i-Braai-apparaat los te koppelen van uw iPhone®, iPad®, iPod Touch® of Android ™ -apparaat:
• Terwijl ingeschakeld, plaatst u uw i-Braai naast uw smarttoestel en selecteert u het startscherm.
• Tik op “Koppelen” in de linkerbovenhoek van het scherm.
• Tik op “Verbinding verbreken” in het midden van het scherm.
7. Positionering van magnetische basis
• De basis van de i-Braai is magnetisch voor gemakkelijke plaatsing op een koel gedeelte van uw grill, smoker of ander
magnetisch apparaat oppervlakken.
• De magnetische basis is niet ontworpen om hoge temperaturen te weerstaan en moet op een koel oppervlak worden geplaatst.
8. Sonde
• Vleessondes moeten altijd in het midden van het te koken item worden gestoken voor een nauwkeurige temperatuurmeting.
• Als u de standaard braadthermometer gebruikt, zorg er dan voor dat u de sondedraad zo leidt dat deze niet wordt blootgesteld
aan vlammen of temperaturen hoger dan 572 ° F / 300 ° C).
• Reinig de sonde met de hand met een vochtige handdoek of een hygiënisch doekje. De sonde is niet
vaatwasmachinebestendig. Voorkom dat de bedrading van de sonde nat wordt.
• Zorg ervoor dat de bedrading van de sondes en het gebied waar de bedrading en krimp de sonde raken, niet wordt blootgesteld
aan water.
• De sonde is niet waterdicht en kan beschadigd raken door blootstelling aan water.
• Dompel de sonde nooit onder in water.9. APP-functies
BBQ (Fig.6)
• De i-Braai App heeft vooringestelde alarmen voor vele soorten vlees en kooktemperaturen.
Als u op profiel en vervolgens op vleessoort tikt, gaat u naar de vooraf ingestelde alarmen.
• Wissel tussen vleessoorten door op de vleessoort of temperatuurmarkering te tikken.
• Zodra het vlees is geselecteerd, kunt u ‘Selecteer uw gaarheid’.
• Tik op “Terug” en vervolgens op “Start” om te beginnen.
• U kunt ook uw eigen vooraf ingestelde alarm voor elke gewenste temperatuur maken door
op profiel te tikken en vervolgens op type vlees of temperatuurmarkering.
• U kunt ervoor kiezen om de vooraf ingestelde alarmen te omzeilen door “Temperatuur” of
“Timer” te kiezen.
• Kies bij “Temperatuur” de gewenste gaarheid en start dan.
• Kies voor “Timer” de tijd en start vervolgens om het aftellen te laten beginnen.
CAMERA (Fig.7)
• Upload foto’s van uw maaltijden terwijl ze nog koken en deel ze met anderen.
• Tik op het camerapictogram en kies het platform om te delen.
Fig. 6
INSTELLINGEN (Fig.8)
• Kies uw alarmtoon door het volgende te doen:
• Profiel selecteren om de geluidsopties te bekijken.
• Tik op elke toon om het gewenste toongeluid te horen en te selecteren.
ONDERSTEUNING
• Handleiding
VERSIE
• Versie van de geïnstalleerde APP
10. Garantie
Fig. 7
CADAC (Pty) Ltd garandeert hierbij aan de OORSPRONKELIJKE KOPER van dit CADAC-
product, dat het vanaf de aankoopdatum gedurende 2 jaar vrij zal zijn van defecten in
materiaal en vakmanschap.
De garantie is alleen van toepassing als het apparaat is gemonteerd en bediend in
overeenstemming met de gedrukte instructies.
CADAC kan een redelijk bewijs van uw aankoopdatum nodig hebben. DAAROM MOET U UW
AANKOOPBEWIJS BEWAREN.
Deze beperkte garantie is beperkt tot de reparatie of vervanging van onderdelen die defect
blijken te zijn bij normaal gebruik en onderhoud en die bij onderzoek naar CADAC’s
tevredenheid zullen aangeven dat ze defect zijn. Neem voordat u onderdelen retourneert
contact op met de klantenservice in uw regio. Als CADAC het defect bevestigt en de claim
goedkeurt, zal CADAC ervoor kiezen om dergelijke onderdelen te vervangen.
Deze beperkte garantie dekt geen defecten of bedieningsmoeilijkheden als gevolg van
ongelukken, misbruik, verkeerd gebruik, wijziging, verkeerde toepassing, vandalisme,
onjuiste installatie of onjuist onderhoud of service, of het niet uitvoeren van normaal en
routineonderhoud.
Fig. 8Verslechtering of schade als gevolg van zware weersomstandigheden zoals hagel, orkanen, aardbevingen of tornado’s, verkleuring door blootstelling aan chemicaliën direct of in de atmosfeer, valt niet onder deze beperkte garantie. Er zijn geen andere uitdrukkelijke garanties behalve zoals hierin uiteengezet en alle toepasselijke impliciete garanties van verkoopbaarheid en geschiktheid zijn beperkt in duur tot de periode van dekking van deze uitdrukkelijke schriftelijke beperkte garantie. Sommige regio’s staan geen beperking toe van de duur van een impliciete garantie, dus deze beperking is mogelijk niet op u van toepassing. CADAC is niet aansprakelijk voor enige bijzondere, indirecte of gevolgschade. In sommige regio’s is de uitsluiting of beperking van incidentele schade of gevolgschade niet toegestaan, waardoor deze beperking of uitsluiting mogelijk niet op u van toepassing is. CADAC machtigt geen enkele persoon of bedrijf om voor haar enige verplichting of aansprakelijkheid op zich te nemen in verband met de verkoop, installatie, gebruik, verwijdering, teruggave of vervanging van haar apparatuur; en dergelijke verklaringen zijn niet bindend voor CADAC. Deze garantie is alleen van toepassing op producten die in de detailhandel worden verkocht.
ATTENTION                                                                FR
                         Ce produit est utilisé avec des produits en contact avec des surfaces chaudes.
                                                         IMPORTANT
                         Lisez attentivement ces instructions afin de vous familiariser avec le produit.
                             Conservez ces instructions pour pouvoir vous y référer ultérieurement.

1. Général
Merci d’avoir acheté le thermomètre i-Braai.
Pour commencer, il vous suffit de suivre les étapes suivantes pour vous aider à configurer et à utiliser l’application et ses fonctions.

2. Dans la boîte
•   1 thermomètre i-Braai
•   1x pile (installée)
•   1x sonde à viande
•   1x base magnétique

3. Instructions de démarrage rapide
Téléchargez l’application CADAC i-Braai sur l’App Store® ou sur la boutique Google PlayTM
en tapant “iBraai” comme mot clé dans la barre de recherche (voir la figure 1 pour l’icône de
l’application).

L’application CADAC i-Braai est compatible avec les appareils suivants
• iPhone® (4S et versions ultérieures)
• iPad® (3ème génération et versions ultérieures)
• iPad mini™ (toutes les versions)                                                                                              Fig. 1
• iPod touch® (5e génération et plus)
• Android™ appareils équipés de
• Bluetooth® 4.0 et le logiciel Android™ version 4.3 ou supérieure

Séparez l’i-Braai de sa base en tenant fermement la base d’une main et en tirant doucement sur
l’i-Braai vers le haut avec l’autre main. Sur la face inférieure de l’i-Braai, tournez et ouvrez la
batterie en le tournant dans le sens inverse des aiguilles d’une montre, retirez le film plastique et
replacez le couvercle. (Fig.2)

Replacez le couvercle de l’i-Braai sur sa base.
Branchez la sonde dans le port de sonde de l’i-Braai.
Activez la fonction de localisation, puis la fonction Bluetooth® sur votre appareil smart sous
“Paramètres”.                                                                                                                    Fig. 2

Appuyez sur le bouton
d’alimentation situé en bas
de la façade.
Ouvrez l’application CADAC
i-Braai sur votre appareil
smart.

Appuyez sur “Recherche”
au centre de l’application
et celle-ci se couplera
automatiquement avec votre
thermomètre i-Braai (Fig.
3 et 4).

Vous êtes maintenant con-
necté et prêt à utiliser votre
i-Braai. (Fig.5)

                                 Fig. 3                           Fig. 4                                Fig. 5
4. Mise sous tension et hors tension
Pour allumer l’i-Braai, suivez ces étapes:
• Assurez-vous que la sonde est installée
• Appuyez une fois sur le bouton d’alimentation situé au centre de la façade.
• Appuyez à nouveau rapidement sur le bouton de mise en marche pour passer de Celsius à Fahrenheit.
Pour éteindre l’i-Braai, suivez ces étapes:
• Appuyez sur le bouton d’alimentation situé au centre de la façade et maintenez-le enfoncé pendant plusieurs secondes.
5. Connexion
Pour connecter votre i-Braai à votre iPhone®, iPad®, iPod touch® ou Android™, procédez comme suit:
• Ouvrez les paramètres de votre appareil Smart.
• Activez la fonction ‘Localisation’.
• Activez le Bluetooth®.
• Allumez votre thermomètre i-Braai et placez-le à côté de votre appareil Smart.
• Sélectionnez “Rechercher” au centre de l’écran.
6. Déconnexion
Pour déconnecter votre appareil i-Braai de votre iPhone®, iPad®, iPod Touch® ou Android™, procédez comme suit:
• Placez votre i-Braai à côté de votre appareil Smart et sélectionnez l’écran d’accueil.
• Appuyez sur “Paire” dans le coin supérieur gauche de l’écran.
• Appuyez sur “Déconnecter” au centre de l’écran.
7. Positionnement de la base magnétique
• La base de l’i-Braai est magnétique pour un positionnement pratique sur une partie froide de votre grill, fumoir ou autres
surfaces.
• La base magnétique n’est pas conçue pour résister à une chaleur élevée et doit être placée sur une surface froide.
8. Sonde de température
• Les sondes à viande doivent toujours être insérées au centre du produit à cuire pour une lecture précise de la température.
• Lorsque vous utilisez une sonde à viande standard, veillez à placer le fil de la sonde à un endroit où il ne sera pas exposé à
des flammes ou à des températures dépassant 572°F / 300°C.
• La sonde doit être nettoyée à la main avec une serviette humide ou une lingette hygiénique. La sonde ne passe pas au lave-
vaisselle. Prenez des précautions pour ne pas mouiller le câble de la sonde.
• Veillez à éviter l’exposition à l’eau du câble de la sonde ainsi que la zone où le câblage et le sertissage rencontrent la sonde.
• La sonde n’est pas étanche et l’exposition à l’eau peut l’endommager.
• La sonde ne doit jamais être immergée dans l’eau.9. Fonctions de l’APP
BBQ (Fig. 6)
• L’application i-Braai propose des alarmes préréglées pour de nombreux types de viandes et
de températures de cuisson.
En appuyant sur le profil puis sur le type de viande, vous accédez aux alarmes préréglées.
• Passez d’un type de viande à l’autre en appuyant sur le type de viande ou sur le repère de
température.
• Une fois que la viande est sélectionnée, vous pouvez “Sélectionner votre degré de cuisson”.
• Appuyez sur “Retour” puis sur “Démarrer” pour commencer.
• Vous pouvez également créer votre propre alarme personnalisée préréglée et ce pour
n’importe quelle température souhaitée en appuyant sur profil et en sélectionnant ensuite
le type de viande ou la température.
• Vous pouvez choisir de contourner les alarmes prédéfinies en choisissant “Température” ou “
Minuterie”.
• Pour “Température”, choisissez le degré de cuisson désiré, puis démarrez.
• Pour “Minuterie”, choisissez le temps et démarrez le compte à rebours.
CAMERA (Fig. 7)
• Téléchargez des photos de vos repas pendant qu’ils sont encore en train de cuire et Fig. 6
Partagez-les avec d’autres.
• Touchez l’icône de l’appareil photo et choisissez la plateforme pour le partager.
REGLAGES (Fig. 8)
• Choisissez votre tonalité d’alarme en procédant comme suit :
• Sélectionnez le profil pour afficher les options sonores.
• Appuyez sur chaque son pour entendre et sélectionner le son souhaité.
SUPPORT
• Manuel d’instructions
VERSION
• Version de l’APP installée
10. Garantie
Fig. 7
CADAC (Pty) Ltd garantit par la présente à l’ACHETEUR ORIGINAL de ce produit
CADAC,qu’il sera exempt de tout défaut de matériel et de fabrication à partir de la date
d’achat pendant 2 ans.
La garantie ne s’appliquera que si l’appareil est assemblé et utilisé conformément aux
instructions imprimées.
CADAC peut exiger une preuve raisonnable de votre date d’achat. PAR CONSÉQUENT, VOUS
DEVRIEZ CONSERVEZ VOTRE TICKET DE CAISSE OU VOTRE FACTURE.
La présente garantie limitée se limite à la réparation ou au remplacement des pièces qui
prouvent défectueux dans des conditions normales d’utilisation et d’entretien et qui, à
l’examen, indique à CADAC satisfaction, elles sont défectueuses. Avant de retourner des
pièces, contactez le service clientèle dans votre région. Si CADAC confirme le défaut et
approuve la réclamation, CADAC choisira de remplacer ces pièces.
Cette garantie limitée ne couvre pas les pannes ou les difficultés de fonctionnement dues
à un accident, abus, mauvaise utilisation, modification, mauvaise application, vandalisme,
installation incorrecte ou l’entretien ou le service, ou l’absence d’entretien normal et courant.
Fig. 8Détérioration ou dommages dus à des conditions météorologiques graves telles que la grêle, les ouragans, les tremblements de terre ou les tornades, la décoloration due à l’exposition à des produits chimiques soit directement, ne sont pas couvert par la présente garantie limitée. Il n’y a pas d’autres garanties expresses, à l’exception de celles qui sont énoncées dans le présent document et de toute garantie implicite applicable de qualité marchande et sont limitées dans le temps à la période de couverture de cette garantie limitée écrite expresse. Certaines régions n’autorisent pas la limitation de la durée d’une garantie implicite, de sorte que cette limitation peut ne pas s’appliquer à vous. CADAC n’est pas responsable des dommages spéciaux, indirects ou consécutifs. Certaines régions n’autorisent pas l’exclusion ou la limitation de dommages accessoires ou indirects, cette limitation ou exclusion peut ne pas s’appliquer à vous. CADAC n’autorise aucune personne ou société à assumer pour elle une quelconque obligation ou responsabilité en rapport avec la vente, l’installation, l’utilisation, l’enlèvement, le retour ou le remplacement de ses équipements ; et aucune de ces représentations n’engage CADAC. Cette garantie s’applique uniquement aux produits vendus au détail.
You can also read