Version 1.4 Brief User Guide
←
→
Page content transcription
If your browser does not render page correctly, please read the page content below
Version 1.4
                                      Brief User Guide

© Copyright 2012-2020, LibRaw LLC, www.libraw.com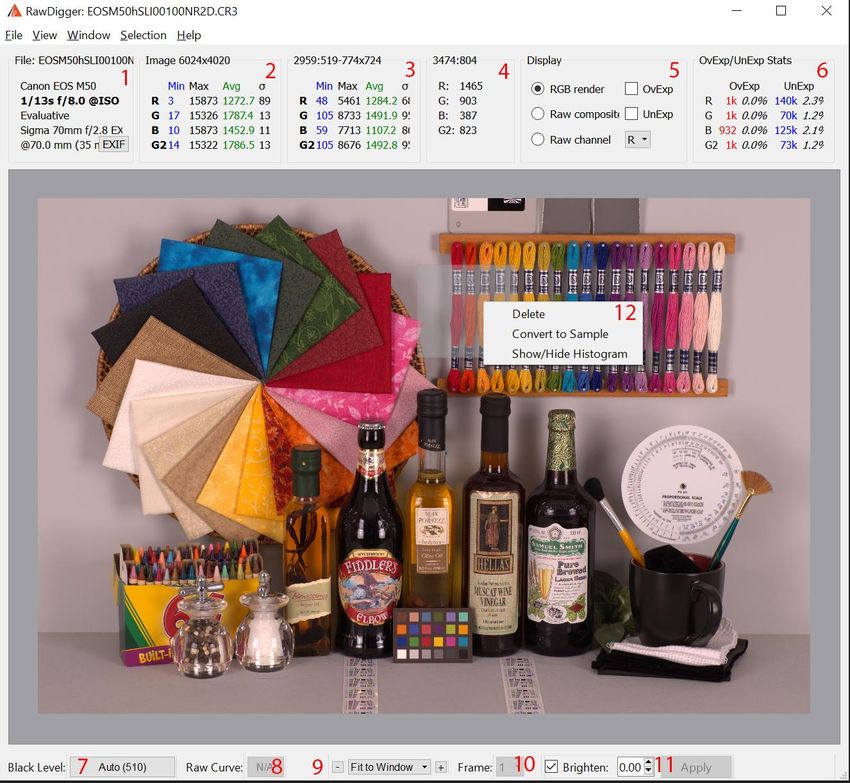
RawDigger User Guide

Contents
What is RawDigger .............................................................................................................................................. 3
   RawDigger Editions feature table ................................................................................................................... 5
System Requirements ......................................................................................................................................... 6
Program Installation ............................................................................................................................................ 7
   Windows.......................................................................................................................................................... 7
   Mac OS X ......................................................................................................................................................... 9
Program Activation ........................................................................................................................................... 10
   Manual Activation ......................................................................................................................................... 11
Program Usage .................................................................................................................................................. 14
   Starting RawDigger ........................................................................................................................................ 14
   Main Program Window ................................................................................................................................. 15
   Program Menu .............................................................................................................................................. 22
   RawDigger Histograms .................................................................................................................................. 24
   Samples Table ............................................................................................................................................... 28
   Selection Grid: processing color targets ....................................................................................................... 32
   Raster Image Data Export ............................................................................................................................. 37
   Processing of floating point data .................................................................................................................. 39
Preferences ....................................................................................................................................................... 41
   Display Options Tab....................................................................................................................................... 42
   Data Processing Tab ...................................................................................................................................... 45
   Data Processing -> Vendor specific Tab ........................................................................................................ 47
   Histograms Tab.............................................................................................................................................. 49
   File Handling Tab ........................................................................................................................................... 51
   Misc. Options Tab.......................................................................................................................................... 53
   Over/Under Exposure tab ............................................................................................................................. 55
   Support of non-standard cameras ................................................................................................................ 56
Supported Cameras ........................................................................................................................................... 58
Copyrights and Acknowledgments.................................................................................................................... 82

Page 2 of 84 © Copyright 2012-2020, LibRaw LLC, www.libraw.com
RawDigger User Guide

What is RawDigger
RawDigger by LibRaw, LLC, is a tool to visualize and examine pure raw data as the camera has recorded it.
In essence, it is a microscope of sorts that lets you drill down into raw data.
RawDigger doesn’t alter the raw data in any way. RawDigger is not a raw convertor. Instead, it allows you to
see the data that will be used by raw convertors.

RawDigger supports nearly all cameras that have raw capability. Support for new cameras is usually
implemented within few weeks after raw samples become available.

Some unique RawDigger features:
    •   RawDigger displays the real histogram of the raw data, which greatly differs from the in-camera
        histogram and histograms presented by most of the raw convertors.
    •   Overexposure (OE) indicator will show you exactly what areas of the shot are blown out and in
        which color channel(s) it happened (best if used in channel view).
    •   RawDigger allows determining how exposure meter is calibrated and what raw level corresponds to
        the midpoint of in-camera histogram. That is, RawDigger lets you establish the headroom in
        highlights and obtain optimal exposures.
    •   For ETTR practitioners, RawDigger makes it very simple to compare raw histogram to in-camera
        histogram and account for the difference, making the exposures as much “to the right” as possible.
    •   RawDigger helps determining the raw level at which the overexposure “blinkies” start on the
        camera LCD and to know how much headroom is still available after the blinkies start showing.
    •   If the shadows look blotchy, colorless, or details in shadows are poorly resolved you will be able to
        determine how much they are underexposed and set Underexposure (UE) indicator in RawDigger
        accordingly.
    •   RawDigger is a useful tool for examining how the relative per-channel underexposure depends on
        the color of light.
    •   RawDigger is more precise than any exposure meter for the purpose of evaluation of the uniformity
        of fill light and reproduction light setups (in terms of the evenness of both color balance and
        luminosity across the background).
    •   For studio photography RawDigger helps establishing the proper light filtration to achieve the
        cleanest possible shadows on the shots.
    •   Landscape photographers may want to use RawDigger to determine the effect of the filters on the
        lens, to check neutrality of polarizing and neutral density filters and, possibly, to select color
        correction and color compensation filters to use in different light.
    •   RawDigger can be used to check the amount of vignetting caused by the lens and the sensor.
    •   RawDigger helps determine the idiosyncrasies of both camera and raw convertor by providing a
        true view into the raw data and comparing it to the results obtained through raw conversion.
    Some of the more advanced features, depending on the RawDigger edition, include:
            o   RAW data export as TIFF.

Page 3 of 84 © Copyright 2012-2020, LibRaw LLC, www.libraw.com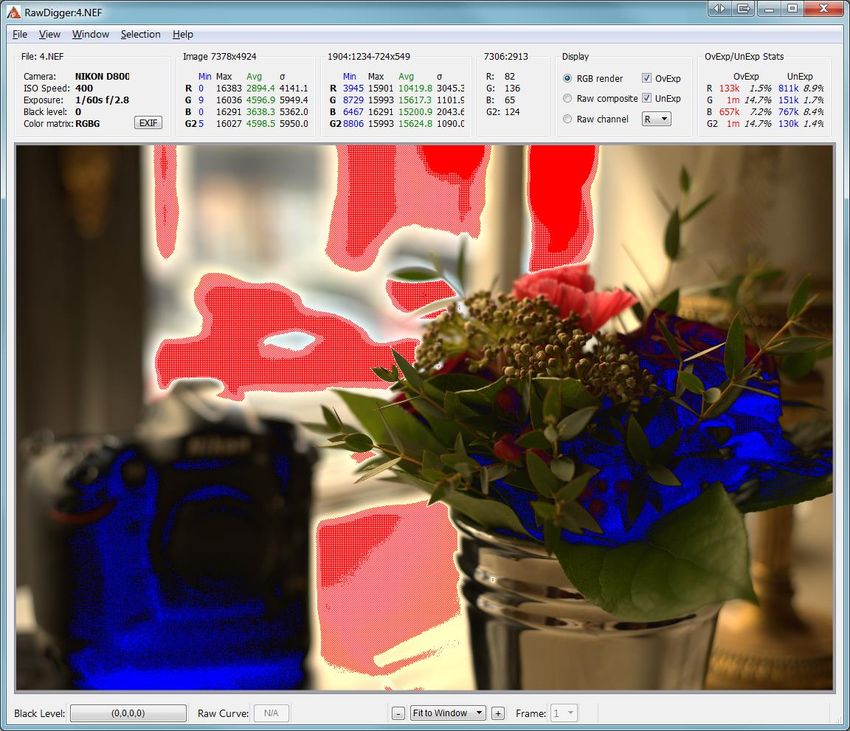
RawDigger User Guide
            o   Plot and save per channel raw data histograms for both the entire file and for an arbitrary
                rectangular area of the file (selection). The histograms can be saved as graphics or as a table
                for further external processing.
            o   Calculate the statistics per channel (minimum, maximum, average, root-mean-square
                deviation) for the entire file and for an arbitrary rectangular selection.
            o   Calculate the statistics per channel and save the results in a processing-friendly form - CSV,
                CGATS (for an arbitrary number of rectangular areas of the file).
            o   Save the compression curves of raw files in a tabulated form (for cameras and raw data
                formats where such curves are used).

RawDigger is available in several editions:
    •   Exposure Edition is for everyday use and is intended to help those who are serious about extracting
        the maximum quality from the camera to get precise exposures.
        Exposure Edition displays RAW data in all modes (RGB, RAW Composite, and RAW per channel),
        indicates over- and underexposed areas, displays RAW histogram, image statistics, as well as
        statistics and histogram for selected area.

    •   Research Edition is meant for camera/sensor evaluation and statistical analysis of raw data. It is
        suitable for a wide range of tasks, starting from personal use and preparing reviews and all the way
        to programming RAW data processing.
        Research Edition adds TIFF export, multiple selected areas via samples, tables of sampled data;
        statistics and histograms over multiple samples, exporting sampled data as CSV and CGATS.

    •    Profile Edition is for those who need to create sensor calibration data, linearization data, or device
         data for color profiling.
Profile Edition adds selection grids for faster processing of step wedges and color targets, as well as for
calculating non-uniformity maps. Profile Edition allows applying white balance, normalization, equalization
(Flat Field), and filtering of outlying values before data export.

Page 4 of 84 © Copyright 2012-2020, LibRaw LLC, www.libraw.com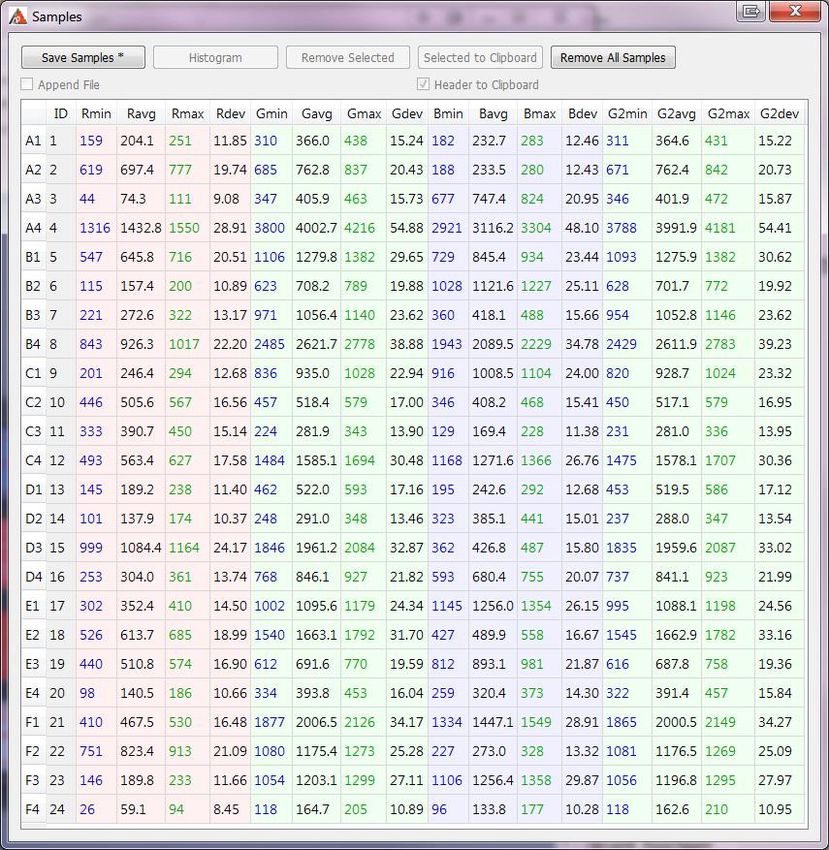
RawDigger User Guide

                               RawDigger Editions feature table
                                                                  RawDigger         RawDigger
                                 RawDigger                         Research        Profile Edition
                                 Exposure Edition                   Edition

User Groups and suggested        General photography:           Camera and
usage                            exposure evaluation,           RAW data          Creating
                                 exposure meter                 analysis          calibration,
                                 calibration, verification of   (evaluating       linearization
                                 the light evenness             cameras,          tables; preparing
                                 (brightness and white          preparing         data for color
                                 balance consistency)           camera reviews,   profiling
                                                                programming
                                                                RAW data
                                                                processing)

Reads all supported RAW                       +
formats                                                                +                  +
Display of RAW data in all                    +
modes (RGB, RAW                                                        +                  +
Composite, and RAW per
channel)

Display of Over- and                          +
UnderExposed areas                                                     +                  +

                                              +
Display of the histogram and                                           +                  +
statistics for the entire file

Statistics and histogram for                  +
one selected area                                                      +                  +
TIFF export                                    -
                                                                       +                  +

Page 5 of 84 © Copyright 2012-2020, LibRaw LLC, www.libraw.com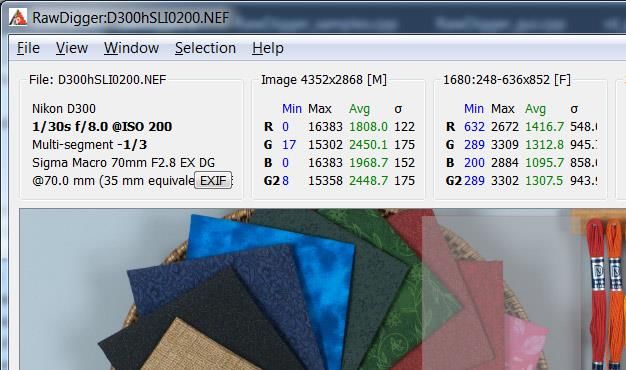
RawDigger User Guide

Multiple selected areas
(samples and table of
                                                -                        +                     +
sampled data): statistics,
histogram, and export to CSV
and CGATS formats

Filtering of the data to be
exported: white balance,                        -                         -                    +
normalization, equalization
(Flat Field), filtering of
outlying values.

                                                -
Selection grids (for fast                                                 -                    +
processing of color targets
and step wedges)

System Requirements
Windows: Currently, the program requires a computer with Windows (XP SP2+, Vista, 7), 32 or 64-bit, 1GB
memory, CPU supporting SSE2 or higher (Intel Pentium 4 or newer). Screen resolution should be 1024x768
or more.

Mac OS X: Intel Mac running Mac OS X 10.5 or newer. The program may work under 10.4, but this has not
been tested. Both 32- and 64-bit systems are supported.

Linux: Currently, users report that one can use Wine to run RawDigger under OS X and Linux (configurations
reported as tested are OS X 10.6.8 and Wine-1.2.3; Wine (1.3.37-0ubuntu1~ppa1~lucid1) and Debian
testing.

Page 6 of 84 © Copyright 2012-2020, LibRaw LLC, www.libraw.com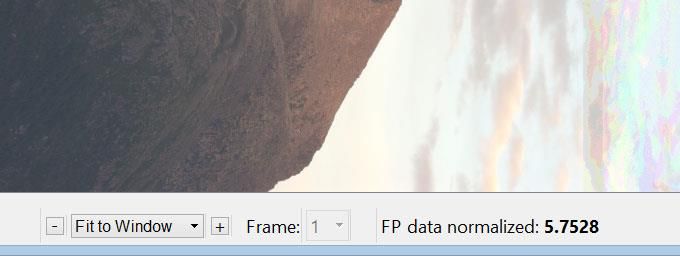
RawDigger User Guide

Program Installation
Windows
The program is installed by running the executable file of the distribution package (RawDigger-1.0.0.xxx--
Setup.exe)

If you downloaded RawDigger from our site on the first program launch, current versions of Windows will
display the following security warning:

After the “Run” button is pressed, the UAC (Windows User Access Control) system will display a warning
once again:

Both dialogs allow you to verify that the setup program is signed with unique LibRaw LLC electronic
signature.

To proceed with the installation, you must agree to the dialog above, and the usual Setup Wizard will be
launched:

Page 7 of 84 © Copyright 2012-2020, LibRaw LLC, www.libraw.com
RawDigger User Guide

At the next screens of Setup Wizard:

    1.   The User License is displayed
    2.   An installation folder is suggested; a different folder may be selected by the user
    3.   Creating a Group in the Programs menu is suggested
    4.   A list of possible additional actions is shown: add icon to the desktop, add icon to the Quick Launch
         menu

Afterwards, the installation takes place. Upon completion, the following screen appears:

Page 8 of 84 © Copyright 2012-2020, LibRaw LLC, www.libraw.com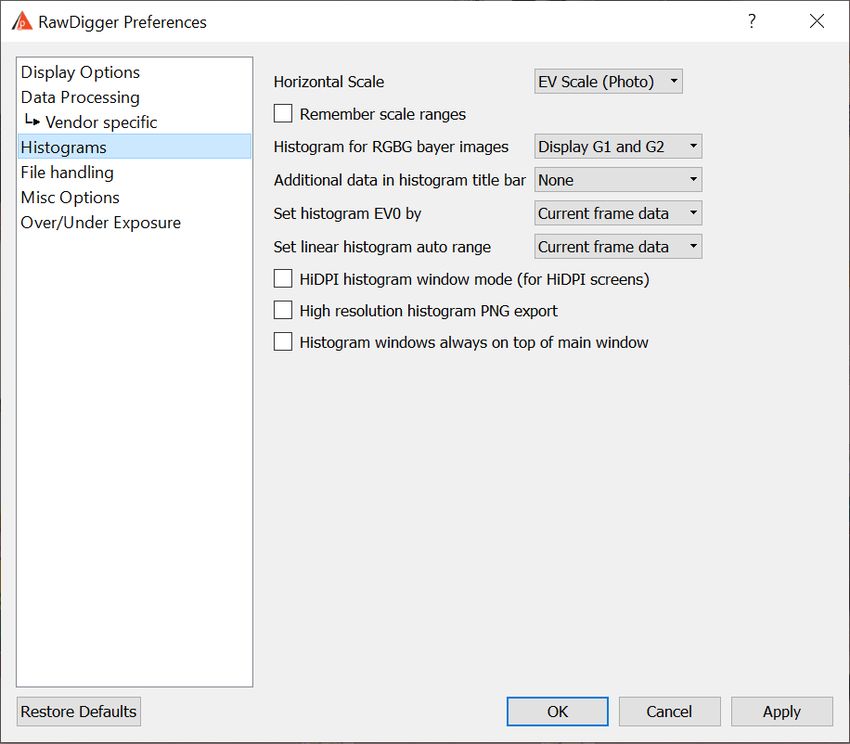
RawDigger User Guide
In case of any errors during installation, please post to the technical support forum at
www.rawdigger.com/forum (English or Russian languages are OK).

Mac OS X
Double click on RawDigger-1.x.x.dmg to mount the RawDigger disk image you've downloaded. The content
of the disk image will appear like this:

Drag RawDigger icon onto the Applications icon. The program will be copied to Applications folder and
ready to run.

Other items contained in the disk image are:

    •   RawDigger Manual (RawDigger-manual.pdf)
    •   Brief description (README.txt) and Changelog (Changelog.txt)
    •   End-User License Agreement (EULA.txt), Copyright Information (Copyrights.txt), Licenses and
        Copyrights for libraries and components used in RawDigger (folder Licenses.

Page 9 of 84 © Copyright 2012-2020, LibRaw LLC, www.libraw.com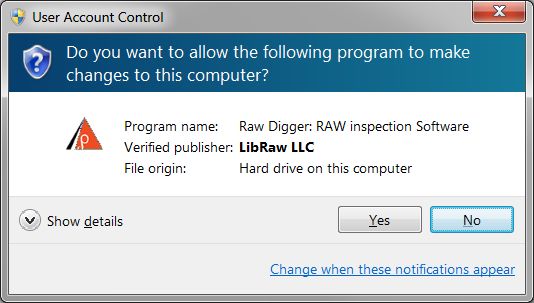
RawDigger User Guide

Program Activation
During the first launch RawDigger will display a splash screen suggesting the activation of the trial version

Next, an activation dialog will be displayed:

After the Activate Trial button is clicked, the program will be activated in trial mode for 30 days. During this
period, all RawDigger features will be available.
To use RawDigger after the trial period, the user will need to obtain a full license for the RawDigger edition
of his or her choice.

To obtain the license, please click the “Buy License” button or open www.rawdigger.com/purchase in your
browser. As a result of the transaction, you will be provided with the license key (online and as a separate
email). This license key should be entered into the License Key field of the activation dialog, which is also
available through Menu-Help-Purchase/Activate):

Page 10 of 84 © Copyright 2012-2020, LibRaw LLC, www.libraw.com
RawDigger User Guide

After the license key is entered, please click Activate license button. The license will be activated and you
will be able to continue using the program.
The Help-Purchase/Activate menu item will now be renamed to Help-Registration data, and the respective
dialog will show your registration data:

To complete the activation (of both the trial and the fully licensed version) the program needs a one-time
access to the Internet. If you cannot grant the appropriate Internet access permissions, you can activate the
program manually.

Manual Activation
If the program fails to connect with the activation server, you will see a pop up alert, with a «Manual
Activation» button on the bottom right of the notification window.

Page 11 of 84 © Copyright 2012-2020, LibRaw LLC, www.libraw.com
RawDigger User Guide
After clicking the «Manual Activation» button, a «Manual Trial Activation» window will pop up:

Depending on your Internet access, you can use one of the 3 ways to obtain the activation code:

By using browser (if your browser has an internet connection) – use this if your browser can connect to
the Internet.
Simply click this url: http://activate.rawdigger.com/activate.cgi and you will see a browser window pop up
with your unique activation key:

Page 12 of 84 © Copyright 2012-2020, LibRaw LLC, www.libraw.com
RawDigger User Guide

By using E-mail client with an automatically prepared message – click the mailto:activate@rawdigger.com
link and your mail client will create a new pre-populated email to activate@rawdigger.com. You will only
need to click send.

By using an E-mail client and manually writing the message – you can send an email to
activate@rawdigger.com using the text in the window below (I'm unable to activate…»
If you choose to obtain the activation key via email, you will receive a reply email with the text identical to
that which you would see in the web browser (the activation key, however, will be different.)

You can then use the Activation Key (from the browser or email) and enter it into the Activation Key field (it
is best to use Copy-Paste, as every character of the key is important) and press «Activate.»

After clicking the «Close window» button, the window will close and the RawDigger activation window will
display the registration status (as well as the edition you are using.)

Page 13 of 84 © Copyright 2012-2020, LibRaw LLC, www.libraw.com
RawDigger User Guide

Program Usage
Starting RawDigger
Windows
To start RawDigger, double-click its icon on the Desktop, or use the Windows Start menu

If the program is started from the command line, the first argument is interpreted as a name of the raw file
to open. Consequently, if an icon of a raw file is dragged onto the RawDigger program icon the program will
start and open this raw file.

If “single instance” mode is in effect (see Preferences below) and RawDigger is already running, starting a
new RawDigger process with a file name to open as a command line parameter will cause the file to be
opened by the already running instance.
To open a new RawDigger instance start RawDigger with –newinstance parameter, such as
RawDigger –newinstance filename

This will cause the new window to open even while in “single instance” mode.

Mac OS X
To start RawDigger, double-click its icon or drag a raw file icon onto the RawDigger icon.

Page 14 of 84 © Copyright 2012-2020, LibRaw LLC, www.libraw.com
RawDigger User Guide

Main Program Window
The main window of the program shows the name of the current (opened via menu command File->Open)
raw file, its metadata and some statistical data. The file view mode is also selected in the main window.

  The main program window displaying an opened raw file. Information blocks and controls are marked
                                         with digits in red.

1. File metadata
   This window displays:
           a. The file name (as a window caption)
           b. Camera make and model
           c. Shutter speed, aperture, ISO sensitivity value
           d. Type of metering and exposure correction (if it was applied at the time of shooting)
           e. Lens type

Page 15 of 84 © Copyright 2012-2020, LibRaw LLC, www.libraw.com
RawDigger User Guide
f. Focal length at which the shot was taken
Pressing “EXIF” button here, you can open a window displaying EXIF metadata for the file (see below for
sample EXIF output window).
2. Raw data statistics per channel
Block header: image size in pixels. Block body: minimum, maximum, average (Avg) and root-mean-
square deviation of pixel values in each color channel (σ).
3. Statistics per channel for the last selected area
Block header: coordinates of top left corner of selected area (X-Y-W-H). Block body: minimum,
maximum, average and root-mean-square deviation of pixel values in each channel within the selected
area.
4. Mouse pointer coordinates and the corresponding raw values
Block header: mouse pointer coordinates (X-Y). Block body: value in pixel or in 4 pixels under the
pointer (which mode it is, 1 or 4 pixels, is set in the Preferences window; see Preferences section
below).
5. Image view mode:
• RGB render: shows the RGB representation with the selected (see description of
Preferences below) white balance. This mode is not available for cameras where the aspect
ratio of a single pixel differs from 1 (for example, some Fuji cameras).
• Raw Composite: for an RGB(G)-Raw it is an RGB-image where the green channel is
computed by averaging two green channels available in the raw file. For all raw file where
the CFA is not RGB(G) (but rather CFA is of a different type, like CMYG, RGBE, etc.) a
grayscale image is displayed (i.e. Show RGBG in grayscale setting /see below/ is forced on
for such files).
• Raw channel: the selected channel is shown in the black-and-white mode.
• OvExp: switches overexposure indication On; the overexposed areas are highlighted in red.
• UnExp: switches underexposure indication On; the underexposed areas are highlighted in
blue.
6. Statistics for over- and underexposed areas.
For each color channel the number and the percent (relative to the total number of pixels of the given
color) of saturated and underexposed pixels is indicated.
7. Black level subtraction status display:
Current Black Level subtraction mode is indicated right on the button; Auto for the value reported by
the camera, same as the level displayed in the block #1; Off when no black level subtraction is
performed; Manual and Value if the same value of the black level is subtracted from all the channels; or
1-4 values in brackets when black level is established individually for each of the channels. When this
button is pressed the “Settings” dialog window is opened (more on “Settings” dialog see below), with
the focus on the “Data Processing” pane.
8. Decompression using compression curve data from raw file:
The indication on the button can be Normal if the standard tone curve contained in the raw file is used;
Linear, if a 45-degree straight line is used; or N/A if the particular file tone curve in raw is not applicable.
When this button is pressed the “Settings” dialog window is opened (more on “Settings” dialog see
below), with the focus on the “Data Processing” pane.
Page 16 of 84 © Copyright 2012-2020, LibRaw LLC, www.libraw.comRawDigger User Guide
9. Image zoom
The + and – buttons change the scale, and the Fit To Window pull-down menu can be used to select the
scale from list.
10. Frame selection (for multiframe Raw)
The dropdown list is used to select the frame to be shown. This interface element is not available for
files containing only one frame (most raw formats).
11. Section containing controls of the brightness of RGB render
This section allows to control the brightness of RGB render in a non-linear fashion, through setting the
value for gamma increase, 0 .. 3 above the regular value of 2.2, for the total value of gamma to be 2.2 ..
5.0. This method makes room for increased brightness in shadows and midtones by compressing
highlights, not by clipping them.
12. Right-clicking selections and samples opens the context menu; from here you can delete the selection
or sample; show/hide the histogram; convert (change) selection to sample.
Statistics panes for the whole image as well as for a selection may display additional indicators (see picture
above):
• [M] in the "Image" pane indicates that the display of "black frame" is ON and the statistics includes the
data from the masked pixels (the sensor area that does not contain image)
• [F] in the "Selection/Sample" pane indicates that filtering of outlying values is ON (please refer to
Preferences - Data Processing - Discard abnormal pixel values section)
Working with the Main Window
• Moving the pointer allows the user to see the pixel values (raw data) under it. Depending on the view
mode (see Preferences section below), the program shows either the data value for a specific pixel (the
remaining three components are zero) or the pixel values of all 4 color channels for the 2x2-pixel square
under the mouse pointer.
Page 17 of 84 © Copyright 2012-2020, LibRaw LLC, www.libraw.comRawDigger User Guide
• Pressing the Alt + left mouse button allows the user to set a sample of a fixed size. The size of the
sample is specified in the program preferences (see Preferences section below). The samples set earlier
in the image have a gray semitransparent background and green border. Operations with samples are
described below, in the Samples Window section.
• Pressing Shift and the left mouse button allows the user to make a rectangular selection of an arbitrary
size. One angle of the sample is fixed at the moment when the mouse button is pressed; the opposite
angle, at the moment when Shift is released. Only one selection can exist at a time, but can be
converted into a sample. Operations with selections are described below, in the Selection Menu section
of Program Menu.
• Left-clicking allows one to scroll the image in the program window
• Left-clicking a selection or sample allows to re-position the selection or the sample
• Right-clicking a selection or sample displays a context menu:
o Delete – to delete the selection or the sample
o Show/Hide Histogram – to show or hide the histogram for this selection or sample
o Convert Selection To Sample (available only for the active selection) – converts the selection to
the sample, that is now the data for the selection is available in the «Samples Window» (more
on the «Samples Window» please see below).
• Drag and Drop – raw file can be dragged and dropped to the program window; this has the same effect
as selecting the file through File->Open.
Page 18 of 84 © Copyright 2012-2020, LibRaw LLC, www.libraw.comRawDigger User Guide
Display of the areas of under- and overexposure
If the checkboxes OvExp (overexposure indication) and/or UnExp (underexposure indication) are On in the
Display section the areas with blown-out highlights and/or with plugged shadows will be highlighted with
red/blue colors, respectively.
To adjust the levels at which the over- and/or underexposure is diagnosed please use Preferences,
Over/Under Exposure section (see below “Preferences” section).
EXIF Window
The EXIF data window will be displayed, if:
• The EXIF button in the metadata info block is pressed
• Menu – Windows – EXIF is used
The EXIF window displays the metadata contained in the file as extracted by Exiftool:
Page 19 of 84 © Copyright 2012-2020, LibRaw LLC, www.libraw.comRawDigger User Guide Page 20 of 84 © Copyright 2012-2020, LibRaw LLC, www.libraw.com
RawDigger User Guide
“Filter:” -- this field allows one to enter filtering conditions, based on substring(s):

The “Filter:” field allows one to use regular expressions (in PCRE format); for example, Width|Height will
result in the display of only those strings that contain substrings Width or Height. The search is case-
insensitive.

The buttons to copy the EXIF data to Clipboard and to close the EXIF window are located at the bottom part
of the EXIF window:

    •   Copy to Clipboard (text) button allows one to copy the EXIF table into the Clipboard as text
    •   Copy to Clipboard (HTML) button allows one to copy the EXIF table into the Clipboard as HTML
        (preserving the formatting tags)

The “Copy full table” checkbox is useful if the filtering is on, but one still wants to place the un-filtered (full)
EXIF data into the Clipboard, ignoring the effect of filtration.
Page 21 of 84 © Copyright 2012-2020, LibRaw LLC, www.libraw.com
RawDigger User Guide
Program Menu
File Menu
• Open: opens a raw file. If the operation has failed for some reason (format not supported, file
corrupted), the program will keep the previously opened file active.
If the current file contains samples whose data has not been yet saved, the program will ask if you want
to save them prior to opening a new file. The coordinates of the existing samples and selection will be
preserved after the new file is opened if they fall completely within the size of the new file. Other
samples and selections will be lost. For the remaining ones, the statistical data will be recalculated using
the values from the new file.
• Next file: opens the next raw file in the current directory. The settings for the sorting order can be
found at Preferences - Misc. Options – File order. If the end of the list is reached and the user attempts
to open a “next” file, the program responds with a beep, warning that there are no further files.
• Prev File: opens the previous raw file in the current directory.
• Close file: closes the current file, frees up memory
o closes all additional windows (samples, histograms)
o changes the current folder to %HOME%/Pictures or %HOME%
Useful when working with removable media (flash cards, and others), allows to un-mount and eject the
device without closing RawDigger
• Export Tiff: exports the data of the currently opened RAW-file as TIFF (see Data Export section below).
• Dump RAW curve: this menu item is active only for raw files that use a tone (compression) curve during
unpacking. Using this menu item, the user can save the tone curve in the CSV format for subsequent
examination.
• Screenshot: saves the image of the main program window in the PNG or JPG format. PNG is the default
format; to save in JPG, one should select this extension in the File Save dialog box.
• Preferences: activates the dialog box, see description below in the Preferences section.
• Exit: quits the program. If there are any unsaved samples of data, the program will ask if you want to
save them.
• In addition to the standard menu items listed above, the program remembers the 5 most recent files
and displays their list in the File menu.
View Menu
The View menu duplicates the image zoom controls at the bottom of main program window.
• Zoom In
• Zoom Out
• Normal Size sets the scale to 100% (1:1)
• Fit To Window sets the scale so that it fits to the program window
Window Menu
The Window menu makes it possible to show/hide additional program windows:
• Histogram - Entire file histograms (see “RawDigger Histograms” section below).
Page 22 of 84 © Copyright 2012-2020, LibRaw LLC, www.libraw.comRawDigger User Guide
• Samples Window - Samples tables (see “Samples Table” section below).
• EXIF – Exif window.
Selection Menu
The Selection menu allows the user to perform the following actions over the selected area:
• Clear Selection: removes the selected area.
• Selection Histogram: opens the window with a histogram of the selected area (see RawDigger
Histograms section below).
• Convert Selection to Sample: converts the current selection to a sample and adds it to the samples list
(see Samples Table section below).
• Set Selection by Numbers: allows one to position the selection area precisely by entering the
coordinates of the top left corner of the selection, its width and height
When «Center selection on image» is checked «Left» and «Top» fields are grayed-out. The position of
the top left corner is calculated automatically so that the center of the selection is in the center of the
image.
• Selection Grid: to be used for reading data off color targets and (non-)uniformity analysis as described
in “Selection Grid” section below.
Help Menu
The Help menu contains five items:
• Supported Cameras: shows the list of the cameras supported by the given version of RawDigger.
• Check for Updates – checks if there are any updates of RawDigger for the version of RawDigger you are
currently running.
• Registration Data (for the full license) or Purchase/Activate (for the Trial mode) – displays
activation and registration data dialog
• Technical Support Forum – opens support forum page in your browser.
• Contact Support – opens feedback form in your browser.
• About: shows information about the program version, available updates, etc.
Hot keys and Shortcuts
MS Windows
• Ctrl-O to open a file, same as Menu->File->Open
• Ctrl -> (Arrow Right) – to open the next file (Menu -> File -> Next file)
Page 23 of 84 © Copyright 2012-2020, LibRaw LLC, www.libraw.comRawDigger User Guide
• Ctrl File -> Prev file)
• Ctrl-E – to open the data export dialog (Menu -> File -> Export Tiff)
• Ctrl-P to access the Preferences dialog, same as Menu->File->Preferences
• Ctrl-Q to exit the program, same as Menu->File->Exit
• Ctrl-+, Ctrl-= to zoom in, same as Menu->View->Zoom-In
• Ctrl—to zoom out, same as Menu->View->Zoom-Out
• Ctrl-S to display the image at 100%, same as Menu->View->Normal Size
• Ctrl-F to scale the image so that it fits the program window, same as Menu->View->Fit to Window
• Ctrl-H to show/hide the histogram window, same as Menu->Window->Histogram
• Ctrl-L to show/hide «Samples Window» containing the table of measurements from samples, same as
Menu->Window->Samples
• Ctrl-M to convert the current (active) selection to the sample, same as Menu->Selection->Convert
Selection to Sample
Mac OS X
Same hotkeys as in Windows version, but with Command instead of Control (i.e. Command-O opens file and
so on). The only exception is Histogram open/close: Option-H is used because Command-H is reserved for
hiding entire program window.
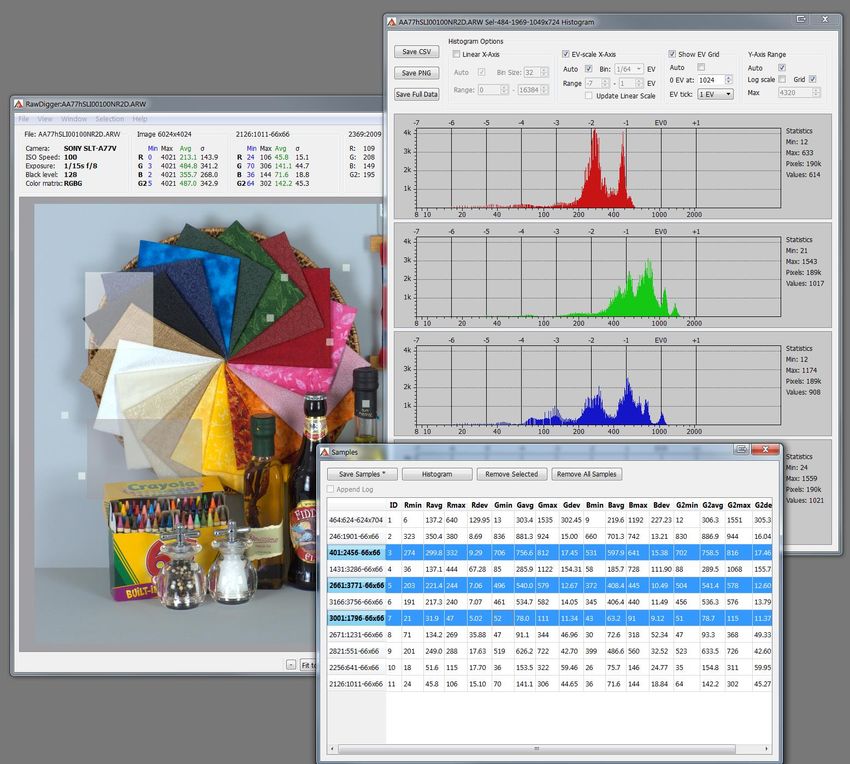
RawDigger Histograms
The Window->Histogram menu item shows the window with per channel histograms plotted using all the
file data.
RawDigger histograms have the following features:
1. The Horizontal scale can be either linear (according to values in raw data from the currently opened
file) or photographic (linear with respect to the EV scale, that is, every next step of the scale contains
twice the signal compared to the previous one). The horizontal axis has two sets of tick labels: linear
under the histogram and photographic above the histogram.
2. The Vertical scale can be either linear or logarithmic.
3. The width of the histogram columns (bins) is always equal to an integer number of pixels in order to
reduce aliasing (moiré). Hence, if the column (bin) width is chosen automatically, the histogram
occupies from ½ to all of the window width and cannot be zoomed by an arbitrary factor.
4. All per channel histograms are displayed using the same scale.
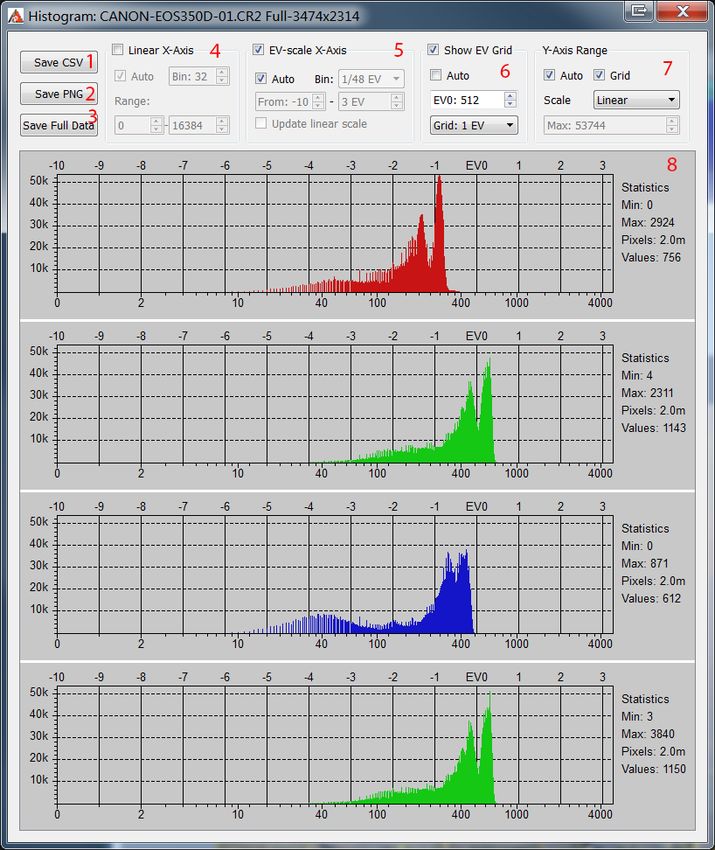
The histogram window contains histogram controls, which are shown on the figure on the next page.
Page 24 of 84 © Copyright 2012-2020, LibRaw LLC, www.libraw.comRawDigger User Guide
Histogram window: the red digits mark the controls described below.
1. Save CSV: saves the histogram in the form of a CSV file suitable for further processing (e.g., in Microsoft
Excel). The data in the histogram bins is saved according to the current preferences (bin width, work
mode, etc.; see below).
Page 25 of 84 © Copyright 2012-2020, LibRaw LLC, www.libraw.comRawDigger User Guide
2. Save PNG: saves the histogram in the form of a graphic file (PNG or JPEG; to save it in JPEG, one should
select the extension .jpg or .jpeg for the file to be saved).
3. Save Full Data: saves the unprocessed histogram data (not sorted into bins); data is saved as the signal
level value vs. the number of pixels with this value.
4. Histogram representation in linear mode
In the linear mode, the horizontal scale is constant all along the horizontal axis. In this mode, the major
portion of the plot is occupied by highlights (and, to a lesser extent, midtones) of the image, whereas
the shadows occupy a narrow range near the left border of the histogram.
Linear mode controls:
• Linear X-axis: linear mode on.
• Auto: automatic choice of minimum/maximum and histogram bin width according to
horizontal axis.
• Bin Size: manual setting of bin width (number of levels in one bin is set).
• Range: setting of the visible range on the horizontal axis.
5. Histogram representation in photographic mode
In the photographic mode, the horizontal scale is linear with respect to the exposure stops (exposure
value units, EV). Each stop, regardless of its position in the tonal range of the photo (shadows,
midtones, highlights), occupies the same length along the horizontal axis of the histogram.
In the shadows, the number of possible levels may be smaller than the one set by the histogram bin
size. For example, the ”3rd photographic step from black level” of the image corresponds to values from
4 to 7 inclusively, meaning that there are 4 different levels. In this case, some of the bins will have a
height of zero and there will be ”holes” in the histogram.
Photographic mode controls:
• EV-scale X-Axis: photographic mode on.
• Auto: automatic choice of bin width and visible histogram range.
• Bin size: manual setting of bin width, as a fragment of 1EV (photographic stop).
• Range: setting of the visible range on the horizontal axis.
• Update Linear Scale: if on, modifications of photographic mode range will also change the
linear range.
6. Viewing EV grid
The EV grid (photographic stops) is shown in the form of solid vertical lines in the histogram field.
Controls:
a. Show EV Grid: show/hide EV grid.
b. Auto: automatic calculation of grid zero (gray point position) and setting grid step to 1EV. The
zero is located at the level that is 3 stops (8 times) lower than the maximum pixel value rounded
up (ceiling) to the nearest power of 2. For example, if the maximum value of all pixels in the
photo is 3000, then the nearest power of two greater than this value is 4096 and the EV0 value
for this photo will be automatically set to level 512.
The maximum can be determined either as the maximum pixel value in the currently opened
frame, or as a theoretical maximum for the given camera. The setting that switches on the
choice of the theoretical maximum for the maximum is available in Preferences – Histograms –
Set histogram EV0 by (please see the chapter on Preferences below).
Page 26 of 84 © Copyright 2012-2020, LibRaw LLC, www.libraw.comRawDigger User Guide
c. 0 EV at: setting the level for EV0. In photographic mode of the histogram display, changes in
EV0 also affect the data visualized; hence, the look of the histogram changes.
d. EV tick: setting the EV grid step (1/3EV, 1/2EV, 1EV, 2EV).
7. Vertical scale control
Vertical scale display is controlled using the following elements:
a. Auto – the upper limit is determined automatically so that all the counts fit into the histogram
window while the lower limit is always set to zero
b. Scale – controls the scaling of the vertical axis:
i. Linear – the scale of the vertical axis is linear
ii. Logarithm – the vertical scale is set to logarithmic; the graph is calculated for
log(count+1) to prevent log(0) issue.
iii. Square root – the height of the bars is proportional to the square root from the number
of pixels that correspond to the bin.
c. Grid – display the horizontal grid lines.
d. Max - set the maximum value for vertical axis, available only with Auto off.
8. Statistical data for the histogram:
a. Min/Max – minimum and maximum values for the pixels in the given channel (color)
b. Pixels – for the area which is used for the histogram, number of pixels in the given channel .
c. Values – number of different pixel values in the given channel.
Page 27 of 84 © Copyright 2012-2020, LibRaw LLC, www.libraw.comRawDigger User Guide
Samples Table
The Samples window shows the table with the samples created in the file:
Samples window
The Samples table lists (left to right):
• Coordinates of the top left corner and the size of the sample (format X-Y-Width-Height).
• Sample number.
• For each color channel: the minimum (min), average (avg), maximum (max) values and root-mean-
square deviation (dev) over the sample area.
The background color of the cells corresponds to the «colors» of the respective raw channels in the file.
The font color corresponds to the font color in the informational blocks of the main window (blue for
min values, green for max values, black is used for display of average and standard deviation.)
One or several rows in the table can be selected (to select several rows, click them holding down the Ctrl
key). The selected rows will have a blue background (see image above).
If some rows are selected, the corresponding samples in the main program screen start blinking.
The top part of the window, above the list of samples, contains the following controls:
1. Save Samples: saves all values from the samples list (see section Saving Samples Table below).
Append File: activated if samples have already been saved during the current program session and the
selected format allows appending. If this box is checked, Save Samples button changes to Append File,
no new file name dialog appears, and the data is appended to the file that was created earlier. The
Append File option is activated only if the previous data file was saved in the CSV format (see below);
for the CGATS format, appending samples to a file is not possible.
Page 28 of 84 © Copyright 2012-2020, LibRaw LLC, www.libraw.comRawDigger User Guide 2. Histogram: opens windows with histograms for all selected table rows. The histograms are shown only for samples containing more than 25 pixels. 3. Remove Sel.: removes the selected rows and corresponding samples in the main screen; closes the windows (if any) with histograms corresponding to the samples. 4. Sel. to Clipboard: copies the selected rows in system clipboard. If ‘Header to Clipboard’ checkbox is checked, the data will be copied with the table headings. 5. Remove All Samples: this button removes all samples from the table. 6. Load – loads a previously saved file with coordinates of sampling (see below, «Saving Samples Table»). When loading, select a previously saved file and, if you want to keep the existing samples too, uncheck Clear existing samples The Samples table is enabled in Research and Profile Editions of RawDigger. Page 29 of 84 © Copyright 2012-2020, LibRaw LLC, www.libraw.com
RawDigger User Guide
Saving Samples Table
When saving the Samples table, the dialog window similar to following is displayed:

                                       Save Samples Table window.

In addition to standard dialog elements which are used to specify the name of the file, this window contains
additional controls for saving the samples table:

1. The File Format block is used to choose the format of the saved file:
   • CSV: saving in Comma Separated Values format, which is convenient for subsequent data analysis in
       Microsoft Excel and similar programs.
   • CGATS: saving in Committee for Graphic Arts Technologies Standards format, which is used, among
       other things, in color profiling software.
   • Flat Field Data – this file contains the characterization of the variations in the sensor response that
       occur due to light variations at the space occupied by the target, as well as caused by different
       forms of vignetting.

Page 30 of 84 © Copyright 2012-2020, LibRaw LLC, www.libraw.com
RawDigger User Guide
Data will be obtained by shooting an even monochrome non-textured matte surface (thick white
paper or plastic is OK given they are placed physically flat) placed on top of the target or instead of
the target, in exact same light, same focusing, same aperture, and same camera position. Same
camera ISO setting may be needed too. The shutter speed for flat field shot does not need to be the
exact same as for the shot of the target itself. In practice, the higher the exposure for the flat field
shot is, the better accuracy can be achieved; however flat field shot shall have no overexposed
zones whatsoever.
We suggest starting with overexposing the flat field shot by 1.5 EV over the meter readings in
center-weighted or spot mode. As usual for this type of work, a steady enough tripod and remote
camera control make things easier.
Flat field data if present can be used to normalize the target shot data to overcome most of non-
uniformities. The data for the flat field shots is stored in RawDigger-specific format
• Coordinates only – saves the coordinates of the sampled regions to a file with .RDS extension, this
file can be later loaded by pressing the Load button.
2. The Additional Data Fields block is used to indicate which data fields are to be included in the saved file.
• Raw Filename: include the file name.
• Raw Frame Number: include the frame number in raw file.
• Cell Coordinates: include, in separate table columns, the coordinates of top left corner, the width
and height of selected area.
• Min/Max Values: include minimum/maximum values.
• StdDev: include standard (root-mean-square) deviation values.
• Average Green Channels: average the values of two green channels (this option is active only for
RGBG files).
Sample name and number, as well as average values for each channel, are always included.
• Camera vendor/Camera model – includes the names of the camera manufacturer and camera
model in the output CSV file.
• Shutter value/Shutter string – information on the exposure will be included in the output CSV file:
• Shutter value – exposure in seconds (for example 0.01).
• Shutter string – exposure, in “pretty” format (for example, 1/100).
• Aperture value/Aperture string – information about the aperture will be included in the output CSV
file:
• Aperture value – numeric value (for example 5.6)
• Aperture string – “pretty” string (for example f/5.6)
• ISO – the ISO speed value will be included in the output CSV file
• Add DESCRIPTOR “DCP Profile” will add this string to output CGATS file (use this with BasicColor
Input profiler to create DNG profile).
3. Flat Field Normalization – to point to the file with Flat Field data that will be used to correct non-
uniformities.
• FlatField Datafile – file, containing flat field data.
• Average Channels - to average all channel data for the flat field correction data calculation.
• Match Flat Field Data by Sample Name - for the flat field compensation, data between ffd file
and target measurements is matched based on the patch names instead of line numbers.
Page 31 of 84 © Copyright 2012-2020, LibRaw LLC, www.libraw.comRawDigger User Guide
4. White Balance – output data will be white-balanced based on the readings from the patch indicated by
Sample ID. Normally a neutral gray patch is used for the purpose; often the target manufacturer
suggests the proper patch. White balancing is performed by multiplication of channel values for all
patches by the coefficients that make the RGBG readings from the indicated patch equal.
This setting can't be switched on for single channel (black and white) RAW files.
5. Data Scaling and Gamma – output target data will be scaled and gamma-corrected:
• Gamma Value – set the value of gamma, 0.1 to 4.0
• Maximum Value – set the maximum value for the brightest patch (scaling is performed after patch
data averaging)
Flat Field Normalization, White Balance, Data Scaling, and Gamma are enabled only in RawDigger Profile
Edition.
Selection Grid: processing color targets
As a routine while color profiling one needs to sample many color patches. This can be achieved by setting
Selections manually and subsequently transforming Selections into Samples, but in RawDigger we offer a
more productive and convenient method of processing the color targets.
The Selection Grid is enabled only in the RawDigger Profile Edition.
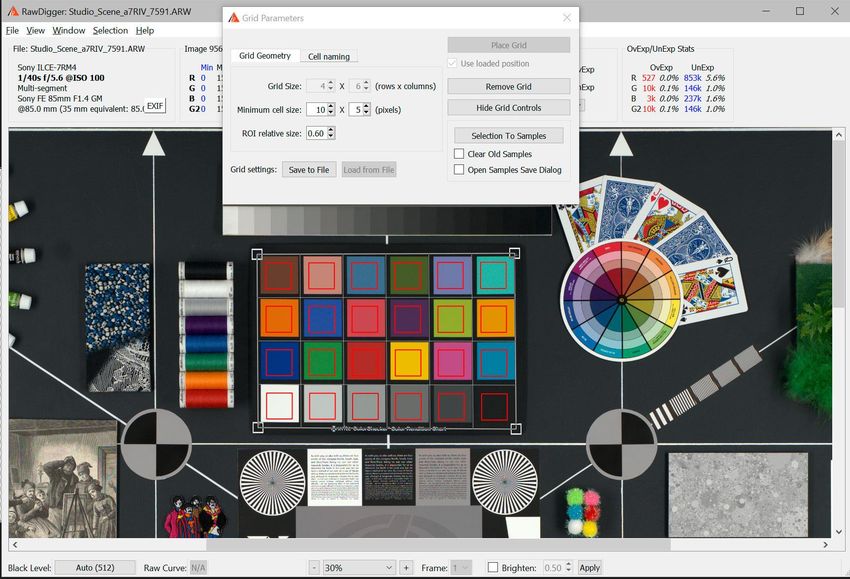
Grid-type selection is activated via menu: Selection->Selection Grid. You will be presented with the Grid
Parameters dialog that allows controlling the grid parameters.
Dialog parameters:
• Grid Size: number of the cells that form the grid
• Minimum cell size: the minimal number of pixels that compose the cell of the grid; while
interactively changing the size of the grid this number limits the cell shrinking.
• ROI relative size: the averaging of the values under the cell shall take part from the central portion
of the cell, as defined by the region of interest, ROI, marked in red. ROI: the ratio of the cell side size
(sell being displayed as the red rectangle) to the size of the side of sampling rectangle (this rectangle
is displayed as gray).
Page 32 of 84 © Copyright 2012-2020, LibRaw LLC, www.libraw.comRawDigger User Guide
• Grid settings button group (see below how to save and load grid settings):
o Save to file – saves the current settings to a file.
o Load from file – loads the grid settings from a file
• In the Cell Naming tab,
there are located settings to
control grid cell naming:
o Start from corner:
to select the corner
at which the first
cell is placed
o Walk order: the
order in which the
cells are numbered,
column first or row
first
o Naming order: one of the 7 methods of cell naming
o Show Cell ID/Name on Grid: to display (or not) the cell names
• Place Grid: to place the grid on the screen
o Use loaded position – uses the grid’s position if it was loaded from a file (this checkmark will
only be available if the grid’s position was successfully loaded).
• Remove Grid: to remove the grid from the screen
• Selection to Samples: fills the Samples (deleting the old content if the checkbox to Clear Old
Samples is set)
• Hide Grid Controls: to hide the grid control dialog.
Page 33 of 84 © Copyright 2012-2020, LibRaw LLC, www.libraw.comRawDigger User Guide
After the Place Grid button is pressed the main program window displays the grid. All the grid parameters
except the Grid Size (grayed out) can be altered using the Grid Parameters dialog.
You can move the grid on the screen:
• Moving the corners:
o While the left mouse button is pressed you can move one corner.
o While Ctrl is pressed simultaneously with the left mouse button you can change the
dimensions of the grid
• To drag the whole grid set the mouse pointer to the center of the grid, press and hold the left
mouse button and do a drag.
Page 34 of 84 © Copyright 2012-2020, LibRaw LLC, www.libraw.comRawDigger User Guide After the Selection to Samples button in Grid Parameters dialog is pressed the sample table is filled with the readings named in accordance with the cells naming scheme. You can process and save these readings in the usual manner (save as CSV or CGATS, delete table rows, display histograms of selected samples, etc.). The last set of Selection Grid parameters are automatically saved and reused when the program is restarted. Saving/Loading grid settings Grid Settings – Save to File button: Page 35 of 84 © Copyright 2012-2020, LibRaw LLC, www.libraw.com
RawDigger User Guide
    •    This will save the grid settings to a file with an RGS extension, exactly as they are currently set in the
         grid settings dialog (Grid Size, Minimum cell size…).
    •    If the grid is placed over an image, then the coordinates of its corners will be saved.

    Grid Settings – Load from File button:

    •    This is active only if there is no grid on the screen (if there is one, use the Remove Grid button)
    •    This will read all of the settings for the grid setting dialog from an RGS file, and apply them.
    •    If the coordinates of a grid were recorded to the RGS file, then this will read them and the checkbox Use
         loaded position under the Place Grid button will become active.

    Place Grid button with the Use loaded position checkbox set:

•       If the pixel dimensions of the currently opened image file exactly correspond to the dimensions of the
        grid settings that were saved to the RGS file, then the grid will be placed exactly as recorded, “to the
        pixel.”
•       If the pixel dimensions of the current file differs from the one for which the grid was saved, then the grid
        will be set based on relative coordinates.
        When restoring the grid from the saved coordinates, the visible part of the screen scrolls so that the grid
        is visible (this is relevant when working with large zooms).

    Page 36 of 84 © Copyright 2012-2020, LibRaw LLC, www.libraw.com
RawDigger User Guide
Raster Image Data Export
Raster image data export allows saving data as a TIFF; it operates for the following types of data:
• Results of RGB-render
• All color channels of RAW file; resulting TIFF file will contain one, three or four channels, depending
on the type of RAW
• Separate color channel of the RAW file; exported as a monochrome TIFF
Upon starting data export (Menu->File->Export Tiff), the following dialog is presented to the user:
Export options, located below the file name input line, control the file export:
Data section allows one to set the type of the data to be exported:
1. RGB Render: this option sets the export to RGB.
This option will be available if RGB rendition was calculated for the RAW file. If the option is
unavailable, it is grayed out and unavailable for selection.
If RGB option is selected, RAW and Bayer processing options are made unavailable.
If the settings for Brighten are active, they are applied to the exported file, making it “brighter”.
Data is exported into an 8-bit or 16 bit Tiff- file (see 16-bit output option below):
a. Single channel (Grayscale), if the RAW file is recorded using monochrome camera.
Page 37 of 84 © Copyright 2012-2020, LibRaw LLC, www.libraw.comRawDigger User Guide
b. 4-channel (interpreted by image processing software as CMYK), if the source RAW file is 4-
color (RGBE, CMYG, etc.) and the settings state “Display RGB Render in RAW colors”. The
values in the file will be inverted with white coded as 0 and black coded as 255, as it is
traditional for CMYK.
c. 3-channel RGB-file in all other cases.
2. RAW composite – the resulting TIFF will contain RAW data coming from all the color channels from
the source RAW file.
The data will be processed according to the settings in Raw processing and Bayer processing
options (for Bayer type RAW files) sections.
The result on the export is a 16-bit TIFF-file:
a. Single channel (grayscale) for monochrome RAW files.
b. Single channel (grayscale) for Bayer RAW, if in the Bayer Processing Options the mode
“Single layer (Grayscale) pixel map” is set.
c. 3-channel RGB or four channel RGBG if three-channel RGB output is chosen.
d. 4-channel (non-inverted, white coded at full scale, black coded as 0) interpreted as CMYK
“negative” for all other cases.
3. Raw channel (you need to select the channel from the drop-down menu) – the output is 16-bit
single channel (grayscale) TIFF file containing the selected color channel from the RAW file.
Raw processing section allows setting the output processing options:
1. 3-channel (RGB) output – two green channels of RGBG files will be averaged.
This setting will be grayed out for non-RGBG files.
2. Autoscale to use full 16-bit range – RAW data pixel values will be multiplied by a coefficient
calculated so as to stretch the date to fill the whole 16-bit output range.
For YCbCr data channels Y and Cb/Cr are scaled with different multipliers (for more details on YCbCr
please see Show YCbCr data for Canon sRAW files in Settings section below).
In all other cases the scaling multiplier is the same for all channels.
3. Apply gamma 2.2 curve – if this option is “on”, the output is gamma-corrected to gamma 2.2, and if
it is “off” the output contains linear data.
Autoscaling and gamma-correction are rounding the values to integers. These options are better suited for
visual inspection of data. If the data is to undergo numerical analyses, we recommend switching off all
options in the RAW processing section. This way, it is guaranteed that the data is accurate.
The Bayer processing section controls the output for Bayer-type 2 x 2 pattern RAW files. For all other types
of RAW and pseudo-RAW files (monochrome, linear DNG, Canon sRAW) this section is unavailable.
1. Half Size – 2 x 2 Bayer pattern will be binned and recorded as a single RGB pixel, and the resulting
TIFF file will be half of the pixel dimensions of the censor.
2. 2x2 pixels – the resulting file will be of full size, though pixel values in 2 x 2 patterns will be the
same.
Page 38 of 84 © Copyright 2012-2020, LibRaw LLC, www.libraw.comRawDigger User Guide
3. Fill missing values w/ zeroes – the resulting file will be of full size, but only the data presented in
source RAW data will be meaningful, while all the missing values will be zeroed out.
4. Single layer (grayscale) pixel map – This will be exported as a full-sized single channel (grayscale)
file, where every pixel contains data corresponding to its pixel value in the matrix. The color
information can be restored at a later stage of the user-supplied processing routine by taking the
original Bayer pattern into account.
This mode is intended for use with cameras in which the sensors have had the CFA removed
(Meaning, originally “color” cameras, re-worked to monochrome).
Additional export options:
1. Uncompressed TIFF - to save an uncompressed TIFF file.
2. 16-bit output: write RGB export as 16-bit TIFF file (RAW composite/channel export is always 16 bit).
Note: 16-bit output available only in 64-bit version of RawDigger due to available memory
restrictions.
3. The option Add EXIF tags from RAW file allows copying the EXIF data from the source RAW file to
the exported TIFF file.
4. Embed ICC profile will embed ICC profile into resulting file (RGB rendering export only).
5. Open exported file with default application – the resulting file will be opened by your default
application associated with TIFF files.
Data export as TIFF is available only in Research and Profile Editions of RawDigger.
Processing of floating point data
Starting with version 1.2, RawDigger supports DNG files containing floating point data. This format is used as
an output by a number of programs that overlay several shots in order to extend the dynamic range and
thus create HDR (High Dynamic Range) data.
Unlike regular integer raw files, the data range in raw files containing floating point data can be very small,
like (0..1) or quite large, (0..1000000). The range does not affect data processing, and is selected by the
authors of the respective programs based mostly on convenience.
Internally, RawDigger uses 16-bit unsigned integer data representation. Thus, the floating point data raw
files are converted to internal RawDigger data format; and if the range of floating point data is too small or
to large, normalization is performed (input floating point data is multiplied by a certain coefficient).
Normalization is controlled through the settings in Floating point data normalization in Preferences – Data
Processing
Page 39 of 84 © Copyright 2012-2020, LibRaw LLC, www.libraw.comYou can also read